1
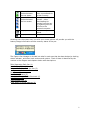
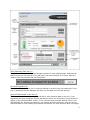
2010
Capturx® Pen and
Pen Manager User
Guide
User Guide
1
Contents
Using the Pen and the Capturx Pen Manager ................................................................................. 3
Using the Pen and Docking Station ................................................................................................ 3
Using the Capturx Pen Manager - Version 2.6 ............................................................................... 4
Care and Maintenance of the Pen ................................................................................................. 11
2
Using the Pen and the Capturx Pen Manager
This user guide provides a description of the pen and docking station and the Capturx Pen
Manager. The docking station is used to dock your pen and to upload data. Capturx Pen
Manager is used to manage settings for the pen and for processing the data saved on the
pen. The topics and in this user manual include:
A description of the digital pen and docking station and how they are used to upload
data
A description of the Capturx Pen Manager and its features
A section on the care and maintenance of the pen
Using the Pen and Docking Station
The pen looks and feels just like an ordinary ballpoint pen and you use it in the same way.
There are no keys to press. You simply activate the pen by removing the cap and deactivate
it by replacing the cap. The docking station is used to dock your pen and to connect your
pen to a PC or laptop via the USB port so you can upload data. The docking station consists
of the base, insert, and the USB connector you use to connect the docking station to your
computer.
3
To upload the ink using the pen and docking station:
1. You may need to place the ink cartridge in the pen. To place the cartridge in the pen,
take one of the ink cartridges and gently slide it into the hole at the tip until it is
completely seated and does not fall out. It’s normal for the cartridge to feel slightly
loose.
2. Attach the docking station to a PC or laptop via the USB port.
3. Fully insert the pen in the docking station.
4. The gold connection points on the pen and docking station need to be aligned and
the pen needs to be firmly placed in the docking station.
5. After you connect the USB port to your computer and dock your pen, you will initially
need to keep the pen in the docking station for four hours for it to fully charge.
Note: The pen needs to be charged before you can use it to capture data. To prevent your
battery from running low, do not leave the cap off the pen for extended periods of time. You
will need your pen cap so keep it in a place you will remember.
Using the Capturx Pen Manager - Version 2.6
The Capturx Pen Manager is used to manage settings for the pen and processing ink records
saved on the pen. Features and options include:
Viewing the docked and/or locked status of the pen
Entering and saving contact details to the pen
Assigning a password to the pen
Setting a Customer Reference Pen for accessing additional services
Viewing the remaining time left on the battery of the pen
Downloading and deleting the pages currently on the pen
Setting how you want the pages to download
Activating Capturx enterprise applications for the pen
Enabling or disabling the Bluetooth feature on the pen
Registering the pen
Entering an email or server address for sending ink records
Using the Pattern Migrator to move pattern from one account to another
You can view the activity of the Pen Manager and access it by double-clicking on the icon in
your system tray.
Four states of the icon are used to show you status:
Displays this icon
One or more pens are
docked
4
Animated icon that
flashes between
the two states
Animated icon that
flashes between
the four states
Displays this icon
Displays this icon
One or more pens
have unprocessed ink
in their memory
Pen is processing ink
records - either
downloading ink
records from the pen
or importing from an
XID file to the
personal computer
One or more pens are
locked
No pens docked
Hovering over the system tray icon with your mouse pointer will provide you with the
battery charge information and the memory status of the pen.
The Capturx Pen Manager is divided into tabs for each pen that has been docked, a docking
status indicator, and other main sections and options. Each of these is identified by the
number in the diagram and chapters below with descriptions:
Tabs Separating Each Pen (1)
Pen Docking Status (2)
Personal Data Stored on the Pen (3)
o Customer Reference Pen
Pen Status (4)
Pen Docking Status (5)
Pen Activation and Enable Bluetooth (6)
Install Pattern (7)
Save/Register Pen (8)
Enter Email or Server Address (9)
5
Tabs Separating Each Pen (1)
Tabs are used to separate the Pen Manager options for each individual pen. Selecting the
tab will show you the options for the tab (pen) you have selected. The “Close” button is
used to close the particular tab you have open.
Pen Docking Status (2)
Pen status tells you if your pen is currently docked or locked (using the password). If the
pen is undocked, the Pen Manager will show you the data from the last docking.
Personal Data Stored on the Pen (3)
This section is used to assign a password and to enter personal data to the pen. If you
registered your pen during the original activation process, the information you entered will
appear in the "personal data" section. If not, you can enter personal data by filling in the
desired fields. By assigning a password, you prevent someone else from using the pen to
download data or from viewing the personal information you have entered. Once you assign
6
a password, you will be asked to enter it before you can download data from the pen. The
password options include:
Delete Button: Use this button to delete the password on your pen
Change Button: Use this button to change the password you have previously
assigned to the pen
Keep your password in a safe place.
The Customer Reference Pen is used to designate the pen serial number that is sent to
Adapx to identify the account used for acquiring additional pattern. You may be asked to
supply this serial number when ordering products. Capturx will select the first pen that you
dock as your CRP. After docking other pens, you may select them as your CRP.
Note: If your password is lost you cannot retrieve it and you will need to contact Adapx.
Pen Status (4)
This section allows you to view the following information:
Battery Status: Percent charged, writing time, and idle time left on the pen
Data on Pen: Percentage of free space left on the pen, pages remaining, and the
number of current pages on the pen ready to download. You can also delete and
download the current pages on the pen by selecting the desired button.
Based on average data per page, an estimate of how many pages you have left to
use on the pen
Pen Docking Status (5)
This section allows you to select a download option. Download options enable you to see
instructions for how you want to download your pen data. For example, if you select "Auto
download” the data will be auto downloaded. The download options include:
Automatically download – Data is auto downloaded as soon as the system detects a
connected pen.
Prompt for download – When the system detects a connected pen, you are prompted
for permission to download the data. For example:
Manual Download – With the pen connected, the system will wait for you to initiate
download using the Download button on the Pen Status section of the Pen Manager.
7
Pen Activation and Enable Bluetooth (6)
To begin using Capturx products, other than Capturx for Microsoft OneNote, you must have
an activated pen. (Typically, your pen will come fully activated from Adapx.) Although
activating the pen is part of the initial registration and activation process, you may want to
activate additional pens or to activate your pen if you did not do it during the initial
registration. You have the choice to activate using an offline key or via the internet. Activate
offline by manually entering your software activation key.
The Enable Bluetooth option allows you to use the check box to enable the Bluetooth feature
on the pen hardware. Your Bluetooth PIN will also be displayed, so that you can use it to
pair your pen with a supported mobile handset (for use with Capturx Pen Manager on that
handset). When using Bluetooth, see how Capturx works with Mobile device at:
http://www.adapx.com/mobile
Install Pattern (7)
Although you may have received pattern when you installed your pen, you may need
additional pattern if you dock a new pen or run out of pattern. The Install Pattern button is
activated when you have pattern on the pen.
Save/Register Pen (8)
Selecting the Save/Register button will save the changes you made to the pen register and
update the pen’s registration information sent to Adapx with the information shown in
section 3.
Enter Email or Server Address (9)
You can also send ink records to an email recipient or to a Capturx-enabled Server by
entering the mail recipient address or URL in the “Connection” field at the bottom of the Pen
Manager and selecting Enable.
Ink Records routed to Capturx-enabled Server
1. Enter a URL for a Capturx-enabled Server in the Connection field
2. Select Enable
3. Records written on forms printed from the Capturx-enabled Server will be processed
4. All other ink records on the pen will then be processed on the local machine
Ink Records routed to other Capturx installations via email
1. Enter an email address formatted as [email protected] in the Connection field and
select Enable.
2. Dock the pen once the data is collected.
3. Capturx will create an email using your default email client with the sender being
whatever address is entered into the Connection field. The ink records will be contained
in an .XID file (Adapx Ink Document) attached to the email.
When routing from a pen containing ink records from both Capturx for OneNote and other
Capturx applications, two XID files will be created once the pen is docked – all data stored
on the pen will be saved as one of two XID file(s).
a. One XID file containing ink records for Capturx for Microsoft Office OneNote
b. One XID file for the other Capturx applications
Each .XID file will be named with the following:
8
a. Name of the Pen Author
b. Date and time of the file upload
c. Whether or not the ink records are for OneNote or not (“Non-OneNote”).
Opening XID files:
In order for the email recipient to open the XID file
Recipient must have Capturx Pen Manager 2.5 installed and the corresponding Capturx
application for each document that the ink record was written upon.
1. Capturx for OneNote:
a. Double click on the OneNote.XID file named with the appropriate date/time,
author
b. OneNote ink record is processed and uploaded into a Microsoft Office OneNote
Notebook.
2. Capturx Forms for Excel, Capturx for ArcGIS: and other Capturx applications,
except OneNote.
a. Open the saved file from which the document was printed
b. Download and open the XID file named with the appropriate date/time, author
and Non-OneNote.XID file
For either kind of XID, successful processing of Ink Records will be reported by the Capturx
Pen Manager after processing.
9
Unsuccessful processing of Ink Records will result in a “Failure” message. Failures are
generally explained by the following conditions and can be rectified with the accompanying
actions:
Condition
Ink record was created
with an Unactivated Pen
Capturx is unable to find
the correct file
Ink record has already
been imported
Unable to import ink
record
Action
Please activate the pen on this machine before attempting to
import the ink.
Copy and open the original document on this computer, or
import this XID on the computer where the document was
printed
This ink record has already been imported. This can happen if
you accidentally try to import the same file more than once.
Unexpected error during import. Try rebooting the computer if
this does not work contact Adapx customer support -
Ink record belongs to an
application that has been
uninstalled
This ink record belongs to an application that has been
uninstalled. To import this ink, please re-install the application
or import it on a computer that has the application installed.
http://www.adapx.com/Support/Contact-Technical-Support.html
Pattern Migrator
This utility is installed with the Capturx Pen Manager. If needed you will be able to obtain
additional pattern which is used create the printed digital watermark when printing Capturx
enabled documents. You can also use this tool to move pattern from one Windows account
to another.
For more information see: C:\Program Files\Adapx\Pattern Migrator\Help\Using Capturx
Pattern Migrator.htm
If you encounter any issues, contact Adapx Technical Support:
http://www.adapx.com/Support/Contact-Technical-Support.html
10
Care and Maintenance of the Pen
This section describes the features of the pen and notes on how to use it properly.
The Digital Pen
The digital pen stays charged for five to seven days of typical use with built in
Lithium-ion rechargeable battery. Charging time approximately 2.5 hours (150 min),
from 0% to 100% via cradle and USB adapter. The digital pen can endure a standby
time (without cap) of 10 hours.
The digital pen can be used for 2 hours (120 minutes) continuously, and holds up to
50 pages of letter sized paper.
Data Communication: USB 1.1 standard (also supports USB 2.0 standard),
Bluetooth® available but NOT currently supported
For use: 32 to 104 degrees Fahrenheit at relative humidity levels of 10-85%
For storage: -4 to 113 degrees Fahrenheit at relative humidity levels of 10-90%
Ruggedness tested on 'standard' 4 foot drop while capped.
Pen can be used in inclement weather and rain, but it is not submersible.
11