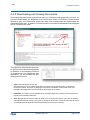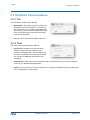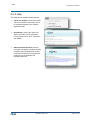
1
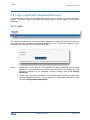
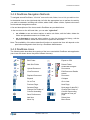
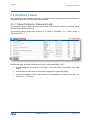
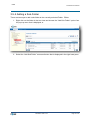
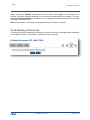
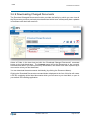
DoxShare User Manual PDMS Revision DoxShare 2.2 Date 7th March 2014 Document ID DoxShareUserManual.docx PDMS Limited, Global House, Isle of Man Business Park, Douglas, Isle of Man, IM2 2QZ Tel: +44 (0) 1624 664000 Fax: +44 (0) 1624 678787 Email: [email protected] Web: www.pdms.com/DoxShare PDMS DoxShare User Manual Table of Contents 1.1 Change History _________________________________________________________ 3 2 Terms of Reference ______________________________________________ 4 3 DoxShare ______________________________________________________ 5 3.1 DoxShare Home Page and Documents ______________________________________ 5 3.2 Login, Logoff and Password Recovery _______________________________________ 6 3.2.1 Login __________________________________________________________________________ 6 3.2.2 Forgotten Password ______________________________________________________________ 7 3.2.3 Log Off_________________________________________________________________________ 8 3.3 MyDoxShare ___________________________________________________________ 9 3.3.1 User Details ____________________________________________________________________ 9 3.3.2 Change Password ________________________________________________________________ 9 3.3.3 Change Memorable Word _________________________________________________________ 10 3.4 Browsing DoxShare _____________________________________________________ 11 3.4.1 Document Portal Page ___________________________________________________________ 11 3.4.2 DoxShare Navigation Methods _____________________________________________________ 12 3.4.3 DoxShare Icons _________________________________________________________________ 12 3.5 DoxShare Folders ______________________________________________________ 13 3.5.1 Folder Contents / Document Lists ___________________________________________________ 13 3.5.2 Search Functions _______________________________________________________________ 15 3.5.3 Viewing Folder Attributes__________________________________________________________ 15 3.5.4 Adding a Sub-Folder _____________________________________________________________ 16 3.5.5 Editing a Folder’s Details __________________________________________________________ 18 3.5.6 Deleting a Folder ________________________________________________________________ 19 3.5.7 Moving a Folder _________________________________________________________________ 20 3.6 Documents in DoxShare _________________________________________________ 21 3.6.1 Browsing Documents ____________________________________________________________ 21 3.6.2 Searching for Documents _________________________________________________________ 22 3.6.3 Viewing Information about a Document _______________________________________________ 23 3.6.4 Viewing a Document _____________________________________________________________ 25 3.6.5 Uploading a Document ___________________________________________________________ 26 3.6.6 Editing a Document’s Details _______________________________________________________ 27 3.6.7 Replacing a Document ___________________________________________________________ 27 3.6.8 Deleting a Document _____________________________________________________________ 29 3.6.9 Downloading Changed Documents __________________________________________________ 30 4 DoxShare Personal _____________________________________________ 31 4.1 Introduction to DoxShare Personal _________________________________________ 31 4.2 Installation of DoxShare Personal __________________________________________ 32 Revision: CDP 2.12 Page 2 of 45 PDMS DoxShare User Manual 4.3 Configuration of DoxShare Personal ________________________________________ 34 4.3.1 General DoxShare Personal Settings ________________________________________________ 34 4.3.2 Remote Server Connection Settings for DoxShare Personal ______________________________ 35 4.3.3 DoxShare Personal Synchronisation Schedule _________________________________________ 37 4.3.4 DoxShare Personal License _______________________________________________________ 38 4.4 DoxShare Personal Main Window __________________________________________ 40 4.4.1 Configuring a Folder for Automatic Download __________________________________________ 41 4.4.2 Downloading and Viewing Documents _______________________________________________ 42 4.5 DoxShare Personal Menus _______________________________________________ 44 4.5.1 File __________________________________________________________________________ 44 4.5.2 Tools _________________________________________________________________________ 44 4.5.3 Help __________________________________________________________________________ 45 1.1 Change History DOXSHARE Version Summary of changes Date 1.0 User Manual version 1 02/04/2012 1.3 Various, including CDP Personal 31/05/2012 1.5 Updated to include changes introduced on versions 1.4 and 1.5 02/10/2012 2.0 Updated to include changes introduced in CDP Version 2.0, e.g: forgotten 25/02/2012 password recovery; memorable word; 2.1 Updated to include changes introduced in CDP Version 2.1 2.2 Changed references from Controlled Document Portal (CDP) to DoxShare – 07/04/2014 images not updated yet though Revision: CDP 2.12 20/11/2013 Page 3 of 45 PDMS DoxShare User Manual 2 Terms of Reference DoxShare is a software application and secure data repository provided by PDMS on a resilient, managed, Software-as-a-Service basis. (Please note that DoxShare was previously called the Controlled Document Portal (“CDP”) and some images in this document still include references to the CDP and CDP Personal). DoxShare enables you to centrally store, edit and share documents with your various stakeholders, in a controlled way, no matter where they are in the world. Key features of this secure system include a simple folder-based filing structure, with document version controls, audit trails and search features, and sophisticated access/permission settings that your Administrator(s) can manage for each User of the system. Hosting, backups and upgrades are taken care of by PDMS as part of the monthly subscription package. DoxShare can be accessed via web-browsers using a secure connection from anywhere with Internet access. It is optimised for Internet Explorer (version 8 and above), and the latest versions of Firefox, Safari and Chrome. Depending on how your network is set up, you may also be able to use Windows File Explorer to access DoxShare folders. If permitted by your organisation, you will be able to access folders and documents stored in DoxShare via a network drive in the same manner that you access other network resources. DoxShare Personal is an application which, once installed and configured, connects to DoxShare server and downloads and stores the documents available to a user on their computer. Downloaded documents can then be viewed even when an Internet connection is not available. This manual provides guidance for the use of DoxShare and DoxShare Personal. For further resources and important information, please visit www.pdms.com/DoxShare/resources Note: Images have been included in this manual as a visual prompt to help locate the item in the application. As DoxShare is enhanced, and as the interface to may have been tailored to suit your organisation, some controls may have a different appearance and location in your version of the application to those illustrated in this manual. Their behaviour, however, will be consistent with that described. To facilitate identification of the control or icon being explained, red circles/ovals overlaying images of the system have been used as highlights, e.g. item of interest. Revision: CDP 2.12 Page 4 of 45 PDMS DoxShare User Manual 3 DoxShare 3.1 DoxShare Home Page and Documents The Documents displayed on the DoxShare Home Page are those Documents within DoxShare marked as “Visible without login”. These Documents are available to all Home Page visitors for viewing and downloading without need for authentication. The Documents displayed can be filtered by Document Type by choosing the required Document Type from the displayed drop-down, and selecting the Go command button. Notes: 1. If no Documents are marked as “Visible without login”, then no documents will be displayed on the Home Page. 2. Visitors to the Home Page cannot view any other documents, or perform any other DoxShare functions, without logging in to DoxShare. Revision: CDP 2.12 Page 5 of 45 PDMS DoxShare User Manual 3.2 Login, Logoff and Password Recovery If your DoxShare instance is integrated with another sign on system (e.g. Active Directory, OAuth). The Login, Logoff and Password Recovery process may not apply or may function differently. 3.2.1 Login The Login link, at the top left of the Home Page, displays the Login page via which, by entry of the Username and Password combination supplied to you in the first instance by your DoxShare Administrator, you can access DoxShare. Notes: 1. At first Login, or on expiry of your Password, you will be prompted to enter a new Password. Your organisation’s DoxShare Security Policy may require that your Password conforms to its Password Security Settings (see 3.3.2 Change Password). 2. At first Login, you will be prompted to enter a Memorable Word for use during the forgotten Password process. You can change your Memorable Word at any time (see 3.3.3 Change Memorable Word) Revision: CDP 2.12 Page 6 of 45 PDMS DoxShare User Manual 3.2.2 Forgotten Password If you are unable to remember your Password, click the Click here link. This will open the Password Assistance – Account Details window. Enter either your User Name or Email Address and press the Next command button. This will open the Password Assistance – Account Verification window. Enter the appropriate characters from your memorable word, and press the Send Recovery Email command button. An email will be sent to the email address registered with DoxShare for your account. The email will contain a link; clicking on the link will open the Recover Account – Enter a new password window. Revision: CDP 2.12 Page 7 of 45 PDMS DoxShare User Manual Enter and confirm your new Password; note that your organisation’s DoxShare Security Policy may require that your Password conforms to its Password Security Settings (see 3.3.2 Change Password). Press the Change Password command button. You will then be able to logon using your new Password. Note: If for any reason you are unable to complete this process, then send an email to your registered DoxShare Administrator by clicking the link displayed in each window. 3.2.3 Log Off You can exit DoxShare from any window in the system by selecting the Log Off link. Revision: CDP 2.12 Page 8 of 45 PDMS DoxShare User Manual 3.3 MyDoxShare The MyDoxShare menu option displays further menu options to review and change your personal and security information. 3.3.1 User Details The User Details menu option displays your account details. If you have permission, you can change these as appropriate by pressing the Edit command button. 3.3.2 Change Password To change your Password, click the Change Password menu option. Enter your old (existing) Password, and enter and confirm your new (required) Password twice. Press the Save command button. Notes: 1. Your organisation’s DoxShare Security Policy may require that your new Password conforms to its Password Security Settings. This may mean that: your Password must contain one or more of; a lower and upper case letter, a number, a symbol; you must change your Password after a certain number of days. 2. When your Password expires, you will automatically be directed to this Change Password window. Revision: CDP 2.12 Page 9 of 45 PDMS DoxShare User Manual 3.3.3 Change Memorable Word Your Memorable Word is used during the forgotten Password process. To set/change your Memorable Word, click the Change Memorable Word menu option. Enter your Memorable Word and your Password, and click the Save command button. Revision: CDP 2.12 Page 10 of 45 PDMS DoxShare User Manual 3.4 Browsing DoxShare 3.4.1 Document Portal Page Once logged in to DoxShare, the Document Portal page is displayed. This is split into two sections: The left hand side of the page displays a hierarchical ‘tree’ structure of the Folders and Documents stored in the system. The Folders and Documents can be navigated, expanded and collapsed either by clicking on them and the arrow icons displayed next to them, or by using the arrow keys on the keyboard. Note that the Folders displayed will be filtered to only those that you have permission to see. The right hand side of the page displays the relevant details of the selected Folder or Document, as described below. Note that the Document Portal page can be accessed from anywhere in the system by selecting the Document Portal link. Revision: CDP 2.12 Page 11 of 45 PDMS DoxShare User Manual 3.4.2 DoxShare Navigation Methods To navigate around DoxShare, “left click” once on the tab, folder, icon or link you wish to view. In the details view on the right hand side, left click the appropriate icon to perform the activity you wish to undertake, including edit a folder, add a folder, delete a folder, upload a document and download changed documents. A list and descriptions of the icons used in DoxShare are provided below. In the tree view on the left hand side, you can also “right click”: on a folder to see and select options to add a sub folder, edit the folder, delete the folder and upload documents to a folder; and on a document to see and select options to view the document’s history, edit the document’s details, delete the document or replace the document. Note: The availability of the above described functions to a particular User will depend on the permissions assigned to that User by a DoxShare Administrator. 3.4.3 DoxShare Icons The following table describes the meaning of the icons used within DoxShare web-application (two icons are shown where they differ between themes). Icon Function Icon or Edit Folder or Add Sub-Folder or or Upload Document or or View Document or Replace Document Function Export to CSV ..or or Delete Folder Download Changed Documents Edit Document Details Delete Document Expand Collapse Go to First Go to Last Previous Page Next Page Selected Page Change Sort Order of Column Assending Save Preferences Next page of data Ex 2 Change Sort Order of Column Descending Number of lines per page Add Item Move Up Delete Item Move Down Revision: CDP 2.12 Page 12 of 45 PDMS DoxShare User Manual 3.5 DoxShare Folders The availability of the following functions to a particular User will depend on the permissions assigned to that User by a DoxShare Administrator. 3.5.1 Folder Contents / Document Lists The Contents tab for a particular folder will provide a list of the Documents it contains, along with Document Search features. The following image shows the contents of a Folder in DoxShare, or, in other words, a “Document List”: Unless otherwise specified, all Document Lists, as illustrated above, will: Include navigation buttons for “First Page”, “Previous Page”, “Next Page” and “Last Page”; Include page number links to allow direct navigation to particular pages; Include an indication of the total number of rows available for viewing in the list, e.g. “Records 1 – 10 of 432”; Revision: CDP 2.12 Page 13 of 45 PDMS DoxShare User Manual Include the ability to change the sort order of the content within certain columns; Display 10 rows per page by default, but will allow the specification of different page sizes of 5, 10, 25 or 50 rows; Allow different columns to be shown or hidden using the “Column Selection” drop down list, by “checking” or “unchecking” the box next to the column heading and clicking the “Apply” button. Note that your current column and sort selections can be saved by clicking the icon next to the rows per page selector. Next time you log in to DoxShare, the list screen will default to these saved settings. Revision: CDP 2.12 Page 14 of 45 PDMS DoxShare User Manual 3.5.2 Search Functions When the list of documents in a folder is viewed, by default the search criteria pane will be displayed in its collapsed state. To use the search controls, click on the command to expand the search pane and reveal the search criteria: To collapse the search pane, click on the command. More information on the features of the search is provided in the Searching for Documents section below. 3.5.3 Viewing Folder Attributes The attributes of the selected Folder can be viewed by selecting the Detail tab. Revision: CDP 2.12 Page 15 of 45 PDMS DoxShare User Manual 3.5.4 Adding a Sub-Folder There are two ways to add a sub-folder to the currently selected Folder. Either: 1. Right click on the folder in the tree view and choose the “Add Sub Folder” option from the pop-up menu that is displayed; or 2. Select the “Add Sub Folder” command button that is displayed in the right hand pane. Revision: CDP 2.12 Page 16 of 45 PDMS DoxShare User Manual The Add Sub-Folder page will be displayed to allow you to enter the details of the new subfolder. The information/fields required for creation of the new folder are listed in the table below; mandatory fields are marked with an asterisk as shown above. Field Details Notes Name The name of the sub-folder as it is to appear in the tree. Folders within a parent folder must be unique. Maximum length = 100 characters. Description A longer description of the purpose of the folder. Maximum length = 2000 characters Security Level The level of user that the contents of the folder should be available to. This security level cannot be lower than that of any of its ascendant/ higher level folders (parent, grandparent etc.). Groups These are your functional business groups e.g. Finance, Human Resource, etc. These groups can then be used on the folders to restrict access in conjunction with user classificiation clearance Select from the list of available groups Additional groups can be set up by your DOXSHARE administrator When all details are entered, select Save. The new folder will be created and appear in the tree on the left of the screen. Revision: CDP 2.12 Page 17 of 45 PDMS DoxShare User Manual 3.5.5 Editing a Folder’s Details There are two ways to add a sub-folder to the currently selected Folder. Either: 1. Right click on the folder in the tree view and choose the “Edit Folder” option from the pop-up menu that is displayed; or 2. Select the “Edit Folder” command button that is displayed in the right hand pane. The folder details will be shown and can be edited. The edited fields must still comply with the validation rules described in the Adding a Sub-Folder section of this manual. Revision: CDP 2.12 Page 18 of 45 PDMS DoxShare User Manual 3.5.6 Deleting a Folder There are two ways to delete a sub-folder from the currently selected Folder. Either: 1. Right click on the folder in the tree view and choose the “Delete Folder” option from the pop-up menu that us displayed; or 2. Select the “Delete Folder” command button that is displayed in the right hand pane. A confirmation message will be shown, explaining that all the Documents contained in the folder will be deleted, with a list of the names of those documents. Click the “Confirm” button for the deletion to proceed. Note:A Folder cannot be deleted if it contains sub-folders. Revision: CDP 2.12 Page 19 of 45 PDMS DoxShare User Manual 3.5.7 Moving a Folder A Folder can be moved to another parent Folder by dragging-and-dropping it within the tree view. Whilst it is being dragged, a icon is displayed to indicate that the Folder cannot be dropped into the underlying Folder (e.g. a folder cannot be dragged into one of its own subfolders). The icon changing to a indicates that the Folder can be dropped into the underlying Folder. Prior to moving the Folder, a confirmation dialogue will be displayed. When a folder is moved it will retain its existing Security Groups. Please note that because the security groups work in a hierarachical manner (e.g. you can only view the contents of a folder if you have one of more of the security groups assigned to that folder and also the appropriate security groups to see all the parent folders of that folder) moving the folder may affect its visibility. Note that Folder names must be unique within a parent Folder. A warning will be displayed if a Folder of the same name already exists in the new parent Folder, and the move will be prevented. The name of one of the Folders will need to be changed to allow the move. Revision: CDP 2.12 Page 20 of 45 PDMS DoxShare User Manual 3.6 Documents in DoxShare The availability of the following functions to a particular User will depend on the Security Group(s) and Document Classisifcation Clearance assigned to that User by a DoxShare Administrator. 3.6.1 Browsing Documents When a Folder is selected from the tree, the right hand side of the Document Portal page displays the Contents tab containing a list of the Documents contained within the Folder and its sub-folders (N.B. whether sub-folders are included or not can be changed by altering the search criteria, the default setting of this search variable is this behaviour is controlled by a system setting so may have been altered by your system administrator) The Documents can also be seen in the hierarchical folder tree-view in the left hand side. Revision: CDP 2.12 Page 21 of 45 PDMS DoxShare User Manual 3.6.2 Searching for Documents The Search Criteria pane of the Contents tab can be used to search the Documents contained within a Folder and, if specified, its Sub-Folders. Clicking on the command will reveal the Search Criteria controls; clicking on the command will hide them. The criteria on which a search will be performed are: Name – the whole or a part of the Document Name; Description – the whole or a part of either the Short or Long Description; Document Content – a word or phrase that forms a part of the Content of the Document (note: not all Document formats can be indexed); Document Format – the format (e.g. PDF) of the current version of the Document; Uploaded By System User – the User who uploaded the Document; Uploaded Date – a Date prior to or subsequent to which the Document was uploaded; Include Sub Folders – whether Documents from sub-folders are to be included in the results; Document Type – the type of document as selected by the user. Note: The Search Criteria may include controls for any Additional Fields specific to your instance of DoxShare as set up by your DoxShare Administrator. Revision: CDP 2.12 Page 22 of 45 PDMS DoxShare User Manual 3.6.3 Viewing Information about a Document The information about a Document can be viewed by either clicking on the Document in the folder tree-view, or by selecting the “Details” option displayed against the Document in the Folder contents list. Depending on your permissions, the information about the document is displayed on tabs, including: Details – including information supplied by the User who uploaded the Document, which can subsequently be edited (see below); History – a historical list of the document versions; Audit – information about who has performed what actions on the Document. Revision: CDP 2.12 Page 23 of 45 PDMS DoxShare User Manual 3.6.3.1 Document Details The Document Details, as displayed in the image above, are either provided by system Users, or automatically set by the system as follows. Provided by system Users: o Name – an identifier for the document, which may or may not be the same as the name of the original file that was uploaded; o Short Description – information about the document; o Long Description – more information about the document; o Version Comment – information relating to this particular version of the document; o Version – information identifying this particular version of the document; o Document Type – the type of document as chosen by the uploader; o Visible without login – specifies whether the Document will appear on DoxShare Home Page and can be viewed by unauthenticated Users; o Any other Additional Fields specific to your instance of DoxShare as set up by your DoxShare Administrator. Automatically set by the system: o Original Filename – the name of the file that was uploaded; o Document Format – the file format of the document version (e.g. PDF. DOC) (note that the file format may be different for different versions of the same Document); o Folder – DoxShare Folder into which the document version was uploaded; o Uploaded On – the date and time the document version was uploaded; Revision: CDP 2.12 Page 24 of 45 PDMS DoxShare User Manual o Uploaded By System User – who uploaded the document version. o Document URL – URL which can be given to non-authenticated users to access the document (N.B. this only appears if the document is marked as “Visible without login”). 3.6.4 Viewing a Document A Document can be viewed by clicking the “View Document” command button that is displayed in on the Document Details screen when a Document is selected in the tree-view. Clicking the document name in the Folder Contents view will also download the document. Where the document is downloaded to will depend on your computer settings (e.g. you may be prompted for a location or all documents may be downloaded to your default “Downloads” folder). The appropriate application can then be used to open the document e.g. Microsoft Word or Adobe Acrobat Reader. Revision: CDP 2.12 Page 25 of 45 PDMS DoxShare User Manual 3.6.5 Uploading a Document A new Document is uploaded to DoxShare by selecting the desired Folder in the tree-view and clicking the “Upload Document” command button displayed in the right hand pane, resulting in the display of the Upload Document pane. Clicking the Browse command button will result in the display of a “Choose File to Upload” (or similar) dialogue, allowing you to choose the file to upload. Then enter the User specified Document Details (see above) and click the Save command button. Notes: 1. The Name and Description attributes are used by DoxShare Search functions, so set their values appropriately. 2. Depending on your organisations policy, a maximum file size may have been set. If so, this will be displayed on the Upload Document pane. Revision: CDP 2.12 Page 26 of 45 PDMS DoxShare User Manual 3.6.6 Editing a Document’s Details A Document’s details can be changed by clicking the “Edit Document Details” command button displayed in the right hand pane. The User specified Document Details (see above) can be changed as required and saved by clicking the Save command button. Note:Editing a Document’s details will not create a new document version, but will create an audit record. 3.6.7 Replacing a Document The current version of a Document can be replaced by the clicking the “Replace Document” command button displayed in the right hand pane, resulting in the display of the Replace Document pane. Revision: CDP 2.12 Page 27 of 45 PDMS DoxShare User Manual Revision: CDP 2.12 Page 28 of 45 PDMS DoxShare User Manual Again, clicking the Browse command button will result in the display of a “Choose File to Upload” (or similar) dialogue, allowing you to choose the replacement file to upload. The User specified Document Details (see above) can be changed as required, and saved by clicking the Save command button. Note:A Document in one format can be replaced by a Document in another. 3.6.8 Deleting a Document A Document can be deleted by the clicking the “Delete Document” command button displayed in the right hand pane; confirmation of the delete will be required. Revision: CDP 2.12 Page 29 of 45 PDMS DoxShare User Manual 3.6.9 Downloading Changed Documents The Download Changed Documents function provides the facility by which you can view all the Documents you have previously downloaded and which have subsequently been updated in DoxShare with their later versions. Select a Folder in the tree-view and click the “Download Changed Documents” command button on the right hand pane. The Contents pane will list the Documents in the currently selected folder which you have previously downloaded, and which have been replaced by a new version since your last download. You can download these documents individually (by clicking the Document Name). Clicking the Download Documents command button displayed at the foot of this list will create a ZIP file containing all the listed documents which you can save to your local disk, or open in your default ZIP handling application. Revision: CDP 2.12 Page 30 of 45 PDMS DoxShare User Manual 4 DoxShare Personal 4.1 Introduction to DoxShare Personal DoxShare Personal is an application which allows you to download and store documents locally on your computer in a secure, encrypted repository, providing you with access to these documents whilst not connected to the Internet. DoxShare Personal: Provides you with access to your DoxShare Documents when an Internet connection is not available; Automatically synchronises with your DoxShare site when an Internet connection is available to ensure the correct Documents are stored locally; Only stores locally the Folders and Documents you have permissions to view; Can be configured to automatically check and update the Folders and Documents to a schedule set by you; Displays a status bar showing the last time it synchronised with your DoxShare site; Will automatically update to the latest version of the application as and when these become available. The following sections provide further information on how to install, configure and use DoxShare Personal. Please note that the images may refer to CDP Personal. For this please read DoxShare Personal. Revision: CDP 2.12 Page 31 of 45 PDMS DoxShare User Manual 4.2 Installation of DoxShare Personal DoxShare Personal will run on a Windows XP Professional, a Windows Vista or a Windows 7 machine. N.B. DoxShare Personal is not compatible with Active Directory Authenticated User Accounts. It requires the following: Windows Installer 4.5 Microsoft .NET Framework 4 Client Profile (x86 and x64) SQL Server Compact 4.0 which, if not already in place, will be installed by the Installation process: To install DoxShare Personal, open your browser and navigate to the following URL: http://download.pdms.com/doxsharepersonal/setup.exe The subsequent process will vary depending on your operating system version and security policies, but an example is now described. You may require the assistance of your network Administrator to complete the installation. Choose Run in response to the above, or a similar, dialog. Revision: CDP 2.12 Page 32 of 45 PDMS DoxShare User Manual The progress of your installation will be shown in dialogs similar to the ones below. When complete you will see DoxShare Personal application open to show its main window. At this point, DoxShare Personal is installed on your computer, and can be accessed from the Start Menu at: All Programs > PDMS > DoxShare > PDMS DoxShare Personal However, in order to connect it to your DoxShare web-application, it requires configuring and licencing. Revision: CDP 2.12 Page 33 of 45 PDMS DoxShare User Manual 4.3 Configuration of DoxShare Personal To configure DoxShare Personal, choose the “Tools” menu in DoxShare Personal application (as per the image above) and select “Options”. You will then see the dialog box as shown in the image below. (Please read CDP Personal as DoxShare Personal). The following sections describe how to update each of the four tabs – General, Remote Server, Synchronisation and Licensing. 4.3.1 General DoxShare Personal Settings The “General” tab contains the following settings, detailed with their default settings: Automatically start DoxShare Personal when I log on to Windows – Unchecked Start DoxShare Personal minimised to the taskbar – Unchecked Revision: CDP 2.12 Page 34 of 45 PDMS DoxShare User Manual Automatically check for updates (to Documents) on connection to DoxShare server – Checked To change these settings according to your own preferences, check/uncheck the checkbox next to the appropriate option(s) and click “Save”. These settings should be reviewed/adjusted after installation, but can be revisited and edited at any future time. 4.3.2 Remote Server Connection Settings for DoxShare Personal The “Remote Server” tab is where DoxShare Personal needs to be configured with the information necessary to access the DoxShare web application: The dialog box shown above should be updated as follows: URL – Enter the URL that DoxShare Personal will use to connect to DoxShare, that is the URL that you use to access your DoxShare with the extension /webdav/ added, for example: https://myDoxShare.DoxShare.pdms.com/webdav/ Username – Enter the user name you use to access the DoxShare website; Revision: CDP 2.12 Page 35 of 45 PDMS DoxShare User Manual Password – Enter the password you use to access the DoxShare website. Click “Save” to save this configuration information. Revision: CDP 2.12 Page 36 of 45 PDMS DoxShare User Manual 4.3.3 DoxShare Personal Synchronisation Schedule The “Synchronisation” tab controls how often DoxShare Personal will download updated Documents from your DoxShare web application. The synchronisation frequency options available are: Never Every Day Every Hour Every Week On Connection If left at the default option of “Never”, then synchronisation with your DoxShare web application you will have to be performed manually (see DoxShare Personal Menu/Tools section below). Whichever option is chosen, synchronisation will only be performed whist DoxShare Personal is running. Notes: 1. If no Documents have been updated to your DoxShare web application since DoxShare Personal last synchronised, then no data will be transferred. 2. Consideration should be given to your connectivity to your DoxShare web application when selecting the synchronise schedule. Revision: CDP 2.12 Page 37 of 45 PDMS DoxShare User Manual 4.3.4 DoxShare Personal License The “Licensing” tab is where you install the DoxShare Personal licence ‘key’. You will need to request a Licence, which is a long series of apparently random letters and numbers, from your DoxShare Administrator. Once you have received a licence: 1. Copy the Licence provided to you by your DoxShare Administrator to your Windows Clipboard. 2. Click the “New Licence File” button. 3. Using the “Paste” button, paste the copied contents into the “Licence Entry Box” and click “Save”. Revision: CDP 2.12 Page 38 of 45 PDMS DoxShare User Manual This completes the licencing of DoxShare Personal. The Licence details can be viewed at any time by selecting the Licensing tab. Note: The DoxShare Personal Licence has an expiry date, which should be noted. Revision: CDP 2.12 Page 39 of 45 PDMS DoxShare User Manual 4.4 DoxShare Personal Main Window The DoxShare Personal main window is laid out in a similar way to the DoxShare web application. On the left side you see the Folder Tree and on the right side of the window you see the Documents area. Documents Folder Tree Synchronise log Status information At the top left of the window are two command buttons: This onnects and dis-connects DoxShare Personal with to/from your DoxShare web-application (see File|Work Offline, below). When connected to your DoxShare web-application, this synchronises the Document information and Folder structure from the DoxShare web-application (see Tools|Synchronise, below). Note that this does not download the Documents themselves. At the bottom of the window is an expandable “Activity Log” which can be used to check which documents have been synchronised. Click the “Up” arrow to expand the Activity Log window, and the “Down” arrow to minimise it. The Status Bar at the very bottom right of the main window confirms the date and time of the last synchronisation with the central DoxShare site, and whether DoxShare Personal is currently “Connected to DoxShare Server” or “Working Offline”. Revision: CDP 2.12 Page 40 of 45 PDMS DoxShare User Manual 4.4.1 Configuring a Folder for Automatic Download A Folder can be configured to automatically download the Documents it contains when DoxShare Personal is connected to your D DoxShare web application. To do this, right click on the Folder in the tree-view and choose Properties. Then, in the Folder Properties dialog, check the “Automatically download folder contents” checkbox. The contents of the Folder will then be automatically Downloaded to your DoxShare personal on synchronisation with your DoxShare web application, both when a manually and when a synchronisation is performed as per a Synchronisation Schedule set up by you (see DoxShare Personal Synchronisation Schedule, above). Revision: CDP 2.12 Page 41 of 45 PDMS DoxShare User Manual 4.4.2 Downloading and Viewing Documents Documents that have been synchronised with your DoxShare web-application, but have not yet been downloaded, are displayed in the Documents section of DoxShare Personal Main Window in grey text; Documents which have been both synchronised and downloaded are displayed in black text. In addition, Documents which have been downloaded will be displayed with a “File Retrieved” date. Document(s) available for offline viewing will have the retrieved date shown The behaviour of the functions that can be performed on Documents depends on whether or not DoxShare Personal is connected to your DoxShare web application. All are available by right clicking the Document. Open: Will download and open the selected document in the default application for the file type of the Document. If DoxShare Personal is Online, then prior to opening the Document, DoxShare Personal will check your DoxShare web application and download the Document as necessary. Download: This option is only available when DoxShare Personal is Online; it will download the Document to DoxShare Personal. Save As: Will open a Save As dialog to allow you to save the Document in your own file system. If DoxShare Personal is Online, then prior to saving the Document, DoxShare Personal will check your DoxShare web application and download the Document as necessary. Revision: CDP 2.12 Page 42 of 45 PDMS DoxShare User Manual Properties: Will open a dialog box detailing the properties of the document, as uploaded to the Document Details section of your DoxShare web application. Revision: CDP 2.12 Page 43 of 45 PDMS DoxShare User Manual 4.5 DoxShare Personal Menus 4.5.1 File The File menu contains two options: Work Offline: This switch is used to control if the application is Online or Offline (i.e. connected or not connected to your DoxShare web application). When Offline, you can only see Folders that have been synchronised and access Documents that have been downloaded. Exit: This option will close DoxShare Personal. 4.5.2 Tools The tools menu contains three options: Synchronise: Clicking this option will cause DoxShare Personal to synchronise to your DoxShare web application. Synchronisation will transfer the information about the files contained in the folders, but will not download the files themselves. Download All: Clicking this option will download all the Documents that you have permission to access in your DoxShare web application. Options: This is where you set your preferences and configure DoxShare Personal as described in the “Configuration” section above. Revision: CDP 2.12 Page 44 of 45 PDMS DoxShare User Manual 4.5.3 Help The Help menu contains three options: Check For Updates: Clicking this option will cause DoxShare Personal to check for updates/upgrades to the software application itself. Show EULA: Clicking this option will display a window showing DoxShare Personal End-User Licence Agreement with PDMS. About DoxShare Personal: Clicking this option will display a window showing DoxShare Personal application version information and links to the agreements relating to use of DoxShare and DoxShare Personal. Revision: CDP 2.12 Page 45 of 45