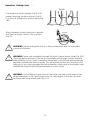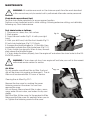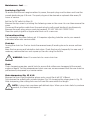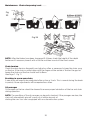
1
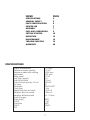
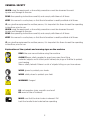
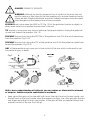
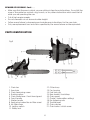
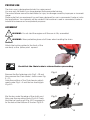
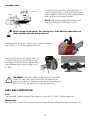
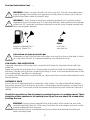
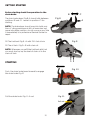
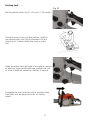
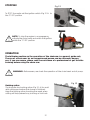
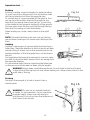
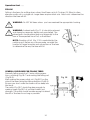
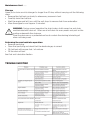
38CC
H
C
N
I
16
W
A
S
AIN
CH
Protect yourself and others by observing all safety information, warnings, and cautions. Failure to
comply with instructions could result in personal injury and/or damage to product or property.
Please retain instructions for future reference!
ROSSGARDEN
1
RGCS38CC
INDEX
PAGE
SPECIFICATIONS
GENERAL SAFETY
PARTS IDENTIFICATION
PROPER USE
ASSEMBLY
FUEL AND LUBRICATION
GETTING STARTED
OPERATION
2
3
6
7
7
8
10
12
MAINTENANCE
16
TROUBLE SHOOTING
19
WARRANTY
20
SPECIFICATIONS
Engine displacement
Maximum engine capacity
Maximum speed with cutting
equipment
Idling speed
Fuel Tank capacity
Fuel/Oil Mix Ratio
Chain Oil tank capacity 210 ml
Bar Type
Bar length
Chain type
Weight with bar and chain
Vibration @ Front handle
Vibration @ Read handle
Spark Plug gap
Spark plugs;
HUADE
Champion
BOSCH
NGK
37.2 cm3
1.2 kW
10000 rpm
3000 rpm
310 ml
25:1
210 ml
OREGAN
16”
OREGAN 91P
5.1Kg
8.01m/s2
6.35m/s2
0.6 - 0.7mm
L8RTF
CJ-6Y
WS7F
BPM7A
2
GENERAL SAFETY
WHEN using the equipment, a few safety precautions must be observed to avoid
injuries and damage to the saw.
READ the operating instructions carefully and comply with them at all times.
KEEP this manual in a safe place, so that the information is readily available at all times.
IF you give the equipment to another person, It is important for them to read the operating
instructions prior to use.
Explanation of the symbols and warning signs on the machine
READ the user manual before using the machine.
ALWAYS wear safety goggles to guard your eyes from flying
materials/objects and a sound-proof helmet, ear plugs or the like to protect
your hearing.
Wear a safety helmet if there is a risk of objects falling on you from above.
WEAR gloves to protect your hands.
WEAR safety shoes to protect your feet.
WARNING! Danger!
DO not operate a chain saw with one hand!
BE aware of the of kickback!
MAKE sure that the chain brake is released. Pull
back the handle/chain brake before operating
3
General Safety Cont ...
• DO NOT operate a chain saw with one hand! Serious injury to the operator, helpers, bystanders, etc may result from one handed operation. A chain saw is intended for two
handed use.
• DO NOT operate a chain saw when you are fatigued.
• Use safety footwear, snug-fitting clothing, protective gloves, and eye, hearing and head
protection equipment.
• Use caution when handling fuel. Move the chain saw at least 10 feet (3m)
from the fuelling point before starting the engine.
• DO NOT allow other persons to be near when starting or cutting with the chain saw. Keep
bystanders and animals out of the work area.
• DO NOT start cutting until you have a clear work area, secure footing, and a planned retreat
path from the falling tree.
• Keep all parts of your body away from the saw chain when the engine is running.
• Before you start the engine, make sure that the saw chain is not contacting anything.
• Carry the chain saw with the engine stopped, the guide bar and saw chain to the rear, and
the muffler away from your body.
• DO NOT operate a chain saw that is damaged, improperly adjusted, or not completely and
securely assembled. Be sure that the saw chain stops moving when the throttle control
trigger is released.
• Shut off the engine before setting the chain saw down.
• Use extreme caution when cutting small size brush and saplings because slender material
may catch in the saw chain and be whipped toward you or pull you off balance.
• When cutting a limb that is under tension, be alert for spring back so that you will not be
struck when the tension in the wood fibres is released.
• Keep the handles dry, clean, and free of oil or fuel mixture.
• Operate the chain saw only in well-ventilated areas.
• DO NOT operate a chain saw in a tree unless you have been specifically trained to do so.
• All chain saw service, other than the items listed in the user manual safety and maintenance instructions, should be performed by competent chain saw service personnel.
• When transporting your chain saw, use the appropriate guide bar scabbard.
• DO NOT operate your chain saw near or around flammable liquids or gases whether in or
out of doors. An explosion and/or fire may result.
• DO NOT lubricate, fill with fuel or oil when the chain saw engine is running.
• USE THE RIGHT TOOL: Cut wood only. Do not use the chain saw for purposes for which it
was not intended. For example, do not use the chain saw for cutting plastic, masonry, or
building materials.
4
DANGER! BEWARE OF KICKBACK!
WARNING: Kickback can lead to dangerous loss of control of the chain saw and
result in serious or fatal injury to the saw operator or to anyone standing close by.
Always be alert. Rotational kickback and pinch-kickback are major chain saw operational dangers and the leading cause of most accidents.
KICKBACK may occur when the NOSE or TIP (Fig 1 B) of the guide bar touches an object, or
when wood closes in and pinches the saw chain in the cut.
TIP contact in some cases may cause a lightning-fast reverse reaction, kicking the guide bar
up and back toward the operator. (Fig 1 A)
PINCHING the saw chain along the BOTTOM of the guide bar may PULL the saw forward away
from the operator. (Fig 2 A-B)
PINCHING the saw chain along the TOP of the guide bar may PUSH the guide bar rapidly back
toward the operator. (Fig 2 B-C)
ANY of these reactions may cause you to lose control of the saw, which could result in serious personal injury or death.
Fig 1
Fig 2
With a basic understanding of kickback, you can reduce or eliminate the element
of surprise. Sudden surprise contributes to accidents.
• Keep a good firm grip on the saw with both hands, the right hand on the rear handle, and
the left hand on the front handle, when the engine is running. Use a firm grip with thumbs
and fingers encircling the chain saw handles. A firm grip will help you reduce kickback and
maintain control of the saw. Don’t let go.
5
BEWARE OF KICKBACK! Cont …..
• Make sure that the area in which you are cutting is free from obstructions. Do not let the
nose of the guide bar contact a log, branch, or any other obstruction which could be hit
while you are operating the saw.
• Cut at high engine speeds.
• Do not overreach or cut above shoulder height.
• Follow manufacturer’s sharpening and maintenance instructions for the saw chain.
• Only use replacement bars and chains specified by the manufacturer or the equivalent.
PARTS IDENTIFICATION
Fig 3
21
1. Chain bar
2. Saw chain
3. Chain tensioning screw
4. Bucking spikes
5. Chain brake lever / front hand guard
6. Front handle
7. Starter handle
8. Spark plug (under the air filter cover)
9. Air filter cover
10. Ignition switch
11. Safety lock
12. Oil tank cap
13. Fan housing
14. Fuel tank cap
15. Rear handle / bootstrap
16. Chain guard
17. Choke / (carburettor setting)
18. Bar fastening nuts
19. Throttle lever
20. Chain catcher
21. Chain brake / clutch cover
6
PROPER USE
The chain saw is designed exclusively for sawing wood.
You may only fell trees if you have received the appropriate training.
The manufacturer cannot be held liable for injury or damage caused by improper or incorrect
usage.
Please note that our equipment has not been designed for use in commercial, trade or industrial applications. Your warranty will be voided if the machine is used in commercial, trade or
industrial businesses or for equivalent purposes.
ASSEMBLY
WARNING: Do not start the engine until the saw is fully assembled.
WARNING: Wear protective gloves at all times when handling the chain.
Attach the bucking spikes to the front of the
saw body so the spikes point upward.
Check that the Chain brake is released before proceeding.
Remove the Bar fastening nuts (Fig 3 –18) and
then remove the Chain brake / clutch cover (Fig
3 –21)
Note the position of the Chain tension adjustment screw (Fig 4 –A) and the bar locating pin
(Fig 4-B)
Fig 4
A
B
Slip the bar under the edge of the clutch and
then over the mounting studs (Fig 5-A) Check
that the bar locating pin (Fig 4-B) is engaged in
to the hole at the bottom of the bar (Fig 5-B)
Fig 5
A
B
7
Assembly Cont …..
C
Cutting Edge
Fig 6
Lay the chain around the sprocket (fig 6 –A)
Check that the tangs of the chain links are sitting correctly in the slots in the sprocket and
then lay the chain around the Bar.
NOTE: The cutting edge of the chain must
face in the direction indicated (Fig 6-C)
B
A
Before using a new chain / bar for the first time liberally lubricate the
chain and bar by hand using chain oil
Replace the Chain brake / clutch cover and Bar fastening
nuts (Fig 3– 21 & 18) and tighten the nuts
Adjust the chain tension screw (Fig 7 –A)
so that if the chain is pulled down with
the fingers at the centre of the bar the
gap between the chain and the bar is 6
to 8mm.
Fig 7
6 to 8mm
A
WARNING!: Saw chain stretches during use, particularly
when it is new, and it will occasionally be necessary to
adjust and tighten it. New chain will require adjustment in
less than 5 cuts. Re adjust it as often as necessary.
FUEL AND LUBRICATION
Fuel
Use standard grade unleaded fuel mixed in a ratio of 25:1 with 2-stroke engine oil
Mixing fuel
Mix fuel with 2-stroke oil in an approved container. Shake gently and ensure thorough mix.
8
Fuel and Lubrication Cont …...
WARNING!: Never use raw fuel with out oil in your unit. This will cause permanent
engine damage and void the your warranty for that product. Never use a fuel mixture that has been stored for over 90 days.
WARNING!: The 2 stroke oil must be a premium grade oil for 2-cycle air cooled
engines and must be mixed at a 25:1 ratio with the fuel. Mixing the fuel at a greater
ration than 25:1 provides insufficient lubrication and will cause engine damage and
voids your engines warranty.
Motor
Regular Unleaded Plus 2
stroke oil. Mixed 25:1
Chain
Use Chain
saw chain oil
Lubrication of chain and chain bar
Whenever you refill the fuel tank with petrol you must also top up the level of chain
oil in the chain oil tank. It is recommended to use standard chain oil.
SAW CHAIN / BAR LUBRICATION
Adequate lubrication of the saw chain is essential at all times to minimize friction with the
guide bar.
Never starve the bar and chain of oil. Running the saw with too little oil will decrease cutting
efficiency, shorten saw chain life, cause rapid dulling of chain, and cause excessive wear of bar
from overheating. Too little oil is evidenced
by smoke, bar discolouration or pitch build-up. New chains/bars should be lubricated by hand
before starting.
AUTOMATIC OILER
Your chain saw is equipped with an automatic oiler system. The oiler automatically delivers
the proper amount of oil to the bar and chain. As the engine speed increases, so does the oil
flow to the bar pad. The oil tank should be checked and topped up each time the fuel tank is
refilled.
Check the operation of the oil pump by running the saw at a medium speed. There
should be visible spatters of oil coming from tip of the saw about 30 second after
starting the saw.
WARNING: During normal operation the chain brake, clutch cover, bar and chain
are lubricated with chain oil. After use oil will drain for many weeks and pool on the
surface underneath the chainsaw.
Place the chainsaw on a protected surface to contain the draining lubricating oil
when not being used.
9
GETTING STARTED
Before starting check the operation to the
chain brake
The chain brake lever (Fig 8-A) should click between
positions (B) and (C). Leave it in position (C) for
starting.
B
C
Fig 8
A
NOTE: The brake lever should snap into both positions. If strong resistance is felt, or lever does not
move into either position, do not use your saw. Take
it immediately to a professional Service Centre for
repair.
Fill The fuel tank (Fig 9 –A) with 25:1 fuel oil mix
Fig 9
Fill The oil tank (Fig 9—B) with chain oil.
NOTE: Whenever you refill the fuel tank with fuel
you must also top up the level of chain oil in the
chain oil tank.
STARTING
Fig 10
Push the chain brake lever forward to engage
the chain brake Fig 10
Fig 11
Pull the choke knob (Fig 11-A) out
Pull out
10
A
Starting Cont …….
Fig 12
Set the Ignition switch (Fig 12 –A) to the “I” ON position
Place the saw on a firm and level surface. Hold the
saw securely with your foot as illustrated. Pull the
starter up to 10 times. Watch the chain in case it
runs
When the motor starts let it idle of a couple of seconds
to warm up. Apply part throttle and maintain the unit
at a low to Medium speed for a further 10 second.
Disengage the chain brake by pulling back the chain
bake lever and bringing the motor to cutting
speed
11
STOPPING
Fig 12
To STOP the motor set the ignition switch (Fig 12-A) to
the “0” OFF position
NOTE: To stop the engine in an emergency,
activate the chain brake and switch the ignition
switch the “0” OFF position
OPERATION
The following section on the operation of the chainsaw is a general guide only.
The use of a chain saw by an inexperienced person can be extremely dangerous. If you are unsure, please seek the assistance of a professional or get suitable
training before using the chain saw.
WARNING!: Before every use check the operation of the chain break and oil pump.
Fig 13
Bucking spikes
The chainsaw has bucking spikes (Fig 13 –A) to assist
with cutting and reduce the chance of kickback.
Keep the bucking spikes touching the wood when
cutting will help prevent any pinching or kick-back.
A
12
Operation Cont …...
Bucking
Bucking is cutting a log into lengths for easier handling.
To saw a log lying on the ground, first saw halfway, then
roll the log over and cut from the opposite side.
To saw the end of a log supported off the ground, first
saw up from the bottom one-third through the log
then finish by sawing down from the top. To saw a log
in the middle of two supports holding it off the ground,
first saw down from the top one-third through the log
then finish by sawing up from the bottom.
When bucking on a slope, always stand on the uphill
side.
Fig 14
NOTE: Be careful that the chain does not cut into the
ground when bucking as this causes rapid dulling of the
chain.
Limbing
Limbing is the process of removing the branches from a
fallen tree. Check the direction in which a branch will bend
before cutting it. Always cut on the opposite side to the
bending direction so that the guide bar is not pinched in
the cut.
For large limbs that cannot be removed in one cut, make
an initial cut from the bent side and finish by sawing from
the opposite direction.
Do not remove limbs that are supporting the fallen tree
on the ground until the tree has been cut into lengths.
Fig 15
WARNING! Always keep a well balanced stance. Do not stand on the log. Be alert
to the fact that the log may roll over. When working on a slope, always stand on the
uphill side of the log.
Pruning
Pruning is the removal of a limb or branch from a
standing tree.
WARNING! Do not use an unstable foothold
or ladder. Do not overreach. Do not saw above
shoulder height. Always use both hands to
hold the saw. First cut up from the bottom and
finish down from the top.
13
Fig 16
Operation Cont …...
FELLING
Felling is the term for cutting down a tree. Small trees up to 6-7 inches (15-18cm) in diameter are usually cut in a single cut. Larger trees require notch cuts. Notch cuts determine the
direction the tree will fall.
WARNING: Do NOT fell trees unless you have received the appropriate training.
WARNING: A retreat path (Fig 17- A) should be planned
and cleared as necessary before cuts are started. The
retreat path should extend back and diagonally to the
rear of the expected line of fall, as illustrated.
Fig 17
NOTE: Direction of fall (Fig 17-B) is controlled by the
notching cut. Before any cuts are made, consider the
location of larger branches and natural lean of the tree
to determine the way the tree will fall.
GENERAL GUIDELINES FOR FELLING TREES:
Normally felling consists of 2 main cutting operations, notching (Fig 18-C) and making the felling cut
( Fig 18-D).
Start making the upper notch cut ( Fig18-C) on the
side of the tree facing the felling direction (Fig18-E).
Be sure you don t make the lower cut too deep into
the trunk.
The notch (Fig 18-C) should be deep enough to
create a hinge (Fig18-F) of sufficient width and
strength. The notch should be wide enough to direct
the fall of the tree for as long as possible.
14
Fig 18
Operation (Felling) Cont …...
Fig 19
Use wooden or plastic wedges (Fig 19-A) to
prevent pinching the bar and chain (Fig 19B) in the cut. Wedges also control felling (Fig
18-E).
Fig 20
When diameter of wood being cut is greater
than the bar length, make 2 cuts as shown
(Fig 20).
WARNING: Before making the final cut, always recheck the area for bystanders,
animals or obstacles.
WARNING: Never saw completely through the trunk. Always leave a hinge (Fig 18-F).
The hinge guides the tree. If the trunk is completely cut through, control over the
felling direction is lost. Insert a wedge or felling lever in the cut well before the tree
becomes unstable and starts to move. This will prevent the bar from binding in the
felling cut if you have misjudged the falling direction. Make sure no bystanders have
entered the range of the falling tree before you push it over.
WARNING: As the felling cut gets close to the hinge, the tree should begin to fall.
When tree begins to fall, remove saw from cut, stop engine, put chain saw down,
and leave area along retreat path (Fig 17-A).
15
MAINTENANCE
WARNING: All maintenance work on the chainsaw apart from the work described
in this manual may only be carried out by authorised after-sales service personnel.
Chain brake operational test
Test the chain brake periodically to ensure proper function.
Perform a chain brake test prior to initial cutting, following extensive cutting, and definitely
following any Chain brake service.
Test chain brake as follows:
1. Place saw on a clear, firm, flat surface.
Fig 21
2. Start engine.
3. Grasp the rear handle (Fig 21-A) with your right
hand.
4. With your left hand, hold the front handle (Fig 21B) [not chain brake lever (Fig 21-C)] firmly.
5. Squeeze the throttle trigger to 1/3 throttle, then
immediately activate the chain brake lever (Fig 21-C).
6. Chain should stop abruptly. When it does, immediately release the throttle trigger.
7. If chain brake functions properly, turn the engine off and return the chain brake to the DISENGAGED position.
WARNING: If chain does not stop, turn engine off and take your unit to the nearest
authorised service centre for service.
Air filter
Do not operate saw without the air filter. Dust and
dirt will be drawn into engine and damage it. The air
filter must be cleaned after 20 hours of service.
Cleaning the air filter (Fig 22-C)
Remove the top cover by undoing the cover
fastening screw on the cover. You can then
remove the cover.
Lift out the air filter and wash filter in clean, warm,
soapy water. Rinse in clear, cool water. Air dry completely.
Refit the filter, fit the cover for the engine/air filter.
Make sure that the cover fits perfectly when you do
so. Tighten the fastening screw for the cover.
16
Fig 22
Maintenance Cont …...
Spark plug (Fig 22-D)
To ensure that the saw’s engine retains its power, the spark plug must be clean and have the
correct electrode gap (0.6 mm). The spark plug must be cleaned or replaced after every 20
hours of service.
Set the On/Off switch to Stop (0).
Remove the top cover by undoing the fastening screw on the cover. You can then remove the
cover.
Disconnect the ignition cable from the spark plug by pulling and twisting it simultaneously.
Remove the spark plug using a spark plug wrench. DO NOT USE ANY OTHER TOOLS.
Clean the spark plug with a copper wire brush or fit a new one.
Carburettor setting
The carburettor has been factory set. If it requires adjusting, take the saw to your nearest
authorized after-sales service outlet.
Chain bar
Turning the chain bar. The bar should be reversed every 8 working hours to ensure uniform
wear.
Keep the bar groove and lubrication hole clean. Check the bar rails frequently for wear and, if
necessary, remove the burs and square-up the rails using the flat file.
WARNING: Never fit a new chain to a worn chain bar.
Chain
Chain sharpening requires special tools to ensure that cutters are sharpened at the correct
angle and depth. For the inexperienced chain saw user, we recommend that the saw chain be
professionally sharpened by a service centre.
Chain sharpening (Fig. 23 & 24)
Sharpen the chain using protective gloves and a round file of ø3/16” (4.8mm).
Only sharpen the cutters with outward strokes (Fig. 24) observing the values given in Fig. 23.
After sharpening, the cutting links must all have the same width and length.
NOTE: A sharp chain produces well-defined chips. When your chain starts to produce
sawdust, it is time to resharpen it.
17
Maintenance (Chain sharpening) cont ……
Fig
23
Fig 24
NOTE: After the blades have been sharpened 3-4 times, check the height of the depth
limiter and if necessary lower it with a flat file and then round off the front corner.
Chain tension
Check the chain tension frequently and adjust as often as necessary to keep the chain snug
on the bar, if the chain is pulled down with the fingers at the centre of the bar the gap between the chain and the bar should be 6 to 8mm.
(See Page 7 - Fig 7 )
Breaking in a new saw chain
A new chain will need to be readjusted after as few as 5 cuts. This is normal during the breakin period, future adjustments will be required less often.
Oil passages
Oil passages on the bar should be cleaned to ensure proper lubrication of the bar and chain
during operation.
NOTE: The condition of the oil passages can be easily checked. If the passages are clear, the
chain will automatically give off a spray of oil within seconds of
starting the saw. Your saw is equipped with an automatic oiler system.
18
Maintenance Cont …...
Storage
Never put a chain saw into storage for longer than 30 days without carrying out the following
steps.
• Remove the fuel tank cap slowly to release any pressure in tank.
• Carefully drain the fuel tank.
• Start the engine and let it run until the unit stops to remove fuel from carburettor.
• Allow the engine to cool (approx. 5 minutes).
WARNING: During normal operation the chain brake, clutch cover, bar and chain
are lubricated with chain oil. After use oil will drain for many weeks and pool on the
surface underneath the chainsaw.
Place the chainsaw on a protected surface to contain the draining lubricating oil
when not being used.
Returning the saw back into operation
• Remove spark plug.
• Clean the spark plug and check that the electrode gap is correct.
• Fill fuel tank with proper fuel / oil mixture.
• Fill the chain oil tank.
See Fuel and Lubrication Section.
TROUBLE SHOOTING
19
WARRANTY
This product has been manufactured to a high quality standard. It is guaranteed against faulty
materials and workmanship for 12 months from the date of purchase. Please retain your receipt as proof of purchase.
If the product is found to be defective within the relevant time period, we will either replace
all defective parts or, at our discretion, replace the unit free of charge.
This warranty will not apply:
(i) where this product has been subjected to misuse, abuse, accident or want of care;
(ii) where this product has been used for a purpose for which it was not designed or is not
suited;
(iii) where the service of this product has been undertaken by a non-authorised person or
company or if non-approved parts have been used;
(iv) where this product has been used for industrial purposes.
Should service become necessary during the warranty period, the purchaser should contact
an Authorised Service Centre or J W Ross. In order to obtain warranty service, the purchaser
must present the store receipt showing the name of the retailer and the date of purchase.
The period of the warranty begins from the original date of purchase, notwithstanding any
subsequent repair or parts replacement.
Purchaser shall be responsible for all transport charges to and from the Authorised Service
Centre.
Damage in transit is not covered by this warranty. The purchaser should remove from the
product any liquids (if applicable) before sending the chain saw for service or repair. The chain
saw should be packed securely to prevent damage.
Warranty exclusions
Wear parts or service related parts required when performing normal and regular maintenance of this product are not covered by warranty unless it is found to be defective by an
Authorised Service Centre. These include, but are not limited to:
Chains, Chain Bar, Spark Plugs, Carburettor Adjustments, Lubricants.
Engine Tune-ups, Filters.
Distributed in Australia by J W Ross and Sons ( Australia ) Pty Ltd.
PO Box 352 North Ryde BC, NSW, 1670
Inquiries phone 1800 251 338
The J.W. Ross policy is one of continuous improvement and
the company reserves the right to alter designs, colours and
specifications without notice.
For information on all ROSS products
please visit: www.rosstools.com.au
The ROSS logo and Bull device are trademarks of J.W. Ross Pty Ltd.
20