1
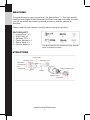
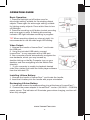
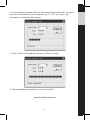
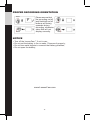
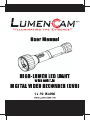
WELCOME
Congratulations on your purchase of the LumenCam™! This high quality
flashlight with Digital Video Recorder (DVR) will add years of safety to what
you do, as well as document evidence, inventory, events, people, or
activities.
Please read the user manual carefully before using this product.
PACKING LIST
①
②
③
④
⑤
⑥
LumenCam™ x 1
USB Cable x 1
Software CD x 1
Power Adapter x 1
Safety Strap x 1
Lithium Battery x 1
①
②
③
④
⑤
⑥
The pictures are for reference only, please
refer to actual product.
STRUCTURE
Indicator LED
Recording on/off
Flashlight on/off
Bright LED
Low-light LED
Lens
Charge Indicator Light
Low-light LED
Handle
USB Socket
Charge Indicator
Power Jack
www.LumenCam.com
-1-
OPERATION GUIDE
Basic Operation:
1. Press the flashlight on/off button once for
ultra-bright setting, suitable for illuminating distant
objects. Press again for wide angle setting, suitable
for lighting nearby objects. Press a third time to turn
off flashlight;
2. Press the recording on/off button to start recording
and once again to stop. A flashing blue working
indicator LED light indicates recording in progress.
Recording
on/off
Flashlight
on/off
Indicator
LED
TIP! When recording objects up close at night, it is
recommended to use the wide angle LED setting.
Video Output:
1. Unscrew the handle of LumenCam™ and locate
the USB port.
2. Using the included USB cable, connect
LumenCam™ to any computer with a USB port.
3. Your computer should automatically recognize the
new hardware, which you may browse by
double-clicking on the My Computer icon on your
desktop, and then navigating into the Mobile Disk
directory.
* If your computer is unable to playback desired
video files, please first install the video player software
from the included CD.
Charge Indicator Light
Installing Lithium Battery:
1. Unscrew the handle of LumenCam™ and locate the handle;
2. Insert the Li-battery into the handle with proper orientation.
Recharging Lithium Battery:
1. Locate and remove the waterproofing plug at the base of LumenCam™;
2. Connect the power adapter to LumenCam™ and an (100-240V ~ 50/60Hz)
power source. The indicator will illuminate green when charging, and turn off
when fully charged.
www.LumenCam.com
-2-
NOTES:
1. The indicator LED flashing red signifies critically low battery, recharge
immediately. If power is completely exhausted, the file you are recording will
be saved automatically before shutting down.
2. If your memory is full, pressing the recording on/off button will
cause the blue Indicator LED to stop and recording will not take place,
3. When LumenCam™ is connected to your computer via USB cable, it acts
as a separate drive where files may be stored.
Date/Time Reset:
If the date/time of your video does not match the local date/time, please
follow the these steps:
1. Set the date/time on your computer to match the local date/time;
2. Connect LumenCam™ to your computer via the USB cable provided;
3. Double-click the My Computer icon on your desktop, and then navigate
into the Mobile Disk directory. This is the directory that the LumenCam™
SD card uses;
4. Insert the CD provided into your computer’s CD drive;
5. Search your CD drive for a file named ‘getsystemTime.exe’, copy and
paste this file into the Mobile Disk folder;
6. Double click the file and wait for your system to automatically produce a
‘Reftime.txt’ file;
7. You may now close all folders and disconnect the USB cable, set up has
been successfully completed.
Formatting Memory:
It is highly recommended to use the software on the CD provided to format
LumenCam™ built-in memory. Using the functions of a Windows PC system
to format LumenCam™ will alter certain values, causing video file storage
time to become slower. Follow the instructions below to format:
1. Insert the CD provided into your computer’s CD drive, and search your
CD drive for a file named ‘UDiskFormat.exe’ and double-click on this file:
www.LumenCam.com
-3-
2. In the dialogue window, enter the disk name that LumenCam™ is given
when it is connected to your computer, e.g., H:/, G:/, etc. (open ‘My
Computer’ to locate the disk name):
3. Click ‘Format’ to format the memory, or ‘Exit’ to close.
4. After formatting successfully, you may click ‘Exit’.
www.LumenCam.com
-4-
PROPER RECORDING ORIENTATION
Button
F
Button
Please ensure that
the recording on/off
and flashlight on/off
buttons are facing
upwards during
recording, otherwise
video files will not
display correctly.
Button
Button
NOTICE
• Turn off the LumenCam™ if not in use;
• Do not put the battery in fire or water. Dispose of properly;
• Do not use metal objects to connect the battery polarities;
• Do not open the battery;
www.LumenCam.com
-5-
SPECIFICATIONS
Model No.
Imaging Sensor
Video Resolution
Viewing Angle
Video Format
Video File Size
Viewing Resolution
Storage Medium
Power Supply
Charging Time
Data transmission
Working Time
LED Light Power
LED Light Color Temperature
Waterproof Capacity
Consumption Current (Max.)
Charging Current
Dimensions (W x D x H)
Approx. Weight
Operating Temperature
Operating Humidity
LumenCam
1/4-inch Color CMOS
640 x 480
56°
.AVI
>15M Byte/ minute
640 x 480 (VGA)
Built-in Memory with up to 32GB
Li-battery (3.7V/2000mAH)
4 hours (Max.)
USB 2.0
3.5 hours (Min.)
1W
>5500K
IP65
560mA
>800mA
191 x 56 x 56 (mm)
300g
0°C~50°C
15~85%RH
* All the specifications are subject to minor change without prior notice.
www.LumenCam.com
-6-
FCC Information
This device complies with part 15 of the FCC Rules. Operation
is subject to the following two conditions:
(1) this device may not cause harmful interference;
(2) this device must accept any interference received, including
interference that may cause undesired operation. Changes or
modifications not expressly approved by the party responsible for
compliance could void the user’s authority to operate the equipment.
www.LumenCam.com
349 n. Vinewood St.
Escondido, CA 92029
800.959.2899
EU Environmental Protection
Waste electrical products
should not be disposed of
with household waste. Please
recycle where facilities exist.
Check with your local authority
or retailer for recycling advice.