1
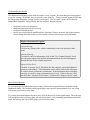
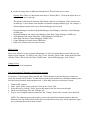
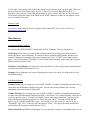
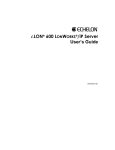
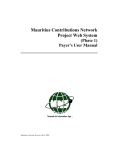
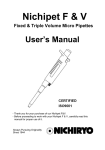
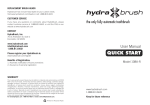
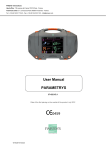
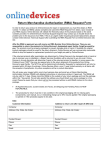
NPF CONNECT User's Manual Table of Contents: 1. Main Logging In Changing Your Password 2. Dashboard Get Results Understanding the Results More Detailed Results 3. User Management Create a New User Delete A User Change A User Lost User Password 4. Site Management Add a Center Delete A Center 5. Miscellaneous Customizing Display Settings Grid Results Options Main Logging In: To log in to NPF Connect, go to: https://www.npfconnect.com. You will be asked to enter your Login name and Password. The password is case-sensitive, and must be typed exactly as assigned. All the instructions below assume that you have already logged in to NPF CONNECT. Please Note: If you have misplaced your Login and / or Password, please contact the person who gave these to you originally. For questions, please contact NPF, Inc. at (760) 432-0145 or send an Email to [email protected] Changing Your Password: When you login for the first time, you will be asked to validate your account by entering your own password. Please make this password something that you can remember, as you will not be able to log in to NPF CONNECT without it in the future. Your new password will require one upper case character and one numeric character. The on-screen instructions will assist you with this. We recommend that you do not write this password down in a place where someone else can find it. To change your password in the future, click on “Members” and then on “Change Password.” Dashboard The dashboard allows you to see oximetry test activity between specified date ranges for the centers / areas / regions you have been assigned to. To view the Dashboard, click on “Members,” then on “Main Dashboard.” Or from the “Quick Links” menu, select “Dashboard.” To view oximetry test activity between specified date ranges, first select the date ranges by clicking on the calendar icons next to “Activity From” and “Activity To,” then click “Get Results,” as shown below: Understanding the Results: The dashboard will display results from all centers / areas / regions / divisions that have been assigned to you for viewing. By default, they are sorted by state, then city. “Total Accepted” means all files that the Independent Diagnostic Testing Facility has accepted. “Not Accepted” means all files that the Independent Diagnostic Testing Facility has not accepted. Reasons include: • • • • the doctor's order was incomplete additional paperwork was not received the doctor canceled the test the file was rejected due to insufficient time (less than 2 hours), incorrect date in the oximeter, the test being older than 10 days, or because the oximeter data was previously submitted. Display Customization Options: Column Sorting: Click on any column's title, which is underlined, to have the grid sort in that order. Column Filtering: To search for specific information, click on the "Use Column Filtering" check box, then type in part of the desired information into the text box that appears beneath the title for the column in question. Export Grid to Excel: Click the “Export to Excel” link below the date ranges to export the dashboard results to a spreadsheet. This information can be saved, shared with colleagues, or used for center performance calculations. If the information does not display correctly, you may be using an alternate form of excel. If that is the case, click the check box “Alternate Excel format,” and then click “Export to Excel” again. More Detailed Results: To view more specific information on any center, click on the Location ID that is underlined in the Dashboard results. The location results page displays more specific information on every test, along with giving you charts to select from. To view the patient information for these tests, click on the activity counts graph image. The next page will provide an Activity History chart, and below this chart is a list containing patient name, physician name, and activity date for each file in the Activity History chart. User Management Users are those that can log in to NPF CONNECT. If your NPF CONNECT account gives you authority over other users, click “Members,” then “Managers,” then “User Management.” You will see a list of all users that you manage. Display Customization Options: Column Sorting: Click on any column's title, which is underlined, to have the grid sort in that order. Column Filtering: To search for specific information, click on the "Use Column Filtering" check box, then type in part of the desired information into the text box that appears beneath the title for the column in question. Export Grid To Excel: Click the “Export to Excel” link below the date ranges to export the user list to a spreadsheet. If the information does not display correctly, you may be using an alternate form of excel. If that is the case, click the check box “Alternate Excel format,” and then click “Export to Excel” again. Create A New User Account: Important: Make sure you know what center the user belongs to before creating them. Also make sure the center already exists. See Site Management for instructions on viewing centers. To view a list of all users that the currently logged-in account holder has access to, click "Users" from the "Quick Links" menu on the left. To view / edit information about a particular user, click the "Select" link to the left of their LOGIN name. To create a new user, click the link "Create New User" in the center of the page, just above the user grid. The next page is the "User Record Creation Page." User Login: This is the login name that the user will type when accessing the site. We recommend using a standard naming convention for each user's login name. If a company already uses a standard naming convention for another service, like Email, we recommend making these the same. For example, if everyone's email address is [email protected], we would recommend each user's login be firstname_lastname. Password: The initial password requires at least one capital letter and one numeric character. Example: Newuser1 Once all information is completed on this page, click the "Begin Creation" button. On the next page there is additional information to fill out for the user account. Primary Role: There is a drop-down menu next to "Primary Role." Click on the down arrow to select the new user's role type. The options in this drop-down menu differ based on the level of authority of the current user's account type. A user cannot create another user that has a higher authority type. For example, a branch manager cannot create a new Division Manager user account. • • • • • • Division Managers can choose Regional Manager, Area Manager, Sales Rep, Center Manager or DME user. Regional Managers can choose Area Manager, Sales Rep, Center Manager or DME user. Area Managers can choose Sales Rep, Center Managers or DME user. Sales Reps can choose Center Managers or DME users. Center Managers can only choose DME users DME users cannot create new user accounts. Delete a User: Since users will have access to patient information, it is critical to delete their account if they are no longer at your company. To delete a user, click "Users" from the "Quick Links" menu on the left, then click the "Select" link to the left of their LOGIN name. On the following page, click “Delete.” Change a User: Changing a user level assignment Lost User Password / Resetting a Locked User Account: For security, if a user forgets their password and 3 failed attempts to log into their user account are made, the account will be locked. To unlock the account again, another user with higher authority must reset the locked account's status and password. Follow these steps to reset the user account: 1. 2. 3. 4. 5. Login to NPF connect In the “Quick Links” menu on the left, click on the “Users” link. Select the user by clicking "Select" next to their name in the list of users on the right. On the user detail page, click the "Website" tab. Type in a new temporary password and click the “Change” button. The account is now unlocked. NOTE: The temporary password must have a least one capital letter and one numeric character. When the user logs in the first time after their account has been reset, they will be required to type a new, permanent password for their account. Site Management If your NPF CONNECT account gives you authority over more than one center, you can click on “Members,” then “Managers,” then “Site Management” to view these centers. You may also click on "Sites" from the "Quick Links" menu on the left of the screen. A list of the centers will be displayed here that you are allowed access to. Management accounts will have access to more than once site, and in some cases in more than one area. In these situations, each area the manager has access to will be listed at the top of the grid. For each center in the grid, the "Child Of" column represents the area under which the center is categorized. If, for example, a center is in Escondido, CA, it could belong to an Area called “San Diego Area.” Note For Managers: Please check your locations carefully. Notify us immediately if centers you expect to see are not listed, or if centers are listed that should not be in you area. Display Customization Options: Column Sorting: Click on any column's title, which is underlined, to have the grid sort in that order. Column Filtering: To search for specific information, click on the "Use Column Filtering" check box, then type in part of the desired information into the text box that appears beneath the title for the column in question. Export Grid to Excel: Click the “Export to Excel” link below the date ranges to export the site list to a spreadsheet. If the information does not display correctly, you may be using an alternate form of excel. If that is the case, click the check box “Alternate Excel format,” and then click “Export to Excel” again. Export Grid To Excel: Click the “Export to Excel” link below the date ranges to export the site list to a spreadsheet. If the information does not display correctly, you may be using an alternate form of excel. If that is the case, click the check box “Alternate Excel format,” and then click “Export to Excel” again. Add a Center: Only management-type accounts can add centers. To add a center, you must know what level you want it to be under. Then simply click on the folder image next to that area at the top of the grid. When you put your mouse over the folder image, the text “Create a New Location Beneath This Area” is displayed. Once you have entered the information here, please contact NPF, Inc. at (760) 432-0145. We will need to link this center to the DME record in NPF's database so that you can begin to see the activity counts for the center. Delete a Center: If you have a center that has closed or merged, please contact NPF, Inc. at (760) 432-0145 or [email protected]. Miscellaneous Customizing Display Settings: To customize the NPFCONNECT environment, click on “Members,” then on “Preferences.” Grid Paging refers to how you want results to display when you are doing test activity counts or looking up center / user information. It is faster to choose a smaller paging number, because fewer results are displayed on one page, and you can simply click “Next” or “Back” to navigate between pages. You can also choose “Not Paged” if you want all results to display on the same page; however, this may take more time to load. Grid Lines / Grid Themes refer to how the results will look. Feel free to play around with these until you find a look and feel that works for you. Startup refers to what page you want to be displayed as soon as you log in. By default, this is set to the Dashboard page. Grid Result Options: Column Sorting: On every page you view in NPF CONNECT, whether it be dashboard counts, user or center lists, this information is displayed in grids. You can click on any column's title, which is underlined, to have the grid sort in that order. Column Filtering: On every page you view in NPF CONNECT, whether it be dashboard counts, user or center lists, this information is displayed in grids. Click on the “Use Column Filtering” check box to search for specific criteria. Text boxes will display below each column in the grid. Type part of the desired information into the appropriate text boxes and press “Enter.” The page will refresh and display any records that matched the search. For example, to see the record of a site whose city is "Escondido," type “Esco” in the city text box and press “Enter.” The page will refresh and find any records where the city name contains the text “Esco.” Export Grid To Excel: When results display, you can export these results to a spreadsheet that you can save, share with colleagues, or use to create performance calculations. Just click on the “Export to Excel” link below the date ranges. If the information does not display correctly, you may be using an alternate form of excel. If that is the case, click the check box “Alternate Excel format,” and then click “Export to Excel” again.