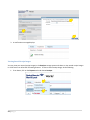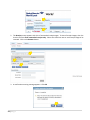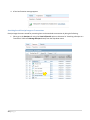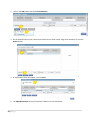
1
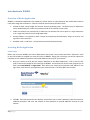
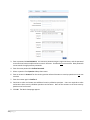
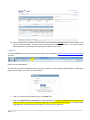
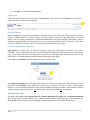
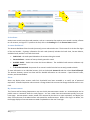
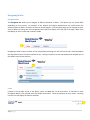
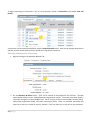
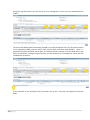
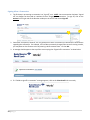
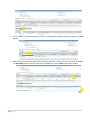
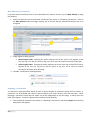
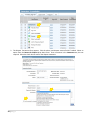
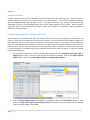
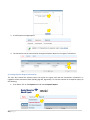
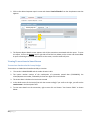
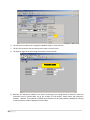
Purchasing Card User Manual October, 2014 Purchasing Card User Manual Table of Contents Introduction ................................................................................................................................................................4 Purpose .......................................................................................................................................................................4 What is a Purchasing Card? ........................................................................................................................................4 Who Does What?........................................................................................................................................................4 Cardholder/Employee ............................................................................................................................................4 School/Department Bookkeeper............................................................................................................................5 Principal/Department Head ...................................................................................................................................5 Finance Department ...............................................................................................................................................5 Purchasing Department..........................................................................................................................................6 What Forms Are Used And Where Are They ? ...........................................................................................................6 Forms Used .............................................................................................................................................................6 Where to Find the Forms........................................................................................................................................6 General Guidelines .....................................................................................................................................................6 Cardholder Eligibility ..............................................................................................................................................6 Cardholder Liability ................................................................................................................................................6 Lost or Stolen Purchasing Cards .............................................................................................................................7 Termination or Transfer of Cardholder ..................................................................................................................7 Limitations on Use of Purchasing Card ...................................................................................................................7 Spending Limits ......................................................................................................................................................7 Prohibited Use of the Purchasing Card ..................................................................................................................7 Violations ................................................................................................................................................................8 Over-the-Counter Purchases ..................................................................................................................................8 Sales Tax .................................................................................................................................................................8 Travel ......................................................................................................................................................................9 Telephone Orders ...................................................................................................................................................9 Disputed Items .................................................................................................................................................... 10 Lost Receipts........................................................................................................................................................ 10 Payment Procedures ........................................................................................................................................... 10 1|Page Reimbursing District for Internal Account Charges ............................................................................................. 11 Request for New Purchasing Cards ..................................................................................................................... 11 Annual Inventory of Cards ................................................................................................................................... 11 Introduction to WORKS ........................................................................................................................................... 12 Overview of Works Application ........................................................................................................................... 12 Accessing Works Application ............................................................................................................................... 12 Initial Login ...................................................................................................................................................... 12 Logging In......................................................................................................................................................... 14 Logging Out ..................................................................................................................................................... 15 Security Timeout.............................................................................................................................................. 15 Forgotten Login Name or Password ................................................................................................................ 15 Works Home Page ............................................................................................................................................... 15 Action Items..................................................................................................................................................... 16 Accounts Dashboard........................................................................................................................................ 16 Alerts................................................................................................................................................................ 16 My Announcements ........................................................................................................................................ 16 Navigating Works ................................................................................................................................................ 17 Navigation Bar ................................................................................................................................................. 17 Icons................................................................................................................................................................. 17 Breadcrumb Trail ............................................................................................................................................. 18 Accessing Works Training Guides and Videos ................................................................................................. 18 Processing Transactions ...................................................................................................................................... 19 Overview.......................................................................................................................................................... 19 Reviewing Transactions ................................................................................................................................... 19 Allocating Transactions to a GL Account ......................................................................................................... 21 Attaching a Receipt.......................................................................................................................................... 23 Signing Off on a Transaction ............................................................................................................................ 25 Dividing a Transaction ..................................................................................................................................... 26 Duplicating a Transaction Line ........................................................................................................................ 28 Mass Allocating Transactions .......................................................................................................................... 29 Disputing a Transaction .................................................................................................................................. 29 Other Useful Functions ........................................................................................................................................ 31 2|Page Storing Receipt Images for Processing Later ................................................................................................... 31 Viewing Stored Receipt Images ....................................................................................................................... 32 Removing Stored Receipt Images .................................................................................................................... 33 Attaching Stored Receipt Images to Transactions........................................................................................... 35 Reports ................................................................................................................................................................ 37 Monthly Statements ........................................................................................................................................ 37 Creating Expense Reports (Grouping Transactions) ........................................................................................ 37 Accessing Expense Report Information ........................................................................................................... 38 Viewing Transactions in SmartStream................................................................................................................. 39 Transactions Purchased with County Budget .................................................................................................. 39 Transactions Purchased with Internal Accounts ............................................................................................. 41 3|Page Introduction The Volusia County Schools’ (VCS) Purchasing Card Program is designed to efficiently purchase goods and/or services from any vendor that accepts the VISA credit card. Purpose To provide guidance on the proper use of the VCS Purchasing Card as an efficient supplement to purchase orders and to ensure that all charges made with the purchasing card are done so in accordance with school board policy and are for authorized district use only. Policies and procedures apply to all employees authorized to use either a district or internal accounts purchasing card (individual cards and/or site cards). What is a Purchasing Card? The purchasing card is a VISA credit card issued by Bank of America Merrill Lynch to individuals or to schools/departments (site cards). It allows schools/departments the flexibility to purchase goods and/or services directly from any vendor without issuing a district or internal accounts purchase order. Cards are managed via a web-based application that provides real-time purchasing card administration, post-purchase approval workflow and integration with the District’s accounting software. Certain authorization controls may be adjusted periodically as needed and may include the following: Single transaction limit Monthly credit limit Approved merchant category codes The Bank of America Merrill Lynch purchasing card offers an enhanced security against counterfeiting or cloning. The “Chip and PIN” card has a computer chip embedded in the card containing information usually stored in the card’s magnetic strip. A personal identification number (PIN) is required by the cardholder at the time of purchase as an added security measure. Each cardholder is mailed a PIN by Bankcard Center. For site cards, see the school/department’s bookkeeper for the PIN. Not all vendors have the updated technology to process these cards so you may or may not be asked for a PIN. Who Does What? Cardholder/Employee Properly safeguard the purchasing card Order/receive goods and/or services Ensure that no sales tax is charged (except when required for certain types of purchases) or no backorders Ensure sufficient funds are available prior to making a charge on the purchasing card. Collect sales receipts and turn them into your school/department’s bookkeeper If a receipt is lost, request a duplicate from the vendor. If unsuccessful in obtaining a duplicate receipt, prepare a signed statement explaining the reason for the missing receipt along with a detailed 4|Page description of the transaction, including vendor name, description of the item(s) purchased, the date of purchase, quantity, unit price, and total amount of transaction. Comply with all purchasing and purchasing card policies and procedures School/Department Bookkeeper Properly safeguard site purchasing cards and check cards in/out Ensure availability of funds in GL accounts Review, attach a receipt, allocate to a GL account, and sign off each transaction made on the purchasing cards that are assigned to you Process on-line billing statements by the 10th of the following month Review monthly billing statements for validity and appropriateness of all transactions Ensure that no sales tax is charged (except when required for certain types of purchases) or no backorders Notify the Purchasing Department of any changes needed to spending limitsReview monthly charges with principal/department head Handle disputed charges directly with the vendor and notify Purchasing Report any charges that appear to be inappropriate to the principal/department head Maintain original receipts and supporting documentation in accordance with State of Florida General Records Schedule (GS1-SL) for State and Local Government Agencies Internal Account Bookkeepers Only - reimburse the District by the 10th of the following month for purchases made on the internal account purchasing cards Comply with all purchasing and purchasing card policies and procedures Principal/Department Head Ensure that purchasing cards are properly safeguarded Request purchasing cards for designated employees from Purchasing Set individual spending limits within established guidelines Designate the school/department bookkeeper Collect cards from terminated or transferred employees. Notify the Purchasing Department of terminated cards and return the card cut in half to Purchasing Notify the Purchasing Department of any lost or stolen cards or any inappropriate or disputed charges Ensure availability of funds and proper GL accounts Review, approve and sign the monthly statement authorizing charges Resolve any questionable purchases with the individual responsible Has the authority to revoke an individual’s privilege to use a purchasing card if the individual has violated the School District of Volusia County’s policies and procedures for purchasing card use Comply with all purchasing and purchasing card policies and procedures Finance Department Review charges for validity and appropriateness Flag any transactions that need additional attention from the cardholder or bookkeeper Confirm that all charges have a receipt attached, are allocated to the proper GL account, and are signed off by the school/department bookkeeper Notify the principal/department head of any inappropriate charges Monitor bookkeepers’ on-line activity to ensure timely payment to the financial institution 5|Page Pay financial institution for all monthly charges from consolidated statements (county and internal accounts) Ensure that schools have reimbursed the District by the 10th of the following month for purchases made on the internal account purchasing cards Process accounting data Initiate training program for all schools/department bookkeepers In collaboration with the Purchasing Department, maintain policies and procedures manuals Purchasing Department Coordinate the issuance, maintenance, and cancellation of purchasing cards Initiate training program for all cardholders and principals/department heads Notify the financial institution of any billing disputes and participate in the resolution Coordinate and maintain internal controls Pursue supplier discount opportunities Conduct semi-annual inventory of purchasing cards In collaboration with the Finance Department, maintain policies and procedures manual What Forms Are Used And Where Are They ? Forms Used Request for New Purchasing Card Purchasing Cardholder Agreement Site Cardholder Agreement Purchasing Cardholder Maintenance Purchasing Card Dispute Form Where to Find the Forms The forms can be obtained from either the Purchasing or Finance websites. General Guidelines Cardholder Eligibility Purchasing cards may be issued to individual permanent employees of Volusia County Schools. Each individual cardholder must sign a Purchasing Card Agreement provided by the Purchasing Department. An individual’s request for a purchasing card must be approved by the principal/department head. Cardholder Liability The purchasing card is a Volusia County Schools charge card which will not affect the cardholder’s personal credit. However, it is the cardholder’s responsibility to ensure that the card is used in accordance with Volusia County Schools’ Purchasing Card Policies and Procedures. Failure to comply with program guidelines will result in permanent revocation of the card, notification of the situation to management, and further disciplinary measures. 6|Page Lost or Stolen Purchasing Cards Cardholders are required to immediately report any lost or stolen purchasing cards to the Purchasing Department, at 386-734-7190 extension 50845 or the bank by calling Bank of America Merrill Lynch at 1-800-822-5985. The cardholder is responsible for reporting all information necessary to reduce the liability to Volusia County Schools. The cardholder must also immediately notify the principal/department head about the lost or stolen card since the school/department is responsible for all costs associated with a lost or stolen card. Disciplinary action may be taken in the event that the Purchasing Department and the bank are not notified Termination or Transfer of Cardholder The principal/department head or designee MUST collect the purchasing card from any terminated or transferred employees. Purchasing should be notified by email to cancel the card immediately. The card must be cut in half, and returned with a completed Cardholder Maintenance form to the Purchasing Department for cancellation. In the event the principal/department head is unable to collect the purchasing card when an employee terminates, the Purchasing Department must be immediately notified to cancel the card. A completed Cardholder Maintenance form must still be completed and sent to the Purchasing Department. Limitations on Use of Purchasing Card The purchasing card is to be used for School Board of Volusia County authorized purchases ONLY. The purchasing card cannot be used for any personal use or any such use will require immediate reimbursement and may result in disciplinary action. All credits for returned or defective merchandise must be in the form of a credit against the purchasing card. No cash refunds, gift cards/certificates or store credits are permitted. No purchases are to be delivered to an address other than your school/department’s address. Spending Limits The principal/department head will set a single purchase limit and a monthly spending limit when requesting a purchasing card for an employee. Purchasing guidelines set the recommended maximum limit at $1,000 for a single purchase and $10,000 for a monthly spend. The guidelines allow for increases above the recommended maximum limits to accommodate special purchases that otherwise do not violate School Bard purchasing policies. A purchase may be made of multiple items, but the invoice total cannot exceed the cardholder’s single purchase limit. Transactions shall not be split to circumvent the singe transaction limit. Prohibited Use of the Purchasing Card The following types of purchases are prohibited: Fixed Assets (computers, furniture, equipment, etc. with a cost over $750) – In case of emergency, an email must be sent to the Budget Department Inventory Specialist explaining the purchase. A copy of the email must be attached to the transaction along with the receipt. Departments cannot charge to a capital outlay object (6XX) from their discretionary budget (project 0000) without authorization from the Budget Department. Personal purchases Gasoline or other fuel except when used for rental cars or vehicles or equipment owned by the School District of Volusia County. Food, for employees, incurred during travel. Food for classroom use or for students during field trips, athletic or scholastic events is permitted. 7|Page Cash advances Gift cards for employees Any additional goods and/or services specifically restricted by the Purchasing Department Violations Any abuse or misuse of the purchasing card or these procedures may result in card privileges being revoked. The Director of Purchasing has the authority to revoke a purchasing card if district guidelines are repeatedly violated. Examples of some violations are: Purchases of items referenced under the “Prohibited Use of the Purchasing Card” section Failure to submit proper documentation and/or receipts, in a timely manner for prompt payment to the financial institution Splitting purchases to circumvent single transaction limits. Failure to report a lost or stolen purchasing card in accordance with these procedures Accepting cash or cash equivalents for returned merchandise Over-the-Counter Purchases The purchasing card may be used at any store or business that accepts VISA. When a purchase is made, the cardholder must obtain a sales receipt with the supplier’s name and identification; a detailed description of the item(s) purchased; unit cost; date; and total amount of the purchase. Ensure that no sales tax is charged (except when required for certain types of purchases). For your convenience, the sales tax exemption number is printed on the card. Verify the accuracy of the sales receipt prior to leaving the store. Turn in receipts and any other supporting documentation to the school/department’s bookkeeper. The Bank of America Merrill Lynch purchasing card offers an enhanced security against counterfeiting or cloning. The “Chip and PIN” card has a computer chip embedded in the card containing information usually stored in the card’s magnetic strip. A personal identification number (PIN) is required by the cardholder at the time of purchase as an added security measure. Each cardholder is mailed a PIN by Bankcard Center. For site cards, see the school/department’s bookkeeper for the PIN. Not all vendors have the updated technology to process these cards so you may or may not be asked for a PIN. If a receipt is lost, request a duplicate from the vendor. If unsuccessful in obtaining a duplicate receipt, prepare a signed statement explaining the reason for the missing receipt along with a detailed description of the transaction, including vendor name, description of the item(s) purchased, the date of purchase, quantity, unit price, and total amount of transaction. Sales Tax The School District of Volusia County’s purchases are generally exempt from State sales tax. In order to make taxfree purchases the School District of Volusia County Consumer’s Certificate of Exemption should be furnished to the vendor at the time of purchase. The applicable tax exemption number is printed on the purchasing card. Cards will be re-issued periodically to reflect exemption number changes. The vendor may require a copy of the certificate, which is available on the District’s website under the Finance Department. 8|Page A general rule in determining whether sales tax should be paid on a school internal accounts purchase is determined by “ownership” of the item purchased. If the ownership passes from the school to an individual, then sales tax should be paid on the purchase, unless the item is specifically tax exempt. The State of Florida has granted school districts the privilege of paying the sales tax directly to the supplier on the purchase price of the items, rather than collecting the tax on the sales or rental. When paid by this method, the tax is considered part of the cost of the item and the tax is not collected separately. Rule-of-thumb, pay sales tax on the purchase of tangible property to be used for rental (other than those specifically tax exempt). The following is a list of items that are exceptions to the “ownership” general rule and are considered tax exempt: Coupon books Musical instruments needed for curriculum purposes (e.g. recorders for music classes) Yearbooks, magazines newspapers, directories, bulletins, and similar publications distributed by the school Textbooks and workbooks containing printed instructional materials, such as questions and answers , that are used in regularly prescribed courses of study Food and beverages sold or dispensed through vending machines or other dispensing devices located in the student lunchroom, student dining room, or other area designated for student dining For more details on sales tax please refer to the Internal Accounts Procedures Manual Travel Travel is an authorized expenditure. When the purchasing card is used for hotel charges, registrations, car rental, airfare, etc. related to travel, a copy of the approved District leave form must be attached to the transaction(s). Section 112.061, Florida Statutes requires each traveler to travel by the most economical means. Overnight accommodations for one day meetings within a radius of 100 miles from the traveler’s official worksite will not be allowed unless extenuating circumstances are approved by the traveler’s supervisor and attached to the transaction. If a traveler attends a meeting lasting two or more days, and is within a radius of 100 miles, the appropriate overnight stay may be authorized by the traveler’s supervisor. Reasonable efforts shall be made to ensure that the employee obtains an economical lodging rate in a location that also allows for full participation in the event involved. For travel within the State of Florida, remind the hotel at check-in that the District is sales tax exempt. If you are charged sales tax, you will be required to contact the hotel for a credit. If a hotel charges for personal items, such as meals, telephone or movies to your room, make sure a personal card is used to pay for these items. If you are staying additional days for personal reasons, these days should be charged to your personal card. If this happens inadvertently, you must reimburse the school or District immediately. Notify the Finance Department to coordinate reimbursement. All credits must be applied to the purchasing card – do not accept cash or checks. It is the responsibility of the cardholder to cancel any reservations made with the purchasing card so that the District will not be charged for rooms or airfare not used. If the cardholder does not cancel the reservation in a timely manner and the District is charged, the employee may be responsible for reimbursing the school or District. Telephone Orders Telephone orders should be placed for items available for immediate shipment – backorders will not be allowed. When placing a telephone order, the cardholder must confirm that the vendor will charge the purchasing card only when the item is shipped so that the item is received during the same billing cycle as the charge. 9|Page Ensure that the vendor is aware of the School District of Volusia County’s sales tax exemption status. For your convenience, the sales tax exemption number is printed on the card. Disputed Items If a charge appears on your account that was not made by an employee at your site, contact the Purchasing Department immediately. Fraudulant charges should be handled like a dispute, but Purchasing will cancel the account and arrange for a replacement card/account. Sales tax is not a disputed item. A purchase is considered to be “in dispute” when one of the following situations occur: If an item purchased with the purchasing card is found defective, it is your responsibility to return the item to the supplier for replacement or to receive a credit. If the supplier refuses to replace the item or issue a credit, then the purchase is considered to be “in dispute”. If the amount for an item purchased appears to be incorrect or duplicated, it is your responsibility to contact the supplier to verify all information and to confirm that a duplicate shipment did not occur. If resolution cannot be made with the supplier, then the purchase is considered to be “in dispute”. All disputed items must be reported to the Purchasing Department. Send an email and attach all supporting documentation. Purchasing will contact the vendor and/or the financial institution and notify you of the action taken. Disputes must be resolved with the financial institution with 60 days or you will be responsible for the charge. Lost Receipts If a receipt is lost, the cardholder is responsible for requesting a duplicate from the vendor. If unsuccessful in obtaining a duplicate receipt, the cardholder must prepare a signed statement indicating the item(s) purchased the date of purchase, and the merchant name. Continued incidents of missing receipts may result in the cancellation of the card and the employee may be required to make payment for the transaction(s). Payment Procedures The cutoff for the purchasing card is the last day of each month. The District must pay the totals on both the county and internal accounts billing statements prior to the statements’ due dates or a late fee is accessed. For the cardholders, a billing statement report will be scheduled to run two business days after the billing cycle (see Monthly Statements under the Reports section). 1. By the 10th of the subsequent month (for reporting period of January, this would be February 10th) all transactions scheduled for payment must be reviewed, receipt attached, have an expense account assigned, be signed off, and approved by Finance. 2. Also by the 10th of the subsequent month, a reimbursement check (made payable to Volusia County Schools) for the total of all internal account transactions must be sent to Finance (see Reimbursing District for Internal Account Charges below). 3. Original documents (eg. receipts and signed monthly billing statements ) remain at the school/department site and must be made available at time of audit. After the audit is completed, refer to the General Records Schedule, which can be found on the District’s Archives and Records website, for record retention. 10 | P a g e Reimbursing District for Internal Account Charges By the 10th of the subsequent month, a reimbursement check for the total of all internal account transactions must be sent to Finance. 1. The check must be cut for the grand total of your monthly billing statement for internal accounts. 2. On a daily basis transactions are loaded into SFO as journal entries. They are expensed to the individual accounts and the total is posted to the offset account – 0900.000 Accounts Payable – Pcard. This is the account you actually cut the check from. When it’s time to cut a check back to the District, remember that there may be transactions posted to the Accounts Payable – Pcard account that are for the current month and not for the statement month (prior month). For example, if you are paying July’s statement, there may be August transactions posted to Accounts Payable – Pcard. To reconcile the grand total to the Accounts Payable – Pcard account, take the Accounts Payable – Pcard account balance and subtract out the August transactions. This should agree with the grand total of your monthly billing statement. 3. Checks are to be made payable to Volusia County Schools. Use vendor “VOLUSIA COUNTY SCHOOLS – P”. The account the District needs to apply the payment will automatically print on your check. 4. The balance remaining in the 0900.000 Accounts Payable – Pcard account after cutting the check should be only for the current month’s transactions. Request for New Purchasing Cards The principal/department head may request a purchasing card for an employee or a site card by submitting a completed “New Card Request” form to the Purchasing Department. At the time of the request, the principal/department head must select the spending limits in which the cardholder/site card is authorized to charge. Select a single transaction amount (total dollar amount of each swipe of the card) and a monthly credit amount (total dollar amount available each month). The Purchasing Department coordinates the issuance of all purchasing cards with the financial institution. Prior to receiving the district purchasing card, the cardholder is required to sign a School District of Volusia County Purchasing Cardholder Agreement Form accepting responsibility for the card. The form is retained in Purchasing. Principals/department heads will sign for all site cards issued at their request for their school/department. Annual Inventory of Cards Once a year, the Purchasing Department will provide a list to each school principal and department head of all purchasing cards that have been issued to their school/department. The principal/department head will conduct a physical inventory to assure that all of the cards assigned to their school/department are in their possession. After verifying each card, the principal/department head will sign the bottom of the “Annual Card Inventory” form acknowledging that all cards issued have been accounted for. This document is to be returned to the Purchasing Department for audit documentation. 11 | P a g e Introduction to WORKS Overview of Works Application WORKS is a web-based application that enables the school district to make payments with credit cards and then track and manage the transactions. Features utilized by Volusia County Schools include: Utilized for both county budget and internal account purchasing cards. The District pays all statements and is reimbursed by the schools for purchases made on the internal account cards. Credit card accounts are controlled by a credit limit (the amount that can be spent in a single transaction or in a single day) set by the Purchasing Department. Account holders are required to attach receipts and supporting documentation, assign an account, and sign off on each transaction. Available credit = credit limit – current balance (total of posted purchases) Accessing Works Application Initial Login Before you can access WORKS, the Finance Department must create a user account and send a “Welcome” email to you that includes an assigned user name and a link to WORKS. During your initial login, you will be required to complete security validation questions that provide additional security for your account. 1. Once you receive an email with the subject “Welcome to the Works Application”, Click on the first link (URL) in the email message for the initial login to WORKS. An Initial Security Check screen prompts you to enter your Email Address or Login Name. Enter either your Volusia County Schools email address or the login name, both of which are supplied on your welcome email. The field is NOT case sensitive. 2. Click OK. The Initial Password screen displays, which allows you to create a password, select three security validation questions, and enter the answers to those questions to provide additional security for your account. 12 | P a g e 3. Enter a password in New Password. The minimum password length is eight characters, and the password must contain at least one alpha and one numeric character. Passwords are case sensitive. New passwords cannot match the eight previous passwords. 4. Enter the same password in Confirm Password. 5. Select a question from Question 1 drop-down menu. 6. Enter an answer in Answer 1 for the security question selected. Answers to security questions are not case sensitive. 7. Enter the answer again in Confirm 1. 8. Continue to select and answer two additional security validation questions. Users are required to select and answer three security validation questions and answers. None of the answers to the three security questions can be the same. 9. Click OK. The Works homepage appears. 13 | P a g e 10. After clicking the link included in the email and creating a password, do not attempt to access Works using the link in the email again. The email link is rendered inactive after the initial use. You should create a bookmark/favorite in your browser to quickly access Works in the future. Logging In To access WORKS, open your internet browser and enter the web address (https://payment2.Works.com/Works/) as shown: Initial use of the web address: The first time you use the web address above, the Login to Works screen requests and email address. Subsequent logins will not require you to enter an email address. 1. Enter your Volusia County School’s email in the Email field. 2. Enter your Login Name and Password in the appropriate field. If you are responsible for both county and internal accounts, you will have a separate Login Name associated with each account. For example, your Login Name for internal accounts may include “IA” after your VCS username. 14 | P a g e 3. Click Login. The Works homepage appears. Logging Out Users may log out of Works from any screen in the application after clicking on the Log Out link in the upperright corner of any screen (as shown below): Security Timeout Works is designed to time out if the application is open but not active for 15 minutes. This is known as a security timeout. If Works performs a security timeout, you are prompted to enter your login information to re-access Works. Your last action in Works will be saved and accessible after you enter your login information. A user is allowed six attempts within a five-minute time frame to log into Works before he/she is locked out. This lockout remains in effect for 30 minutes. After 30 minutes, the user can attempt to log in again. Forgotten Login Name or Password Login Names are usually your VCS Network Username, unless your VCS Network Username is less than 6 characters. A “1” is usually added at the end of the VCS Network Username for those that are only five characters long. If you unable determine your Login Name, contact the Finance Department via email and request a new Login Name. Finance will send an automated email containing the Login Name. If you forgot your password, click the appropriate link on the Login page. The Forgot Your Password screen displays and prompts you to enter your Login Name. After entering your Login Name and clicking Submit, Works sends you an email with instructions on how to create a new password. However, you must know the answers to your security validation questions to create a new password. Security validation answers and usernames are not case sensitive. However, passwords are case sensitive. Works Home Page The Works Home page includes Action Items (#1), Accounts Dashboard (#2), Alerts (#3), and My Announcements (#4). Action Items list tasks assigned to you. Accounts Dashboard lists the accounts you are authorized to use. Alerts and My Announcements contain messages or announcements from the Program Administrator. 15 | P a g e Action Items Action Items contain items that need attention, such as a transaction that requires you to attach a receipt, allocate to a GL account, and sign off. To perform the task, click on the Pending link in the Current Status column. Accounts Dashboard The Accounts Dashboard lists the cards (accounts) you are authorized to use. The Account ID is the last four digits of the card number. Summary information for each card (account) includes the Credit Limit, Current Balance, Available Credit, and the % of Credit Limit Used. Credit Limit – the total spend allowed on the account during the month Current Balance – amount of money already spent this month Available Credit = Credit Limit minus the Current Balance. The Available Credit amount calculates only posted transactions. % of Credit Limit Used the percent of an account’s credit limit that has currently posted to Works. To view information on an individual account, click on the desired Account ID and then select View Full Details. The Account Summary screen has three tabs for detailed information on the account – Spend Control Profile, Account, and Accountholders. Alerts Alerts may display when account credit limit thresholds have been exceeded or to notify you of password expirations. Password expiration alerts contain a Change It Now link to access the Change Password screen in one click. My Announcements The Finance and Purchasing Departments may use the My Announcements section as a communication tool to publish news or comments about the card program. You can review these announcements quickly from your home page. Announcements remain posted until removed by the District or upon expiration, and display the date, time and name of the Administrator who posted the announcements. When a user logs in to Works, the Home page displays all announcements created or updated since the user’s last login. 16 | P a g e Navigating Works Navigation Bar The Navigation Bar allows you to navigate to different elements in Works. The options you can access differ depending on your security. For example, a user without the Program Administrator role cannot access the Accounts option in Works. However, all users can access Reports. From the Home page, you can navigate to other areas of Works by clicking the main navigational menu tabs that display across the top of the page. Main menu tabs display on every screen and are always visible. Navigating to other screens in Works can be completed by hovering over the main menu tabs. Hovering displays the drop-down menu of functions available to you. Clicking an option from the drop-down menu navigates you to the default screen of that function. Icons Located in the top-right corner of the Works screen are icons that can be used either as shortcuts to move throughout Works or can provide users with helpful information. These icons display on every screen. Hovering over the icon will display the function available. 17 | P a g e My Profile – Click My Profile to navigate to access your personal information on the Users Details screen. On the User Details screen you may edit your password. Home – Click the Home icon from any screen in Works to return to the Home page. Help – Click the Help icon to access online help regarding functions and features for a specific screen. Contact Us – Click the Contact Us icon to access telephone and email information for Program Administrator Support Services and Customer Service at Bank of America. Breadcrumb Trail When you navigate to other areas of Works by clicking the main menu tabs that display across the top of the page, a breadcrumb trail displays. A breadcrumb trail shows the series of options you selected to arrive at the information displayed on the screen. It displays on every screen as you move throughout Works. Accessing Works Training Guides and Videos To access Work’s User Guides and additional reference materials, click the Training Guides link that displays at the bottom of every screen in Works. To access training videos, click the Training Videos link that displays at the bottom of every screen. 18 | P a g e Processing Transactions Overview As the Primary Accountholder, you are responsible for processing transactions that were purchased using the cards listed under your Accounts Dashboard on the Home page. The cards may be issued in your name or your school/department’s name (Account Name). Processing transactions include the following actions: Reviewing the details of the transaction Resolving any sales tax or other discrepancies with the vendor Allocating the transaction to a GL account Attaching a receipt to the transaction Signing off on the transaction to indicate you have reviewed and processed the transaction. Providing a comment in the comment box that appears if you need to make a note about tax charged, etc. Reviewing Transactions Once you make a purchase using the District’s purchasing card, the details of the transaction will post to Works. There is usually a delay (approximately 24 hours) between when the transaction is posted to the bank and when it is posted to Works. Transactions appear in the Transactions Pending Sign Off queue. There are a couple of ways to review the details of a transaction from the Home page. 1. Under the Action Items section, click on the Pending link for actions that need to be signed off. 2. Or click on the Expenses tab on the navigation bar and then choose Transactions. 19 | P a g e Using either method, the Transaction – Accountholder screen appears. Unprocessed transactions are listed under the Pending Sign Off tab. The following is a brief explanation of each column: 20 | P a g e Document – All purchase transactions are assigned a unique transaction number in Works. All transaction numbers begin with “TXN” followed by 8 digits Account ID – The last four digits of the purchasing card used for the purchase Sign Off – Will show the status of the “sign off” process. New transactions will have “none”. Processed transactions, depending on where it is in the process, will have up to three “sign offs”. o AH – Signed off by Accountholder o APR – Signed off by Approver (this is automatic) o ACT – Signed off by Accountant (Finance Department) Date Posted – Date the transaction posted to the bank and is liable for payment. There is usually a delay (approximately 24 hours) between when the transaction is posted to the bank and when it is posted to Works Date Purchased – The date on which the goods or services were purchased Primary Accountholder – The name of the person responsible for processing transactions that were purchased using the cards listed under your Accounts Dashboard on the Home page Purchase Amount – Amount of the goods or services purchased Vendor – The merchant from which the goods or services were purchased Allocation – The GL account that will be charged for the transaction. Works automatically assigns the school/department organization number, but the remaining GL account must be assigned. Amount Allocated - The amount allocated to the GL account. The purchase amount may be split between more than one GL accounts. Uploaded Receipt – Field indicating whether or not a receipt has been attached to the transaction. It will either be Yes or No. To begin processing the transactions, click on the transaction number (TXN########) and choose View Full Details. A transaction can be processed completely using the View Full Details screen. Here you can navigate using tabs to allocate, attach a receipt and then use the Action link to sign off the transaction. Allocating Transactions to a GL Account 1. Begin by clicking on the Allocation & Detail Tab. 2. On the Allocation & Detail screen,. enter the GL account to be charged for the purchase. The ORG automatically defaults to your school/department organization number. The screen shot below shows a transaction charged on a county budget card. The GL account consists of a fund (FND), function (FNCT), object (OBJ), organization (ORG), unit (UNIT) and project (PROJ). There is a possibility that Works will allow you to enter an invalid GL account, however, it will not allow you to sign off on the transaction. 21 | P a g e During the sign off process, you will receive an error message that “one or more GL combinations are invalid”. The screen shot below shows a transaction charged on an internal accounts card. The GL account consists of an organization (ORG), Account (ACCT), Sub Account (SUB), and Event Code (EVENT). There is a possibility that Works will allow you to enter an invalid GL account, however, it will not allow you to sign off on the transaction. During the sign off process, you will receive an error message that “one or more GL combinations are invalid”. If you would like to see the detail of the transaction, click on the + icon and it will expand to show the detail 22 | P a g e 3. Click on the Save button at the bottom right corner of the screen. Attaching a Receipt 1. Before attaching a receipt, the receipt must be scanned. The image must be less than 1 (one) MB to upload. See also the section on “Storing Receipt Images for Processing Later”. Click on the Receipts tab. 2. On the Receipts tab, click on the Add button at the bottom left of the screen and choose New Receipt. 23 | P a g e 3. On the Add Receipt screen, click on the Browse button to find the scanned file. 4. Choose the appropriate file. The Receipt Date and Description fields are optional. Click on the OK button. 5. The document will now show on the Receipts tab with an upload date, file name, and file size. 6. Click on the Save button at the bottom right corner of the screen. 24 | P a g e Signing Off on a Transaction 1. The final step in processing a transaction is to “sign off” on it. NOTE: Once a transaction has been “signed off” no changes can be made to it without Finance “Flagging” the transaction. To sign off, click on the Actions link on right side of the blue bar midway on the screen and choose Sign Off. 2. Comments are optional, however, this is a good place to enter a comment you would like to send Finance regarding the transaction. For example, it the vendor erroneously charged sales tax and is issuing a credit, you may want to alert Finance to this by entering a brief comment here. Click on OK. 3. A message should appear at the top of the screen saying that “Signed off 1 transaction” as show below. 4. If a “Failed to sign off 1 transaction” message appears, click on the View Details link to see why. 25 | P a g e 5. Once a transaction has been allocated to a GL account, a receipt attached, and signed off, it is automatically moved to the Signed Off tab and is ready for Finance’s approval. The Transaction – Accountholder screen shows the summary information at a glance for all Signed off transactions, including the account allocated and if the receipt is uploaded. 6. Transactions that are Flagged by Finance appear in the Flagged tab. These are transactions that have been marked by Finance requiring further attention by you. . Emails will not be sent when a transaction is flagged by Finance. Therefore, it is important to check in your dashboard to see if you have any transactions that have been flagged. You will need to go into the transaction and read the comment made by the approver. Once the transaction has been corrected, you will need to save and sign off again. 7. Transactions that have been approved by Finance will remain in the Signed Off tab, but will have an ACT in the Sign Off line, meaning that it has been signed off (approved) by the Accountant (Finance). Dividing a Transaction Dividing a transaction must be done before you sign off on the transaction. If you have already signed off on a transaction that needs to be divided, the Finance Department must perform the task. 1. Select the desired transaction (see section on “Reviewing Transactions”) and choose View Full Details. On the Allocation & Detail tab, click on the Add button at the bottom of the screen. Choose the number of lines desired. 26 | P a g e 2. You can divide a transaction either by amount or percentage by using the drop down box in the Value column. 3. Enter the amount or percentage to be distributed on each line as well as the GL accounts to be charged. The Description must be manually entered in the added lines. Click the Save button when finished. 27 | P a g e Duplicating a Transaction Line Another way to divide a transaction is by duplicating the transaction line. 1. Select the desired transaction (see section on “Reviewing Transactions”) and choose View Full Details. On the Allocation & Detail tab, select the check box next to the row to duplicate, click on the Duplicate button, and choose the desired number of lines. 2. The first line will be completely duplicated, including the description. Choose how you want the transactions divided (either by amount or percentage) by using the drop down box in the Value column. Enter the amount or percentage to be distributed on each line as well as the GL accounts to be charged. Click the Save button when finished. 28 | P a g e Mass Allocating Transactions If you have several transactions that are to be allocated to the same GL account, you can Mass Allocate by doing the following. 1. Select the check box next to the desired transactions (see section on “Reviewing Transactions”). Click on the Mass Allocate button and begin entering the GL account that the selected transactions are to be charged to. 2. Empty Segment Field(S) options: Retain original codes: Selecting this option maintains the current value if a GL segment (a fnd, fnct, obj, org, unt or proj for county or org, acct, sub or event for internal accounts) is left empty. Delete original codes: Selecting this option replaces the current value with a blank field if the GL segment (a fnd, fnct, obj, org, unt or proj for county or org, acct, sub or event for internal accounts) is left empty when allocating. 3. Click OK. A confirmation message displays. Disputing a Transaction You should first make good faith efforts to settle a claim or dispute for purchases directly with the vendor. A transaction can be disputed with Bank of America Merrill Lynch within 60 days from the post date. NOTE: Disputing a transaction online does not relieve you of the responsibility to pay the charge. It merely alerts the bank of the dispute. To initiate a dispute online in Works do the following: 1. Click the desired transaction (see section on “Reviewing Transactions”) and choose Dispute from the drop down menu that appears. 29 | P a g e 2. The Dispute Transaction form appears. Edit the phone, and dispute amount fields if needed. Select an option from the Reason for Dispute drop down menu. Enter comments in the Comments text, but not required. Select the check box to confirm the dispute statement. 30 | P a g e 3. Click OK. A confirmation message appears. 4. Any further communication about the disputed transaction (including revoking the dispute) must be handled by Gary Hopkins in Purchasing. Other Useful Functions Storing Receipt Images for Processing Later You may upload and store receipt images in the Receipts storage queue for processing later. Removing a receipt image from the Receipts view removes the image from storage, but does not remove it from any document to which it is attached. Receipt image uploads must be performed one at a time. Each upload must be less than one (1) MB in file size. You are responsible for maintaining original receipts at your worksite. To store a receipt image, do the following: 1. From Home, click on the Expenses tab and choose Receipts. 2. The Receipts screen appears. Click on the Add button. When the Add Receipt screen appears, click on the Browse button. Select the desired receipt image filename. Receipt Date and Description fields are optional. Click OK. 31 | P a g e 3. A confirmation message displays. Viewing Stored Receipt Images You may view your stored receipt images in the Receipts storage queue and select to view stored receipt images in a PDF version to utilize PDF formatting features. To view a stored receipt image, do the following: 1. From Home, click on the Expenses tab and choose Receipts. 32 | P a g e 2. The Receipts screen appears with a list of unattached receipt images. To view all receipt images, clear the check mark from Show unattached receipts only. Click the desired File Name and the receipt image appears to the right of the screen. 3. To view the receipt image in the PDF version, click View PDF, then Open. The receipt image displays. Removing Stored Receipt Images Removing a receipt image from the Receipts view removes the image from storage, but does not remove it from any document to which it is attached. To remove a receipt image do the following: 1. From Home, click on the Expenses tab and choose Receipts. 33 | P a g e 2. The Receipts screen appears with a list of unattached receipt images. To view all receipt images, clear the check mark from Show unattached receipts only. Select the check box next to each receipt image to be removed. Click on the Remove button. 3. A confirmation warning message appears. Click OK. 34 | P a g e 4. A final confirmation message appears. Attaching Stored Receipt Images to Transactions Receipt images that were stored for processing later can be attached to transaction by doing the following: 1. Either go to the Receipts tab using the View Full Details option as discussed in “Attaching a Receipt to a Transaction” OR choose Manage Receipts directly from the drop down menu. 35 | P a g e 2. Click on the Add button and choose Stored Receipt. 3. On the Select Receipts screen, select the check box next to each receipt image to be attached. Click on the Attach button. 4. A confirmation screen will appear. Click on Close. 5. The Uploaded Receipt column will now have a Yes in it for that transaction. 36 | P a g e Reports Monthly Statements A billing statement report will be scheduled to run two business days after the billing cycle. When you login to WORKS, you will see a report to be run and printed in your “Action Items”. This is to be reviewed and signed by the principal/department head and kept on site. All original documents (eg. receipts and monthly billing statements) remain at the school/department and must be made available at time of audit. After the audit is completed, refer to the General Records Schedule, which can be found on the District’s Archives and Records website, for record retention. Creating Expense Reports (Grouping Transactions) Expense Reports are containers that allow you to group transactions to efficiently organize your documents and perform a single task on all documents in the report at one time. You can view and print the expense categories of the documents, the sum and the dates of documents in the expense report. For example, if several employees from your school/department attended a conference, you might add all transactions related to that trip into an expense report. You can include a transaction in only one expense report. Therefore, if you add a transaction that is already contained in an expense report, the transaction will be moved to the new report. To create an expense report, do the following: 1. You may add transactions to a new or existing expense report from the Pending Sign Off, Signed Off, or Flagged queues (tabs). Select the check box for each desired transaction, click on the Add to Expense Report button, choose either New Expense Report or Existing Expense Report. 2. Enter an Expense Report Name to be applied to the expense report and a Description (optional). Only click on the Sign off on report and all expense report documents if all the transactions for the expense report have been added. Click on OK. 37 | P a g e 3. A confirmation message appears. 4. The transaction can be accessed either through the Expense Report or the regular Transactions. Accessing Expense Report Information The user who created the expense report can access the report and view the transactions contained in it regardless of the transaction status (Pending Sign Off, Signed Off). To view the contents of an expense report, do the following: 1. From Home, click on the Expenses tab and choose Expense Reports 38 | P a g e 2. Click on the desired expense report’s name and choose View Full Details from the drop down menu that appears. 3. The Expense Report Details screen appears with all the transactions associated with the report. To print this report, click on the Actions link on right side of the blue bar midway on the screen and choose Print. A report containing the detailed information on the screen, as well as totals will print. Viewing Transactions in SmartStream Transactions Purchased with County Budget Transactions are loaded into SmartStream daily as invoices. 1. The vendor is BANKOFAMER and the vendor location is 001 2. The invoice number consists of the combination of transaction posted date (YYYYMMDD), the school/department number, followed by the last four digits of the card number 3. The invoice date is the date the invoice was created 4. In the detail section of the invoice (line with the account coding) if you scroll to the right, you will see the vendor name in the Description field. 5. To view more details on the transaction, right mouse click and choose “Line Custom Fields” as shown below: 39 | P a g e 6. The transaction number that is assigned by WORKS resides in Custom Field 1. 7. The first line printed on the purchasing card resides in Custom Field 2. 8. The last four digits of the purchasing card reside in Custom Field 6. 9. Basically, the information loaded in the invoice should give you enough detail to determine what the transaction was for (posted date, org #, last 4 digits of card number, vendor name and transaction number). However, if more detail is needed, the transaction can be easily viewed in WORKS by referring to the transaction number supplied in Custom Field 1. 40 | P a g e Transactions Purchased with Internal Accounts Transactions are loaded into SmartStream daily as invoices. 1. All internal account purchases default to the following account: 110-7300-511-ORG-101-0009. 2. The vendor is BANKOFAMER and the vendor location is 003 3. The invoice number consists of the combination of transaction posted date (YYYYMMDD), the school/department number, followed by the last four digits of the card number 4. The invoice date is the date the invoice was created 5. In the detail section of the invoice (line with the account coding) if you scroll to the right, you will see the vendor name in the Description field. 6. To view more details on the transaction, right mouse click and choose “Line Custom Fields” as shown below: 7. The transaction number that is assigned by WORKS resides in Custom Field 1. 8. The first line printed on the purchasing card resides in Custom Field 2. 9. The event code assigned to the transaction is in Custom Field 3. 10. The primary account (fund account) assigned to the transaction is in Custom Field 4. 11. The sub account (account extension) resides in Custom Field 5. 12. The last four digits of the purchasing card reside in Custom Field 6. 41 | P a g e 13. Basically, the information loaded in the invoice should give you enough detail to determine what the transaction was for (posted date, org #, last 4 digits of card number, vendor name and transaction number). However, if more detail is needed, the transaction can be easily viewed in WORKS by referring to the transaction number supplied in Custom Field 1. 42 | P a g e