1
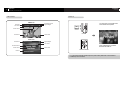
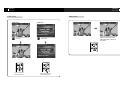
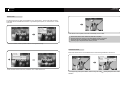
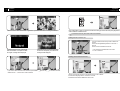
User's Manual
T-DMB Receiver
Thanks for purchase of Perstel DMB Receiver.
Please read User’s Manual before use.
01
Before use
Before use
Safety precautions
Safety precautions
Power On!
Manual
Front
glass
Do not turn on the product
before turning on the engine.
Install the antenna at the
center of loop for best
reception.
Do proper connection of
cables, or it may cause
damage to the product.
The product is designed to
best work at 5 ~ 25C.
Please maintain the temperature for best use in deep
summer and winter.
Please clear the product
with dry clothes. Do not
apply chemical or detergent.
Do not dismantle the product without proper knowledge, or warranty will be
void.
dashboard
Please hold the product firmly with mounting bracket,
and have lower part of
mounting bracket placed on
dashboard.
Please do not use the product while engine is not working, or vehicle battery may
be discharged.
For safety, please have
speed detector cable
engaged with tachometer
at all times.
Please do not too much
raise volume level, or it
may take your attention
away while driving.
dashboard Please do not
operate the product while
driving, or it may cause
serious accident.
Please keep the remote
controller handy.
PUSH
Stop the engine for installation.
Please do not block eyesight
and/or airbag with the product.
The product is packaged with
12V cigar lighter charger.
Please prepare 24V cigar
lighter charger to use in buses
and/or trucks.
02
03
Before use
Before use
Intellectual Property Rights
Package contents
Intellectual Property Rights
PERSTEL holds intellectual property rights for those material used in this user's manual.
Any content or image is not allowed for copying, transforming without prior consent by
PERSTEL.
2005 PERSTEL INC. All Rights reserved.
DMR132VLM
Remote
controller
User's manual
Speed detector
cable
Legal disclaimer
- Manufacturer, importer, or distributor is not liable for any contingent damage caused by
misuse of the product.
- Color, specification and contents are subject to change without prior notice.
12V cigar lighter
charger
Mounting bracket
Antenna set
Optional accessories
These accessories are sold separately.
Wall adapter
(indoor 12V)
Car pack audio
connector
On-dash mounter
Rod anteanna
I indoor antenna
cable & connector
24V cigar lighter
charger
Headrest
mounter
04
05
Before use
Before use
Intellectual Property Rights
Product installation
1. Product installation
For safety reasons, it is highly recommended to consult installation work with local
installation shops or dealers. Installation work may be different by car type.
For safety reasons, please have speed detector cable engaged with tachometer at all
times.
Far safety reasons, please turn off the engine for the entire installation procedure.
Insert connection
joint ( ) in the set
bracket rail.
(Mounting bracket)
Secure proper space on
front glass. Place suction
cup on the glass and
push the suction lever
over the suction cup.
Bend zebra rod to
secure best visual
angle.
Place DMR132 on set bracket. Insert screw in the
screw hole at bottom of DMR132, and screw it tight.
For installation in deep winter, the suction cup
may become too hard to use. Place it under hot
air blow to make it soft before installation.
Front
glass
(Set bracket)
Tighten screw ( ) till
two brackets are
firmly fixed. And
tighten
locking
screw ( ).
DMR132 may too much shake while driving if it
hangs high in the air. Adjust height of suction
cup, and bend zebra rod to have lower part supported with vehicle dash board.
dashboard
06
07
Before use
Before use
Intellectual Property Rights
Intellectual Property Rights
2. Antenna mounting
08
4. Speed detector connection
Speed detector is a mandatory device to secure drivers’ safety while driving. Speed
detector detects vehicle speed and automatically shut off display screen when vehicle
is moving (audio remains alive). Connection may vary depending on vehicle type, so
please consult with mechanic for speed detector connection.
Insert antenna in magnet base
and screw it tight.
Screw in antenna cable with
antenna connector.
For best reception, place antenna on the loop using magnet base.
For best performance, fasten antenna connector tight.
It is recommended to wrap cables with waterproof tapes.
Organize excessive cables with cable holders.
3. Power connection
1
2
3
DD
4
5
6
FF
RPT
PUSH
Plug in power cable to the DC IN port, and plug in cigar lighter charger to the socket.
Please consult with mechanic when connecting power directly from vehicle.
Please be sure to clean dusty from cigar lighter charger socket.
Plug in one end of speed detector cable to SPEED DET port. And, connect another end of speed
detector cable to vehicle’s speed pulse signal line. Display screen will be shut off when vehicle is
moving.
Please consult with local mechanic since vehicles’ pulse signal position varies by vehicle type.
In case speed detector is not properly connected as stated, display screen remains active while
driving, and it may cause serious incidents.
Any incident caused by absence of speed detector will be responsibility of users or drivers.
Manufacturer will not be responsible for the consequences at any degree.
09
Before use
Before use
Intellectual Property Rights
Intellectual Property Rights
Installation of optional items
4. On-dash mounting bracket
1. Rod antenna
On-dash mounting bracket works more stable than on-glass mounting bracket.
It is matter of choice and matter of convenience.
Screw in the rod antenna to
antenna port firmly.
2. Indoor wall adapter
Turn on the unit, and simulate antenna
position till best reception is obtained.
Insert connection joint
in the set bracket rail,
and screw it tight.
Unscrew rear screw to
adjust angle. Fasten the
rear screw when the
adjust is done.
3. Support bar
Before placing the whole set of unit,
please clean up mounting floor. Peel
off protection vinyl from adhesive
tape when ready.
When using the product at home,
please replace cigar lighter charger with
indoor wall adapter like above diagram.
Place the DMR132 on
the set bracket and fasten locking screw.
When using on table, unfold the support bar from the rear, and stretch it to
convenient angle.
Place the whole set on the floor (on
dash board or else), and make sure
adhesive tape hold the set firmly.
10
11
Before use
Before use
Controls diagram
Intellectual Property Rights
5. Indoor antenna cable & adapter
Controls diagram
Depending on country and broadcast system, indoor antenna cable & adapter set
enables users to watch DMB using TV antenna.
Power LED (Red)
Tune LED (Green)
Top
Remote control I/F
Navigation
Favorite memories
MENU
Display
LCD
Plug in antenna adapter to one end of
antenna cable.
Plug in and screw the antenna
adapter to DMR132 ANT port.
Another end of antenna cable is
for wall TV antenna socket. Plug it
gently to the socket like connecting cable TV antenna.
Antenna port
Rear
Side
Indoor antenna & adapter is designed for those who use normal TV antenna
system. Please check TV system before purchase of this accessory.
USB
port
Speaker
Power
switch
Audio out
Speed detector port
DC
In
screw
mounting
hole
Support bar
USB port is only for upgrading system software in the future. Please consult
with local dealer or manufacturer for upgrade.
12
13
Operation
Operation
Functionality of remote controller
Functionality of remote controller
Functionality of remote controller
Battery replacement (Remote controller)
Menu
Open the battery compartment by
List
using tiny pin, and replace battery
following polarity indication. Slide
Navigation
Favorite
Enter/ Mute
battery compartment back to original position.
Display
Power
Turn on and off of DMR132
Navigation
Up/Down - For volume control, or scroll up and down the menu in menu
mode.
Left/Right - For service change while receiving signal, or entering or
escaping menu in menu mode.
OK/ Mute
Menu mode- For confirming Selection.
Long key when receiving - Current service will be saved in preset list.
(Press it for more than 3 seconds.)
Short key when receiving -Audio will be muted.
Favorites
Press to instantly access to saved favorite memories.
While receiving services, press it (1 ~ 5) and hold to store or overwrite
favorite memory.
Menu
Enter the menu or escape the menu.
List
Shows preset list or hides the list.
Display
Shows information of current service.
14
15
Operation
Operation
Power on
Functionality of remote controller
Power on
LCD indicator
DMB mode
Ensemble
Tune mode
Information window
Turn the power on using slide switch
on the left side of the product.
Signal strength
Service name
Volume level
Current time
Left side
DAB mode
Current time
Signal strength
Tune mode
Press POWER button to activate/
deactivate the DMR132.
Ensemble name
Service name
Volume level
Remote controller
DLS info
To use remote controller, please keep main power switch (slide switch on the left side of
DMR132) “ON” at all times.
16
17
Operation
Operation
Volume control
Mute/ Unmute
Mute/ Unmute
Volume control
DMB mode
Press up button to raise volume level.
Press up button to
raise volume level.
DAB mode
Press down button to lower
volume level.
Press down button to
lower volume level.
Press Mute button shortly to mute
audio.To unmute audio, press
mute button again, or adjust volume button.
18
19
Operation
Operation
Preset tune mode
Service scan
Service scan
For the first time use, it is highly recommended to run a "Service Scan". Service scan finds and saves
entire DMB services available at the location. To get better signal reception, run "Service Scan" at wide
open area.
Preset list
Tune Mode
Search
Setting
Search
Yes
When service scan completes, tune mode automatically turns to Preset.
Service scan takes a while. Please be patient till it completes.
Services found from service scan are automatically stored in service list.
Service list will not be generated when no DMB service is available.
Press any key to stop service scan while in process.
Press menu button, and use up/down button to move to [Service scan].
Preset tune mode
Preset mode enables users to tune to DMB services out of service list generated from service scan.
Preset list
Tune Mode
Search
Search
Setting
Yes
No
Search
Yes
Preset list
Tune
Tune Mode
Mode
Search
Setting
Manual Mode
Preset
Preset Mode
Mode
Press OK button to enter sub-menu, and select "Yes" to start service scan.
To change tuning mode, press MENU, and move to [Tune mode]
selection.
[Preset] and press OK to confirm
20
21
Operation
Operation
Service scan
Preset tune mode
DMR132 tunes to other services if left or right button is pressed while a service is being broadcasted.
Press [LIST] button to bring up service list. Scroll the list using up/ down button and press [OK] button to
confirm selection of desired service.
This function works only when tune mode is set at Preset.
Adding service to service list
Tune to a certain service that you wish to add to service list.
Press and hold [OK/MUTE] button for more than 1
second.
Current service is added to service list.
If selected service is at very weak signal
area and therefore no reception is made,
"No signal" message will be displayed.
If selected service is at strong signal area
but service is temporarily out, "No service"
message will be displayed.
If you wish to select a service from service list, press MENU
desired service
Press OK to confirm selection
Add To Preset!
This function is available when tune mode
is set to Manual.
Deleting service from service list
Preset list
Tune Mode
Search
Setting
[Service List]
22
up and down to select
1. Bring up service list and move to the service that you wish to delete.
2. Press and hold [OK] button for more than 1 second.
3. Selected service will be deleted from service list.
23
Operation
Operation
Display
Manual tune mode
24
Display
Manual tune mode
When a certain ensemble frequency is known, it would be convenient to move to that ensemble and tune
to its services at Manual tune mode. To direct to that ensemble, please firstly change tune mode to
[Manual].
Ensemble chart appears when
right button is pressed. Scroll
up and down by up/ down button and press [OK] button to
confirm selection.
When DAB/ DMB signal
exists, tune LED stays green
and service window is active.
Scroll up/down to a desired
service and press [OK] button
to tune to it.
Service window closes when
service is tuned.
To move to other service,
press right button, then service window will be active.
Scroll up/down to a desired
service and press [OK] button
to select new service.
DISP (Display) button enables to show service information – ensemble, service name, signal strength,
current time and volume level.
When service list is displayed,
press left button to return to
ensemble list.
Night
Daylight
DISP also enables to switch brightness between “Daylight” and “Night” when service information is
active.
DISP shuts off screen when pressed and held for more than 1 second. To bring the screen back,
press and hold DISP button again. Audio remains whether of not the screen shuts off.
25
Operation
Operation
MENU TREE
Favorite services
Favorite services
MENU TREE
Favorite services can be stored at and restored from (1) (2) (3) (4) (5) for instant access.
MENU
Preset list
Tune Mode
Manual
Preset
Favorite 1 saved
Search
Yes
No
To store current service to favorite service memory, press and hold favorite number until “Favorite (1)
saved” message is displayed.
To restore favorite service, press favorite number.
Menu
1. Press [MENU] button to enter menu.
2. Scroll the menu using up/down buttons and press [OK] button to enter sub-menu.
3. For sub-menu to set values, use up/down to set value and press [OK] button to finish setting.
4. To exit menu by step by step, press [MENU] at any time in menu mode.
Setting
Audio Out
Speaker
FM...Mhz
Main-menu
Brightness
0~100
Contrast
0~100
Country
Korean
EU
OSD Language
Korean
English
System Reset
Yes
No
Sub-menu
Values
26
27
Operation
Operation
Car pack audio connector
Audio output with FM transmitter
Audio output with FM transmitter
Car pack audio connector
DMR132 is designed to transmit audio output to vehicle audio system using FM transmitter. One of the
following FM frequencies carries DMB audio to vehicle audio system. Be sure to keep the FM radio on,
and choose unoccupied frequency.
Preset list
Tune Mode
Search
Setting
Car pack audio connector delivers better quality of audio to vehicle audio system. Make sure that your
vehicle has built-in cassette tape deck before purchase this accessory.
Audio Out
Brightness
Contrast
Country
OSD Language
System Reset
Speaker
To use FM transmitter, press [MENU]
[Setting]
[Audio output]
and press [OK].
- Press [MENU]
[Setting]
[Language]
select language, and press [OK] to set the change.
Insert 3.5mm audio jack to Audio OUT port positioned rear of the product.
Setting
Brightness
CD IN
Audio Out
Setting
+
TUNE
Audio
AudioOut
Out
Speaker
Audio Out
Speaker
DISC
-
Setting
BSM
CDCHG
Audio Out
EQ
Speaker
Audio Out
VOL
Speaker
1
2
DD
3
4
5
6
FF
RPT
Setting
Scroll down to [FM], and simulate FM frequencies using left/ right button.
When the frequency is set, press [OK] to
confirm setting.
To switch back audioContrast
output to built-in
stereo speaker, choose [Speaker] and
press [OK] to confirm change.
Insert car pack in the cassette tape deck.
Turn on the vehicle audio system, and adjust
volume
level like using cassette tape.
Setting
Setting
Brightness
Brightness
Factory default setting is “Speaker” as audio output.
Depending on terrain, FM transmitter may carry large amount of noise. Please try other frequency.
Brightness
Setting
Country
Korea
Setting
Setting
Contrast
28
Contrast
Contrast
Audio output has to be set “Speaker”.
Setting
Brightness Setting
Brightness
29
Operation
Operation
Country setting
Brightness & Contrast control
Setting
Setting
Audio Out
Setting
Speaker
Brightness & Contrast control
Setting
Country setting
Audio Out
[Setting]
[Brightness],
Press [MENU]
Setting
and pressSetting
[OK] to enter value setting menu.
Brightness
Setting
Contrast
Setting
Audio Out
Preset list
Tune Mode
Search
Setting
Speaker
Speaker
Brightness
Contrast
DAB/DMB frequency is not all the same per country. When country setting changes, frequency band and
reception area changes accordingly. Check region before running “Service scan”.
Audio Out
Setting
Audio Out
Brightness
Contrast
Country
Setting
OSD Language
System Reset
Contrast
Speaker
If you wish to adjust entire brightness of the screen, please do followings.
Preset list
Setting
Tune
Mode
Search
Setting
Brightness
Press left/ right button to adjust brightness.
Brightness can be set any value between 0
to 100. Press [OK] when value setting is
done.
Brightness
Audio Out
Brightness Setting
Contrast
Country
OSD Language
System Reset
To change country setting, press [MENU]
Country
Korea
Korea
Country
EU
[Setting]
[Country]
select country, and press [OK].
Setting
Setting
Korea
Contrast
Korea
OSD Language
OSD Language
Preset list
Tune Mode
Search
Setting
Setting
Audio Out
Brightness
Setting
Contrast
Country
OSD Language
System Reset
Setting
Country
Contrast
Korea
Contrast
Setting
Setting
Korea
Country
Yes
Yes
[Contrast],
Press [MENU]
[Setting]
and press [OK] to enter value setting menu.
Press left/ right button to adjust contrast
level. Contrast can be set any value
between 0 to 100. Press [OK] when value
setting is done.
Setting
Setting
30
Setting
Korea
Country
Setting
Korea
Country
Korea
OSD Language
Korea
OSD Language
System Reset
System Reset
Contrast
Setting
31
Setting
Operation
Language setting
Product specifications
Contrast
Setting
Language setting
Contrast
Setting
Korea
Country
Country
Korea
Product specifications
Do the followings to set message and menu language.
Setting
Preset list
Tune Mode
Search
Setting
Press [MENU]
change. Setting
Country Setting
Audio Out
Brightness
Contrast
Country
OSD Language
System Reset
[Setting]
[Language]
Korea
Country
DMR132VM ( L- Band Option )
Korea
Frequency
BAND-III : 174MHz ~ 240MHz
OSD Language
Korea
OSD Language
Korea
Technical standards
English
Sensitivity
Better than -96dBm @ BER = 1 x 10⁻⁴
Video decoding
MPEG-4 / H.264
Audio decoding
MUSICAM & MPEG4/BSAC
Video output
5" TFT LCD ( CCFL Back Light )
select language, and press [OK] to set the
Setting
Korea
OSD Language
Setting
Korea
OSD Language
Setting
System reset
Yes
Yes
“System reset” clears the entire user settings, and brings back factory default setting.
System Reset
Preset list
Tune Mode
Search
Setting
Model
Setting
Setting
Audio Out
Brightness
Contrast
Country
OSD Language
System Reset
For system reset, press [MENU]
[Setting]
System Reset
Audio output
System Reset
Yes
Yes
Interface
No
System Reset
[System reset]
System reset takes a while. Please wait till it completes.
[Yes], and press [OK].
Power source
12VDC (Adapter or cigar lighter charger)
Dimension (WHD)
175 x 110 x 29 (mm)
Weight
430 (g)
32