1
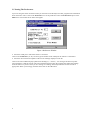
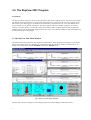
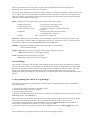
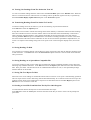
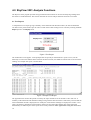
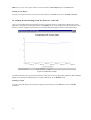
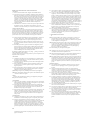
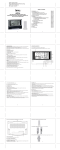
GPSE SkyLog 3001 Weather Station
User Manual
Version 1.0 August 1997
Skylog 3001 Weather Station, Version 1.1
GPSE
Because It Should Be Fun
AR Harris GPSE Ltd, 136 Worcester Street, PO Box 13047, Christchurch, Ph: 0064 3 379 3642, Fax: 0064 3 366 7799,
email: [email protected]
Contents
1.0 GETTING STARTED ............................................................................................................................... 3
1.0 Introduction ......................................................................................................................................... 3
1.1 Packing List ......................................................................................................................................... 3
2.0 INSTALLING THE SKYLOG 3001 STATION....................................................................................... 4
2.0 General................................................................................................................................................. 4
2.1 Station Features ................................................................................................................................... 4
2.2 Setting Up The Station ......................................................................................................................... 5
2.3 Installing The SkyView 3001 Program On Your PC ............................................................................ 5
2.4 Running The SkyView 3001 Program .................................................................................................. 5
2.5 Setting The Preferences ....................................................................................................................... 6
3.0 THE SKYVIEW 3001 PROGRAM........................................................................................................... 7
3.0 General................................................................................................................................................. 7
3.1 The SkyView 3001 Main Window......................................................................................................... 7
3.2 Programming The Station To Log Readings........................................................................................ 8
3.3 Viewing Live Readings From The Station On Your PC ....................................................................... 9
3.4 Transferring Readings From The Station To Your PC ........................................................................ 9
3.5 Saving Readings To Disk ..................................................................................................................... 9
3.6 Saving Readings As A Spreadsheet Compatible File............................................................................ 9
3.7 Saving The Text Report To Disk .......................................................................................................... 9
3.8 Loading A Saved File From Disk Into The SkyView 3001 Program.................................................... 9
4.0 SKYVIEW 3001 ANALYSIS FUNCTIONS ........................................................................................... 10
4.1 Text Reports ....................................................................................................................................... 10
4.2 Graphing Weather Readings From The Station Or A Data File ........................................................ 11
5.0 STATION SPECIFICATIONS................................................................................................................ 12
5.1 Sensors:............................................................................................................................................. 12
5.2 System Requirements ........................................................................................................................ 12
6. USING THE MODEM .............................................................................................................................. 13
General .................................................................................................................................................... 13
Attaching a Modem To The Station ......................................................................................................... 13
How To Call The Station ......................................................................................................................... 14
Microsoft is a US registered trademark of Microsoft Corporation.
Excel is a trademark of Microsoft Corporation.
Note
The information in this document is subject to change without notice.
GPSE shall not be liable for errors contained herein or for incidental or consequential damages in connection
with the furnishing, performance, or use of this material.
No part of this document may be photocopied, reproduced, or translated to another language without the prior
written consent of AR Harris GPSE Ltd.
2
1.0 Getting Started
1.0 Introduction
Thank you for purchasing a SkyLog 3001 weather station.
The SkyLog 3001 is a personal computer ( PC ) based weather station that simultaneously records, and
automatically stores in memory, readings of air, soil, grass temperatures, relative humidity, solar radiation, wind
speed, wind direction, barometric pressure, leaf wetness sensor and rain fall. The SkyLog 3001 can be left
permanently connected to a PC displaying real time weather conditions, using the SkyView 3001 Windows™
software, or it can be left in the field recording weather conditions, independently of a PC. The data from the
station can also be down loaded through a modem or a radio link.
1.1 Packing List
• GPSE SkyLog 3001 Weather Station
• GPSE SkyView 3001 Software Installation Disk
• User's Guide
3
1
1
1
2.0 Installing The SkyLog 3001 Station
2.0 General
The following sections will explain the installation and operation of the SkyLog 3001 station.
2.1 Station Features
The main features of the station are illustrated below.
2
3
4
5
1
6
7
8
9
10
Figure 1 Station Features
Features :
1. Anemometer
2. Leaf Wetness sensor
3. Radiation sensor
4. Cross beam
5. Wind vane
6. Relative Humidity & Temperature sensors in Radiation shield
7. Guy rope
8. Solar Panel
9. Station computer box attached to the mast
10. Ground Temperature probe
4
Please note not all of the sensors shown above may installed on your station.
2.2 Setting Up The Station
Where To Locate The Station
For best results the station should be located in an area with good air flow and few obstructions which could
shade the solar radiation sensor or interfere with the anemometer and wind vane. Be careful not to locate the
station above objects such as dark roofs which get warm during the day, heat from these objects could cause
errors in the readings from the temperature and relative humidity sensors.
Mounting The Station On a Mast
The correct method for mounting the station on a mast is shown in Figure 1.0.
If you are not using GPSE’s mast ensure that the cross beam U-clamp bolts are tight enough to prevent the
station from turning around the mast in high winds. The anemometer and wind vane should ideally be mounted
in such a way that optimum air flow past the sensors.
Orienting The Wind Vane With North
To align the wind vane with North rotate the vane so that it is in line with the beam on which the anemometer
and wind vane are mounted. Then orient the beam so the anemometer and wind vane end faces North, as shown
below.
North
The following describes the procedure for setting up the station for the first time.
1. Erect the station on an appropriate mast as described above.
2. Orient the wind vane and anemometer toward North as described above.
3. Now connect the serial cable from the station to a spare RS232 serial port on
the PC. Make a note of the port number as you will need this later.
4. The station is designed to operate from a +12V dc power source. There are two
wires coming from the serial connector to the PC. The red wire is the positive
terminal and the black one is ground.
2.3 Installing The SkyView 3001 Program On Your PC
1. When in Windows 3.1, 95 or 98 close all open applications.
2. Insert the SkyView 3001 program disk into a floppy disk drive.
3. In Windows 3.1 select the Run option in the File menu and type A:\Setup at the
prompt, press Enter. Or in Windows 95 : Select the Run option in the Start button
and type A:\Setup. If you are installing from B drive then type B:\Setup.
4. Follow the instructions on the screen.
2.4 Running The SkyView 3001 Program
In Windows run the SkyView 3001 program by clicking on the Weather icon.
5
2.5 Setting The Preferences
If you are using the station for the first time you will need to tell the SkyView 3001 program some information
about the station. This is done in the Preferences. To set the preferences select the Preferences option in the
Edit menu. The window shown below will appear.
Figure 2 Preferences Window
• Select the COM port to which the station is connected.
Click on the Comm Port ( 1 - 4 ) box and type the number of the COM port the station is connected to.
• Select the interval between updates of the current readings displayed on the PC.
Click on the Current Data Display Update Interval Range ( 2 - 60 secs ) : box and type the desired up date
interval between 2 and 60 seconds. This interval determines how often the program will update the readings
from the station on your PC when you are viewing live readings. Generally and interval of 30 seconds is
appropriate. When you are happy with the values click on the OK button.
6
3.0 The SkyView 3001 Program
3.0 General
The SkyView 3001 program is used to control the station and process readings from it. It is also used to transfer
the readings stored in the station to a PC and then allow them to be stored on the PC for later use. Because the
station has its own data logger it can either be left continuously connected to the PC via a spare RS232 serial
port on the PC or it can operate stand alone. The station gathers and stores weather readings in its internal
memory, even when the PC is turned off or being used for other tasks. Using the SkyView 3001 program live
weather readings can be graphically displayed on the PC screen in real time or readings stored in the station can
be transferred to the PC for analysis.
3.1 The SkyView 3001 Main Window
The main window of the SkyView 3001 program is shown below. When the SkyView program is run with the
station connected to the PC live readings can be displayed, at the bottom of the window, as shown below. To
display live readings select the Current Data option in the Window menu.
Fig 3 SkyView 3001 Main Window
The area above the live readings is used to display graphs of weather readings transferred from the
7
station or loaded from disk. A text report is shown in the upper left hand window while graphs of air
temperature, wind speed and rain fall etc are also shown.
The current alarm thresholds for temperature, relative humidity, sky brightness and battery voltage as well as the
current logging interval and accumulated rain fall and barometric pressure are displayed on the right hand side
of the live readings. The bottom line of the main window displays the current status of the program and station.
These items are explained in the following :
Status : Indicates the current status of the serial link between the station and PC.
Communications OK
Communications Error
Communication In Progress
Loaded OK
No Data
- The serial link is operating correctly.
- The serial link is not operating.
- The SkyView program is communicating with
the station.
- Indicates a data file has been successfully
loaded from disk or the station.
- There is no data to be worked with.
File Name : This is the name of the data file in use. When data is transferred from the station to the PC a file
name, consisting of a random number, is automatically assigned as a temporary file name. A new name can be
assigned to the data file by using the Save Data As option in the File menu.
Readings : The number of readings transferred from the station or contained in the
data file loaded from disk.
Logging : ON Indicates the station is logging readings and storing them in memory.
OFF Indicates the station is not logging readings.
Alarm : ON Indicates the alarm has been triggered.
OFF indicates the alarm has not been triggered.
Current Readings
If the station is connected to a PC then the current readings from the sensors can be displayed at the bottom of
the screen as shown in Figure 3. The readings from the temperature probes are displayed in the second window
from the left. The gauge and first numerical value represent the air temperature probe, on socket 1, while the
temperature reading from the ground temperature probe is displayed numerically to the right of the air
temperature reading. The readings for sensors that are not connected to the station will be random and should be
ignored.
3.2 Programming The Station To Log Readings
Once the station has been set up and the SkyView 3001 software installed the station must be programmed to
start taking readings.
1. Ensure that the station serial link is connected to the PC.
2. Run the SkyView 3001 program in Windows.
3. Ensure the station is turned on.
4. Clear the old readings from the station memory. To erase the old readings from the stations memory select the
Clear Log option in the Control menu.
Note : This step is only necessary if the station has been logging and has readings stored in its memory. Before
erasing the old readings in the station be sure you have transferred them to the PC, see section 3.4.
5. Set the desired logging interval. In the Control menu select the Logging Interval option and enter the
desired delay in minutes between readings ( 1 to 255 ), then press enter.
6. Program the station to begin logging readings. In the Control menu select the Start Logging option. The
8
station will begin storing readings from the sensors at the selected logging interval.
3.3 Viewing Live Readings From The Station On Your PC
To view live weather readings from the station select the Current Data option in the Window menu. When the
station is connected to the PC and turned on live readings will be up-dated at regular intervals, as specified by
the Current Data Display Update Interval option in the Preferences option.
3.4 Transferring Readings From The Station To Your PC
To transfer readings stored in the station to your PC the following steps should be followed :
In the File menu select the Upload option.
It may take a few seconds to transfer the readings if the station memory is almost full. When all of the readings
have been transferred to the PC from the weather station a new data file will be automatically created with a
name composed of random numbers. The readings should then be saved to disk under a new file name by
selecting the Save Data As option in the File menu. The number of readings transferred is shown in the status
line at the bottom of the main window. Data files can also be saved to disk as spreadsheet compatible files, see
section 3.6. Graphs of the readings along with a text report can be viewed using the Display menu, see section
4.0.
3.5 Saving Readings To Disk
If it is desired to re-load the data file into the SkyView 3001 program at a later date the data file should be saved
to disk as follows : In the File menu select the Save Data As option and enter a new file name for the data file.
Then press Enter.
3.6 Saving Readings As A Spreadsheet Compatible File
To save the readings to disk in a file which can be loaded into popular spreadsheet packages such as Excel the
following steps should be followed : In the File menu select the Export option and enter a new file name for the
data. Then press Enter. The data file will be in comma delimited format or CSV, in the spreadsheet package
load the data file in this format.
3.7 Saving The Text Report To Disk
Each time a new set of readings is transferred from the station to the PC a text report is automatically generated.
This text report is then saved to disk along with the data automatically. If it is desired to have the text report as a
separate text file which can be loaded into word processors and editors then use the Save Report option in the
File menu to save it to disk as a text file.
3.8 Loading A Saved File From Disk Into The SkyView 3001 Program
To load a data file that has already been saved to disk follow these steps :
In the File menu select the Load option and enter the name of the file you wish to retrieve at the prompt and
press Enter.
9
4.0 SkyView 3001 Analysis Functions
The SkyView 3001 program provides many powerful functions which can be used for analysing readings from
the station or loaded from disk. This section describes the various analysis functions and how to use them.
4.1 Text Reports
A comprehensive text report giving a summary of the minimum and maximum values, the total accumulated
rain fall over the period of the report as well as a table of the actual readings can be viewed by selecting the Text
Report option in the Display menu.
Figure 4 Text Report
The window above will appear. At the prompts enter the period you would like the report to cover, use the
delete key to remove the default values and enter the desired values, the default is from the start to the end of the
readings. An example text report is shown below.
Figure 5 Example text Report
The uppermost line contains the period covered by the report 02/9/98 10:45 to 02/9/98 13:00 in this case. A
summary of the maximum and minimum readings along with the dates and times at which they occurred and the
total accumulated rain fall is displayed next. Finally the actual weather readings are displayed in a table. A text
report can display a maximum of 500 readings, if there are more than 500 readings they will be truncated
automatically. In addition parts of the report can be cut & pasted into other applications using the mouse and
10
Edit menu. To save a text report to disk as a text file select the Save Report option in the File menu.
Printing A Text Report
To print a text report select the text report window and then, in the File menu, select the Print command.
4.2 Graphing Weather Readings From The Station Or A Data File
Once a set of readings have been transferred to the PC from the station or loaded from a data file they can be
graphed by selecting the desired graph option in the Display menu. At the prompt enter the desired period over
which to view the readings and press Enter. An example temperature graph is shown in the Figure below.
Figure 6 Temperature Graph
The dates and times to the right of each graduation, along the x-axis, belong the that graduation. Many different
graphs can be displayed simultaneously by using the Tile option in the Window menu.
Printing A Graph
To print a particular graph select the desired graph window and then, in the File menu, select the Print
command.
11
5.0 Station Specifications
5.1 Sensors:
Temperature Air, Soil
Range
Accuracy
: -25C to +50C
: +/- 0.5C ( typ )
Relative Humidity
Range
Accuracy
Linearity
: 0 to 100% RH
: +/- 5% RH 0 to 60% ( Un cal ), +/- 2% RH 0 to 90% ( cal )
: +/- 0.8% ( typ )
Solar Radiation
Range
Resolution
Accuracy
: 0 to 1500 W/m2
:+/- 1 W/m2
: +/- 8%
Wind Speed
Range
Accuracy
Start Speed
Stop Speed
: 4 to 280 km/h ( 0.9 to 78 m/s )
: +/- 5% ( typ )
: 6.5 km/h ( typ )
: 4 km/h ( typ )
Wind Direction
Range
Resolution
Accuracy
: 0 to 360 deg
: +/- 5 deg
: +/- 5 deg
Leaf Wetness
Range
: 0 to 100%
Barometric Pressure
Range
Resolution
Accuracy
: 800-1100mb
: 1mb
: +/-10mb
Station Computer
Analogue inputs: 8 - Battery voltage, wind vane, leaf wetness, solar radiation, barometric pressure,
relative humidity, ground temperature and air temperature
Digital inputs : 3 - Rain gauge, anemometer, spare - serial lead
Digital outputs : 2 - Alarm/spare, spare/modem/radio
Memory
: 16384 bytes/channel. For eg., if 8 analogue inputs and 3 digital inputs are used and
sample is taken every 60 mins, the station can store 62 days of readings.
5.2 System Requirements
The computer on which the system is to be used must have the following :
• IBM Compatible.
• 386 or higher processor running Windows™ 3.1 or Windows™
• At least 2mb of RAM memory and 1 mb of free disk space.
• VGA or higher graphics system.
• A floppy disk drive.
• Mouse or other pointing device.
• A fully compatible RS232 serial port.
12
95.
6. Using The Modem
General
A modem is simply an accessory for your computer that lets your computer talk to other computers, in this case
the weather stations computer, the way a telephone allows you to speak to other people. If you are accessing the
station data from the remote location, tick the appropriate box how you would like to down load the readings via a modem or a radio link. If it is through modem, type in the phone number you are dialling and click OK.
Attaching a Modem To The Station
To attach a modem to the station do the following :
1. On your PC save any work you have been doing and close all open programs, then ensure that both the power
to the station and the PC is turned off. Also unplug both the PC and the station from the mains power.
2. With the modems power adaptor not plugged into a mains socket connect the small round plug to the modems
power adaptor socket.
3. Now plug the modem serial cable on the Interface unit into the modem serial socket on the back of the
modem.
4. Connect the flat grey telephone cable plug into a telephone (line) socket, this will be either the same socket
your telephone is plugged into or a new line, plug the other end into the telephone line socket on the back of the
modem.
Note
If you want to use the station modem on the same wall socket that your telephone is connected to you will need
to use a special socket which can accept two telephones. These are readily available in most hardware stores or
supermarkets.
5. Plug the modems power adaptor into a mains wall socket and turn the modem on using the button on the top
of the lid.
6. Reconnect the PC and the station to the wall power. The turn on the PC.
7. Finally turn on the station using the switch on the station interface unit.
When you turn on the station you will see the RD and SD red lights on the front of the modem flashing on & off
after a delay of approximately 20 seconds as the station sets up the modem. When the modem is correctly set up
the following red lights on the modem should be on : HS TR MR AA. If HS is not on then you will need to run a
terminal communications program in your windows program. In your communications program set the
following parameters.
Speed
Data bits
Stop bits
Parity
Terminal type
Flow control
: 9600 bps
:8
:1
: none
: ANSI
: none
After setting up these, in the terminal screen type atz and hit return. Computer should respond to you by saying
What? and your HS light should be on now. Close the terminal program now.
13
How To Call The Station
To call the station follow these steps :
1. In your communications package set the phone number to the number that the stations modem is connected
to.
2. When you are connected to the station you should see the words Communication OK message at the bottom of
the screen.
3. Once you are connected or “on-line “ with the station you can use the same commands in the usual manner.
With one exception : you cannot read or send mail using the modem, this must only be done on the local PC
connected to the station.
14
TERMS AND CONDITIONS OF SALES AND SERVICE
1. GENERAL
1.1 In these terms and conditions the “Supplier” means GPSE Limited.
1.2 All goods and services to be supplied by the Supplier will be supplied on
these terms and conditions only. If the Customer orders goods or services,
the Customer will be deemed to have accepted these terms and conditions.
The only circumstance where any variation to these terms and conditions
will apply is where the Supplier has expressly agreed in writing to that
variation. Any terms and conditions of customer’s order inconsistent with
these terms and conditions are expressly negatived. Any statement by the
customer that the Customer’s terms and conditions shall prevail is
expressly negatived.
1.3 Cancellation of or variations to an order will only be accepted if advised to
the Supplier in writing. The Supplier will be entitled to invoice the
Customer for all costs incurred by it as a result of cancellation or variation.
2. PRICES AND PAYMENT
2.1 Goods or Services will be invoiced at the price stated and do not include
costs of customs agents, carrier fees, freight, insurance, tariffs, duties, taxes of
any kind, imposts, assignments and other levies which are payable in addition
where those costs are incurred by the Supplier. The Supplier reserves the right
to alter the price without notice and the price may be different from the price
quoted or stated. Prices do not include GST which is payable in addition.
2.2 Unless otherwise stated or agreed in writing by the Supplier, payment is to
be made in full by the 20th of the month following the date of invoice
however the Supplier reserves the right to require payment in cash on
delivery.
2.3 The Customer may not deduct or withhold any amount (whether any way
of set-off, counterclaim, retention or otherwise) from any money owing to
the Supplier.
2.4 If the full payment for any goods is not made to the Supplier by the due
date for payment, then Customer shall be in default and Customer shall at
Supplier’s discretion (and without affecting any other right the supplier
may have), pay default interest, both before and after judgement, on any
amount outstanding at the rate including GST stated.
The charging of default interest shall in no way imply granting or extension of
credit by the Supplier to the Customer.
2.5 Except where otherwise advised any quotation is open for acceptance for 20
days from the date of quotation.
3. DELIVERY
3.1 The Supplier will endeavour to meet agreed delivery or completion dates
but will not be held liable for, nor may the Customer cancel any order for
late delivery or late completion.
3.2 All claims for errors or short delivery must be made to the Supplier within
seven days of delivery.
3.3 Delivery shall be at the Supplier’s premises and shall be deemed to have
occurred as soon as soon as the goods are ready for collection at the
Supplier’s premises.
3.4 If the Customer fails or refuses to take delivery of any goods, the Supplier
may (without limiting any other right the Supplier may have) charge the
Customer for any of the following expenses:
(a) handling charges for any unloading work carried out by the Supplier;
(b) storage, transportation, disposal of the goods or other additional expenses
incurred in relation to the goods.
4. RISK
All risk in, and responsibility for insuring, goods supplied by the Supplier
shall pass to the Customer on delivery.
5. OWNERSHIP
5.1 Title to any goods supplied by the Supplier shall not pass to the Customer
until all amounts owing by the Customer to the Supplier in respect of those
goods and all other goods have been paid.
5.2 The Customer agrees that until title passes in them to the Customer all
goods supplied are held by the Customer for and on behalf of the Supplier
as bailee and the Customer will store them in such a way that they are
identifiable as the property of the Supplier.
5.3 If the Customer wishes to resell any goods before title to them passes to the
Customer, the Customer may do so only by way of bona fide sale in the
ordinary course of business and the Customer shall hold the proceeds of
such sale on trust for the Supplier and shall account to the Supplier for
such proceeds.
6. WARRANTIES
6.1 The Supplier will endeavour to pass on to the Customer the benefit of any
manufacturer’s warranties relating to goods or component parts of goods.
6.2 Except for such guarantees as cannot be excluded by virtue of the
Consumer Guarantees Act 1993 except as expressly provided in terms and
conditions, all warranties, descriptions, representations or conditions
whether implied by the law, trade custom or otherwise, are, and all other
liability of the Supplier, whether in tort (including negligence), contract or
otherwise is expressly excluded to the fullest extent permitted by law. The
guarantees implied by the Consumer Guarantees Act 1993 are expressly
15
excluded where the Consumer is acquiring goods or services for the
purpose of a business.
6.3 Unless otherwise stated, all goods supplied by the Supplier comply, at the
date of delivery, with any New Zealand statutory safety requirements.
6.4 In any event, the total liability of the Supplier whether in tort (including
negligence), contract or otherwise for any loss, damage or injury arising
directly or indirectly from any defects in goods or services supplied by the
Supplier or any other breach of the Supplier’s obligations shall in any case
be limited at the Supplier’s option, except where statute expressly requires
otherwise, to the lesser of the purchase price of the goods complained of,
the cost of repairing or replacing the defective goods or workmanship or
the actual loss or damage suffered by the Customer. The Supplier shall not
be liable for any consequential, indirect or special damage, loss or injury of
any kind suffered by the Customer or any other person.
6.5 While the Supplier will make every effort to ensure the accuracy of any
advice, recommendation, information, assistance or service provided by the
Supplier or their use or application, the Supplier does not accept any
liability or responsibility in respect thereof.
6.6 The Customer indemnifies and will keep the Supplier indemnified in
respect of all costs, losses, damages, claims or expenses caused to or
suffered by any third party whether directly or indirectly arising out of or
in connection with the use of the goods and services supplied to the
Customer by the Supplier.
7. OTHER RIGHTS OF SUPPLIER
If:
(a) any amount payable by the Customer to the Supplier is overdue, or the
Customer fails to meet any other obligation to the Supplier, or in the
Supplier’s opinion the Customer is likely to be unable to meet its payment
or other obligations to the Supplier; or
(b) the Customer becomes insolvent, has a receiver appointed in respect of all
or some of its assets, makes or is likely to make an arrangement with its
creditors or has a liquidator (provisional or otherwise) appointed or is
placed under statutory or official management or any like happening
howsoever is called in any jurisdiction;
then without limiting any other right of the Supplier:
(i)
the Supplier may cancel all or any part of the Contract or Contracts with
the Customer which remains unperformed; and
(ii)
all amounts outstanding under any contract with the Supplier whether or
not due for payment immediately become due and payable; and
(iii) the supplier shall be entitled to claim any goods it has supplied which are
in the Customer’s possession or control and to dispose of them for its own
benefit and for the purpose of the supplier shall be entitled, without notice
to enter directly or by its agents on any premises where it believes goods
which it has supplied may be stored, without in anyway being liable to any
person.
8.MISCELLANEOUS
8.1 The Customer shall be responsible for disposing, at its own cost, of all
materials used in the packaging or delivery of goods supplied by the
Supplier.
8.2 If at any time the Supplier does not enforce any of these terms and
conditions or grants the Customer time or other indulgence, the Supplier
shall not be construed as having waved that term or condition or its rights
to later enforce that or any other term or condition.
8.3 Where any provision of these terms and conditions is rendered void,
unenforceable or otherwise ineffective by operation of law, that shall not
affect the enforceability or effectiveness of any other provision.
8.4 No delay in performance of or failure to perform any obligation by the
Supplier shall constitute a breach by the Supplier of its obligations under
any contract with the Customer if such delay or failure is occasioned by
any cause beyond the reasonable control of the Supplier. The Supplier
shall notify the Customer of any such failure or interruption and shall use
reasonable diligence to put itself as quickly as possible in a position to
carry out its obligations hereunder.
8.5 The Customer undertakes to keep terms and conditions and prices of goods
and services or both confidential.
8.6 The terms and conditions and any contract subject to them are and is to be
governed by and construed in accordance with New Zealand law.
8.7 The 1980 United Nations Conventions on Contracts for the International
Sale of Goods is excluded with respect to goods covered by any contract
subject to these terms and conditions.
8.8 The Customer acknowledges that all rights to patents, trademarks, trade
names, inventions, trade benefits, copyrights and know-how relating to the
design and manufacture of goods are vested in the Supplier and the
Customer undertakes not to breach any of these rights by its use of the
goods.