1
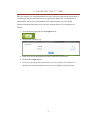
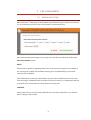
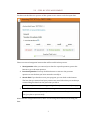
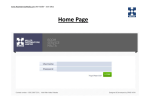
MINISTRY OF HIGHER EDUCATION MALAYSIA
Research University
Questionnaire System
User Guide
09
1 CONTENTS
2
The HOME PAGE ........................................................................................................................................... 3
3
Registration ..................................................................................................................................................... 4
4
Login for the 1st time................................................................................................................................... 5
5
The Assessment ............................................................................................................................................. 6
6
5.1
Period Selector..................................................................................................................................... 6
5.2
STEP-BY-STEP Assessment ........................................................................................................... 7
5.3
Finalising RAW DATA....................................................................................................................... 8
The Result Page ............................................................................................................................................. 9
2
2 THE HOME PAGE
This is how the Home Page looks like:
There are several links available at the top of the page (left-to-right):
1. Home. This link will bring you to the Home Page.
2. Glossary. This link opens a pop-up document explaining the details of the
entire question asked during the assessment.
3.
About. Here you can find the information and history about the RU (Research
University).
4. Contact. In case you need help or there is a question to be asked, you can
always click on this link to reveal the contact of the system administrator.
Besides the above links, there are two main action buttons on the green section of the
home page (left-to-right):
1. Register. Click here to register and start assessing your institution.
2. Login. After registering, you will be given one login ID and a password. Use this
ID to start assessing, continue your progress, opening your saved result, or
modify your saved data.
3
3 REGISTRATION
As the first step, a user is required to fill the registration form in the home page.
Here are the detailed registration steps:
1. Go Click on the Register button:
2. A notice and a brief objective of the system will pop-up. After finish reading it,
you can click “X” icon on the right top of the document to close it.
3. A registration form will show-up:
4. Fill the registration form. The system will let you know if you have entered an
invalid entry (eg. alphabet for the phone number).
NOTE: This registration will be subject to verification by the system
administrator, kindly make sure all the information you entered is correct.
5. After all entries are filled, press the Register button.
6. You will be brought to the Registration result page, indicating that your
registration has been saved and the system admin is noticed. An email is also
sent to your email address.
4
4 LOGIN FOR THE 1 S T TIME
After you register, the system administrator will verify your registration information. If
everything is OK, they will authorize your registration. When you are authorized, an
email will be send to your email address. This email contains your user ID and
password. With this information you can start entering data for your institution as
follows:
1. Go to the home page and click the Login button:
2. A login form will show-up:
3. Enter your user ID and password to their respective form entries.
4. Click the blue Login button.
5. If your user ID and password are correct, you are ready to start. If there is a
mistake, the system will inform you. You may try again to login after that.
5
5 THE ASSESSMENT
5.1 PERIOD SELECTOR
After a success 1st time login, an Assessment Period Selector page is shown. This allows
you to pick any start year as well as the number of assessment year:
After selecting the desired options, you may now start the assessment by clicking the
Start Assessment button.
NOTE:
The system is capable of adapting itself to the current year in progress. For example, if
the current year is 2009, the maximum starting year are 2004-2009 (5-years back
value are also available).
The combination of start year and number of years is also calculated to prevent a user
from entering a combination that is invalid. You may not choose a combination that will
stretch the year of assessment to more than the current year.
CAUTION:
This period selector is shown only ONCE. Means if you have submitted it, you will not
able to change it afterwards.
6
5.2 STEP-BY-STEP ASSESSMENT
You have reached the core process of this system as it is starts to ask for input data:
There are several navigation buttons that will be useful in this process:
1. Next Question. After you entered your data for a specific question, press this
button to go to the next question.
2. Previous Question. You may click this button to return to the previous
question to see the data you have entered or modify it.
3. Save & Exit. If you decide to save your progress, you can click on this button.
The last data you entered and your position are saved. After this you can always
resume filing the data from the place that you left it.
NOTE: You may resume by entering your login ID and password at the front page
4. Cancel. Use this button to exit without saving.
CAUTION: This action may render your data as inconsistent. Always use Save &
Exit if you plan to quit normally.
Other than the navigational button, there are two things that will aid you in filling the
data:
7
1. Section Quick Jump. On above of the section indication, there is a drop down
menu that will make you able to jump between sections.
2. Question hint
. Just mouse-over this icon to show the detailed information
for the current question.
5.3 FINALISING RAW DATA
After all question been answered, the system will notify you that the assessment has
finished and the final result is calculated. An email is also sent to your address notify
you about the finalisation:
From here you can click on the See Result button to show your assessment result.
8
6 THE RESULT PAGE
In the result page the below screen will be shown:
There are five actions that you can select:
1. Change Profile & Password. From here you can change your given password
and change your saved profile information.
NOTE: You can change all information except your institution name.
2. Modify Data. If you plan to change your data, click this button to bring you back
to the step-by-step assessment screen. Here you can alter your previously
entered data.
NOTE: If you made changes to the data, be sure to press Save & Exit button in the
step-by-step assessment screen to update your result. Fail to do so will make your
data as obsolete.
3. Create PDF. When you click on this button, a PDF file contains your data and
result will be created.
4. Export to Excel. After clicking on this button, a save file dialog will show up.
This will save an excel version of your data and result.
5. Print Result. To print all your data and result, you may click on this button. A
print dialog will appear.
9
As the data part, there are two sections that are selectable using this tab:
A. RAW DATA
This tabular section contains all your previously entered data.
10
B. RESULT
The result calculated from your data will be shown in this tabular section. Two bottom
rows are indicating the final result of your assessment. These are:
1. Total Marks. This row represents the sum of Section B, C, D, and E. It will
shown the value in red if the mark is lower than 50.
2. Overall Score. This row represents the sum of all sections. If the score are
more than 75, it will inform you that you have passed the baseline value.
NOTE: If the Total Marks and Overall Score are satisfying, a note will appear and
indicating that your institution can officially apply for an RU status.
11