1
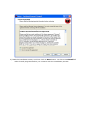
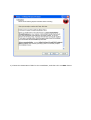
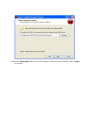
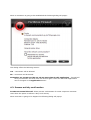
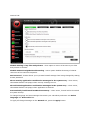
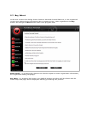
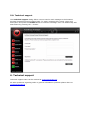
FortKnox Personal Firewall
User Manual
Document version 1.4 EN ( 15. 9. 2009 )
Copyright (c) 2007-2009 NETGATE Technologies s.r.o. All rights reserved.
This product uses compression library zlib Copyright (C) 1995-1998 Jean-loup Gailly and Mark Adler.
All other trademarks are property of their respective owners.
Content
1. Introduction ............................................................................................................................ 3
1.1. Basic Protection Concepts ......................................................................................... 3
1.2. Used Technologies ....................................................................................................... 3
1.3. Supported Operating Systems ................................................................................ 3
2. Installation .............................................................................................................................. 3
2.1. Installation from website .......................................................................................... 3
2.2. Installation Process ..................................................................................................... 4
3. Program Activation ............................................................................................................ 11
3.1. Trial/Limited Version ................................................................................................. 11
3.2. Purchase ........................................................................................................................ 11
3.3. Registration .................................................................................................................. 11
4. Working with FortKnox Personal Firewall ................................................................. 12
4.1. System tray icon ........................................................................................................ 12
4.2. Network connection confirmation ........................................................................ 13
4.3. Process activity confirmation ................................................................................. 14
4.4. Window handling icons............................................................................................. 15
5. Application Interface ......................................................................................................... 16
5.1. Statistics ........................................................................................................................ 16
5.2. Connections .................................................................................................................. 17
5.3. Advanced ....................................................................................................................... 19
5.4. Options ........................................................................................................................... 22
5.5. Applications .................................................................................................................. 28
5.6. Traffic Log ..................................................................................................................... 29
5.7. Buy/About ..................................................................................................................... 30
5.8. Technical support ....................................................................................................... 31
6. Technical support ............................................................................................................... 31
1. Introduction
This user manual introduces overview of all features and technologies provided by FortKnox
Personal Firewall .
1.1. Basic Protection Concepts
Most threats today use Internet to spread and download additional malware that may harm
user’s computers. Spyware can monitor user’s activity and send collected data over Internet
to its creator. Firewall is one of the most important barriers that protect systems from
potential treats.
1.2. Used Technologies
FortKnox Personal Firewall uses the following technologies to protect your system:
•
Inbond traffic checking – controls incoming traffic from the network.
•
Outbound traffic checking – controls outgoing traffic to the network.
•
Statefull packet inspection – analyze traffics for correctness and allow connections
initiated by user only.
•
Intrusion prevention system – analyze packet streams for suspicious activity.
•
Process defense system – ensures integrity of all processes that have access to the
network.
1.3. Supported Operating Systems
FortKnox Personal Firewall is compatible with Windows 7 (64-bit and 32-bit), Windows
Vista (64-bit and 32-bit), Windows XP (32-bit), and Windows 2000 (32-bit) operating
systems.
2. Installation
FortKnox Personal Firewall can be installed either from the installation file available on
your installation CD, or can be downloaded from FortKnox Personal Firewall website:
www.fortknox-firewall.com in download section. Latest version is always available on the
mentioned website.
2.1. Installation from website
Visit FortKnox Personal Firewall website at www.fortknox-firewall.com, go to the
Download section of the website and select appropriate Download Now link based on your
language preferences. Save the installation file to your disk. Start the installation by
executing (double-clicking) the downloaded setup file.
2.2. Installation Process
Please note: It is recommended that you close all other running applications before starting
the installation process; including other security applications that might block the
installation. You have to start installation process under administrator account.
a) Double-click on the installation setup file to begin the installation process.
b) Select the preferred installation language and click on OK button.
Note: This is the language of the installation program. You can change the language of
the FortKnox Personal Firewall later on the Skin/Languages setup wizard page.
To change the language after installation, right-click the system tray icon and select
the Options menu. Select from Active Language menu your preferred language and
press the Apply button.
c) When setup begins click on Next to view the License Agreement dialog. Click on I
accept the agreement to accept FortKnox Personal Firewall License Agreements
terms and conditions.
d) Read the Installation Notes, and then click on Next button. You have to uninstall all
other firewall programs before you continue with the installation process.
e) Choose the destination folder for the installation, and then click on Next button.
f) Select the Start Menu folder where the program's shortcuts will be located. Click on Next
to continue.
g) Check the additional tasks that should be performed. It is recommended to check all
options. Click on Next to continue.
h, FortKnox Personal Firewall Language and Skin wizard will be shown. Select preferred skin
and language that matches your individual taste.
i, To complete the installation process your computer need to restarted. Click on Finish
button to restart computer.
After the installation process is finished, your system has to be restarted to successfully
start the FortKnox Personal Firewall . First start may take a while on computers with
Windows Vista operation systems.
3. Program Activation
3.1. Trial/Limited Version
From the FortKnox Personal Firewall website you can download the trial version of FortKnox
Personal Firewall . After the installation, this trial full-featured mode will run for 15 days.
After this period the program will switch to limited mode. Many features and options are
disabled in limited mode, it is recommended to purchase a valid license to switch back to the
full featured mode. License is valid for purchased time period. After license expiration the
program will switch back to the limited mode and you should renew your license. Valid time
period will be visible on the main program screen after synchronization with the license
server.
3.2. Purchase
In the Buy menu select the Buy Now button. Default Internet browser will be launched with
the registration page.
3.3. Registration
In the Buy menu select the Enter serial button. Registration dialog will show up.
With purchase of FortKnox Personal Firewall you have received registration information;
registration name, registration e-mail and serial number. This information has to be
exactly entered into registration dialog. Please note that serial number only contains
characters A-F and numbers.
4. Working with FortKnox Personal Firewall
After you have successfully installed FortKnox Personal Firewall on your computer, the
FortKnox Personal Firewall icon will appear on your desktop. Double-clicking the icon will
launch the FortKnox Personal Firewall . This interface allows you to configure individual
aspects of the application.
4.1. System tray icon
Once the application is started, you can see a small red/black icon in the system tray,
indicating that the application is running. By right-clicking on the tray icon, a context menu
will popup:
The following options are available:
FortKnox Personal Firewall - click this option to hide or show the main application screen.
Block All – when set, this option will block all incoming and outgoing traffic.
Normall – when set, firewall will filter traffic based on firewall rules.
Allow All – when set, this option will allow all incoming and outgoing traffic.
Statistics – shows statistical information about incoming and outgoing traffic and attacks.
Connections – shows active network connections.
Advanced – allow to set extended user rules for filtering traffic.
Options – this option will open application configuration dialog.
Applications – shows individual application rules.
Traffic Log – show log of all network traffic inspected by firewall.
Enable Network Connections – enable all network interfaces in the system.
Disable Network Connections – disable all network interfaces in the system.
About - this option will show application about dialog.
Exit - this option will quit the application.
4.2. Network connection confirmation
FortKnox Personal Firewall allows network connection confirmation in real-time. Users
have the option to allow or deny network connections for the individual applications.
When a connection is going to be established the following dialog will popup:
This dialog offers the following actions:
Yes – connection will be allowed.
No – connection will be denied.
Remember my answer and do not ask me next time for this application – firewall will
save your decision and next time will not ask again. Rules for individual applications
can be changed in the Applications menu.
4.3. Process activity confirmation
FortKnox Personal Firewall allows process confirmation for some suspicious activities.
Users have the option to allow or deny such activity.
When an action is going to be happen the following dialog will popup:
This dialog offers the following actions:
Yes – action will be performed.
No – action will be denied.
Add to the Trusted Applications and do not ask me next time for this application –
firewall will save your decision and next time will not ask again. To reset these rules press
the Reset Trusted button in the Options/Enhancements menu (near the Enable
Process Defense System option). Note: Process Defense System option has to be enabled
to allow process activity confirmation.
Confirmation actions are:
- Writing to remote process
- Browser execution
- Active desktop background changes
- AppInit_DLLs registry key changes
4.4. Window handling icons
There are four icons at the right-top corner of the program interface. Minimize button (topleft) allows you to minimize application windows to the system tray. Maximize/Restore
(top-right) button allow you to maximize application window to the maximum width and
height of your desktop and restore it to the previous size. Help (bottom-left) button displays
help information about currently open dialog. Information (bottom-right) button will show
about dialog.
5. Application Interface
5.1. Statistics
The statistics dialog shows information about incoming and outgoing traffic history and
history of happened attacks.
5.2. Connections
The connection dialog shows all active network connections in the system. Every item
shows local and remote IP addresses or only local IP addresses for listening states, status of
the connection and associated process.
Details – shows details about selected item.
Block Connection– denies selected network connection.
Trace Route – shows network route to the selected item’s destination. (Note: this method
use ICMP messages and some systems may block this kind of traffic)
WhoIs Lookup – lookups selected item’s destination or entered domain name in the whois
database.
Terminate Process – terminates selected item’s process.
Show on Map – option shows selected IP address on the map.
5.3. Advanced
The advanced dialog allows editing of extended application rules. These rules have more
priority than application rules.
Add rule – adds new advanced rule.
Edit Rule – edits selected advanced rule.
Remove – deletes checked advanced rules.
Note: The following functionality under Advanced menu is supported for Internet Explorer
(with disabled protected mode under Windows Vista), Mozilla Firefox and Opera browsers
only.
Blocked Domain list – this list contains used defined domains that should be blocked. To
add new domain name use Add… button, to remove it you should use Delete button.
Enable Site Control System – enables blocked domain list functionality.
Filtering server proxy port – port of the filtering http proxy server, only experienced user
should change this value.
Enable Ad Blocking – enables ad filtering functionality.
Enable ActiveX Blocking – enables blocking of ActiveX installation files (.cab, .ocx).
Enable Referer Blocking – enables blocking of referrer field of the HTTP header, this field
use some sites to track down pages from which you have come and may not work with this
option enabled.
Enable Cookies Blocking – enables blocking of internet browsers cookies, sites use
cookies to save information between sessions, some sites may not work with this option
enabled.
Apply – applies changes under Advanced menu. Note: You may need to restart your
internet browser to apply changes.
Add/Edit Advanced Rules dialog:
Description - field could be any text to identify the rule.
Protocol - is the type of protocol that is used to communicate between two computers, use
Any protocol to match all protocols.
Action – action to be performed for the specified rule; Allow – allow connection, Deny –
deny connection.
Route - could be incoming and outgoing, use 'Any' to match both directions.
Process - field could be empty to match all applications or use … button to limit rule to a
specific application only. To limit rule to a specific time period or specific user, use User and
Temporary restriction lists.
Local host - is IP address of your computer. Your computer can have more than one
network card. Use All addresses option to match all your network interfaces or you
can specify individual network card/address by entering MAC address or IP address. When
entering IP address you have the option to specify Port and Subnet Mask.
Remote host - is the IP or MAC address of the remote computer. Address 0.0.0.0 with
mask Any means any IP address.
5.4. Options
The Options dialog allows configuration of individual functions of FortKnox Personal
Firewall .
General Tab:
Disable sharing of my files and printers - when option is active all access to your files
and printers is blocked.
Disable network neighborhood browsing - active option disables browsing of shared
resources of the network computers.
Set Password - button allows you to protect firewall settings from being changed by setting
access password.
Show security applications notification messages in the system tray – when active,
information balloon will popup when security message occurs.
Show blocked applications notification messages in the system tray – when active,
information balloon will popup when application is blocked.
Automatically load firewall at Windows startup – when active, firewall will be launched
at system startup.
To change language and skins settings that match your individual preference set Active
language and Active skin lists.
To apply all changed settings on the General tab, press the Apply button.
Enhancements Tab:
Enable Intrusion Prevention System (IPS) – IPS is integrated Intrusion Detection
System (IDS) which detects known threats in the packet stream and actively response to
them. When a threat is detected based on a signature, user is automatically notified about it
and depending on default action, threat is blocked.
Enable NETBIOS Protection - option automatically blocks all NETBIOS communication
from computers located outside of local subnet range.
Block Universal Plug and Play traffic - option blocks UPnP traffic which is often used for
distributed denial of service attacks. Note: you should disable this option if some of your
application requires the UPnP protocol to operate.
Enable OS fingerprinting masquerading - option blocks common attackers methods to
detect your operating system.
Enable anti-MAC spoofing - option blocks all unexpected ARP traffic which was not
requested by your system. MAC spoofing is a way to hijack a communication session
between two computers in order to hack one of the machines.
Enable anti-DNS spoofing - option blocks all unexpected DNS responses to your system to
prevent DNS attacks.
Enable anti-IP spoofing - option randomize sequence number for each
communication packet to prevent hijacking of communication session with IP spoofing
attack. Note: some network cards could be incompatible with option.
Enable fingerprint authentication - option verify every application for file changes. To
reset all fingerprints for all application use Reset fingerprints button.
Automatically block attacker for: - when option is enabled, all attacks to your system are
automatically blocked for specified time period. To reset blocked attackers IP list press the
Reset button.
Block fragmented packets - when enabled, option drops all fragmented IP packets.
Enable Process Defense System - option ensures integrity of applications and confirms
potentially suspicious process actions. When enabled Confirm process action dialog will
popup when such activity is detected. To reset all Trusted applications use Reset Trusted
button.
Enable AppInit DLL Protection – option notifies user about this registry change by
applications.
Enable portscan detection - option detects, notify and block scanning of your ports which
is common hacker action to find out if you have some ports open and usable for attacks.
Enable DoS detection - option checks all traffic for known Denial of Service (DoS) attacks
which overload system services and block usage of services by common users.
Enable local network traffic - option allows traffic on local network subnet range.
Enable time synchronization - option allows traffic for time synchronization over Internet
servers.
Enable DHCP - option allows the Dynamic Host Configuration Protocol traffic which can be
used to automatically assign IP addresses and other TCP/IP configuration information. Note:
if you disable this option and you need DHCP for correct functionality of your system, you
must create an advanced rule for UDP packets on remote ports 67 and 68.
Enable DNS - option allows domain name resolution to IP addresses. Note: if you disable
this option, you must create an advanced rule that allows UDP traffic for remote port 53.
To apply all changed settings on the Enhancements tab, press the Apply button.
Logging Tab:
Enable Security log - option enables logging of important and security events.
Enable System log - option enables logging of events related to firewall functionality.
Enable Traffic log - option enables logging of all inbound and outbound network traffic.
Enable Packet log - option enables logging of all communication packets including their
data.
To limit size of the traffic and the packet log use Maximum traffic log size and Maximum
packet log size options.
Delete old log files after - option sets numbers of days after which are the old log files
deleted. Setting value to zero turns this option off.
Enable Notification - option turns on e-mail notification when security event occurs. To
test your e-mail settings use the Test E-Mail button.
To apply all changed settings on the Logging tab, press the Apply button.
Miscellaneous Tab:
ICMP - settings for incoming and outgoing packets. Change these settings only if you are
experienced user.
Notify me about newer version - option will notify you when a new version of FortKnox
Personal Firewall is available.
Automatically update signatures – when option is enabled, new signatures will
be automatically downloaded and installed from the server. To update signatures
manually, press the Update button.
To apply all changed settings on the Miscellaneous tab, press the Apply button.
5.5. Applications
The Applications dialog shows all application specific rules. Every rule can have allow, deny
or ask action set and every application connection that was confirmed by you is listed here.
Select All – selects all items in the list.
Deselect All - deselects all items in the list.
Allow – sets selected items to allow mode; such process traffic will be automatically
allowed.
Deny – sets selected items to deny mode; such process traffic will be automatically blocked.
Ask – sets selected items to ask mode; confirmation for such process will popup.
Remove – this option deletes selected item/rule from the list.
Import Rules – imports saved applications and advanced rules from a file.
Export Rules – saves current applications and advanced rules to a file.
5.6. Traffic Log
The Traffic Log dialog shows all the network traffic inspected by the FortKnox Personal
Firewall .
Details – shows details about selected item.
Trace Route – shows network route to the selected item’s destination. (Note: this method
use ICMP messages and some systems may block this kind of traffic)
WhoIs Lookup – lookups selected item’s destination or entered domain name in the whois
database.
Export… – save active log file to the file.
Delete – deletes saved log file/files.
Show on Map – option shows selected IP address on the map.
To switch between different types of log files use the list near to the Details button.
5.7. Buy/About
In the trial version this dialog shows FortKnox Personal Firewall features; in the registered
version this dialog shows information about registered user. After registration the Buy
button will change to About button after next program start.
Enter serial – by pressing this button user has the option to enter registration information;
the registration dialog will popup.
Buy Now – by pressing this button your default browser windows will be shown and the
online shop web page will be displayed allowing purchasing the product.
5.8. Technical support
The Technical support dialog allows users to send e-mail message to the FortKnox
Personal Firewall technical support team. To send a message fill in email, name and
description and press the Submit button to send the message. User can additionally add
attachment by pressing the … button.
6. Technical support
Technical support team can be reached at [email protected] .
All other questions regarding sales or general information questions please direct to
[email protected] .