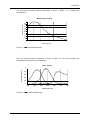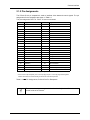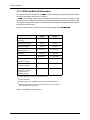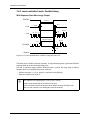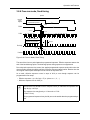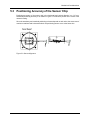
1
A101
User’s Manual
Document ID Number: DA 037202
Revision Date: July 10, 2001
Subject to Change Without Notice
© Basler Vision Technologies
Basler Support Worldwide:
Americas: +1-877-934-8472
[email protected]
www.basler-vc.com
Europe: +49-4102-463-500
[email protected]
Asia: +65-425-0472
[email protected]
For customers in the U.S.A.
This equipment has been tested and found to comply with the limits for a Class A digital device,
pursuant to Part 15 of the FCC Rules. These limits are designed to provide reasonable protection
against harmful interference when the equipment is operated in a commercial environment. This
equipment generates, uses, and can radiate radio frequency energy and, if not installed and used
in accordance with the instruction manual, may cause harmful interference to radio communications. Operation of this equipment in a residential area is likely to cause harmful interference in
which case the user will be required to correct the interference at his own expense.
You are cautioned that any changes or modifications not expressly approved in this manual could
void your authority to operate this equipment.
The shielded interface cable recommended in this manual must be used with this equipment in
order to comply with the limits for a computing device pursuant to Subpart J of Part 15 of FCC
Rules.
For customers in Canada
This apparatus complies with the Class A limits for radio noise emissions set out in Radio Interference Regulations.
Pour utilisateurs au Canada
Cet appareil est conforme aux normes Classe A pour bruits radioélectriques, spécifiées dans le
Règlement sur le brouillage radioélectrique.
Life Support Applications
These products are not designed for use in life support appliances, devices, or systems where
malfunction of these products can reasonably be expected to result in personal injury. Basler customers using or selling these products for use in such applications do so at their own risk and
agree to fully indemnify Basler for any damages resulting from such improper use or sale.
Warranty Note
Do not open the housing of the camera. The warranty becomes void if the housing is opened.
DRAFT
Table of Contents
1 Introduction
1.1 Camera Models . . . . . . . . . . . . . . . . . . . . . . . . . . . . . . . . . . . . . . . . . . . . . . . . . . . 1-1
1.1.1 Camera Name Change . . . . . . . . . . . . . . . . . . . . . . . . . . . . . . . . . . . . . . . . . 1-1
1.2 Performance Specifications . . . . . . . . . . . . . . . . . . . . . . . . . . . . . . . . . . . . . . . . . . 1-2
1.3 Precautions . . . . . . . . . . . . . . . . . . . . . . . . . . . . . . . . . . . . . . . . . . . . . . . . . . . . . . . 1-4
2 Camera Interface
2.1 Connections . . . . . . . . . . . . . . . . . . . . . . . . . . . . . . . . . . . . . . . . . . . . . . . . . . . . . . 2-1
2.1.1 General Description . . . . . . . . . . . . . . . . . . . . . . . . . . . . . . . . . . . . . . . . . . . 2-1
2.1.2 Pin Assignments . . . . . . . . . . . . . . . . . . . . . . . . . . . . . . . . . . . . . . . . . . . . . . 2-3
2.2 Cable Information . . . . . . . . . . . . . . . . . . . . . . . . . . . . . . . . . . . . . . . . . . . . . . . . . . 2-5
2.2.1 Video Data Cable Between the Camera and the Frame Grabber . . . . . . . . . 2-5
2.2.2 Camera to PC RS-232 Cable . . . . . . . . . . . . . . . . . . . . . . . . . . . . . . . . . . . . 2-5
2.3 Video Data and Control Signals . . . . . . . . . . . . . . . . . . . . . . . . . . . . . . . . . . . . . . . 2-6
2.3.1 Input Signals . . . . . . . . . . . . . . . . . . . . . . . . . . . . . . . . . . . . . . . . . . . . . . . . . 2-6
2.3.1.1 ExSync: Controls Frame Readout and Exposure Time . . . . . . . . . . 2-6
2.3.2 Output Signals . . . . . . . . . . . . . . . . . . . . . . . . . . . . . . . . . . . . . . . . . . . . . . . . 2-6
2.3.2.1 FVAL: Indicates a Valid Frame . . . . . . . . . . . . . . . . . . . . . . . . . . . . 2-6
2.3.2.2 LVAL: Indicates a Valid Line . . . . . . . . . . . . . . . . . . . . . . . . . . . . . . 2-6
2.3.2.3 PCLK: Indicates a Valid Pixel . . . . . . . . . . . . . . . . . . . . . . . . . . . . . 2-6
2.3.2.4 Video Data . . . . . . . . . . . . . . . . . . . . . . . . . . . . . . . . . . . . . . . . . . . 2-6
2.3.3 LVDS and RS-644 Information . . . . . . . . . . . . . . . . . . . . . . . . . . . . . . . . . . . 2-8
2.3.3.1 RS-644/RS-422 Compatibility . . . . . . . . . . . . . . . . . . . . . . . . . . . . 2-10
2.3.3.2 Converting TTL to RS-422/644 . . . . . . . . . . . . . . . . . . . . . . . . . . . 2-10
2.4 Serial Port . . . . . . . . . . . . . . . . . . . . . . . . . . . . . . . . . . . . . . . . . . . . . . . . . . . . . . . 2-11
2.5 Power Supply . . . . . . . . . . . . . . . . . . . . . . . . . . . . . . . . . . . . . . . . . . . . . . . . . . . . 2-11
2.6 Status LEDs . . . . . . . . . . . . . . . . . . . . . . . . . . . . . . . . . . . . . . . . . . . . . . . . . . . . . 2-11
3 Basic Operation and Features
3.1 Functional Description . . . . . . . . . . . . . . . . . . . . . . . . . . . . . . . . . . . . . . . . . . . . . . 3-1
3.2 Configuration Sets . . . . . . . . . . . . . . . . . . . . . . . . . . . . . . . . . . . . . . . . . . . . . . . . . 3-3
3.3 Basic Exposure Time Control Modes . . . . . . . . . . . . . . . . . . . . . . . . . . . . . . . . . . . 3-4
3.4 Free Run Mode . . . . . . . . . . . . . . . . . . . . . . . . . . . . . . . . . . . . . . . . . . . . . . . . . . . . 3-4
3.5 Fixed and Flexible Timing . . . . . . . . . . . . . . . . . . . . . . . . . . . . . . . . . . . . . . . . . . . . 3-5
3.5.1 Flexible Timing . . . . . . . . . . . . . . . . . . . . . . . . . . . . . . . . . . . . . . . . . . . . . . . 3-5
3.5.2 Fixed timing . . . . . . . . . . . . . . . . . . . . . . . . . . . . . . . . . . . . . . . . . . . . . . . . . . 3-6
3.6 Dynamic exposure time control . . . . . . . . . . . . . . . . . . . . . . . . . . . . . . . . . . . . . . . 3-7
3.7 What if the Previous Frame is Still Being Transferred at the End of Exposure? . . 3-7
3.8 Exposure Time Control Modes In Detail . . . . . . . . . . . . . . . . . . . . . . . . . . . . . . . . . 3-8
3.8.1 Programmable mode, flexible timing . . . . . . . . . . . . . . . . . . . . . . . . . . . . . . . 3-9
3.8.2 Programmable mode, fixed timing. . . . . . . . . . . . . . . . . . . . . . . . . . . . . . . . 3-11
3.8.3 Level-controlled mode, flexible timing . . . . . . . . . . . . . . . . . . . . . . . . . . . . . 3-12
BASLER A101
I
DRAFT
3.8.4 Level-controlled mode, fixed timing . . . . . . . . . . . . . . . . . . . . . . . . . . . . . . . 3-14
3.8.5 Free-run mode, flexible timing . . . . . . . . . . . . . . . . . . . . . . . . . . . . . . . . . . . 3-15
3.8.6 Free-run mode, fixed timing. . . . . . . . . . . . . . . . . . . . . . . . . . . . . . . . . . . . . 3-17
3.9 Gain and Offset . . . . . . . . . . . . . . . . . . . . . . . . . . . . . . . . . . . . . . . . . . . . . . . . . . 3-18
3.10 Soft Clipper . . . . . . . . . . . . . . . . . . . . . . . . . . . . . . . . . . . . . . . . . . . . . . . . . . . . . 3-20
3.11 Partial Scan . . . . . . . . . . . . . . . . . . . . . . . . . . . . . . . . . . . . . . . . . . . . . . . . . . . . 3-21
3.11.1 Changes to the timing in partial scan mode . . . . . . . . . . . . . . . . . . . . . . . 3-21
3.11.2 Partial scan with binning . . . . . . . . . . . . . . . . . . . . . . . . . . . . . . . . . . . . . . 3-22
3.12 Binning Mode (A101p only) . . . . . . . . . . . . . . . . . . . . . . . . . . . . . . . . . . . . . . . . 3-23
3.12.1 Changes to the timing in binning mode . . . . . . . . . . . . . . . . . . . . . . . . . . . 3-23
3.13 Test Image . . . . . . . . . . . . . . . . . . . . . . . . . . . . . . . . . . . . . . . . . . . . . . . . . . . . . 3-24
3.14 Camera Status . . . . . . . . . . . . . . . . . . . . . . . . . . . . . . . . . . . . . . . . . . . . . . . . . . 3-24
4 Configuring the Camera
4.1 Configuring the camera with the Camera Configuration Tool . . . . . . . . . . . . . . . . . 4-2
4.1.1 Opening the Configuration Tool. . . . . . . . . . . . . . . . . . . . . . . . . . . . . . . . . . . 4-2
4.1.2 Closing the Configuration Tool . . . . . . . . . . . . . . . . . . . . . . . . . . . . . . . . . . . 4-2
4.1.3 Configuration Tool Basics . . . . . . . . . . . . . . . . . . . . . . . . . . . . . . . . . . . . . . . 4-2
4.1.4 Configuration Tool Help. . . . . . . . . . . . . . . . . . . . . . . . . . . . . . . . . . . . . . . . . 4-3
4.2 Configuring the Camera with ProgrammingCommands . . . . . . . . . . . . . . . . . . . . . 4-4
4.2.1 Setting Up a Terminal Emulation Program . . . . . . . . . . . . . . . . . . . . . . . . . . 4-4
4.2.2 Command Format . . . . . . . . . . . . . . . . . . . . . . . . . . . . . . . . . . . . . . . . . . . . . 4-4
4.2.3 Reading Configuration Parameters . . . . . . . . . . . . . . . . . . . . . . . . . . . . . . . . 4-5
4.2.4 Reading the Protocol and Firmware Version. . . . . . . . . . . . . . . . . . . . . . . . . 4-5
4.2.5 Camera Status . . . . . . . . . . . . . . . . . . . . . . . . . . . . . . . . . . . . . . . . . . . . . . . 4-6
4.2.6 Programming Exposure Time Control . . . . . . . . . . . . . . . . . . . . . . . . . . . . . . 4-6
4.2.6.1 Mode Command . . . . . . . . . . . . . . . . . . . . . . . . . . . . . . . . . . . . . . . 4-6
4.2.6.2 Exposure Time . . . . . . . . . . . . . . . . . . . . . . . . . . . . . . . . . . . . . . . . 4-8
4.2.6.3 Frame Period for Free-run Mode . . . . . . . . . . . . . . . . . . . . . . . . . . . 4-9
4.2.7 Gain . . . . . . . . . . . . . . . . . . . . . . . . . . . . . . . . . . . . . . . . . . . . . . . . . . . . . . . 4-10
4.2.8 Offset . . . . . . . . . . . . . . . . . . . . . . . . . . . . . . . . . . . . . . . . . . . . . . . . . . . . . . 4-11
4.2.9 Soft Clipper . . . . . . . . . . . . . . . . . . . . . . . . . . . . . . . . . . . . . . . . . . . . . . . . . 4-12
4.2.10 Partial Scan . . . . . . . . . . . . . . . . . . . . . . . . . . . . . . . . . . . . . . . . . . . . . . . . 4-13
4.2.11 Storing a Modified Configuration . . . . . . . . . . . . . . . . . . . . . . . . . . . . . . . . 4-15
4.2.12 Loading the User Set and Factory Set . . . . . . . . . . . . . . . . . . . . . . . . . . . 4-15
4.2.13 List of Commands . . . . . . . . . . . . . . . . . . . . . . . . . . . . . . . . . . . . . . . . . . . 4-16
5 Mechanical Considerations
5.1 Dimensions . . . . . . . . . . . . . . . . . . . . . . . . . . . . . . . . . . . . . . . . . . . . . . . . . . . . . . . 5-1
5.2 Mounting Facilities . . . . . . . . . . . . . . . . . . . . . . . . . . . . . . . . . . . . . . . . . . . . . . . . . 5-1
5.3 Positioning Accuracy of the Sensor Chip . . . . . . . . . . . . . . . . . . . . . . . . . . . . . . . . 5-3
5.4 Optical Interface . . . . . . . . . . . . . . . . . . . . . . . . . . . . . . . . . . . . . . . . . . . . . . . . . . . 5-4
5.4.1 Adapter Mounting Feature. . . . . . . . . . . . . . . . . . . . . . . . . . . . . . . . . . . . . . . 5-4
II
BASLER A101
DRAFT
6 Troubleshooting
6.1 Quick Checklist . . . . . . . . . . . . . . . . . . . . . . . . . . . . . . . . . . . . . . . . . . . . . . . . . . . . 6-1
6.2 Fault Finding Using Camera Flags . . . . . . . . . . . . . . . . . . . . . . . . . . . . . . . . . . . . . 6-2
6.3 Fault Finding Using the Configuration Tool . . . . . . . . . . . . . . . . . . . . . . . . . . . . . . 6-2
Revision History . . . . . . . . . . . . . . . . . . . . . . . . . . . . . . . . . . . . . . . . . . . . . . . . . . . . . . . i
Index . . . . . . . . . . . . . . . . . . . . . . . . . . . . . . . . . . . . . . . . . . . . . . . . . . . . . . . . . . . . . . . . . .iii
BASLER A101
III
DRAFT
IV
BASLER A101
DRAFT
Introduction
1 Introduction
The BASLER A101 high resolution progressive scan camera is a versatile camera designed for
industrial use. Superb image sensing features are combined with a robust, high precision
machined housing.
Important features are:
• High spatial resolution
• High sensitivity
• Anti-blooming
• Asynchronous full frame shutter via electronic exposure time control
• Square sensor cells
• High Signal-to-Noise ratio
• Programmable via an RS-232 serial port
• Partial scan
• Binning mode (A101p only)
• Correlated double-sampling
• Industrial housing manufactured with high planar, parallel and angular precision
• Compact size.
1.1 Camera Models
There are two camera models currently available: a monochrome model (the A101p) and a color
model (the A101cp). Throughout the manual, the camera will be called the A101. Passages that are
only valid for a specific model will be so indicated.
1.1.1 Camera Name Change
In June 2000, several Basler camera models were renamed. Before June 2000, the
known as the A113.
BASLER A101
A101 was
1-1
Introduction
DRAFT
1.2 Performance Specifications
Specification
BASLER A101p / A101cp
Sensor Type
1300 (H) x 1030 (V) pixels
2/3 inch HAD interline transfer progressive scan CCD
Pixel Size
6.7 µm (H) x 6.7 µm (V)
Lens Adapter
C-mount or F-mount
Spectral Response
A101p:
A101cp:
400 - 1000 nm, peak at 510 nm. See Figure 1-1.
see Figure 1-2.
Anti-Blooming
1:100 or better
Dark Signal Non-uniformity
± 1 gray value
Photo Response Non-uniformity
± 12%
Pixel Clock
18 MHz (9 MHz when horizontal binning or full binning is used)
Max. Frame Rates
11.75 frames/sec. in normal operation
22 frames/sec. with vertical or full binning
up to 157 frames/sec. with partial scan
Video Output
8 bit, RS-644
Synchronization
External via ExSync signal
Exposure Time Control Modes
Level-controlled, programmable, or free-run
Gain and Offset
Programmable via RS-232
Power Requirements
24 V DC (± 15%), max. 5 W
Max. Cable Lengths
RS-232: 15 m
RS-644: 20 m
Conformity
CE, FCC
Housing Size
(without lens adapter)
45 mm x 62 mm x 62 mm ( L x W x H )
Weight
with C-mount adapter: ~ 320 g
with F-mount adapter: ~ 380 g
Table 1-1: A101 Performance Specifications
1-2
BASLER A101
DRAFT
Introduction
The monochrome camera’s spectral responsivity is shown in Figure 1-1. It includes lens
characteristics.
Relative Response
Monochrome Camera
1
0.9
0.8
0.7
0.6
0.5
0.4
0.3
0.2
0.1
0
400
500
600
700
800
900
1000
Wavelength [nm]
Figure 1-1: A101p Spectral Responsivity
The color camera’s spectral responsivity is shown in Figure 1-2. The curve excludes lens
characteristics and light source characteristics.
Color Camera
Relative Response
1
G
B
0.8
R
0.6
0.4
0.2
0
400
450
500
550
600
650
700
Wavelength (nm)
Figure 1-2: A101cp Spectral Responsivity
BASLER A101
1-3
DRAFT
Introduction
1.3 Precautions
Read the manual
Read the manual carefully before using the camera.
Keep foreign matter outside of the camera
Do not open the casing. Touching internal components may damage them.
Be careful not to allow liquid, flammable, or metallic material inside the camera housing. If
operated with any foreign matter inside, the camera may fail or cause a fire.
Ventilation
Allow sufficient air circulation around the camera or provide additional cooling to prevent internal
heat build-up.
Warning!
!
Without sufficient cooling the camera can get hot enough during operation
to cause burning when touched.
Environmental Requirements
Operation temperature:
Operation humidity:
Storage temperature:
Storage humidity:
+ 5° C … +40° C (+ 41° F … +104° F)
5% … 85%, relative, non-condensing
-10° C … + 70° C (+ 14° F … +158° F)
5% … 95%, relative, non-condensing
Electromagnetic Fields
Do not operate the camera in the vicinity of strong electromagnetic fields. Avoid electrostatic
charging.
Transporting
Only transport the camera in its original packaging. Do not discard the packaging.
Cleaning
Avoid cleaning the surface of the CCD sensor if possible. If you must clean it, use a soft, lint free
cloth dampened with a small quantity of pure alcohol. Do not use methylated alcohol.
Because electrostatic discharge can damage the CCD sensor, you must use a cloth that will not
generate static during cleaning (cotton is a good choice).
To clean the surface of the camera housing, use a soft, dry cloth. To remove severe stains, use
a soft cloth dampened with a small quantity of neutral detergent, then wipe dry.
Do not use volatile solvents such as benzine and thinners; they can damage the surface finish.
1-4
BASLER A101
DRAFT
Camera Interface
2 Camera Interface
2.1 Connections
2.1.1 General Description
The BASLER A101 progressive scan camera is interfaced to external circuitry via three connectors
located on the back of the camera. Figure 2-1 shows the connector types used on the camera and
Figure 2-2 provides a general description of the function of each connector.
As shown in Figure 2-2, there are also two status LEDs on the back of the camera which indicate
signal integrity and power OK.
D-Sub
9 pin plug
Subminiature
Round
4 pin plug
D-Sub HD
44 Pin Receptacle
Figure 2-1: A101 Connectors
BASLER A101
2-1
Camera Interface
DRAFT
LED Yellow: Signal Integrity
LED Green: Power OK
+ 24 V Power Supply
Serial Port: RXD, TXD
EXSYNC
Digital Video Data Out (8 bit)
LVAL
FVAL
PCLK
Figure 2-2: A101 Connectors and Signals
2-2
BASLER A101
PDRAFT
Camera Interface
2.1.2 Pin Assignments
The D-Sub HD 44 pin receptacle is used to interface video data and control signals. The pin
assignments for the receptacle are shown in Table 2-1.
The pins assigned to DOUT 8 - DOUT 15 are not connected.
Pin
Signal
Pin
Signal
1
DOUT 0
23
/DOUT 7
2
DOUT 1
24
Not connected
3
DOUT 2
25
Not connected
4
DOUT 3
26
Not connected
5
DOUT 4
27
Not connected
6
DOUT 5
28
Not connected
7
DOUT 6
29
Not connected
8
DOUT 7
30
Not connected
9
Not connected
31
Not connected
10
Not connected
32
Not connected
11
Not connected
33
LVAL
12
Not connected
34
/LVAL
13
Not connected
35
PIXEL CLOCK
14
Not connected
36
/PIXEL CLOCK
15
Not connected
37
ExSync
16
/DOUT 0
38
/ExSync
17
/DOUT 1
39
FVAL
18
/DOUT 2
40
/FVAL
19
/DOUT 3
41
Not connected
20
/DOUT 4
42
Not connected
21
/DOUT 5
43
Shorted to pin 44 internally
22
/DOUT 6
44
DC Gnd1
/ means an inverted signal with the LOW signal being active
1
Pin 44 on the 44 pin receptacle, pin 5 on the 9 pin plug and pin 1 on the 4 pin plug are tied together
inside of the camera to ensure that the grounds are all at the same potential.
Table 2-1: A101 Pin Assignments, D-Sub HD 44 Pin Receptacle
/
BASLER A101
The camera housing is not grounded and is electrically isolated from the circuit
boards inside of the camera.
2-3
DRAFT
Camera Interface
The D-Sub 9 pin plug is used for RS-232 communication between the host computer and the
camera. The pin assignments for the plug are shown in Table 2-2.
Pin
1
Signal
Pin
Signal
1
Not connected
6
Shorted to pin 4 internally
2
RxD
7
Shorted to pin 8 internally
3
TxD
8
Shorted to pin 7 internally
4
Shorted to pin 6 internally
9
Not connected
5
DC Gnd1
Pin 5 on the 9 pin plug, pin 44 on the 44 pin receptacle, and pin 1 on the 4 pin plug are tied together
inside of the camera to ensure that the grounds are all at the same potential.
Table 2-2: A101 Pin Assignments, RS-232, D-Sub 9 Pin Plug
The subminiature, round 4 pin plug is used for input power. The pin assignments for the plug are
shown in Table 2-3.
Pin
Signal
Pin
Signal
1
DC Gnd1
3
+ 24 V
2
Shorted to pin 1 internally
4
Shorted to pin 3 internally
1 Pin 1 on the 4
pin plug, pin 44 on the 44 pin receptacle, and pin 5 on the 9 pin plug are tied together
inside of the camera to ensure that the grounds are all at the same potential.
Table 2-3: A101 Pin Assignments, Subminiature Round 4 Pin Plug
Figure 2-3: A101 Pin Numbering
2-4
BASLER A101
PDRAFT
Camera Interface
2.2 Cable Information
2.2.1 Video Data Cable Between the Camera and the
Frame Grabber
The video data cable between the camera and the frame grabber must be made with 28 gauge
AWG twisted pair wire and have a characteristic impedance of 100 ohms. The maximum length
of the cable is 20 meters.
2.2.2 Camera to PC RS-232 Cable
The RS-232 cable between the camera and the PC can be a null modem cable or a simple three
wire connection as illustrated in Figure 2-4. The maximum length of the cable is 15 meters.
9 Pin
Plug
Serial
Port
Null Modem Cable
RxD
TxD
Gnd
Basler
Camera
1
1
1
1
2
3
2
3
2
3
2
3
4
4
4
4
5
5
5
5
6
7
6
7
6
7
6
7
8
8
8
8
9
9
9
9
RxD
TxD
Gnd
Computer
Figure 2-4: Camera to PC RS-232 Interface
/
BASLER A101
The cable between the camera and the PC must contain a twist so that pin 2 on the
camera connects to pin 3 on the PC and pin 3 on the camera connects to pin 2 on the
PC.
2-5
Camera Interface
DRAFT
2.3 Video Data and Control Signals
All video data and control signals on the A101 use LVDS technology as specified for RS-644.
Detailed information on RS-644 appears in Section 2.3.3.
2.3.1 Input Signals
2.3.1.1 ExSync: Controls Frame Readout and Exposure Time
The camera can be programmed to function in three basic exposure time control modes. In two
of these modes, programmable and level-controlled, an external trigger (ExSync) signal is used
to control exposure time and frame read out. For more detailed information, see Section 3.3.
ExSync can be a periodic or non-periodic function. The frequency of the ExSync signal
determines the camera’s frame rate.
2.3.2 Output Signals
2.3.2.1 FVAL: Indicates a Valid Frame
Frame valid, FVAL, indicates a valid frame as illustrated in Figure 2-5 for fixed timing and Figure
2-6 for flexible timing. Video data is only valid if FVAL is high. The timing for FVAL depends on the
exposure time control mode selected and is described in Section 3.8.
The edge of FVAL rises 25.6 µs after readout of the charges. FVAL remains high for 85.1 ms. This
value changes with vertical binning or partial scan active.
2.3.2.2 LVAL: Indicates a Valid Line
Line valid, LVAL, indicates a valid line of data as illustrated in Figure 2-5 for fixed timing and Figure
2-6 for flexible timing. Video data is only valid when LVAL is high.
LVAL has its first rising edge 7 µs after the rising edge of FVAL. LVAL periodically rises every 82.6
µs. It is low for 10.4 µs and high for 72.2 µs.
With fixed timing, LVAL continues to toggle even when FVAL is low and the LVAL signal is always
periodic. With flexible timing, LVAL is only active when FVAL is high thus enabling asynchronous
line readouts.
2.3.2.3 PCLK: Indicates a Valid Pixel
Pixel clock, PCLK, indicates a valid pixel of data as illustrated in Figures 2-5 and 2-6. The FVAL,
LVAL, and the PCLK signals are used to clock the digital video output data into external circuitry.
Digital data is valid on the rising edge of the pixel clock signal with FVAL and LVAL high. The pixel
clock frequency during standard operation is 18 MHz. If the camera is using horizontal binning or
full binning, the pixel clock frequency is 9 MHz.
2.3.2.4 Video Data
Figures 2-5 and 2-6 illustrate the output timing for pixels, lines and frames. The lines are output
sequentially in a progressive scan so that one full frame is obtained.
The video data for each pixel is output as a digital value in an 8 bit format. Thus the range of
intensity for each pixel includes 256 gray values. The digital gray value 0 corresponds to black
and the digital gray value 255 to white.
2-6
BASLER A101
PDRAFT
Camera Interface
85.1 ms 1
FVAL
10.4 µs 3
7 µs 2
72.2 µs
3.7 µs 4
LVAL 6
82.6 µs 5
PCLK
Video Out
b7 - b0
1
2
N-2 N-1
N
1
2
N-2 N-1
N
N = 1300
Figure 2-5: Pixel timing, fixed timing
85.1 ms 1
FVAL
10.4 µs 3
7 µs 2
72.2 µs
3.7 µs 4
LVAL 6
82.6 µs 5
PCLK
Video Out
b7 - b0
1
2
N-2 N-1
N
1
2
N-2 N-1
N
N = 1300
Figure 2-6: Pixel Timing, Flexible Timing
1
With VBin active: 45 ms
With VBin active: 12.5 µs, with Partial scan active (only flexible timing): 12.5 µs + 5.7 µs per ignored line
3
With VBin active: 16.1 µs
4
With Partial scan active (only flexible timing): see formula in Section 3.11.1
5
With VBin active: 88.3 µs
6
With fixed timing, LVAL toggles continuously even when no image is being transferred. With flexible timing, LVAL only toggles while an
image is being transferred.
2
BASLER A101
2-7
DRAFT
Camera Interface
2.3.3 LVDS and RS-644 Information
All video data and control signals on the A101 use LVDS technology as specified for RS-644. Basic
RS-644 characteristics are outlined in Table 2-4.
The A101 uses National Semiconductor DS90C031 differential line drivers to generate LVDS
output signals and a National Semiconductor DS90C032 differential line receiver to receive LVDS
input signals. Detailed spec sheets for these devices are available at the National Semiconductor
web site (www.national.com).
Figure 2-7 shows a basic schematic for the input/output stage of the Basler A101.
RS-644
RS-422
Low, High Voltage Level
(min./max.)
1.0 V, 1.4 V
0.5 V, 4.0 V
Voltage Swing (typical)
± 0.35 V
± 3.0 V
Receiver Threshold
± 0.10 V
± 0.20 V
0.0 V to 5.0 V [1]
0.0 V to 5.0 V [1]
100 Ohm
100 Ohm
655 MBits/s [2]
15 (<30) Mbits/s [3]
20 m
5m
11 m
Not Possible
0.93 W
3.75 W
Receiver Input
Voltage Tolerance
Termination
Max. Data Rate per Line Pair
Max. Cable Length
at 20
MHz [4]
(typical)
Max. Cable Length
at 40
MHz [4]
(typical)
Power Requirements
(transmitter + receiver)
for 20 line pairs at
20 MBits/s (typical)
[1]
Device-dependent, 5V devices handle this range
[2]
Device-dependent
[3]
Bit rates greater than 15 MBits/s are beyond the RS-422 standard
[4]
Note that the frequency refers to the pixel clock and not the number of
pixels transferred per clock cycle
Table 2-4: RS-644/422 Characteristics
2-8
BASLER A101
PDRAFT
DOUT0
/DOUT0
DOUT1
/DOUT1
DOUT2
/DOUT2
DOUT3
/DOUT3
DOUT4
/DOUT4
DOUT5
/DOUT5
DOUT6
/DOUT6
DOUT7
/DOUT7
1
16
2
17
3
18
4
19
5
20
6
21
7
22
8
23
9
24
10
25
11
26
12
27
13
28
14
29
15
30
31
32
33
34
35
36
37
38
39
40
41
42
43
44
2
3
6
5
10
11
14
13
DOUT0
/DOUT0
DOUT1
/DOUT1
DOUT2
/DOUT2
DOUT3
/DOUT3
Camera Interface
1Y
1Z
2Y
2Z
3Y
3Z
4Y
4Z
90C031
2
3
6
5
10
11
14
13
DOUT4
/DOUT4
DOUT5
/DOUT5
DOUT6
/DOUT6
DOUT7
/DOUT7
1Y
1Z
2Y
2Z
3Y
3Z
4Y
4Z
90C031
2
3
6
5
10
11
14
13
LValOut
/LValOut
PClkOut
/PClkOut
FValOut
/FValOut
LValOut
/LValOut
PClkOut
/PClkOut
SyncIn
/SyncIn
FValOut
/FValOut
1Y
1Z
2Y
2Z
3Y
3Z
4Y
4Z
90C031
R1
100
2
1
6
7
10
9
14
15
4
12
44HDB
GND
GND
1A
1B
2A
2B
3A
3B
4A
4B
G
G
90C032
Figure 2-7: A101 Input/Output Connections (Video Data and Control Signals)
BASLER A101
2-9
DRAFT
Camera Interface
2.3.3.1 RS-644/RS-422 Compatibility
Typically, RS-644 and RS-422 devices are compatible.
As shown in Table 2-4, the RS-422 receiver threshold is ±0.20 V. This threshold is well within the
RS-644 voltage swing of ±0.35 V. For this reason, an RS-422 receiver can handle RS-644 inputs.
On the other side, because RS-644 receivers typically tolerate the voltages generated by RS-422
drivers, an RS-644 receiver can handle RS-422 signals as input.
With RS-422, cable length has a strong impact on signal integrity. Long cables should not be used.
2.3.3.2 Converting TTL to RS-422/644
In many cases, ExSync signals in RS-644 format are generated by a frame grabber board. In
some situations, however, you may want to generate an ExSync signal directly from a TTL device
such as a sensor. Figure 2-8 illustrates a simple circuit that can be used to convert TTL signals to
RS-422/644 compatible signals.
The circuit produces a symmetric 200mV output. The 5V power required for the circuit can be
found on many frame grabbers on the GPIO port. There is no significant time delay due to the TTL
to RS-422/644 conversion.
A disadvantage to this circuit is the constantly existing DC current of approximately 5 mA.
TTL
EXSYNC
Input
EXSYNC
+
GND
/EXSYNC
RS644
EXSYNC
Output
+5V
1k
1k
Figure 2-8: TTL to RS-644 Conversion
2-10
BASLER A101
PDRAFT
Camera Interface
2.4 Serial Port
A101 cameras are equipped with an
RS-232 serial port for programming operation modes and
parameters. The data character format is 8N1 (8 data bits + no parity + 1 stop bit). Baud rate is
9600 bps, others are available upon request. See Section 2.2.2 for details on the RS-232 cable
that must be used between your camera and your PC.
The Basler Camera Configuration Tool (CCT) can be used to change camera modes and
parameters via the serial port. Refer to the CCT installation guide that was delivered with your
camera for instructions on installing the configuration tool. See Section 4.1 and the configuration
tool’s on-line help file for instructions on using the tool.
Camera modes and parameters can also be changed by issuing programming commands using
a terminal emulation program and the serial port. See Section 4.2.1 for instructions on setting up
a terminal emulation program and Section 4.2 for details on changing settings with programming
commands.
Programming commands can also be issued directly from your application via the serial port.
2.5 Power Supply
The A101 requires a 24 V DC power supply. Variations of ± 15% are allowed. Typical current is 170
mA (± 15%). Power is less than 5W.
Use of a 24 V power supply designed for at least 300 mA is recommended.
/
Make sure that the voltage rises to at least 16 VDC within 20 ms after you apply power
to the camera.
2.6 Status LEDs
Green LED
When the green LED is lit, it indicates that power is OK.
Yellow LED
The yellow LED indicates signal integrity. In case of an error, blinking signals from the yellow LED
indicate that an error condition is present. See Section 6.2 for further information.
BASLER A101
2-11
Camera Interface
2-12
DRAFT
BASLER A101
DRAFT
Operation and Features
3 Basic Operation and Features
3.1 Functional Description
The BASLER A101 high resolution camera employs a progressive scan CCD sensor chip with a
resolution of 1300 (H) x 1030 (V) pixels which provides features such as electronic exposure time
control and anti-blooming. The camera also features an asynchronous full frame shutter, that is,
the exposure time can be controlled via an external ExSync signal. The ExSync signal facilitates
asynchronous pixel readout.
There are three basic exposure time control modes: two asynchronous ExSync controlled modes
and a free-run mode.
In the asynchronous modes, the start of the exposure time is triggered by the ExSync signal. In
the level-controlled exposure time mode, the exposure time starts with the falling edge of ExSync
and ends with the rising edge. The rising edge then triggers readout of the charges from the
sensor elements to the CCD shift registers. In the programmable exposure time mode, the rising
edge of ExSync starts the exposure time. The exposure time is programmed to a predetermined
time period via a microcontroller in the camera. In this case, accumulated charges are read out
subsequent to the end of the exposure time.
The free-run mode enables a continuous frame output without the use of an external ExSync
signal. Frame rate and exposure time can be programmed independently.
These three basic exposure time control modes occur in combination with either a flexible or a
fixed timing. Flexible timing allows asynchronous line readouts and very fine exposure time
increments with very little jitter in the start and stop of exposure. Fixed timing has continuous
periodic output signals to which frame grabbers easily get synchronized at the price of larger
exposure time increments.
The accumulated charges are transported from light-sensitive sensor elements to vertical CCD
shift registers (see Figure 3-1). From there, the charges are transferred to a horizontal shift
register. The charges then move from the horizontal shift register to an output amplifier where they
are converted to voltages proportional to the accumulated charges. All lines are read out in a
single frame (progressive scan). The shifts are clocked according to the internal data rate. The
maximum overall output data rate is 11.75 frames per second at a pixel clock of 18 MHz.
The output voltages are digitized by the camera. The video data is transferred as an 8 bit video
data stream. All output signals use LVDS technology according to RS-644. For optimal
digitization, gain and offset are programmable via an RS-232 serial port. Exposure time control
modes, partial scan and binning mode are also programmable via the serial port. The maximum
achieveable frame rate increases to 22 frames per second with vertical binning and up to 157
frames per second with partial scan.
BASLER A101
3-1
Operation and Features
PDRAFT
CCD Sensor
Vert.
Shift
Reg.
ADC
Pixels
Vert.
Shift
Reg.
Pixels
Vert.
Shift
Reg.
Pixels
Vert.
Shift
Reg.
Pixels
VGC
(amplifier)
Horizontal
Shift Register
Figure 3-1: Shift Registers
BASLER A101cp Color Camera
The A101cp color camera is based
on the same sensor chip as the
monochrome camera and therefore has similar features. An exception is
that binning is not possible with the color camera.
The color chip is equipped with an additive color separation filter, known as
a Bayer filter. As a consequence, 2 x 2 pixels capture the RGB colors with
the green pixel occurring twice.
G
R
G
R
G
B
G
B
G
B
G
R
G
R
G
B
G
B
G
B
G
R
G
R
G
B
G
B
G
B
The camera processes the color information of each pixel as an 8-bit value.
A DLL that can be used to convert the 8-bit information into RGB color information is available
through Basler support.
3-2
BASLER A101
DRAFT
Operation and Features
3.2 Configuration Sets
The camera’s adjustable parameters are stored in
configuration sets and each configuration set contains all of
the parameters needed to control the camera. There are
three different configuration sets: the Work Set, the User Set
and the Factory Set. See Figure 3-2.
The Work Set contains the current camera settings and thus
determines the camera’s performance, that is, what your
image currently looks like. The Work Set is stored in the
camera RAM. The configuration parameters in the Work Set
can be altered directly using the Camera Configuration Tool
or programming commands.
EEPROM
User Set
Factory
Set
RAM
Work
Set
Figure 3-2: Config Sets
The Factory Set and the User Set are stored in a non-volatile
EEPROM in the camera. The Factory Set contains the camera’s default configuration and cannot
be changed.
The User Set initially contains factory settings but can be modified permanently by storing the
Work Set into the User Set.
When power to the camera is switched off, the Work set in the RAM is lost. At the next power on,
a Work Set is automatically loaded into the RAM using the settings from the User Set. If the User
Set is corrupted, the settings from the Factory Set are copied into the Work Set.
BASLER A101
3-3
Operation and Features
PDRAFT
3.3 Basic Exposure Time Control Modes
The camera can be programmed to function in two basic exposure time control modes. In these
modes, an ExSync signal is used to control exposure time and frame read out.
• In level-controlled mode, the exposure time of a frame being read out is determined by the
time between the falling edge of ExSync and the next rising edge. Charge is only accumulated when ExSync is low. The frame is read out and transferred on the rising edge of
ExSync. See Figure 3-3.
Figure 3-3: Exposure Time Level-controlled Mode
• In programmable mode, the rising edge of ExSync triggers exposure for a time period programmed via the serial interface. The frame is read out and transferred subsequent to the
programmed exposure time. The falling edge of ExSync is irrelevant. See Figure 3-4.
Figure 3-4: Exposure Time Programmable Mode
3.4 Free Run Mode
In free-run mode, the camera’s operation is similar to programmable mode except that no
ExSync signal is required; the camera generates its own internal control signal. With the rising
edge of this internal frame period signal, exposure is triggered for a time period programmed via
the serial interface. The frame is read out and transferred at the end of the programmed exposure
time (see Figure 3-5). Subsequent frames are automatically transferred to the output of the
camera.
free-run period
Internal
Sync
Signal
programmed exposure
frame read out
Figure 3-5: Exposure Time Free-run Mode
3-4
BASLER A101
DRAFT
Operation and Features
3.5 Fixed and Flexible Timing
Each of the three basic exposure time control modes can be used in combination with a fixed
timing or a flexible timing. The effective exposure time and the time of readout differ according to
the timing selected.
The basic difference between the two timing types is that fixed timing allows easy integration with
most frame grabbers due to continuous periodic LVAL signals while flexible timing enables
adjustment of exposure time in very fine increments. In addition, partial scan is only possible with
flexible timing.
Internally, the camera uses discharge pulses to discharge the light sensitive elements. Discharge
pulse timing depends on LVAL; pulses can only occur during the low time of LVAL 7.6 µs before
LVAL rises (13.4 µs if VBin is active). Discharge takes 2 µs.
To obtain exposure times of more than 82.6 µs, these discharge pulses are suppressed during the
exposure time.
/
Due to its convenience and flexibility, we suggest that you always try to use flexible
timing. Use fixed timing only if flexible timing does not work with your frame grabber.
3.5.1 Flexible Timing
With flexible timing, LVAL only toggles while FVAL is high and lines are actually being transferred.
Flexible timing allows asynchronous LVAL and discharge pulses. With flexible timing, exposure
time can be set in very fine increments of less than one µs.
If FVAL is low when the exposure time starts, a discharge pulse is generated immediately. This
discharge pulse may occur at any time asynchronously to any previous timing (see Figure 3-6).
Effective exposure starts after a delay of 2 µs due to the length of the discharge pulse. The
following discharge pulses are suppressed.
FVAL
25 µs
7 µs1
LVAL
7.6 µs2
exposure time
82.6 µs3
2 µs
Discharge
2 µs
5 µs
Readout
effective exposure time
1
With VBin active: 12.5 µs, with Partial scan active: 12.5 µs + 5.7 µs per ignored line
2
With VBin active: 13.4 µs, with Partial scan active: see formula in Section 3.11.1
3
With VBin active: 88.3 µs
Figure 3-6: Flexible Timing
BASLER A101
3-5
PDRAFT
Operation and Features
At the end of exposure time, charges are read out. Readout begins after a delay of 2 µs and takes
5 µs. Readout can occur asynchronously to any previous timing. Since exposure continues during
readout, the effective exposure time includes the time required for the readout procedure.
The frame is transferred after 25 µs.
/
Some frame grabbers will not synchronize to a camera that is set for flexible timing.
As a basic rule, the end of exposure should only occur while LVAL is low.
An asynchronous discharge pulse can only be generated while no frame is being
transferred, that is, while FVAL is low. FVAL must have been low at least 100 ns before exposure starts. Otherwise the additional discharge pulse is not generated and
effective exposure starts at the end of the last regular discharge pulse as in the fixed
timing.
3.5.2 Fixed timing
With fixed timing, LVAL toggles continuously even while no image is being transferred. These
regular LVAL pulses make it easy for frame grabbers to get synchronized with the camera.
Exposure is accomplished by simply suppressing the pulses that are used to discharge the light
sensitive elements. Since discharge pulses occur every 82.6 µs, exposure time can only be set to
increments of 82.6 µs (see Figure 3-7).
FVAL
25 µs
7 µs1
LVAL
7.6 µs2
exposure time
82.6 µs3
2 µs
Discharge
52 µs
5 µs
Readout
effective exposure time
1
With VBin active: 12.5 µs
2
With VBin active: 13.4 µs
3
With VBin active: 88.3 µs
Figure 3-7: Fixed Timing
Readout of the charges is only possible 52 µs after a discharge pulse. Readout takes 5 µs during
which exposure continues. So the effective exposure time is (n x 82.6 µs) + 57µs (n = 1, 2, ...).
Effective exposure can be set in steps of 82.6 µs, even though the programmed exposure can be
set in very fine steps. The frame is transferred 25 µs after readout.
To avoid exposure variances of 82.6 µs, set the exposure timing so that exposure will start when
LVAL is high and end when LVAL is high. If these recommendations are observed, the exposure
time is very stable.
3-6
BASLER A101
DRAFT
Operation and Features
3.6 Dynamic exposure time control
In the programmable and free-run modes, the microcontroller in the camera detects the shift in the
start of effective exposure time with respect to the programmed start of exposure. The
microcontroller compensates by reducing the end of the exposure time by the same shift. This
feature is called dynamic exposure time control.
3.7 What if the Previous Frame is Still Being
Transferred at the End of Exposure?
It is possible to begin the exposure for the next image, while a previously captured image is being
transferred out of the camera (see Figure 3-9). In this situation, exposure for the next image must
continue for at least 100 ns past the end of transfer of the previously captured image. That is,
exposure must continue for at least 100 ns after FVAL goes low.
If FVAL has not been low for at least 100 ns when the exposure time for the next image ends, the
exposure time for the next image will be increased until the end of transfer for the previous frame.
During this extended exposure period, any ExSync signals triggering the next start of exposure
will be ignored.
As a result, if ExSync triggers images at a rate higher than the specified frame rate, one frame will
be dropped. It is thus impossible to achieve frame rates higher than the specified rate and the
camera remains in a stable state.
BASLER A101
3-7
Operation and Features
PDRAFT
3.8 Exposure Time Control Modes In Detail
This section describes each combination of exposure time control mode and fixed or flexible
timing. It also provides timing diagrams for each combination
/
Note that an exposure time jitter of ± 56 ns frame to frame is possible in every exposure time control mode.
Also note that minimum high and low level time of ExSync is 500 ns or higher depending on the mode selected.
3-8
BASLER A101
DRAFT
Operation and Features
3.8.1 Programmable mode, flexible timing
With Exposure Start After Image Output
EXSYNC
programmed exposure
25 µs
> 100 ns
FVAL
82.6 µs
7 µs
LVAL
1027 1028 1029 1030
1
2
effective exposure
3
82.6 µs
2 µs
Discharge
2 µs
5 µs
Readout
Figure 3-8: Programmable Mode, Flexible Timing with FVAL Low
The rising edge of ExSync starts the exposure. A single discharge pulse is generated. Effective
exposure starts after a delay of 2 µs.
The end of exposure triggers the readout. Readout starts 2 µs subsequent to the end of the
programmed exposure time. Readout of the charges takes 5 µs during which exposure continues.
• Effective exposure = n + 5 µs (where n = programmed exposure).
• Minimum programmed exposure time is 20 µs.
/
ExSync must remain high for a minimum of 82.6 µs.
The exposure time may jitter by ± 56 ns.
FVAL must have been low for at least 100 ns when exposure starts.
With very low exposures, use flash light to prevent smearing.
BASLER A101
3-9
Operation and Features
PDRAFT
With Exposure Start During Image Output
EXSYNC
programmed exposure
25 µs
FVAL
> 100 ns
82.6 µs
7 µs
LVAL
1027 1028 1029 1030
1
2
3
effective exposure
82.6 µs
applied prog. exposure
Discharge
2 µs
5 µs
Readout
Figure 3-9: Programmable Mode, Flexible Timing with FVAL High
If a frame is still being transferred when exposure starts, it is not possible to generate a discharge
pulse asynchronously. In this case, exposure starts at the end of the last regular discharge pulse.
Due to dynamic exposure time control, the microcontroller detects that the effective exposure
started earlier than the programmed exposure time and it makes a corresponding shift in the
applied programmed exposure. The discharge pulses during applied programmed exposure are
suppressed. The end of the applied exposure time triggers readout. Readout occurs after a delay
of 2 µs. Readout takes 5 µs during which exposure continues.
• Effective exposure = n + 7 µs (where n = programmed exposure).
• Minimum programmed exposure time is 20 µs.
/
To obtain a constant exposure time, ExSync must rise while LVAL is active. Otherwise the exposure time may vary by 82.6 µs.
ExSync must remain high for a minimum of 82.6 µs.
The exposure time may jitter by ± 1/2 time unit ± 1 Pclk
(1 Pclk = 56 ns).
FVAL must have been low for at least 100 ns before the end of applied programmed
exposure.
With very low exposures, use flash light to prevent smearing.
3-10
BASLER A101
DRAFT
Operation and Features
3.8.2 Programmable mode, fixed timing
EXSYNC
programmed exposure
25 µs
FVAL
> 100 ns
82.6 µs
7 µs
LVAL
1027 1028 1029 1030
1
2
3
effective exposure
82.6 µs
applied prog. exposure
Discharge
52 µs
5 µs
Readout
Figure 3-10: Programmable Mode, Fixed Timing
The rising edge of ExSync starts the programmed exposure time. The effective exposure time
actually starts earlier, that is, at the last regular discharge pulse preceding the start of programmed
exposure (see Figure 3-10).
Due to dynamic exposure time control, the microcontroller detects that the effective exposure
started earlier than the programmed exposure time and it makes a corresponding shift in the
applied programmed exposure. The discharge pulses during applied programmed exposure are
suppressed. The end of the applied exposure time triggers readout. Readout occurs at the next
regular readout pulse.
As a result, effective exposure occurs in steps of 82.6 µs even though exposure can be
programmed in finer steps.
• Effective exposure = (n x 82.6 µs) + 57 µs (where n = 1, 2, ...).
• Minimum effective exposure is 139.6 µs.
/
To obtain a constant exposure time, ExSync must rise while LVAL is active.
The exposure time should be set to multiples of 82.6 µs. Otherwise the exposure time
may vary by 82.6 µs.
ExSync must remain high for a minimum of 82.6 µs.
The exposure time may jitter by ± 1/2 time unit ± 1 Pclk
(1 Pclk = 56 ns).
FVAL must have been low for at least 100 ns before the end of exposure.
BASLER A101
3-11
PDRAFT
Operation and Features
3.8.3 Level-controlled mode, flexible timing
With Exposure Start After Image Output
EXSYNC
FVAL
exposure
25 µs
> 100 ns
82.6 µs
7 µs
LVAL
1028 1029 1030
1
effective exposure
2
3
82.6 µs
2 µs
Discharge
2 µs
5 µs
Readout
Figure 3-11: Level-controlled Mode, Flexible Timing with FVAL Low
The falling edge of ExSync starts the exposure. A single discharge pulse is generated. Effective
exposure starts at the end of the discharge pulse.
The end of exposure triggers readout. Readout starts 2 µs after the rising edge of ExSync.
Readout takes 5 µs during which exposure continues.
• Effective exposure = n + 5 µs (where n = exposure set by ExSync).
• Minimum exposure time is 20 µs.
/
The exposure time may jitter by ± 1 Pclk (1 Pclk = 56 ns).
ExSync must remain high for a minimum of 82.6 µs.
FVAL must have been low for at least 100 ns before the edge of ExSync falls.
With very low exposures, use flash light to prevent smearing.
3-12
BASLER A101
DRAFT
Operation and Features
With Exposure Start During Image Output
EXSYNC
exposure
d
FVAL
25 µs
> 100 ns
82.6 µs
7 µs
LVAL
1027 1028 1029 1030
1
2
3
82.6 µs
effective exposure
Discharge
2 µs
5 µs
Readout
Figure 3-12: Level-controlled Mode, Flexible Timing with FVAL High
If the falling edge of ExSync occurs while a frame is still being transferred, it is not possible to
generate a discharge pulse asynchronously. In this case, exposure starts at the end of the last
regular discharge pulse. The following discharge pulses are suppressed.
The rising edge of ExSync triggers readout which starts after a delay of 2 µs. Readout takes 5 µs
during which exposure continues.
• Effective exposure = n + d + 7 µs
(where n = exposure set by ExSync).
(where d = time to last discharge pulse)
• Minimum exposure time is 20 µs.
/
To obtain a constant exposure time, make sure that the falling edge of ExSync occurs
while LVAL is high. Otherwise the exposure time may vary by 82.6 µs.
ExSync must remain high for a minimum of 82.6 µs.
The exposure time may jitter by ± 41.3 µs ± 1 Pclk
(1 Pclk = 56 ns).
FVAL must have been low for at least 100 ns before the next rising edge of ExSync.
With very low exposures, use flash light to prevent smearing.
BASLER A101
3-13
Operation and Features
PDRAFT
3.8.4 Level-controlled mode, fixed timing
EXSYNC
exposure
25 µs
FVAL
> 100 ns
82.6 µs
7 µs
LVAL
1027 1028 1029 1030
1
effective exposure
2
3
82.6 µs
Discharge
52 µs
5 µs
Readout
Figure 3-13: Level-controlled Mode, Fixed Timing
The falling edge of ExSync starts the exposure. Effective exposure starts earlier at the end of the
last regular discharge pulse. The discharge pulses during exposure are suppressed.
The rising edge of ExSync ends the exposure time. Readout is at the next regular readout pulse
which occurs at least 2 µs after the end of exposure time. Exposure continues to the end of
readout.
As a result, effective exposure occurs in steps of 82.6 µs even though exposure can be
programmed in finer steps.
• Effective exposure = (n x 82.6 µs) + 57 µs (where n = 1, 2, ...).
• Minimum effective exposure time is 139.6 µs.
/
To obtain a constant exposure time, make sure that the falling edge of ExSync occurs
while LVAL is high and that the rising edge occurs while LVAL is high. Otherwise the
exposure time may vary by 82.6 µs.
ExSync must remain high for a minimum of 82.6 µs.
The exposure time may jitter by ± 1 Pclk (1 Pclk = 56 ns).
If the conditions described above are met, this mode provides a very exact exposure
time even if the falling and rising edge of ExSync jitter.
Note that FVAL must have been low for at least 100 ns before ExSync rises.
3-14
BASLER A101
DRAFT
Operation and Features
3.8.5 Free-run mode, flexible timing
With Exposure Start After Image Output
period
Internal
Sync
Signal
programmed
exposure
25 µs
> 100 ns
FVAL
7 µs
LVAL
1028 1029 1030
1
2
3
4
1027 1028 1029 1030
82.6 µs
effective
exposure
2 µs
Discharge
2 µs
5 µs
Readout
Figure 3-14: Free-run Mode, Flexible Timing with FVAL Low
The start of the free-run period starts the exposure and a discharge pulse is generated. Effective
exposure starts at the end of the discharge pulse.
Readout occurs after the end of the programmed exposure time. It takes 2 µs for readout to start.
Effective exposure ends after readout.
• Effective exposure = n + 5 µs (where n = programmed exposure).
• Minimum programmed exposure time is 20 µs.
/
The programmed exposure time plus 85.2 µs must be smaller than the programmed
period.
The exposure time may jitter by ± 41.3 µs ± 1/2 time unit ± 1 Pclk (1 Pclk = 56 ns).
FVAL must have been low for at least 100 ns at the start of a period.
With very low exposures, use flash light to prevent smearing.
BASLER A101
3-15
PDRAFT
Operation and Features
With Exposure Start During Image Output
period
Internal
Sync
Signal
programmed exposure
25 µs
FVAL
> 100 ns
LVAL
7 µs
1027 1028 1029 1030
1
2
3
4
1026 1027 1028 1029 1030
82.6 µs
effective exposure
applied prog. exposure
Discharge
2 µs
5 µs
Readout
Figure 3-15: Free-run Mode, Flexible with FVAL High
If a frame is still being transferred when exposure starts, it is not possible to generate a discharge
pulse asynchronously. In this case, exposure starts at the end of the last regular discharge pulse.
Due to dynamic exposure time control, the microcontroller detects that the effective exposure
started earlier than the programmed exposure time and it makes a corresponding shift in the
applied programmed exposure. The discharge pulses during applied programmed exposure are
suppressed. The end of the applied exposure time triggers readout. Readout occurs after a delay
of 2 µs. Readout takes 5 µs during which exposure continues.
• Effective exposure = n + 7 µs (where n = programmed exposure).
• Minimum programmed exposure time is 20 µs.
/
3-16
The exposure time may jitter by ± 48.2 µs ± 1/2 time unit ± 1 Pclk (1 Pclk = 56 ns).
FVAL must have been low for at least 100 ns at the end of exposure time.
BASLER A101
DRAFT
Operation and Features
3.8.6 Free-run mode, fixed timing
period
Internal
Sync
Signal
programmed exposure
25 µs
FVAL
> 100 ns
LVAL
7 µs
1027 1028 1029 1030
1
2
3
4
1026 1027 1028 1029 1030
effective exposure
applied prog. exposure
82.6 µs
Discharge
52 µs
5 µs
Readout
Figure 3-16: Free-run Mode, Fixed Timing
The start of the free-run period starts the programmed exposure. Effective exposure starts at the
end of the last discharge pulse. The discharge pulses during exposure are suppressed.
Due to dynamic exposure time control, the applied programmed exposure ends earlier since the
microcontroller detects the shift by which the effective exposure started earlier. Readout is at the
next regular readout pulse subsequent to the end of the exposure time.
As a result, effective exposure occurs in steps of 82.6 µs even though exposure can be
programmed in finer steps.
• Effective exposure = (n x 82.6 µs) + 57 µs (where n = 1, 2, ...).
• Minimum exposure time is 139.6 µs.
/
The exposure time should be set to multiples of 82.6 µs. Otherwise the exposure time
may vary by ± 43.3 µs.
The exposure time may jitter by ± 1/2 time unit ± 1 Pclk
(1 Pclk = 56 ns).
The programmed exposure time plus 86 µs must be smaller than the programmed period.
BASLER A101
3-17
Operation and Features
PDRAFT
3.9 Gain and Offset
The major components in the camera electronics include: a CCD sensor, a variable gain control (VGC),
and an analog to digital converter (ADC). The CCD sensor outputs a voltage signal when it is exposed to light.
This voltage is amplified by the VGC and transferred to
the ADC which converts it to a digital output signal.
Two parameters, gain and offset, are associated with
the VGC and its supporting circuitry. As shown in Figure
3-17, increasing or decreasing the gain increases or
decreases the amplitude of the signal that is input into
the ADC. As Figure 3-18 shows, increasing or decreasing the offset moves the signal up or down the measurement scale but does not change the signal
amplitude.
By adjusting gain and offset, the CCD sensor signal for
a given application can be shaped to match the ADC input voltage range. The camera’s default gain and offset
are factory set so that black has a gray value of 1 and
white has a gray value of 254 under optimal lighting
conditions.
For most applications, white should have a gray value
of 254. Attempt to achieve this, by varying exposure
and illumination before changing the camera’s gain.
The default gain is the optimal operating point (minimum noise) and should be used if possible.
input
signal
to ADC
[V]
increasing gain
increases the
amplitude of
the input signal
light intensity [µJ/cm2]
Figure 3-17: Gain
input
signal
to ADC
[V]
increasing offset
moves the input
signal up the
measurement scale
offset
light intensity [µJ/cm2]
Figure 3-18: Offset
/
Because increasing gain increases both signal and noise, the signal to noise ratio does
not change significantly when gain is increased.
Gain settings in more detail
The output signal of the CCD sensor normally ranges from 0 V when it has been exposed to no
light to 0.4 V when it has been exposed to bright light. Within that range, the sensor characteristics
are linear. Saturation starts at 0.4 V. Further exposure results in a higher sensor output signal but
linearity is no longer guaranteed.
Peak to peak input voltage level of the ADC is 1.8 V. Consequently, the default gain is factory-set
so that the sensor’s linear operating output signal of 0 V - 0.4 V maps onto the ADC input voltage
range of 0 V - 1.8 V. This corresponds to a factor of 4.5 and is equivalent to 13 dB.
Gain is adjustable and can be programmed on a decimal scale that ranges from 0 to 319 [hex 000
to 13f]. The settings result in the following amplification:
• 0 = 3.5 dB
• 319 = 33.5 dB
• In between, the change in dB settings is linear.
• The gain can be adjusted in steps of 0.09 dB.
3-18
BASLER A101
DRAFT
Operation and Features
The desired 13 dB minimum gain is achieved when the gain is programmed to 101 [hex 065]. You
will find that the default gain setting on your camera is near to this value.
Reducing the gain below 101 [hex 065] results in mapping more than the linear operating range
of the sensor to the ADC. Increasing the gain to more than 101 maps a smaller range to the ADC.
If you know the decimal number setting for the gain on your camera, the equivalent decibel value
can be calculated as follows:
33.5 – 3.5
dB = æ -------------------------- × DN ö + 3.5
è
ø
319
If you know the decibels of gain that you want to achieve, the appropriate decimal number gain
setting can be calculated as follows:
319
DN = -------------------------- × ( dB – 3.5 ) , with dB > 3.5
33.5 – 3.5
BASLER A101
3-19
PDRAFT
Operation and Features
3.10 Soft Clipper
Soft clipper is a white compression function that reduces the gain gradient of higher gray values
to 66%. The soft clipper is useful in applications where better resolution of low gray values is
needed without sacrificing dynamic range.
The soft clipper gradient of 66% is fixed. The soft clipper parameter determines the flexion point
in the gain curve where the gradient changes to 66%. The flexion point can be moved in 16 steps
from 40% to 100% of the gain curve. This corresponds to gray values of 102 for 40% and 255 for
100%. If the value is set to 0, soft clipping starts at 40%. If it is set to the end of the scale, 15, the
entire gain curve is linear. Figure 3-19 shows a block diagram for the soft clipper circuit and Figure
3-20 illustrates how the soft clipper setting effects the gain gradient.
The default setting for soft clipping is 15 [hex 00f] meaning that soft clipping is deactivated.
CCD
Image
Sensor
VGC
Soft
Clipper
ADC
AGC = Variable Gain Control
ADC = Analog to Digital Converter
Figure 3-19: Soft Clipper Block Diagram
.
soft
clipper
output
1)
2)
3)
4)
100%
1) DAC2 = 15 (hex 00F)
2) DAC2 = 10 (hex 00A)
3) DAC2 = 5 (hex 005)
4) DAC2 = 0 (hex 000)
40%
40%
100%
130%
soft clipper input
Figure 3-20: Soft Clipper Flexion Point
3-20
BASLER A101
DRAFT
Operation and Features
3.11 Partial Scan
A block of lines can be addressed on the CCD
chip and read out in partial scan mode. Partial
scan can be used to look at elongated objects.
It also allows higher frame rates depending on
how many lines are active.
The starting point of the partial scan area is defined by specifying a number of lines of the
CCD array to skip (see Figure 3-21). The minimum number of lines to skip is one and the
number of lines skipped can be increased in
multiples of four. For example, you can set the
number of lines to skip to 1, 5, 9, 13, 17 ... .
1300
Lines
Skipped
1030
Partial
Scan
Area
4
The size of the partial scan area is defined by
Figure 3-21: Partial Scan
specifying the number of lines to include in the
partial scan area. The minimum number of
lines that must be included in the partial scan area is five and the number included can be increased in multiples of four. For example, you can set the number of lines to be included in the
partial scan area to 5, 9, 13, 17, 21 ... .
Information contained in the skipped lines and the lines below the partial scan area is discarded.
In partial scan, four lines at the bottom of the array are not used so the number of lines skipped
plus the number of lines in the partial scan area can equal a total of 1026.
/
Partial scan can only be used with the flexible timing. In the fixed timing, partial scan
settings are ignored.
Partial scan works differently if you are using it in combination with vertical or full binning. See page 3-22.
3.11.1 Changes to the timing in partial scan mode
FVAL, which is high for 85.176 ms in standard mode, becomes shorter according to:
FVAL = ( L x 82.6 µs ) + [(1030 - L) x 5.7 µs] + 44.8 µs
where L is the number of lines in the scan area.
As a result, the frame rate increases and is
1,000,000 µs
Frames/sec. = ----------------------------------------------------------------------------------------------------------------------(L x 82.6 µs) + [(1030 - L) x 5.7 µs] + 44.8 µs
LVAL normally rises 7 µs after the rising edge of FVAL. This time increases with partial scan
according to:
FVAL -> LVAL = [(S-1) x 5.7 µs] + 12.5 µs
where S is the number of lines skipped
BASLER A101
3-21
PDRAFT
Operation and Features
The falling edge of FVAL normally occurs 3.7 µs after the falling edge of the last LVAL pulse. This
time increases with partial scan according to:
LVAL -> FVAL = [(1030 - L - S) x 5.7 µs] + 32.2 µs
Table 3-1 shows the frame rates that can be achieved with a variety of scan area sizes.
Lines in Scan Area
Frames/sec.
Lines in Scan Area
Frames/sec.
105
71.4
605
19.0
205
46.1
705
16.6
305
34.0
805
14.7
405
26.9
905
13.2
505
22.3
1005
12.0
Table 3-1: Frame Rates for Various Scan Area Sizes
3.11.2 Partial scan with binning
The A101p monochrome camera is capable of using partial scan in combination with binning (see
Section 3.12). When horizontal binning is used, partial scan operates as described on page 3-21.
When vertical binning or full binning is used, partial scan operates differently. In these cases, the
minimum number of lines to skip is one and the number of lines skipped can be increased in multiples of four. For example, you can set the number of lines to skip to 1, 5, 9, 13, 17 ... .
The minimum number of lines that must be included in the partial scan area is 3 and the number
included can be increased in multiples of four. For example, you can set the number of lines to be
included in the partial scan area to 3, 5, 7, 9, 11 ... .
With vertical binning or full binning enabled, the number of lines reported out of the camera will be
one half of the number of lines included in the partial scan area. For example, if the partial scan
area includes 106 lines, 53 lines will be reported out of the camera. This occurs because with vertical binning or full binning, the camera combines information from two adjacent lines on the array
and reports the results out of the camera as a single line.
3-22
BASLER A101
DRAFT
Operation and Features
3.12 Binning Mode (A101p only)
Binning increases the camera’s sensitivity to light by summing up the charges from two or four adjacent pixels into
one pixel. Pixel combinations can be two adjacent pixels in
a line (horizontal binning), adjacent pixels in two rows (vertical binning), or four adjacent pixels (horizontal binning +
vertical binning, also called full binning).
Note that with horizontal binning, horizontal resolution reduces to 650. With vertical binning, vertical resolution reduces to 515. With full binning, resolution reduces to 650
(H) by 515 (V).
/
With horizontal binning enabled, frame grabbers often require the information that the
number of pixels in the X direction is 650. With vertical binning enabled, frame grabbers often require the information that the number of pixels in the Y direction is 515.
Failure to change the settings on your frame grabber can result in synchronization
problems.
Binning generally increases the sensitivity by up to four times normal. After switching
on binning, the image might look overexposed. Reduce the aperture, light intensity or
exposure in this case.
3.12.1 Changes to the timing in binning mode
With horizontal binning or full binning enabled, the Pclk is reduced to 9 MHz and the exposure
time jitter is reduced to ± 28 ns.
With vertical binning enabled,
• the maximum frame rate is 22 Frames/s
• FVAL is high for 45 ms
• LVAL rises 12.5 µs after the rising edge of FVAL,
• LVAL is low for 16.1 µs, as a result, the full LVAL period is now 88.3 µs,
• the time between the falling edge of the discharge pulse and the rising edge of LVAL is
13.4 µs.
BASLER A101
3-23
Operation and Features
PDRAFT
3.13 Test Image
The test image mode is used to check the camera’s basic functionality and its ability to transmit
an image via the video data cable. The test image
can be used for service purposes and for failure
diagnostics.
In test mode, the image is generated with a software program and the camera’s digital devices
and does not use the optics, CCD sensor, gain/
offset circuit or the ADC. The test image consists
of lines with several gray scale gradients ranging
from 0 to 255. The first line starts with a gray
value of 0 on the first pixel, in the second line the
first pixel has a gray value of 1, in the third line the
first pixel has a gray value of 2, and so on.
The mathematical expression is: gray level = [x + y] MOD 256
If you are operating the camera in an exposure mode that requires an ExSync signal, the ExSync
signal must be present and must toggle in order to generate a test image.
If the camera is set for test free-run, each cycle of the camera’s internal sync signal will trigger the
output of a test image.
/
When the test image is active, partial scan and binning will effect the image but the
gain, offset and exposure settings have no effect on the image.
3.14 Camera Status
A101 cameras monitor their status by performing a regular series of self checks. The current status
of the camera can be viewed in several ways:
• with the Camera Configuration Tool. You can use the Status Tab (see Section 4.1 and the
configuration tool’s on-line help file) to check a list of several possible errors and an indication of whether those errors are present.
• with ASCII based programming commands. You can use the Camera Status command (see
Section 4.2.5) to check if the camera has detected any errors.
• by checking the yellow LED on the back of the camera. If certain error conditions are present,
the yellow LED will blink (see Section 6.2).
3-24
BASLER A101
DRAFT
Configuring the Camera
4 Configuring the Camera
The A101 is programmable via the serial port. It comes factory-set so that it will work properly for
most applications with minor changes to the camera configuration. For normal operation, the
following parameters are usually configured by the user:
• exposure time control mode
• exposure time (only for programmable and free-run mode)
• frame period (for free-run mode)
To customize operation for your particular application, the following parameters can also be
configured:
• gain
• offset
• soft clipper
• partial scan
• binning (A101p only)
Two methods can be used to program the A101. The first and easier approach is to change the
camera settings using the Camera Configuration Tool (CCT). See Section 4.1 and the CCT’s online help file for instructions on using the configuration tool.
You can also change the settings by programming the camera directly from a terminal emulation
program or from your application. For this purpose, commands are provided to read and modify
the settings. Section 4.2 lists the commands and provides instructions for their use.
BASLER A101
4-1
Configuring the Camera
DRAFT
4.1 Configuring the camera with the Camera
Configuration Tool
The Camera Configuration Tool is a Windows® based program used to easily configure the
camera. The tool communicates via the serial interface and automatically generates the manual
programming commands that are described in Section 4.2. For instructions on installing the tool,
see the CCT installation guide that was delivered with your camera.
This section assumes that you are familiar with Microsoft Windows® and that you have a basic
knowledge on how to use programs. If not, please refer to your Microsoft Windows® manual.
4.1.1 Opening the Configuration Tool
1. Make sure that the serial interface is connected to your camera and that the camera has
power.
2. Click Start, click Basler Vision Technologies , and then click Camera Config Tool (default
installation).
If start-up was successful, the Model Tab is displayed.
If start-up was not successful the Connection Tab or a Select Camera dialog box will appear.
For possible causes, refer to the Camera Configuration Tool installation guide that was delivered with your camera.
4.1.2 Closing the Configuration Tool
Close the Configuration Tool by clicking on the
button in the upper right corner of the window.
4.1.3 Configuration Tool Basics
The RAM memory in the camera contains
the set of parameters that controls the
current operation of the camera. This set
of parameters is known as the Work Set
(see
Section
3.2).
The
Camera
Configuration Tool is used to view the
present settings for the parameters in the
Work Set or to change the settings. The
configuration
tool
organizes
the
parameters into related groups and
displays each related group on a tab. For
example, the Gain and Offset Tab contains
all of the parameters related to setting the
gain and the offset.
When the configuration tool is opened, it
queries the camera and displays the
current settings for the parameters in the
Work Set.
4-2
Figure 4-1: Gain and Offset Tab
BASLER A101
DRAFT
Configuring the Camera
Using the Refresh and Apply Buttons
Two buttons always appear at the bottom of the configuration tool window, the Refresh button and
the Apply button.
Typically, if you make a change to one or more of
the settings on a tab, you must click the Apply
button for that change to be transmitted from the
configuration tool to the camera’s Work Set. Because the parameters in the Work Set control the
current operation of the camera, when you click the Apply button, you will see an immediate
change in the camera’s operation.
The Refresh button can be used at any time to make sure that the configuration tool is displaying
the current settings for the parameters in the Work Set. When you click the Refresh button, the
configuration tool queries the camera to determine the current setting for each parameter in the
Work Set and updates the display on each tab.
/
Keep in mind that the Work Set is stored in a volatile memory. Any changes you make
to the Work Set using the configuration tool will be lost when the camera is switched
off. To save changes you make to the Work Set, go to the Sets Tab and save the modified Work Set into the camera User Set. The User Set is stored in non-volatile memory
and will not be lost when the camera is switched off (see Section 3.2).
4.1.4 Configuration Tool Help
The Camera Configuration Tool includes a complete on-line help file which explains how to use
each tab and how the settings on each tab will effect the camera’s operation. To access on-line
help, press the F1 key whenever the configuration tool is active.
BASLER A101
4-3
Configuring the Camera
DRAFT
4.2 Configuring the Camera with Programming
Commands
Camera settings can be changed via the serial interface using a set of ASCII based programming
commands. The commands can be issued from a terminal emulation program or from your
application.
Section 4.2.1 describes how a terminal emulation program must be set up when it is used to issue
commands to a Basler camera. Section 4.2.2 describes the general format that is used for
commands. Sections 4.2.3 through 4.2.12 describe each command in detail and Section 4.2.13
lists all commands available.
4.2.1 Setting Up a Terminal Emulation Program
You can also use a terminal emulation program (such as Windows® Hyperterminal) along with the
ASCII based commands described below to change the camera’s settings. If you will be using a
terminal program, make sure that it has the following settings:
• Data character format 8N1 (8 data bits + no parity + 1 stop bit)
• Baud rate 9600 bps
• Local echo: On
• If a field is offered for a delay after LF, set it to 10 ms.
• Add line feeds after carriage returns: On
• No software or hardware protocols (XON/XOFF, RTS/CTS, ...)
4.2.2 Command Format
Communication via the serial port uses ASCII characters exclusively. A command to the camera
starts with a colon and ends with a carriage return (CR) or a line feed (LF), for example:
:x01↵
In the example above, the colon indicates that a command follows. The ’x’ indicates the type of
command and in this case, is followed by two hexadecimal numbers which represent a value.
When sent via the serial interface, each of the 5 characters in the command would be ASCII
coded. Leading zeros must not be omitted. The CR indicates the end of the command.
If the command is a query, the camera answers with data followed by a CR. Wait for the CR before
you send the next command. If the camera is not able to process a command it returns a question
mark and a CR.
/
Note that the camera accepts only lowercase letters. If capitals are used, the camera
replies with a ’?’.
At 9600Bd, each character in a command takes about 1 ms to be transmitted. So, for example,
the command :d0060↵ would take about 7 ms for transmission. Maximum time for a single
command such as a changed gain to take effect is 1 ms after the camera has decoded the
command. Loading and saving entire configuration sets takes approximately 500 ms.
4-4
BASLER A101
DRAFT
Configuring the Camera
4.2.3 Reading Configuration Parameters
To view all current configuration parameters, use the :? query command. The camera replies with
the current configuration of the Work set, for example:
Model A101P
ExpMode 06
DAC0 063
Sn 123456123456
ExpTime 007e0
DAC1 302
Id CF017302
Period 062
PartScan ffff
Flags 00
DAC2 00f
The first line displays:
• the camera model.
• the camera’s serial number.
• a factory ID number.
These settings can also be read individually using the :?0, :?1, :?2, commands respectively.
These values do not effect camera performance.
The second line displays:
• the exposure time control mode
• the exposure time
• the period of the free-run mode
• the partial scan settings
• the camera flags
The third line displays:
• DAC0, which represents the gain setting
• DAC1, which represents the offset setting
• DAC2, which represents the soft clipper value for white compression
All numbers in lines two and three are hexadecimal.
4.2.4 Reading the Protocol and Firmware Version
The protocol version of the serial interface is viewed by using the :?3 command. The camera
replies with the interface version number, for example, 01.
The firmware version can be viewed by using the :?4 command. The camera replies with the
firmware version number, for example, 0100 .
BASLER A101
4-5
Configuring the Camera
DRAFT
4.2.5 Camera Status
To check the current status of the camera, use the :f command. The camera replies with the
current status flags. See Section 6.2 for a more detailed explanation of status flags and a list of
the flags.
/
After any change is made that can effect the camera’s status, the status flags can take
several seconds to update. If you make a change that can effect the camera’s status,
wait at least 5 seconds before using the status command.
4.2.6 Programming Exposure Time Control
4.2.6.1 Mode Command
The exposure mode command is used to:
• select the exposure time control mode
• select fixed or flexible timing
• enable binning and select a binning type
• enable the test image
The format of the mode command is :xn1n0 where n1 and n0 are hexadecimal digits.
The n1 digit is used to enable binning. Table 4-1 lists the allowed
settings for the n1 digit and shows the binning mode that will be
enabled. For example, if n1 is set to 1, vertical binning will be
enabled.
n1
Binning
0
Disabled
1
Vertical
2
Horizontal
3
Full
Table 4-1: Binning Settings
The n0 digit is used to select the exposure time
control mode and fixed or flexible timing. Table
4-2 lists the allowed settings for the n0 digit and
shows the exposure time control mode and the
timing that will be associated with each setting.
For example, if n0 is set to 2, the camera will operate in the programmable mode with fixed timing.
n0
Exposure Time Control Mode
0
Programmable mode, flexible Timing
1
Level-controlled mode, flexible timing
2
Programmable mode, fixed timing
3
Level-controlled mode, fixed timing
4
Free-run mode, flexible timing
6
Free-run mode, fixed timing
Table 4-2: Mode Settings
4-6
BASLER A101
DRAFT
The test image is enabled using a combination of the
n1 and n0 digits.
Configuring the Camera
n1
n0
Test Image
Table 4-3 shows how the digits should be set to
8
1
Test image with ExSync
enable test image with ExSync or test with free run.
8
4
Test Image with free-run
When test image with ExSync is enabled, an ExSync
signal must be provided to the camera and
Table 4-3: Test Image Settings
generation of the test image will be triggered by the
ExSync signal. When test image with free-run is
enabled, generation of the test image will be triggered by the camera’s internal sync signal.
When the test image is active, gain, offset and exposure settings have no effect on the image.
Examples of Exposure mode commands:
Example One
Assume that you want to operate the camera in programmable mode with fixed timing. Also
assume that you do not want binning enabled:
1. Check Table 4-1 and note that for binning to be disabled, n1 should be set to 0.
2. Check Table 4-2 and note that to select programmable mode with fixed timing n0 should be
set to 2.
3. Enter this command:
:x02
Example Two
Assume that you want to generate a test image using an ExSync signal:
1. Check Table 4-3 and note that to generate a test image based on an ExSync signal, n1
should be set to 8 and n0 should be set to 1.
2. Enter this command:
:x81
Reading the Current Exposure Mode Setting
The :x command reads the current exposure mode setting from the Work Set and returns n1n0.
As explained in Section 4.2.3, the :? query command returns a list of all current parameter
settings from the Work set. The ExpMode n1n0 entry shows the current setting for the exposure
mode.
BASLER A101
4-7
Configuring the Camera
DRAFT
4.2.6.2 Exposure Time
When the camera is operating in programmable or free-run mode, an exposure time must be
specified. The exposure time command allows you to set a time unit and a multiplier. The camera
determines the exposure time by multiplying the time unit by the multiplier. For example, if the time
unit is set to 500 ns and the multiplier is set to 1000 [hex 03e8], the exposure time will be 500,000
ns.
The format of the command used to set the exposure time is :tn4n3n2n1n0 where n4, n3, n2,
n1 and n0 are hexadecimal digits.
The n4 digit is used to select the time unit. Table 4-4 lists the
allowed settings for n4 and shows the time unit that will be will
be selected. For example, if n4 is set to 2, the 1000 ns time unit
will be selected.
The n3, n2, n1 and n0 digits are used to specify a multiplier.
The value of these hexadecimal digits can range from 0000 to
ffff (0 to 65535 decimal).
n4
Time unit
0
250 ns
1
500 ns
2
1000 ns
3
2000 ns
Table 4-4: Exposure Time Unit
For fixed timing, the minimum valid exposure time is 139.6 µs
and the maximum is 131072 µs. For flexible timing, the minimum valid exposure is 20 µs and the
maximum is 131072 µs.
Example of an Exposure Time Command:
Assume that you want to set the time unit to 2000 ns and the multiplier to the decimal value 500:
1. Check Table 4-4 and note that to select a time unit of 2000 ns, n4 must be set to 3.
2. Convert 500 to a four digit, hexadecimal value:
500 decimal = 01f4 hex
3. Enter this command:
:t301f4
Reading the Current Exposure Time Multiplier Setting
The :t command reads the current exposure time setting from the Work Set and returns
n 4n 3n 2n 1n 0.
As explained in Section 4.2.3, the :? query command returns a list of all current parameter
settings from the Work set. The ExpTime n4n3n2n1n0 entry shows the current setting for the
exposure time.
4-8
BASLER A101
DRAFT
Configuring the Camera
4.2.6.3 Frame Period for Free-run Mode
The frame period is effective only if free-run mode is selected. Otherwise it is ignored.
The period command allows you to set a time unit and a multiplier. The camera determines the
frame period by multiplying the time unit by the multiplier. For example, if the time unit is set to
1024 µs and the multiplier is set to 100 [hex 64], the exposure time will be 102,400 µs.
The format of the command used to set the frame period is :pn2n1n0 where n2, n1 and n0 are
hexadecimal digits.
The n2 digit is used to select the time unit. Table 4-5 lists the allowed settings for n2 and shows
the time unit that will be will be selected. For example, if n2 is set to 2, the 3072 µs time unit will
be selected.
The n1 and n0 digits are used to specify a multiplier. The value of these hexadecimal digits can
range from 00 to ff (0 to 255 decimal).
n2
Time Unit
n2
Time Unit
n2
Time Unit
0
1
2
3
4
5
1024 µs
2048 µs
3072 µs
4096 µs
5120 µs
6144 µs
6
7
8
9
a
b
7168 µs
8192 µs
9216 µs
10240 µs
11264 µs
12288 µs
c
d
e
f
13312 µs
14336 µs
15360 µs
16384 µs
Table 4-5: Frame Period Time Unit
Example of a Frame Period Command:
Assume that you want to set the time unit to 2048 µs and the multiplier to the decimal value 60:
1. Check Table 4-5 and note that to select a time unit of 2048 µs, n2 must be set to 1.
2. Convert 60 to a two digit hexadecimal value:
60 decimal = 3c hex
3. Enter this command:
:p13c
Reading the Current Frame Period Multiplier Setting
The :p command reads the current frame period setting from the work set and returns n2n1n0.
As explained in Section 4.2.3, the :? query command returns a list of all current parameter
settings from the Work set. The Period n2n1n0 entry shows the current setting for the frame
period.
BASLER A101
4-9
Configuring the Camera
DRAFT
4.2.7 Gain
The format of the command used to set the gain is :d0n2n1n0 where n2, n1 and n0 are
hexadecimal digits. The value of the hexadecimal digits can range from 000 to 13f (0 to 319
decimal).
The factory default setting for the gain is approximately hex 065 (101 decimal).
/
Because increasing gain increases both signal and noise, the signal to noise ratio
does not change significantly when gain is increased.
Do not use a gain setting lower than the factory default (usually around hex 065). If
you set the gain lower than the default, a non-linear portion of the sensor’s response
curve could be mapped to the ADC input and result in increased PRNU.
Example of a Gain Command:
Assume that you want to set the gain to the decimal value 140:
1. Convert 140 to a three digit hexadecimal value:
140 decimal = 08c hex
2. Enter this command:
:d008c
Reading the Current Gain Setting
The :d0 command reads the current gain setting from the Work Set and returns n2n1n0.
As explained in Section 4.2.3, the :? query command returns a list of all current parameter
settings from the Work set. The DAC0 n2n1n0 entry shows the current setting for the gain.
4-10
BASLER A101
DRAFT
Configuring the Camera
4.2.8 Offset
The format of the command used to set the offset is :d1n2n1n0 where n2, n1 and n0 are
hexadecimal digits. The value of the hexadecimal digits can range from 000 to 3ff (0 to 1023
decimal).
The factory default setting for the offset is approximately hex 200 (decimal 512).
Example of an Offset Command:
Assume that you want to set the offset to the decimal value 700:
1. Convert 700 to a three digit hexadecimal value:
700 decimal = 2bc hex
2. Enter this command:
:d12bc
Reading the Current Offset Setting
The :d1 command reads the current offset setting from the Work Set and returns n2n1n0.
As explained in Section 4.2.3, the :? query command returns a list of all current parameter
settings from the Work set. The DAC1 n2n1n0 entry shows the current setting for the offset.
BASLER A101
4-11
Configuring the Camera
DRAFT
4.2.9 Soft Clipper
The format of the command used to set soft clipping is :d2n2n1n0 where n2, n1 and n0 are
hexadecimal digits. The value of the hexadecimal digits can range from 000 to 00f (0 to 15
decimal).
The factory default setting for soft clipping is hex 00f (decimal 15).
Example of a Soft Clipper Command:
Assume that you want to set soft clipping to the decimal value 10:
1. Convert 10 to a three digit hexadecimal value:
10 decimal = 00a hex
2. Enter this command:
:d200a
Reading the Current Soft Clipper Setting
The :d2 command reads the current soft clipper setting from the Work Set and returns n2n1n0.
As explained in Section 4.2.3, the :? query command returns a list of all current parameter
settings from the Work set. The DAC2 n2n1n0 entry shows the current setting for the soft clipper.
4-12
BASLER A101
DRAFT
Configuring the Camera
4.2.10 Partial Scan
As explained in Section 3.11, partial scan is set up by defining a number of lines to skip and a
number of lines to include in the scan area.
To determine the number of lines that will be skipped, the camera’s internal program uses the
equation: lines skipped = 4a + 1 where a = 0, 1, 2, 3 ... .
To determine the number of lines that will be included in the scan area, the camera’s internal program uses the equation: lines scanned = 4b + 5 where b = 0, 1, 2, 3 ... .
The partial scan command allows you to set a value for a and a value for b.
The format of the command used to set up partial scan is :rn3n2n1n0 where n3, n2, n1 and n0
are hexadecimal digits.
The n3 and n2 digits are used to establish the value for a in the equation lines skipped = 4a + 1.
The value of the hexadecimal digits can range from 00 to ff (0 to 255 decimal).
The n1 and n0 digits are used to establish the value for b in the equation lines scanned = 4b + 5.
The value of the hexadecimal digits can range from 00 to ff (0 to 255 decimal).
/
The sum of the number of lines skipped plus the number of lines in the partial scan
area must not exceed 1026.
Partial scan can only be used with the flexible timing. In fixed timing, partial scan settings are ignored.
To deactivate partial scan, use the command :rffff.
On the A101cp, using partial scan shifts the Bayer color filer mask by one vertically. You
may need to change the vertical offset in your frame grabber settings to compensate.
Example of a Partial Scan Command:
Assume you want to skip the first 401 lines and to include the next 505 lines in the partial scan
area.
1. Find the value for a:
lines skipped = 4a + 1
401 = 4a + 1
100 = a
2. Find the value for b:
lines scanned = 4b + 5
505 = 4b + 5
125 = b
3. To determine the values for n3 and n2, convert a to a two digit hexadecimal number:
a = 100 = 64 hex
4. To determine the values for n1 and n0, convert b to a two digit hexadecimal number:
b = 125 = 7d hex
5. Enter this command:
:r647d
BASLER A101
4-13
Configuring the Camera
DRAFT
Reading the Current Partial Scan Settings
The :r command reads the current partial scan setting from the Work Set and returns n3n2n1n0.
As explained in Section 4.2.3, the :? query command returns a list of all current parameter
settings from the Work set. The PartScan n3n2n1n0 entry shows the current setting for partial
scan.
Partial Scan With Vertical or Full Binning
The A101p monochrome camera is capable of using partial scan in combination with binning. When
horizontal binning is used, partial scan is programmed as described on page 4-13. When vertical
binning or full binning is used, partial scan operates differently.
The number of lines skipped is still determined by the result of the formula lines skipped = 4a + 1,
with a being n3n2 and a = 0, 1, 2,... .
The formula for determining the number of lines in the scan area is different. The number of lines
in the scan area is now given by the result of lines scanned = 4b + 6, with b being n1n0 and b =
0, 1, 2, ... .
/
Be aware that when using partial scan with vertical binning or with full binning, the results from two adjacent lines are combined. This means that the number of lines reported out of the camera will be equal to one half of the lines that you include in the
scan area. For example, if you set your scan area to include 806 lines, 403 lines will
be reported out of the camera.
Example of a Partial Scan Command (with vertical or full binning):
Suppose you want to skip the first 101 lines and to include the next 806 lines in the partial scan
area.
1. Find the value for a:
lines skipped = 4a + 1
101 = 4a + 1
25 = a
2. Find the value for b:
lines scanned = 4b + 6
806 = 4b + 6
200 = b
3. To determine the values for n3 and n2, convert a to a two digit hexadecimal number:
a = 25 = 19 hex
4. To determine the values for n1 and n0, convert b to a two digit hexadecimal number:
b = 200 = c8 hex
5. Enter this command:
:r19c8
4-14
BASLER A101
DRAFT
Configuring the Camera
4.2.11 Storing a Modified Configuration
When you use commands to modify the gain, offset, exposure mode, etc., you are modifying the
values stored in the camera’s Work Set. To permanently store the changes you make to the Work
set, use the :z1 command. The :z1 command copies the Work set into the camera’s User Set.
The User Set is stored in non-volatile memory on camera’s EEPROM and will not be lost when
power to the camera is switched off.
Storing a complete configuration set takes approximately 500ms.
Direct programming of configuration parameters in the User Set or the Factory Set is not possible.
4.2.12 Loading the User Set and Factory Set
The :c1 command loads the User set into the Work set, and the :c2 command loads the Factory
set into the Work set.
BASLER A101
4-15
Configuring the Camera
DRAFT
4.2.13 List of Commands
Description
Command
Reading camera configuration
Read Work set
:?
Read camera model
:?0
Read serial number
:?1
Read ID
:?2
Read serial interface protocol version
:?3
Read firmware version
:?4
Read camera status flags
:f
Loading / storing configuration sets
Load User set to Work set
:c1
Load Factory set to Work set
:c2
Store Work set as User set
:z1
Gain
Read gain value from the Work Set
:d0
Write gain value to the Work set
:d0n2n1n0
Offset
Read offset value from the Work Set
:d1
Write offset value to Work set
:d1n2n1n0
Soft clipper
Read soft clipper value from the Work Set
:d2
Write soft clipper value to Work set
:d2n2n1n0
Exposure time control mode (Binning, Test image)
Read exposure time control mode from the Work Set
:x
Write exposure time control mode to Work set
:xn1n0
Exposure time
Read exposure time value from the Work Set
:t
Write exposure time value to Work set
:tn4n3n2n1n0
Frame period for free-run mode
Read period value from the Work Set
:p
Write period value to Work set
:pn2n1n0
Partial Scan
Read partial scan value from Work Set
:r
Write partial scan value to Work set
:rn3n2n1n0
Table 4-6: List of Commands
4-16
BASLER A101
DRAFT
Mechanical Considerations
5 Mechanical Considerations
5.1 Dimensions
The camera’s sensor and electronics are housed in an aluminum case. Dimensions are given in
the diagram in Figure 5-1. All dimensions are in mm.
5.2 Mounting Facilities
The A101 camera housing is manufactured with high precision. Planar, parallel and angular sides
guarantee precise mounting with high repeatability.
The A101 camera is equipped with four M4 mounting holes on the front plate and two M4 mounting
holes on each side as indicated in Figure 5-1.
The M4 holes on the sides of the camera also serve as through holes for 70 mm long, M3 bolts.
The through holes provide an additional mounting option for precise rotational camera adjustment
about one axis. This can be accomplished by inserting an M3 bolt through one of the through holes
and fixing the camera in the required position using bolts in the corresponding M4 holes.
BASLER A101
5-1
Mechanical Considerations
DRAFT
Figure 5-1: Mechanical Dimensions [in mm]
5-2
BASLER A101
DRAFT
Mechanical Considerations
5.3 Positioning Accuracy of the Sensor Chip
Positioning accuracy of the sensor chip in the horizontal and vertical direction is ± 0.15 mm.
Rotational positioning accuracy is as shown in Figure 5-2. Reference position is the center of the
camera housing.
Since the translatory and rotational positioning tolerance depend on each other, the worst case of
maximum rotational and horizontal/vertical mis-positioning cannot occur at the same time.
Figure 5-2: Sensor Alignment
BASLER A101
5-3
Mechanical Considerations
DRAFT
5.4 Optical Interface
A C-mount lens adapter and an F-mount lens adapter is available for each A101 model.
Caution!
!
To avoid collecting dust on the sensor, mount a lens on the camera immediately after removing the dust cap.
5.4.1 Adapter Mounting Feature
To turn the lens inscription to an appropriate rotary position required for your given application:
1. Loosen the four screws that hold the adapter in the camera body.
2. Turn the adapter to the desired position.
3. Tighten the four screws.
C-mount
5-4
F-Mount
BASLER A101
DRAFT
Troubleshooting
6 Troubleshooting
6.1 Quick Checklist
If you are having trouble with the operation of your camera, make a quick check of the following
items:
• Power is applied to the camera and it meets the specifications shown in section 2.5.
• You are using the correct data cable for your frame grabber.
• The data cable is plugged into the camera and the frame grabber.
• The RS-232 cable:
is plugged into the camera.
is plugged into the proper serial port on the PC.
is wired according to the drawing shown in Section 2.2.2.
• The serial port’s settings are correct (8, N, 1 with a baud rate of 9600 bps).
• The correct serial port is selected:
If you are using the Camera Configuration Tool, make sure that the port selected on the
connection tab matches the port that the camera is plugged into.
If you are using a terminal emulation program, make sure that the emulation program’s
settings are as shown in Section 4.2.1. Also make sure that the port selected in the
emulation program’s settings and the port that the camera is plugged into are the same.
BASLER A101
6-1
DRAFT
Troubleshooting
6.2 Fault Finding Using Camera Flags
The A101 regularly performs self tests. Detected errors are signaled by blinking of the yellow LED
on the back of the camera. The number of pulses indicate the detected error. If several error states
are present, the LED outputs the error codes in succession.
To get more information about an error, use the :f command to determine which camera flag has
been set. Each flag is given as a hexadecimal number. For example, if the ExSync signal has not
changed state in five seconds or longer, the :f command would return 10.
If more than one error is present, the values of the flags are added, for example, if the camera was
just switched on and the User Set could not be loaded, the :f command would return 41.
See Table 6-1 for the description of the pulses and the flags.
LED
Flag
Description
On
Continuous
00
The camera is OK.
On
Continuous
40
This is the normal state after power on. The flag is reset to 00 once the :?
or the :f command has been issued. The flag can be used to recognize a
camera reset.
3 pulses
10
ExSync has not changed state for 5 seconds or longer. If you are not supplying an ExSync signal to the camera, this is a normal condition and
should be ignored. Otherwise check the cable and the ExSync generating
device.
5 pulses
04
The Work Set could not be stored into the User Set. Please contact
BASLER technical support.
6 pulses
01
The User Set could not be loaded. Please contact BASLER technical support.
6 pulses
02
The Factory Set could not be loaded. Please contact BASLER technical
support.
Table 6-1: Camera Status
6.3 Fault Finding Using the Configuration Tool
If you are using the Camera Configuration Tool, select the Status Tab to view a general
description of the camera status. You can also use the Presence Check feature on the Connection
Tab to view the camera flags.
6-2
BASLER A101
DRAFT
Revision History
Doc. ID Number
Date
Changes
DA 037201
15-June-2001
Initial release.
DA 037202
10-July-2001
Made revisions required by the new Camera Configuration Tool:
Removed the installation chapter and placed the installation information in a separate camera installation guide and a separate Camera
Configuration Tool installation guide.
Removed the detailed instructions for using the Camera Configuration
Tool. These detailed instructions are now contained in the configuration tool’s on-line help.
Removed references to the A101 and the A101c. These versions of the
camera are no loner available.
BASLER A101
i
DRAFT
ii
BASLER A101
DRAFT
Index
A
F
adapter . . . . . . . . . . . . . . . . . . . . . . . . . . . . . . . . 5-4
anti-blooming . . . . . . . . . . . . . . . . . . . . . . . . . . . . 1-2
apply button . . . . . . . . . . . . . . . . . . . . . . . . . . . . . 4-3
B
binning . . . . . . . . . . . . . . . . . . . . . . . . . . . . . . . . 3-23
explained . . . . . . . . . . . . . . . . . . . . . . . . . . 3-23
setting with commands . . . . . . . . . . . . . . . . . 4-6
C
cable lengths . . . . . . . . . . . . . . . . . . . . . . . . . . . . 1-2
camera configuration tool
apply button . . . . . . . . . . . . . . . . . . . . . . . . . 4-3
closing the tool . . . . . . . . . . . . . . . . . . . . . . . 4-2
explained . . . . . . . . . . . . . . . . . . . . . . . . . . . 4-2
opening the tool . . . . . . . . . . . . . . . . . . . . . . 4-2
refresh button . . . . . . . . . . . . . . . . . . . . . . . . 4-3
camera status . . . . . . . . . . . . . . . . . . . . . . . 3-24, 4-6
cleaning the camera and sensor . . . . . . . . . . . . . 1-4
C-mount adapter . . . . . . . . . . . . . . . . . . . . . . . . . 5-4
color camera . . . . . . . . . . . . . . . . . . . . . . . . . . . . 3-2
command format . . . . . . . . . . . . . . . . . . . . . . . . . 4-4
commands
list of . . . . . . . . . . . . . . . . . . . . . . . . . . . . . . 4-16
programmimg with . . . . . . . . . . . . . . . . . . . . 4-4
configuration sets
explained . . . . . . . . . . . . . . . . . . . . . . . . . . . 3-3
storing/loading with commands . . . . . . . . . 4-15
viewing with commands . . . . . . . . . . . . . . . . 4-5
configuration tool
see camera configuration tool
configuring the camera
with commands . . . . . . . . . . . . . . . . . . . . . . . 4-4
with the config tool . . . . . . . . . . . . . . . . . . . . 4-2
conformity . . . . . . . . . . . . . . . . . . . . . . . . . . . . . . 1-2
D
dark signal non-uniformity . . . . . . . . . . . . . . . . . .
dimensions . . . . . . . . . . . . . . . . . . . . . . . . . . . . .
discharge pulse . . . . . . . . . . . . . . . . . . . . . . . . . .
dynamic exposure time control . . . . . . . . . . . . . .
1-2
5-1
3-5
3-7
E
environmental requirements . . . . . . . . . . . . . . . .
exposure time
setting with commands . . . . . . . . . . . . . . . . .
exposure time control mode
explained . . . . . . . . . . . . . . . . . . . . . . . . . . .
setting with commands . . . . . . . . . . . . . . . . .
ExSync . . . . . . . . . . . . . . . . . . . . . . . . . . . . . . . .
BASLER A101
factory set . . . . . . . . . . . . . . . . . . . . . . . . . . . . . . 3-3
firmware version
viewing with commands . . . . . . . . . . . . . . . . 4-5
fixed timing
explained . . . . . . . . . . . . . . . . . . . . . . . . . . . . 3-6
setting with commands . . . . . . . . . . . . . . . . . 4-6
flags . . . . . . . . . . . . . . . . . . . . . . . . . . . . . . . . . . . 6-2
flexible timing
explained . . . . . . . . . . . . . . . . . . . . . . . . . . . . 3-5
setting with commands . . . . . . . . . . . . . . . . . 4-6
F-mount adapter . . . . . . . . . . . . . . . . . . . . . . . . . 5-4
frame period
setting with commands . . . . . . . . . . . . . . . . . 4-9
frame rate . . . . . . . . . . . . . . . . . . . . . . . . . . . . . . . 1-2
frame valid . . . . . . . . . . . . . . . . . . . . . . . . . . . . . . 2-6
free-run mode . . . . . . . . . . . . . . . . . . . . . . . . . . . 3-4
full binning . . . . . . . . . . . . . . . . . . . . . . . . . . . . . 3-23
functional description . . . . . . . . . . . . . . . . . . . . . . 3-1
FVAL . . . . . . . . . . . . . . . . . . . . . . . . . . . . . . . . . . 2-6
G
gain
explained . . . . . . . . . . . . . . . . . . . . . . . . . . . 3-18
setting with commands . . . . . . . . . . . . . . . . 4-10
H
horizontal binning . . . . . . . . . . . . . . . . . . . . . . . . 3-23
housing size . . . . . . . . . . . . . . . . . . . . . . . . . . . . . 1-2
I
input signals . . . . . . . . . . . . . . . . . . . . . . . . . . . . . 2-6
interfacing the camera . . . . . . . . . . . . . . . . . . . . . 2-1
L
LEDs . . . . . . . . . . . . . . . . . . . . . . . . . . . . . . . . . . 6-2
lens adapter . . . . . . . . . . . . . . . . . . . . . . . . . . . . . 1-2
level-controlled mode . . . . . . . . . . . . . . . . . . . . . . 3-4
line valid . . . . . . . . . . . . . . . . . . . . . . . . . . . . . . . . 2-6
LVAL . . . . . . . . . . . . . . . . . . . . . . . . . . . . . . . . . . 2-6
LVDS . . . . . . . . . . . . . . . . . . . . . . . . . . . . . . . . . . 2-8
M
1-4
4-8
3-4
4-6
2-6
models, camera . . . . . . . . . . . . . . . . . . . . . . . . . . 1-1
mounting facilities . . . . . . . . . . . . . . . . . . . . . . . . 5-1
N
name change . . . . . . . . . . . . . . . . . . . . . . . . . . . . 1-1
iii
DRAFT
O
T
offset
explained . . . . . . . . . . . . . . . . . . . . . . . . . . 3-18
setting with commands . . . . . . . . . . . . . . . . 4-11
optical interface . . . . . . . . . . . . . . . . . . . . . . . . . . 5-4
output signals . . . . . . . . . . . . . . . . . . . . . . . . . . . 2-6
test image
enabling with commands . . . . . . . . . . . . . . . . 4-7
explained . . . . . . . . . . . . . . . . . . . . . . . . . . . 3-24
timing
explained . . . . . . . . . . . . . . . . . . . . . . . . . . . . 3-5
setting with commands . . . . . . . . . . . . . . . . . 4-6
troubleshooting . . . . . . . . . . . . . . . . . . . . . . . . . . 6-1
P
partial scan
explained . . . . . . . . . . . . . . . . . . . . . . . . . . 3-21
setting with commands . . . . . . . . . . . . . . . . 4-13
PCLK . . . . . . . . . . . . . . . . . . . . . . . . . . . . . . . . . . 2-6
performance specifications . . . . . . . . . . . . . . . . . 1-2
photo response non-uniformity . . . . . . . . . . . . . . 1-2
pixel clock . . . . . . . . . . . . . . . . . . . . . . . . . . . 1-2, 2-6
pixel size . . . . . . . . . . . . . . . . . . . . . . . . . . . . . . . 1-2
positioning accuracy of sensor chip . . . . . . . . . . 5-3
power requirements . . . . . . . . . . . . . . . . . . . . . . . 1-2
power supply . . . . . . . . . . . . . . . . . . . . . . . . . . . 2-11
precautions . . . . . . . . . . . . . . . . . . . . . . . . . . . . . 1-4
programmable mode . . . . . . . . . . . . . . . . . . . . . . 3-4
programming commands, list of . . . . . . . . . . . . 4-16
progressive scan camera . . . . . . . . . . . . . . . . . . 3-1
protocol version
viewing with commands . . . . . . . . . . . . . . . . 4-5
U
user set . . . . . . . . . . . . . . . . . . . . . . . . . . . . . . . . 3-3
V
ventilation . . . . . . . . . . . . . . . . . . . . . . . . . . . . . . . 1-4
vertical binning . . . . . . . . . . . . . . . . . . . . . . . . . . 3-23
video data output . . . . . . . . . . . . . . . . . . . . . . . . . 2-6
W
weight . . . . . . . . . . . . . . . . . . . . . . . . . . . . . . . . . . 1-2
white compression . . . . . . . . . . . . . . . . . . . . . . . 3-20
work set
explained . . . . . . . . . . . . . . . . . . . . . . . . . . . . 3-3
relationship to the config tool . . . . . . . . . . . . 4-2
R
refresh button . . . . . . . . . . . . . . . . . . . . . . . . . . . 4-3
RS-232 serial port
cable used with . . . . . . . . . . . . . . . . . . . . . . . 2-5
changing parameters via . . . . . . . . . . . . . . 2-11
RS-644
compatibility with RS-422 . . . . . . . . . . . . . . 2-10
converting TTL to . . . . . . . . . . . . . . . . . . . . 2-10
general information . . . . . . . . . . . . . . . . . . . . 2-8
S
sensor chip
positioning accuracy . . . . . . . . . . . . . . . . . . . 5-3
sensor type . . . . . . . . . . . . . . . . . . . . . . . . . . . . . 1-2
serial number, camera
viewing with commands . . . . . . . . . . . . . . . . 4-5
serial port
see RS-232 serial port
soft clipping
explained . . . . . . . . . . . . . . . . . . . . . . . . . . 3-20
setting with commands . . . . . . . . . . . . . . . . 4-12
spectral responsivity
color camera . . . . . . . . . . . . . . . . . . . . . . . . . 1-3
monochrome camera . . . . . . . . . . . . . . . . . . 1-3
status . . . . . . . . . . . . . . . . . . . . . . . . . . . . . . 3-24, 4-6
status LEDs . . . . . . . . . . . . . . . . . . . . . . . . . . . . 2-11
iv
BASLER A101