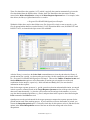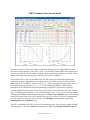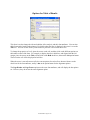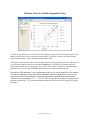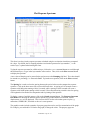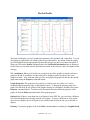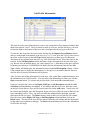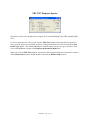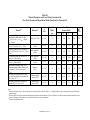
1
3 D-MOD2000 A Computer Program for Seismic Response Analysis of Horizontally Layered Soil Deposits, Earthfill Dams and Solid Waste Landfills User’s Manual Neven Matasović Gustavo A. Ordóñez Pseudo-Absolute Acceleration (g) 2.5 2 1.5 1 0.5 0 0.01 0.1 1 Period (sec) 10 Copyright© 2007-2011 GeoMotions, LLC. All rights reserved. No part of this work may be reproduced or transmitted in any form or by any means, electronic or mechanical, including photocopying, recording, or by any information storage or retrieval systems, without the prior written permission of GeoMotions, LLC. D-MOD2000 - Page No. ii D-MOD2000 A Computer Program Package for Seismic Response Analysis of Horizontally Layered Soil Deposits, Earthfill Dams and Solid Waste Landfills By Neven Matasović, Ph.D. Gustavo A. Ordóñez GeoMotions, LLC September 2011 - Revision D-MOD2000 - Page No. iii D-MOD2000 - Page No. iv Terms and Conditions for Licensing the Software YOU SHOULD READ THE FOLLOWING TERMS AND CONDITIONS CAREFULLY BEFORE USING THE SOFTWARE. INSTALLATION OF THE SOFTWARE INTO YOUR COMPUTER INDICATES YOUR ACCEPTANCE OF THESE TERMS AND CONDITIONS. IF YOU DO NOT AGREE WITH THEM, YOU SHOULD RETURN THE PACKAGE PROMPTLY AND YOUR MONEY WILL BE REFUNDED. These programs are provided by the authors. Title to the media on which the software is recorded and to the documentation in support thereof is transferred to the customer, but title to the software is retained by the authors. GeoMotions, LLC owns all intellectual property in the programs. GeoMotions, LLC permits you to use the programs only in accordance with the terms of this agreement. You assume responsibility for the selection of the software to achieve your intended results and for the installation of the software, the use of and the results obtained from the software. License You may use the software on only one machine at any one time. You may copy the software for back up only in support of such use. You may not use, copy, modify, or transfer the software, or any copy, in whole or part, except as expressly provided in this document. You may not sell, sub-license, rent, or lease this software. You may not reverse engineer, decompile or disassemble the programs to obtain the source code. Although the software was tested, you are solely responsible for using and interpreting the results obtained from execution of the software. When first using the software, you should compare the results from the software with manual calculations and/or results from other computer software to verify the reliability of the program. The software is not a teaching tool for one-dimensional seismic site response analysis. The authors do not guarantee nor imply the accuracy or reliability of this software or related documentation. As such, they cannot be held responsible for incorrect results or damages resulting from the use of this software. It is the responsibility of the user to determine the usefulness and technical accuracy of this software in his/her own environment. This software was not developed as a network application. Thus, it should not be installed on a Network Server. Installation of the software onto your computer indicates your acceptance of the terms and conditions in this agreement. Terms The license is effective until terminated. You may terminate it any time by destroying the software together with any back-up copies. It will also terminate if you fail to comply with any term or condition of this agreement. You agree upon such termination to destroy the software together with any back-up copies, modifications, and/or merged portions in any form. Warranty The authors will correct any errors in the code at no charge after the purchase date of the software. Notification of a suspected error must be made in writing, with a complete listing of the input and output files and description of the error. If, in the judgment of the authors, the code does contain an error, the authors will (at their option) correct or replace the copy at no cost to the user or refund the initial purchase price of the software. These warranties are exclusive and in lieu of all other warranties, whether expressed or implied, including the implied warranties of merchantability, fitness for a particular purpose and non-infringement. No oral or written information or advice given by the authors, distributors, dealers or agents shall increase the scope of the above warranties or create any new warranties. Some states do not allow the exclusion of implied warranties, so the above exclusion may not apply to you. In that event, any implied warranties are limited in duration to ninety (90) days from the date of delivery of the software. This warranty gives you specific legal rights. You may have rights, which vary from state to state. Limitation of Liability The software is a complex program which requires engineering expertise to use correctly. The authors assume absolutely no responsibility for the correct use of this software. All results obtained should be carefully examined by an experienced professional engineer to determine if they are reasonable and accurate. Although the authors D-MOD2000 - Page No. v have endeavored to make the software error free, the program is not and cannot be certified as infallible. Therefore, the authors make no warranty, either implicit or explicit, as to the correct performance or accuracy of this software. In no event shall the authors be liable to anyone for special, collateral, incidental, or consequential damage in connection with or arising out of purchase or use of this software. The sole and exclusive liability to the authors, regardless of the form of action, shall not exceed the purchase price of this software. USB Hardware Key Title to the USB Hardware Key(s) associated with a license belongs to GeoMotions, LLC. You are wholly responsible for maintaining and safeguarding the USB Hardware Key. We reserve the right to determine the cost of replacing a lost or stolen USB Hardware Key, up to and including the cost of a new license. Support The authors will provide telephone or electronic mail support, at no charge, to assist the licensee in the installation of the software on his or her computer system. Additionally, general assistance may be provided in aiding the licensee in understanding the capabilities of the various features of the software. However, no-cost assistance is not provided for help in applying the software to specific user-defined problems. We reserve the right to determine what qualifies as no-cost assistance, and what requires payment. In all instances, the user is encouraged to send the problem description and/or data files to the authors by electronic mail in order to minimize the amount of time spent trying to define the problem and/or to provide help with a problem. Copyright Notice The software and accompanying manual are copyrighted with all rights reserved by the authors, respectively. Under United States Copyright Laws, the software and its accompanying documentation may not be copied, in whole or in part, except to make a backup copy for archival purpose only. Any other copying, selling or otherwise distributing this software is hereby expressly forbidden. All products and brand names are trademarks and/or registered trademarks of their respective holders. Export Law Assurances You agree that the software will not be shipped, transferred or exported directly, into any country prohibited by the United States Export Administration Act and the regulations there under nor will be used for any purpose prohibited by the Act. If you do not agree to these terms and conditions, please return the full product with proof of purchase within 30 days for a full refund, minus shipping and handling costs. D-MOD2000 - Page No. vi D-MOD2000 User’s Manual D-MOD2000 - Page No. vii D-MOD2000 - Page No. viii Table of Contents D-MOD2000 Genesis ................................................................................................................................................... 1 Architecture ............................................................................................................................................ 2 Execution ................................................................................................................................................ 2 EDT File ................................................................................................................................................. 3 Processing of Output Files...................................................................................................................... 4 D-MOD2000 Package Forms ....................................................................................................................... 7 AASHTO's Response Spectra ................................................................................................................ 9 Choose Output Directory...................................................................................................................... 11 Company & Project Information .......................................................................................................... 12 Comparison of Results ......................................................................................................................... 14 Conversion of Ground Motion File ...................................................................................................... 15 Curve Fitting Parameters for MKZ Model ........................................................................................... 23 D-MOD Option 1 – Master Control Card ............................................................................................ 24 D-MOD Option 2 – Layer Description Card ........................................................................................ 27 D-MOD Option 4 – Material Description Card.................................................................................... 29 D-MOD Option 5 – Properties of the Visco-Elastic Half-Space.......................................................... 33 D-MOD Option 6 – Dynamic Analysis Solution Control Card ........................................................... 34 D-MOD Option 7 – Earthquake Record (Accelerogram) Control Card............................................... 36 Database of Damping Ratio Curves ..................................................................................................... 38 Database of G/Gmax Curves .................................................................................................................. 39 Dynamic Material Properties Model .................................................................................................... 40 Earthquake Engineering Analyses & Utilities ...................................................................................... 41 Earthquake Records Database .............................................................................................................. 42 Edit/Add Ground Motion File Information .......................................................................................... 44 EuroCode 8 Response Spectrum .......................................................................................................... 48 G/Gmo & Damping Ratio Curves Database .......................................................................................... 49 Grain Size Distribution Curve Matching .............................................................................................. 50 Graphics Print Menu ............................................................................................................................ 52 Graphics Window ................................................................................................................................. 54 Ground Motion Attenuation Relations ................................................................................................. 55 Ground Motion Parameters .................................................................................................................. 62 IBC Response Spectra .......................................................................................................................... 64 Import Acceleration Data ..................................................................................................................... 66 Input File Order .................................................................................................................................... 69 Legend Text.......................................................................................................................................... 70 Material Parameters and Curve Fitting Constants ................................................................................ 71 Mean/Scaling Response Spectrum ....................................................................................................... 72 MKZ Nonlinear Stress-Strain Model ................................................................................................... 78 NEHRP Response Spectra.................................................................................................................... 81 Newmark Displacement Analysis ........................................................................................................ 82 Newmark Displacement Ground Motion File ...................................................................................... 84 Nonlinear Earthquake Response Analysis............................................................................................ 87 Option List............................................................................................................................................ 95 Options for Table of Results................................................................................................................. 96 Plasticity Chart of Cyclically Degradable Clays .................................................................................. 97 Plot Maximum Values .......................................................................................................................... 98 D-MOD2000 - Page No. ix Plot Object Motion ............................................................................................................................... 99 Plot Partial Results at Uniform Time Step ......................................................................................... 103 Plot Response Spectrum ..................................................................................................................... 105 Plot Soil Profile .................................................................................................................................. 107 Plot Time Histories ............................................................................................................................. 108 Print Menu .......................................................................................................................................... 110 Report Form Development ................................................................................................................. 112 Response Spectra for Ground Motion ................................................................................................ 114 Response Spectrum Plot Menu........................................................................................................... 117 Rjb & Rx Distance ............................................................................................................................... 119 Soil Column Layers ............................................................................................................................ 122 Soil Profile Information...................................................................................................................... 123 Target/User Defined Response Spectrum........................................................................................... 124 UBC 1997 Response Spectra.............................................................................................................. 126 U.S. Geological Survey Seismic Hazard ............................................................................................ 127 Video Player ....................................................................................................................................... 131 Yield Acceleration Function............................................................................................................... 132 References ................................................................................................................................................. 135 Appendix A - Generic Material Parameters and Curve Fitting Constants for Total-Stress Analysis ....... 147 Appendix B - Generic Material Parameters and Curve Fitting Constants for Effective-Stress Analysis . 153 Appendix C - Evaluation of Rayleigh Damping Coefficients .................................................................. 159 Appendix D - Conversion Factors ............................................................................................................ 167 D-MOD2000 - Page No. x D-MOD2000 Genesis The computer program package D-MOD2000 an interactive, WindowsTM-based platform built by GeoMotions, LLC around D-MOD_2. D-MOD_2 is an enhanced version of D-MOD which was developed by Matasovic (1993). D-MOD combined a dynamic response model of DRAIN-2D1 as implemented in computer program DESRA-22 with the nonlinear stress-strain model developed by Matasovic and Vucetic (1993), Dobry et al. (1985) porewater pressure generation model for sand with modification made by Vucetic and Dobry (1988) to simulate quasi two-directional pore water pressure response3, and a porewater pressure generation/cyclic degradation model for clay developed by Matasovic and Vucetic (1995a). In D-MOD_2, modifications have been made with respect to stress-strain constitutive model employed (reference strain has been introduced to facilitate evaluation of the nonlinear stress-strain model material parameters4) and dynamic equation of motion solver (Wilson‟s θ algorithm used in earlier versions of the program was replaced by the Newmark β algorithm). D-MOD_2 further allowed for modeling of soil profile with up to 200 soil layers and 200 material parameter sets (as opposed to 15 layers/materials in D-MOD) and for up to 2,000 nodes for calculation of pore water pressure dissipation (100 in early versions of the program). D-MOD_2 was further modified to allow for use of the extended Rayleigh damping formulation (matching of target damping ratio at up to four frequencies), and for direct calculation of average acceleration of sliding mass within the profile (for use in Newmark-type seismic deformation analysis). Other notable improvements with respect to the previous version of the program include adjustments for dissipation of negative (suction) pore water pressure (negative pore water pressures occur in overconsolidated clays subjected to cyclic straining and, when in composite soil profile, may reduce positive porewater pressures in liquefiable layers), an extension of the nonlinear stress-strain model to simulate seismicallyinduced “slip” along the composite landfill liner interfaces, and introduction of an option for “quasi” 2-D site response analysis of earthfill dams, levees and slopes. The latest version of the program (V9.3.1) incorporates routines for the processing and error checking of output data, and for displaying that output in a form familiar to geotechnical engineers and users of SHAKE2000. The development of D-MOD2000 is a work in progress. We would appreciate receiving suggestions about new features that users would like included in the program, information on modifications that are recommended to make the program easier to use, and information on any bug in the source code that needs to be fixed. DMOD2000 will be continuously updated/upgraded based on input from users and developments in geotechnical earthquake engineering practice. 1 Computer program DRAIN-2D (Kannan and Powell, 1975) is a classical program for calculation of in-elastic (bi-linear) structural response in time domain. 2 The computer programs DESRA/DESRA-2 were written in 1977-78 by Michael K. W. Lee and W. D. Liam Finn at the University of British Columbia (UBC) Department of Civil Engineering. 3 The modified Dobry et al. (1985) porewater pressure model was first implemented in DESRA-2 by Vucetic (1986). Version of DESRA-2 with implemented Dobry et al. (1985) model is called DESRAMOD. 4 In the previous versions of the program, material parameters were evaluated by fitting the initial loading stress-strain curve, while in the current version, the parameters are evaluated by fitting modulus reduction and damping curves, hence a need to introduce reference strain into the model. D-MOD2000 - Page No. 1 Architecture The D-MOD2000 package is essentially an interactive graphical platform built around D-MOD_2. Besides D-MOD_2 site response calculation engine, the platform integrates a suite of auxiliary programs (options) that either facilitate development of a site response model or enable processing of input/output time histories. The following options are presently in D-MOD2000: An option to use numerous attenuation relationships, i.e., empirical models for calculation of Peak Horizontal Ground Acceleration (PHGA) and Peak Ground Velocity (PGV) in bedrock at the site. Several of these attenuation relationships can also be used to calculate pseudo acceleration and pseudo velocity spectra for both rock and soil conditions. An option to generate design spectra based upon NEHRP, IBC 2003, UBC 1997, EuroCode and AASHTO codes. Acceleration response spectra of input motions and spectra calculated from time histories calculated by D-MOD2000 can be plotted against code-derived spectra and spectra generated by empirical attenuation relationships. An option for calculation of permanent seismic displacements by Newmark‟s permanent seismic displacement method. An option to evaluate PHGA for any latitude and longitude in the United States based upon the 1996/2006 USGS National Seismic Hazard Maps. An option to compute the response spectra of any ground motion. An option to printing output results in a table, for inclusion in reports, storage or other uses. As can be inferred from the list of options above, special attention has been devoted to graphic capabilities of the package. For example, in addition to displaying the input data and calculation results, current version of the package plots peak values of time histories along the profile, marks liquefied layers, and can be used to plot attenuation of input ground motions with distance (in both linear and logarithmic scales). The program-generated graphs can be imported into another application such as a word processing program and/or spreadsheet and thus facilitate preparation of presentations and/or reports. Execution To run D-MOD2000, the user either needs to create a new working file or to edit an existing input file. This is done through the options of the main menu form (Figure 1). A tutorial, enclosed in Appendix A, is provided to guide a novice user through the file creation/program execution process. In general, the process starts with use of the Edit button to generate (or edit) the option data. The Add button is used to select options user wants to employ in the analysis. The D-MOD button is used to start the analysis. Upon termination of the analysis (DOS window disappears shortly), the Process button is used to retrieve and process relevant results from the output files generated by site response calculation. These relevant results can be graphed by use of the Plot Options. A number of auxiliary programs included in D-MOD2000 package can be used independently (e.g., ground motion attenuation relationships, processing and scaling of ground motion records to compare them to a target response spectrum, conversion of ground motion records to a format compatible with DMOD2000, Newmark‟s permanent seismic displacement method, ratio or response spectrum, and USGS seismic hazard data). These programs are invoked by pressing the “Earthquake Engineering Analyses & Utilities” button in the main menu form. The results generated by these auxiliary programs can be, within the same graphic platform, compared to D-MOD2000 input/output data/results. D-MOD2000 - Page No. 2 Figure 1: D-MOD2000 Main Menu Form. EDT File The “EDT” file (i.e., file identified by the *.EDT extension) is the main working file of D-MOD2000. This file stores data required for coordination of other input files required for execution of various DMOD2000 options. No limit is imposed on the number of data sets for each option in this file. However, a total number of all of the options combined is limited to 32,000. Upon selecting options from EDT file, the D-MOD2000 *.INP input file is created by pressing the Save button. The difference between an *.EDT file and other input files is that D-MOD2000 options are saved sequentially, beginning with option 1, and so on. For example, an *.EDT file for D-MOD2000 could be composed by the options shown in Figure 2. Option 1 : Option 2 : Option 4 : Option 4 : Option 5 : Option 6 : Option 6 : Option 7 : Option 7 - Master Control Card Soil Profile Material Properties – Case SHA Material Properties – Case SHB Properties of Visco-Elastic Half-Space Dynamic Analysis Solution – Loma Prieta Dynamic Analysis Solution – Northridge Input Ground Motion – Loma Prieta Input Ground Motion – Northridge Figure 2: Sample *.EDT File for D-MOD2000 D-MOD2000 - Page No. 3 The Sample “EDT” file shown in Figure 2 contains 1 set of options 1, 2 and 5 data; and, 2 sets of options 4, 6 and 7 data. By selecting specific options from this database, you could create different input files for D-MOD2000. For example, you could create two different input files, as shown on Figure 3, wherein the same soil profile is analyzed using two different object motions. Notice the difference in the way the options are ordered in Figures 2 and 3. The options in Figure 2 are ordered sequentially, beginning with option 1. Those on Figure 3 are ordered in a way that tells D-MOD2000 to conduct an analysis using the data provided. Option 1 : Option 2 : Option 4 : Option 6 : Option 7 - Master Control Card Soil Profile Material Properties – Case SHA Dynamic Analysis Solution – Loma Prieta Input Ground Motion – Loma Prieta (a) Option 1 : Option 2 : Option 4 : Option 6 : Option 7 - Master Control Card Soil Profile Material Properties – Case SHA Dynamic Analysis Solution – Northridge Input Ground Motion – Northridge (b) Figure 3: Sample input files. To create an *.EDT file, you have two options. First, you may start from scratch by creating new options using the New command button. Or, second, you can edit an existing file by opening a file using the Open command button. The former will create a set of each option, and use default values for each. You will have to enter your project's specific data for each option using the editing forms provided with D-MOD2000. The latter allows you to simply modify existing data without the need to retype data that is similar to each project, like the dynamic material properties. Once you have edited the data for each option, you can create an input file for the program engine. To differentiate the input file from the database file, you should give it a different name and extension. The file does not need to have the EDT extension; however, by default, when opening an existing file, D-MOD2000 will present you with a list of files that end with this extension. Processing of Output Files After a successful “run” of D-MOD2000, depending on the output option selected in the input file, The engine will generate a master output file and zero, two, or eleven auxiliary output files. The master output file echoes the input information, provides information on the initial stress state in the profile, lists the peak values of time-dependent variables (for all layers in the profile), and defines the content (file names, variable and units) of the auxiliary output files. The auxiliary output files contain time-dependent D-MOD2000 - Page No. 4 variables calculated for a specified layer. Depending upon selection, one of the two auxiliary output files sets will be generated. Set 1 (alternative with two auxiliary files): File Name Contents Units i-plot1.prn Time axis Acceleration in layer “i” Shear strain in layer “i” Normalized shear stress in layer “i” Normalized Pore water pressure in layer “i” Degradation index in layer “i” (clay only) (sec) (g) (%) (-) (-) (-) i-plot2.prn Time axis (Scaled) base (input) acceleration Surface acceleration (same as in layer i = 1) Velocity in layer “i” Displacement in layer “i” Shear stress in layer “i” (sec) (g) (g) (ft/sec) (ft) (psf) Set 2 (alternative with eleven auxiliary files): File Name Contents Units i-time.prn i-baccel.prn i-saccel.prn i-accel.prn i-veloc.prn i-displ.prn i-gamma%.prn i-tau.prn i-ustar.prn i-dindex.prn i-taustr.prn Time axis (Scaled) base (input) acceleration Surface acceleration (same as in layer i = 1) Acceleration in layer “i” Velocity in layer “i” Displacement in layer “i” Shear strain in layer “i” Shear stress in layer “i” Normalized pore water pressure in layer “i” Degradation index in layer “i” (clay only) Normalized shear stress in layer “i” (sec) (g) (g) (g) (ft/sec) (ft) (%) (psf) (-) (-) (-) The use5 for the master and auxiliary output files is limited as D-MOD2000 processes them and creates graphical output. The processing results in creation of another set of auxiliary files used with various plot options, as follows. The first file created, identified with the extension *.ACC, contains acceleration time histories for the different layers in the profile. The next file, identified with the *.DPL extension, contains the displacement time history computed for the layers. Maximum values of acceleration, strain, normalized stress and normalized pore water pressure are saved in the file with the extension *.MAX. The normalized shear stress time histories are saved in the file with the extension *.NTS. Pore water pressure 5 We describe these output files as some Federal agencies (e.g., United States Department of Energy) require this level of documentation of calculations. For most users, graphical presentation of the results will suffice. D-MOD2000 - Page No. 5 ratio vs. time histories are saved in the file with the extension *.PWP. Strain and stress time histories for soil profile layers are stored in the files with the extensions *.STN and *.STS, respectively. The file with the extension *.VEL contains the velocity time history data. All these files are ASCII text files, thus, they can be used with other software (e.g., Microsoft® ExcelTM, etc.), to plot the results. While advanced users and researchers prefer manipulation of the individual output files, the majority of the users prefer D-MOD2000 graphing options. The best way to learn these options (and the program) is to follow the step by step tutorial saved in the Manual folder. If you require additional help with running the program, you may e-mail to: [email protected] It is recommended to attach the *.EDT and input ground motion files to any e-mails when requesting technical support. This will help us to identify the cause of any problems and/or to better understand the questions. Free updates of the program can be downloaded from our web site at: http://www.geomotions.com The student version of the program is limited to 20 layers and 10 materials. Other limitations include: the Newmark Analysis and Ratio of Response Spectrum features are disabled. Also, graphs or tables can be printed, but not copied to the Clipboard. Further, the effective-stress analysis with pore water pressure dissipation and redistribution option is disabled. When printing results, a “Student Version” string of characters is also printed. The main purpose of the student version is to help the student learn about seismic site response analysis. D-MOD2000 - Page No. 6 D-MOD2000 Package Forms D-MOD2000 - Page No. 7 D-MOD2000 - Page No. 8 AASHTO's Response Spectra This form is used to define the coefficients to compute the AASHTO response spectra based on the following equations (AASHTO, 1994): Cs 1.2 A S T 2/3 C sm Where: Cs Csm A S T Tm 1.2 A S Tm2 / 3 = = = = = = elastic seismic response coefficient for single mode analysis elastic seismic response coefficient for multimodal analysis Acceleration coefficient from Article 3.2 Dimensionless coefficient for the soil profile characteristics of the site (Article 3.5). Period Period of the mth mode of vibration. D-MOD2000 uses the value of Acceleration Coefficient, A, to compute the spectra for a number of periods using the above equation. For single mode or multimodal analysis, the value of Cs will be > 2.5 A; and, for soil profiles type III or type IV in areas where A >= 0.3, Cs will not exceed 2.0 A. The spectra for multimodal analysis are obtained by selecting the Multimodal option. An x will appear in the check box when multimodal analysis is used by D-MOD2000. Further, the Fundamental Mode option will be enabled when the Multimodal option is selected. If the Fundamental Mode option is not selected, then for soil profiles types III and IV and for periods less than 0.3 seconds, D-MOD2000 will use the following formula to determine Csm: C sm A 0.8 4Tm Further, for multimodal analysis, when Tm exceeds 4.0 seconds the value of Csm for that mode will be determined with the following formula: C sm 3 AS Tm4 / 3 D-MOD2000 - Page No. 9 The user needs to enter the value for A, and select the site classes. To select a site class, click on the check box next to the class. An x will appear in the box when the class is selected. You can select all of the classes. Once you enter a value for A and select at least one class, the Ok command button is enabled. You can click on Ok to return to the previous form. D-MOD2000 - Page No. 10 Choose Output Directory This form is used to select the directory where the output files generated by D-MOD2000 will be stored. There is a directory list box that shows the directories of the current drive, and a drive list box that can be used to change drives. To select a folder, double-click on it. The folder path will be shown on the text box next to the Output Directory label. Once you have selected a directory, click on the Ok button to return to the Main Menu or the Earthquake Response Analysis form. The output directory will be shown on the output directory cell. D-MOD2000 - Page No. 11 Company & Project Information This form is used to enter textual information about your company and/or project that will be printed together with your graph and form. The information that can be entered on this form is divided into two groups: 1) information that is constant such as your company name, address, etc.; and, 2) information that changes from project to project such as project number, dates, etc. When you create your own forms, you can enter a description for the form on the text box next to the Description label. This description can be up to 80 characters long, and will not be shown on the form. To enter information on the form, first type in the information in the Label column. This label is expected to be constant, e.g. “Project No.:”. Then enter the information that changes in the text box for the Information column, e.g. “99-1035”. Then enter the X and Y coordinates where the text will be printed on the paper. The origin of coordinates, i.e. X = 0 & Y = 0, is the upper left corner of the paper sheet. The string of text formed by the information on the Label and Information columns will be printed starting at the point defined by X and Y. If you want to print the string centered at this point, then click on the check box of the Center column to select it (an x is shown on the check box when this option is selected). The string will be vertically centered with respect to the Y coordinate. To change the font type, size, or style of a string, click on the Font command button to display the font dialog form. Select a different font, size, or style and then click on Ok to return to the form. The information for the string's font will be displayed on the Font, Style, and Size text boxes. Every time you move the cursor to a text box on the Label or Information columns, the characteristics of the font for the string will be displayed on the respective text boxes. You can also display a logo on the page at a specific location. The position of the logo is determined by the coordinates for the upper-left and bottom-right corners of a rectangle as entered in the coordinate text boxes at the bottom of the form. This logo should be a bitmap, metafile or an icon type file. To select a D-MOD2000 - Page No. 12 logo, click on the Logo command button to display the file dialog window, select a file, and then click on the Open command button. Then, enter the coordinates for the box where in the logo will be displayed. The example described in the following paragraph is for a letter size paper (8.5” x 11”) and portrait orientation. To change paper type or orientation, click on the Printer command button to display the printer dialog window. For this example, first place the cursor on the text box next to the Description label. Type in a description for the information, e.g. “D-MOD2000 standard form”. Press the Tab key to move the cursor to the text box on the Label column for string No. 1, and enter Project. Next, press the Tab key twice to move the cursor to the text box on the X left column and enter 6.05. Press the Tab key once, and enter 9.575 on the Y left column. Note that the string is now shown on the bottom right corner of the form. Next, follow the same procedure to enter the following: Label File No.: Date: Initials: X left 6.05 6.05 6.05 Y left 9.775 9.975 10.17 The coordinates in this example are such that the text will print on the bottom right corner of the form created in the example of the Report Form Development section of this manual. After you have entered the information, click on the Save command button to save the data on an ASCII text file. The data can be retrieved for future use using the Open command button. Each time you place the cursor on either the Label or Information columns the Add and Delete command buttons are enabled. If you want to add data for a new line, place the cursor on the line where the new line will be located, and click on the Add button. A new line will be created, and the coordinates and thickness for the new line will be the same as those for the line immediately below. Now, you need to modify the information for the coordinates and thickness for the new line. The Delete button is used to delete a line from the form. Place the cursor on either the Label or Information columns, and then click on the Delete button. The data for the line will be removed from the form, and the information for the other lines updated accordingly. The Reset command button will delete the information for all of the lines. D-MOD2000 - Page No. 13 Comparison of Results This form is used to select a number of result files in order to compare the results from different analyses. To compare results, first choose one of the Results and one of the Variable options. Depending on the Results option selected, the appropriate Variable options will be enabled. Then, select the output files using the Open command button. The file name and path will be shown on the File section of the form. You can select up to 6 output files. After selecting the files, click on the Read command button. The program will check that the number of layers and the thickness and depth to the middle of the layer are the same for each file. Those files with the same layering, will be selected and an x will be shown on their check boxes. The data from the files will be read and stored in the computer‟s memory for plotting. Only those files which are selected (i.e. an x is shown on the check box next to the file name) will be read. The other files will be ignored. If you would like to remove a file from the list of files, click on the file and then on the Delete command button. You can enter a description for the results in the Description text boxes. The label entered in this box will be used to identify the curve when plotting. To plot the results, click on the Plot command button. D-MOD2000 - Page No. 14 Conversion of Ground Motion File This form is used to convert ground motion files to a format compatible with D-MOD_2; or to a format and units compatible with other software applications. The ground motion file used as input in D-MOD_2 is usually formed by a series of acceleration values in g‟s saved in a formatted way that is compatible with the Format statement used in the FORTRAN programming language. Today, the user can obtain ground motion records from a wide number of sources. However, these files are not uniform in their formatting or processing. For example, ground motion files can be downloaded through the Internet that are saved in units other than g‟s such as cm/sec2. Other records may include values for acceleration, velocity and displacement in the same file, each as a column of data. Thus, the main purpose of this form is to extract the acceleration data from the file, convert them to g‟s and save them to a formatted text file that can be used by D-MOD_2. This form has two other functions. First, it can be used to enter information about a new ground motion file and then add the information to the database of ground motion files used by D-MOD2000. Second, the user can access the form used to edit information about a ground motion file in the database. Conversion of a ground motion file involves the following steps: 1) opening the original or source ground motion file; 2) defining the way the data in the source file are to be read; and, 3) defining the way the data will be written to the new converted ground motion file. For the first step, use the Open command button to display the Open Source Ground Motion File dialog form, change to a different folder and/or subdirectory if necessary, and click on the file that needs to be converted to select it. This file needs to be a text or ASCII file. Then click on the Open command button of the dialog form to open it. After a few seconds, the first few lines of the file (up to 99 lines) will be displayed on the top list box of the form. D-MOD2000 - Page No. 15 The first three characters displayed in red are the numbers of each row of data in the file followed by a “|”. These characters are not part of the source file and are only shown to number the rows. After the row numbers, the alphanumeric characters that constitute the information saved in the file for each row are shown. Note that the characters are displayed as blue on a white background, and that every tenth character is displayed in red. However, if the tenth character is a “blank space” then the character is not shown. This is done to guide the user when defining the order of the data in the file. During the second step, you need to define the way the data in the source file are to be read. To this end, there are seven options available in SHAKE2000: Other, PEER, USGS, *.HEA file, *.AHL file, *.AVD file and RSPMATCH, PEER AT2 and PEER ACC. The first option is used to manually define the way the data are to be read. The PEER and USGS options are used to automatically convert files downloaded from the respective web sites; and, the *.HEA file, *.AHL file and *.AVD file options are used to convert specific files created by D-MOD2000. The RSPMATCH option is used to convert files created by the RSPMATCH program. To select one of these options, click on the down-arrow of the Source File Type list to display the list of options, and select the option that applies to your file. The PEER option is used to convert files downloaded from the PEER Strong Motion Database at: http://peer.berkeley.edu/smcat/search.html The PEER AT2 option is used to convert files downloaded from the PEER Strong Motion Databases at: http://peer.berkeley.edu/nga/search.html http://peer2.berkeley.edu/peer_ground_motion_database/site The PEER ACC option is used to convert files downloaded from the PEER Ground Motion Database at: http://peer2.berkeley.edu/peer_ground_motion_database/site The USGS option is used to convert files created with the Interactive Deaggregation feature of the United States Geological Survey (USGS) web site at: http://eqint.cr.usgs.gov/eq-men/html/deaggint2002-06.html The files downloaded from either web site, PEER or USGS, should be saved as Text files. This is done by first, selecting the Save As… option of the File menu in your web browser. And second, by selecting the Text File (*.txt) option of the Save as type option list. When using the PEER or USGS option, some basic information needed to read the source file is displayed on some of the text boxes. For PEER files, it is assumed that the first 4 lines in the file are the header, and that the acceleration values in the file are in g‟s. Further, the program will assume that the fourth line of the header section includes the number of acceleration values and the time interval between acceleration values. Hence, the program will use the value next to the NPTS= string for the number of acceleration values, and the value next to the DT= string for the time interval. For example, in the section of the ground motion file shown below, it is assumed that there are 11800 acceleration values and that the time interval is 0.005 seconds. PEER STRONG MOTION DATABASE RECORD. PROCESSING BY PACIFIC ENGINEERING. CHI-CHI 09/20/99, ALS, E (CWB) ACCELERATION TIME HISTORY IN UNITS OF G. FILTER POINTS: HP=0.1 Hz LP=30.0 Hz NPTS= 11800, DT= .00500 SEC .9029319E-05 .9034156E-05 .9026870E-05 .9016792E-05 .9034652E-05 D-MOD2000 - Page No. 16 If the formatting or the information in the file do not match these assumptions, then it is recommended to use the Other option as explained below. The USGS option is similar to the PEER option in that specific information is searched to determine the number of acceleration values and the time interval. However, the USGS files do not have a fixed number of header lines. Accordingly, USGS files are first read to determine the number of header lines, and at the same time, determine the number of acceleration values and time interval. To this end, the program will first search for the “npw2, dt, total duration =” string. For example: npw2, dt, total duration = 16384 0.00500 81.9 When this string is found, it is assumed that the time interval is the second value, e.g. 0.005 sec for the string above. The program will then search for the “Begin Scaled Accelerogram Data” string and assume that the acceleration values start one line after this position. The program will count the number of lines of data until it finds the “END OF AGRAM DATA” string. It is also assumed that the acceleration values are in cm/sec2 units. Once the number of header lines, acceleration values and time interval are determined, the program will proceed to convert the ground motion file. Please note that the USGS files contain data for 6 seismograms. For example: am0, am0b_m0fa= 1.642E+25 0.000E+00 npw2, dt, total duration = 16384 0.00500 *** Begin Scaled Accelerogram Data *** T A1(cm/s2) A2 A3 0.0000 8.2623E-04 2.9951E-04 3.0377E-04 81.9 A4 A5 2.8430E-04 -3.0169E-04 A6 4.7918E-04 In the above section of a USGS file, the first column corresponds to the time for the acceleration value, and the A1 through A6 columns each correspond to a different seismogram. By default, the program will read the acceleration values for the first column of acceleration data, i.e. the A1 column. If you wish to obtain the data for any of the other acceleration columns, change the value on the Acceleration Column text box as explained below. Another option that applies to the USGS files is Match Sa. The motions downloaded from the USGS web site are no longer scaled to the probabilistic motion. For example, for the 1996 synthetic seismogram option, if the probabilistic 2-second spectral acceleration for the 2% probability of exceedance in 50 years was 0.1 g, then each seismogram was scaled so that its 2-second spectral acceleration, with 5% damping, was 0.1 g. This is no longer the case for the 2002 synthetic seismogram option. The Match Sa option can be used to scale the synthetic motions to the probabilistic value. The USGS file includes the following information that is used by D-MOD2000 to scale the motions: Fractional oscillator damping = 0.050 period= 1.000 **Agrams not scaled to PSHA SA level. Avg SA (cm/s/s) = 102.44 **Avg factor needed to match target probabilistic SA 3.5127 **PSHA MODAL r(km), amag, PSHA sa or pga(cm/s2)= 0.138E+03 0.900E+01 0.360E+03 On the first line above, the damping value and period for the Sa are shown. If this line is not found on the file, then it is assumed that the seismogram is for PGA. The second line indicates that the motion was not scaled, and that an average value of Sa of 102.44 cm/sec2 was obtained for the 1-second period from the synthetic motions generated without scaling. The third line notes that the ground motion values will need to be scaled by an average value of 3.5127 to obtain a motion with the corresponding probabilistic value of Sa. On the fourth line, the last value corresponds to the probabilistic value of Sa or PGA (Sa in the above example) that was obtained for your site. Hence, if the synthetic motions were scaled by a factor of 3.5127, their probabilistic value of Sa at 1-second would be 360 cm/sec2. To match the spectra value, D-MOD2000 - Page No. 17 D-MOD2000 will use the probabilistic Sa or PGA value from the fourth line (i.e. 360 for the above example), compute the response spectrum for the synthetic motion, and then use the computed value of Sa for the period of interest (i.e. 1 second for the above example) to obtain a scaling factor by dividing the probabilistic Sa by the computed Sa. The acceleration values for the motion will be multiplied by this factor to obtain the modified ground motion. The Hard Rock option is only enabled when processing USGS ground motion files. When this option is selected, the USGS B/C boundary type motion will be transformed to a hard rock, i.e. rock type A, motion. The motions are converted using the deamplification function presented by Park (2003). The *.AHL file option is used to convert files with the AHL extension (for Acceleration History at Layer), i.e. files created by D-MOD2000. Similarly, the *.HEA file option is used to convert files with the HEA extension (for Horizontal Equivalent Acceleration), i.e. files created by D-MOD2000 from the shear stress time histories. For more information about these files, refer to the Non-Linear Earthquake Response Analysis section of this manual. The *.AVD file option will convert files with the AVD extension (for Acceleration Velocity Displacement), i.e. files created using the Save to file option of the Plot Object Motion form. In this last option, by default, the acceleration data in column 2 of the file will be converted. If you would like to use the baseline-corrected acceleration values instead, change the number in the Acceleration Column text box to 5. For any other type of file, it is recommended to use the Other option. The third option used to convert files is Other. With this option, you can choose one of two alternatives: 1) Free Format Data: The data are separated by blank spaces and can be read sequentially one after another or by using a specific sequence; or, 2) Formatted Data: The data can be obtained by reading a specific number of characters (with or without blank spaces) sequentially or by using a specific sequence. Please note that if the data are separated by characters other than blank spaces, such as “,” or “tabs”, then the data may not be read properly. Free Format Data: If the data are separated by at least one, or more blank spaces, then select the Free Format option. Next, enter the number of acceleration values that are to be read from the file in the text box below the No. Values label. Then, enter the time interval between acceleration values in the text box below the Time Step label. This value is used when plotting the converted motion and when adding the information about the source or converted files to the database. Usually the first few lines in the source file provide information about the motion such as earthquake magnitude, station, etc.; these lines are considered herein as the “header” lines. Also, this is the number of lines that need to be skipped before reaching the section of the file where the acceleration values are located. Enter the number of header lines in the text box below the No. Header Lines label. If you selected the Free Format option, skip the next two text boxes and place the cursor on the text box below the Number of Columns label. When reading the acceleration values in free format, the values should be ordered in one of two ways. Either each row of data is formed only by values of acceleration; or, on each row of data, there are also other values. For the second type, each row of data may have a column for period, acceleration, velocity, and displacement. For example, in the section of the ground motion file below, each row of data is formed only by acceleration values. There are 10 values of acceleration (in cm/sec2) in each row: SAMPLES/SEC=100 FILTER TYPE=BUTTERWORTH CORNER= 0.10 ORDER=3 DATA TYPE=AC NO OF POINTS= 6228, UNITS=CM/SEC**2 -0.16 -0.16 -0.16 -0.16 -0.17 -0.18 -0.20 -0.20 -0.20 -0.22 -0.25 -0.27 -0.28 -0.27 -0.27 -0.29 -0.32 -0.35 -0.38 -0.39 D-MOD2000 - Page No. 18 If your source file is of the above type, skip the Number of Columns and Acceleration Column boxes, and place the cursor on the text box below the Format label. On the other hand, each row of data on the file below has one value for time, acceleration, velocity and displacement: m0444r01 8.0 25.6 147.6 75.9 0.65 sec cm/sec**2 cm/sec cm 0.00 -0.1934E+00 0.0000E+00 0.0000E+00 0.01 -0.1938E+00 -0.1900E-02 0.0000E+00 If the source file is of this second type, enter the total number of columns of data on each row. For example, for the above example you would enter a 4. Next, place the cursor on the text box below the Acceleration Column. In this text box, you enter the number of the column that forms the acceleration value. In the above example this is the second column, thus you would enter a 2. Then place the cursor on the Format text box. Formatted Data: If you did not select the Free Format option, then you need to provide either the number of values per row and the length as number of characters of the values; or, the number of data columns per row, the number of the column with the acceleration values and the length as number of characters of the columns. For the first alternative, you need to define the way the values are separated in each row by indicating the number of values per row and the number of characters that form each value. The number of characters should be the same for every value. For example: 4 values per row, each value is 15 characters long including blank spaces and exponent: -.1059027E-04 -.1461820E-04 -.1690261E-04 -.1506594E-04 8 values per row, each value is 9 characters long including blank spaces: 0.00000 -0.00434 0.00860 0.00540 -0.00565 -0.00944 -0.00369 -0.00669 8 values per row, each value is 9 characters long: -0.000001-0.000002-0.000001-0.000001 0.000000 0.000001 0.000000-0.000001 After you have entered the data for number of values, time step, and number of header lines, place the cursor on the text box below the Values per Line label, and enter the number of values that are included in each line of data (for the above examples: 4, or 8, or 8, respectively). Next, place the cursor on the text box below the No. Digits label and enter the number of characters that form each value (for the above examples: 15, or 9, or 9, respectively). Then enter the rest of the information as described previously. For the second alternative, you need to provide the number of data columns on each row, the number of the acceleration column, and the number of characters that form each column. For example: m0444r01 8.0 25.6 147.6 75.9 0.65 sec cm/sec**2 cm/sec cm 0.00 -0.1934E+00 0.0000E+00 0.0000E+00 0.01 -0.1938E+00 -0.1900E-02 0.0000E+00 In the above section of a ground motion file, there are 4 columns of data per row (one each for time, acceleration, velocity and displacement), the second column is the acceleration value, and each value is 12 characters long including blank spaces and exponent. Thus, after entering data for number of values, time step, and number of header lines, place the cursor on the text box below the No. Digits label and enter the number of characters that form each value (e.g. 12). Then, place the cursor on the text box below the Number of Columns label and enter the total number of columns of data on each D-MOD2000 - Page No. 19 row. For the above example, you would enter a 4. Next, place the cursor on the text box below the Acceleration Column. In this text box, you enter the number of the column that forms the acceleration value. In the above example this is the second column, thus you would enter a 2. To continue with the conversion of the file, enter the rest of the information as described previously. In the third step, you will define how the data will be written to the converted file. First, define the format, i.e. the way the data are written to the file, of the acceleration values. This is based on the syntax used in the Format statement of the FORTRAN computer language. In this statement edit descriptors specify how the values are read. In this feature of D-MOD2000 the only two edit descriptors supported by D-MOD2000 are: Fw.d Ew.d [Ee] Real values Real values with exponents In these descriptors, the field is w characters wide, with a fractional part d decimal digits wide, and an optional exponent width of e. Remember that the field w also includes any blank spaces. You can also indicate that a given data format is repeated a number of times. For example, 8F9.6 repeats a ninecharacter real value with six decimal digits descriptor eight times. The first character on the format field should be a “(” and the last character a “)”, e.g. (8F9.6). Examples of data saved in the ground motion files included with D-MOD2000 and the format used to define them follow: Format: (4E15.8E2) or (4E15.8): -.10590270E-04 -.14618200E-04 -.16902610E-04 -.15065940E-04 Format: (8F9.5): 0.00000 -0.00434 0.00860 0.00540 -0.00565 -0.00944 -0.00369 -0.00669 Format: (8F10.6): -0.000001 -0.000001 -0.000001 -0.000001 0.000000 0.000000 0.000000 0.000001 If you use the “E” descriptor and do not provide a value for exponent width, “e”, D-MOD2000 will use a default value of 2. Depending on the number of decimal figures used for the acceleration values in the converted file, the velocity or displacement time histories obtained by double integration of the converted acceleration time history may not be correct, e.g. they may increase or decrease without bounds. Accordingly, it is recommended to use as many decimal figures as possible when converting the file. However, due to the nature of the programming language used to create D-MOD_2, the acceleration time history values are limited to a maximum of 8 decimal figures. Next, you need to select a factor to convert the acceleration values in the source file to units compatible with D-MOD_2, i.e. fractions of acceleration of gravity (g‟s) or in ft/sec2, if necessary; or, to other units if you wish to use the converted data as input for another software application. This can be done by selecting a factor that represents the units of the acceleration data in the source file from the list of options shown on the Source Units list box; and, by selecting the units of the converted file from the list of options shown on the Output Units list. After selecting the units, a multiplication factor will be displayed on the Multiplier box. This is the multiplication factor that will be used to convert the values from the units shown on the Source Units list box to the units shown on the Output Units list box. For example, to convert values of acceleration from cm/sec2 to g‟s, you need to divide each value by 980.665 cm/sec2; which is equivalent to multiplying each value by 1/980.665 = 0.00102. In the program, this is D-MOD2000 - Page No. 20 done by selecting the cm/sec^2 option of the Source Units list and the g’s option of the Output Units list, respectively. If the accelerations in the source file are in units that are not shown in the list, select the Other option of the Source Units list, and then enter a multiplication factor in the Multiplier text box. This multiplication factor should be appropriate to convert the source acceleration data to the units shown on the Output Units list. For example: WESTERN WASHINGTON EARTHQUAKE APR 13, 1949 - 1156 PST 55 EPICENTER 47 06 00N,122 42 00W 31 INSTR PERIOD 0.0770 SEC DAMPING 0.574 42 NO. OF POINTS 1094 DURATION 89.16 SEC 42 UNITS ARE SEC AND G/10. 23 RMS ACCLN OF COMPLETE RECORD 0.2455 G/10. 43 ACCELEROGRAM IS BAND-PASS FILTERED BETWEEN 0.070 AND 25.000 CYC/SEC 4454 INSTRUMENT AND BASELINE CORRECTED DATA AT EQUALLY-SPACED INTERVALS OF 0.02 SEC. PEAK ACCELERATION 161.63023 CMS/SEC/SEC AT 10.9400 SEC -152 29 -51 -309 -364 -125 134 111 -176 -147 -49 86 88 -69 -103 -75 -234 -176 27 86 26 42 26 -185 17 -65 -181 The fifth line of the header section indicates that the units are seconds and G/10, and from the tenth line you can see that the acceleration values are given in cm/sec2. Thus, to convert the values to g‟s, you need first to divide each value by 10, and then divide the result by 980.665. For example for the first value of 152: 152 10 0.015500 980.665 However, this is equivalent to multiplying each value by a factor of (1 / 9806.65) or 0.000102. Thus, you would enter a value of 0.000102 in the Multiplier text box. If you select the Other option of the Output Units list, you can enter a description of the other units (e.g. gals) in the Other Units text box. The RspMatch option of the Output Units list is used to convert files to a format compatible with the RspMatch computer program. After selecting the multiplication factor, place the cursor on the text box below the Database Header Line label (or Option 7 Set ID – Line label, if converting a file for use in Option 7 of D-MOD_2). Here you would enter a value that represents the line from the header section that will be used to identify the converted file in the database of ground motion files or in the set identification of Option 7. For example, for the above record, you could use the first line to be included in the database, thus you would enter a 1. The last information needed before you convert the file is the number of the lines from the header section in the source file that you would like to include in the converted file. To do this, place the cursor on the first text box below the Lines from Source Header to be included in Converted Ground Motion File label. Here you can select a specific line, or select a range of lines. To select one line, just enter the number of the line in the text box. For example to select the first line from the above file enter a 1. To select a range of lines, enter the number of the first line in the range followed by a “-” and then the number of the last line in the range. For example, if you would like to select the first five lines of the D-MOD2000 - Page No. 21 above header you would enter 1-5 in the text box. There are 3 text boxes in this section that you can use to select different lines from the header section. By default, the first four lines in the header of the converted file will be created by D-MOD2000. The lines will include the name and path of the source file, the units of the acceleration values, the number of acceleration values in the converted file (which may be slightly different from the original number in the source file), the time step of the acceleration time history, and the format string used to write the data to the file. These four lines will provide valuable information if the file is used with a different software application. After you have entered the above information, you need to enter the name and path of the converted file. A default file name and path are shown on the box next to the Converted Ground Motion File label. If you would like to select a different file, first click on the Save command button to display the Save Converted Ground Motion File dialog form. Enter the name of the file on the text box next to the File name label, or use the mouse to select a file by highlighting it. Then click on the Save command button to return to the conversion form. Now, click on the Convert command button to convert the source file to the units and format you selected. After a few seconds, the first few lines (up to 99) of the converted file will be shown on the bottom list box. After you have converted the file, you can plot the resulting motion using the Plot command button. You can also add information about this motion in the database of ground motions using the Dbase command button. Refer to the Edit/Add Ground Motion File Information section of this manual for further information. The Spectra command button is used to display the Response Spectra for Ground Motion form. This form can be used to compute the response spectra for the converted ground motion. Adding Information about a Ground Motion File to the Database: To do this, first click on the Ground Motion File Utilities: Conversion & Database option of the Main Menu form to select it. Then, click on the Ok button to display the conversion form. Next, click on the Open command button to display the Open Source Ground Motion File dialog form. Change to the folder and subdirectory where the file is located if necessary, click on the file to highlight it, and then use the Open button to open the file and return to the conversion form. After a few seconds, the first few lines of the file (up to 99 lines) will be shown on the top list box of the form. Once the file is opened, you need to enter as a minimum the information requested in the No. Values, Time Step, No. Header Lines, Values per Line, Format and Database Header Line text boxes as described in the previous section. Note that in this case, the information that you enter in the Format text box refers to the file that you want to add to the database. If you do not enter a value for “Values per Line”, this information will be obtained from the data entered in the format text box. After entering this information, click on the Dbase command button to display the Edit/Add Ground Motion File Information form. Refer to that section on this manual for further information. Editing the Database of Ground Motion Files: This form also allows you to access the form used to edit the information available in the database of ground motion files. For more information about the database, refer to the Database of Earthquake Records section of this manual. To access the editor form, click on the Dbase command button to display the Edit/Add Ground Motion File Information form. Refer to that section of this manual for more information about editing the database. Please note that to access the database form, you should not open a file first. D-MOD2000 - Page No. 22 Curve Fitting Parameters for MKZ Model This form is used to find the MKZ model parameters β and s for more than one material at a time by either modifying the values by trial and error; or, by using an automatic optimization routine. After you have selected the modulus reduction and damping ratio curves for the materials in Option 4 set, the Curve Fitting Parameters for MKZ Model form can be used to speed up the process of matching β and s. This form is only available after every material has been assigned both modulus reduction and damping ratio curves and when there are at least 3 materials in the Option 4 set. For a trial and error search, enter the values of β, s and in the respective text box; or, use the up/down arrows to increase/reduce the values by 0.05 units (right side) or 0.01 units (left side). The curves will be automatically updated to show the effects of changing the values. An automatic linear data optimization (ALDO) routine is also included that will speed up the process of matching the curves. There are three options for this optimization: Modulus (match modulus reduction curves only); Modulus/Damping (match both modulus reduction and damping curves); and Damping (match damping ratio curves only). Select one of these options using the down arrow and then click on the ALDO command button to optimize the matching process. D-MOD2000 - Page No. 23 D-MOD Option 1 – Master Control Card TITLE Up to 75 alphanumeric characters to describe the analysis NPTYPE Analysis type control number: 1 – Total-Stress Analysis (no cyclic degradation of soil properties during shaking, i.e., dynamic response with neither pore water pressure generation nor cyclic degradation via the generalized degradation index). 2 – Effective-Stress Analysis (cyclic degradation of soil properties, but without hydraulic interaction between layers, i.e., dynamic response with pore water pressure generation and/or cyclic degradation, but with no pore water pressure dissipation). 3 – Effective-Stress Analysis (cyclic degradation of material properties with hydraulic interaction between layers, i.e., dynamic response + pore water pressure generation + pore water pressure dissipation and redistribution). NLAYER Number of material (soil) layers in the profile [min = 2, max = 50 (student version) or max = 200 (full version)]. Note: Single degree-of-freedom system can be analyzed by specifying NLAYER = 1. NMAT Number of material (soil) property sets specified [min = 2, max = 50 (student version) or max = 200 (full version)]. ITMBY Half-space control number: 0 – Half-space is infinitely stiff4 (omit Option 5 in this case). 1 – Half-space is visco-elastic5. 4 Setting ITMBY = 0 simulates an “infinitely” stiff half-space. Use this option to specify an “in-hole” (i.e. “within”) motion. 5 Setting ITMBY = 1 introduces a fictitious layer (transmitting boundary) at the base of the profile. Use this option to simulate the “outcropping” motion. Note that, for this fictitious layer, only the absolute velocity is printed in the master output file. NUNIT System of units to be used in the master input and master output files: D-MOD2000 - Page No. 24 0 – lb-ft-sec system (U.S.) except acceleration which is in “g”. 1 – metric NLINEL Stress-Strain model control number (applies to all layers in the profile): 0 – Linear-elastic model is used (i.e., τ = Gmo ). 1 – Non-linear hysteretic model is used (choice between two non-linear hysteretic models is offered in Option 4). NDAMP Viscous damping6 control number: 1 – Coefficients of the viscous damping matrix [C] are read from input cards as force per unit velocity values (not recommended). 2 – Rayleigh damping coefficients R and R are read from the input cards7. The viscous damping matrix [C] is calculated by the program as: [C] = R[M] + R[K]t=0, where t=0 denotes the initial conditions, i.e., conditions before stiffness degradation by the seismically-induced PWP buildup. 6 Viscous damping is required to maintain numerical stability of the solution. Note that, as viscous damping is additive to the hysteretic (material) damping, it also compensates for lack of material damping in small strain range. 7 Recommended option. NBT Top hydraulic boundary condition number8: 0 – Sets zero pore water pressure (PWP) at the top hydraulic boundary (PWP = 0 at the top of the NFIRST layer; see explanation for NLAST of this card). 1 – Sets zero flow at the top hydraulic boundary (flow = 0 at the top of NFIRST layer). 8 NBB Note that NBT and NBB are used by the program only when NPTYPE = 3. Bottom hydraulic boundary condition control number8: 0 – Sets zero pore water pressure at the bottom hydraulic boundary (PWP = 0 at the bottom of the NLAST layer; see explanation for NLAST of this card). 1 – Sets zero flow at the bottom hydraulic boundary (flow = 0 at the bottom of NLAST layer). 8 Note that NBT and NBB are used by the program only when NPTYPE = 3. ITERRV The “irregular stress-strain behavior” accuracy control number No. 1: 0 – Do not recalculate all time-dependant variables with two smaller time steps each time when reversal in stress-strain loop occurs (this option speeds up calculation). 1 – Recalculate all time-dependant variables with two smaller time steps each time when reversal in stress-strain loop occurs (recommended). ICKFB The “irregular stress-strain behavior” accuracy control number No. 2: 0 – Do not apply correction forces for the departure of the stress-point from the stress strain-curve (this option speeds up calculation). 1 – Apply correction forces for the departure of the stress-point from the stress strain curve (recommended). NFIRST Number of the top saturated soil layer considered for pore water pressure generation and dissipation calculation. D-MOD2000 - Page No. 25 NLAST Number of the bottom saturated soil layer considered for pore water pressure generation and dissipation calculation (Note that saturated soil lies between NFIRST and NLAST layer including these two layers). D-MOD2000 - Page No. 26 D-MOD Option 2 – Layer Description Card As many cards as there are layers, i.e., NLAYER cards. MATYP(I) Material type identification number corresponding to the “i”-th layer. Note that layers in the input file are not numbered, but it is assumed that the layer at the soil surface (or at the crest of a dam) is layer number 1. Uses XLBL (optional) to number the material sets. NSUBD(I) Number of subdivisions of the “i”-th layer for pore water pressure redistribution and/or dissipation calculation9 (min ≡ default value = 2; max = 10). 9 PWP redistribution and/or dissipation are calculated using an explicit finite difference (FD) scheme. The mesh for FD calculation should be denser than the one for site response calculation, hence NSUBD(I) default value is 2. hi Thickness of the “i”-th layer10, hi, [decimal]; [ft]. 10 Note that the maximum frequency of a layer (fmax) is the highest frequency that the layer can propagate. The fmax is calculated as: fmax = Vs/4H, where Vs and H are the shear wave velocity and thickness of the layer, respectively. If a layer is too thick, the maximum frequency that a layer can propagate is small. For example, the most commonly used fmax to calculate an adequate thickness of a layer for site response analysis is 25 Hz, hence layer thickness can be calculated as hi = (Vs)i/100. bi Width of the “i”-th layer, bi, [decimal]; [ft]. ITWT(I) Ground water table control number: 0 – Layer is below the ground water table. 1 – Layer is above the ground water table. MOTYP(I) Pore water pressure/cyclic degradation model control number: 0 – No pore water pressure/cyclic degradation model is activated. 1 – Dobry et al. (1985); Vucetic and Dobry (1988) pore water pressure model for sand is activated. D-MOD2000 - Page No. 27 2 – Generalized degradation-pore water pressure generation model for clay by Matasovic and Vucetic (1995a) is activated. XLBL Up to 10 alphanumeric characters to describe (number) the material set (optional). Use the Add command button to add a new layer at the cursor position. By default, the same data for the current layer will be assigned to the new layer. To delete a layer from the soil column, use the Remove command button. If you want to create more than one layer at a time, place the cursor on the soil layer that you want to copy and then click on the Layers command button. This will display the Soil Column Layers form. Use this new form to enter the data that will be used for the new layers. The Profile command button is used to display a plot of the soil column and other material properties vs. depth. The properties displayed will be for the first set of Option 4 for which there is a number of materials greater or equal than the maximum number entered in the Material Type column. A different set of Option 4 can be chosen on the form where the graphs are displayed. D-MOD2000 - Page No. 28 D-MOD Option 4 – Material Description Card For each (different) material, up to 24 constants may be specified, depending on NPTYPE and MOTYP selected. Note that 5 cards must be used to describe each material, even though some of the constants/parameters may be omitted. There are 5(NMAT) cards for this data set. Use the MKZ command button to display the MKZ Non-Linear Stress-Strain Model form. This form is used to calculate the modulus reduction and damping curves using the MKZ non-linear stress-strain model (Matasovic and Vucetic, 1993). It is also used to find the MKZ model parameters β and s (by trial and error), and to calculate the stiffness-proportional Rayleigh coefficients αR and βR. Upon returning to this form, the values for Gmo, τmo, and s will be updated. Similar to the MKZ button, the Fit command button will display the Curve Fitting Parameters for MKZ Model form. This form is used to find the MKZ model parameters β and s (by trial and error), but for more than one material at a time. After you have selected the modulus reduction and damping ratio curves for the materials in this set, the Curve Fitting Parameters for MKZ Model form can be used to speed up the process of matching β and s. The Fit command button is enabled after every material has been assigned both modulus reduction and damping ratio curves and when there are at least 3 materials in the set. The Sand command button is used to display the Grain Size Distribution Curve Matching form. In this form, the user can enter the gradation curve for his/her own sand/silt soil and then compare this curve to those from other liquefiable sands and/or silts. Based on this, the user can pick a curve that approximates his/her own curve and then use generic material parameters (i.e., k, , f, p, F, s and tv) and curve fitting constants (i.e. r, and s) for the selected curve. Similarly, the Clay command button will display the Plasticity Chart for Cyclically Degradable Clays form. The liquid limit and plasticity index for your clay soil can be entered in this form and compared to other clay soils for which material parameters (i.e., tv) and curve fitting constants of the pore water pressure and degradation model (i.e., st, r, A, B, C, and D) are available. Upon returning to this form, the generic values will be shown on the appropriate text boxes. D-MOD2000 - Page No. 29 To display the other materials, scroll down the Material list and select a material. A new material set can be created by clicking on the New command button. The current material set can be deleted by clicking on the Delete command button. After editing the data, click on the Ok command button to return to the Main Menu form. Please note that for some parameters, a value of zero, i.e. 0, is considered an input value. Accordingly, if you don‟t want to input any value for the parameter, make sure that nothing is shown in the text box for the parameter. For example, entering a value of zero for the αR parameter is not the same as leaving the text box blank. Default material properties for some typical soils are presented in Appendices A and B. More detailed information about the computation of the Rayleigh damping coefficients is presented in Appendix C. Further, the data provided in Appendices A & B can also be imported by clicking on the icons next to the row of data of interest. For example, by clicking on the icon with a sail boat, the Material Parameters and Curve Fitting Constants form is displayed. In this case, the form will display the data provided in Table B-3, i.e. pore water pressure dissipation model (sand and clay), typical values of k, Er, and Martin‟s PWP dissipation model curve fitting constants. You can select the data for any of the materials in that form and import the data into the current material set for Option 4. Card 4.1 – Stress-Strain Model Control Card Gmo Initial (t = 0), tangent shear modulus of soil, Gmo, [decimal]; [psf]. VS Shear wave velocity, [decimal]; [fps]. Either a value for Gmo or VS should be provided; the other value will be computed using the value for the saturated unit weight. τmo Shear stress at reference strain, τmo (MKZ model), or the shear strength of soil, τf (KZ model11), [decimal]; [psf]. Evaluate τmo by curve-fitting the initial loading stress-strain curve or as τmo = Gmo r, where r is reference shear strain. Generic values of r are provided in Tables A-1 and A-2 in Appendix A. 11 Kondner and Zelasko (1963) model, which is sometimes referred as the “hyperbolic model”. Curve-fitting parameter of the non-linear hysteretic MKZ model [decimal]; [-]. To use the KZ model, set = 1.0. Use spreadsheet D-MOD_2 MKZ-fit.xls or the MKZ command button to develop from modulus reduction and damping curves; or pick generic values using the Sand or Clay command buttons; or, use generic values from Tables A-1 and A-2. s Curve-fitting parameter of the non-linear hysteretic MKZ model [decimal]; [-]. To use the KZ model, set s = 1.0. Use spreadsheet D-MOD_2 MKZ-fit.xls or the MKZ command button to develop s from modulus reduction and damping curves; or, pick generic values using the Sand or Clay command buttons; or, use generic values from Tables A-1 and A-2. υ Curve-fitting parameter that controls cyclic degradation of saturated sand. Set υ = 1.0 for all practical applications. For research purposes, check in Matasovic and Vucetic (1993), [decimal]; [-]. D-MOD2000 - Page No. 30 YLBL (ID) Up to 6 alphanumeric characters to describe (e.g., to number) the material sets (optional). Card 4.2 – The Pore Water Pressure Dissipation and Redistribution Model and Physical Properties of Soils (Part I) Er Unloading (rebound) modulus of soil12, Er, [decimal]; [psf]. Default generic values for clay is provided in Table B-3 in Appendix B. Leave blank to have the program calculate Er from the Martin et al. (1975) model (recommended, especially for sand). Note that in sand, Er is a function of ’v, K2, m, n where K2, m, n are constants defined below. 12 Use this option only if Er is to be evaluated from special laboratory testing (testing program described in Martin et al., 1975 paper). Otherwise, leave this column blank to have D-MOD_2 calculate Er (recommended). K2 Constant used to calculate Er from Martin et al. (1975) model, [decimal]; [-]. Generic values are provided in Table B-3. m Constant used to calculate Er from Martin et al. (1975) model, [decimal]; [-]. Generic values are provided in Table B-3. Card 4.3 – The Pore Water Pressure Dissipation and Redistribution Motel and Physical Properties of Soils (Part II) n Constant used to calculate Er from Martin et al. (1975) model, [decimal]; [-]. Generic values are provided in Table B-3. sat Saturated unit weight of soil, [decimal]; [pcf]. The value of Gmo will be re-calculated using the value for VS when the value for saturated unit weight is changed. wet Wet (bulk) unit weight of soil, [decimal]; [pcf]. k Hydraulic conductivity of soil, [decimal]; [ft/sec]. R or c The first Rayleigh damping coefficient, R, or c, if NDAMP13 = 1, an element on the diagonal of the viscous matrix [C], [percent if NDAMP =1; decimal if NDAMP = 2]; [units: “-“ if NDAMP = 1; force per unit velocity if NDAMP = 2]. 13 R NDAMP = the “viscous damping control number” specified in Option 1. Second Rayleigh damping coefficient14, [decimal]; [-]. The damping in soil is not frequency dependent. Therefore, the choice of R and R must be made that provides for damping values that have minimum variations over the range of frequencies of interest. The simplest, and for most practical applications accurate enough way to achieve that is to set R = 0 and calculate R as R = (c/) T, where c is the viscous damping coefficient (decimal) and T is predominant period of the soil deposit (in seconds). T can be calculated in a “dry run” of D-MOD_2. Viscous damping coefficient c is typically in the 0.5 to 5% range. The conventional procedure to evaluate R and R is presented in Appendix D. More rigorous procedure to establish R and R can be found in Hudson et al. (1994). 14 D-MOD2000 - Page No. 31 Card 4.4 – Pore Water Pressure (PWP) Generation Model for Sand (This model is referred to as Model 1 in the master output file) f Factor introduced by Vucetic and Dobry (1988) to simulate quasi two-directional pore water pressure response of Dobry‟s PWP model, [decimal]; [-]. 1.0 – One-directional pore water pressure response. 2.0 – Quasi two-directional pore water pressure response. P Curve-fitting constant of Dobry‟s PWP model, [decimal]; [-]. Generic values are provided in Table B-1. F Curve-fitting constant of Dobry‟s PWP model, [decimal]; [-]. Generic values are provided in Table B-1. s Curve-fitting constant of Dobry‟s PWP model, [decimal]; [-]. Generic values are provided in Table B-1. tv Volumetric threshold shear strain, tv, [decimal]; [%]. Generic values are provided in Table B-1 (for Sands) and in Table B-2 (for clays). Note that tv is a material parameter of both Dobry‟s and Matasovic Vucetic‟s models. Accordingly, it should also be included as part of the material properties for a clayey soil. OCR Overconsolidation ratio of soil, OCR, [decimal]; [-]. Note that this is a descriptive label, not a material parameter and therefore can be omitted. Card 4.5 – Generalized Degradation – Pore Water Pressure (PWP) Generation Model for Clay (This model is referred to as Model 2 in the master output file) st Degradation parameter fitting constant, [decimal]; [-]. Generic values are provided in Table B-2. r Degradation parameter fitting constant, [decimal]; [-]. Generic values are provided in Table B-2. A Degradation index fitting constant, [decimal]; [-]. Generic values are provided in Table B-2. B Degradation index fitting constant, [decimal]; [-]. Generic values are provided in Table B-2. C Degradation index fitting constant, [decimal]; [-]. Generic values are provided in Table B-2. D Degradation index fitting constant, [decimal]; [-]. Generic values are provided in Table B-2. For clayey soils, the volumetric threshold shear strain, tv, should also be provided in the material properties set for the soil. D-MOD2000 - Page No. 32 D-MOD Option 5 – Properties of the Visco-Elastic Half-Space This card is used only if ITMBY = 1. Otherwise, omit this card and go directly to Option 6. E Unit weight of the visco-elastic half-space, E, [decimal]; [pcf]. VSE Shear wave velocity of the visco-elastic half-space, VSE, [decimal]; [ft/sec]. D-MOD2000 - Page No. 33 D-MOD Option 6 – Dynamic Analysis Solution Control Card NEQ Set equal to 1 (this version of the program reads only single (horizontal) acceleration time history from the accelerogram input file). INTYP Set equal to 1 (this version of the program performs step-by-step numerical integration using Newmark‟s “Beta” method). NC Total number of numerical integrations to be performed by the program. Note that if NC is set as NC = NCARD * NREC (recommended; see option 7), the entire accelerogram will be used to calculate the dynamic response of the deposit. NCPR Partial number of numerical integrations to be performed prior to printing time-history values in the master output file. For example, if the time step of the numerical integration is 0.01 seconds and NCPR is 100, then values will be printed in the master output file for every second, since 100 0.01 = 1. NCPRM This variable controls what will be printed in the master output file14. In other words, it is used to specify partial number of numerical integrations to be performed prior to printing peaks of the time histories in the master output file. For example, if the time step of numerical integration is 0.01 seconds and NCPRM = 500, then maximum values that occurred in intervals of 0-5, 5-10 seconds, etc. will be printed in the master output file since 500 x 0.01 = 5. Note that a total sum of the intervals can be larger than the duration of the earthquake record. 14 Also note that the values of acceleration used in the computation of the spectrum will depend on the number of values saved to the output file defined with the NCPR and NCPRM variables. Thus, when computing the spectrum, a value of 1 should be used for NCPR and NCPRM. This will lengthen the time necessary to process the output file, but it will provide acceleration values for each time step. NPLD Auxiliary output file(s) control number: 0 – No auxiliary output file(s) containing time histories will be created by the program. 1 – Time-dependant variables for layer “i”15 will be stored in eleven single-column files (each variable in its own file). All eleven files have descriptive names and extension “prn”. More detailed description of file contents (and units) is provided in the master output file. 2 – Time-dependant variables for layer “i”15 will be stored in two files with extension “dat”. More detailed description of file contents (and units16) is provided in the master output file. 15 16 Layer “i” is specified from console. Note: in program versions prior to 9_03, surface acceleration is printed in the “imperial units”. D-MOD2000 - Page No. 34 t Time step for numerical integration, t. (min = 0.0001; max = 0.1); [decimal]; [sec]. Note that t typically coincides with the time step of the earthquake record. D-MOD2000 - Page No. 35 D-MOD Option 7 – Earthquake Record (Accelerogram) Control Card NCARD Number of earthquake record (accelerogram) data cards1. NREC Number of digitized acceleration values per data card (min = 1; max = 10)1. 1 D-MOD2000 accepts up to 32,000 values for the accelerogram file. Accordingly, the result of NCARD x NREC should be less than or equal to 32,000. NFTS Input Acceleration unit control number: 0 – Input acceleration values are in g-units. 1 – Input acceleration values are in ft/sec2. RDFR Accelerogram scaling constant. Input acceleration values will be multiplied by this constant before execution of the step-by-step numerical integration. (RDFR = 1.0 by default). Time Step Time step of earthquake record in seconds. FINPEQ Name of the accelerogram input file (e.g. taftN21E.sar). Any 1-, 2-, and/or 3-letter file extension is allowed. A maximum of 68 characters is allowed for this variable. NHEAD Number of the header lines at the top of the accelerogram input file [min = 0; max = 200]. The Accelerogram Input File: Card 1.0 – Headers (Accelerogram Description Card(s)). There are NHEAD cards to describe the accelerogram. TITLE Up to 72 alphanumeric characters to describe the accelerogram Card 2.0 – Earthquake Record (Accelerogram) Cards. There are NCARD accelerogram cards: AE(I,J) Acceleration values digitalized at time step t. The time step should be specified on Option 6. The acceleration values need to be input in accelerogram input file in either of the following FORTRAN “F” formats: 1F9.1, 1F9.2, ……., 1F9.8; 4F9.1, ……, 4F9.8; 10F9.1, ….., 10F9.8. The most commonly used format is 8F9.6 (i.e. eight columns, nine digits in each column, out of nine digits one is decimal point, six are decimals). D-MOD2000 - Page No. 36 Earthquake Records: You can select an object motion listed in the earthquake records database by clicking on the Quakes button to display a listing of the records saved in the D-MOD2000.EQ file. Once the list is displayed, you can choose a record by highlighting it and clicking on the Ok button, or by double clicking on it. The New Option 6 option when selected allows you to automatically create a corresponding Option 6 for this Option 7. If you want to use the data saved in a file that is not included in D-MOD2000.EQ, use the Other command button to display the Object Motion File dialog box to select the file. After you choose a file, the name of the file will be displayed on the text box below the FINPEQ label. The Convert command button is used to display the Conversion of Ground Motion File form that can be used to convert ground motion files to different units and/or formatting. Further information on this feature is provided in the Conversion of Ground Motion File section of this manual. The View command button can be used to view the contents of a ground motion file. This will help you to collect the information needed to define the formatting of the file if necessary. To do this, first select a file using the Other button to select other files. The first 60 lines of the file will be displayed on a form, with the first three characters displayed in red representing the numbers of each row of data in the file followed by a “|”. These characters are not part of the source file and are only shown to number the rows. After the row numbers, the alphanumeric characters that constitute the information saved in the file for each row are shown. Note that the characters are displayed as blue on a white background, and that every tenth character is displayed in red. However, if the tenth character is a “blank space” then the character is not shown. This is done to guide the user when defining the order of the data in the file. The Plot command button is used to display a graph of the acceleration time history. The program will read the data from the file using the information on this form. A value that may cause problems is the number of characters that will be read to create a number. Basically, the program opens the file, reads NHEAD number of header lines, and then it will read the first line of data. Next, the program obtains the length of this line, i.e. the total number of characters on the line. Then, it will use the NREC number, i.e. the number of acceleration values per line, to obtain the number of characters that form each value. For example, say that the length of the data line is 72 characters and the number of values per line, NREC, is 8. Thus, each value will be formed by 72/8 = 9 characters. Thus, the program will create an acceleration value by selecting groups of 9 characters. If there are any errors when plotting the time history, it is likely due to reading of the data. Check that the data lines are of uniform length. A copy of the ground motion file is saved in the EDT file. If you wish to restore the file, click on the Restore command button. A copy of the file with the same name will be then created in the same folder where the input file is saved. D-MOD2000 - Page No. 37 Database of Damping Ratio Curves To select a damping curve, click on the material to highlight it, and then on the Choose command button. You will return to the MKZ Non-Linear Stress-Strain Model form. You can also double-click on the material to select it and return to the MKZ model form. Some of the curves included with D-MOD2000 where obtained from the following references: Sukhmander Singh and Bruce J. Murphy (1990); Kavazanjian, E. Jr.; Matasovic, N.; and Caldwell, J. (1998).; Idriss, I.M.; Fiegel, Gregg; Hudson, Martin B.; Mundy, Peter K.; and Herzig, Roy (1995); Gazetas G. and Dakoulas, P. (1992); Seed, H.B.; Wong, R. T.; Idriss, I.M.; and Tokimatsu, K. (1986); Vucetic, M. and Dobry, R. (1991); Rollins, K.M.; Evans, M.D.; Diehl, N.B. and Daily, W.D. III (1998); Yegian, M.K.; Harb, J.N. and Kadakal, U. (1998); Makdisi, F.I. and Seed, H.B. (1978); Schnabel, P.B. (1973); Seed, H.B. and Idriss, I.M. (1970); Sun, J.I.; Golesorkhi, R. and Seed, H.B. (1988), Wehling et al. (2003); Darendeli, M. (2001); EPRI (1993); Roblee and Chiou (2004); Martirosyan et al. (2003); Singh and Donovan (1977); Matasovic, N. (1993); and, Zekkos et al. (2008). D-MOD2000 - Page No. 38 Database of G/Gmax Curves To select a G/Gmax curve, click on the material to highlight it, and then on the Choose command button. You will return to the MKZ Non-Linear Stress-Strain Model form. You can also double-click on the material to select it and return to the MKZ model form. Some of the curves included with D-MOD2000 where obtained from the following references: Sukhmander Singh and Bruce J. Murphy (1990); Kavazanjian, E. Jr.; Matasovic, N.; and Caldwell, J. (1998).; Idriss, I.M.; Fiegel, Gregg; Hudson, Martin B.; Mundy, Peter K.; and Herzig, Roy (1995); Gazetas G. and Dakoulas, P. (1992); Seed, H.B.; Wong, R. T.; Idriss, I.M.; and Tokimatsu, K. (1986); Vucetic, M. and Dobry, R. (1991); Rollins, K.M.; Evans, M.D.; Diehl, N.B. and Daily, W.D. III (1998); Yegian, M.K.; Harb, J.N. and Kadakal, U. (1998); Makdisi, F.I. and Seed, H.B. (1978); Schnabel, P.B. (1973); Seed, H.B. and Idriss, I.M. (1970); Sun, J.I.; Golesorkhi, R. and Seed, H.B. (1988), Wehling et al. (2003); Darendeli, M. (2001); EPRI (1993); Roblee and Chiou (2004); Martirosyan et al. (2003); Singh and Donovan (1977); Matasovic, N. (1993); and, Zekkos et al. (2008). D-MOD2000 - Page No. 39 Dynamic Material Properties Model This form is used to enter the input data for the different relationships for estimating normalized shear modulus and material damping ratio of soils. The relationships included with D-MOD2000 are those developed by Darendeli, M.B. (2001); Ishibashi and Zhang (1993); and, Zhang, Andrus and Juang (Zhang et al., 2005; Andrus et al., 2003; Zhang et al., 2008). For the Darendeli (2001) relationship, it is necessary to enter values for the mean effective confining stress, ‟m, in atmospheres; the soil plasticity index as percentage; overconsolidation ratio; loading frequency; and, number of loading cycles. For the Zhang, Andrus & Juang (2005) relationship you need to enter a value for mean effective confining stress in kPa, select one of the Geologic Unit options, and enter a value for Plasticity Index (PI). For each Geologic Unit option, a range of PI values is displayed on the PI label. For PI values other than those presented in Andrus et al. (2003), the coefficients will be obtained through interpolation. The effective confining stress in kN/m2 and plasticity index values should be provided when using the Ishibashi & Zhang (1993) relationship. After entering the data for the model, select the property curve, i.e. Shear Modulus or Damping, to plot and then click on the Plot command button to display the curve. The mean effective confining stress, ‟m, used in these models is computed from: 1 2 K o' 3 m' v' Where; ‟v = vertical effective stress K‟o = coefficient of effective earth stress at rest After both graphs have been plotted the Ok command button will be enabled. Click on the Ok command button to return to the MKZ Non-Linear Stress-Strain Model form. The Mean Std. Dev. options to compute the mean standard deviation curves are only enabled when the Darendeli, M.B. or Zhang, Andrus & Juang model is being used to obtain the curves. D-MOD2000 - Page No. 40 Earthquake Engineering Analyses & Utilities This form presents a list of different features and other utilities useful for geotechnical earthquake engineering analyses. To execute one of these options, first click on the option to select it and then on the Ok command button. Ground Motion Attenuation Relations: This option is used to plot attenuation relations for peak ground acceleration and peak horizontal velocity with distance, and pseudo absolute acceleration and pseudo relative velocity response spectra. Several equations are used, as described in the Ground Motion Attenuation Relations section of this manual. Ground Motion – Parameters, Plotting, Scaling: This option is used to plot the acceleration time history for an earthquake record; to compute the mean response spectrum for a series of ground motion records; and, to obtain various parameters useful in characterizing ground motions. For example, you can use this option to plot the object motion that is used as input for the D-MOD_2 analysis. The Plot Object Motion form will be displayed to allow you to select the object motion to be plotted. Ground Motion File Utilities: Conversion & Database: With this option the user can convert ground motion files to different units and/or formatting. Also, the information on the database of ground motion files can be edited and data about new files added. Newmark Displacement Analysis: This option allows you to determine permanent slope displacements due to earthquake shaking, using the Newmark Method. Response Spectra for Ground Motion: This option is used to compute the response spectra for a ground motion. U.S. Geological Survey Seismic Hazard: This form is used to retrieve the Peak Ground Acceleration from the files of gridded points used to make the 1996 USGS National Seismic Hazard Maps (Frankel et al., 1996), for the updates (Frankel et al., 2002; U.S. Geological Survey, 2003a and 2003b, 2008, 2010); and also, to plot the results of the seismic hazard deaggregation for a site in the conterminous states of the United States. D-MOD2000 - Page No. 41 Earthquake Records Database This form is used to display a listing of earthquake records available in your system. Basic information for each record is saved in the D-MOD2000.EQ database file located in the same directory where D-MOD2000 is installed. This file is an ASCII text file that can be modified either manually or through the Edit Database of Ground Motion Files form to include new information about new records, or to edit current information. To select an earthquake record, click on it to highlight it, and then click on the Choose button. You will return to either, the Option 7 editor where the data will be displayed on the corresponding cells; or, to the Plot Object Motion form, where the data will be displayed on the bottom section of the form. Use the Directory command button to choose the path to the directory where the earthquake motion files are stored. After clicking on this button, the Path to Earthquake Files form will be displayed. Use the mouse to select the drive and directory, and then click on the Ok button. The directory will be displayed on the text box next to the Path to Earthquake Files label. The following web sites provide ground motion records for download. Please note that the following Internet addresses were valid at the time this User‟s Manual was written. 1. PEER Strong Motion Databases: These databases contains over 1000 records from 140 earthquakes from tectonically active regions. http://peer.berkeley.edu/smcat/ http://peer.berkeley.edu/nga/search.html 2. Cosmos Virtual Data Center http://db.cosmos-eq.org/scripts/earthquakes.plx It is highly recommended that you use the above web sites to search for records given specific characteristics (e.g. mechanism, soil classification, magnitude, etc.). When downloading a file from an internet site, you need to save the file as a text file. Once you have an appropriate record for your D-MOD2000 - Page No. 42 analysis, you may need to transform the record to a format compatible with D-MOD2000. You can use the Ground Motion File Utilities: Conversion & Database option of the Main Menu to convert the file. D-MOD2000 - Page No. 43 Edit/Add Ground Motion File Information This form is used to edit the database of ground motion files used by D-MOD2000. The information about the files (e.g. file name, number of values, etc.) is saved in the D-MOD2000.EQ file and can be accessed by different features of D-MOD2000 to get the information for the ground motion. For example, this database can be accessed from the Option 7 editor form to select a ground motion file used in the D-MOD_2 analysis; or, from the response spectra form to select a ground motion for which the response spectra is computed. The editing functions that can be performed with this form are twofold. First, you can edit the data for an existing ground motion file, or you can remove a file from the database. Second, you can add the information about a new file in the database. Edit Information about a Ground Motion File: To display this form, you need to first select the Ground Motion File Utilities: Conversion & Database option of the Analyses & Utilities form and then click on the Ok command button. This will display the Conversion of Ground Motion File form. In this second form click on the Dbase command button to display the editing form. Once this form is displayed, you can edit the information by entering the new values in their respective text boxes. In the text box below the Description of Ground Motion File used in Database enter a string up to 128 characters long that describes the motion and that is displayed in the list box. For example, the first ground motion in the database shown above is identified as Alaska (7/3072) – Sitka Record, M: 7.5, Dis: 48 km, Amax: 0.091g, Rock outcrop. The name of the file and a path are entered in the text box below the Ground Motion File text box. The information in this text box can be added to the information shown on the Path to Earthquake Files text box to define the path to the file. For example, when executing D-MOD2000 the path to the first ground motion will be specified as c:\D-MOD2000\quakes\alaska.eq when the path option is selected. You can also enter the name and a path if you saved the files in different subdirectories. For example, you can enter quakes\alaska.eq if the file is saved in the quakes subdirectory, and then on the path option you would select the c:\D-MOD2000 folder as the path where the file is located. Use the Directory command button to choose the path to the directory where the earthquake motion files are stored. After D-MOD2000 - Page No. 44 clicking on this button, the Path to Earthquake Files form will be displayed. Use the mouse to select the drive and directory, and then click on the Ok button. The directory will be displayed on the text box next to the Path to Earthquake Files label. The total number of acceleration values that form the object motion file is entered in the text box below the No. Values label. For the above example, there are 2048 values in the file. In the text box below the Time Step label, enter the time interval between each acceleration value. For this example, it is 0.02 seconds. The peak acceleration value of the ground motion can be entered in the text box below the Max. Acc. label. Entering this value is optional. In the text box below the No. Header label enter the number of lines at the beginning of the file that are used to describe the object motion. In the above example, the first three lines are the header lines. In the text box below the Values/Line label, enter the number of acceleration values on each line of the file. For the above example, there are 8 values on each line. The number entered in this box is used with the information entered in the Format text box to determine how many values are to be read from each row of data in the file. Other examples of the information entered in this box are: In the line below there are 4 values separated by blank spaces: -.1059027E-04 -.1461820E-04 -.1690261E-04 -.1506594E-04 In the line below there are 8 values. Note that there are no blank spaces separating the values when a negative sign is included: -0.000001-0.000001-0.000001-0.000001 0.000000 0.000000 0.000000 0.000001 In the line below, there are 8 values, and there are blank spaces separating the values. The last number (e.g. 1) only identifies the row number. Thus, you would enter an 8 in this cell for this specific example: 0.00000 -0.00434 0.00860 0.00540 -0.00565 -0.00944 -0.00369 -0.00669 1 The last information needed for the file is the Format value. The format string tells D-MOD2000 how to read the ground motion values from the file. This string is based on the syntax used in the Format statement of the FORTRAN computer language. In this statement edit descriptors specify how the values are read. The edit descriptors supported by D-MOD2000 in this feature are: Fw.d Ew.d [Ee] Gw.d Dw.d Iw Real values Real values with exponents Real values, extended range Double-precision real values Integer values In these descriptors, the field is w characters wide, with a fractional part d decimal digits wide, and an optional exponent width of e. Remember that the field w also includes any blank spaces and the sign. You can also indicate that a given data format is repeated a number of times. For example, 8F9.6 repeats a nine-character real value with six decimal digits descriptor eight times. The first character on the format field should be a “(” and the last character a “)”, e.g. (8F9.6). Examples of data saved in the ground motion files included with D-MOD2000 and the format used to define them follow: Format: (4E15.7): -.1059027E-04 -.1461820E-04 -.1690261E-04 -.1506594E-04 D-MOD2000 - Page No. 45 Format: (8F9.6): -0.000001-0.000001-0.000001-0.000001 0.000000 0.000000 0.000000 0.000001 From the format string, D-MOD2000 gets the number of digits that form each value, and combines this number with the value entered in the Values/Line box to determine the length of each value and the number of values to read from a ground motion file. For more information on format types, please refer to a FORTRAN Programming Language book. After you have modified the information, click on the Edit command button to include the new information on the database file. You will be asked if you want to proceed with the changes. However, even if you accept, the information on the d-mod2000.eq file will not be changed until after you leave this form using the Ok command button. Thus, even if you have changed the information on several of the files, but ultimately elect not to modify the information in the d-mod2000.eq file, click on the Cancel command button to cancel all of the changes. To remove a file from the database, click on the Delete command button. You will be asked if you want to proceed with removal of the file‟s information or not. Add Information about a New Ground Motion File: To add information about a new file to the database of ground motion files, you first need to use the Conversion of Ground Motion File form to open the file and enter the information described previously. To do this, first click on the Ground Motion File Utilities: Conversion & Database option of the Analyses & Utilities form to select it. Then, click on the Ok button to display the conversion form. Next, click on the Open command button to display the Open Source Ground Motion File dialog form. Change to the folder and subdirectory where the file is located if necessary, click on the file to highlight it, and then use the Open button to select the file and return to the conversion form. After a few seconds, the first few lines of the file (up to 99 lines) will be shown on the top list box of the form. Once the file is opened, you need to enter as a minimum the information requested in the No. Values, Time Step, No. Header Lines, Values per Line, Format and Database Header Line text boxes of the conversion form as discussed in the Conversion of Ground Motion File section of this manual. After entering this information, click on the Dbase command button to display the Edit/Add Ground Motion File Information form. When you are adding information about a new file, the Edit and Delete command buttons are not displayed. Instead, the Add command button is the only button displayed. Click on this button to include the information on the database, and then on the Ok command button to modify the d-mod2000.eq file. If you are adding data for a file converted using the Conversion of Ground Motion File form, then the text boxes where the information are displayed will not be enabled, i.e. you will not be able to modify the information. These boxes are enabled if you are adding information about a file that has not been converted with the conversion form. Edit the D-MOD2000.EQ File with a Text Processor: The database file can be modified manually using a text processor. Please remember that the formatting in the file (i.e. the way the information is saved in columns) should not be modified. If you choose to do this, the following section explains the way the information is saved in the file which will help you edit the file manually. D-MOD2000 - Page No. 46 Earthquake Records File – D-MOD2000.EQ Format: D-MOD2000 ".EQ" File Earthquake Database Number of Earthquake Records: 2363 |Identification |Path |No. Acc |Time Step|Mx. Acc. |Header |Values Alaska (7/30/72) - Sitka Record, M: 7.5, Dis: 48 km, Amax: 0.091g, Rock outcrop alaska.eq 2048 0.02 3 8 Apeel 7 - crystal spr, pulgas 0 deg pulgas0.eq 2000 0.02 1 8 Apeel 7 - upper crystal spr. pulgas 90 deg pulgas90.eq 2000 0.02 1 8 ANZA 02/25/80 1047, ANZA FIRE STATION, 225 (USGS STATION 5160) - PEER Database azf225.eq 2058 0.0050 4 6 |Format (8F9.6) (8F9.6) (8F9.6) (6E15.7) The first two lines in the file (i.e. D-MOD2000 ".EQ" File & Earthquake Database) should not be modified. The third line (Number of Earthquake Records: 2363 ) is the number of records listed in the file. Every time you add or delete a record, this number should be modified accordingly. For the above example there is information listed for 2363 different records. The next line is a blank line, followed by two lines that limit the fields for the information necessary for each record. The next line is a blank line. Each record is described by two lines. The first line (|Identification) describes the record (e.g. Alaska (7/30/72) - Sitka Record, M: 7.5, Dis: 48 km, Amax: 0.091g, Rock outcrop). This line can contain as many as 128 characters. The following line, i.e.: |Path |No. Acc |Time Step|Mx. Acc. |Header |Values |Format gives information about the record that is used in Option 7 of D-MOD2000, and also to plot the object motion. The first field (i.e. |Path) is 30 characters long, from columns 1 through 30, and describes the path in your hard drive where the file is stored or the file name only. For the above example, the first record is saved as a file named alaska.eq and assumed to be saved in the quakes directory of the hard drive. You could also only include the name without the subdirectory. The |No. Acc field from columns 36 through 45 is the number of acceleration values in the object motion. The time interval between acceleration values is entered in the |Time Step field, from columns 46 through 55. The next field |Mx. Acc., from columns 56 through 65, is used to enter the maximum acceleration value to be used. If this field is left blank, a value of zero will be assigned. The number of header lines in the file containing the object motion is entered in the |Header field, from columns 66 through 75. The number of acceleration values per line in the object motion file is entered in the |Values field, from columns 76 through 85. The format for reading the acceleration values is entered in the |Format field, from columns 86 through 95. After modifying the file, don't forget to update the number of earthquake records in the Number of Earthquake Records line. The file should be saved as a text file, with no special formatting using a text processor. D-MOD2000 - Page No. 47 EuroCode 8 Response Spectrum This form is used to select the options and/or enter the data necessary to plot a design response spectrum in accordance with Part 1 of the EuroCode 8 (European Committee for Standardization, 2000). To select a spectrum, first, choose one of the Spectrum Type options. Then, select a subsoil class from the Subsoil Class options to determine the soil parameter, S. Next, enter a value for the design ground acceleration in the text box adjacent to the ag label. Then, click on the Ok button to return to the Response Spectrum Plot Menu form. The value of damping shown is the first value selected in the Response Spectrum Plot Menu form. The value for the soil parameter, S, can be changed to 1.4 for the special case “ …when the subsoil includes an alluvial surface layer with thickness varying between 5 and 20 m, underlain by much stiffer materials of class A” (European Committee for Standardization, 2000). To do this, place the cursor on the text box adjacent to the S label and enter 1.4. Please note that this is only allowed when Class B of the Subsoil Class options is selected. If a different value is entered, the program will set the default value for the soil parameter based on the type of spectrum selected. D-MOD2000 - Page No. 48 G/Gmo & Damping Ratio Curves Database The current damping data entered in the MKZ nonlinear Stress-Strain Model form can be added to the database of material properties. First click on the Dbase command button on the MKZ form. Then, click on the Add command button. You will be asked if you would like to add the data to the position highlighted in the list of materials. Data for a specific material can be deleted from the database. To do this, highlight the material to be deleted and then click on the Delete command button. You will be asked if you wish to continue with deletion of this material. D-MOD2000 - Page No. 49 Grain Size Distribution Curve Matching In this form, the user can enter the gradation curve for his/her own material and then compare this curve to those from other liquefiable sands and/or silts (Matasovic, N., 2006). Based on this, the user can pick a curve that approximates his/her own curve and then use the generic material parameters and curve fitting constants for the selected curve. The particle size and percent finer by weight values should be entered in the appropriate text boxes. Every time a pair of values is entered, the graph will be automatically redrawn to show your curve. The label for your curve can be entered in the text box below the Curve ID label. This label will be shown as the last legend on the legend section of the graph. To select a “matching” curve, click on any of the symbols for the curve that best matches your own. The label for the selected curve will be shown in the text box below the Curve Matched to label. The curves for Upper Bound and Lower Bound are only shown for reference and cannot be selected. The data for your curve can be save to a text file using the Save command button. The same data can be retrieved from this file using the Open command button. A copy of the graph can be sent to a printer or copied to the Windows Clipboard using the Print command button. The Property command button is used to display the help pages for the graph control. The grain size distribution curves for the sands and silts included with the program are listed below. The references listed contain more detailed material characterization information, as well as verification of curve fitting constants and material parameters on case histories. D-MOD2000 - Page No. 50 Banding Sand (BS); poorly-graded commercially available sand; Dr = 40%; D50 = 0.19; Cc = 0.9; Cu = 1.4; d,min = 90 pcf; d,max = 106 pcf. Reference: Dobry et al. (1985) Wildlife Site Sand A (WSA); void ratio 0.84 to 0.85; 37% fines; N 5; VS 350 ft/sec. Reference: Vucetic and Dobry (1988); Matasovic and Vucetic (1993). Wildlife Site Sand B (WSB); loose silty sand that liquefied in the past; void ratio 0.74 to 0.76; Dr = 25%; 25% fines; N 6 to 13; VS 450 to 500 ft/sec. Reference: Vucetic and Dobry (1988); Matasovic and Vucetic (1993). Heber Road Site Sand CF; loose sand; void ratio 0.70; 22% fines; Dr = 40%; VS 400 to 466 ft/sec. Reference: Vucetic et al. (1986); Matasovic and Vucetic (1993). Heber Road Site Sand PB; medium dense clean sand that liquefied in the past; void ratio 0.70; 15% fines; Dr = 45%; VS 500 to 600 ft/sec. Reference: Vucetic et al. (1986); Matasovic and Vucetic (1993). Santa Monica Beach Sand (SMB); clean dense sand; similar to Monterey No. 0; void ratio = 0.56; zero fines; Dr 75%; VS 867 ft/sec. Reference: Matasovic, N. (1993); Matasovic and Vucetic (1993). Owi Island Sand at depths from 6 to 14 m b.g.s.; silty fine sand placed as hydraulic fill; 18% < fines < 35 %. Reference: Tilakaratne and Vucetic (1987); Ishihara et al. (1987). Owi Island Silt at depth of 6 m b.g.s.; placed as hydraulic fill; 50% < fines < 85 %. Reference: Tilakaratne and Vucetic (1987); Ishihara et al. (1987). D-MOD2000 - Page No. 51 Graphics Print Menu The graph can also be printed using the System Property Page of the graphics server. To do so, click on the toolbar at the top of the graphics window to display the property pages. Select the System tab. You can also use this page to save an image of the graph to a file in either metafile or bitmap format. For further information or help, click on the question mark icon. D-MOD2000 uses the standard printer dialog form from Windows to select a printer and/or to change the properties of the printer and paper used to print the graph. This form can be displayed by clicking on the Printer command button. Every time the size or position of the graph is changed, the graph is automatically redrawn on the preview window. To zoom in on the preview graph, double-click on it with the left mouse button. To zoom out, double-click on it with the right mouse button. Use the Copy command button to copy the graph to the clipboard. You can use then the Paste or Paste Special commands on other Windows applications (i.e. Microsoft Word), to insert the graph into other documents. D-MOD2000 - Page No. 52 X coordinate: This cell is used to enter the X coordinate from the top left corner of the graph. The origin of the coordinate system is at the top left corner of the paper sheet. Use the Tab key to move to the other data cells, and the Delete key to delete the contents of a cell. Once the value of this cell is modified, the margins shown will be automatically updated. Y coordinate: This cell is used to enter the Y coordinate from the top left corner of the graph. The origin of the coordinate system is at the top left corner of the paper sheet. Use the Tab key to move to the other data cells, and the Delete key to delete the contents of a cell. Once the value of this cell is modified, the margins shown will be automatically updated. Graph width: Set the width of the graph using the units defined by the paper size set on the window's print setup dialog. Use the Tab key to move to the other data cells, and the Delete key to delete the contents of a cell. Once the value of this cell is modified, the margins shown will be automatically updated. Graph height: Set the height of the graph using the units defined by the paper size set on the window's print setup dialog. Use the Tab key to move to the other data cells, and the Delete key to delete the contents of a cell. Once the value of this cell is modified, the margins shown will be automatically updated. The paper dimensions shown in the Width and Height boxes will switch to update the paper orientation to portrait or landscape. The margins shown will also be updated. Once you have entered the dimensions and position of the graph, use the Print button to send a copy of the graph to the printer To create a form that can be printed together with the graph, click on the Report command button to display the Company & Project Information form, and then on the Form command button to display the Report Form Development form. Options: Print in color: Select this option to print the graph in color using a color printer. By default, when the Graphics Print Menu form is displayed, the graph is drawn in black & white. When this option is selected, an x will appear in the check box, and the graph will be redrawn in color. Print as a windows metafile: Select this option if you want to create a Windows metafile of the graph. Click on Print to display the Windows Metafile dialog form. Enter the name of the file, and select a directory where the file will be saved. Then click Save. Print report form: Select this option to print a form on the same sheet of paper as the graph. To create the form, click on the Report command button to display the Company & Project Information form, and then on the Form command button to display the Report Form Development form. Physical page: This option determines whether the logical page used by the printer control should correspond to the entire physical page or only to its printable area. Most printers have a “logical” paper size that corresponds to the printer's printable area, and a “physical” paper size that corresponds to the actual page size. The physical paper size is always a little larger than the logical paper size. If this option is selected (an x is shown on the check box), the program will print to the physical page. This option only works when the Print report form option is selected. D-MOD2000 - Page No. 53 Graphics Window This form is used to plot a number of parameters, e.g. attenuation relations, time histories, etc. The graphics routine includes a number of property pages that can be used for customization of the graph. For example, you could add a 3-D look to the graph, or change the colors. The property pages are accessed through the icons shown on the upper part of the graph. More help on the graph control property pages can be obtained by clicking on the Help command button of these pages. To display the X and Y coordinates of a specific point on the graph, click on any point along the graph to display its coordinates in the text cells shown on the right side of the form. A copy of the graph can be printed, or copied to the Windows Clipboard for use by other applications, by clicking on the Print command button. This will display the Graphics Print Menu form that can be used for printing. To change the legends of the curves, click on the Legend command button. This will display the Legend Text form. When plotting the significant duration of earthquake ground motions using either the Abrahamson & Silva (1996) or the Kempton & Stewart (2006) relation, the duration/distance pair for a user‟s record can be plotted on the same graph for comparison purposes. To do this, first enter the record‟s distance and duration in the respective text boxes and a label of up to 24 characters to describe this record; then, click on the Plot user’s event option to select it. D-MOD2000 - Page No. 54 Ground Motion Attenuation Relations This section presents a number of ground motion attenuation relations that can be used to estimate the peak ground acceleration or velocity with distance, and the pseudo-absolute acceleration or pseudorelative velocity response spectra. The reference for each attenuation relation is given, and the user is solely responsible for verifying that the attenuation relations are appropriate for his/her particular problem, and that the data required for each attenuation relation are entered in the appropriate units. It is recommended to review the references listed in this section to obtain more detailed information about these attenuation relations and their uses. The attenuation relations available in D-MOD2000 include: 1. Abrahamson & Silva (1997). Reference: Abrahamson, N.A. and Silva, W. (1997). 2. Abrahamson & Silva (2008) – NGA. Reference: Abrahamson, N.A. and Silva, W. (2008). 3. Akkar & Bommer (2007) – Europe/Middle East. Reference: Akkar, S. and Bommer, J. (2007a, 2007b). 4. Ambraseys et al. (2005) – Europe/Middle East. Reference: Abramseys, N.N., Simpson, K.A., and Bommer, J.J. (1996); and, Ambraseys et al. (2005a, 2005b). 5. Atkinson & Boore (2006) - ENA. Reference: Atkinson, G.M. and Boore, D.M. (2006). 6. Atkinson & Boore (2003) - Subduction. Reference: Atkinson, G.M. and Boore, D.M. (1997a); Atkinson, G.M. and Boore, D.M. (2003, 2008). D-MOD2000 - Page No. 55 7. Berge-Thierry et al. (2003) - Europe. Reference: Berge-Thierry, C., Cotton, F. and Scotti, O. (2003). 8. Boore, D. & Atkinson, G. (2008) – NGA. Reference: Boore, David and Atkinson, Gail (2008); Atkinson & Boore (2011). 9. Boore, Joyner & Fumal (1997). Reference: Joyner, W.B., Boore, D.M. and Fumal, T.E. (1997). 10. Campbell, K.W. (1997). References: Campbell, K.W. (1997) and Campbell, K.W. (2000a, 2000b). 11. Campbell, K.W. (2002) - CEUS. Reference: Campbell, K.W. (2002; 2003, personal communication; 2004). 12. Campbell & Bozorgnia (2003). References: Campbell, K.W. and Bozorgnia, Y. (2003a, 2003b, 2003c, 2004); Campbell, K.W. (2003). 13. Campbell & Bozorgnia (2008) - NGA. Reference: Campbell, K.W. and Bozorgnia, Y. (2008). 14. Campbell, Bozorgnia & Hachem (2010) – Relation for Inelastic response spectra. Reference: Bozorgnia et al. (2010). 15. Chiou, B. & Youngs, R. (2008) – NGA. Reference: Chiou, Brian S. and Youngs, Robert R. (2008). 16. Gregor et al. (2002) - Cascadia Subduction. Reference: Gregor et al. (2002). 17. Idriss, I.M. (2008) – NGA. Reference: Idriss, I.M. (2008). 18. Kanno et al. (2006) – Japan. Reference: Kanno et al. (2006) 19. Sabetta & Pugliese (2009) - Italy. References: Sabetta, F. and Pugliese, A. (1987, 1996, 2009). 20. Sadigh et al. (1997). Reference: Sadigh et al. (1997). 21. SEA99 - Spudich et al. (1999). Reference: Spudich, P. et al. (1996); Spudich, P. et al. (1999); and, Pankow & Pechmann (2004). 22. Stewart, Liu & Choi (2003). Reference: Stewart, Liu and Choi (2003). 23. Tavakoli & Pezeshk (2005) – ENA. Reference: Tavakoli & Pezeshk (2003). 24. Toro et al. (1997) - Gulf Region of NA. References: Toro, G.R., Abrahamson, N.A. and Schneider, J.F (1997); Silva, W., Pyke, R., Youngs, R., and Idriss, I.M. (1996); Electric Power Research Institute (EPRI) (1993); and, Toro, Gabriel R. (2002). 25. Toro et al. (1997) - Mid-Continent of NA. References: Toro, G.R., Abrahamson, N.A. and Schneider, J.F (1997); Silva, W., Pyke, R., Youngs, R., and Idriss, I.M. (1996); Electric Power Research Institute (EPRI) (1993); and, Toro, Gabriel R. (2002). 26. Youngs, Chiou, Silva & Humphrey (1997). Reference: Youngs, R.R., Chiou, S.J., Silva, W.J. and Humphrey, J.R. (1997). 27. Zhao et al. (2006) – Japan. Reference: John X. Zhao et al. (2006). Three equations for prediction of significant-duration are also provided: 28. Abrahamson & Silva (1996). Reference: Abrahamson and Silva (1996). 29. Bommer, Stafford & Alarcon (2009). Reference: Bommer et al. (2009). 30. Kempton & Stewart (2006). Reference: Kempton and Stewart (2006). Please refer to the above references for detailed information on the use and application of these attenuation relations. To plot an attenuation relation, first select what type of plot you would like to use by choosing one of the four options on the top right section of the form. There are four options: Peak Ground Acceleration, Peak Ground Velocity, Acceleration Spectrum, and Velocity Spectrum. Depending on what type of ground motion parameter you choose, different relations will be available. For example, by default, when the Peak Ground Acceleration option is chosen, most of the equations are enabled (i.e., they are not grayed out). If you choose the Peak Ground Velocity option, then only the Atkinson & Boore (1997) Cascadia; Atkinson & Boore (2006) ENA; Atkinson & Silva (2000) – California; Campbell, K.W. (1997); D-MOD2000 - Page No. 56 Sabetta & Pugliese (1996); and, SEA99, Spudich et al. relations will be enabled and the others will be disabled (i.e. shown as grayed out options). Next, select which attenuation relations you want to use by clicking on the check box next to each. An x appears in the box when an attenuation relation is selected. Use the Tab key or the mouse to place the cursor on the Magnitude text box, and enter the earthquake magnitude. Enter the distance and depth in the Distance and Depth text boxes, respectively. Select other options as explained below, depending on the relations chosen. The Plot command button is enabled when at least one attenuation relation is selected. Click on the Plot button to display the curve. Please note that the depth value used in the Campbell (1997) equation is the depth to basement rock. Thus, if you are using several relations at the same time, use the Ground Motion Attenuation Relations - Parameters form to enter depth values for each attenuation relation. The Curve for specific period option allows you to plot the spectral acceleration or velocity attenuation curve (i.e., acceleration or velocity vs. Distance) for specific periods. When selecting more than one attenuation relation, the attenuation curve will be displayed only for those equations that have coefficients for that specific period. Check the Period column for each attenuation relation‟s coefficients to determine if a period value is acceptable. Enter the value for the period in the text box next to the label. Depending on the attenuation relation selected, there are other options that can be used. Some relations classify the faulting mechanism of an earthquake into one of a number of categories. The different categories are shown in the Style of Faulting section of the form. By default, the Strike Slip type is chosen. You can select other types by clicking on any of the options shown. The type selected will be used for all of the relations that it applies to when those relations are selected. Note that an attenuation relation will not be selected (i.e. an x is shown on the check box) if the Style of Faulting option selected does not apply to this relation. The Subduction option in the Style of Faulting list only applies to the Zhao et al. (2006) relation. The Intraslab and Interface options apply to the Youngs, Chiou, Silva & Humphrey (1997); Atkinson & Boore (2003); and Zhao et al. (2006) relations. By default, the Intraslab option is selected, thus the attenuation relation for intraslab events will be used. To use the attenuation relation for interface events, click on the Interface option. The M Sigma option is used to plot the median attenuation curve, and the curves that represent the median plus and the median minus sigma. When this option is selected, only one of the attenuation relations will be used, i.e. the top attenuation relation selected will be the one used. The Plot Spectra vs. Frequency (Hz) option is used to change the X-axis to the frequency scale. When this option is selected, an x appears in the check box. To deselect this option, click on the check box, this will switch to the period scale in the X-axis. A value for the shear wave velocity (Vs) to a depth of 30 meters can be entered in the Shear Wave Velocity to 30 m label, in m/sec. When using the Vertical component option, the attenuation relations and/or coefficients for the vertical component of PGA, PGV and PSA will be used. The Site Class options are used with the Atkinson & Boore (2003) and Zhao et al. (2006) attenuation relations. By default, the attenuation relation for Site Class A is selected. A different site class can be chosen by clicking on the respective option. The site classes represent the NEHRP classes (see Table 2 of Zhao et al. (2006) for equivalent site class definitions). Further, for the Atkinson & Boore (2003) D-MOD2000 - Page No. 57 relation, classes A and B represent rock. In addition, the user can select a region for the Atkinson & Boore relation by selecting the Cascade, Japan, or Other option; and, the Regional SD option for region specific error terms. For the Toro et al. (1997) attenuation relations, the equations used are those for Moment Magnitude. For Bozorgnia & Campbell (2003), when considering the effect of the hanging wall, it is necessary to enter rjb, or the closest distance to the surface projection of fault rupture (Campbell, K.W. and Bozorgnia, Y., 2003a; Boore et al., 1997). Alternatively, the fault dip angle,, can be used instead. To enter rjb, click on the Rjb command button to display the Rjb and Rx Distance form. On this form, enter the rjb distance for each value of rseis. If you need more information about this distance, please refer to Cambpell, K.W. and Bozorgnia, Y. (2003a) and Abrahamson, N.A. and Shedlock, K.M. (1997). The dip angle value can be entered in the dip (deg) text box. By default, the peak ground acceleration is estimated using the attenuation relation for uncorrected PGA. To use the corrected PGA attenuation relation, click on the Corrected option of the Bozorgnia (PGA) options. Please note that the value of PGA used in the computation of the standard deviation, lnY, is determined based on the choice of the Bozorgnia (PGA) options. The Rjb and Rx distances are also required when using the Campbell & Bozorgnia (2003); Abrahamson & Silva (2008) – NGA; Akkar & Bommer (2008); Boore, D. & Atkinson, G. (2008) – NGA; Campbell & Bozorgnia (2008) – NGA; Chiou, B. & Youngs, R. (2008) – NGA; and, Campbell, Bozorgnia & Hachem (2010) relations. To enter Rjb and Rx, click on the Rjb command button to display the Rjb and Rx Distance form. Note that the program will plot the PHA vs. Distance, where for the NGA equations the distance is Rrup and for the Campbell & Bozorgnia (2003) it is Rseis. Accordingly, when Rjb and/or Rx are needed, these should be computed and entered in the respective columns of the Rjb and Rx Distance form. Similarly, for the Boore & Atkinson NGA and the Akkar & Bommer relations, the program will also plot the PHA vs. Distance wherein distance is assumed to be Rrup, but the program will use Rjb entered in the respective column of the Rjb and Rx Distance form for the computations. The single value of Rjb or Rx distance used for computation of response spectra can be entered in the rjb (km) or Rx text box, respectively. For the Boore & Atkinson NGA, the value of distance entered in the rjb (km) text box is used instead of the value entered in the Distance text box. The figure shown in the next page, and included in the PEER NGA Excel spreadsheet, will help you understand the distance definition in a more clear way. For a definition of the parameters in the NGA Parameters section of the form, please refer to references for the NGA attenuation relations. The user can manually enter a value for each parameter, or enter the “DEF” string to use the default values. For the Z1 and Z2.5 parameters, the default values are based on relationships provided in Abrahamson & Silva (2008) , Campbell & Bozorgnia (2008) and Chiou & Youngs (2008), based on the VS,30. For the Ztor and Width values, the program will use the relations presented in Kaklamos et al. (2010). In the Sabetta & Pugliese (2009) relation, the data for the Joyner-Boore distance are used. Further, when computing response spectra, the program will use the distance entered in the rjb text box. The ground motion parameters recommended by Stewart, Liu & Choi (2003) are taken as the product of their amplification factors and the median attenuation values for rock obtained from the Abrahamson & Silva (1997) relation. For this relation, a classification category can be selected from the Stewart combo list in the Other Site Conditions & Options section of the form. In addition, the effect of the hanging wall can be accounted for by selecting the Stewart option of the Hanging Wall options. D-MOD2000 - Page No. 58 When an attenuation relation can be applied to more than one site condition (e.g. rock and deep soil), DMOD2000 will by default use the attenuation relation for rock when plotting the ground motion parameters. To plot these parameters for other site conditions, select the appropriate option for each attenuation relation from the Other Site Conditions & Options. Some specific information about these options is: In the Campbell (1997) attenuation relation, the coefficients for local site conditions are defined by selecting one of five options: Alluvium/firm soil, soft rock, hard rock, generic soil, or generic rock. By default, the option for hard rock is selected. For the generic options, default values of depth to basement rock of 1 and 5 km for rock and soil respectively, are used in the attenuation relation. For the Abrahamson & Silva (1997, 2008 NGA), Bozorgnia & Campbell (2003), Chiou & Youngs (2008 NGA) or Stewart et al. (2003) attenuation relations, select the corresponding D-MOD2000 - Page No. 59 option of the Hanging Wall options to use the factor to distinguish between ground motions on the hanging wall and footwall of dipping faults. When using the ground-motion prediction equations for significant-duration by Abrahamson & Silva (i.e. A&S 1996), Bommer, Stafford & Alarcon (BSA 2009) or Kempton & Stewart (i.e. K&S 2006), the magnitude value is entered in the Magnitude text box. For Kempton & Stewart and Bommer, Stafford & Alarcon, the value for Vs-30 is entered in the Shear Wave Velocity to 30 m text box; and, the value of Ztor entered in the Ztor text box for the BSA. The Mediand±Sigma options also apply to these equations. By default, for Abrahamson and Silva, the equation for rock is used. If you wish to use the equation for soil, click on the Abrahamson & Silva (1996) – Duration Soil option to select it. The base model by Kempton and Stewart can be corrected for near-fault conditions by selecting the Kempton &Stewart (2006) – Near-Fault option. The result plotted will be the Da5-95 value, i.e. the time interval between 595% of the Arias Intensity as a function of the acceleration record. For those attenuation relations that yield pseudo velocity (PRV), the Pseudo Absolute Acceleration (PAA) is obtained using the following equation: PAA 2 PRV 981T In addition, for those attenuation relations that yield pseudo absolute acceleration, the Pseudo Relative Velocity is obtained using the following equation: PRV 981T PAA 2 In which T is period in seconds. The attenuation data can be saved to a text file by selecting the Save Attenuation Data option. This text file can then be open with other applications, e.g. Excel, for further use. The path and name of the text file can be changed by clicking on the command button with the folder icon next to the text box. When plotting acceleration response spectra, a CSV (comma separated values) file will also be created in the same path using the same name but with the extension “.csv”. This file can be opened with Excel for further processing. The CSV file will only save the data for one response spectrum. When obtaining response spectra, the GM option will compute the geometric mean spectrum for the set of relations selected for the common range of periods. The WA option is used to obtain a “weighted” spectrum, i.e., different weights summing up to 1.0 can be assigned to the relations selected to compute a weighted spectrum. To enter the weights, first select between 2 and 10 relations and then click on the Weight command button to display the Model Weight form. D-MOD2000 - Page No. 60 In this form, enter the weights for each relation in their respective text boxes. The weights should add up to 1.0 and each weight should be greater than 0.0. Also, when obtaining target response spectrum, the geometric mean or the weighted spectrum will be used as the target. To enter the data for a target response spectrum that can be plotted with the other spectra, click on the Target button to display the Target Response Spectrum form. In this form, you can enter values of period and spectra for a target response spectrum. To plot the target spectrum, also select the Plot Target SPC option. Conditional Mean Spectrum: This option is provided to compute the conditional mean spectrum as defined by Baker (2009) and further explained in Baker & Cornell (2005a, 2005b, 2006a, 2006b, 2008) and Baker & Jayaram (2008). An example of the applicability of this spectrum in the selection of ground motions for analysis is provided by PEER Ground Motion Selection and Modification Working Group (2009). This option only works with a few selected ground motion relations. To select this option, click on the Epsilon check box, then enter a value for epsilon in the text box. Based on the ground motion relation selected, a list of periods will be displayed when clicking on the down-arrow for the Period list. Click on the down-arrow to display the list and then click on the period that you would like to use for computation of the conditional mean spectrum. To plot the results, click on the Plot command button. Both the ground motion spectrum and the conditional mean spectrum will be displayed. When obtaining target response spectrum, only the conditional mean spectrum will be plotted. D-MOD2000 - Page No. 61 Ground Motion Parameters This form presents various parameters used to characterize a ground motion, which can then be used to select a representative time history for site specific response analyses. These parameters include peak ground acceleration, Arias Intensity, Root-Mean-Square of the acceleration time history (RMSA), bracketed duration, Trifunac & Brady duration, and predominant period (Hu et al., 1996; Kavazanjian et al., 1997; Kramer, 1996). In addition, you can plot a graph of the Normalized Arias Intensity, or Husid Plot, together with the ground motion; and the computed and smoothed Fourier Amplitude Spectra. The Peak Acceleration Value is the maximum, absolute acceleration value of the time history. The energy content of the acceleration time history provides another means of characterizing strong ground motions. A measure of the total energy content of a ground motion is given by the Arias Intensity, which is defined by the following relation: IA tf at dt 2g 2 0 Where tf is the duration of ground shaking, a(t) the ground acceleration, and g is the acceleration of gravity. A plot of the increase of the energy content as a ratio of the total energy versus time is known as a Normalized Husid Plot. The root-mean-square of the acceleration time history, or RMSA, is also used as a measure of the energy content. The RMSA is defined by the following relation: 1 RMSA tf tf at dt 2 0 In D-MOD2000, the time interval between 5 and 95 percent of the total Arias Intensity is used to compute the RMSA. The Bracketed Duration of strong motion is the time interval between the first and last acceleration peaks greater than a specified acceleration value, or threshold acceleration. The value shown in the above form D-MOD2000 - Page No. 62 is for a threshold acceleration of ±0.05 g. Based on the Normalized Husid Plot, the Trifunac & Brady Duration is the time interval between 5 and 95 percent of the total Arias Intensity. Other parameters commonly used to evaluate the frequency content of a ground motion are the predominant spectral period, Tp, or commonly defined as the “… period of the maximum spectral acceleration.” (Rathje et al., 2004); the smoothed spectral predominant period, To, which “….attempts to define the peak in the response spectrum by smoothing the spectral accelerations over the range where Sa is greater than 1.2 * PGA” (Rathje et al., 2004); and, the average spectral period, Tavg, defined as an average period (over a specified frequency range) weighted by the spectral accelerations (Rathje et al., 2004). To compute these periods, the response spectrum for 5% damping is first computed using equally spaced periods on a log axis to obtain To, and then the spectrum is computed a second time using equally spaced periods on an arithmetic axis to obtain Tavg. Another indicator of frequency content of accelerograms is the Mean Period, Tm, defined as (Rathje et al., 1998; Stewart et al., 2001): Tm 1 fi Ci2 C i 2 i i Where: Ci = fi = Fourier amplitudes of the entire accelerogram Discrete Fourier transform frequencies between 0.25 and 20 Hz. The value for Tm is shown on the text box next to the Mean Period, Tm label. On the bottom section of the form there are two plotting options. The Husid Plot option will display a graph of the Normalized Husid Plot. If you select the Plot Ground Motion option, then the acceleration time history will be plotted on the same graph with the Husid Plot. In the plot, the section of the Husid Plot for the Trifunac & Brady duration is shown as a red curve. The Fourier Spectrum option will plot the Fourier amplitude spectrum. By default, the Fourier response spectrum is plotted using frequency values in the X-axis. Alternatively, to plot the Fourier amplitudes vs. period click on the Amplitude vs. Period check box to select it. After selecting one of the plotting options, click on the Plot command button to display the graphs. When plotting the response and the Fourier spectra, Tp, To, Tavg and Tm will be shown on the graphs. You can print the results by using the Print command button. D-MOD2000 - Page No. 63 IBC Response Spectra This form is used to select the options and/or enter the data necessary to plot a MCE or a design response spectrum in accordance with the IBC (International Code Council, 2003; ASCE, 2006). The procedure followed to obtain the spectrum starts by first selecting spectral accelerations at short period, Ss, and at 1-second period, S1, from the Maximum Considered Earthquake (MCE) Ground Motion Maps provided in the IBC code. The MCE maps were based on the U.S. Geological Survey (USGS) probabilistic hazard maps (Leyendecker et al., 2000; Frankel et al., 1996; Frankel et al., 2002; USGS, 2008, 2010); however, for some selected areas, the USGS maps were modified to incorporate deterministic ground motions and to apply engineering judgment. In D-MOD2000, either the Ss or S1 values can be entered manually or they can be automatically obtained from the files of gridded points used to create the USGS hazard maps. However, as previously noted, the maps included in the IBC are not “exactly the same” as the USGS maps for selected areas. Accordingly, the second option in DMOD2000should only be used for those regions for which the USGS maps were not modified. Leyendecker et al. (2000) briefly explain where the probabilistic USGS maps are and/or are not applicable. We recommend that you review the article by Leyendecker et al. (2000) for more information about the creation of the Maximum Considered Earthquake Ground Motion Maps. Also, before using the automatic option, check that your site is located in a region where the USGS maps are applicable; or, use this option to obtain “approximate” values of Ss and S1 that are to be compared to the values on the IBC maps. In accordance with the IBC, the maps used in D-MOD2000are for 0.2 and 1.0 second spectral response acceleration with 2% probability of exceedance in 50 years for the Conterminous United States, Alaska, Hawaii and Puerto Rico. For the other maps included in the IBC (i.e. Culebra, Vieques, St. Thomas, St. John, St. Croix, Guam and Tutuilla), the user needs to enter the values for Ss and S1 manually. Please note that the program uses two sets of maps for the Conterminous United States region, i.e. the data maps generated in 2003 and 2008 updates of the National Seismic Hazard Maps (Frankel et al., 2002; U.S. Geological Survey, 2003a, 2003b, 2008, 2010). For Alaska, the program uses the maps developed in either 1999 or 2007; for Hawaii the maps developed in 1999; and, for Puerto Rico the 2003 maps. The 2008 and 2010 updates of the maps were recently released by the USGS (2008, 2010). Although these latest updates have not been adopted for use in the IBC code, these maps are included with the program for comparison purposes only; i.e., at this moment they should not be used for any other purpose other D-MOD2000 - Page No. 64 than to compare the values. To use a specific year, click on the year‟s option to select it. The issue year for the maps used is shown on the Spectral acceleration in g’s label. For the 2010 and WUS options, a VS,30 value can be selected from the down-list. However, it is recommended to visit the USGS web site for the most recent information and values regarding the hazard maps. If you want to use the maps to obtain the spectral accelerations Ss and S1, first click on the Enter the site’s location to obtain spectral accelerations from USGS maps option to select it, and then enter the latitude and longitude of your site in degrees, minutes and seconds. There is no need to enter a negative sign for the longitude value as required by the online NEHRP website. Next, select one of the Region options and the site class by selecting one of the Soil Profile Type options. The spectral values for the four grid points that surround your site are retrieved from the files, and if necessary, the values interpolated between the four grid points. The Ss and S1 values are displayed in their corresponding text boxes on the upper right corner of the form. To enter the values of Ss and S1 manually, first click on the Enter values of spectral acceleration manually option to select it. Then, enter the value for Ss on the text box next to the Sa for Short period, Ss label; and, the value for S1 on the text box next to the Sa for 1-second period, S1 label. In this option, you also need to select one of the Soil Profile Type options. The long-period transition period, TL, needs to be entered in the Long-Period Transition, TL text box. By default the program will compute the design spectrum. If you need to use the MCE spectrum, click on the MCE Spectrum option to select it. When the spectrum is plotted, either the Design or MCE word will be shown on the plot label to indicate which spectrum is being used. When this form is called from the RRS form, the default spectrum will be the MCE. If you would like to manually enter the values for period and spectral acceleration, select the User option. The User command button will be enabled when this option is selected. This option will display the User Defined Response Spectrum form. In this form, you can enter values of period and spectra for a user defined response spectrum that will be used to compute the modified spectrum using the results of the RRS analysis. In this way, you can enter a user-defined spectrum and select the IBC 80%-design spectrum to be plotted on the same graph with the modified spectrum. After you have entered the above input information, click on the Ok button to compute the spectrum and to return to the previous form. If you click on the Cancel button, you will return to the previous form without modifying the input information if any had been selected previously. If any of the options is disabled or results for any of the parameters are not shown on the respective text box, this is due to the maps for this option or for these parameters not being available from the USGS. D-MOD2000 - Page No. 65 Import Acceleration Data This form is used to import acceleration files for use in the Newmark Method for displacement analysis included with D-MOD2000. The applications supported by D-MOD2000 are ProShake and Quake/W. In short, first, you will select an output file created by another application, e.g. ProShake; then, read that output file to determine if there are any acceleration time histories and how many there are ( D-MOD2000 will only read the first 6 acceleration time histories found in the file); and finally, create a series of output files, i.e. one per acceleration time history, in the format used by D-MOD2000 to perform the displacement analysis with the Newmark Method. Before using any of the files created with this form, we highly recommend that you compare the contents of each file with the data in the original output file to determine if the data were read correctly. You can use a text processor to open the files. For ProShake, D-MOD2000 supports two types of output files: 1) files with the extension *.RAW; and, 2) files with the extension *.LYR. For Quake/W, D-MOD2000 uses the History Node file, i.e. files whose extension starts with the letter “O”. To select an output file, first select one of the software applications, and then click on the File command button to display the Open Output File dialog form. By default, for ProShake a listing of the files with the extension *.LYR will be automatically displayed. To select files with the extension of *.RAW, click on the down-arrow for the list box next to the Files of type label and then select the ProShake *.RAW option. For Quake/W, a listing of files whose extension starts with the letter “O” will be displayed. Double-click on the file to select it and return to D-MOD2000. The file name and its path will be shown on the text box next to the ProShake or Quake/W File label. The next step is to read the contents of the output file to extract the information necessary to create the acceleration time history file. In ProShake, D-MOD2000 will only read the first 6 acceleration time histories in the file. Click on the Read command button to start reading the output file. After a few seconds, some information for the acceleration time histories will be displayed in the text boxes on the form. The number shown on the History No. column indicates the position of this time history in the output file. In ProShake, the number of the soil layer for which the acceleration time history was computed is shown on the Layer No. column. For Quake/W, the number of the node will be shown in the Node No. column. As noted in the Newmark Method - Accelerogram File section of this document, a weighted-average file created from a series of files can be used in the Newmark Method included with D-MOD2000. To D-MOD2000 - Page No. 66 create this average file, you need to know the weight of the soil column above the layer. However, this value is not read from the ProShake or Quake/W output file, thus, a number is not shown on the Column Weight column for the time history. If you know this value, you can enter it in the specific text box for each time history, otherwise, a value of 0.00 (zero) will be saved in the new time history file. The number of values for each time history is shown in the No. Values column, and the time step for the acceleration time history in the Time Step column. A description for each history found in the output file is shown on the History Information column. For ProShake, if a file of type *.RAW is read, this description is usually a number that identifies the ground motion used (e.g. 1, 2, etc.). For files of type *.LYR, this description will be the path to the ground motion file used in the analysis (e.g. C:\PROSHAKE\YERBA.EQ), and other information such as number of values, period, etc.. For Quake/W, the information on this text box will be the information shown in the second line of the history node file. You can modify the description for the history by entering up to 128 characters in this text box. To create the acceleration time history files compatible with D-MOD2000, click on the Export command button. An individual file will be created for each time history displayed in this form. For ProShake, each file will have a name such as PrSk#L##.AHL, wherein the number before the L is the number on the History No. column, and the number after the L is the number shown on the Layer No. column. For example, for the time history shown on the fifth row in the form above, the file name will be PrSk5L17.AHL, i.e. this is the file for the fifth time history in the file, and it is for layer 17. The files will be written to the directory shown on the Export Directory box. For Quake/W, each acceleration file will have a name that starts with the string QkeW followed by the number in the Node No. column, and will have an extension of AHL. For example, QkeW79.AHL is the acceleration time history for node 79, extracted from a Quake/W history node file. The output files created have the following format: 0 2048 0.0200 3 8 9 ProShake Output File: C:\ProShake\Output\Shake.lyr Acceleration Time History],17, 0, 1,C:\Download\EduShake\TREAS.EQ, 2048, .0200 -.000408 -.002954 -.002443 -.000820 -.000282 .000451 .000215 -.000442 The values shown on the first line are: the weight of the soil column above the layer (e.g. 0); the number of values in the acceleration time history (e.g. 2048); the time step for the acceleration time history (e.g. 0.02 seconds); the number of header lines in this file (e.g. 3 header lines); the number of data columns used to write the acceleration values (e.g. 8 columns are used, see line four); and, the number of digits that form each data column (e.g. 9 digits per column, see line four). The second line describes the type of output file used to create this file and its path (e.g. a ProShake output file named Shake.lyr located in the C:\ProShake\Output directory). The third line shows the header line found in the original ProShake output file for this specific acceleration time history. The fourth and subsequent lines are the values of acceleration for the time history saved in the file. This file can now be used in D-MOD2000 to perform the Newmark Displacement Analysis as explained in the Newmark Displacement Analysis section of this document. If the acceleration values in the source file are in units other than g‟s then you need to select a factor to convert the values to units compatible with D-MOD2000, i.e. fractions of acceleration of gravity (g‟s), if necessary. Some files provide motion data in different units, for example cm/sec2, ft/sec2, etc.. To convert the units, select a factor that represents the units of the acceleration data in the source file from the list of options shown on the Acceleration Units list box. Remember that these are the units of the source or original data. Click on the down arrow of the list and select an option. After selecting a unit, a multiplication factor value will be displayed on the Multiplier box. This is the multiplication factor that D-MOD2000 - Page No. 67 will be used to convert the values. For example, to convert values of acceleration from cm/sec2 to g‟s, you need to divide each value by 980.665 cm/sec2; which is equivalent to multiply each value by 1/980.665 = 1.0191716E-03. If the accelerations in the source file are in units that are not shown in the list, select the Other option, and then enter the correct multiplication factor in the Multiplier text box. The Directory command button can be used to select the directory where the acceleration files generated will be stored. This button will display the Choose Output Directory form. D-MOD2000 - Page No. 68 Input File Order Enter value for new position in input file: Enter the value for the new position of an option in the input file. For example, if you set Option 4 - Material Properties in position 4 and Option 7 – Input Motion in position 3, you will need to reorganize your input file so that D-MOD_2 executes Option 4 before Option 7. To do this, click on Option 4 on input file option's list of the Non-Linear Earthquake Response Analysis form, and then click the Order button. Then, enter 3 on the data cell and click on the Ok button. Control will be returned to the Non-Linear Earthquake Response Analysis form, and the options will be reorganized automatically. To cancel this action without modifying the order, click on the Cancel button. D-MOD2000 - Page No. 69 Legend Text This form is displayed by clicking on the Legends command button on the graphics window. When the form is displayed, the legends for the first five curves are shown in the text boxes. To edit the legend, place the cursor on the text box and enter the new legend. Each legend has a maximum length of 80 characters. To display the legends for the following set of five curves, click on the Next button. Click on the Ok button to return to the graphics window. If you don't want to modify the legends, click on the Cancel button. The Reset command button is used to restore the original legends for the curves. D-MOD2000 - Page No. 70 Material Parameters and Curve Fitting Constants This form is used to display the material parameters and curve fitting constants for the different models used in D-MOD. The data included in this form are the same as those shown in Appendices A and B. To select the parameters and/or constants for use in one of the materials of Option 4, first click on the down arrow of the Material list and then select a material by clicking on it. The material and/or parameters will be updated on the respective text boxes. To use these values for the material in Option 4, click on the Choose command button. Click on Cancel if you don‟t want to select any material and return to Option 4 without importing any values. D-MOD2000 - Page No. 71 Mean/Scaling Response Spectrum This form can be used to obtain the mean spectral acceleration response spectrum for a series of ground motion records. The mean value can then be compared to a target spectrum in order to visually evaluate how well the shape of the average spectrum compares to the shape of the target spectrum. A more detailed explanation about selecting ground motion records for analysis based on how well they match a target spectrum is given by Bommer and Acevedo (2004), Hancock et al. (2005), Kottke and Rathje (2007), and PEER Ground Motion Selection and Modification Working Group (2009). To use the form, the user needs to select a number of ground motion files, a target spectrum; and, optionally, enter a range of periods of interest. There are three different command buttons that can be used to select ground motion files. First, you can select an object motion listed in the earthquake records database by clicking on the Quakes button to display the Earthquake Records Database form. This form shows a listing of the records saved in the D-MOD2000.EQ file. Once the list is displayed, you can choose a record by highlighting it and clicking on the Ok button, or by double clicking on it. The data for the record will be shown on their respective fields upon returning to this form. To select files that are not included in the database of earthquake records, click on the Other command button to display the Acceleration Time History File dialog form. Switch to the appropriate folder, select the ground motion file and click on the Open command button. The file name and path will be displayed on the list shown below the File of Acceleration Time History label. In order to read and use the data saved in the file you need to enter: 1. The total number of acceleration values that form the object motion file in the No. Values text box; 2. The time interval between each acceleration value in the Time Step text box; 3. If the motion will be scaled to a different peak acceleration value, then enter the scaling value used to modify the acceleration in the Scaling Factor text box; 4. The number of lines at the beginning of the file that are used to describe the object motion in the No. Header text box; and, 5. The number of acceleration values on each line in the Values per Line text box; and, the number of digits that form an acceleration value in the No. Digits text box. D-MOD2000 - Page No. 72 The Other command button can also be used to select multiple files at a time. Also, use the Other command button to select files downloaded from the PEER NGA Ground Motion Database, i.e. *.AT2 files. Please note that these files are not in a format compatible with SHAKE, but can still be used with this feature of the program. If you wan to convert some of these files to a format compatible with SHAKE after the scaling procedure, use the Export command button. More detailed information about these values is provided in the Plot Object Motion or Response Spectra for Ground Motion sections of this manual. The third option used to select ground motion files is with the Convert command button. This button is used to display the Conversion of Ground Motion File form that can be used to convert ground motion files from different units and/or formatting to a file that can be used with D-MOD2000. Further information on this feature is provided in the Conversion of Ground Motion File section of this manual. Upon returning to this form, the information used to read the file is displayed in their respective columns. The View command button can be used to view the contents of a ground motion file. This will help you to collect the information needed to define the formatting of the file if necessary. To do this, first select a file by clicking on its name/path, then click on View. When you click on the file‟s name/path the check box will be selected or de-selected. Note that when the check box is not selected, the file will not be used for computation of the average spectrum. The first 60 lines of the file will be displayed on a form, with the first characters displayed in red representing the numbers of each row of data in the file followed by a “|”. These characters are not part of the source file and are only shown to number the rows. After the row numbers, the alphanumeric characters that constitute the information saved in the file for each row are shown. Note that the characters are displayed as blue on a white background, and that every tenth character is displayed in red. However, if the tenth character is a “blank space” then the character is not shown. This is done to guide the user when defining the order of the data in the file. As noted before, the average spectrum will be compared to a target spectrum. There are six options used to select the target spectrum: Attenuate, EuroCode, IBC, NEHRP, and User’s. Select one of these options and then click the Target command button to display the respective form. Further information for the first four options is provided in the respective sections of this manual. The Other option will display the Response Spectra for Ground Motion form. This form can be used to compute the response spectrum using the data saved in a ground motion file. If you would like to manually enter the values for period and spectral acceleration, select the User’s option. This option will display the User Defined Response Spectrum form. In this form, you can enter values of period and spectra for a user defined response spectrum. A period range of interest can be shown on the graph of results. Enter a lower and upper value in the Tmin and Tmax text boxes, respectively. A dashed line will be shown across the graph at each period value. If you want to scale the spectra to a specific spectral value at a target period, enter the period in the T match text box and click on the check box to select this option. The program will compute the scaling factor necessary to scale each spectrum to that spectral value and display it in the Scaling Factor column. If you want to use both horizontal components, select the Geometric Mean option. The program will compute the geometric mean spectrum and use this spectrum in the selection process. Before using this option, you need to define the corresponding pair for each motion. Enter the number of the file that is the pair for each file in the Pair column. For *.AT2 file, the program will automatically try to identify each corresponding pair. For example, in the screen shot in the previous page, the first file is file number one. For this file the corresponding pair is file number two. In the Pair text box for the firs file a 2 is shown indicating that file number 2 is the corresponding pair. D-MOD2000 - Page No. 73 Once you have selected a suite of ground motion files and a target spectrum, click on the Scale command button to compute the average response spectrum. In D-MOD2000, the analysis consists of obtaining the 5% damping pseudo-acceleration response spectrum for each ground motions selected and then obtaining an average value of spectral acceleration for each period. To aid in comparing the spectra, the fit is evaluated through the root-mean-square-error (RMSE) as recommended by Kottke and Rathje (2007): 1 RMSE np ln Sa RMSE = np = Sascaled,avg,i = root-mean-square-error. number of periods in range of interest. average scaled pseudo-spectral acceleration for records considered at period Ti, for periods within the period range of interest. target pseudo-spectral acceleration at the same period Ti for periods within the period range of interest. np i 1 ln Sat arg et ,i 2 scaled , avg , i Where, Satarget,i = The RMSE for the computed average spectrum is shown next to the RMSE label. Further, the fit is computed only for the range of periods of interest. For calculation of the response spectrum, 300 periods equally spaced in a log space, between 0.01 seconds and 10 seconds are used. To plot the results click on the Plot command button. To delete a ground motion file from the list of motions, click on the name/path for the file to highlight it and then on the Remove command button. The input and output data can be saved to a text file using the Save command button. The data can be retrieved from the file using the Open command button. This file is an ASCII text file, thus, it can be open with other software applications for other purposes by the user. An alternative way of finding the scaling coefficients is by using a computer program developed by Kottke and Rathje (Kottke and Rathje, 2007). This program, sigmaSpectra, selects and scales motions from a suite of a user provided library of motions so that their average fits a target response spectrum. After the user has executed sigmaSpectra, the results can be imported into D-MOD2000 and used to compute the mean and median spectra as explained previously. The installation file for sigmaSpectra is saved in the sigmaSpectra folder when D-MOD2000 is installed. Please run this installation file to install sigmaSpectra. The following is a quick tutorial on how to use sigmaSpectra and how to use the results with D-MOD2000. First, you need to create a library of ground motion files that will be used by sigmaSpectra to create different suites of ground motion files whose average closely match a target spectrum. This library is formed by ground motion records downloaded from the PEER web site at: http://peer.berkeley.edu/nga/ D-MOD2000 - Page No. 74 These files should have the extension *.AT2, which is typically the extension automatically given to the files downloaded from the PEER website. Further, these files should have the same names as those entered in the Motion Identification column of the Mean Response Spectrum form. For example, in the form below, the library of ground motion files is saved in: c:\Program Files\SHAKE2000\SigmaSpectra\Example Within this folder, there may be other folders were files for specific seismic events are stored; e.g., the files for ground motion histories recorded for the 11/24/87 Superstition Hills event, B-SUP045.AT2 and B-SUP135.AT2, are located in the Superstition Hills subfolder. After the library is created, use the Select Path command button to select the path where the library of ground motion files is stored. As shown on the previous form, for this example the path selected would be c:\Program Files\SHAKE2000\SigmaSpectra\Example. Then use the Number of motions in suite and Seed combination size options to select the number of motions per suite and the size of the seed combination for the analysis, respectively. Refer to Kottke and Rathje (2007) for more detailed information on these options. Data for the target response spectrum; i.e. period, spectral acceleration and standard deviation, are entered in their respective columns located on the Target Response Spectrum section of the previous form. The data can be entered manually, i.e. place the cursor on the text box and type in the numbers, or you can copy the data from another application, e.g. Excel, and paste them in the respective data colum using the Paste command of the Edit menu item. sigmaSpectra uses the periods entered for the target spectrum to compute the response spectrum for the ground motions used in the matching process. If you would like to increase the number of periods, you can use the Interpolate period option. Click on the check box for this option to select it, and then use the options in the Period Interpolation section of the form to define the settings and values for the interpolation. D-MOD2000 - Page No. 75 After you have selected the ground motion library and set other options and values, click on the Compute command button to do the matching. Once the program has completed the calculations, the results for the first suite of ground motions will be automatically displayed as shown below. This form shows the response spectra for each ground motion on the suite; the target, median and median standard deviation response spectra; and the ground motion files that form the suite. It also lists the different suites created on the upper left corner of the form. To view the results for other suite, click on the row for that suite to select. To use these results with D-MOD2000, you need to export the data using the Export Suites command button. First, select the suites that you want to export by clicking on the check box for each suite on the Export column. Then click on the Export Suites command button to display the following file dialog form. D-MOD2000 - Page No. 76 On this form, click on the Open command button to select the folder where the results file will be saved; then, click on the SHAKE2000 suite file option to select it. To create the results file, click on Ok. This file will be automatically given the SuiteLog.txt file name and extension. In the Mean Response Spectrum form of D-MOD2000, click on the open folder icon next to the text box for Motion Selector Suite and use the file dialog form to select the SuiteLog.txt file created with sigmaSpectra, and then click on Open. The results for the first suite will be shown on the text box. To select a different suite, open the list by clicking on the down arrow, and then select the suite. The scaling coefficients for each motion in the suite will be updated and those for the motions not included in the suite will be changed to 1.0. Then, click on the Scale command button to conduct the matching analysis; and, use the Plot command button to display the results as explained before. After you have obtained a suite of motions that fit the target spectrum, the information about the ground motions can be exported to an EDT file in the form of Options 6 & 7 used by D-MOD. To do this, first click on the Export command button to display the Export to EDT File dialog form. Select the EDT file you would like to add the information to, and then click on Save. If you wish to add this information for use with the random creation of data feature, first create the random EDT file before exporting the data. D-MOD2000 - Page No. 77 MKZ Nonlinear Stress-Strain Model This form is used to calculate the modulus reduction and damping curves using the MKZ non-linear stress-strain model (Matasovic and Vucetic, 1993). It is also used to find the MKZ model parameters β and s (by trial and error), and to calculate stiffness-proportional Rayleigh coefficients R and βR. More detailed information about the Rayleigh coefficients is provided in Appendix C. The required input is in blue (for the MKZ model fit), and in green (to evaluate Rayleigh damping coefficients R and βR); although the viscous damping term ξ is shown in green, it is also used in the MKZ model fit. For D-MOD_2 analysis, use 0.1% ≤ ξ ≤ 5.0% for most practical applications; and, n = 0 for simplified Rayleigh damping; or, n = 1, 3, 5 or 7 for full Rayleigh damping. More detailed information on the computation of the Rayleigh damping coefficients is presented in Appendix C. To find the MKZ model parameters β and s (by trial and error), you can either enter the values for strain, G/Gmo and damping ratio manually, or you can import/model a curve. G/Gmo curves can be imported by clicking on the G/Gmo command button to display the G/Gmax Curves Database form. After selecting a material, the data for the curve will be shown in the respective text boxes. Similarly, a damping ratio curve for a material can be imported by clicking on the Damping command button to display the Damping Ratio Curves Database form. The G/Gmo and damping ratio curves can also be estimated using any of the theoretical models included with the program. Click on the Model command button to display the Dynamic Material Properties D-MOD2000 - Page No. 78 Model form. This form is used to enter the input data for the different relationships for estimating normalized shear modulus and material damping ratio of soils. The relationships included with DMOD2000 are those developed by Darendeli, M.B. (2001); Ishibashi and Zhang (1993); and, Zhang, Andrus and Juang (2005). If you enter your own data for the G/Gmo and Damping ratio curves, these can be added to the database of material properties using the Dbase command button. To change a value of β, s and enter the value manually in the respective text box; or, use the up/down arrows to increase/reduce the values by 0.05 units (right side) or 0.01 units (left side). The curves will be automatically updated to show the effects of changing the values. After you have entered the values for strain, G/Gmo and damping, you can “fit” a curve by varying the values of initial (t = 0), tangent shear modulus, Gmo; shear stress at reference strain, mo; reference shear strain, r; and, the curve-fitting parameters β and s. Different materials of Option 4 may use the same G/Gmo and Damping Ratio vs. strain curves as the one shown on the form. If that is the case, you can then update the values of β and s for each material by selecting the Update β & s for material type option. However, you may still need to check the other materials to determine if the new values of β and s are appropriate as how well the model fits the curves also depends on the values of Gmo and τmo for each material. The way the program determines which materials are the same is based on comparing the description of both the G/Gmo and damping ratio curves; i.e., the program will compare the description shown on the G/Gmo Curve and Damping Curve text boxes on this form with every other material and for those materials for which the descriptions are identical, the program will set the same values of and s. A description of the G/Gmo or damping ratio curve can be entered in the text box next to the Shear Modulus Curve or Damping Ratio Curve label, respectively. If the curves are imported or modeled, the description will be entered automatically upon returning to this form. This label will be displayed as a graph title. When entering data for either curve, a new data-row can be inserted at the cursor‟s location by clicking on the Add command button. Similarly, a data-row can be removed by clicking on the Delete command button. The Reset command button is used to delete the data for both curves. The Display data for options are used to switch between calculated values of γ (or “Strain” in the above form), τ, G, Eta 1, and Eta 2 for G/Gmo or damping. These data would be different if the values for strain used to define the G/Gmo curve are different from the values of strain used to define the damping ratio curve. The stiffness-proportional Rayleigh coefficient βR is calculated by entering values for viscous damping coefficient, ξ; an odd integer, n; and, predominant period of the soil deposit, T. A “dry run” of D-MOD_2 can be used to calculate the predominant period of the soil deposit; or, it can be computed by selecting the Period from Option 2 Set No. option. With this option, the thickness and material type for each layer will be obtained from the Option 2 set chosen. Knowing the material type for each layer, the value of VS is obtained from Option 4 for each material. The period is then calculated as 4H/Vs,avg (where H is the height of the soil profile and Vs,avg is the weighted-averaged shear wave velocity of the soil profile). The viscous damping coefficient value is typically in the 0.1% to 5% range. More rigorous procedures to establish R and βR can be found in Hudson et al. (1994). D-MOD2000 - Page No. 79 When entering values of viscous damping, , there are a number of options that can be used to use the same value for all of the other materials. To use this value of for all of the other materials, first click on the Update all using option to select it. After this, one of two options can be used. The first, Same, is used when the same value of will be used. For example, on the form on the previous page a value of 3 would be assigned to each material of Option 4. If instead you prefer to use the small strain damping ratio from the curve, select then the Small option. With this option, the program will assign the damping ratio for the smallest strain from the curve as the value for for each material. Please note that will depend on the damping ratio curve used for each material, it may or may not be the same for every material. For example, on the form on the previous page, if the Small option is selected, then the program will use = 0.36 for the current material. To evaluate the goodness of fit, the % Difference column shows the difference between the measured value and the value obtained from the MKZ model. For example, for the modulus reduction value this is calculated as: G Gmo % Difference G MKZ mod el Gmo G Gmo measured measured * 100 When returning to the Option 4 form, the program will update all of the other materials to change the value based on the option selected, and recalculate the values of r and r. If you change the value of on the form, but do not select the Update all using option, then will only change for this material. The program will also compute new values for other materials if the value of T or n changes. When using the Small option, the program will set minimum and maximum default values of 0.5 and 5 if the values from the damping ratio curve are less or greater than, respectively. If you still would like to use different values, you can manually change them. D-MOD2000 - Page No. 80 NEHRP Response Spectra This form is used to select the options and/or enter the data necessary to plot a response spectrum in accordance with Section 3.3 of NEHRP (Building Seismic Safety Council, 2004a & 2004b). The procedure followed to obtain the spectrum starts by first entering spectral accelerations at short period, Ss, and at 1-second period, S1, from the Maximum Considered Earthquake (MCE) Ground Motion Maps provided as Figures 3.3-1 through 3.3-14 on the NEHRP Provisions. These values are entered in the Ss and S1 text boxes respectively. By default, a Long-period transition period, TL, of 4 seconds is shown on the TL text box. If you would like to use a different value, enter the appropriate value in this text box. The program will only accept values of 4, 6, 8, 12 or 16 seconds for T L as these are the only values used in the maps on Figures 3.3-16 through 3.3-21 of NEHRP. Next, select the site class by choosing one of the Site Class options. The Fa and Fv values will be computed and displayed in their corresponding text boxes on the upper right corner of the form. By default, the program will compute the design spectrum. If you need to use the MCE spectrum, click on the MCE Spectrum option to select it. When the spectrum is plotted, either Design or MCE will be shown on the plot label to indicate which spectrum is being used. When this form is called from the RRS form, the default spectrum will be MCE. If you would like to manually enter the values for period and spectral acceleration, select the User option. The User command button will be enabled when this option is selected. This option will display the User Defined Response Spectrum form. In this form, you can enter values of period and spectra for a user defined response spectrum that will be used to compute the modified spectrum using the results of the RRS analysis. After you have entered the above input information, click on the Ok button to compute the spectrum and to return to the Response Spectrum Plot Menu form. If you click on the Cancel button, you will return to the plot menu form without modifying the input information if any had been selected previously. The Reset button is used to set the values of the form to their default values. D-MOD2000 - Page No. 81 Newmark Displacement Analysis This feature of D-MOD2000 allows you to determine permanent slope displacements due to earthquake shaking, using the Newmark Method. For more complete information on the methodology and data used in this feature, please refer to the papers by Houston et al. (1987), Matasovic et al. (1998) and Newmark (1965). In D-MOD2000 two different approaches are used to create an algorithm for the Newmark Method as recommended by Houston et al. (1987) and by Franklin and Chang (1977). The approach by Houston et al. allows the use of the upslope component of the yield acceleration in order to account for upslope movement. However, when only the downslope component of the yield acceleration is used, both approaches yield similar results. To select a method, click on the radio button for the method‟s option. When this form is first displayed, the cursor is on the Project text box. Enter the description (up to 80 characters) for the analysis you will be doing. Press the Tab key, or use the mouse pointer to move the cursor to one of the Yield Acceleration options. The first option, Constant Acceleration, allows you to use a constant value for the yield acceleration. When this option is selected, the text box next to the label is enabled, and the cursor is placed on it. Enter the value for the yield acceleration. The second option, Changes with time, allows you to enter values of yield acceleration that vary as a function of time. After you select this option, the Edit command button next to the text box will be enabled. Click this button to display the Yield Acceleration Function form. Enter the data for time, yield acceleration and a brief description for the function in the Description text box. Then click on the Ok command button. Upon returning to the displacement screen, the description will be displayed on the text box. The next option, Changes with displacement, allows you to enter values of yield acceleration that vary as a function of displacement. Matasovic et al. (1998) provide an example of this application. These data are entered as described previously for the Changes with time option. To select an acceleration time history to use in the displacement analysis, click on the File command D-MOD2000 - Page No. 82 button on the Acceleration Time History line to display the Newmark Displacement Ground Motion File form. Use this form to select a time history file; or, to create a weighted-file from a series of files that may represent different columns on the soil profile. If you would like to scale this acceleration time history to a different value of maximum peak acceleration, place the cursor on the Maximum Acceleration Value text box and enter the value for the new peak acceleration in g's. If you enter 0 (zero), a scaling factor of 1 (one) will be used and the record will not be changed. An option to account for the upslope movement is included in D-MOD2000. Normally, the error in not including the upslope movements is not significant (Jibson, 1993; Newmark, 1965). To include the upslope movement, click on the check box for the Include upslope movement option. If you select this option, you need to enter a value for the static factor of safety. Based on the method proposed by Houston et al. (1987), the static factor of safety is used to compute the upslope component of the yield acceleration based on the following equation: FS 1 a y ,upslope a y ,downslope static FS static 1 Where ay,downslope is the downslope value of yield acceleration. To enter the static factor of safety, place the cursor on the text box next to the Static Factor of Safety label and enter the value. When working with English units, a default value of 386.4 in/sec2 is used for the acceleration due to gravity. A value of 981 cm/sec2 is used when working with SI units. However, you can change this value to obtain the results using a different system of units. Select a different acceleration value by clicking on the down arrow key of the list box next to the Acceleration due to Gravity label and choose a new value. After you have entered all the information, the displacements are computed automatically. The results will be displayed in the Maximum, Minimum and Average displacement text boxes. A value of displacement is computed by using the acceleration data as they are saved in the input file. If the acceleration time history is significantly unsymmetrical, then Houston et al. (1987) recommend that the history be reversed. A second value of displacement is calculated by first reversing the acceleration time history, i.e. the sign of each value is changed, and then by conducting the analysis a second time. The displacement values are compared to determine the maximum and minimum, and an average value is computed. The data can be saved to a text file by clicking on the Save command button. This will display the save file dialog box. Enter a name for the text file where all this information will be saved for future retrieval using the Open command button. The acceleration, velocity and displacement time histories are also saved in this data file. The Append command button can be used to add the current results at the end of the output file. You can print the results by using the Print command button. This button will display the Print Displacement Results form. To plot the results, click on the Plot command button. You can select to plot the three graphs at the same time or each graph separately. When using the Franklin & Chang option, plots of the relative values for acceleration, velocity and displacement are also available. The Reversal option allows you to plot the results obtained using the reversed acceleration time history. D-MOD2000 - Page No. 83 Newmark Displacement Ground Motion File There are four options for selecting an accelerogram for the Newmark's method: The first one is to use a file that was obtained from processing of the output files from D-MOD_2. The file is given a name such as xxxxxA#L###.AHL or xxxxxA#L###.HEA, where xxxxx is the label used to name the output files; A stands for analysis, and the number following it is the analysis number; and, L means layer and is followed by three numbers which are the layer number. Files identified with the extension *.AHL (or acceleration history at layer) are those created from the acceleration time histories; and, those with the extension *.HEA (or horizontal equivalent acceleration) are those created from the shear stress time histories. As explained in Bray et al. (1995) for the seismic analysis of landfills, the HEA, or horizontal equivalent acceleration, at a specific depth and time can be obtained as the ratio of the shear stress to the total vertical overburden stress. Accordingly, these files are created using the shear stress histories computed and the overburden stress computed using the thicknesses and unit weights for the soil layers. To select a file, click on the check box next to the first (Click Choose to select a file) label. Then on the Choose command button to open the Open Acceleration Time History dialog box. Select a file and then click on Ok to return to the form. Some information will be displayed on the boxes next to the file name. Click on Ok to return to the Newmark Displacement Analysis form. The second option is to create an average file from a series of files. The method used to compute an average accelerogram in D-MOD2000 is as recommended by Abramson et al. (1996). In this method, a weighted average approach is used to compute an average file from a series of n files based on the equation: i n Acc avg m a (t ) i 1 i i i n m i 1 i Where, mi ai(t) = mass of unit column directly above point i (when using *.HEA files, this value will be 1.0) = acceleration response at point i D-MOD2000 - Page No. 84 To create the average accelerogram, first select up to fifty motion files. To do this, click on the check box next to the first (click Choose to select a file) label (an x is shown on the box when a file is selected), then on the Choose command button to display the Open Acceleration Time History dialog box. Select a file then click on Ok to return to the form. Some information will be displayed on the boxes next to the file name. Use the scroll bar to display check boxes for additional files. After selecting the files, you need to choose a name for the average file. By default D-MOD2000 will give this file the name output.nmk, and will save it in the directory selected for the output files in the main menu form. The name and path will be shown on the text box next to the Weighted average accelerogram file label. If you would like to use a different name and/or path, click on the Save command button to display the Save Accelerogram File form. Then, select a file or enter a new name in the File name: text box. This file is given the extension *.NMK by default. Click on Ok to return to the file selection form. After you have selected the files and have chosen a name, click on the Motion command button to create the file. Only the files for which an x is shown on the check box will be used in the calculation of the average file. Finally, click on the Ok command button to return to the Newmark Displacement Analysis form. Import an acceleration file created by another application (e.g. ProShake, Quake/W). In short, first, you will select an output file created by another application, e.g. ProShake; then, read that output file to determine if there are any acceleration time histories and how many there are (D-MOD2000 will only read the first 6 acceleration time histories found in the file); and finally, create a series of output files, i.e. one per acceleration time history, in the format used by D-MOD2000 to perform the displacement analysis with the Newmark Method. To access this feature, click on the Import command button to display the Import Acceleration Data form. Using other acceleration history file: If you want to use the data saved in a file different from the ones described above, use the Other command button to display the Acceleration Time History dialog box to select the file that you want to use. The name of the file will be displayed next to the option button on the bottom section of the form. Now you need to enter the following information on the data cells below the file name. First, you need to select the file by clicking on the button next to the Other Acceleration Time History label. This will enable (i.e. the mouse cursor changes to the I-beam appearance when placed on the cells) the data cells to enter the data. We'll use the following example to explain the information necessary to plot the object motion. Example: D-MOD2000 Sample Object Motion Time Period = 0.01 Number of Points = 2048 0.024455 0.000868 -0.019352 -0.012488 0.003331 -0.050340 -0.025930 0.000123 0.020366 -0.000176 0.030202 -0.008401 0.021586 -0.013457 -0.022183 -0.014927 1 2 No. Values: This is the total number of acceleration values that form the object motion file. For the above example, there are 2048 points in the file, thus, you will enter 2048 in this cell. Time step: Enter the time interval between each acceleration value. For this example, it is 0.01 seconds. No. Header (or Number of header lines): Enter the number of lines at the beginning of the file that are used to describe the object motion. In the above example, the first two lines are the header lines. Thus, you will enter a 2 in this data cell. D-MOD2000 - Page No. 85 Values/Line (or Number of values per line): Enter the number of acceleration values on each line. For the above example, there are 8 values on each line. The last number (e.g. 1) only identifies the row number. Thus, you would enter an 8 in this cell for this specific example. No. Digits (or Number of digits per value): Enter the number of digits that form an acceleration value. In the above example, each value is defined by 9 digits, including the spaces. Therefore, you would enter a 9 for this specific example. Units: For the Newmark Displacement Analysis the values of acceleration are in g‟s. If the values saved in the file are in other units (e.g. ft/sec2, cm/sec2, or mm/sec2), then select the appropriate units by clicking on the up or down arrows to scroll through the different options. This way, the data will be converted from these units to g‟s. For example, if the data in the file were in ft/sec2, then you scroll down until ft/sec/sec is shown on the Units box. The values will be divided by 32.2 to transform them to g‟s. Free format: With this option the data from the file are read "free format", i.e. no consideration is given to the number of digits in each column, or to the number of columns in a row. When you select this option (an x is shown on the check box), you only need to provide the No. Values, Time Step and No. Header values, and then select the dimensions for the Y axis by clicking on the up or down arrow keys next to the Units text box. To be "free format" the data in the file have to be separated by at least one blank space or be in different lines. The View command button can be used to view the contents of a ground motion file. This will help you to collect the information needed to define the formatting of the file if necessary. To do this, first select a file using the Other button to select other files. The first 60 lines of the file will be displayed on a form, with the first three characters displayed in red representing the numbers of each row of data in the file followed by a “|”. These characters are not part of the source file and are only shown to number the rows. After the row numbers, the alphanumeric characters that constitute the information saved in the file for each row are shown. Note that the characters are displayed as blue on a white background, and that every tenth character is displayed in red. However, if the tenth character is a “blank space” then the character is not shown. This is done to guide the user when defining the order of the data in the file. D-MOD2000 - Page No. 86 Nonlinear Earthquake Response Analysis This is the Main Menu form for D-MOD2000. It has three main uses: 1) to create the input file for D-MOD_2; 2) to process the master and auxiliary output files created by D-MOD_2; and, 3) to allow the user access to plotting and other engineering analyses features of the program. In this section, we will first explain the main working file in D-MOD2000. This file is identified by the extension *.EDT. This file is a database file that stores the data for the different options for D-MOD_2. You can have any number of sets of data for each option, i.e., 8 sets of option 1 data, 6 sets of option 2, etc. The total maximum number of all sets for all of the options combined is 32,000. You can then select from this database those options that you want to use in the analysis and save them in an input file for DMOD_2. The difference between an *.EDT file and other files is that the options are saved sequentially, beginning with option 1, and so on. For example, an EDT file for D-MOD2000 could be composed by the following options. Option Option Option Option Option Option Option Option Option 1 1 2 2 4 5 6 7 7 – – – – Master Control Card: Single Sand Layer within Clay Deposit Master Control Card: Clay Deposit Soil Profile: Single Sand Layer within Clay Deposit Soil Profile: Clay Deposit Material Description Properties of Visco-Elastic Half-Space Dynamic Analysis Solution Control Card Input Motion: CHI-CHI 09/20/99, ALS, E (CWB Input Motion: Nisqually, WA, Earthquake – 2/2001 – Olympia; DNR Building By selecting specific options from this database, you could create different input files for D-MOD_2. For example, you could create an input file, as shown in the following: D-MOD2000 - Page No. 87 Option Option Option Option Option 1 2 4 6 7 – – Master Control Card: Single Sand Layer within Clay Deposit Soil Profile: Single Sand Layer within Clay Deposit Material Description Dynamic Analysis Solution Control Card Input Motion: Nisqually, WA, Earthquake – 2/2001 – Olympia; DNR Building To create an *.EDT file, you have four options. First, you may select the Create new EDT file using default data option. Second, you may start from scratch by creating sets for each option using the New command button to display the Option List form. Each new option will use default values. You will have to enter your project's specific data for each option using the editing forms provided with D-MOD2000. Third, you can edit an existing file by using the Open command button to display the Open Existing EDT File dialog form. This allows you to simply modify existing data without the need to retype data that is similar to each project, e.g. material properties. A backup copy of the EDT file will be automatically created in the Backup\D-MOD folder. This backup copy can be used to restore your original file, and it can also be used to restore some of the other working files as explained in the following sections. Or fourth, you could import the data from an input file for SHAKE2000. To do this, select the Import Data from SHAKE2000 Input File option then click on Ok. Using the file dialog window, select the SHAKE2000 input file and click on Open. The program will read the input file and create the different options for D-MOD2000. A few comments about this procedure are recommended here; The program will use the value of maximum frequency, i.e. fmax, entered in the text box next to the Import SHAKE2000 Input – Use Fmax option. The default value of 25 Hz is recommended for most analysis. Using fmax the program will determine the maximum thickness for each layer of the D-MOD soil column based on hmax < VS / (4 * fmax). The VS value is obtained from SHAKE‟s Option 2 for each soil layer. If the thickness for each layer in SHAKE‟s Option 2 is greater than its respective hmax, then the layer will be subdivided in layers until the thickness of each layer is less than or equal to hmax. It is likely then that the D-MOD column may have more layers than the SHAKE column. A layer for the half-space in SHAKE‟s Option 2 will not be created in D-MOD‟s Option 2. For D-MOD‟s Option 4, the program will create one “material” for each layer of the SHAKE column, i.e., if the SHAKE column as defined by Option 2 has 16 layers, then the program will create 16 different materials for D-MOD‟s Option 4. For each material, the Gmo will be assigned to be equal to Gmax or calculated based on the total unit weight and VS from SHAKE‟s Option 2. Each material in D-MOD‟s Option 4 will also be assigned the G/Gmax vs. strain and Damping Ratio vs. strain curves based on the soil type code in SHAKE‟s Option 2. Further, the program will assign default values for some of D-MOD‟s Option 4 values based on the description of these curves. For example, if the description for the G/Gmax curve includes the word “sand”, the program will assign default values for a sand material. Other words that will be used to define default values are “clay”, “silt”, “rock”, “cohesionless”, “waste”, “peat”, and “gravel”. For clay soils, the program uses the default values for plasticity index of 15; however, it will also accept “PI-30” or “PI 30”, “PI-50” or “PI 50”, and “PI-100” or “PI 100”. Other values for material properties are provided in Appendices A and B. D-MOD‟s Options 6 & 7 will be created based on the data in SHAKE‟s Option 3. For D-MOD‟s Option 7, the program will use the multiplication factor from SHAKE‟s Option 3 as the acceleration scaling constant in D-MOD‟s Option 7 if available. Alternatively, the program will D-MOD2000 - Page No. 88 use the maximum acceleration value in SHAKE‟s Option 3 to calculate an acceleration scaling constant after reading the acceleration data from the ground motion file. D-MOD requires the ground motion file to be in the FORTRAN “F” format, e.g. 8F9.6, etc. The program will display a warning message if any of the ground motion files in SHAKE‟s Option 3 is not in the “F” format, but will not change the formatting of the file. You will need to manually change the format of the file before using this ground motion file in the D-MOD analysis. Based on the values in SHAKE‟s Option 4, the program will create a D-MOD‟s Option 5 if the ground motion is assigned as an outcrop motion. The program will also set the half-space control number in D-MOD‟s Option 1 to “1” to reflect this. For D-MOD‟s Option 1, the program will by default assign layer number 2 as the top saturated layer and the last layer as the bottom saturated layer. In D-MOD‟s Option 1, the analysis type control number will be set by default to “1”, i.e. total stress analysis. If there are more than one set of a SHAKE option in the input file, the program will create a DMOD option for each. After importing the SHAKE information, you need to review and modify the different D-MOD options created to ensure the default data are appropriate for your D-MOD analysis. To differentiate the input file from the EDT database file, you should give it a different name and extension when saving them. The main database file does not need to have the EDT extension; however, by default, when using the Open command button, D-MOD2000 will present you with a list of files that end with this extension. When the database file is saved, the options will be saved in numeric order, and all the sets for each option will be grouped together. The options available in the EDT file are shown on the top list box, i.e. the EDT File's Option List. This list is used to select the options that the user can edit and options to be included in the input file. The vertical scroll bars on the right side of the list box can be used to scroll between the options. To edit an option, click on it to highlight it and then click on the Edit button. You can also double click on the option to edit it. If you want to remove an option from the *.EDT file, highlight it and then click on the Delete button. The option cannot be un-erased. To create a specific option that is not included in the *.EDT file, or to create a new set of an existent option, click on the New button. This button will display the Option List form used to select new options. To save the *.EDT and Input files, click on the Save button. The files can be saved automatically after you edit an option, or before you execute D-MOD_2, by selecting the Automatically save EDT & Input Files check box. The Check input data before running D-MOD option is selected by default. When this option is selected, the data in the different options that form the input data will be checked to determine if there are any errors that may cause problems during the execution of D-MOD_2. For example, a different number of soil layers in Options 1 and 2 will cause D-MOD_2 to crash. The program attempts to detect this and other errors before execution of D-MOD_2 is started. The user will be provided with detailed information on the error. If you are sure that your data are correct and do not wish to check the data before execution of D-MOD_2 starts, click on the check box to de-select this option. When the Automatically save EDT & Input Files option is selected (an x is shown on the check box) the EDT and Input files will be automatically saved every time you return from editing an option (using the Edit command button), or previously to execute D-MOD_2 (with the D-MOD command button). D-MOD2000 - Page No. 89 By default, D-MOD2000 will use English units for most of the data used in the program. If you wish to use SI units, select the SI units option by clicking on the check box. Please note that the original source code for D-MOD_2 was written to work in Imperial units. Accordingly, when working with SI units, the input data for D-MOD_2 are transformed to English units before executing D-MOD_2. This transformation only takes place for the data saved in the input file, and does not affect the data shown on the different D-MOD2000 forms. Similarly, the output data provided by D-MOD_2 are in English units. When working with SI units, these data are converted to SI units during processing of the data. The Create Excel CSV Files option can be used to save the output data from D-MOD as comma separated values (CSV) files that can be opened with Excel. The program will use the name shown in the Name of Plot Files text box and add three letters to identify the data in the file. For example, DMODout-ACC.csv will save the acceleration time histories. The files will be created in the folder shown on the Directory of Output Files text box. A few of the features included in D-MOD2000 are available only on SI units, e.g., the attenuation relations. This is the case when the feature has been originally developed using the SI units, and to support the worldwide move towards a common system based on the SI units. For most data used in DMOD2000, the units for each value are shown on each form. To create an input file for D-MOD2000, select the options you want to include from the top list (i.e. EDT File's Option List) in the order they will be executed by D-MOD_2. The options selected will be shown on the bottom list box (Input File's Option List) with the order number next to them. To include an option in the input file, first select the option by clicking on it to highlight it, and then click on the Add button. More than one set of input options can be created in order to create different input files. The information about each set will be saved in the EDT file. To switch between sets, click on the down arrow next to the description text box and select a different set. A description for this set of input options is entered in the text box next to the Input Set Description label. To create and/or delete a set, click on any of the options on the input list window and then click on the Clear command button. On the message box, if you click on Yes, the current set will be deleted and a new set created. If you click on No, the current set will be kept and a new set created. When a new set is created, a default description string is entered in the description text box; and, the input list window is cleared. With each set of input options, the name and path to the input file, the output directory, the name of the two output files and the name of the plot files are also saved in the EDT file. The Order, Remove and Clear buttons are not enabled, i.e. they are grayed out. These buttons are enabled when an option from the input file's option list is selected. Once you have selected the options, you can reorganize them with the Order button, remove any with the Remove button, and delete all the options from this list box with the Clear button. Then, use the Save command button to store these options in the input file. A file dialog form will be displayed requesting you to enter the name for the file. Alternatively, you can select to overwrite an existing file by selecting it. Before you execute D-MOD_2, you need to enter the name of the master output file and select a directory path where the files created by processing of the master output file will be saved. Place the cursor on the text box next to the Master Output File Name label and type in the name for the file, followed by a period and the extension (e.g. Example.out). D-MOD2000 will not add an extension to the end of the file if it is not entered. You can enter up to 32 characters. Blank spaces are not allowed. Next, place the cursor on the text box next to the Name of Plot Files label and type in a name that will be used to identify the files created during processing of the master output file. A maximum of 8 characters is allowed as input for this text box. This name will be “added” to a default name and extension D-MOD2000 - Page No. 90 depending on the type of data saved in the file. These files will be saved to the folder shown on the text box next to the Directory of Output Files label. To change the location of the output directory, there is a command button located next to the text box (i.e. the button with the open folder icon). Click on this button to display the Choose Output Directory form, select a different folder by double clicking on it, and then click on the Ok button to return to this form. In the text box next to the Output Generated for Layer label, enter the number of the layer for which time-dependent variables will be generated and stored. To execute D-MOD_2, click on the D-MOD command button. You will be prompted to save the input file. When the D-MOD DOS window opens, you will be prompted to enter the name of the input file; the name of master output file; and, depending on the value of the NPLD variable in Option 6, the number of the layer for which time-dependent variables will be generated and saved. Please note that for both the input and master output files, you need to provide the path to the file, if these files are not saved in the same path as the D-MOD executable file. The D-MOD executable file is saved in the folder where DMOD2000 was installed. After you have executed D-MOD_2, you need to process the master output file created. D-MOD2000 will read the output file and extract the information that is most useful to the user, and store it in a series of ASCII files that are used by the Plot Data options described below. To process the output file, click on the Process command button. A message window will be displayed after processing is completed. The time for processing depends on the amount of data stored in the master output file. It could take from a few seconds to a few minutes. For example, for the extreme case when using a soil column with 200 layers, a ground motion record with 32,000 points, with data being saved for every time step, and running the program on a Pentium Celeron 2.2 laptop, processing of the output file took approximately 35 minutes. At the end of processing, a message window is displayed that shows a list of the layers that liquefied, and the “D-MOD terminated normally” message if execution of D-MOD_2 terminated normally, i.e. there were no errors during execution of the program. If there are any errors, then it is recommended to use a text processor (e.g. WordPad) to open the master output file and browse through the input data and results to obtain more information. Processing of the master output file will create files that have the name entered in Name of Plot Files text box, with the “aux” label added, and an extension depending on the data saved in the file. For example, if we used the “Example” label for the name of the plot files and requested results for layer 3, the following files would be created: Exampleaux.acc Exampleaux.vel Exampleaux.dpl Exampleaux.max Exampleaux.nst Exampleaux.pwp Exampleaux.stn Exampleaux.sts ExampleA1L3.var Acceleration Velocity Displacement Maximum values Normalized shear stress Pore Water Pressure ratio Shear Strain Shear Stress Time dependant variables for layer 3 ExampleA1L3.ahl ExampleA1L3.hea Acceleration Time History at layer 3 Equivalent Acceleration Time History at layer 3 Each of the “aux” files above, except the *.MAX file, will save the time history for the respective variable. It should be noted that the number of values and the time step for the time history will be D-MOD2000 - Page No. 91 determined based on the values entered in variables NC and NCPR of Option 6. The total number of points is partially determined by the NC variable, i.e. the total number of numerical integrations to be performed. If NC is set equal to the number of values in the ground motion input file, then the entire accelerogram will be used to calculate the dynamic response of the soil column. However, the number of results in the output file is also determined by the values of the NCPR variable, i.e. the partial number of numerical integrations to be performed prior to printing of time-history values in the master output file. For example, if NC is set equal to the total number of values in the input ground motion, and NCPR is set equal to “1”, then results will be saved in the master output file at every time step. Hence, the time step for the results will be the same as the time step for the input ground motion. The time histories are saved for each layer of the soil column. If auxiliary output files were created for a specific layer, then an additional file will be created that can be used for example in a Newmark Displacement analysis. This file will have the extension of *.AHL and will save the acceleration time history data. The file will have the same name as the output files, plus the letter “A” followed by a number representing the number of the analysis conducted; and, the letter “L” followed by a number that corresponds to the layer number entered in the Output Generated for Layer text box. Display/Print Input & Output Options: To print the EDT or Input file, first click on the Print EDT File or the Print Input File option, respectively, and then click on the Print command button. This will display the Print *.EDT and Input Files form. The Print Summary of Master Output File option will display the first section of the master output file, i.e. the input data; and, the bottom section of the master output file, i.e. the table of maximum values. After you have selected this option, click on the Print button to display the form. Plotting Options: To execute a plot option click on the option to select it, and then click on the Plot button to plot the data saved in the file. The file for each option is formed by using the path shown in the text box next to the Directory of Output Files label, the file name shown in the Name of Plot Files text box, and the file extension for each option. For example, the c:\D-MOD2000\output\exampleaux.acc file would store the acceleration values for each soil layer, for every numerical integration step used. The data in this file would be read when using any of the options in this group. Maximum Values: This option will plot a graph of the maximum values for acceleration, shear strain, normalized shear stress and PWP Ratio versus depth along the soil column. After selecting this option, click on the Plot command button to display the Plot Results form. Partial Results at Uniform Time Step: This option will plot a graph of the dependent variable versus depth and time along the soil column. After selecting this option, click on the Plot command button to display the Plot Results form. The graph in this form can also be “animated”, i.e. the change of the variable with time and depth will be displayed. D-MOD2000 - Page No. 92 Response Spectrum: Select this option to display plots of response spectrum for different damping ratios for any layer. The different response spectra plotted are: Relative Displacement (Sd), Relative Velocity (Sv), Pseudo-Relative Velocity (PSV), Absolute Acceleration (Sa), and Pseudo-Absolute Acceleration (PSA) versus Period. After selecting this option, click on the Plot command button to display the Plot of Response Spectrum form. By default, the absolute acceleration spectrum for 5% damping for layer number 1 will be displayed upon loading of the form. You can select other layers, or other damping rations in the form. Time Histories: This option is used to plot the dependent variable time history for a layer of the soil column. After selecting this option, click on the Plot command button to display the Plot Results form. By default, the acceleration time history for layer 1 will be displayed upon first loading of the form. Compare Results of Several Analyses: This option is used to plot simultaneously results from up to 6 different analyses. The results that can be compared include maximum values, response spectra and partial results at uniform time step. Time Dependant Variables for a Layer: When executing D-MOD, results for a specific layer can be saved in auxiliary output files. This option will plot the results for this layer only. When processing the output file created by D-MOD_2, the auxiliary output files will be read and the data saved to a file with an extension of *.VAR. The name of this file will be formed by the label entered in the Name of Plot Files; followed by the letter “A” and a number representing the number of the analysis; and, the letter “L” followed by a number which is the number of the layer entered in the Output Generated for Layer text box. For example “WildSHCA1L3.VAR” would be the name for a file created using the “WildSHC” for the name of the output files; for analysis number one, i.e. “A1”; and, for layer number 3, i.e. “L3”. After choosing this option, click on the Plot command button to open the file dialog box and select a *.VAR file. Calibrate with Frequency Domain Analysis: This option is used when plotting the response spectrum obtained for a specific layer (as explained in the Time Dependant Variables for a Layer option above) and comparing the spectrum to that obtained from a SHAKE analysis. When this option is selected, you will be asked for a *.VAR file the first time the option is used. For subsequent uses of this option, the same VAR file will be used. This option is used to facilitate the calibration of the nonlinear analysis against an equivalent-linear analysis when estimating the viscous damping. When using this option, you can change the values of T, n and . After changing these values, click on the D-MOD command button to conduct a new analysis. After the D-MOD DOS window closes, click on Process to process the output file and then click on Plot to compare the spectra. To change the VAR file, click on the Time Dependant Variables for a Layer option and then on Plot. The next time you use the calibration option, you will be asked for a new VAR file. The best way to estimate viscous damping is by calibrating the D-MOD analysis against an equivalentlinear, i.e. SHAKE, analysis that has a constant value of viscous damping at all frequencies. To this end, n and can be evaluated in an iterative procedure as follows: 1. Develop a SHAKE column and perform the SHAKE analysis to obtain the response spectrum at the surface level. Limit the input ground motion to 0.4 g‟s and shear strains to 0.5%. 2. Develop the D-MOD column to match the SHAKE column as close as possible and use n=5 and = 0.5. 3. Perform the nonlinear analysis using the D-MOD command button. D-MOD2000 - Page No. 93 4. Compare the response spectrum from SHAKE to the response spectrum from D-MOD (use the Process command button to process the output file, load the VAR file and then plot the results. Use the Graph button to display the response spectrum menu and then the Other command button to obtain the response spectrum using the acceleration time history file obtained from the SHAKE analysis). The value shown as MSE is the mean square root difference between the spectra and it is only intended to provide the user a guidance to help determine how close the spectra are; e.g., the closer the number to zero the closer the match is. 5. Adjust n and and repeat from step 3 until a “satisfactory” match between the SHAKE and DMOD spectra and shear strain vs. depth is obtained. After running D-MOD, use the Process command button to process the output data. You will be asked to open the VAR file to compute the response spectrum for the layer and also to open the calibration file created by SHAKE2000. If there is no calibration file, click on Cancel. You can open the calibration file later by using the Open command button when the Calibrate with Frequence Domain Analysis option is selected. An step-by-step example of how to perform the calibration procedure is provided in the Quick Tutorial document saved in the Manual folder. Section 5 of Stewart et al. (2008) provides more information on the calibration procedure between the equivalent-linear and nonlinear analyses. Play AVI Movie: This option is used to play up to 2 movies created with D-MOD2000. Select this option and then click on the Play command button to display the Video Player form. Other Analyses & Utilities Options: Earthquake Engineering Analyses & Utilities: This option will display a form that includes a number of other analyses and utilities useful in geotechnical earthquake engineering. These include Ground Motion Attenuation Relations; Ground Motion Parameters; Ground Motion File Utilities – Conversion & Database; Newmark Method – Displacement Analysis; Response Spectra for Ground Motion; and, U.S. Geological Survey Seismic Hazard. After selecting this option, click on the Ok command button to display the form. D-MOD2000 - Page No. 94 Option List This form is used to select D-MOD_2 options that are not already included in the *.EDT file, or to create new sets of an option. Default values will be given to the option. To select an option, click on the option to highlight it and then click on the Choose button to return to the Earthquake Response Analysis form. The new option will be shown on the option list. You can also double click on the option to select it. D-MOD2000 - Page No. 95 Options for Table of Results This form is used to change the title and subtitles of the analysis, and their font attributes. You can also add a footer and a header to the printout. By default, when the form is displayed, the cursor is set to the Title cell. You can use the Tab key or the mouse to place the cursor on the other cells. To change the properties of a cell, place the cursor on the cell, and then click on the different options on the bottom section of the form. For example, to display the title in bold face, and aligned with the left margin, place the cursor on the Title cell and click on the Bold check box, then on the Left option button. The text on the cell will be displayed in bold face. When the cursor is moved between cells, the current options for each cell are shown with an x on the check box for the font attributes, and by a dot on the option button for the alignment options. The Page Header and Page Footer options use the same font attributes, and will display the last options set. However, they do not use the same alignment option. D-MOD2000 - Page No. 96 Plasticity Chart of Cyclically Degradable Clays The user can use this form to see if his/her soil falls within the range of soils for which parameters of the Matasovic and Vucetic (1995) model have been developed. In general, if subject soil falls within the limits shown on the plot, generic model parameters may be used. The liquid limit and plasticity index values should be entered in the appropriate text boxes. The label for your soil can be entered in the text box below the Soil ID label. This label will be shown as the last legend on the legend section of the graph. Also, select a value of OCR if applicable. After entering the information for your soil, click on the Ok command button to return to the materials form. Note that the PWP generation / cyclic degradation model for clay was developed for cyclic analysis of offshore foundations, not for geotechnical earthquake engineering applications. However, the model can be used for the earthquake engineering applications within the shear strain range for which it has been developed (i.e., 0 < γ < 0.15%). The red ellipse delineates the zone of generic model parameters applicability. We recommend reading the Matasovic and Vucetic (1995) paper before using this model. D-MOD2000 - Page No. 97 Plot Maximum Values This form is used to display the maximum values of the dependent variables vs. depth. To change the variable displayed (i.e. acceleration, shear strain, normalized shear stress, or PWP ratio), click on one of the Maximum Values Options options. The graph will be updated automatically. The layers that form the soil column can be displayed by selecting the Show Layers option. Further, the layers that liquefied can be highlighted as red lines when selecting the Highlight Liquefied Layers option. To display the X and Y coordinates of a specific point on the graph, click on any point along the graph to display its coordinates in the text cells shown on the right side of the form. The graphics routine includes a number of property pages that can be used for customization of the graph. For example, you could add a 3-D look to the graph, or change the colors. The property pages are accessed through the Property command button. More help on the graph control property pages can be obtained by clicking on the Help command button of these pages. To print a copy of the graph, or to copy the graph to the Windows Clipboard for use by other applications, click on the Print command button to display the Graphics Print Menu form. D-MOD2000 - Page No. 98 Plot Object Motion Using object motion files included as Option 7 sets in an *.EDT file: You can plot the object motions included as Option 7 in an *.EDT file. To do this, click on the EDT command button to open the Open EDT File with Object Motion Files dialog box to select the file. The file name and path are displayed on the text box next to the EDT File label, and the name of the object motion files (from the Option 7 sets) displayed next to the option buttons on the upper part of the form. In the Format text box, you will define how the data in the ground motion file will be read. This is done by defining the format, i.e. the way the data are written on the file, of the acceleration values. This is based on the syntax used in the Format statement of the FORTRAN computer language (e.g., 8F9.6, 4E15.6E2). Additional information on the object motion is shown next to each file. To plot a file, click on the option button for the file, and then click on the Plot command button. After a few seconds, the object motion will be plotted on the screen. Using an object motion file not included in an *.EDT file: If you want to use the data saved in a file that is not included as an Option 7 in an *.EDT file, use the Other command button to display the Open Object Motion File dialog box to select the file that you want to plot. The name of the file will be displayed next to the Earthquake File option button on the bottom section of the form. Now you need to enter the following information on the data cells below the file name. First, you need to select the file by clicking on the option button. This will enable the data cells to enter the data. We'll use the following example to explain the information necessary to plot the object motion. Example: STATION: 2702 AMU ANCHORAGE, GOULE HALL . 61.189N 149.801W SL GLACIAL TILL GRND LEV 2 STORY BLDG . AR-240 CHANNEL 1 N315E SCALE=1.925(*) PER=.0520 DAMP=.59 . EVENT: 1975 JAN 01 03:55 61.920N 149.720W 58KM M=6.0 V . EPIC DIST = 81KM AZIMUTH AT STN = 183 FILTERS: HI-PASS 0.15HZ ORD 3 LO 50-100HZ TAPER BASELINE. YEAR= 0 JULIAN DAY= 0 HOUR= 0 MINUTE= 0 SECOND= 0 COMPONENT= SAMPLES/SEC=200 FILTER TYPE=BUTTERWORTH CORNER= 0.15 ORDER=3 DATA TYPE=AC NO OF POINTS= 3720, UNITS=CM/SEC**2, CM/SEC, AND CM D-MOD2000 - Page No. 99 0.049344 0.035475 -0.009943 …………. …………. -0.002152 -0.002223 -0.011564 0.044214 0.036526 0.027073 0.039972 0.039483 0.030785 0.026584 0.014714 0.013246 0.000550 0.000876 -0.007465 -0.015113 -0.012849 -0.011799 -0.012492 -0.013971 -0.011197 -0.011350 -0.016224 -0.000184 -0.001245 -0.003100 -0.001377 -0.001204 -0.003773 -0.003376 -0.002468 -0.002356 -0.001785 -0.000602 -0.000215 -0.000439 -0.000572 This example shows the top 12 and bottom 2 lines of an acceleration time history file. Using this information, you will need to enter the following data to describe the time history: No. Values: This is the total number of acceleration values that form the object motion file. For the above example, there are 3720 points in the file, thus, you will enter 3720 in this cell. Time step: Enter the time interval between each acceleration value. For this example, it is SAMPLES/SEC or 1/200 = 0.005 seconds. No. Header (or Number of header lines): Enter the number of lines at the beginning of the file that are used to describe the object motion. In the above example, the first nine lines are the header lines. Thus, you will enter a 9 in this data cell. Values/Line (or Number of acceleration values per line): Enter the number of acceleration values on each line. For the above example, there are 8 values on each line. Thus, you would enter an 8 in this cell for this specific example. No. Digits (or Number of digits per acceleration value): Enter the number of digits that form an acceleration value. In the above example, each value is defined by 10 digits, including the spaces. Therefore, you would enter a 10 for this specific example. Units: This list provides you with a series of units that are used to plot the correct units on the graph, or to select the acceleration units of your file when computing the ground motion parameters using the GMP command button. This list is only enabled when a file is selected using the Other button. For ground motion files selected with either the EDT or Quakes command buttons, the program assumes that the acceleration values in the file are in units of g‟s. In the above example the original units of the file were in cm/sec2, however the values shown are in g‟s, the original header lines were kept to maintain consistency with the source file. Free Format: Select this option if the values in the file are separated by at least one blank space, and if each row of acceleration values is formed only by acceleration data (i.e. some old ground motion files used to have an integer number either at the beginning or at the end of the row that identified the row number, this number is not an acceleration value and thus should not be read. If you select the free format option, then this value will be read.). If this check box is selected (an x is shown), then you don‟t need to enter values for Values/Line and No. Digits. If the values in the file are not separated by blank spaces, i.e. they appear as a continuous row of numbers, then the numbers entered in the Values/Line and No. Digits columns are used as a means of separating the numbers in columns. After you have entered the information above, or selected a file with either the EDT or Quakes command button, click on the Plot button to display the time history. The All three option of the Plot Time History for options allows you to plot the acceleration, velocity and displacement time histories in one graph. D-MOD2000 - Page No. 100 The View command button can be used to view the contents of a ground motion file. This will help you to collect the information needed to define the formatting of the file if necessary. To do this, first select a file from the list of ground motions in the EDT file, use the Quakes command button to select a file from the database of ground motion files, or use the Other button to select other files. The first 60 lines of the file will be displayed on a form, with the first three characters displayed in red representing the numbers of each row of data in the file followed by a “|”. These characters are not part of the source file and are only shown to number the rows. After the row numbers, the alphanumeric characters that constitute the information saved in the file for each row are shown. Note that the characters are displayed as blue on a white background, and that every tenth character is displayed in red. However, if the tenth character is a “blank space” then the character is not shown. This is done to guide the user when defining the order of the data in the file. Earthquake Records: You can plot the object motions listed in the ground motion files database by clicking on the Quakes button to display a listing of the files saved in the D-MOD2000.EQ file. Once the list is displayed, you can choose a record by highlighting it and clicking on the Ok button, or by double clicking on it. The data for the ground motion will be shown on the Other section of the form. To plot the object motion click on the Plot button. Analysis of Ground Motions: A series of options are included that may help the user with the visual analysis of the ground motions. This is helpful to evaluate the reliability of the ground motion record for use in geotechnical analyses. For example, for some ground motion files the displacement time history obtained from double integration of the acceleration time history may be unreasonable (e.g. it may increase or decrease without bounds). One possible explanation for this incompatibility is that in practice, when a ground motion history is processed, the velocity and displacement time histories are obtained by applying additional corrections (Trifunac and Lee, 1973). However, the acceleration time history may not reflect these corrections. Accordingly, the three histories are not fully compatible with one another, although each may represent the best estimate of the quantity at the site. A similar problem has been evaluated by Crespellani et al. (2003) who studied the effect of the techniques used for processing strong ground motion records on the results obtained from Newmark displacement analyses. A simplified baseline correction of the acceleration time history is done by applying a parabolic baseline correction to the acceleration time history with minimization of the mean square of the resulting velocity (Brady, A.G., 1966, as referenced in Nigam & Jennings, 1968). The “corrected” time histories for acceleration, velocity or displacement will be displayed when the respective time history and the Baseline corrected options are selected. For integration of the acceleration time history, D-MOD2000 will use a default value of 0.0 for both the initial velocity and displacement. If the user wishes to use a different value, the initial value for velocity should be entered in the text box next to the V label; and, the initial value for displacement entered in the text box next to the D label. The units for these initial values should be as shown by the respective unit labels. When the acceleration time history values are given as ratios of gravity (i.e. g‟s), the user has the option to plot and/or save the input acceleration, derived velocity and displacement, and corrected time histories in a different set of units, e.g. cm/sec2, gals, etc.. To do this, select a set of units from the Units for Time Histories list of options. Some options show two sets of units, e.g. g’s & ft or gals & cm; and, a few others only the units for acceleration, e.g. ft/sec2. For options that show two sets of units, the acceleration values will be provided based on the first set and the velocity and displacement values will be based on the second set (e.g. acceleration in g‟s and velocity and displacement in ft/sec and ft, respectively). Please note that these options will not be used when the input acceleration values are in units other than g‟s. D-MOD2000 - Page No. 101 Today, the user can obtain ground motion records from a variety of sources. Many of these sources provide the acceleration, velocity and displacement time histories in the same file. Usually these are the “processed” histories. Accordingly, if the user wishes to obtain the best estimate of either the velocity or the displacement time history, he/she should use that provided with the original source file for the ground motion. For the ground motions provided with D-MOD2000, the web addresses of the sources from which most of the files were obtained are included in the Database of Earthquake Records section of this manual. The processed velocity and displacement time histories may also be obtained from these same sources. As a simplifying alternative, an option is included in D-MOD2000 that saves the computed velocity and displacement time histories from the original ground motion record, and the baseline corrected acceleration, velocity and displacement time histories for further use. To create the file, first select the All three and Baseline corrected options. Next, click on the Save to file check box. A default file name and path are shown on the text box at the bottom of the form next to the AVD File label. To select a different file, click on the open-folder icon. Then, click on the Plot command button to display the graph of the time histories. Please note that is up to the user to decide on the suitability of these computed time histories for further use in other analyses. The Scale command button is used to display the Mean Response Spectrum form. This form can be used to obtain the mean/median spectral acceleration response spectrum for a series of ground motion records. The mean/median value can then be compared to a target spectrum in order to visually evaluate how well the suite of ground motions selected match the target spectrum. Ground Motion Parameters: Various parameters used to characterize a ground motion can be obtained by using the GMP command button. These parameters include peak ground acceleration, Arias Intensity, Root-Mean-Square of the acceleration time history (RMSA), bracketed duration, Trifunac & Brady duration, predominant period, average period and mean period. More information on these parameters is provided in the Ground Motion Parameters section of this manual. The mean period is commonly obtained using the Fourier amplitude spectrum. The method used in D-MOD2000 to compute the FFT is that summarized in Press et al. (1986). The FFT option only works for acceleration time histories, i.e. if necessary the data will be converted to g‟s before obtaining the FFT. To obtain the parameters, first select one of the motions in the EDT file, use the Quakes command button to select a file from the database of ground motion files, or use the Other button to select other files and then click on the GMP button. After a few seconds the Ground Motion Parameters form is displayed to show the parameters. If the units for the motion file selected with the Other command button are either cm/sec2, ft/sec2 or m/sec2 then the acceleration values will be converted to g‟s using the appropriate conversion factor before computing the Fourier spectrum. The Fourier spectrum can also be computed for velocity or displacement time histories, however, when the Ground Motion Parameters form is displayed, only the Fourier Spectrum options will be enabled. Other parameters will only be calculated and displayed for acceleration time histories. D-MOD2000 - Page No. 102 Plot Partial Results at Uniform Time Step This form is used to display the dependent variables vs. depth and time graph; i.e., the change on the variable with depth and time can be displayed as an “animated” graph. To change the variable displayed (i.e. acceleration, velocity, displacement, shear strain, shear stress, or PWP ratio), click on one of the Results Plot Option options. The graph will be updated automatically. Depending on the amount of data, this may take a few seconds. The layers that form the soil column can be displayed by selecting the Show Layers option. Further, the layers that liquefied can be highlighted as red lines when selecting the Highlight Liquefied Layers option. By default, the variable at the first time step; i.e., first numerical integration step for which data were saved in the master output file, will be displayed when loading this form or when changing the variable. If you would like to display the results for other time steps, click on the left or right arrow buttons to move through the results one time-step at a time, backwards or forwards respectively. Also, click and hold the mouse down on the sliding bar, and slide the bar to move faster through the time history of results. The button with a camcorder icon is used to “animate” the graph; i.e., a “movie-like” presentation of the results starting at the first time-step and automatically continuing until the last time step will be presented. To stop the animation, click on the icon with the red cross on the camcorder. The |< and |> buttons will draw the first time step or the entire graph, respectively. D-MOD2000 - Page No. 103 You can create a movie file (AVI) that can be played with the Windows Media Player or other players, by first selecting the Record Movie option. The movie will be saved to the path and file shown on the text box at the bottom of the form. If you want to save the movie to a different file, click on the open folder icon to change it. The number in the Rate text box controls how often a frame is added to the movie. For example, a value of 5 will indicate that every fifth frame will be added to the movie file. In other words, when the animation starts, the graph is updated every time step; however, with a value of 5 for frame rate, every fifth time step a frame will be added to the movie file. The value in the Speed text box can be interpreted as the time between frames. The greater this number, the slower the movie will play, i.e. the longer the time a frame will be shown on the screen before a new frame is displayed. It should be noted, that movie files can be very large, hundreds of megabytes, or a few gigabytes. So, before creating a movie file, check that there is enough space on the hard drive or drive where the movie file is to be stored. Also, the creation of the movie can take a considerable amount of time, e.g. a couple of hours for a movie with a couple of thousand frames. To determine the best settings for the movie, i.e. how often a frame is created from the graph and the time between frames, you will need to try different combinations. The list of options below the Rate and Speed text boxes is a list of video compressor options available in your computer. The selection of the option that works best for you is a trial and error approach. We recommend the use of the Microsoft Video 1 option if available. If the “Fail to save AVI file” error message is displayed when creating a movie, try a different compressor option. To display the X and Y coordinates of a specific point on the graph, click on any point along the graph to display its coordinates in the text cells shown on the right side of the form. The graphics routine includes a number of property pages that can be used for customization of the graph. For example, you could add a 3-D look to the graph, or change the colors. The property pages are accessed through the Property command button. More help on the graph control property pages can be obtained by clicking on the Help command button of these pages. To print a copy of the graph, or to copy the graph to the Windows Clipboard for use by other applications, click on the Print command button to display the Graphics Print Menu form. D-MOD2000 - Page No. 104 Plot Response Spectrum This form is used to plot the response spectrum calculated using the acceleration time history computed for a layer. By default, the 5% damping Absolute Acceleration spectrum for layer number 1, i.e. the surface layer, is plotted when loading this form. To plot the response spectrum for a different layer, click on the < or > command buttons to scroll through the different layers, or type in the layer number in the text box. Then, click on the Plot command button to display the spectrum. A new value of damping can be entered in the text box next to the Damping (%) label. This value should be entered as a percentage, i.e. 5 instead of 0.05. To plot the new spectrum, click on the Plot command button. The Spacing list is used to select the spacing between the period values used to compute the response spectrum. Click on the down arrow list to select a different value. A spacing of 0.01 seconds creates a spectrum with 1000 points starting with 0.01 seconds, while a spacing of 0.001 seconds will create a spectrum with 10,000 points starting at 0.001 seconds. Please note that using a smaller value for spacing will lengthen the time needed for computation and for plotting of the spectrum. To display a menu of available spectra, click on the Graph command button. The Response Spectrum Plot Menu form showing the different spectra options (e.g. pseudo-absolute acceleration, relative displacement, etc.) will be displayed. This form can also be used to select other spectra to plot, e.g. attenuation, NEHRP, IBC, Eurocode or the user‟s own spectrum. The graphics routine includes a number of property pages that can be used for customization of the graph. For example, you could add a 3-D look to the graph, or change the colors. The property pages are D-MOD2000 - Page No. 105 accessed through the icons shown on the upper part of the graph. More help on the graph control property pages can be obtained by clicking on the Help command button of these pages. To display the X and Y coordinates of a specific point on the graph, click on any point along the graph to display its coordinates in the text cells shown on the right side of the form. A copy of the graph can be printed, or copied to the Windows Clipboard for use by other applications, by clicking on the Print command button. This will display the Graphics Print Menu form that can be used for printing. To change the legends of the curves, click on the Legend command button. This will display the Legend Text form. D-MOD2000 - Page No. 106 Plot Soil Profile This form will display a series of graphs that summarize the Options 2 and 4 input data. You can also display a graph of the soil column with soil type information. By default, when the graphs are first displayed the left most graph will show the soil layers as they were entered in Option 2. When you click on the Profile command button, the Soil Profile Information form is displayed. On this form you can enter data for the bottom elevation of the soil layer, and a description of the soil type. X Y coordinates: When you left-click on a symbol on any of the graphs, except the soil layers graph, the X and Y coordinates for that point will be displayed on the text boxes above the graphics window. Also, note that when you click on a graph, that graph will become the default graph when using the Property command button. Graph Properties: The properties of a graph (e.g. symbol color, axis values, etc.) can be modified using the property pages of the graphics server. To display the property pages for a graph, first left-click on any symbol of the graph to display its coordinates, and then click on the Property command button. To obtain more information about the different properties of the graph, click on the Help command button of the property pages. Option 4 Set: If there is more than one set of Option 4 in the EDT file, you can select a different set of material properties to display with the soil column. To select a different set, click on the down arrow to display the list of Option 4 sets available and click on the one you would like to display. Printing: To print the graphs, click on the Print command button to display the Graphics Print D-MOD2000 - Page No. 107 Plot Time Histories This form is used to display the time history for acceleration, velocity, displacement, shear strain, shear stress, PWP ratio, normalized shear stress and the time dependant variables for a layer of the soil profile. When plotting time histories for each layer, a different variable can be plotted by selecting one of the Time History Options. If a different option is selected for the same layer, then the graph will be refreshed automatically. However, if a different layer is selected by clicking on either the < or > command buttons or by typing in the layer number in the text box, then you may need to click on the Plot command button to refresh the graph. When plotting the stress-strain loops, the Plot Input Motion and Fixed Axis options will be enabled. The Time Step option is used to plot the stress-strain loops as a time-series plot, i.e. the graph will be draw one point at a time. The base (input) acceleration time history can also be plotted by selecting the Plot Input Motion option. When using these options with large amounts of data, drawing of the graph will take several minutes. By default, the axis of the stress-strain loops graph are scaled according the range of values being plotted, i.e. the scale shown on the axis will change every time the graph is drawn. If you want to plot the graph with axes that are not redrawn every time a point is plotted, select the Fixed Axis option. If you would like to display the results for other time steps, click on the left or right arrow buttons to move through the results one time-step at a time, backwards or forwards respectively. Also, click and hold the mouse down on the sliding bar, and slide the bar to move faster through the time history of results. D-MOD2000 - Page No. 108 The button with a camcorder icon is used to “animate” the graph; i.e., a “movie-like” presentation of the results starting at the first time-step and automatically continuing until the last time step will be presented. To stop the presentation, click on the button with the red cross icon. You can create a movie file (AVI) that can be played with the Windows Media Player or other players, by first selecting the Record Movie option. The movie will be saved to the path and file shown on the text box at the bottom of the form. If you want to save the movie to a different file, click on the open folder icon to change it. The number in the Rate text box controls how often a frame is added to the movie. For example, a value of 5 will indicate that every fifth frame will be added to the movie file. In other words, when the animation starts, the graph is updated every time step; however, with a value of 5 for frame rate, every fifth time step a frame will be added to the movie file. The value in the Speed text box can be interpreted as the time between frames. The greater this number, the slower the movie will play, i.e. the longer the time a frame will be shown on the screen before a new frame is displayed. It should be noted, that movie files can be very large, hundreds of megabytes, or a few gigabytes. So, before creating a movie file, check that there is enough space on the hard drive or drive where the movie file is to be stored. Also, the creation of the movie can take a considerable amount of time, e.g. a couple of hours for a movie with a couple of thousand frames. To determine the best settings for the movie, i.e. how often a frame is created from the graph and the time between frames, you will need to try different combinations. The list of options below the Rate and Speed text boxes is a list of video compressor options available in your computer. The selection of the option that works best for you is a trial and error approach. We recommend the use of the Microsoft Video 1 option if available. If the “Fail to save AVI file” error message is displayed when creating a movie, try a different compressor option. The |< button will draw the results for the very first time step, i.e. the graph will be deleted and only a point will be shown, you can then draw the graph one time step at a time by using the right arrow button. The |> button will draw the graph up to the last time step, i.e. the time history of the stress-strain loop will be shown in its entirety. Stepping through time also applies to the base (input) motion graph when this graph is selected. The graphics routine includes a number of property pages that can be used for customization of the graph. For example, you could add a 3-D look to the graph, or change the colors. The property pages are accessed through the Property command button. More help on the graph control property pages can be obtained by clicking on the Help command button of these pages. The Spacing list is used to select the spacing between the period values used to compute the response spectrum. Click on the down arrow list to select a different value. A spacing of 0.01 seconds creates a spectrum with 1000 points starting with 0.01 seconds, while a spacing of 0.001 seconds will create a spectrum with 10,000 points starting at 0.001 seconds. Please note that using a smaller value for spacing will lengthen the time needed for computation and for plotting of the spectrum. The Plot Other Spectrum option is used to simultaneously plot a spectrum computed using the Other option of the Response Spectrum Plot Menu form. With this option, you don‟t need to recalculate the other spectrum when conducting different D-MOD analysis. To print a copy of the graph, or to copy the graph to the Windows Clipboard for use by other applications, click on the Print command button to display the Graphics Print Menu form. D-MOD2000 - Page No. 109 Print Menu This form is used to print tabular results or input data. An explanation of the different options in this form is given in the following. The Zoom list can be used to select a magnification factor for the print viewing window. To open the zoom selection list, click on the arrow, and then click on one of the magnification factors. D-MOD2000 uses the standard printer dialog form from Windows to select a printer and/or to change the properties of the printer and paper used to print the graph (e.g. paper size, orientation, etc.). This form can be displayed by clicking on the Printer command button. The Options button will display a form that can be used to change the title and subtitle for the analysis, and the font attributes such as bold face, italic, etc.; and to optionally add a header and/or footer to the page. To print the table, click on the Print button. A message window is displayed indicating the default printer, and a Cancel button that can be used to stop printing. When printing either the *.EDT or input file, the Print Page option is selected by default. When this option is selected, only the displayed page will be printed. If you would like to print the entire document, select the Print Document option. By default, the file will be printed using tables and descriptions for the different data. Use the |<, <, > or |> buttons to display other pages of data. Print report form: Select this option to print a form on the same sheet of paper as the table of results. To create the form, click on the Report command button to display the Company & Project Information form, and then on the Form command button to display the Report Form Development form. D-MOD2000 - Page No. 110 Physical page: This option determines whether the logical page used by the printer control should correspond to the entire physical page or only to its printable area. Most printers have a “logical” paper size that corresponds to the printer's printable area, and a “physical” paper size that corresponds to the actual page size. The physical paper size is always a little larger than the logical paper size. If this option is selected (an x is shown on the check box), the program will print to the physical page. This option only works when the Print report form option is selected. New margins for the paper sheet can be entered in the Set margins text boxes, or by clicking on the respective arrow buttons. Please note that the table of results has a specific size and changing the default margin settings may prevent the table from being printed in its entirety. To return to the previous form, click on the Close button. D-MOD2000 - Page No. 111 Report Form Development This screen is used to create a form that can be printed together with your graphs. The process of creating a form consists of entering the coordinates of the end points and the thickness for each line on the form. You can then use the Company & Project Information form to enter textual information that is printed as part of the form. The origin of coordinates (i.e. x = 0 & y = 0) is the top left corner of the paper sheet; and, the dimensions are those set for the paper (e.g. for the standard letter size of 8.5” by 11”, the dimensions are in inches). Also, remember that the Physical page option of the Graphics Print Menu form may affect the way your form fits on the paper. This option determines whether the logical page used by the printer control should correspond to the entire physical page or only to its printable area. Most printers have a “logical” paper size that corresponds to the printer's printable area, and a “physical” paper size that corresponds to the actual page size. The physical paper size is always a little larger than the logical paper size. If this option is selected (an x is shown on the check box), the program will print to the physical page. To better understand how to create a form, open the standard form included with D-MOD2000 and then modify it as explained in the following. The example described in the following paragraph is for a letter size paper (8.5” x 11”) and portrait orientation. To change paper type or orientation, click on the Printer command button to display the printer dialog window. For this example, first, click on the Open command button to display the file dialog form. If necessary, change to the directory where D-MOD2000 is installed, and select the shakey2k.frm file. Now, click on Open. You will return to this screen, and the form will be displayed on the graphics window, and the information about each line shown on the text boxes. For each line, the coordinates of its end points and thickness are shown on the text boxes. To complete this form, enter the following lines: First, place the cursor on the X left text box for line No. 4 and type in 6. Press the Tab key to move the cursor to the text box on the Y left column. Enter 9.7. These are the coordinates for the left end point of the line. Now, press the Tab key to move the cursor to the text box on the X right column and enter 8. Place the cursor on the text box for the Y right column, and enter 9.7. By default, a line thickness of 25 pixels is shown when entering data for a new line. We will reduce the thickness to 15 by clicking on the down arrow key next to the text box on the Thickness column until 15 is shown in it. A new line has been added to the form on the bottom right corner. To D-MOD2000 - Page No. 112 magnify the form, double-click on the graphics window with the left-button of the mouse. Double clicking with the right button reduces the size of the drawing. Repeat the above procedure for the following lines: X left 6 6 6 Y left 9.9 10.1 10.3 X right 8 8 8 Y right 9.9 10.1 10.3 Thickness 15 15 15 If you select the Box option (an x is shown on the check box) then the coordinates entered will be taken as the upper-left and bottom-right corners, respectively, of a rectangle. To save the information for the form, click on the Save command button to display the file dialog form, and then click on Save to save the data. You can enter a different file name to save each form you create to a new file. When you create your own forms, you can enter a description for the form on the text box next to the Description label. This description can be up to 80 characters long, and will not be shown on the form. Each time you place the cursor on either the X left, Y left, X right, or Y right columns the Add and Delete command buttons are enabled. If you want to add data for a new line, place the cursor on the line where the new line will be located, and click on the Add button. A new line will be created, and the coordinates and thickness for the new line will be the same as those for the line immediately below. Now, you need to modify the information for the coordinates and thickness for the new line. The Delete button is used to delete a line from the form. Place the cursor on either the X left, Y left, X right or Y right columns and then click on the Delete button. The data for the line will be removed from the form, and the information for the other lines updated accordingly. The Reset command button will delete the information for all of the lines. After you have created the form, click on the Ok command button to return to the Company & Project Information form. D-MOD2000 - Page No. 113 Response Spectra for Ground Motion This form is used to compute the response spectra for a ground motion. The routine used by D-MOD2000 is based on the SPECTR computer program (Donovan, 1972). To compute the response spectra, first select a ground motion file. There are two ways you can select a ground motion file. First, you can use the information stored in the D-MOD2000.EQ file; or second, by using the Other command button to select a file and then entering the information necessary to read the data. 1. Ground Motion Files defined in D-MOD2000.EQ: Included with D-MOD2000 is a series of ground motion files that can be used for seismic analysis with D-MOD2000. Basic information for each record is saved in the D-MOD2000.EQ data base file located in the same directory where D-MOD2000 is installed. This file is an ASCII text file that can be modified to include new information about new records. However, the formatting in the file should not be modified. Use the Directory command button to choose the path to directory where the earthquake motion files are stored. After clicking on this button, the Path to Earthquake Files form will be displayed. Use the mouse to select the drive and directory, and then click on the Ok button. The directory will be displayed on the text box next to the Path to Earthquake Files check box. In the D-MOD2000.EQ data file, the name of the earthquake ground motion file is stored as shown on the data box next to the Ground Motion File label. Due to restrictions on D-MOD2000, it is difficult to include the entire path to the file in the D-MOD2000.EQ file. For example, if the path to the earthquake file is saved as quakes\alaska.eq in the D-MOD2000.EQ file, but the physical path to the file in the hard disk is c:\D-MOD2000\quakes\alaska.eq, and depending on the last directory path used, D-MOD2000 may not be able to find the file to plot it. This is because D-MOD2000 will look for it in the last directory path from which data was accessed, and if in this path the subdirectory quakes is not found, then the file alaska.eq will not be found either and an error will occur during plotting. To work around this, use the Directory command button to select the C:\D-MOD2000 path. Then D-MOD2000 will look for the file c:\D-MOD2000\quakes\alaska.eq instead of only quakes\alaska.eq. To select an D-MOD2000 - Page No. 114 earthquake record, click on it to highlight it. The information stored in d-mod2000.eq for this file will be displayed on the corresponding cells. If you wish to scale the ground motion to a different value of peak acceleration, enter the new peak value in the Scale Acc. text box. Each acceleration value will be scaled proportionally to the ratio of the specified scale acceleration to the maximum acceleration of the time history. 2. Using an object motion file not included in the D-MOD2000.EQ file: If you want to use the data saved in a file that is not included in D-MOD2000.EQ, use the Other command button to display the Open Object Motion File dialog box to select the file that you want to plot. The name of the file will be displayed next to the option button on the bottom section of the form. Now you need to enter the following information on the data cells below the file name. First, you need to select the file by clicking on the check box next to the Other Ground Motion File cell (an x is shown on the check box). This will enable (i.e. the mouse cursor changes to the I-beam appearance when placed on the cells) the data cells to enter the data. We'll use the following example to explain the information necessary to plot the object motion. Example: D-MOD2000 Sample Object Motion Time Period = 0.01 Number of Points = 2000 .024455 .000868-.019352-.012488 .003331 .030202 .021586 -.022183 -.050340-.025930 .000123 .020366-.000176-.008401-.013457 -.014927 1 2 No. Values: This is the total number of acceleration values that form the object motion file. For the above example, there are 2000 points in the file, thus, you will enter 2000 in this cell. Time step: Enter the time interval between each acceleration value. For this example, it is 0.01 seconds. Scale Acc.: Maximum acceleration to be used, in g's; each acceleration value will be scaled proportionally to the ratio of the specified scale acceleration to the maximum acceleration of the time history. No. Header (or Number of header lines): Enter the number of lines at the beginning of the file that are used to describe the object motion. In the above example, the first two lines are the header lines. Thus, you will enter a 2 in this data cell. Values/Line (or Number of values per line): Enter the number of acceleration values on each line. For the above example, there are 8 values on each line. The last number (e.g. 1) only identifies the row number. Thus, you would enter an 8 in this cell for this specific example. No. Digits (or Number of digits per value): Enter the number of digits that form an acceleration value. In the above example, each value is defined by 8 digits, including the spaces. Therefore, you would enter an 8 for this specific example. Units: For the computation of response spectra, the values of acceleration are in g's. If the values saved in the file are in other units (e.g. ft/sec2, cm/sec2, or mm/sec2), then select the appropriate units by clicking on the up or down arrows to scroll through the different options. This way, the data will be converted from these units to g's. For example, if the data in the file are in ft/sec2, then you scroll down until ft/sec/sec is shown on the Units box. Then, the values will be divided by 32.2 to transform them to g's. D-MOD2000 - Page No. 115 Free format: The data from the file are read “free format”, i.e. no consideration is given to the number of digits in each column, or to the number of columns in a row. When you select this option (an x is shown on the check box), you only need to provide the No. Values, Scale Acc., Time Step and No. Header values, and then select the dimensions for the Y axis by clicking on the up or down arrow keys next to the Units text box. To be “free format” the data in the file have to be separated by at least one blank space, a comma, a tab, or be in different lines. Period spacing: This list is used to select the spacing between the periods used to compute the response spectrum. Click on the down arrow list to select a different value. A spacing of 0.01 seconds creates a spectrum with 1000 points starting with 0.01 seconds, while a spacing of 0.001 seconds will create a spectrum with 10,000 points starting at 0.001 seconds. Please note that using a smaller value for spacing will lengthen the time needed for computation and for plotting of the spectrum. Once you have selected a ground motion file, you need to enter the values of damping ratio used for the computation of the response spectra. To add a new ratio, place the cursor on the first blank cell next to the Damping Ratios (in decimal) label and enter the value in decimal (e.g., 5% damping is entered as 0.05). The number of damping ratios will be increased automatically every time you enter a new damping value. To delete a ratio, place the cursor on the corresponding cell, and use the Delete key. Then press the Tab key to move the cursor to a different cell. The number of damping ratios will be decreased, and the ratios will move to occupy the empty cells. After you have entered at least one value of damping ratio, the Spectra command button will be enabled. Click on this button to compute the response spectra for the ground motion. The results will be automatically saved in the file shown on the text box next to the File for Response Spectra Data label. To select a different file to save the data in, click on the Save command button and select, or enter the name for, a new file. The results can be plotted by clicking on the Plot command button. By default, the Relative Displacement spectrum is plotted. If you want to plot other spectra (e.g. relative velocity, absolute acceleration, etc.), click on the Graph command button to display the Response Spectrum Plot Menu. In this form, you will be able to select other computed spectra, and other spectra from codes and attenuation relations. The View command button can be used to view the contents of a ground motion file. This will help you to collect the information needed to define the formatting of the file if necessary. To do this, first select a file using the Other button to select other files. The first 60 lines of the file will be displayed on a form, with the first three characters displayed in red representing the numbers of each row of data in the file followed by a “|”. These characters are not part of the source file and are only shown to number the rows. After the row numbers, the alphanumeric characters that constitute the information saved in the file for each row are shown. Note that the characters are displayed as blue on a white background, and that every tenth character is displayed in red. However, if the tenth character is a “blank space” then the character is not shown. This is done to guide the user when defining the order of the data in the file. The ground motion can be plotted by clicking on the Motion command button. When this form is called from the Ratio of Response Spectra form, the damping ratio text boxes and the list of period values will be disabled, i.e. the user will not be able to modify these values. The Ok command button will be enabled after the spectrum has been computed for the respective motion using the Spectra command button. D-MOD2000 - Page No. 116 Response Spectrum Plot Menu This form is used to select different response spectra and damping ratio options for plotting. To display the spectrum for a damping value, place the cursor on the damping check box and then click the left button on the mouse. An x will appear in the check box to indicate your selection. To choose a Type of Response Spectrum, click on the appropriate check box, then, click on the Ok button to display the graph. To cancel a selection, click on the box again to remove the x. There are three possible combinations for displaying the response spectrum: Select one damping value and one type of response spectrum. Select one damping value and two types of response. The two types of response spectrum are either Relative Velocity & Pseudo-Relative Velocity, or Absolute Acceleration & PseudoAbsolute Acceleration. Select as many damping values as desired, up to the total shown, and only one type of spectrum. Other options and/or features available are: Period: Select this option to use the period (sec) scale in the X-axis. Frequency: Select this option to use the frequency (Hz) scale in the X-axis. Normalized: Use this option to plot the normalized response spectrum. This option only works when plotting Sa or PSA spectra. Relative Displacement (Sd): Plot the Relative Displacement versus period. Relative Velocity (Sv): Plot the Relative Velocity versus period. Pseudo-Relative Velocity (PSV): Plot the Pseudo-Relative Velocity versus period. Absolute Acceleration (Sa): Plot the Absolute Acceleration versus period. Pseudo-Absolute Acceleration (PSA): Plot the Pseudo-Absolute Acceleration versus period. AASHTO: This option allows you to plot the AASHTO response spectra. This option can only be used with the Acceleration response spectra and 5% damping. You can use this option together with the D-MOD2000 - Page No. 117 Mean, Site, Attenuate or NEHRP options. After clicking on the AASHTO button, the AASHTO's Seismic Response Coefficients form will be displayed. Attenuate: This option allows you to plot pseudo absolute acceleration or pseudo relative velocity spectra, predicted using published attenuation relations. This option can only be used with either the Acceleration or Velocity response spectra, and 5% damping. After clicking on the Attenuate button, the Ground Motion Attenuation Relations form will be displayed. EuroCode: This button is used to select the options and/or enter the data necessary to plot a design response spectrum in accordance with Part 1 of the Eurocode 8 (European Committee for Standardization, 2000). IBC: Use this command button to plot a design response spectrum using the procedure set forth in the International Building Code. This button will display the IBC Design Response Spectrum form that can be used to select the appropriate spectrum. NEHRP: This option allows you to plot up to two site-specific response spectra in accordance with Section 3.3 of NEHRP (Building Seismic Safety Council, 2004a & 2004b). This option can only be used with either the Absolute Acceleration or Pseudo-Absolute Acceleration response spectra, and 5% damping. Other: This command button is used to open the Response Spectra for Ground Motion form. In this form, the response spectra for a recorded ground motion can be computed. Target: Click on this button to display the Target Response Spectrum form. In this form, you can enter values of period and spectra for a target response spectrum that will be plotted together with the other spectra. UBC: Design spectra using the 1997 Uniform Building Code (UBC) method, can be determined by clicking on the UBC button. This button will display the UBC Design Spectra form. Check to plot: Once you have selected a response spectra option (Attenuate, NEHRP, IBC, Target, UBC, or AASHTO), the corresponding option will be enabled (i.e., will not be grayed out). The purpose of this option is to allow the user to switch on and off the plotting of the response spectra. For example, if you have selected the NEHRP spectra and entered the coefficients, an x will appear in the check box next to the NEHRP label. This means that every time that you click on the Plot command button, these spectra will be plotted together with any other spectra selected. If you click on the check box, the x will be removed, and when you click on the Plot button, the NEHRP spectra will not be plotted. To plot them again, just click on the check box again. You don't need to re-enter the coefficients. The response spectra data can be saved to a text file by selecting the Save Spectrum Data option. This text file can then be open with other applications, e.g. Excel, for further use. The path and name of the text file can be changed by clicking on the command button with the folder icon next to the text box. D-MOD2000 - Page No. 118 Rjb & Rx Distance This form is used to enter Rjb, or the closest distance to the surface projection of fault rupture used by the Akkar & Bommer (2007) – Europe/Middle East; Campbell & Bozorgnia (2003); Campbell & Bozorgnia (2008) – NGA; Boore, D. & Atkinson, G. (2008) – NGA; Chiou, B. & Youngs, R. (2008) – NGA; and, the Rx distance used by the NGA attenuation relations. Note that the program will plot the PHA vs. Distance, where for the NGA equations the distance is Rrup and for Campbell & Bozorgnia (2003) it is Rseis. Accordingly, for the NGA relations Rjb and Rx should be computed and entered in the Rjb and Rx columns of the Rjb and Rx Distance form. Similarly, for the Boore & Atkinson NGA relation, the program will also plot the PHA vs. Distance wherein distance is assumed to be Rrup, but the program will use Rjb entered in the respective column of the Rjb and Rx Distance form for the computations. For further information on these distances, please refer to the respective reference for each relation. To enter the data, place the cursor on the text box for Rjb column and type in the values in kilometers. Please note that the default values shown on the Rjb and Rx columns are not representative of any particular field situation. Also enter values for Distance based on the attenuation relation being used. For example, for the Campbell & Bozorgnia NGA the values on the Distance column will correspond to the values for Rrup. When computing the attenuation values, the program will linearly interpolate between the values entered to obtain the corresponding Rjb and Rx when specific values for a distance are not entered. The program will only accept values greater than 1 for distance. After you have entered the information for each Rjb and Rx, click on the Ok command button to return to the Ground Motion Attenuation Relations form. Each time you place the cursor on the Distance, Rjb or Rx columns the Add and Delete command buttons are enabled. If you want to add data for a new Distance, place the cursor on the distance where the new values will be located, and click on the Add button. New values will be created, and the values will be the same as those for the Distance immediately below. The Delete button is used to delete the data for a D-MOD2000 - Page No. 119 Distance from the table. Place the cursor on the Distance, Rjb or Rx value column and then click on the Delete button. The data for the Distance will be removed from the table, and the information for the other Distances updated accordingly. The Reset command button will delete all the information on the table and display the default values. The Save command button is used to save the data in a text file for future use. These data can be retrieved using the Open command button. The Rjb – Rx command button can be used to compute values of Rjb and Rx for the distances shown on the Distance column (or Rrup on the figure). The computation of the distance is based on the geometries shown on the following figures (a), (b) and (c) included in the PEER NGA Excel spreadsheet. For the computation of the Rjb and RRup distances, the program will first assume default values of either Rjb or Rx and then use the equations presented by Kaklamanos et al. (2010) to compute RRup. For these equations, the value of the source-to-site azimuth can be entered in the Azimuth (◦) text box. D-MOD2000 - Page No. 120 The information and data used for the computation, i.e. dip, style of faulting, ZTOR, and width; are entered in the Ground Motion Attenuation Relations form. D-MOD2000 - Page No. 121 Soil Column Layers This form is used to create more than one layer for a soil column. The number of layers shown in the Number of Layers text box will be added beginning one layer after the number of the layer shown in the Start Layer text box. For example, in the above form 4 layers will be created after layer 6, i.e. new layers 7, 8, 9 and 10 and the values shown for material type, number of subdivisions, thickness, width, GWT control number, PWP control number and material descriptions will be used for each layer. If there are any existing layers 7 through 10, the information on those layers will be scrolled up and will form layers 11 through 14. After entering the information for the new layers, click on the Ok command button to return to the Option 2 form and create the new layers. Click on Cancel to return to the Option 2 form without creating the new layers. D-MOD2000 - Page No. 122 Soil Profile Information This form is used to enter information to create a soil column that will be displayed with the data input from Options 2 and 4. The soil column is made up of layers, and for each layer, you need to enter the depth to the bottom of the layer and a description for the soil type on the layer. To enter the data, first place the cursor on the text box for the Depth to Layer Bottom column and type in the depth to the bottom of the layer (e.g. 10.5). Next, press the Tab key once to move the cursor to the text box for the Soil Type column and type in a short (up to 24 characters) description of the soil that forms the layer (e.g. Silty Sand with Gravel). Move the cursor to the text box for the Soil Description column and enter a longer description for the soil in the layer (e.g. Brown, loose to medium dense, wet, some organics, etc.). Depending on the space allowed for printing on each layer, D-MOD2000 will display first the information entered in the Soil Type column, and then display the information entered in the Soil Description column. If there is not enough space to display the information (i.e. the space is even smaller than the font size used for the text), then no information will be shown. After you have entered the information for each layer, click on the Save command button to save the information on an ASCII text file. You can retrieve the information for future use with the Open command button. To return to the previous form, click on the Ok command button. Each time you place the cursor on the Depth, Soil Type or Soil Description column the Add and Delete command buttons are enabled. If you want to add data for a layer, place the cursor on the layer where the new layer will be located, and click on the Add button. A new layer will be created, and the depth, type and description for the new layer will be the same as those for the layer immediately below. Now, you need to modify the information for the depth, type and description for the new layer. The Delete button is used to delete a layer from the soil column. Place the cursor on the Depth, Soil Type or Soil Description column and then click on the Delete button. The data for the layer will be removed from the soil column, and the information for the other layers updated accordingly. The Reset command button will delete the information for all of the soil layers. D-MOD2000 - Page No. 123 Target/User Defined Response Spectrum This form is used to enter values for a user-defined spectrum that can be plotted together with other spectra or spectra values used with the Ratio of Response Spectrum analysis. You need to enter a value for the period in seconds, and a value for the spectra values in the appropriate dimensions. To enter the data, first place the cursor on the text box for the Period column and type in the value. Next, press the Tab key once to move the cursor to the text box for the PSV, Sa or Spectral Value column and type in the value for the spectra. An alternative way of entering the data is to use one of the standard spectra available in D-MOD2000. The form used to define one of the standard spectra can be displayed by clicking on the Attenuate, EuroCode, IBC, or NEHRP command button. For example, clicking on the Attenuate command button will display the Ground Motion Attenuation Relations form. In this form, select one attenuation relation, enter the parameters or select the options used by the attenuation relation, and then click on the Plot command button. You need to plot the spectra to calculate the values. This also helps you determine if the spectrum is the one you want to use. After plotting the spectra, click on the Ok command button to return to this form. The periods and spectra values will be shown on the data cells of the form. A description of the spectrum will be shown on the text box below the Target Response Spectrum label. This description can be modified and/or entered manually by placing the cursor in the text box and typing in the desired information. After you have entered the information for each period-spectra pair, click on the Ok command button to return to the previous form. Each time you place the cursor on the Period, PSV, Sa or Spectra Value columns the Add and Delete command buttons are enabled. If you want to add data for a new period-spectra pair, place the cursor on the period where the new values will be located, and click on the Add button. A new period-spectra pair will be created, and the values for the new pair will be the same as those for the pair immediately below. D-MOD2000 - Page No. 124 Now, you need to modify the information for the period and spectral value. The Delete button is used to delete a pair from the table. Place the cursor on the Period, Spectra Value, Sa or PSV column and then click on the Delete button. The data for the pair will be removed from the table, and the information for the other pairs updated accordingly. The Reset command button will delete all the information on the table. The Save command button is used to save the data in a text file for future use. These data can be retrieved using the Open command button. D-MOD2000 - Page No. 125 UBC 1997 Response Spectra This form is used to select design spectra using the 1997 Uniform Building Code (UBC) method (ICBO, 1997). To select a spectrum, first, select a zone from the UBC Zone options to determine the zone factor (Z). Next, select the spectra you would like to plot by clicking on the check boxes next to the different Soil Profile Type options. Note that the Ok button is enabled when at least one site type is checked. Then, click on the Ok button to return to the Response Spectrum Plot Menu form. When you select the UBC Zone 4 option, the spectra will be computed using the seismic source selected in the Seismic Source options, and the distance entered in the Distance (km) text box. D-MOD2000 - Page No. 126 U.S. Geological Survey Seismic Hazard This form is used to retrieve the Peak Ground Acceleration from the files of gridded points used to make the 1996/1999 USGS National Seismic Hazard Maps (Frankel et al., 1996), the updates of some of these maps (Frankel et al., 2002; U.S. Geological Survey, 2003a and 2003b; 2008, 2010); and also, to plot the results of the seismic hazard deaggregation for a site in the Conterminous United States. For more information, to view or to download these maps, visit the USGS web site at: http://earthquake.usgs.gov/research/hazmaps/ The files used in D-MOD2000 are for PGA with 2%, 5%, or 10% probability of exceedance in 50 years for the Conterminous United States, Alaska, Hawaii and Puerto Rico. The original files are approximately 80 Mb in size. For D-MOD2000, the files have been reprocessed and reduced to a more manageable size, and are installed in the USGSmaps subdirectory. Please note that the program uses two sets of maps. The 2008 and 2010 maps are included with the program for comparison purposes only; i.e., at this moment they should not be used for any other purpose other than to compare the 2003 maps to the most recent maps. The issue year for the map used is shown next to the (g‟s) unit‟s label. For the 2010 and WUS options, a VS,30 value can be selected from the down-list. However, it is recommended to visit the USGS web site for the most recent information and values regarding the hazard maps. To obtain the PGA, enter the latitude and longitude of your site in degrees, minutes and seconds, and then select one of the Region options, and any of the Probability of Exceedance options. There is no need to enter a negative sign for the longitude. The values of PGA, Ss and S1 for each of the four points that surround your site are retrieved from the files, and if necessary, the values interpolated between the four grid points. The values are displayed in the corresponding text boxes. The USGS interactive deaggregation website is located at: D-MOD2000 - Page No. 127 http://earthquake.usgs.gov/research/hazmaps/interactive/ On this web site the seismic hazard deaggregation for a site in the Conterminous United States can be conducted. The results of this analysis are provided graphically, and also as an ASCII file. The data on this text file are used by D-MOD2000 to obtain a plot of the deaggregated distance, magnitude and ground-motion uncertainty for the specified parameters. Once the file is displayed, use the Save As command of the File menu option in your browser to save the file to your hard drive. The file should be saved as a text file, thus, the Text File (*.txt) option should be shown on the Save as type box of the file dialog form. On the USGS Seismic Hazard form of D-MOD2000, click on the command button next to the Hazard Matrix text box to display the USGS Hazard Matrix file dialog form. Switch to the folder where the file is saved, click on the file to select it, and then click on the Open command button to retrieve the data. After opening the file, some information about the site and the return period is shown on the respective text boxes. Data for several SA frequencies are included in this file. A list of the available SA frequencies in the file is shown by clicking on the down-arrow of the SA Frequency combo list; or, PGA list when using the 2008 deaggregation results. When using the 2008 deaggregation results, the list will show the list of ground motion prediction equations listed in the hazard matrix file. The options on the Epsilon Interval list are used to create plots for the different hazard columns at each distance-magnitude (R, M) bin location. Once you have selected a frequency and epsilon interval, click on the Plot command button to display the seismic hazard deaggregation graph. For example, when using the Highest Eps option, the plot of the results from the 2008 deaggregation of PGA for all of the ground motion prediction equations is shown below. PSH Deaggregation - Lacey (122.775° W , 47.021° N) - USGS 2008 Eps>2 1<Eps<2 0<Eps<1 6% 5% 4% 3% 2% 1% 0% 0 km 50 km 10 Highest Eps-IntevalContribution 9 8 100 km X: Source to Site Distance (km ) 7 Y: % Contribution to Hazard Z: Magnitude (Mw) 6 150 km 5 PGA = .5537 g for 2475 years - Mean Hazard w/all GMPEs D-MOD2000 - Page No. 128 Please note that different colors are used for the graph bars. These colors represent the interval of epsilon (from the hazard matrix file) that contributes the most to that pair. For example, a section of the results from the hazard matrix file for the above graph are shown below. *** Deaggregation of Seismic Hazard at One Period of Spectral Accel. *** *** Data from U.S.G.S. National Seismic Hazards Mapping Project, 2008 version *** PSHA Deaggregation. %contributions. site: Lacey long: 122.775 W., lat: 47.021 N. Vs30(m/s)= 760.0 (some WUS atten. models use Site Class not Vs30). NSHMP 2007-08 See USGS OFR 2008-1128. dM=0.2 below Return period: 2475 yrs. Exceedance PGA =0.5537 g. Weight * Computed_Rate_Ex 0.403E-03 #Pr[at least one eq with median motion>=PGA in 50 yrs]=0.00011 #This deaggregation corresponds to Mean Hazard w/all GMPEs DIST(KM) MAG(MW) ALL_EPS EPSILON>2 1<EPS<2 0<EPS<1 -1<EPS<0 -2<EPS<-1 EPS<-2 7.3 5.05 0.631 0.437 0.194 0.000 0.000 0.000 0.000 53.2 5.05 0.162 0.162 0.000 0.000 0.000 0.000 0.000 …… …… ….. ….. 101.0 8.80 0.397 0.194 0.203 0.000 0.000 0.000 0.000 62.4 9.00 4.569 0.733 2.918 0.918 0.000 0.000 0.000 80.2 9.00 7.338 1.788 5.550 0.000 0.000 0.000 0.000 101.0 9.00 1.663 0.628 1.036 0.000 0.000 0.000 0.000 145.1 9.00 0.200 0.200 0.000 0.000 0.000 0.000 0.000 62.4 9.20 1.791 0.245 1.003 0.543 0.000 0.000 0.000 80.2 9.20 3.040 0.597 2.354 0.089 0.000 0.000 0.000 101.0 9.20 0.738 0.228 0.510 0.000 0.000 0.000 0.000 145.1 9.20 0.106 0.086 0.020 0.000 0.000 0.000 0.000 Summary statistics for above PSHA PGA deaggregation, R=distance, e=epsilon: Contribution from this GMPE(%): 100.0 Mean src-site R= 52.4 km; M= 7.23; eps0= 1.52. Mean calculated for all sources. Modal src-site R= 80.2 km; M= 9.00; eps0= 1.20 from peak (R,M) bin MODE R*= 80.2km; M*= 9.00; EPS.INTERVAL: 1 to 2 sigma % CONTRIB.= 5.550 Modal-source dmetric: distance to rupture surface (Rrup or Rcd) Principal sources (faults, subduction, random seismicity having > 3% contribution) Source Category: % contr. R(km) M epsilon0 (mean values). Cascadia M8.3-M8.7 Floating 7.44 77.8 8.53 1.54 Cascadia Megathrust 23.04 77.8 9.02 1.15 WUS Compr crustal gridded 10.87 8.3 6.12 1.11 50-km Deep Intraplate 43.46 59.5 6.61 1.99 Puget Lowlands gridded 14.13 7.8 6.31 0.94 Individual fault hazard details if its contribution to mean hazard > 2%: Fault ID % contr. Rcd(km) M epsilon0 Site-to-src azimuth(d) #*********End of deaggregation corresponding to Mean Hazard w/all GMPEs *********# For this example, the pair with the highest epsilon-interval contribution corresponds to an Mw 9.0 event at a distance of 80.2 km (highlighted in yellow). For this particular pair, the maximum contribution of 5.55 is for the 1<Eps<2 level (highlighted in light blue). Accordingly, for this pair a light blue color will be used when creating the graph. The View command button can be used to view the contents of a hazard matrix file. The first lines of the file will be displayed on a form, with the first characters displayed in red representing the numbers of each row of data in the file followed by a “|”. These characters are not part of the file and are only shown to number the rows. The Ok button will return you to the Main Menu form. If any of the options is disabled or results for any of the parameters are not shown on the respective text box, this is due to the maps for this option or for these parameters not being available from the USGS. D-MOD2000 - Page No. 129 To display a USGS Seismic Hazard map, click on the appropriate frequency, probability or region option and then click on the Map command button. If any of the options is disabled or results for any of the parameters are not shown on the respective text box, this is due to the maps for this option or for these parameters not being available from the USGS. To display a USGS Seismic Hazard map, click on the appropriate frequency, probability or region option and then click on the Map command button. D-MOD2000 - Page No. 130 Video Player This form is used to play up to 2 movies created with D-MOD2000. To select a movie, click on the open folder icon, browse to the folder where the movie file (*.AVI) is located and click on Open. Then click on the Play (>) command button to start the videos. To pause the movie, click on || and then on > to start the movie again. To return to the D-MOD2000 main menu form, click on the cross button on the upper right corner of the form to close this form. D-MOD2000 - Page No. 131 Yield Acceleration Function This form is used to enter data to define a yield accleration (Ky) function, i.e. a description of a change in Ky with time or displacement (Houston et al., 1987; Matasovic et al., 1998). You need to enter a value for either time in seconds, or for displacement in the units selected for gravity in the Newmark Displacement Analysis form; and, a value for yield acceleration in g's. To enter the data, first place the cursor on the text box for the Time/Displacement column and type in the value. Next, press the Tab key once to move the cursor to the text box for the Yield Acc. column and type in the value for Ky. It is recommended that the first value entered should be that for a time/displacement of zero. Additionally, the last value for time should be greater than or equal to the length of the acceleration time history used; or, that the last value of displacement should be greater than the greatest value expected. The values of yield acceleration between two points of the function are obtained by linear interpolation. For a constant value of yield acceleration, the two values for the function between two time/displacement points should be equal. A description of the function will be shown on the text box below the Description label. This description can be modified/entered manually by placing the cursor in the text box and typing in the desired information. After you have entered the information for each time/displacement - Ky pair, click on the Ok command button to return to the Newmark Displacement Analysis form. Each time you place the cursor on either the Time/Displacement or Yield Acc. columns the Add and Remove command buttons are enabled. If you want to add data for a new pair, place the cursor on the row where the new values will be located, and click on the Add button. A new pair will be created, and the values for the new pair will be the same as those for the pair immediately below. Now, you need to modify the information for the time/displacement and yield acceleration. The Remove button is used to D-MOD2000 - Page No. 132 delete a pair from the table. Place the cursor on either the Time/Displacement or Yield Acc. column and then click on the Remove button. The data for the pair will be removed from the table, and the information for the other pairs updated accordingly. The Reset command button will delete all the information on the table. D-MOD2000 - Page No. 133 D-MOD2000 - Page No. 134 References AASHTO (1994). Standard Specifications for Highway Bridges, Division IA - Seismic Design. 16th Edition, American Association of State Highway and Transportation Officials, Washington, D.C. Abrahamson, N.A. and Shedlock, K.M. (1997). Overview. Seismological Research Letters, Volume 68, Number 1, January/February 1997. Abrahamson, N.A. and Silva, W. (1996). Empirical Ground Motion Models. Report to Brookhaven National Laboratory. Abrahamson, N.A. and Silva, W. (1997). Empirical Response Spectral Attenuation Relations for Shallow Crustal Earthquakes. Seismological Research Letters, Volume 68, Number 1, January/February 1997. Abrahamson, N.A. and Silva, W. (2007). Abrahamson & Silva NGA Ground Motion Relations for the Geometric Mean Horizontal Component of Peak and Spectral Ground Motion Parameters. As posted on the PEER Website on August, 2007. http://peer.berkeley.edu/products/rep_nga_models.html Abrahamson, N.A. and Silva, W.J. (2008). Summary of the Abrahamson & Silva NGA ground-motion relations. Earthquake Spectra 24, 67-97. Abramson, L.W.; Lee, T.S.; Sharma, S. and Boyce G.M. (1996). Slope Stability and Stabilization Methods. John Wiley & Sons, Inc. Akkar, Sinan and Bommer, Julian (2007a). Empirical Prediction Equations for Peak Ground Velocity Derived from Strong-Motion Records from Europe and the Middle East. Bulletin of the Seismological Society of America, Vol. 97, No. 2, pp. 511-530, April 2007. Akkar, Sinan and Bommer, Julian (2007b). Prediction of elastic displacement response spectra in Europe and the Middle East. Earthquake Engineering and Structural Dynamics (in press). Ambraseys, N.N. and J. Douglas (2003). Near-field horizontal and vertical earthquake ground motions. Soil Dynamics and Earthquake Engineering, Vol. 23, pp. 1-18. Ambraseys, N., Douglas, J., Sarma, S. and Smit, P. (2005a). Equations for the Estimation of Strong Ground Motions from Shallow Crustal Earthquakes Using Data from Europe and the Middle East: Horizontal Peak Ground Acceleration and Spectral Acceleration. Bulletin of Earthquake Engineering, January 2005, Vol. 3, No. 1, pp. 1-53. Ambraseys, N., Douglas, J., Sarma, S. and Smit, P. (2005b). Equations for the Estimation of Strong Ground Motions from Shallow Crustal Earthquakes Using Data from Europe and the Middle East: Vertical Peak Ground Acceleration and Spectral Acceleration. Bulletin of Earthquake Engineering, January 2005, Vol. 3, No. 1, pp. 55-73. Ambraseys, N.N., Simpson, K.A., and Bommer, J.J. (1996). Prediction of Horizontal Response Spectra in Europe. Earthquake Engineering and Structural Dynamics, 25, pp. 371-400; as referenced in Earthquake Engineering Handbook (2003), edited by Wai-Fah Chen and Charles Scawthorn, CRC Press. D-MOD2000 - Page No. 135 American Society of Civil Engineers (ASCE) (2006). ASCE 7-05 Minimum Design Loads for Buildings and Other Structures. Andrus, R.D, Zhang, J., Ellis, B.S. and Juang, C.H. (2003). Guide for estimating the dynamic properties of South Carolina soils for ground response analysis. Report No. FHWA-SC-03-07, South Carolina Department of Transportation, Columbia, S.C. Atkinson, G.M. (1997). Empirical ground motion relations for earthquakes in the Cascadia Region. Canadian Journal of Civil Engineering, Volume 24, No. 1, 1997. Atkinson, G.M. (2001). An Alternative to Stochastic Ground-Motion Relations for Use in Seismic Hazard Analysis in Eastern North America. Seismological Research Letters, Volume 72, Number 2, March/April 2001, pp. 299-306. Atkinson, G.M. and Boore, D.M. (1997a). Stochastic point source modeling of ground motions in the Cascadia region. Seismological Research Letters, Volume 68, Number 1, January/February 1997, 74-85. Atkinson, G.M. and Boore, D.M. (1997b). Some Comparisons Between Recent Ground Motion Relations. Seismological Research Letters, Volume 68, Number 1, January/February 1997, 24-40. Atkinson, G.M. and Boore, D.M. (2003). Empirical Ground-Motion Relations for Subduction-Zone Earthquakes and Their Application to Cascadia and Other Regions. Bulletin of the Seismological Society of America, Volume 93, No. 4, pp. 1703-1729, August 2003. Atkinson, G.M. and Boore, D.M. (2006). Earthquake Ground-Motion Prediction Equations for Eastern North America. Bulletin of the Seismological Society of America, Volume 96, No. 6, pp. 2181-2205, December 2006. Atkinson, G.M. and Boore, D.M. (2008). Erratum to Empirical Ground-Motion Relations for Subduction-Zone Earthquakes and Their Application to Cascadia and Other Regions. Bulletin of the Seismological Society of America, Volume 98, No. 5, pp. 2567-2569, October 2008. Atkinson, Gail M. and David M. Boore (2011). Modifications to Existing Ground-Motion Prediction Equations in Light of New Data. Bulletin of the Seismological Society of America, Vol. 101, No. 3, pp. 1121-1135, June 2011. Atkinson, G.M. and Silva, W. (2000). Stochastic Modeling of California Ground Motions. Bulletin of the Seismological Society of America, Volume 90, pp. 255-274. Baker, Jack W. (2009). The Conditional Mean Spectrum: A tool for ground motion selection. ASCE Journal of Structural Engineering (in press). Baker, J.W. and Jayaram, N. (2008). Correlation of spectral acceleration values from NGA ground motion models. Earthquake Spectra, 24(1), 299-317. Battaglia, Glenn J. (1996). Mean Square Error. AMP Journal of Technology, Vo. 5, June 1996. Berge-Thierry, C., Cotton, F. and Scotti, O. (2003). New Empirical Response Spectral Attenuation Laws for Moderate European Earthquakes. Journal of Earthquake Engineering, Volume 7, No. 2, pp. 193-222. D-MOD2000 - Page No. 136 Bennett, M.J., McLaughlin, P.V., Sarmiento, J.S. and Youd, T.L. (1984). Geotechnical investigation of liquefaction sites, Imperial Valley California. Open-File Report 84-252, U.S. Geological Survey, Menlo Park, California, 103 p. Bhatia, S.K. (1981). The Verification of Relationships for Effective Stress Method to Evaluate Liquefaction Potential of Saturated Sands. Ph.D. Dissertation, Civil Engineering Department, University of British Columbia, Vancouver, B.C. Bierschwale, J.G. and Stokoe, K.H. (1984). Analytical evaluation of liquefaction potential of sands subjected to the 1981 Westmorland Earthquake. University of Texas, Geotechnical Engineering Report GR-84-15, 23 p. Bommer, J.J. and Beatriz Acevedo, A. (2004). The Use of Real Earthquake Accelerograms as Input to Dynamic Analysis. Journal of Earthquake Engineering, Vol. 8, Special Issue 1, pp. 43-91. Bommer, J. J., Douglas, J. and Strasser, F.O. (2003). Style-of-Faulting in Ground-Motion Prediction Equations. Bulletin of Earthquake Engineering, 1, 171-203. Boore, D. M. and Atkinson, G. M. (2008). Ground-motion prediction equations for the average horizontal component of PGA, PGV, and 5%-damped PSA at spectral periods between 0.01 s and 10.0 s. Earthquake Spectra, 24, 99-138. Boulanger, R.W., Arulnathan, R., Harder, L.F., Torres, R.A. and Driller, M.W. (1998). Dynamic Propertiesof Sherman Island Peat. Journal of Geotechnical and Geoenvironmental Engineering, ASCE, Vol. 124, No. 1, pp. 12-20. Bray, J. D.; Augello, A. J.; Leonards, G. A.; Repetto, P. C.; and, Byrne, R. J. (1995). Seismic Stability Procedures for Solid-Waste Landfills. Journal of Geotechnical Engineering, Vol. 121, No. 2, February, 1995. Pp. 139-151. Building Seismic Safety Council (2004a). NEHRP Recommended Provisions for Seismic Regulations for new Buildings and Other Structures, Part 1 – Provisions, FEMA 450. Prepared by the Building Seismic Safety Council for the Federal Emergency Management Agency, National Institute of Building Sciences, Washington, D.C., 2004. Building Seismic Safety Council (2004b). NEHRP Recommended Provisions for Seismic Regulations for new Buildings and Other Structures, Part 2 – Commentary, FEMA 450. Prepared by the Building Seismic Safety Council for the Federal Emergency Management Agency, National Institute of Building Sciences, Washington, D.C., 2004. Campbell, K.W. (1997). Empirical Near-Source Attenuation Relationships for Horizontal and Vertical Components of Peak Ground Acceleration, Peak Ground Velocity, and Pseudo-Absolute Acceleration Response Spectra. Seismological Research Letters, Volume 68, Number 1, January/February 1997. Campbell, K.W. (2000a). Erratum: Empirical Near-Source Attenuation Relationships for Horizontal and Vertical Components of Peak Ground Acceleration, Peak Ground Velocity, and Pseudo-Absolute Acceleration Response Spectra. Seismological Research Letters, Volume 71, Number 3, May/June 2000. Campbell, K.W. (2000b). Erratum: Empirical Near-Source Attenuation Relationships for Horizontal and Vertical Components of Peak Ground Acceleration, Peak Ground Velocity, and Pseudo-Absolute D-MOD2000 - Page No. 137 Acceleration Response Spectra. Seismological Research Letters, Volume 72, Number 4, July/August 2000. Campbell, K.W. (2002). Development of Semi-Empirical Attenuation Relationships for the CEUS. USGS External Research Program, Annual Technical Summary, http://erpweb.er.usgs.gov/reports/annsum/vol43/ni/ni_vol43.htm. Campbell, K. W. (2003). Prediction of Strong Ground Motion Using the Hybrid Empirical Method and Its Use in the Development of Ground-Motion (Attenuation) Relations in Eastern North America. Bulletin of the Seismological Society of America, Vol. 93, No. 3, pp. 1012-1033, June 2003. Campbell, K.W. (2004). Erratum: Prediction of Strong Ground Motion Using the Hybrid Empirical Method and Its Use in the Development of Ground-Motion (Attenuation) Relations in Eastern North America. Bulletin of the Seismological Society of America, Vol. 94, No. 6, pp. 2418, December 2004. Campbell, K. W. and Bozorgnia, Y. (2003a). Updated Near-Source Ground-Motion (Attenuation) Relations for the Horizontal and Vertical Components of Peak Ground Acceleration and Acceleration Response Spectra. Bulletin of the Seismological Society of America, Volume 93, Number 1, pp. 314331, February 2003. Campbell, K. W. and Bozorgnia, Y. (2003b). Erratum - Updated Near-Source Ground-Motion (Attenuation) Relations for the Horizontal and Vertical Components of Peak Ground Acceleration and Acceleration Response Spectra. Bulletin of the Seismological Society of America, Volume 93, Number 3, pp. 1413, June 2003. Campbell, K. W. and Bozorgnia, Y. (2003c). Erratum - Updated Near-Source Ground-Motion (Attenuation) Relations for the Horizontal and Vertical Components of Peak Ground Acceleration and Acceleration Response Spectra. Bulletin of the Seismological Society of America, Volume 93, Number 4, pp. 1872, August 2003. Campbell, K.W. and Bozorgnia, Y. (2004a). Erratum: Updated Near-Source Ground-Motion (Attenuation) Relations for the Horizontal and Vertical Components of Peak Ground Acceleration and Acceleration Response Spectra. Bulletin of the Seismological Society of America, Vol. 94, No. 6, pp. 2417, December 2004. Campbell, Kenneth W. and Yousef Bozorgnia (2007). Campbell-Bozorgnia NGA Ground Motion Relations for the Geometric Mean Horizontal Component of Peak and Spectral Ground Motion Parameters. PEER Report 2007/02, Pacific Earthquake Engineering Research Center, College of Engineering, University of California, Berkeley, May 2007. Campbell, K. W. and Bozorgnia, Y. (2008). NGA ground motion model for the geometric mean horizontal component of PGA, PGV, PGD and 5% damped linear elastic response spectra for periods ranging from 0.01 to 10 s. Earthquake Spectra 24, 173-215. Chiou, B. S. J. and Youngs, R. R. (2008). Chiou-Youngs NGA ground motion relations for the geometric mean horizontal component of peak and spectral ground motion parameters. Earthquake Spectra, 24, 173-215. Crespellani, T., Facciourusso, J., Madiai, C. and Vannucchi, G. (2003). Influence of uncorrected accelerogram processing techniques on Newmark’s rigid block displacement evaluation. Soil Dynamics and Earthquake Engineering, Volume 23, pp. 415-424. D-MOD2000 - Page No. 138 Crouse, C.B. (1991). Ground-Motion Attenuation Equations for Earthquakes on the Cascadia Subduction Zone. Earthquake Spectra, Vol. 7, No. 2, 1991, pp. 201-236. Darendeli, M. B. (2001). Development of a New Family of Normalized Modulus Reduction and Material Damping Curves. Ph.D. Dissertation. The University of Texas at Austin, August 2001. http://www.seas.ucla.edu/~jstewart/usgs_report/Darendeli.2001a.pdf Darendeli, M.B., Stokoe, K.H., II, Rathje, E.M. and Roblee, C.J. (2001). Importance of Confining Pressure on Nonlinear Soil Behavior and its Impact on Earthquake Response Predictions of Deep Sites. Proc. 15th International Conference on Soil Mechanics and Geotechnical Engineering, Istanbul, Turkey. Dickenson, S. (2008). Nonlinear Effective-Stress Modeling of Dynamic Soil Response, Proposed Oregon LNG Facility, Warrenton, Oregon. Technical Memorandum, Stephen Dickenson, Corvallis, Oregon. Dobry, R., R.D. Borcherdt, C.B. Crouse, I.M. Idriss, W.B. Joyner, G.R. Martin, M.S. Power, E.E. Rinne, and R.B. Seed (2000). New Site Coefficients and Site Classification System Used in Recent Building Seismic Code Provisions. Earthquake Spectra, Volume 16, No. 1, February 2000. Dobry, R., Pierce, W.G., Dyvik, R., Thomas, G.E. and Ladd, R.S. (1985). Pore Pressure Model for Cyclic Straining of Sand. Research Report, Civil Engineering Department, Rensselaer Polytechnic Institute, Troy, New York, 56 p. Donovan, N.C. (1972). SPECTR - Spectra Response Analysis, Program Documentation. Dames & Moore, San Francisco, California. Electric Power Research Institute (EPRI) (1993). Guidelines for Site Specific Ground Motions. Palo Alto, California, Electric Power Research Institute, November, TR-102293. European Committee for Standardization (2000). Eurocode 8: Design of structures for earthquake resistance, CEN/TC250/SC8/N269 – Part 1: General rules, seismic actions and rules for buildings - Draft No. 1. FERC (2004). Engineering Guidelines for the Evaluation of Hydropower Projects: Chapter 13 (Draft). Federal Energy Regulatory Commission, http://www.ferc.gov/industries/hydropower/safety/engguide/chap13-draft.asp Frankel, A., Mueller, C., Barnhard, T., Perkins, D., Leyendecker, E., Dickman, N., Hanson, S., and Hopper, M. (1996). National Seismic-Hazard Maps: Documentation. U.S. Geological Survey Open-File Report 96-532, 110 pp. Frankel, A.D.; Petersen, M.D.; Mueller, C.S.; Haller, K.M.; Wheeler, R.L.; Leyendecker, E.V.; Wesson, R.L.; Harmsen, S.C.; Cramer, C.H.; Perkins, D.M.; and, Rukstales, K.S. (2002). Documentation for the 2002 Update of the National Seismic Hazard Maps. U.S. Geological Survey Open-File Report 02-420. Franklin, A.G., and Chang, F.K. (1977). Earthquake Resistance of Earth and Rock-Fill Dams; Permanent Displacements of Earth Embankments by Newmark Sliding Block Analysis. Miscellaneous Paper S-71-17, Report 5, U.S. Army Engineer Waterways Experiment Station, CE, Vicksburg, Mississippi. D-MOD2000 - Page No. 139 Geomatrix Consultants (1995). Seismic Design Mapping, State of Oregon. Prepared for Oregon Department of Transportation, January 1995, Project No. 2442. Gregor, N. J., Silva, W.J., Wong, I.G. and Youngs, R.J. (2002). Ground-Motion Attenuation Relationships for Cascadia Subduction Zone Megathrust Earthquakes Based on a Stochastic Finite-Fault Model. Bulletin of the Seismological Society of America, Vol. 92, No. 5, pp. 1923-1932, June 2002. Hancock, J., Watson-Lamprey, J. Abrahamson, N.A., Bommer, J.J., Markatis, A. McCoy, E. and, Mendis, R. (2005). An Improved Method of Matching Response Spectra of Recorded Earthquake Ground Motion Using Wavelets. Paper submitted for publications to the Journal of Earthquake Engineering. Holtzer, T.L., Youd, T.L., and Hanks, T.C. (1989). Dynamics of liquefaction during the 1987 Superstition Hills, California, earthquake. Science, Vol. 244, 56-59. Houston, S.L.; Houston, W.N. and Padilla, J.M. (1987). Microcomputer-Aided Evaluation of Earthquake-Induced Permanent Slope Displacements. Microcomputers in Civil Engineering, pp. 207222. Hu, Y.; Liu, S. and Dong, W. (1996). Earthquake Engineering. E & FN Spon, Oxford, Great Britain, 410 pp. Hudson, M.B. (2004). Behavior of Slopes and Earth Dams during Earthquakes. Doctoral Dissertation, University of California, Davis, California. ICBO (1997). Uniform Building Code, Volume 2, Structural Engineering Design Provisions. International Conference of Building Officials, Whittier, California. Idriss, I.M. (1991a). Earthquake Ground Motions at Soft Soil Sites. Proceedings: Second International Conference on Recent Advances in Geotechnical Earthquake Engineering and Soil Dynamics, March 1115, 1991, St. Louis, Missouri, pp. 2265-2272. Idriss, I.M. (1991b). Procedures for Selecting Earthquake Ground Motions at Rock Sites. Report prepared for the Structures Division, Building and Fire Research Laboratory, National Institute of Standards and Technology. Center for Geotechnical Modeling, Department of Civil & Environmental Engineering, University of California, Davis. Idriss, I.M. (2007). Empirical Model for Estimating the Average Horizontal Values of Pseudo-Absolute Spectral Accelerations Generated by Crustal Earthquakes, Volume 1, Sites with Vs30 = 450 to 900 m/s. http://peer.berkeley.edu/products/rep_nga_models.html Idriss, I.M. (2008). An NGA empirical model for estimating the horizontal spectral values generated by shallow crustal earthquakes. Earthquake Spectra 24, 217-242. International Code Council, Inc. (2000). International Building Code. Building Officials and Code Administrators International, Inc., Country Club Hills, IL; International Conference of Building Officials, Whittier, CA; and Southern Building Code Congress International, Inc., Birmingham, AL. Ishibashi, I. and Zhang, X.J. (1993). Unified dynamic shear moduli and damping ratios of sand anc clay. Soils and Foundations, Vol. 33, No. 1, pp. 182-191. Ishihara, K., Anazawa, Y. and Kuwano, J. (1987). Pore Water Pressure and Ground Motions Monitored During the 1985 Chiba-Ibaragi Earthquake. Soils and Foundations, JSSMFE, Vol. 27, No. 3, pp. 13-30. D-MOD2000 - Page No. 140 Jibson, R.W. (1993). Predicting Earthquake-Induced Landslide Displacements Using Newmark’s Sliding Block Analysis. Transportation Research Record, No. 1411, pp. 9-17. Joyner, W.B., Boore, D.M. and Fumal, T.E. (1997). Equations for Estimating Horizontal Response Spectra and Peak Acceleration from Western North American Earthquakes: A Summary of Recent Work. Seismological Research Letters, Volume 68, January/February 1997. Kaklamanos, James; Laurie G. Baise; and, David M. Boore (2010). Technical Note, Estimating Unknown Input Parameters when Implementing the NGA Ground-Motion Prediction Equations in Engineering Practice. Department of Civil and Environmental Engineering, Tufts University, Medford, MA. Kalkan, E. and Gülkan, P. (2004). Site-Dependent Spectra Derived from Ground Motion Records in Turkey. Earthquake Spectra, Volume 20, No. 4, pp. 1111-1138, November 2004. Kannan, A.E. and Powell, G.H. (1975). Drain 2-D – A General Purpose Computer Program for Dynamic Analysis of Inelastic Plane Structures with User’s Guide. Report No. EERC 73-22, Revised August 1975, Earthquake Engineering Research Center, University of California, Berkeley, California, 37 p. (plus Appendices). Kanno, Tatsuo, Akira Narita, Nobuyuki Morikawa, Hiroyuki Fujiwara and Yoshimitsu Fukushima (2006). A New Attenuation Relation for Strong Ground Motion in Japan Based on Recorded Data. Bulletin of the Seismological Society of America, Vol. 96, No. 3, pp. 879-897, June 2006. Kavazanjian, E., Jr. and Matasovic, N. (1995). Seismic Analysis of Solid Waste Landfills. Geoenvironment 2000, ASCE Geotechnical Special Publication No. 46, Vol. 2, pp. 1066-1080. Kavazanjian, E.; Matasovic, N.; Hadj-Hamou, T. and Sabatini, P.J. (1997). Geotechnical Engineering Circular #3, Design Guidance: Geotechnical Earthquake Engineering for Highways, Volume I – Design Principles. Report No. FHWA-SA-97-077. U.S. Department of Transportation, Federal Highway Administration, Washington, D.C., 163 pp. Kempton, Justin J. and Jonathan P. Stewart (2006). Prediction Equations for Significant Duration of Earthquake Ground Motions Considering Site and Near-Source Effects. Earthquake Spectra, Volume 22, No. 4, pages 985-1013, November 2006. Kottke, Albert and Mary Ellen Rathje (2007). Semi-Automated Selection and Scaling of Earthquake Ground Motions. 4th International Conference on Earthquake Geotechnical Engineering, Paper 1248, Thessaloniki, Greece, June (CD-ROM). Kramer, S.L. (1996). Geotechnical Earthquake Engineering. Prentice-Hall, Inc., Upper Saddle River, NJ, pp. 653. Kwok, O-L.A., Stewart, J.P., Hashash, Y.M.A., Matasovic, N., Pyke, R., Wang, Z., and Yang, Z. (2006). Practical Implementation of Analysis Routines for Nonlinear Seismic Ground Response Analysis. Proc. 8th U.S. National Conference on Earthquake Engineering (8NCEE), San Francisco, California, CD-ROM Paper No. 546. Lee, M.K.W. and Finn, W.D.L. (1978). DESRA-2, Dynamic Effective Stress Response Analysis of Soil Deposits with Energy Transmitting Boundary Including Assessment of Liquefaction Potential. Soil Mechanics Series No. 36, Department of Civil Engineering, University of British Columbia, Vancouver, Canada, 60 p. D-MOD2000 - Page No. 141 Leyendecker, E.V., Hunt, R.J., Frankel, A.D., and Rukstales, K.S. (2000). Development of Maximum Considered Earthquake Ground Motion Maps. Spectra, Earthquake Engineering Research Institute, Oakland, CA., Volume 16, No. 1, pp. 21-40. February 2000. Martin, G.R., Finn, W.D.L. and Seed, H.B. (1975). Fundamentals of Liquefaction under Cyclic Loading. Journal of the Geotechnical Engineering Division, ASCE, Vol. 101, No. GT5, pp. 423-438. Martirosyan, A., U. Dutta, N. Biswas, A. Papageorgiou, and R. Combellick (2002). Determination of Site Response in Anchorage, Alaska, on the Basis of Spectral Ratio Methods. Earthquake Spectra, Volume 18, No. 1, pp. 85-104, February 2002. Matasovic, J. (1993). Analysis of seismic records obtained on November 24, 1987, at the Wildlife Liquefaction Array. Master‟s Thesis, Civil Engineering Department, University of California, Los Angeles, California. Matasovic, Neven (1993). Seismic Response of Composite Horizontally-Layered Soil Deposits. Ph.D. Dissertation, Civil Engineering Department, University of California, Los Angeles, 483 p. Matasovic, N. (2006). D-MOD_2 – A Computer Program for Seismic Response Analysis of Horizontally Layered Soil Deposits, Earthfill Dams, and Solid Waste Landfills – User’s Manual. GeoMotions, LLC, Lacey, Washington. Matasovic, N. and Kavazanjian, E., Jr. (1998). Cyclic Characterization of OII Landfill Solid Waste. ASCE Journal of Geotechnical and Geoenvironmental Engineering, Vol. 124, No. 3, pp. 197-210. Matasovic, N., Kavazanjian, E. and Giroud, J.P. (1998). Newmark Seismic Deformation Analysis for Geosynthetic Covers. Geosynthetics International, Vol. 5, Nos. 1-2, pp. 237-264. Matasovic, N. and Vucetic, M. (1993). Cyclic Characterization of Liquefiable Sands. ASCE Journal of Geotechnical Engineering, Vol. 119, No. 11, pp. 1805-1822. Matasovic, N. and Vucetic, M. (1995). Generalized Cyclic Degradation-Pore Pressure Generation Model for Clays. ASCE Journal of Geotechnical Engineering, Vol. 121, No. 1, pp. 33-42. Newmark, N.M. (1965). Effects of Earthquakes on Dams and Embankments. Geotechnique 15(2); 139160. Nigam, N.C. and Jennings, P.C. (1968). SPECEQ/UQ - Digital Calculation of Response Spectra from Strong Motion Earthquake Records. Earthquake Engineering Research Laboratory, California Institute of Technology, Pasadena, California. Pankow, K. L. and Pechmann, J.C. (2004). The SEA99 Ground-Motion Predictive Relations for Extensional Tectonic Regimes: Revisions and a New Peak Ground Velocity Relation. Bulletin of the Seismological Society of America, Vol. 94, No. 1, pp. 341-348, February 2004. Park, D. (2003). Estimation of Non-Linear Seismic Site Effects for Deep Deposits of the Mississippi Embayment. Doctoral Thesis, Department of Civil and Environmental Engineering, Urbana, University of Illinois at Urbana-Champaign, p. 337. Park, D. and Hashash, Y.M.A. (2004). Soil Damping Formulation in Nonlinear Time Domain Site Response Analysis. Journal of Earthquake Engineering, 8(2), pp. 249-274. D-MOD2000 - Page No. 142 PEER Ground Motion Selection and Modification Working Group (2009). Evaluation of Ground Motion and Modification Methods: Predicting Median Interstory Drift Response of Buildings. Curt B. Haselton, Editor, PEER Report 2009/01, Pacific Earthquake Engineering Research Center, College of Engineering, University of California, Berkeley, June 2009. Press, W.H.; Flannery, B.P.; Teukolsky, S.A. and Vetterling, W.T. (1986). Numerical Recipes, The Art of Scientific Computing. Cambridge University Press, New York, 818 pp. Rathje, E.M., Abrahamson, N.A., and Bray, J.D. (1998). Simplified frequency content estimates of earthquake ground motions. Journal of Geotechnical & Geoenvironmental Engineering, ASCE, Vol. 124, No. 2, pp. 150-159. Rathje, E.M., Fadi Faraj, F., Russell, S. and Bray, J.D. (2004). Empirical Relationships for Frequency Content Parameters of Earthquake Ground Motions. Earthquake Spectra, Volume 20, No. 1, pages 119144, February 2004. Sabetta, F. and Pugliese, A. (1987). Attenuation of peak horizontal acceleration and velocity from Italian strong-motion records. Bulletin of the Seismological Society of America, Vol. 77, No. 5, pp. 1491-1513. Sabetta, F. and Pugliese, A. (1996). Estimation of Response Spectra and Simulation of Nonstationary Earthquake Ground Motions. Bulletin of the Seismological Society of America, Vol. 86, No. 2, pp. 337352. Sadigh, K., Chang, C.Y, Egan, J.A., Makdisi, F. and Youngs, R.R. (1997). Attenuation Relationships for Shallow Crustal Earthquakes Based on California Strong Motion Data. Seismological Research Letters, Volume 68,Number 1, January/February 1997. Sadigh, K. and Egan, J.A. (1998). Updated Relationships for Horizontal Peak Ground Velocity and Peak Ground Displacement for Shallow Crustal Earthquakes. Proceedings of the 6th U.S. National Conference on Earthquake Engineering, Seattle, WA, May-June 1998. Shibuya, S., Kong, X.J. and Tasuoka, F. (1990). Deformation Characteristics of Gravels Subjected to Monotonic and Cyclic Loading. Proc. 8th Japan Earthquake Engineering Symposium, Tokyo, Japan, pp. 771-776. Silva, W., Pyke, R., Youngs, R., and Idriss, I.M. (1996). Development of Generic Site Amplification Factors. Submitted to Earthquake Spectra. (1997, Personal Communication with Dr. Silva). Spudich, P., Fletcher, J., Hellweg, M., Boatwright, J., Sullivan, C., Joyner, W., Hanks, T., Boore, D., McGarr, A., Baker, L., and Lindh, A., (1996). Earthquake Ground Motions in Extensional Tectonic Regimes. U.S. Geological Survey Open File Report 96-292. Spudich, P., Fletcher, J., Hellweg, M., Boatwright, J., Sullivan, C., Joyner, W., Hanks, T., Boore, D., McGarr, A., Baker, L., and Lindh, A., (1996). SEA96 - A New Predictive Relation for Earthquake Ground Motions in Extensional Tectonic Regimes. U.S. Geological Survey, Western Earthquake Hazards Team, Seismology Section, Menlo Park, CA. Accepted for publication in the January 1997, issue of Seismological Research Letters on ground motion attenuation relations. Spudich, P., Joyner, W.B., Lindh, A.G., Boore, D.M., Margaris, B.M., and Fletcher, J.B. (1999). SEA99: A revised ground motion prediction relation for use in extensional tectonic regimes”. Bulletin of the Seismological Society of America, Volume 80, Number 5, pp. 1156-1170, October 1999. D-MOD2000 - Page No. 143 Stewart, J. P., Chiou, S.-J., Bray, J. D., Graves, R. W., Somerville, P. G., and Abrahamson, N. A. (2001). Ground Motion Evaluation Procedures for Performance-Based Design. PEER Report 2001/09, Pacific Earthquake Engineering Research Center, College of Engineering, University of California, Berkeley, September 2001. Stewart, J. P., Liu, A.H. and Choi, Y. (2003). Amplification Factors for Spectral Acceleration in Tectonically Active Regions. Bulletin of the Seismological Society of America, Volume 93, No. 1, pp. 332-352, February 2003. Stewart, Jonathan P., Annie On-Lei Kwok, Youssef M.A. Hashash, Neven Matasovic, Robert Pyke, Zhiliang Wang, Zhaohui Yang (2008). Benchmarking of Nonlinear Geotechnical Ground Response Analysis Procedures. PEER Report 2008/04, Pacific Earthquake Engineering Research Center, College of Engineering, University of California, Berkeley. August 2008. Stokoe, K.H. and Lodde, P.F. (1978). Dynamic Response of San Francisco Bay Mud. Proc. Earthquake Engineering and Soil Dynamics, ASCE, Pasadena, California, pp. 940-959. Stokoe, K.H. and Nazarian, S. (1985). Use of Rayleigh waves in liquefaction studies. Proc. Measurements and use of Shear Wave Velocity for Evaluating Dynamic Soil Properties, GED, ASCE, Denver, Colorado. Tavakoli, B. and Pezeshk, S. (2005). Empirical-Stochastic Ground-Motion Prediction for Eastern North America. Bulletin of the Seismological Society of America, Vol. 95, No. 6, pp. 2283-2296, December 2005. Thilakaratne, V. and Vucetic, M. (1987). „CLASS A’ Prediction of Accelerations and Seismic Pore Pressures at the Owi Island Site during October 4, 1985 Earthquake in Tokyo Bay. Report No. 87-3, Department of Civil and Environmental Engineering, Clarkson University, Potsdam, New York, 92 p. Thilakaratne, V. and Vucetic, M. (1989). Analysis of liquefaction occurrence at the Wildlife Site during 1987 Superstition Hills earthquake. Research Report, Civil Engineering Department, University of California, Los Angeles, California, 131 p. Toro, Gabriel R. and Silva, Walter J. (2001). Scenario Earthquakes for Saint Louis, MO, and Memphis, TN, and Seismic Hazard Maps for the Central United States Region Including the Effect of Site Conditions. Risk Engineering, Inc., Boulder, CO. Toro, G. R. (2002). Modification of the Toro et al. (1997) Attenuation Equations for Large Magnitudes and Short Distances. Risk Engineering, Inc., June 12, 2002. Toro, G.R., Abrahamson, N.A. and Schneider, J.F (1997). Model of Strong Ground Motions from Earthquakes in Central and Eastern North America: Best Estimates and Uncertainties. Seismological Research Letters, Volume 68, Number 1, January/February 1997. Trifunac, M.D. and Lee, V. (1973). Routine computer processing of strong-motion accelerograms. Report No. EERL 73-03, Earthquake Engineering Research Laboratory, California Institute of Technology, Pasadena, CA. U.S. Geological Survey; National Seismic Hazard Mapping Project (2003a). Explanation of April 2003 Revision. http://geohazards.cr.usgs.gov/eq/html/2002apr03.html. April 2003. D-MOD2000 - Page No. 144 U.S. Geological Survey; National Seismic Hazard Mapping Project (2003b). Explanation for the October 2003 Revision of the National Seismic Hazard Maps. http://geohazards.cr.usgs.gov/eq/html/2002oct03.html. October 2003. U.S. Geological Survey; National Seismic Hazard Maps (2008). 2008 United States National Seismic Hazard Maps. http://earthquake.usgs.gov/research/hazmaps/products_data/2008/ U.S. Geological Survey; National Seismic Hazard Maps (2010). Revision III, January 2010. http://earthquake.usgs.gov/hazards/products/conterminous/2008/update_201001/ Vucetic, M. (1986). Pore Pressure Buildup and Liquefaction of Level Sandy Sites During Earthquakes. Ph.D. Thesis, Rensselaer Polytechnic Institute, Troy, New York, 616 p. Vucetic, M. and Dobry, R. (1988). Cyclic Triaxial Strain-Controlled Testing of Liquefiable Sands. Advanced Triaxial Testing of Soil and Rock, ASTM STP 977, American Society for Testing and Materials, Philadelphia, pp. 475-485. Vucetic, M. and Dobry, R. (1991). Effect of Soil Plasticity on Cyclic Response. Journal of Geotechnical Engineering, ASCE, Vol. 117, No. 1, pp. 89-107. Vucetic, M., Dobry, R., Stokoe, K.H., Ladd, R.S., and Youd, T.L. (1986). Evaluation of a Liquefaction Case History: Heber Road Site, 1979 Imperial Valley Earthquake. Proc. 8th European Conference on Earthquake Engineering, Lisbon, Portugal, Vol. 2, pp. 57-64. Youngs, R.R., Chiou, S.J., Silva, W.J. and Humphrey, J.R. (1997). Strong Ground Motion Attenuation Relationships for Subduction Zone Earthquakes. Seismological Research Letters, Volume 68, Number 1, January/February 1997. Zekkos, Dimitrios, Jonathan D. Bray, and Michael F. Riemer (2008). Shear modulus and material damping of municipal solid waste based on large-scale cyclic triaxial testing. Canadian Geotechnical Journal, Vol. 45, pages 45-58. Zhang, J., Andrus, R.D. and Juang, C.H. (2005). Normalized Shear Modulus and Material Damping Ratio Relationships. Journal of Geotechnical and Geoenvironmental Engineering, Vol. 131, No. 4, April 2005, pp.453-464. Zhang, Jianfeng, Ronald D. Andrus, and C. Hsein Juang (2008). Model Uncertainty in Normalized Shear Modulus and Damping Relationships. Journal of Geotechnical and Geoenvironmental Engineering, Vol. 134, No. 1, January 2008, pp.24-36. Zhao, John X., Jian Zhang, Akihiro asano, Yuki Ohno, Taishi Oouchi, Toshimasa Takahashi, Hiroshi Ogawa, Kojiro Irikura, Hong K. Thio, Pagul G. Sommerville, Yasuhiro Fukushima, and Yoshimitsu Fukushima (2006). Attenuation Relations of Strong Ground Motion in Japan Using site Classification Based on Predominant Period. Bulletin of the Seismological Society of America, Vol. 96, No. 3, pp. 898-913, June 2006. D-MOD2000 - Page No. 145 D-MOD2000 - Page No. 146 Appendix A - Generic Material Parameters and Curve Fitting Constants for Total-Stress Analysis D-MOD2000 - Page No. 147 D-MOD2000 - Page No. 148 Table A-1 Curve Fitting Constants of the MKZ Stress-Strain Model Part A – Liquefiable Sands and Silts Material Reference Banding Sand (BS); poorly-graded commercially available sand; Dr ≈ 40%; D50 = 0.19; Cc = 0.9; Cu = 1.4; γd,max = 106 pcf. Wildlife Site Sand A (WSA) (lose silty sand that liquefied in the past; void ratio 0.84 to 0.85; Dr ≈ 20 %; 37 % fines; N ≈ 5; Vs ≈ 350 ft/s)(1) Wildlife Site Sand B (WSB) (loose silty sand that liquefied in the past; void ratio 0.74 to 0.76; Dr ≈ 25%; 25% fines; N ≈ 6 to 13; Vs ≈ 450 to 500 ft/s)(1) Heber Road Site Sand CF (lose sand; void ratio 0.70; D r ≈ 40 %; Vs ≈ 400 to 466 ft/s)(1) Heber Road Site Sand PB (medium dense clean sand that liquefied in the past; void ratio 0.70; Dr ≈ 45 %; Vs ≈ 500 to 600 ft/s)(1) Santa Monica Beach Sand (SMB) (clean dense sand; similar to Monterey No. 0; void ratio = 0.56; Dr ≈75 %; Vs ≈ 867 ft/s)(1) Silty Sand (σo‟ = 25 kPa or 552 psf) (4) Silty Sand (σo‟ = 100 kPa or 2,089 psf) (4) Silty Sand (σo‟ = 400 kPa or 8,354 psf) (4) Silty Sand (σo‟ = 1600 kPa or 33,418 psf) (4) Owi Island Sand; Placed as hydraulic fill at depths ranging from 6 to 14 m b.g.s.; 18 % < fines < 35 % Owi Island Silt; Placed as hydraulic fill at a depth of 6 m b.g.s.; 50 % < fines < 85 % (2) r (3) MKZ Model Parameters s Dobry et al. (1985), modified (5) (5) (5) Matasovic and Vucetic (1993) 0.00128 (γmo = 1%) 1.7 0.67 Matasovic and Vucetic (1993) 0.00163 (γmo = 1%) 1.5 0.68 Matasovic and Vucetic (1993) 0.00046 (γmo = 1%) 1.0 0.98 Matasovic and Vucetic (1993) 0.00088 (γmo = 1%) 1.9 0.70 Matasovic and Vucetic (1993) 0.00049 (γmo = 1%) 1.7 0.80 Darendeli et al. (2001) Darendeli et al. (2001) Darendeli et al. (2001) Darendeli et al. (2001) 0.0002 (γmo = 1%) 0.0004 (γmo = 1%) 0.0008 (γmo = 1%) 0.0016 (γmo = 1%) 1.1 1.1 1.1 1.1 0.92 0.90 0.87 0.85 Darendeli et al. (2001) 0.001730 (γmo = 1%) 6.0 1.10 Darendeli et al. (2001) 0.003300 (γmo = 1%) 0.9 0.95 Notes: (1) See Figure A-1 for grain size distribution of the WSA, WSB, CF, PB, and SMB sands and OWI Island hydraulic fills; and Figure A-2 for stress-strain curve plot. (2) β and s were determined by curve-fitting of modulus reduction and damping curves published in references listed in this column. Use spreadsheet MKZ model form to develop new sets of the MKZ model constants. (3) γr = τmo/Gmo, where Gmo is the initial (small strain) shear modulus, and τmo is the shear stress at shear strain equal γmo. For design based upon generic parameters, use γr and Gmo to calculate τmo. (4) σo‟ = (isotropic) effective confining stress. (5) Pick appropriate Darendeli et al. (2001) parameters based upon site-specific σ‟o. D-MOD2000 - Page No. 149 Table A-2 Curve Fitting Constants of the MKZ Stress-Strain Model Part B – Other Soils Material Gravel (Similar to “weak rock” that comes with SHAKE91) Generic Sand (PI = 0) Generic Clay (PI = 15) Generic Clay (PI = 30) Generic Clay (PI = 50) Generic Clay (PI = 100) Generic Clay (PI = 200; Mexico City Clay) San Francisco Bay Mud (PI = 49) Sherman Island Peat Generic Solid Waste (Geoenvironment 2000) OII Landfill Solid Waste (“Recommended Curve”) Reference(1) r(2) Shibuya et al. (1990) Vucetic and Dobry (1991) Vucetic and Dobry (1991) Vucetic and Dobry (1991) Vucetic and Dobry (1991) Vucetic and Dobry (1991) Vucetic and Dobry (1991) Stokoe and Lodde (1978) Boulanger et al. (1998) Kavazanjian and Matasovic (1995) Matasovic and Kavazanjian (1998) 0.000722 (γmo = 0.1%) 0.000324 (γmo = 0.4%) 0.000920 (γmo = 1%) 0.001600 (γmo = 1%) 0.002440 (γmo = 1%) 0.003610 (γmo = 1%) 0.004610 (γmo = 1%) 0.000990 (γmo = 0.3%) 0.01 (γmo = 1%) 0.00160 (γmo = 1%) 0.00316 (γmo = 1%) MKZ Model Parameters s 0.36 1.5 1.3 1.1 1.0 0.7 0.6 0.5 1.0 2.5 0.5 0.40 0.90 0.85 0.85 0.85 0.90 1.00 1.20 0.80 0.60 1.10 Notes: (1) β and s were determined by curve-fitting of modulus reduction and damping curves published in references listed in this column. Use spreadsheet in MKZ form to develop new sets of MKZ model constants. (2) γr = τmo/Gmo, where Gmo is the initial (small strain) shear modulus, and τmo is the shear stress at shear strain equal γmo. For design based upon generic parameters, use γr and Gmo to calculate τmo D-MOD2000 - Page No. 150 Figure A-1: Grain Size Distribution Curves for Liquefiable Sands and Silts Referred to in Table A-1. Figure A-2: Stress-Strain Curves of Liquefiable Sands Referred to in Table A-1. D-MOD2000 - Page No. 151 D-MOD2000 - Page No. 152 Appendix B - Generic Material Parameters and Curve Fitting Constants for Effective-Stress Analysis D-MOD2000 - Page No. 153 D-MOD2000 - Page No. 154 Table B-1 Material Parameters and Curve Fitting Constants of the Pore Water Pressure and Degradation Models (Sand and Low-Plasticity Silt) Material (1) Banding Sand (BS); poorly-graded commercially available sand; Dr= 40%; D50=0.19; Cc=0.9; Cu=1.4; γd,min = 90 pcf; γd,max = 106 pcf Wildlife Site Sand A (WSA); void ratio 0.84 to 0.85; 37 % fines; N ≈ 5; Vs ≈ 350 ft/s Wildlife Site Sand B (WSB); void ratio 0.74 to 0.76; 25 % fines; N ≈ 6 to 13; Vs ≈ 450 to 500 ft/s Heber Road Site Sand PB; void ratio 0.70; 15 % fines; Vs ≈ 500 to 600 ft/s Heber Road Site Sand CF; void ratio 0.70; 22 % fines; Vs ≈ 400 to 466 ft/s Santa Monica Beach Sand (SMB); clean uniform beach sand similar to Monterey No. 0; void ratio = 0.56; zero fines; dense; Vs ≈ 867 ft/s Owi Island Sand at depths from 6 to 14 m b.g.s.; silty fine sand placed as hydraulic fill; 18 % < fines < 35 % Owi Island Silt at depth of 6 m; placed as hydraulic fill; 50 % < fines < 85 % k (ft/s) Degradation Model f 5.5 x 10⁻⁴ 1.0 1.0 1.00 10.9 1.00 0.017 Vucetic and Dobry (1988) 9.8 x 10⁻⁴ 1.0 2.0 1.04 2.6 1.70 0.020 Vucetic and Dobry (1988) 6.6 x 10⁻³ 1.0 2.0 1.04 2.6 1.70 0.020 Vucetic and Dobry (1988) Vucetic and Dobry (1988) 1.4 x 10⁻⁴ 1.0 2.0 1.05 1.706 1.09 0.024 3.9 x 10⁻⁵ 1.0 1.0 1.071 1.333 1.08 0.022 Matasovic (1993) 3.3 x 10⁻¹ 3.8 1.0 1.00 0.73 1.00 0.020 Thilakaratne and Vucetic (1987) 6.6 x 10⁻³ 1.0 2.0 1.005 3.0 1.80 0.025 Thilakaratne and Vucetic (1987) 9.8 x 10⁻⁴ 1.0 2.0 0.95 2.5 1.60 0.015 Reference (2) Dobry et al. (1985) Pore Water Pressure Model p F s tv(3) (%) Notes: (1) Grain size distribution curves for all of the sands and silts listed in this table are shown in Figure A-1. All model parameters were developed based upon cyclic DSS straincontrolled testing. (2) References listed in this column contain more detailed material characterization information as well as verification of curve fitting constants and material parameters on case histories. Full citations of these references are provided in the References section of this manual. (3) Volumetric threshold shear strain. D-MOD2000 - Page No. 155 Table B-1 (continued) Material Parameters and Curve Fitting Constants of the Pore Water Pressure and Degradation Models (Sand and Low-Plasticity Silt) (1) k Degradation Model (ft/s) f not reported 1.0 1.0 (2) Material Reference Warrenton, Oregon Silt recovered from 130 and 248 ft b.g.s.; 73% < fines < 99 %; 32.9 % < water content < 37.3 %; 86.3 < dry < 88.9 pcf; 822 < Vs = 1,086 fps; OCR = 1.0; Dickenson (2008) Pore Water Pressure Model p F 1.0 0.493 tv(3) s (%) 1.761 0.06 Notes: (1) Plasticity chart for this silt is shown in Figure B-2. (2) Full citation of this reference is provided in the References section of this manual. (3) Volumetric threshold shear strain. Table B-2 Material Parameters and Curve Fitting Constants of the Pore Water Pressure and Degradation Model (Clay) Material(1) Marine Clay (OCR = 1.0) Marine Clay (OCR = 1.4) Marine Clay (OCR = 2.0) Marine Clay (OCR = 4.0) Reference(2) tv(3) (%) Matasovic and Vucetic (1995) Matasovic and Vucetic (1995) Matasovic and Vucetic (1995) Matasovic and Vucetic (1995) 0.1 0.1 0.1 0.1 Pore Water Pressure and Degradation Model Parameters(4) st r A B C D 0.075 0.064 0.054 0.042 0.495 0.520 0.480 0.423 7.6451 14.6202 12.9495 11.2634 -14.7174 -30.5124 -26.3287 -21.4595 6.3800 18.4265 15.3736 11.2404 0.6922 -2.5343 -1.9944 -1.0443 Notes: (1) The PWP generation/cyclic degradation of clay model parameters have been developed based upon strain-controlled testing of five marine clays (VNP, VTCA, VTCB, VTCC and VTCD clays). These clays are characterized in Figure B-1. Note index properties of these clays (50 ≤ PI ≤ 100; 20 ≤ LL ≤ 60). (2) Reference cited in this column contain more detailed material characterization information as well as verification of curve fitting constants and material parameters on case histories. (3) Volumetric threshold shear strain. (4) Valid for 0 < < 0.15% ( = shear strain). D-MOD2000 - Page No. 156 Table B-3 Pore Water Pressure Dissipation Model (Sand and Clay) Typical Values of k, Er, and Martin’s PWP Dissipation Model Curve Fitting Constants Material Ottawa Sand (Dr = 44%) Crystal Silica Sand (Dr = 45%; vo‟ = 1,000 – 4,000 psf) Monterey No. 0 Sand (SP; Dr = 60%; D50 = 0.36 mm; Cc = 0.9; Cu = 1.5) Marine Clays (50 PI 100; 20 LL 60; 1 OCR 4) k (ft/sec) Reference 1 x 10⁻⁴ to 1 x 10⁻³ (1) Er (psf) Martin’s PWP Dissipation Model K2 m n Bhatia (1981) N/A 0.0025 0.43 0.62 Martin et al. (1975) N/A 0.0025 0.43 0.62 1 x 10⁻⁴ to 1 x 10⁻³ Bhatia (1981) N/A 0.0025 0.43 0.62 1 x 10⁻⁸ to 1 x 10⁷ Matasovic (1993) 7.53 x 10⁻⁶ N/A N/A N/A -4 1 x 10 to 1 x 10 -3 Notes: (1) Full references are provided in the References section of this manual. N/A = Not Applicable; σvo‟ = vertical effective stress; PI = Plasticity Index; LL = Liquid Limit; OCR = Overconsolidation Ratio; k = saturated hydraulic conductivity; Er = unloading (rebound) modulus of soil. D-MOD2000 - Page No. 157 Figure B-1 Plasticity Chart for Cyclically Degradable Clays Referred to in Table B-2. 60 Warrenton, Oregon Silt PLASTICITY INDEX (%) 50 CH or OH 40 30 e Lin CL or OL A- 20 MH or OH CL-ML 10 ML or OL 0 0 10 20 30 40 50 60 70 80 90 100 LIQUID LIMIT (% ) Figure B-2: Plasticity Chart for Cyclically Degradable Silt Referred to in Table B-1 (continued). D-MOD2000 - Page No. 158 Appendix C - Evaluation of Rayleigh Damping Coefficients D-MOD2000 - Page No. 159 D-MOD2000 - Page No. 160 Role of Viscous Damping in Non-Linear Analysis D-MOD_2 solves the dynamic equation of motion in time domain using Newmark‟s β algorithm. The dynamic equation of motion is typically written as: [M] {ü} + [C] {ů} + [K] {u} = f(t) (1) where [M], [C] and [K] are the diagonal mass matrix, viscous damping matrix, and non-linear stiffness matrix, respectively, f(t) is excitation at the base of the layer, and {u}, {ů} and {ü} are the displacements, velocities, and accelerations of the mass [M] relative to the base. If [C] is zero (or close to zero), acceleration response of a layer cannot be calculated, and the program crashes (ERROR MESSAGE “ACCELERATION RESPONSE TOO LARGE” appears in the printout). Viscous damping is frequency dependent while the damping in soil is not frequency dependent. One may hypothesize that viscous damping may be used to provide for damping in the nonlinear site response analysis at very small strains where the hysteretic damping inherent to the non-linear soil models is nearly zero. To make this hypothesis valid, the viscous damping must be introduced into the non-linear site response analysis in a way that provides for hysteretic damping at very small strains with minimum variation of viscous damping over the range of frequencies of interest. In the non-linear analysis, viscous damping is expressed through viscous damping ratio, c which is commonly modeled as: c = αR m x βR k (2) where αR and βR are the Rayleigh damping coefficients and m and k are elements of the mass and stiffness matrices, respectively. Figure D-1 illustrates how viscous damping, expressed through c, changes with frequency. Figure D-1 Schematic Illustration of Viscous Damping Change with Frequency (after Park and Hashash, 2004). The viscous damping ratio can be brought closer to a constant value of target damping ratio (δtar) by specifying c at only one frequency (e.g., f2 in Figure D-1) which is termed the simplified Rayleigh damping formulation; at two frequencies (f1 and f2) which is termed the full Rayleigh damping formulation (Hudson, 1994); and, at four frequencies (f1 through f4) which is termed the extended D-MOD2000 - Page No. 161 Rayleigh damping formulation (Park and Hashash, 2004). D-MOD_2 accommodates all of these viscous damping formulations, and allows for different viscous damping to be specified for each layer in the profile. Simplified Rayleigh Damping Formulation The simplified Rayleigh damping formulation is the simplest and most commonly used formulation to introduce Rayleigh damping into the non-linear analysis (see, e.g., Lee and Finn, 1978; Matasovic, 1993). In this formulation, the first Rayleigh damping coefficient, αR, is set to be zero while the second coefficient, βR, is calculated as: βR = (ξtar T) / π (3) where: ξtar T H Vs,avg Target damping ratio; Fundamental period of (soil) deposit, calculated as T = 4 H / Vs,avg; Thickness of the soil deposit; and, Average shear wave velocity of (soil) deposit (weighted average). Review of Equation (2) shows that modeling of Rayleigh damping with the simplified formulation is equal to an assumption that viscous damping is solely stiffness proportional. The basis for this assumption is the fact that the mass matrix is always (numerically) much smaller than the stiffness matrix. Full Rayleigh Damping Formulation Calculate Rayleigh damping coefficients αR and βR as: αR = ξtar (4π/T) [n / (n+1)] (4) βR = (ξtar T) / [π (1 + n)] (5) where: ξtar T fs H Vs,avg n Target damping ratio; Fundamental period of (soil) deposit, calculated as T = 1/ fs = 4H / Vs,avg; Site frequency; Thickness of the soil deposit; Average shear wave velocity of (soil) deposit (weighted average); and, an odd integer (1, 3, 5 or 7); pick n by calibrating against the SHAKE analysis, or use n = 5 as the “best guess.” Note that modeling Rayleigh damping using the full formulation corresponds to an assumption that viscous damping is both mass and stiffness proportional. Also note that, by setting n = 0, Equations (4) and (5) reduce to Equation (3). D-MOD2000 - Page No. 162 Extended Rayleigh Damping Formulation D-MOD_2 does not explicitly include a model for the extended Rayleigh damping formulation. However, the extended formulation can be simulated by direct input of viscous damping into the program. More details on how to apply the extended damping formulation can be found in Park and Hashash (2004). Selection of Target Damping Ratio and Other Rayleigh Damping Model Parameters The target damping ratio ξtar is, for most practical applications, in the 0.1 to 5% range. This is consistent with the hypothesis that viscous damping may be used to provide for damping at very small strains where hysteretic damping inherent to the non-linear soil models is nearly zero; hence, the fitted damping curve in the MKZ-model spreadsheet is adjusted for viscous damping. However, note that adding viscous damping may also contribute to over-damping at higher strains. The most accurate estimate of viscous damping can be obtained by calibrating the non-linear analysis against an equivalent-linear analysis that has a constant value of viscous damping at all frequencies. The calibration variables include the target damping ratio, ξtar, an odd integer, n, and target frequency, f. Figure D-2 illustrates sample calibration of the non-linear analysis. Variables considered in the calibration include two target damping ratios (0.5% and 5%), three “odd integers” (n = 0, 3 and 5), and the following target frequencies: site frequency, fs (defined as inverse of the predominant period of soil profile), mean frequency, fm (defined as the weighted average site frequency with weights defined from the Fourier amplitudes spectrum; Rathje et al., 1998), and predominant frequency of the input motion, fp (corresponds to the highest peak in the acceleration spectrum of the input motion). Acceleration response spectrum calculated using SHAKE91 is, for reference, also shown in Figure D-2. Figure D-2 Comparison of Response Spectra for Simi Valley Knolls School Site (Kwok et al., 2006). Figure D-2 shows that ξtar, is the dominant parameter in the Rayleigh damping model. Figure D- 2 further shows that a relative close approximation of acceleration response spectra calculated by SHAKE91 can be obtained by careful selection of the damping model parameters. D-MOD2000 - Page No. 163 Example Calculations Given: fundamental period (frequency) of soil deposit, T = 1/fs = 0.153 s, calculate Rayleigh damping coefficients using either Equations (1) through (3) or MKZ model form of the program. Simplified Rayleigh damping formulation – use Equation (3): Assume: ξtar = 0.5%. αR = 0; and βR = 0.000244 Full Rayleigh damping formulation – use Equations (4) and (5): Assume: n = 5; and ξtar = 0.5%. αR = 0.342221; and βR = 0.000041 Figure D-3 below shows the surface acceleration response spectra calculated from surface acceleration response using SHAKE91 (Idriss and Sun, 1992) and D-MOD_2. These plots are based on total stress analysis and within motion with a stiff base. For reference, spectra of the within input motion are also shown in Figure D-3. Figure D-3 Response Spectra of Input Motion and Surface Responses Calculated by SHAKE91 and DMOD_2. The D-MOD_2 results with both full Rayleigh damping (n = 5; and ξtar = 0.5%) and simplified Rayleigh damping (n = 0; and ξtar = 0.5%) show lower spectral ordinates than SHAKE91 at short periods (< 0.13 s) and the identical spectral ordinates at higher periods. The effect of full Rayleigh damping versus simplified Rayleigh damping is typically restrained to short periods and, in this example, relatively small. The simplified Rayleigh damping results are lower than the other solutions (SHAKE91 and/or D-MOD_2 with full Rayleigh damping) at short periods. D-MOD2000 - Page No. 164 Concluding Remarks In general, use of the full Rayleigh damping formulation, calibrated against SHAKE91 analysis, is recommended. However, for many practical situations (e.g., evaluation of soil liquefaction potential; Newmark-type seismic displacement analysis; site response of shallow soil profiles), simplified analysis with n set to 0 and ξtar to 0.5% should suffice. D-MOD2000 - Page No. 165 D-MOD2000 - Page No. 166 Appendix D - Conversion Factors D-MOD2000 - Page No. 167 D-MOD2000 - Page No. 168 To convert from Inches (in) Feet (ft) Meters (m) Length To Feet Centimeters Meters Inches Centimeters Meters inches feet centimeters Multiply by 0.083333 2.54 0.0254 12.0 30.48 0.3048 39.370079 3.2808399 100 Area To convert from Square meters (m2) Square feet (ft2) Square centimeters (cm2) Square inches (in2) To convert from Cubic centimeters (cm3) Cubic meters (m3) Cubic inches (in3) Cubic feet (ft3) To Square feet Square centimeters Square inches Square meters Square centimeters Square inches Square meters Square feet Square inches Square meters Square feet Square centimeters Multiply by 10.76387 10000 1550.0031 0.09290304 929.0304 144 0.0001 0.001076387 0.1550031 0.00064516 0.0069444 6.4516 Volume To Cubic meters Cubic feet Cubic inches Cubic feet Cubic centimeters Cubic inches Cubic meters Cubic feet Cubic centimeters Cubic meters Cubic centimeters Cubic inches Multiply by 1 x 10⁶ 3.5314667 x 10⁻⁵ 0.061023744 35.314667 1000000 61023.74 1.6387064 x 10⁻⁵ 5.787037 x 10⁻⁴ 16.387064 0.028316847 28316.847 1728 Force To convert from Pounds (lb) Kips To grams kilograms Tons (short) kips Newtons Pounds D-MOD2000 - Page No. 169 Multiply by 453.59243 0.45359243 5 x 10⁻⁴ 1 x 10⁻³ 4.44822 1000 Tons (short) (T) Kilograms (kg) Kilonewtons (kN) To convert from Pounds/square foot (lb/ft2) Pounds/square inch (lb/in2) Tons (short)/square foot (T/ft2) Kips/square foot (ksf) Kilograms/square centimeter (kg/cm2) Atmospheres Tons (short) kilograms kilograms pounds Kips grams pounds Tons (short) kips newtons pounds Tons (short) kips kilograms Stress and Pressure To Pounds/square inch Kips/square foot Kilograms/square centimeter Tons/square meter atmospheres Kilonewtons/square meter (kilopascals) Pounds/square foot Kips/square foot Kilograms/square centimeter Tons/square meter atmospheres Kilonewtons/square meter atmospheres Kilograms/square meter Pounds/square inch Pounds/square foot Kips/square foot Kilonewtons/square meter Pounds/square inch Pounds/square foot Tons (short)/square foot Kilograms/square centimeter Kilonewtons/square meter Pounds/square inch Pounds square foot Feet of water (4oC) Kips/square foot Tons/square meter atmospheres Kilonewtons/square meter bars Kilograms/square centimeter D-MOD2000 - Page No. 170 0.5 453.59243 907.18474 2000 2 1000 2.2046223 11.023113 x 10⁻⁴ 2.2046223 x 10⁻³ 9.80665 224.81 0.1124 0.22481 101.97 Multiply by 0.0069445 1 x 10⁻³ 0.000488243 0.004882 4.72541 x 10⁻⁴ 0.04788 144 0.144 0.070307 0.70307 0.068046 95.76 0.945082 9764.86 13.8888 2000 2.0 95.76 6.94445 1000 0.5 0.488244 47.88 14.223 2048.1614 32.8093 2.0481614 10 0.96784 98.067 1.0133 1.03323 Kilonewtons/square meter (kPa) To convert from Grams/cubic centimeter (g/cm3) Kilograms/cubic meter (kg/m3) Pounds/cubic inch (lb/in3) Pounds/cubic foot (lb/ft3) Kilonewtons/cubic meter (kN/m3) Grams/square centimeter Kilograms/square meter Pounds/square foot Pounds/square inch Tons (short)/square foot Kilonewtons/square meter Pounds/square foot Pounds/square inch Tons (short)/square foot Meters of water Kips/square foot Kilograms/square centimeter Bars MegaPascals atmospheres 1033.23 10332.3 2116.22 14.696 1.0581 101.325 20.886 0.145 0.01044 0.1020 0.02089 0.01020 0.01 0.001 0.00987 Unit Weight To Kilograms/cubic meter Pounds/cubic inch Pounds/cubic foot Kilonewtons/cubic meter Grams/cubic centimeter Pounds/cubic inch Pounds/cubic foot Kilonewtons/cubic meter Grams/cubic centimeter Kilograms/cubic meter Pounds/cubic foot Kilonewtons/cubic meter Grams/cubic centimeter Kilograms/cubic meter Pounds/cubic inch Kilonewtons/cubic meter Grams/cubic centimeter Kilograms/cubic meter Pounds/cubic inch Pounds/cubic foot Multiply by 1000.0 0.036127292 62.427961 9.8039 0.001 3.6127292 x 10⁻⁵ 0.062427961 9.80584 x 10⁻³ 27.679905 27679.905 1728 271.37 0.016018463 16.018463 5.78703704 x 10⁻⁴ 0.157099 0.1020 101.98 0.003685 6.3654 Velocity To convert from Centimeter/second (cm/sec) Feet/second (fps) Meters/second (m/sec) Feet/minute To Meters/second Feet/second Feet/minute Meters/second Feet/minute Centimeters/second Feet/second Feet/minute Centimeters/second Centimeters/second D-MOD2000 - Page No. 171 Multiply by 0.01 0.032808399 1.9685039 0.30479999 60.0 30.48 3.2808399 196.850394 100.0 0.508001 Meters/minute D-MOD2000 - Page No. 172 0.3048