1
ENGLISH
OWNER’S MANUAL
DIGITAL SIGNAGE MEDIA
PLAYER
Please read this manual carefully before operating
your set and retain it for future reference.
DIGITAL SIGNAGE MEDIA PLAYER MODEL
NC2000
www.lge.com
CONTENTS
Product Information
NC2000 Specifications..............................4
About SuperSign Manager......................23
General specifications.................................... 4
Multi I/O port................................................... 4
Operational Specifications............................. 4
How to Install SuperSign Manager..........24
NC2000 Components................................5
Basic Components......................................... 5
Name and Functions of
Each Part (NC2000)..................................6
Back Panel..................................................... 6
How to Install
NC2000 Connection..................................7
SuperSign Solution
What is SuperSign?..................................8
Display........................................................... 8
Media Player.................................................. 8
Software......................................................... 8
SuperSign Player
SuperSign Player Settings........................9
Log-in to Setting Menu................................... 9
Network Settings.......................................... 10
Screen setting.............................................. 15
Password..................................................... 16
EWF............................................................. 17
Initialize S/W................................................ 18
Regional and Language Options Settings.19
Regional and Language Options Settings.... 19
SuperSign Player Functions....................20
Signage Mode (Video Playback Mode)........ 20
Tray Icon Description................................... 21
Tray Icon Menu............................................ 22
Viewing SuperSign Player Summary
Information................................................... 22
2
SuperSign Manager
Product Information...................................... 23
System Requirements.................................. 24
Installing the Program.................................. 25
Installing SuperSign Manager...................... 26
Uninstalling the program.............................. 29
Starting SuperSign Manager...................31
Starting SuperSign Manager........................ 31
Logging In.................................................... 31
Selecting Players......................................... 32
Setting Canvas............................................. 33
Selecting Templates or Layouts................... 34
SuperSign Manager Overview..................... 35
Contents Edit...........................................36
Overview...................................................... 36
Checking details........................................... 37
Changing Layouts........................................ 39
Changing Templates..................................... 40
Using Library................................................ 41
Creating Contents........................................ 44
Setting Timeline............................................ 53
Distributing Completed Content................... 55
Content Properties/Tool................................ 57
Schedule.................................................62
Overview...................................................... 62
Properties and Tool windows....................... 63
Setting schedules......................................... 64
Copying Schedules...................................... 65
Deleting Schedules...................................... 66
Distributing Schedules................................. 66
Management...........................................67
Overview...................................................... 67
Manage Functions........................................ 68
Creating Tile Mode....................................... 71
Other features.............................................. 74
Appendix
Frequently Asked Questions (FAQs).......77
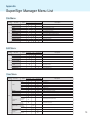
SuperSign Manager Menu List................79
File Menu..................................................... 79
Edit Menu..................................................... 79
View Menu.................................................... 79
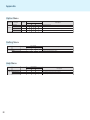
Option Menu................................................. 80
Setting Menu................................................ 80
Help Menu.................................................... 80
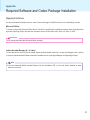
Required Software and Codec Package
Installation...............................................81
Required Software....................................... 81
Codec Package Installation.......................... 82
Files Supported by SuperSign..................... 82
Microsoft Windows Embedded Standard
Limitations...............................................83
Swap Displays.........................................84
SMTP Email Setting................................85
3
Product Information
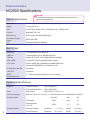
NC2000 Specifications
Attention
General specifications
● The product specifications may change without prior notice to
improve the performance.
Dimensions
250 mm (W) x 43 mm (H) x 205mm (D) (only Set)
Weight
1.43 kg (only Set)
CPU
Intel ATOM Processor 330 1.6 GHz(Dual Core), FSB 533 MHz
Chip Set
Nvidia MCP7A-I ON
Main Memory
DDR3 1066 1024 MB SODIMM type
Secondary Storage
Device
SATA SSD 8 GB
O/S
Windows Embedded Standard
Multi I/O port
Serial Port
One external RS-232 Serial port
USB Port
Hi-Speed USB 2.0 port 480 Mbps rate (x5)
LAN Port
Realtek RTL8103E 10/100 Mbps Ethernet controller
VGA / HDMI
Nvidia MCP7A-ION integrated Graphic chipset
4-in-1 Card
Secure Digital (SD) / MultiMedia Card(MMC/MMC4.0) /
Memory Stick(MS/MS-Pro) / xD Memory Card
PCI Express Card Slot
Supported
LINE OUT
Supported
SPDIF
(Digital audio out)
5.1 Channel supported (Depend on source signal)
Operational Specifications
Resolution
Maximum Resolution
1920 x 1080 @ 60 Hz
Recommended Resolution
1920 x 1080 @ 60 Hz
Power
Rated Voltage
AC 100-240 V~, 50 / 60 Hz, 1.2 A
Sound output Wattage
RMS Audio Output 10 W + 10 W (R + L) : When connected to the monitor (Model Name : M4224C)
Operating Condition
Operating Conditions
4
Sync (H/V)
Video
LED
Normal Mode
On/On
Active
On
Deep Sleep Mode
(Set = Off)
Off/Off
Off
Off
5 ℃ to 35 ℃
humidity
10 % to 80 %
-20 ℃ to 60 ℃
humidity
5 % to 95 %
Operating Conditions
Temperature
Storage Conditions
Temperature
Product Information
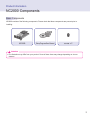
NC2000 Components
Basic Components
NC2000 consists of the following components. Please check that these components are present prior to
installing.
NC2000
Setup Program/User Manual
screw x 2
Attention
● The illustration may differ from your product. Some of these items may change depending on circumstances.
5
Product Information
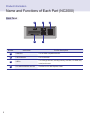
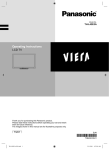
Name and Functions of Each Part (NC2000)
Back Panel
Number
6
A
B
D
C
C
each screen
Function Descriptions
A
HDMI Out
For an HDMI-compatible monitor.
B
LAN Connector
For a LAN cable.
C
USB In
For USB-type devices, including memory, hard disk, CD-ROM, Keyboard, and mouse.
D
PCI MINI EXPRESS card slot
Provided for PCI Mini Express Cards.
How to Install
NC2000 Connection
We recommend you to use the items provided with your NC2000 and follow our instructions for integrating
the product with your monitor in order to ensure the correct results.
Attention
● The monitor illustrations shown above to guide your integration may differ from your product.
1
Remove the screw.
2
Attach the Box Guide to the rail slots, and press it upward.
3
Use screws to secure the player and the Box Guide as shown below.
7
SuperSign Solution
What is SuperSign?
SuperSign is a digital signage solution that was developed exclusively by LG Electronics. The LG SuperSign
solution offers display, media player (hardware and software), and management programs.
Component
LG
Display
Media player
LG SuperSign Solution
Software
Note
● Digital Signage Solution is a network-based digital signage communication program. These new advertising
media can be used in various places such as commercial and public facilities, airports, and schools,
depending on the ad content and location characteristics.
Display
Display is connected to the media player and used to show advertising videos. SuperSign Solution supports most
LCD monitor display products supporting LG RS-232C protocols. The brightness, resolution, sound, and other
features of an LG RS-232C protocols-enabled monitor can be controlled by the SuperSign Manager software.
Note
● Display types and their controllable range are listed in the Appendix to this document.
Media Player
SuperSign Solution's media player includes the NC2000 hardware as well as its software.
Software
SuperSign Solution provides the SuperSign Manager software, an all-in-one management program that is
used to control the display and the media player, as well as create and distribute media.
Note
8
● More information on SuperSign Manager is available in the SuperSign Manager section of this document.
SuperSign Player
SuperSign Player Settings
SuperSign Player can be customized for multiple users.
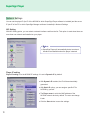
Log-in to Setting Menu
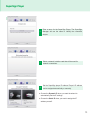
1
To use the SuperSign Player setting menu, right click on the SuperSign Player (
the Windows taskbar. Its pop-up menu will appear as shown below.
) icon located on
2
Click Setting to display the password entry screen.
3
Type in your password and click OK to view the <SuperSign Player Menu> as shown below.
Note
● The SuperSign Player's default password is set to "0000".
● You can change the password by yourself. For details on password setting, refer to Password of this document.
9
SuperSign Player
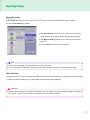
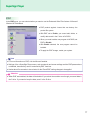
Network Settings
You can set the player IP (the IP of the NC2000 in which SuperSign Player software is installed) and the server
IP (the IP of the PC in which SuperSign Manager software is installed) in Network Settings.
NIC Setting
With NIC Setting option, you can select a network interface card from the list. This option is used when there are
more than one network card installed on your player.
Note
● SuperSign Player will automatically detect a network
interface card available when the player is started.
Player IP setting
Player IP setting is for the NC2000 IP settings. It is set to Dynamic IP by default.
● With Dynamic IP enabled, the IP will be automatically
generated.
● With Static IP option, you can assign a specific IP for
NC2000 by yourself.
● The Player name is set to the MAC address of the
NC2000 network device by default. The user can change
it later.
● Click the Save button to save the settings.
10
SuperSign Player
Server IP setting
In the Server IP setting you can set the IP of the PC (server) in which SuperSign Manager is installed.
It is set to Auto Setting by default.
● With Auto Setting selected, the IP of the server using the
same network as the player will be automatically assigned.
● With Manual Setting selected, you can choose a specific
server IP.
● Click the Save button to save the settings.
Note
● Only IPv4 is supported in the player and the server IP settings.
● If you entered the IP manually, and the network is disconnected, check the IP address and try again.
Wizard Setting
SuperSign Solution now provides SuperSign Network Setup Wizard that guides you through the steps necessary
to configure network settings on your SuperSign Player and SuperSign Manager.
Attention
● Before continuing with the wizard, please make sure you already have a SuperSign Manager installed on
your server. If not, this wizard may not setup network connections correctly.
11
SuperSign Player
Follow the steps below to setup network connections by using the wizard.
1
Select the network environment that you want to use to connect to SuperSign Manager and SuperSign
Player.
● Choose the LAN when the SuperSign Manger and the
SuperSign player are connected to the same network.
● Choose the WAN when the SuperSign Manger and the
SuperSign player are connected to the different networks.
Note
● If the default gateway address and the subnet mask set to the SuperSign Manager are same as the
SuperSign Player, they are connected to the same network.
● Here is how to find the default gateway address and subnet mask set to your SuperSign Manager.
Go to the desktop of the server on which the SuperSign Manager is installed.
1. Click Start > Control Panel.
2. On the control panel, double-click Network Connections.
3. Right-click Local Area Connection.
4. Click Properties.
5. Select Internet Protocol (TCP/IP), and then click Properties.
6 < Internet Protocol (TCP/IP) Registration Information> dialog box appears.
7. Check the default gateway address and the subnet mask.
● For SuperSign Player network settings, see SuperSign Player Settings > Network Settings in this
document.
12
SuperSign Player
2
Enter a name for the SuperSign Player. The SuperSign
Manager will use the name to identify the connected
players.
3
Select a network interface card that will be used for
network connections.
4
Set the SuperSign player IP address. Player's IP address
can be assigned automatically or manually.
● Choose the Dynamic IP when you want the wizard to
automatically set the IP settings.
● Choose the Static IP when you want to assign the IP
address yourself.
13
SuperSign Player
5
Set the IP address for the server on which the SuperSign
manager is installed. Server's IP address can be assigned
automatically or manually.
● Choose the Auto Setting when you want the wizard to
automatically assign the IP address to the server.
● Choose the Manual Setting when you want to assign the
IP address yourself.
6
Connection will be made if the player is connected with a
network cable properly. To complete the network connection, move to SuperSign Manager and select Option >
Start search in the File menu. Please check the connection to players by running "Start search".
Attention
● If the network setting is failed with an error, make sure that the server and player are connected to the
network and try again.
14
SuperSign Player
Screen setting
In the Screen setting menu, you can choose the screen view type. The type is set to Landscape by default.
● Select Landscape when you place the monitor horizontally.
● Select Portrait when you place the monitor vertically.
15
SuperSign Player
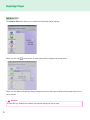
Password
In Password menu, you can set a password to access the SuperSign player menus.
Settings
You can choose whether you want to use a password when entering the SuperSign Player menu.
● If you select Enable, you must type in your password to use the SuperSign Player Menu.
● If you select Disable, you can use the SuperSign
Player Menu without entering the password.
Change
You can change the password required for the SuperSign Player Menu. The password should be a four-digit
number. You will then have to use your new password to launch the SuperSign Player Menu.
Enter a new password in Change menu and click the
1
OK button.
Verify menu will be activated.
In the Verify menu, re-enter the same password you
2
used in the Change menu. Save the change by clicking
the OK button.
3
16
This will display the message: "Your password has been
changed."
SuperSign Player
EWF
In the EWF menu, you can select whether you want to use the Enhanced Write Filter feature of Microsoft
Windows XP Embedded.
● EWF protects against viruses that can destroy the
product file system.
● With EWF set to Enable, you cannot add, delete, or
modify data saved in the C drive of NC2000.
● When you need to add a new program to NC2000, set
EWF to Disable.
● With Enable selected, the new program cannot be
installed.
● To apply the EWF change, restart your system.
Note
● For more information on EWF, visit the Microsoft website.
● Settings of the <SuperSign Player menu> such as network and screen settings and the EWF password are
not deleted, because they are not controlled by EWF functions.
● It takes about five seconds to two minutes for the IP and EWF setting changes to be applied.
Attention
● When EWF was enabled, the data will be deleted if you reboot the machine even though you saved data in
the C drive. If you want to keep the data, save it in the D drive.
17
SuperSign Player
Initialize S/W
The Initialize S/W menu allows you to initialize the SuperSign Player settings.
When you click the
on the menu, an alert window will be displayed as shown below.
When you click Yes, the SuperSign Player settings will return to the same conditions that existed at the time of
your purchase.
Attention
● Even after you initialize the software, the network settings will not be reset.
18
SuperSign Player
Regional and Language Options Settings
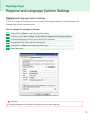
Regional and Language Options Settings
If you want to change the language, you can use <Regional and Language Options> of Microsoft Windows XP
Embedded, the NC2000's Operating System.
You can change the language as follows:
1
Change EWF to Disable on the SuperSign Player Menu.
2
In Windows, select Start > Setting > Control Panel > Regional and Language Options.
3
Choose the language you want to use as shown in the illustration.
4
Re-install SuperSign Player with the new language.
5
Change EWF to Enable on the SuperSign Player Menu.
6
Reboot the system.
Attention
● SuperSign Manager and SuperSign Player should use the same language.
19
SuperSign Player
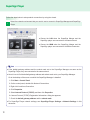
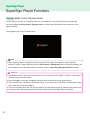
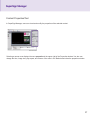
SuperSign Player Functions
Signage Mode (Video Playback Mode)
With NC2000 on and set up, SuperSign Player runs automatically. Then SuperSign Player automatically
executes the Play schedule feature. Signage mode is for playing pre-distributed videos based on the assigned schedule.
The Signage mode screen is shown below.
Note
●W
hen SuperSign Player is restarted, ad content is automatically played according to the last transferred
schedule. However, content distributed from the Edit contents or Management menu of SuperSign Manager will
not auto-played, even if SuperSign Player is restarted. Check out SuperSign Manager Schedule for details.
Attention
● The playback may be slow when more than two Full HD videos (H.264, MPEG-2, WMV) or other types of
media are played simultaneously.
● When messages or texts are overlapped with more than two videos, this may cause blinking.
● The PowerDVD SE is included in SuperSign Player. If you remove the PowerDVD from SuperSign Player,
quick video play will not be available.
● If you use Transition Effect onto Full HD-level pictures or more than two pictures, playback may become slow.
● A change to the Windows Standard Timeline will be applied after SuperSign Player is restarted.
20
SuperSign Player
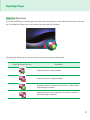
Tray Icon Description
If you click the ESC key on the Signage mode while videos are playing, the video will pause and move to the desktop. The SuperSign Player tray icon is located in the lower right of the desktop.
The SuperSign Player tray icon shows the server connectivity status as shown below.
SuperSign Player Tray Icon
Description
SuperSign Player is being installed.
SuperSign Player is being uninstalled.
SuperSign Player is connected to the server in which SuperSign Manager is installed.
SuperSign Player is not connected to the server in which SuperSign Manager is installed.
21
SuperSign Player
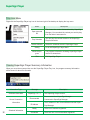
Tray Icon Menu
Right-click the SuperSign Player tray icon in the lower right of the desktop to display the tray menu.
Menu
Description
Open exported
file
This shows the content list transferred by SuperSign
Manager. You can select the content you want to play
from the folder it was saved in.
Play Schedule
You can play the content based on the SuperSign
Player's schedule.
Delete schedule
Setting
About the program
Exit
Delete the schedule stored in SuperSign Player.
Go to the SuperSign Player Menu.
The program information including SuperSign Player
version is shown here.
Exit SuperSign Player
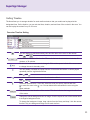
Viewing SuperSign Player Summary Information
When you move the mouse pointer over the SuperSign Player Tray icon, the program summary information
will be shown for about five seconds.
Information Type
Software information
Server Connection
information
22
Schedule information
Message
SuperSign 1.0.1.1
Disconnected
IP Address
Ready
Scheduled
Description
The SuperSign Player version.
Disconnected from SuperSign Manager.
Connected to SuperSign Manager
The IP address of the connected/disconnected SuperSign Manager
There is no schedule registered.
There are one or more schedules registered.
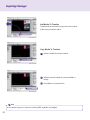
SuperSign Manager
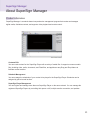
About SuperSign Manager
Product Information
SuperSign Manager is a network-based comprehensive management program that creates and manages
digital media, distributes content, and supports video playback and remote control.
Contents Edit
You can create content for the SuperSign Player with a variety of media files. It supports numerous media
files, including video, audio, documents, and Flash files, and applies an easy Drag and Drop feature to
facilitate content creation.
Schedule Management
You can manage the schedules of your content to be played in the SuperSign Player. Schedules can be
assigned by period as well as time.
SuperSign Player Management
You can register and manage more than one SuperSign Player on the same network. You can manage the
registered SuperSign Players by controlling their power on/off, multiple monitor connection, and updates.
23
SuperSign Manager
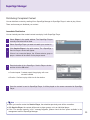
How to Install SuperSign Manager
The SuperSign Manager is supplied with the NC2000. Insert the CD included in the NC2000 package into your
PC and install SuperSign Manager.
System Requirements
SuperSign Manager PC Recommended Specifications
Accessories
Requirements
CPU
2.5 GHz Core 2 Duo L2 Cache 2 MB or higher
RAM
2 GB or higher
HDD
250 GB or higher
Network
100 Mbps or higher
OS
Windows XP sp3 or Window 2003 Server
Graphics card memory
512 MB or higher
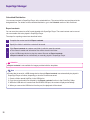
SuperSign Manager PC Minimum Requirements
Accessories
Requirements
CPU
2.0 GHz L2 Cache 512 KB or higher
RAM
1 GB or higher
HDD
40 GB or higher
Network
10 Mbps or higher
OS
Windows XP sp2 or higher
Graphics card memory
512 MB or higher
Note
● SuperSign Manager basically supports Windows XP (32-bit), Windows 2003 Server (32-bit), and Windows
VISTA (32-bit) only. The program cannot be run on operating systems other than these.
24
SuperSign Manager
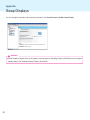
Installing the Program
When the CD provided in the NC2000 package is inserted into a PC, the installation program will run
automatically as shown below.
A
B
C
D
A
User's Guide
Guide for the SuperSign Solution users.
B
Safety Precautions
Safety instructions about the program.
C
SuperSign Program
Installation
Installation is initiated by clicking SuperSign Manager.
D
Regulatory
Appropriate regulations for each country.
Note
● If the autostart is not working, open the window manually by double clicking the file SupersignManager_
setup.exe in the CD-ROM Drive:\SuperSign\SuperSign Software\Application\SuperSign Manager\
directory of the CD.
25
SuperSign Manager
Installing SuperSign Manager
When the CD provided in the NC2000 package is inserted into a PC, the installation program will run
automatically.
Follow the steps below to install the SuperSign Manager.
26
1
Click Run in the Download file pop-up window.
2
Click Run in the Security warning pop-up window.
3
Select the language and then click OK to continue.
4
After reviewing the installation instruction, click Next to
continue.
SuperSign Manager
5
If necessary, change the installation path to the directory where you want to install SuperSign Manager.
Click Next to continue.
6
Installation is initiated. Click Details to see the detailed
installation process information during installation.
7
During the installation process, Adobe AIR installer will
run to install it.
Click Agree to install Adobe AIR. You must install Adobe
AIR to use SuperSign Manager properly.
27
SuperSign Manager
8
Click Complete to finish the installation of Adobe AIR.
9
Adobe Flash Player Active X installation is initiated. Click
Close when the installation of Adobe Flash Player Active
X ends.
10
After SuperSign Manager installation is complete, Click
Finish to exit the installation.
Note
● When you re-install the program without uninstalling it, you can preserve the data or initialize the system.
● If you use the Windows Vista operating system, you should log on as an Administrator. Otherwise, you
cannot install the program.
28
SuperSign Manager
Uninstalling the program
To uninstall SuperSign Manager, Click Start > Program > SuperSign Manager > Remove SuperSign Manager.
Follow these steps to uninstall SuperSign Manager.
1
Click Remove to start the un-installation of SuperSign
Manager.
2
Click Details to see the detailed un-installation process
information during un-installation.
29
SuperSign Manager
3
After SuperSign Manager uninstallation is complete,
Click Finish to exit the un-installation.
Note
● SuperSign Manager can be uninstalled using Add or Remove Programs in Control Panel.
1. Windows XP, Windows 2003 Server
S
elect SuperSign Manager in Start > Settings > Control Panel > Add or Remove Programs, Click
Remove.
2. Windows VISTA
S
elect SuperSign Manager in Start > Settings > Control Panel > Programs and Features > Uninstall
or change a program, Click Remove.
Attention
● All data created by the user will be deleted when the program is uninstalled.
30
SuperSign Manager
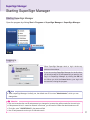
Starting SuperSign Manager
Starting SuperSign Manager
Open the program by clicking Start > Programs > SuperSign Manager > SuperSign Manager.
Logging In
1
When SuperSign Manager starts, a log-in window appears as shown below.
2
If you are running SuperSign Manager for the first time,
you should create an ID and password you want to use.
Log in to SuperSign Manager by clicking the OK button. When you click the Cancel button, your log-in will
be canceled, closing the program.
Note
● When SuperSign Manager is initially run, the default user ID is set as "Administrator", which you can
change later.
Attention
● You must remember the new ID and password you changed to, because they will be needed for the next log-in.
● If the password is lost, it cannot be restored. In that case, you will need to initialize the administrator account.
● To do this, enter "1234567890init" in the password field.
● Your ID and password can be up to 20 characters each.
31
SuperSign Manager
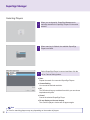
Selecting Players
1
When you are signed in, SuperSign Manager automatically searches for SuperSign Players on the same
network.
2
When scanning is finished, the available SuperSign
Players are listed.
3
Select SuperSign Player to connect and then click the
OK or Canvas Setting button.
● Scan
Repeat the search for connected SuperSign Players.
● Canvas Setting
You can set the desired resolution.
● OK
The OK button brings up a window from which you can choose
templates and layouts.
● Cancel
Cancel the selected SuperSign Player.
● Do not display on the next startup.
The <Select a player> window will not appear again.
Note
32
● Time for searching players may vary depending on the number of players.
SuperSign Manager
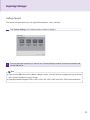
Setting Canvas
The canvas is a space where you can import and edit photos, videos, and texts.
1
Click Canvas Setting in the <Select a player> window to display it.
2
You can select the resolution you want in the <Canvas Setting> window. Choose the resolution and
click the OK button.
Note
● If you click the OK button on the <Select a player> screen, <Canvas Setting> is skipped and you go directly
to the <Select Template or Layout> screen.
● SuperSign basically supports 1920 x 1080, 1360 x 768, 1080 x 1920, and 768 x 1360 monitor resolutions.
33
SuperSign Manager
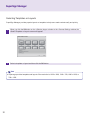
Selecting Templates or Layouts
SuperSign Manager provides popular layouts or templates to help users make content easily and quickly.
1
When you click the OK button on the <Select a player> window or the <Canvas Setting> window, the
<Select Template or Layout> screen will appear.
2
Select a template or layout and then click the OK button.
Note
● SuperSign provides templates and layouts if the resolution is 1920 x 1080, 1360 x 768, 1080 x 1920, or
768 x 1360.
34
SuperSign Manager
SuperSign Manager Overview
A
B
C
D
Index
Item
Description
A
File Menu
The major features of SuperSign Manager are listed here.
B
Top Menu
With tab menus, content editing, content play schedule setting, system management are done here
C
Workspace
Content editing, playback schedule setting, and player management are done
here.
D
Hide button
If you click the Hide button, the window not in use will be displayed or hidden.
35
SuperSign Manager
Contents Edit
SuperSign Manager provides a media content editor.
You can create content and play it in SuperSign Player with this content editor.
Overview
Content editing and various other features are available under Contents Edit in the top menu.
A
B
H
C
G
F
E
D
36
Index
Item
Description
A
File Menu
The major features of SuperSign Manager are listed here.
B
Top Menu
With tab menus, content editing, content play schedule setting, system management
are done here.
C
Media
window
You can view items registered in the templates and the media library. The SuperSign
Player's registered information is available here.
D
Quick
Menu
Popular content-editing features are displayed for quick search.
E
Timeline
Intuitive timeline is provided to allow editing the time and order per zone.
Timeline allows you to arrange duration for each media content so that your media
can be played at the designated time. Start time, duration, and end time of the zone
can be set.
F
Canvas
The canvas is a space where you can import and edit photos, videos, and texts.
You can divide the canvas zone and apply a different layout in each section. By
overlapping many images in the divided sections in different timeline, you can create
multiple image layers.
G
Tool
window
You can change the properties of the selected zone or media. Use this to change
background color or image properties.
H
Properties
Displays the properties of the selected zone or media. Information about the connected SuperSign Player and the resolution of the zone is displayed.
SuperSign Manager
Checking details
A
B
C
D
Index
Description
A
Canvas file name and resolution.
B
Buttons for creating zones and text boxes.
Create a zone on the canvas. Click the Zone button and then click on the
canvas to create a zone.
Create a text box on the canvas. Click the Text button and then click on the
canvas to create a text box.
C
Scroll bar that is used to zoom the canvas screen in or out.
The screen size is controlled by moving the bar or entering a number in the field. The unit for
the screen size adjustment is 10.
Note
● What is a zone?
A SuperSign Manager zone is an area on the canvas in which media or a layer is placed while the content
is being edited. You can create a zone by combining different types of media items and create an ad by
including another zone or zones (A zone can accommodate only one type of media). The zone can include
photos, documents, webpages, videos, Flashes, music, and more. Because each zone is a separate area,
it has its own properties and can be deleted or inserted easily. Also, ad content is easily created by
dragging and dropping onto the canvas.
37
SuperSign Manager
Number
D
Description
Quick menus that allows using popular content-editing features.
You can preview your content before playing it with SuperSign Player.
This allows users to preview the content being edited within the canvas
prior to exporting it to SuperSign Player.
You can transfer your content to SuperSign Player that is on the same
network as SuperSign Manager.
Stop playing the content currently playing on the player.
Attention
● Make sure that the Office program should be closed before previewing the Office files.
● Office or web files may not be displayed in the edited order (Z-order).
● To repeat SWF files, you should set them to repeatedly play.
Note
● Content file names can include letters, numbers, and special characters such as @, #, $, %, [, ] and { ,}.
38
SuperSign Manager
Changing Layouts
You can change layouts to suit your needs.
1
Click Template > Layout in the left part of the SuperSign Manager screen.
2
This will display the layouts registered in the media library.
3
Double-click on a new layout.
4
It will be shown on the canvas.
Attention
● If you change the layout, the content you are editing will be lost. Please save it before changing the layout.
39
SuperSign Manager
Changing Templates
As with layouts, you can change templates to suit your needs.
1
Click on Template in the left part of the SuperSign Manager screen.
2
This will display the templates registered in the media library under different categories. The categories
include Bar/Restaurant, Shopping Mall, and Public Organizations.
3
Double-click on a new template. This example explains how to change an existing template to a
shopping mall template. (Double-click the shopping mall.)
4
The selected template will appear on the canvas.
Attention
40
● If you change the template, the content you are editing will be lost. Please save it before changing the
template.
SuperSign Manager
Using Library
The media library is used to enroll media files needed for media content production, and to use services,
including websites, RSS, and Widget.
To register media files in the media library, click the Library tab on the media window in the left part of the
SuperSign Manager screen.
Note
● A video thumbnail is picked randomly from the middle frames of the file.
● If a video cannot be uploaded, check the required codecs from the Codec Package Installation in the
Appendix section.
41
SuperSign Manager
The library is divided into media and service as shown below.
Add a media file
You can add photos, videos, Flashes, music, PDF, and MS Office files on the media tab.
To add media, click
on the media tab.
After you select the file from the Select Files window and click the Open button, the media file will be
registered in the library as shown below.
In addition to photos, the same process can be used to register videos, Flashes, music, and PDF/MS Office
files.
Attention
● Please note that when a media file is deleted from the AutoUpload folder, it will also be removed from
the library.
Note
42
● Registered media files are automatically saved in the AutoUpload folder in the folder containing SuperSign
Manager. For example, C:\Program Files\SupersignMgr\AutoUpload
● Once registered, a media file will be automatically enrolled in the library whenever SuperSign Manager is run.
● To change the library folder, click Options > Contents Edit in the file menu and select the "Local media library
folder information" field.
● By setting the Sync (Auto-upload) cycle in the Options > Contents Edit under the file menu, your library's media
files will be automatically uploaded at every designated time. To start the Auto-upload process, click the Start
sync button.
SuperSign Manager
Add service contents
You can use SuperSign Manager to add online content such as websites, RSS feeds, and widgets, as well as
their date and time.
Click Library > Service on the media window to launch the menu for adding content as shown below.
Note
● Service contents cannot be saved together with media files in the library.
● For details on adding content, refer to the Create contents section of this document.
43
SuperSign Manager
Creating Contents
Follow these steps to create contents:
44
1
Select Template or Layout
Select a layout or template to display various media on the screen. The example shows the layout set
to None. For specific information on how to change layout, refer to Changing layouts or Changing
templates section of this document.
2
Register Media in Library
To use a media file, you first need to register it in the library. Register a media file as described in the
Using Library section of this document.
SuperSign Manager
3
Display Media
You can exhibit media such as photos, videos, music, PDF, and MS Office files registered in the library.
There are two ways to display media on the canvas.
Add Media to Zone
1
Click the Zone button in the upper right of the screen.
Keep the zone button on.
2
Move the mouse pointer onto the desired location
within the canvas and click.
The zone is created as shown below.
3
Drag and drop a media file already registered in the
library.
4
The media will be added to the zone.
45
SuperSign Manager
Drag Media
You can directly display media files.
46
1
To do this, drag and drop a registered media file.
2
The file will be displayed on the canvas as shown below.
You will also see that a new zone is automatically
created. The size and location of the new zone can be
freely adjusted.
SuperSign Manager
4
Display Service Content
You can use SuperSign Manager to add online content such as websites, RSS feeds, and widgets, as
well as their date and time.
To add service content, click Library > Service on the media window.
Add Websites
1
To add a website, enter a URL you want to add and then
click the Add button.
The website zone will be added on the canvas.
2
Move the new website zone to the desired location. Click
the Preview button from the quick menus. You will see the
website added as shown below.
47
SuperSign Manager
Add RSS Feeds
1 To add an RSS feed, enter a URL you want to add and
click the Add button.
The RSS feed zone will be added on the
canvas.
Note
● The service and text zones can include only one item each.
● RSS stands for Really Simple Syndication, and is defined as a format used to publish frequently updated
works. Using RSS reader software, users can subscribe to receive timely updated content provided by their
favorite sites in an RSS-compatible format.
2 Display the RSS feed zone on the desired location
on the canvas. Click the Preview button from the
quick menus to see the screen with RSS content
added.
48
SuperSign Manager
Add Widgets
1
To add widgets, enter a widget code and then click the Add
button.
The widget zone will be added on the canvas.
Note
● Widgets are small icons linked to frequently used services that users can run without opening a web
browser.
2
Display the widget zone on the desired location on the
canvas. Click the Preview button from the quick menus to
see the screen with Widget content added.
49
SuperSign Manager
Add Dates
1 To add dates, click Add Date in the Date/
Time zone.
The date zone will be added.
2 Move the new date zone to your desired
location. Click the Preview button from the
quick menus to see the screen with the added
time information.
50
SuperSign Manager
Add Times
1
To add times, click Add Time in the Date/
Time zone.
A time zone will be added.
2 Move the new time zone to your desired
location. Click the Preview button from the
quick menus to see the screen with the added
time information.
51
SuperSign Manager
Copy Zones
A zone on the canvas can be copied and pasted to other spaces.
1
To do this, first select the zone you want to copy.
2
Click Edit > Copy in the file menu, or press Ctrl + c to copy the selected zone.
3
Click Edit > Paste in the file menu, or press Ctrl + v to paste the selected zone onto the canvas.
Note
● If you copy a zone, its properties and the media in it will be copied as well.
52
SuperSign Manager
Setting Timeline
Timeline allows you to arrange duration for each media content so that your media can be played at the
designated time. On the timeline, you can set start time, duration, and end time of the content in the zone. You
can set to play the content for up to 12 hours.
Overview Timeline Setting
You can display or hide the boundary color and file name of the zone on the canvas.
(On:
, Off:
)
Set the basic time unit of the timeline. Time units that can be selected are 1 minute, 10
minutes, or 30 minutes.
Double-click on the zone name to change it. Click on the square in front of the zone name
to change the zone's boundary color.
You can enable or disable the repeat function. A zone with this feature on will be played
repeatedly until the registered end time.
(On:
, Off:
)
Lock the zone. Locked zones cannot be selected or edited.
(On:
, Off:
)
Delete the selected zone. To do this, select the zone you want to remove and click
or move the zone to the icon. You can delete the media within the zone using the
same methods.
This shows the total duration of the content. This time indicates the longest duration time
of the zones.
Change the canvas background color or image. Click the square in front of the canvas name
to change its background color.
To change the background image, drag a photo from the library and drop it into the canvas
timeline. Only one background image can be used at a time.
53
SuperSign Manager
Add Media To Timeline
To add media to the timeline, drag a file to the timeline
of the zone you want to add to.
Copy Media To Timeline
1
Select a media file from the timeline.
2
With the selected media file, press the Ctrl + c
hotkey.
3
Press Ctrl + v to paste the file.
Note
● You cannot copy text or services, including RSS, websites, and widgets.
54
SuperSign Manager
Distributing Completed Content
You can distribute content by sending it from SuperSign Manager to SuperSign Player in order to play it there.
There are three ways to distribute your content:
Immediate Distribution
You can instantly send the created content to and play it with SuperSign Player.
1
Select Player in the media window. The SuperSign Players
currently connected will be listed.
2
Select SuperSign Player you want to transfer your content to.
3
Click Send to Player in the quick menus. The <SuperSign >
Send to Player> window will appear.
If there is no connected player, the <Please select a group or
player.> window will be shown for the player search.
4
Enter the duration in the <SuperSign > Send to Player> window
and then click the OK button.
● Constant repeat : Constant repeat: Keep playing until a new
schedule is added.
● Duration : Continue to play at this time for the duration.
5
Once the content is sent to SuperSign Player, it will be played on the screen connected to SuperSign
Player.
Note
● When you transfer content via Send to Player, the schedules previously sent will be overwritten.
● With Send to Player, the content will be sent to player groups, not to an individual player.
● If the "The storage capacity is full." message appears, please check the free space available in the
management menu of SuperSign Manager.
55
SuperSign Manager
Scheduled Distribution
You can send content to SuperSign Player at the scheduled time. The content will be sent and played at the
designated time. For details on the scheduled distribution, go to the Schedule section of this document.
Export contents
You can save the content as a file format playable with SuperSign Player. The saved content can be moved
via a removable disk to be played in SuperSign Player.
The steps for exporting content are described below:
1
Complete the content and click Export contents.
2
Specify the folder in which the content will be saved.
3
Click Export contents to create a new folder in which to save the content.
● The content's media and information files will be stored in the folder.
● Use a USB storage device to play the content file sent as Export contents.
● Export contents can be automatically or manually played in SuperSign Player.
Attention
● Export contents is not available for images provided with the templates.
Note
● Content that is saved in a USB storage device through Export contents can automatically be played in
SuperSign Player as follows, depending on how the content was saved.
1. Create a folder named AutoPlay in the USB device.
2. Copy the xml and media files created by the Export contents function to that "AutoPlay" folder.
3. When the USB device is inserted into the NC2000 USB port, the content will play automatically.
4. When you remove the USB device from the port, the playback will be closed.
56
SuperSign Manager
Content Properties/Tool
In SuperSign Manager, users can check and modify the properties of the selected content.
Selecting a canvas zone displays the zone properties in the upper right of the Properties window. You also can
change the time, image size, play repeat, and volume of the zone in the Tool window below the properties window.
57
SuperSign Manager
Content Properties/Tools
Media File
Shows information on
the connected players
and groups.
Shows information on
the connected players
and groups.
Background resolution
Zone infomation
Zone customization
Background customization
Pictures only in the media
library can be used as background.
Changes zone order
(bring to front, bring
forward, send backward,
send to back)
Repeat setting within
canvas
<Background>
<Zone>
Shows information on
the connected players
and groups.
Shows information on
the connected players
and groups.
Shows information about
the selected picture.
Shows information about
the selected video.
Sets a playback time for
the selected picture.
Sets the playback time.
Fit to zone as original
Fit to zone, keeping ratio
Fit to zone as full screen
Fit to zone as original
Fit to zone, keeping ratio
Fit to zone as full screen
Specifies whether to repeat
the playback of the selected
video within the set media
playback time.
Adds special effects to
the picture.
<Photo >
58
Volume control
<Video>
SuperSign Manager
Shows information on
the connected players
and groups.
Shows information on
the connected players
and groups.
Shows information about
the selected flash.
Shows information about
the selected audio.
Sets a flash playback time.
Sets an audio
playback time.
Specifies whether to
repeat the playback of
the selected audio.
Specifies whether to repeat
the playback of the Flash.
Volume control
<Music>
<Flash>
Shows information on
the connected players
and groups.
Shows information about
the selected document.
Sets an PDF playback time.
<PDF/Office>
59
SuperSign Manager
Service
Shows information on
the connected players
and groups.
Shows information on
the connected players
and groups.
Web site to be linked.
Sets the playback time for
the selected web site.
Sets a text playback time.
Changes the web site to
be linked.
Sets the text format to the
selected style.
Sets the direction and
speed of the text movement.
<Text>
<Web site>
Shows information on the connected players and groups.
RSS (Really Simple Syndication) feeds to be linked.
Sets the playback time for the
selected RSS feed.
Sets the text format to
the selected style.
Sets the direction and speed of the
text movement.
Changes the RSS feed to be linked.
Sets space between RSS titles.
Sets RSS update period.
<RSS>
60
SuperSign Manager
Shows information on
the connected players
and groups.
Shows information on
the connected players
and groups.
Sets a date playback time.
Sets a playback time for the
time content.
Sets the text format to
the selected style.
Sets the text format to the
selected style.
Date format
Time format
<Time>
<Date>
Shows information on the connected players and groups.
Information about the connected
widget
Sets a widget playback time.
Changes the URL of a widget to
be connected.
<Widget>
61
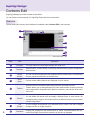
SuperSign Manager
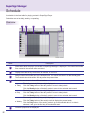
Schedule
A schedule is the time table for playing content in SuperSign Player.
Schedules are set as daily, weekly, or repeating.
Overview
A
B
C
Index
E
D
Description
A
Information about the player connected to SuperSign Manager is displayed. The content and media
files created in the content editor are listed.
B
Display times are set by 10 minutes, 30 minutes, or one hour.
C
Assign content and media files to the desired times. You cannot set them to a date already past.
The schedule should be within 180 days after the present date.
D
Schedules are shown in three different modes.
The daily schedule (24-hour unit) is displayed.
Click the Today button of the daily mode to move to today's date.
Click the Weekly button of the daily mode to move to the selected date's week.
The daily schedule (24-hour unit) is displayed.
● Daily
Click the Today button of the daily mode to move to today's date.
Click the Weekly button of the daily mode to move to the selected date's week.
The weekly schedule (7-day unit) is displayed.
Click the Today button of the weekly mode to display the present week.
● Weekly
Click the Daily button of the weekly mode to go to the selected date. If no date is
selected, it will go to the first day of the selected week.
● Today
E
62
Schedule properties are displayed.
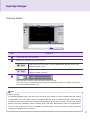
SuperSign Manager
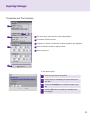
Properties and Tool windows
A
B
C
A The name, type, and resolution of the selected player.
B Preview the selected content.
C Properties of content or media files for which schedules are registered.
D
D Enter the duration directly to display content.
E Set a repeat cycle.
E
To set repeat cycles:
1
Enter the end time for the repeat.
2
Set the days for scheduling the repeat before the
end date.
3
Check the Everyday box to repeat the play every
day.
4
Click the OK button to update the schedule with
this change.
63
SuperSign Manager
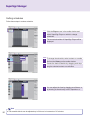
Setting schedules
Follow these steps to make a schedule:
1
Click the Player menu in the media window and
select SuperSign Player on which to change
schedules.
2
The current schedules of SuperSign Player will be
displayed.
3
To change the schedule, select content or a media
file from the Library on the media window.
4
Create the basic schedule by dragging and dropping the selected content or media files.
5
You can adjust the time by dragging a cell down, or
by entering its time directly in the Properties or s.
Note
64
● The schedule blocks can be adjusted up to 24 hours in increments of 10 minutes.
SuperSign Manager
Copying Schedules
Schedules can be copied in order to re-use them.
1
Select the schedule blocks you want to copy.
2
Press Ctr l + C to change the mouse pointer to the
copy icon (
). Press the Esc key to turn the icon
back to the mouse pointer.
3
Click the point on the schedule table where you
want to paste the copied schedule.
4
Click the Save button to apply the change.
65
SuperSign Manager
Deleting Schedules
Delete Schedules Via File Menu
Select the schedule block you want to delete and then select Edit > Delete in the file menu.
Delete Schedules Via X Button
Select the schedule block you want to delete and then click the Delete button.
Delete Schedules Via Delete Key
Select the schedule block you want to delete and then press the Delete key on your keyboard.
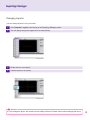
Distributing Schedules
Immediate Distribution
Send the schedule to a selected player by clicking the Send to Player button.
Scheduled Distribution
You can set scheduled distribution times in Option > Distribution under the file menu. The schedule distribution time is disabled by default.
Note
● You can stop the transfer while schedules or content is being sent. Once suspended, you should resume
the transfer process from the start.
If the transfer is not 100% completed, the content will not be played.
66
SuperSign Manager
Management
The SuperSign Players connected to SuperSign Manager and the monitors connected to each player can be
managed by group in the management menu. By grouping distribution destinations, duration, and places to
be displayed, you can control player and monitor information.
Overview
B
C
A
D
E
Index
Description
A
The SuperSign Players connected to SuperSign Manager is listed.
B
Content and media files created from the content editor will be listed.
C
There is an information tab containing the selected SuperSign Player, and a control tab with control settings. The player and control information will not be shown if you select a group.
*
: Group,
: Player,
: Display Device
SuperSign Manager software items
D
E
Scan
Re-search players.
Add
Add a new group.
Delete
Delete the selected group.
Tree view
Tree view mode
List view
List view mode
Double-click the group or player to rename it.
Note
● Group, player, and display names can be up to 20 characters each.
67
SuperSign Manager
Note
● If a player is disconnected, it will automatically attempt to reconnect the SuperSign Manager.
● If SuperSign Manager becomes disconnected while in use, this will be alerted through an alert
message and status lights.
Note
●W
hen more than one SuperSign Managers are used, you cannot use them to control the same player at
the same time. You should use the Manual Setting to connect the player to be controlled.
●W
hen players are searched from more than one SuperSign Manager, the first player found will be
connected. The same player cannot be used by different managers.
Manage Functions
Distribute Content Immediately
Drag content or media files onto the management screen to distribute them immediately to the connected
SuperSign Player.
1
Select the content or media files to send to SuperSign
Player in the library.
2
Drag the file to SuperSign Player to which you want to
send it.
3
The <SuperSign > Send to Player> window will appear.
4
Enter the duration in the <SuperSign > Send to Player>
window and then click the OK button.
● Constant repeat: Constant repeat: Keep playing until a new
schedule is added.
● Duration: Continue to play at this time for the duration.
5
Once the content is sent to SuperSign Player, it will be played on the screen connected to SuperSign Player.
Note
68
● When you distribute media by drag-and-drop, it will be applied to the player group, not to an individual
player.
SuperSign Manager
Manage Groups
You can manage the players in a group and their displays here.
When you select a group, the group-based tabs will be activated.
With the group-based tabs, you can control the player power, display power, time, screen, audio, video, and other
general features.
Note
● The status information is not available in the group control.
Control players
You can control players that are in a group or are individually connected.
When you select a player, the appropriate items will be shown on tabs for each player.
The player's power, tile production, general features, and updates can be controlled here.
Note
● Scan allows searching players that share the same network with SuperSign Manager.
● The information of the searched player includes the player and the display.
● The SuperSign Player's power (On/Off) can be controlled in the same network.
69
SuperSign Manager
Control Displays
You can control the display connected to the player.
When you select the display, the settings with tabs will be activated.
The display power, time, screen, audio, video, tile adjustment, and other general features are available here.
Each tab will list the settings of the current display.
Note
● The display control will be activated according to its entries or options.
● The display control shows the status information of the connected display.
● RS-232C commands through hyper terminals are not executed while SuperSign Player is in use.
70
SuperSign Manager
Creating Tile Mode
Create Tile
Please execute the Display Search for Daisy Chain of option in advance when you configure the Tile Mode.
1
You can specify the number of rows and columns in
the tile mode with mouse clicks or drag and drop. The
size of tile cannot exceed the maximum number of
displays connected.
Click Next button to move to the next step.
2
Click the button to move to the next step.
You can configure the input of each display.
Layout for the display wall
will be organized automatically according to the tile
size you set above.
3
You can select a display to be used in organizing the tile mode. The
displays you select will be highlighted as shown above.
71
SuperSign Manager
4
Attention
● If select input source after selecting one display,
the display sets its tile size as 1x1.
Specify the input source of the selected displays.
5
You can choose the order of the displays using drag
and drop.
6
Apply: complete the settings for a tile mode.
Cancel: cancel the settings you made.
Reset: reset the settings to the default configuration.
In the Preview/Apply tab, the tiled image can be previewed.
Note
● The number of tiles cannot exceed the number of connected monitors.
● To connect multiple monitors for tile mode, see the How to Install section of this document.
● The control shows the status information of the connected display.
72
SuperSign Manager
Option
1
If you want to manually search for a display after connecting the monitor with an RS-232C cable, select the
Player and select Control > Options > Display search
for Daisy Chain.
2
Click the Search button to find and add the display connected with a Daisy Chain.
73
SuperSign Manager
Other features
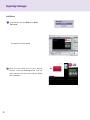
Update Now
You can remotely update the SuperSign Player software.
The player settings which the user entered will not change.
74
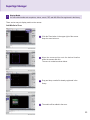
1
Click a connected player on the Grouping & Monitoring
window and select the update tab menu under the control
menu.
2
Press the Open button to select the SuperSign Player
update files downloaded from the SuperSign homepage,
www.lge.com.
3
Press the Update Now button to update the software of the
selected player.
The player in a remote location will be restarted automatically after the updating is completed.
At this time, the player will be disconnected from the manager and then reconnected when the reboot is finished.
SuperSign Manager
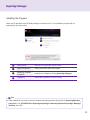
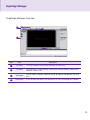
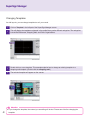
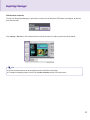
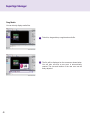
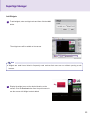
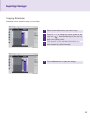
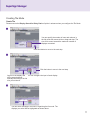
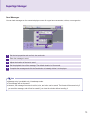
Send Messages
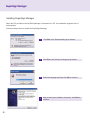
You can load messages on the connected player screen for urgent announcements, notices, or emergencies.
A
B
C
D
E
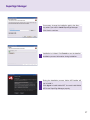
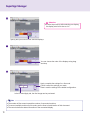
A
Set the text properties such as font, size, and color.
B
Enter the message to send.
C
Adjust the location of the text to send.
D
Set the playback time of the message. The default duration is 10 seconds.
E
Complete the message and click the Send button to instantly deliver it to the player.
Note
● Message entry is available only in landscape mode.
● The message will not be saved.
● However, the message format such as font, size, and color can be saved. The format will be saved only if
you send the message, and will not be saved if you close the window without sending it.
75
SuperSign Manager
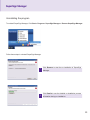
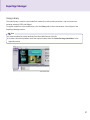
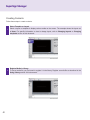
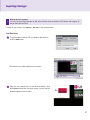
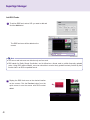
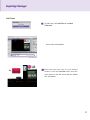
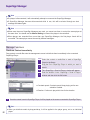
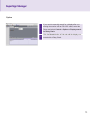
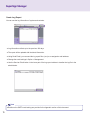
Create Log Report
You can see the log information of system and contents.
● Log information reflects up to the previous 180 days.
● The report will be updated with the latest information.
● Using Send Email, you can send the log report files (.csv) to an assigned e-mail address.
● Change the email settings in Option > Management.
● Use the Send an Email button in the lower part of the log report window to transfer the log file to the
administrator.
Note
● Details on the SMTP email setting are provided in the Appendix section of this document.
76
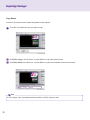
Appendix
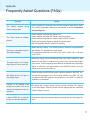
Frequently Asked Questions (FAQs)
Question
Answer
The transfer stopped during
[Send to player] task.
● Check whether the media file is an officially supported type and try again.
The officially supported media types are available in the Files Supported
by SuperSign list.
The "Scan" shows no available
players.
● Check whether the SuperSign Player is on.
● Check whether the SuperSign Player is working properly.
● Check the SuperSign Player's network cable connection status.
● Check the SuperSign Player's network IP address status.
● Set the SuperSign Player's network IP manually.
There are no templates visible in
SuperSign Manager.
● When selecting a player, if you select a player's resolution not supported by
the template, the template will not be shown.
● The supported resolutions are 1360 x 768, 1920 x 1080, 768 x 1360, and
1080 x 1920.
The data saved in the SuperSign Player's C drive were lost.
●S
uperSign Player uses the Enhanced Write Filter (EWF) function for data
protection. With EWF on, data saved by users in the C drive are only temporarily saved. These temporarily saved data will be deleted when SuperSign
Player is rebooted. If you do not want to use the EWF function, go to the
Player menu and turn the EWF off.
MS Office files do not open in
SuperSign Player.
● Check whether the MS Office program is properly installed. With EWF "on",
the MS Office program will not be correctly installed. Turn EWF "off" and
re-install the MS Office program. We advise you to turn EWF "on" after the
installation is completed.
Content is not playable even
● The player will not play the new content received if another file is playing
though the content I sent to the
on the same player. Stop the content currently playing and then repeat the
player was registered in the me"Send to Player" process.
dia library.
Letters of RSS, text, or messages are not correctly displayed.
●C
hange the Windows language setting using Regional and Language Options.
77
Appendix
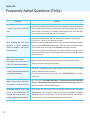
Frequently Asked Questions (FAQs)
Question
Answer
I cannot see Photo and PDF
files.
● Check the current settings of Regional and Language Options in Windows
and change the file name to be consistent with the language, then re-register the file in the library. For example, photos with a name in Korean may
not be seen when the language is set to English.
After changing the time of the
Windows in which SuperSign
Player is installed, I found that it
changed back.
● First check whether EWF was "off" when you changed the time setting.
● If it was "on", switch it "off" and then try again.
● Also check for the time sync option by right-clicking the Windows taskbar
and opening the Date/Time dialog menu. With this option checked, the time
will regularly reset according to the timeline selected by the user.
If you do not want to use this function, select the Internet Time tab on the
menu screen and uncheck the "Automatically synchronize with an Internet
time server" item.
After I sent content while
SuperSign Player was playing a
video, the video was disrupted.
● This could be caused by the network status. Please retry the transfer
when no content is playing in the player.
I lost the administrator password
of SuperSign Manager.
● Once lost, the password cannot be restored. In that case, you will need to
initialize the administrator account.
● To initialize the administrator account, type "1234567890init" in the password field.
Where can I get SuperSign Player programs or their driver files?
● You can find SuperSign\SuperSign Software\Application\SuperSign
Player or SuperSign\SuperSign Software\System\SuperSign Driver in
the CD included in the NC2000 package.
A message reading "As the web ● This means the web server was not properly installed when SuperSign
server is not operational, the
Manager was set up. Even if another web server is available, SuperSign
program will be terminated." apManager may not work properly. If you have another web server already in
peared. What does this mean?
use, delete it, or check whether the 6080 port is being used.
78
Appendix
SuperSign Manager Menu List
File Menu
0DLQPHQX
6XEPHQX
2SWLRQ
0HQX(QDEOHG
&RQWHQWV(GLW
3ODQ
:ULWHDQHZFDQYDV
2SHQ
0DLQPHQX &ORVH
6XEPHQX
6DYH
:ULWHDQHZFDQYDV
6DYHDV
2SHQ6XEPHQX
)LOH
0DLQPHQX
6DYHIRU7HPSODWH
&ORVH
([SRUWFRQWHQWV
:ULWHDQHZFDQYDV
6DYH
6HQGWRSOD\HU
2SHQ
6DYHDV
/RJRXW
&ORVH
)LOH
6DYHIRU7HPSODWH
6DYH
3DVVZRUG&KDQJH
([SRUWFRQWHQWV
6DYHDV
([LW
6HQGWRSOD\HU
)LOH
6DYHIRU7HPSODWH
/RJRXW
([SRUWFRQWHQWV
3DVVZRUG&KDQJH
6HQGWRSOD\HU
([LW
0DLQPHQX /RJRXW
6XEPHQX
Edit Menu
2SWLRQ
2SWLRQ
2SWLRQ
0HQX(QDEOHG
&RQWHQWV(GLW
3ODQ
0DQDJHPHQW
0HQX(QDEOHG
&RQWHQWV(GLW
3ODQ
0DQDJHPHQW
0HQX(QDEOHG
&RQWHQWV(GLW
3ODQ
0DQDJHPHQW
3DVVZRUG&KDQJH
&XW
(GLW
0DLQPHQX
(GLW
(GLW
3DVWH
6XEPHQX
'HOHWH
&XW
0RYHWR&RQWHQWV
&RS\
(GLWZLQGRZ
6XEPHQX
3DVWH
0RYHWR3ODQ
&XW
ZLQGRZ
'HOHWH
&RS\
$GGJURXS
0RYHWR&RQWHQWV
(GLWZLQGRZ
3DVWH
5HOHDVHJURXS
'HOHWH
0RYHWR3ODQ
ZLQGRZ
0RYHWR&RQWHQWV
2SWLRQ
2SWLRQ
0HQX(QDEOHG
&RQWHQWV(GLW
3ODQ
0DQDJHPHQW
0HQX(QDEOHG
&RQWHQWV(GLW
3ODQ
0DQDJHPHQW
0DLQPHQX
150%
5HOHDVHJURXS
120%
=RRP
0DLQPHQX
6XEPHQX
=RRP
3UHYLHZ
6KRZ:L]DUG
9LHZ
9LHZ
9LHZ
+LGH:L]DUG
=RRP
3UHYLHZ
6KRZ:L]DUG
&RQWHQWV(GLW
+LGH:L]DUG
:LQGRZ
3UHYLHZ
6KRZ:L]DUG
+LGH:L]DUG
&RQWHQWV(GLW
:LQGRZ
3ODQ:LQGRZ
&RQWHQWV(GLW
:LQGRZ
0DQDJHQHQW
3ODQ:LQGRZ
:LQGRZ
3ODQ:LQGRZ
0DQDJHQHQW
:LQGRZ
0DLQPHQX
2SWLRQ
$GGJURXS
0DLQPHQX
6XEPHQX
View
Menu
6XEPHQX
0DQDJHQHQW
6WDUWVHDUFK
:LQGRZ
&RQWHQWV(GLW
2SWLRQ
6XEPHQX
0DLQPHQX
0DQDJHPHQW
100%
2SWLRQ
80%
150%
60%
120%
2SWLRQ
50%
100%
30%
150%
80%
120%
60%
100%
50%
0HQX(QDEOHG
&RQWHQWV(GLW
3ODQ
0DQDJHPHQW
0HQX(QDEOHG
&RQWHQWV(GLW
3ODQ
0DQDJHPHQW
0HQX(QDEOHG
&RQWHQWV(GLW
3ODQ
0DQDJHPHQW
80%
30%
7LPHOLQH
60%
3OD\HU
50%
7HPSODWH
30%
/LEUDU\
'HVFULSWLRQ
([LWWKHSURJUDP
&RS\
3DVWH
'HVFULSWLRQ
'HOHWH
&XW
0RYHWR&RQWHQWV(GLWLQJZLQGRZ
&RS\
'HVFULSWLRQ
3DVWH
0RYHWR3ODQZLQGRZ
&XW
'HOHWH
&RS\
&UHDWHDQHZJURXS
0RYHWR&RQWHQWV(GLWLQJZLQGRZ
3DVWH
5HPRYHVHOHFWHGJURXS
'HOHWH
0RYHWR3ODQZLQGRZ
3URSHUW\
3OD\HU
7LPH6HWWLQJ
7RRO
7HPSODWH
/LEUDU\
3URSHUW\
,QIRUPDWLRQ
3URSHUW\
7RRO
&RQWURO
7LPH6HWWLQJ
3OD\HU
6KRZ+LGH,QIRUPDWLRQ&RQWURO
6KRZ+LGH3URSHUW\7RRO
6KRZ+LGH3URSHUW\7LPH6HWWLQJ/LEUDU\
6KRZ+LGHSOD\HU/LEUDU\
6KRZ+LGH/LEUDU\
/LEUDU\
2SWLRQ
2SWLRQ
'HVFULSWLRQ
6KRZ+LGH3URSHUW\7LPH6HWWLQJ/LEUDU\
6KRZ+LGH3URSHUW\7RRO
6KRZ+LGHSOD\HU7HPSODWH/LEUDU\
6KRZ+LGH/LEUDU\
6KRZ+LGHSOD\HU/LEUDU\
3OD\HU
/LEUDU\
,QIRUPDWLRQ
&RQWURO
100% (2ULJLQDO)
80% (=RRPRXW)
150% (=RRPLQ)
60% (=RRPRXW)
120% (=RRPLQ)
'HVFULSWLRQ
50% (=RRPRXW)
100%
(2ULJLQDO)
30% (=RRPRXW)
150% (=RRPLQ)
80%
(=RRPRXW)
3UHYLHZFXUUHQWO\HGLWLQJFRQWHQWV
120% (=RRPLQ)
60%
(=RRPRXW)
6KRZ6WDUW:L]DUGZKHQVWDUWXSWKHSURJUDPRUZULWHDQHZFDQYDV
100%
(2ULJLQDO)
50% (=RRPRXW)
'RQRWVKRZ6WDUW:L]DUGZKHQVWDUWXSWKHSURJUDPRUZULWHDQHZFDQYDV
80%
30% (=RRPRXW)
(=RRPRXW)
6KRZ+LGH7LPHOLQH
60%
(=RRPRXW)
3UHYLHZFXUUHQWO\HGLWLQJFRQWHQWV
'RQRWVKRZ6WDUW:L]DUGZKHQVWDUWXSWKHSURJUDPRUZULWHDQHZFDQYDV
6KRZ+LGHSOD\HU7HPSODWH/LEUDU\
6KRZ+LGHSOD\HU/LEUDU\
6KRZ+LGH7LPHOLQH
/LEUDU\
7LPHOLQH
/LEUDU\
2SWLRQ
/LEUDU\
'HVFULSWLRQ
3UHYLHZFXUUHQWO\HGLWLQJFRQWHQWV
6KRZ+LGH7LPHOLQH
6KRZ+LGH3URSHUW\7RRO
6KRZ6WDUW:L]DUGZKHQVWDUWXSWKHSURJUDPRUZULWHDQHZFDQYDV
7RRO
3OD\HU
3OD\HU
7HPSODWH
3URSHUW\
,QIRUPDWLRQ
7LPH6HWWLQJ
&RQWURO
5HPRYHVHOHFWHGJURXS
0RYHWR3ODQZLQGRZ
&UHDWHDQHZJURXS
150% (=RRPLQ)
5HPRYHVHOHFWHGJURXS
120%
(=RRPLQ)
50%
(=RRPRXW)
6KRZ6WDUW:L]DUGZKHQVWDUWXSWKHSURJUDPRUZULWHDQHZFDQYDV
6KRZ+LGHSOD\HU7HPSODWH/LEUDU\
30% (=RRPRXW)
'RQRWVKRZ6WDUW:L]DUGZKHQVWDUWXSWKHSURJUDPRUZULWHDQHZFDQYDV
7LPHOLQH
3URSHUW\
'LVWULEXWLRQ
6WDUWVHDUFK
6XEPHQX
0DLQPHQX &RQWHQWV(GLW
&ORVHFXUUHQWO\HGLWLQJFDQYDV
6DYHFXUUHQWO\HGLWLQJFRQWHQWV
:ULWHDQHZFDQYDV
6DYHFRQWHQWVWRQHZQDPH
2SHQH[LVLWLQJFRQWHQWVILOH
'HVFULSWLRQ
6DYHFRQWHQWVDVDWHPSODWH
&ORVHFXUUHQWO\HGLWLQJFDQYDV
([SRUWFXUUHQWO\HGLWLQJFRQWHQWVWRWKHILOH
:ULWHDQHZFDQYDV
6DYHFXUUHQWO\HGLWLQJFRQWHQWV
6HQGFXUUHQWO\HGLWLQJFRQWHQWVWRWKHSOD\HU
2SHQH[LVLWLQJFRQWHQWVILOH
6DYHFRQWHQWVWRQHZQDPH
8VHUORJRXW
&ORVHFXUUHQWO\HGLWLQJFDQYDV
6DYHFRQWHQWVDVDWHPSODWH
6DYHFXUUHQWO\HGLWLQJFRQWHQWV
&KDQJHXVHUSDVVZRUG
([SRUWFXUUHQWO\HGLWLQJFRQWHQWVWRWKHILOH
6DYHFRQWHQWVWRQHZQDPH
([LWWKHSURJUDP
6HQGFXUUHQWO\HGLWLQJFRQWHQWVWRWKHSOD\HU
6DYHFRQWHQWVDVDWHPSODWH
8VHUORJRXW
([SRUWFXUUHQWO\HGLWLQJFRQWHQWVWRWKHILOH
&KDQJHXVHUSDVVZRUG
6HQGFXUUHQWO\HGLWLQJFRQWHQWVWRWKHSOD\HU
([LWWKHSURJUDP
'HVFULSWLRQ
8VHUORJRXW
0RYHWR&RQWHQWV(GLWLQJZLQGRZ
&UHDWHDQHZJURXS
(GLWZLQGRZ
$GGJURXS
0RYHWR3ODQ
5HOHDVHJURXS
6XEPHQX
ZLQGRZ
2SHQH[LVLWLQJFRQWHQWVILOH
&KDQJHXVHUSDVVZRUG
&XW
([LW
&RS\
0DLQPHQX
'HVFULSWLRQ
0DQDJHPHQW
:ULWHDQHZFDQYDV
0HQX(QDEOHG
&RQWHQWV(GLW
3ODQ
0DQDJHPHQW
6KRZ+LGH,QIRUPDWLRQ&RQWURO
6KRZ+LGH3URSHUW\7LPH6HWWLQJ/LEUDU\
6KRZ+LGH/LEUDU\
'HVFULSWLRQ
6WDUW3OD\HU6FDQQLQJ
6KRZ+LGH,QIRUPDWLRQ&RQWURO
0HQX(QDEOHG
&RQWHQWV(GLW
3ODQ
0DQDJHPHQW
0HQX(QDEOHG
6HWRSWLRQVUHODWHGWR&RQWHQWV(GLWPRGH
'HVFULSWLRQ
6HWWKH(PDLORIWKHDGPLQLVWUDWRUWRVHQGWKH/RJUHSRUW
6HWFRQWHQWVGLVWULEXWLRQWLPHVFKHGXOH
6WDUW3OD\HU6FDQQLQJ
6HWRSWLRQVUHODWHGWR&RQWHQWV(GLWPRGH
'HVFULSWLRQ
79
0DLQPHQX
6XEPHQX
&RQWHQWV(GLW
:LQGRZ
3UHYLHZ
Appendix
6KRZ:L]DUG
9LHZ
+LGH:L]DUG
=RRP
3ODQ:LQGRZ
&RQWHQWV(GLW
:LQGRZ
3UHYLHZ
0DQDJHQHQW
:LQGRZ
6KRZ:L]DUG
Option
Menu
9LHZ
+LGH:L]DUG
3ODQ:LQGRZ
0DLQPHQX &RQWHQWV(GLW
6XEPHQX
:LQGRZ
0DQDJHQHQW
6WDUWVHDUFK
:LQGRZ
2SWLRQ
0DLQPHQX
&RQWHQWV(GLW
0DQDJHPHQW
3ODQ:LQGRZ
'LVWULEXWLRQ
6XEPHQX
0DQDJHQHQW
6WDUWVHDUFK
:LQGRZ
0DLQPHQX
2SWLRQ
6HWWLQJ
&RQWHQWV(GLW
6XEPHQX
0DQDJHPHQW
6HUYHU
'LVWULEXWLRQ
5HVHW
6XEPHQX
0DLQPHQX
Setting
Menu
7LPHOLQH
60%
3OD\HU
2SWLRQ
50%
7HPSODWH
30%
/LEUDU\
150%
0HQX(QDEOHG
&RQWHQWV(GLW
3ODQ
0DQDJHPHQW
3URSHUW\
120%
7RRO
100%
3OD\HU
80%
/LEUDU\
7LPHOLQH
60%
3URSHUW\
3OD\HU
50%
7LPH6HWWLQJ
7HPSODWH
30%
/LEUDU\
/LEUDU\
'RQRWVKRZ6WDUW:L]DUGZKHQVWDUWXSWKHSURJUDPRUZULWHDQHZFDQYDV
6KRZ+LGHSOD\HU/LEUDU\
6KRZ+LGH7LPHOLQH
3OD\HU
7LPHOLQH
/LEUDU\
2SWLRQ
/LEUDU\
3URSHUW\
,QIRUPDWLRQ
7RRO
&RQWURO
0HQX(QDEOHG
&RQWHQWV(GLW
3ODQ
0DQDJHPHQW
,QIRUPDWLRQ
&RQWURO
2SWLRQ
2SWLRQ
0HQX(QDEOHG
&RQWHQWV(GLW
3ODQ
0DQDJHPHQW
6HWWLQJ
+HOS
&RQWHQWV(GLW
2SWLRQ
6XEPHQX
2SWLRQ
6HUYHU
'LVWULEXWLRQ
0DQXDO
5HVHW
0HQX(QDEOHG
&RQWHQWV(GLW
3ODQ
0DQDJHPHQW
0HQX(QDEOHG
&RQWHQWV(GLW
3ODQ
0DLQPHQX
0HQX(QDEOHG
&RQWHQWV(GLW0HQX(QDEOHG
3ODQ
0DQDJHPHQW
&RQWHQWV(GLW
3ODQ
0DQDJHPHQW
6HWWLQJ
+HOS
+HOS
80
6HWRSWLRQVUHODWHGWR&RQWHQWV(GLWPRGH
'HVFULSWLRQ
6HWWKH(PDLORIWKHDGPLQLVWUDWRUWRVHQGWKH/RJUHSRUW
6KRZVHUYHULQIRUPDWLRQ
6HWFRQWHQWVGLVWULEXWLRQWLPHVFKHGXOH
Initialize the SuperSign Manager settings
'HVFULSWLRQ
6HWRSWLRQVUHODWHGWR&RQWHQWV(GLWPRGH
'HVFULSWLRQ
6HWWKH(PDLORIWKHDGPLQLVWUDWRUWRVHQGWKH/RJUHSRUW
'HVFULSWLRQ
6KRZVHUYHULQIRUPDWLRQ
6HWFRQWHQWVGLVWULEXWLRQWLPHVFKHGXOH
Show
SuperSign
manual
Initialize
the SuperSign
Manager settings
Show SuperSign Manager software information
6XEPHQX
2SWLRQ
6XEPHQX
2SWLRQ
0HQX(QDEOHG
'HVFULSWLRQ
&RQWHQWV(GLW0HQX(QDEOHG
3ODQ
0DQDJHPHQW
&RQWHQWV(GLW
3ODQ
0DQDJHPHQW
6KRZVHUYHULQIRUPDWLRQ
'HVFULSWLRQ
5HVHW
0DQXDO
Initialize
the SuperSign
Show SuperSign
manualManager settings
7HFKQLFDO6XSSRUW
Show LG Electronics technical support information
$ERXW
Show SuperSign Manager software information
Help Menu
0DLQPHQX
'HVFULSWLRQ
Show LG Electronics technical support information
7HFKQLFDO6XSSRUW
6HUYHU
6KRZ+LGH/LEUDU\
0DQDJHPHQW
$ERXW
0DLQPHQX
6HWFRQWHQWVGLVWULEXWLRQWLPHVFKHGXOH
6KRZ+LGH3URSHUW\7LPH6HWWLQJ/LEUDU\
6WDUW3OD\HU6FDQQLQJ
6XEPHQX
0DQDJHPHQW
'HVFULSWLRQ
6KRZ+LGH,QIRUPDWLRQ&RQWURO
6WDUW3OD\HU6FDQQLQJ
6WDUWVHDUFK
0DLQPHQX
2SWLRQ
0DLQPHQX
6KRZ+LGH/LEUDU\
6HWRSWLRQVUHODWHGWR&RQWHQWV(GLWPRGH
6KRZ+LGHSOD\HU/LEUDU\
6HWWKH(PDLORIWKHDGPLQLVWUDWRUWRVHQGWKH/RJUHSRUW
/LEUDU\
2SWLRQ
/LEUDU\
6KRZ+LGH3URSHUW\7LPH6HWWLQJ/LEUDU\
6KRZ+LGHSOD\HU7HPSODWH/LEUDU\
6WDUW3OD\HU6FDQQLQJ
6KRZ+LGH,QIRUPDWLRQ&RQWURO
6KRZ+LGH3URSHUW\7RRO
3OD\HU
3URSHUW\
7LPH6HWWLQJ
'HVFULSWLRQ
50% (=RRPRXW)
6KRZ+LGHSOD\HU7HPSODWH/LEUDU\
30% (=RRPRXW)
150% (=RRPLQ)
3UHYLHZFXUUHQWO\HGLWLQJFRQWHQWV
120% (=RRPLQ)
6KRZ+LGH3URSHUW\7RRO
6KRZ6WDUW:L]DUGZKHQVWDUWXSWKHSURJUDPRUZULWHDQHZFDQYDV
100% (2ULJLQDO)
'RQRWVKRZ6WDUW:L]DUGZKHQVWDUWXSWKHSURJUDPRUZULWHDQHZFDQYDV
80%
(=RRPRXW)
6KRZ+LGHSOD\HU/LEUDU\
6KRZ+LGH7LPHOLQH
60% (=RRPRXW)
6KRZ+LGH3URSHUW\7LPH6HWWLQJ/LEUDU\
50%
(=RRPRXW)
6KRZ+LGHSOD\HU7HPSODWH/LEUDU\
30% (=RRPRXW)
6KRZ+LGH/LEUDU\
3UHYLHZFXUUHQWO\HGLWLQJFRQWHQWV
6KRZ+LGH,QIRUPDWLRQ&RQWURO
6KRZ+LGH3URSHUW\7RRO
6KRZ6WDUW:L]DUGZKHQVWDUWXSWKHSURJUDPRUZULWHDQHZFDQYDV
3URSHUW\
,QIRUPDWLRQ
&RQWURO
7RRO
3URSHUW\
3OD\HU
7LPH6HWWLQJ
7HPSODWH
6KRZ+LGH7LPHOLQH
60% (=RRPRXW)
6XEPHQX
2SWLRQ
0HQX(QDEOHG
&RQWHQWV(GLW
3ODQ
'HVFULSWLRQ
0DQDJHPHQW
0DQXDO
Show SuperSign manual
7HFKQLFDO6XSSRUW
Show LG Electronics technical support information
$ERXW
Show SuperSign Manager software information
Appendix
Required Software and Codec Package Installation
Required Software
You should install all software below in order to take advantage of all Edit functions in the SuperSign solution.
Microsoft Office
To create content with Microsoft Office Word, PowerPoint, and Excel-formatted documents, both SuperSign Manager and SuperSign Player should have the same version of MS Office suite: 2000, XP, 2003, or 2007.
Attention
● You should purchase the Microsoft Office package.
Adobe Acrobat Reader (8.1 or later)
To see Help and to use PDF files as media, Adobe Acrobat Reader version 8.1 or later (excluding the Lite version)
is required. Adobe Acrobat Reader should be installed both in SuperSign Manager and SuperSign Player.
Note
● You can download Adobe Acrobat Reader from the installation CD, or from the Adobe website at www.
adobe.com for free.
81
Appendix
Codec Package Installation
You need to install codecs if you want to upload or play videos.
If SuperSign Manager and SuperSign Player have different codecs installed, the player may not be able to play
content. Use the same type and same version of codecs in SuperSign Manager and SuperSign Player.
You may need different codecs depending on the video files.
You can download codec packages from the links below.
● http://www.codecguide.com
● http://shark007.net
● http://www.free-codecs.com
Attention
● Please check the site's instructions concerning the
codec license details.
Note
● LG Electronics takes no responsibility for managing the above sites. Each site's content may
change without prior notice.
Attention
● Check if the package you downloaded has the required codec and install it.
● Install the same codec package in SuperSign Manager and SuperSign Player.
● Do not re-install the package if it is already installed.
● If you want to install another codec package, make sure that the one previously installed has been removed.
Files Supported by SuperSign
Supported Video File Formats: .avi, .wmv, .mp4, .mov, .mkv, .ts, .tp, .mpg, .mpeg, .flv
Attention
● To register and play videos, the SuperSign Manager and SuperSign Player should have the required codec
pack.
Supported Image File Formats: .jpg, .bmp, .png.
Attention
● The maximum image size is 8,192 pixels (width or height). The total number of pixels should not exceed
16,777,216.
Supported Image File Formats: .mp3, .wma, .wav
Supported Flash File Formats: .swf
Supported Document File Formats: .ppt, .xls, .doc, .pdf
82
Appendix
Microsoft Windows Embedded Standard Limitations
The following are potential errors that may occur due to internal limitations of Microsoft Windows Embedded
Standard, which is the OS of SuperSign Player.
·If you press Alt+Enter on the DOS window, text other than English may be shown corrupted.
·If you use Save As function in the Print window, the menu window name will be displayed in English.
·When you move to sub-menu items such as Control Panel, some of the items, such as hyper terminal, country
and language setting, will be written in English.
83
Appendix
Swap Displays
You can change the primary and secondary monitors in the Control Panel > Nvidia Control Panel.
Attention
● Nvidia Graphic Chipset which is the graphic card equipped in SuperSign Player (NC2000) does not support
display swap in the Windows Display Registry Information.
84
Appendix
SMTP Email Setting
Follow the steps below to set the SMTP email. Log reports can be sent to the email address you set.
1
Select File menu Options > Management to use the email setting menu.
2
The <Options> window will appear.
3
Type an email address in the Administrator Email field to receive the report. Type the email server
address in the SMTP Server field.
4
If the SMTP server requires user identification, provide the user ID and password and then click the OK
button. (Encryption such as SPA and SSL is not supported.)
5
When you have filled in the required fields, click the Test Email button.
6
Check whether the test email has arrived at the designated address.
85
Make sure to read the Important Precautions
before using the product.
Keep the User’s Guide(CD) in an accessible
place for furture reference.
The model and serial number of the SET is
located on the back and one side of the SET.
Record it below should you ever need service.
MODEL
SERIAL
Temporary noise is normal when powering
ON or OFF this device.
WARNING - This is a class A product. In
a domestic environment this product may
cause radio interference in which case the
user may be required to take adequate
measures.