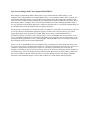
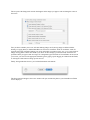
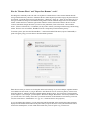
1
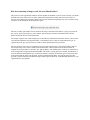
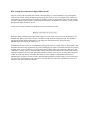
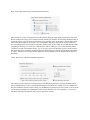
PhotoReviewer User Manual
Last modified December 28, 2004.
By Ben Haller. Copyright © 2004 Stick Software.
[ This manual is only available in English at present. ]
PhotoReviewer is a photo management application for Mac OS X. This manual assumes that you have already
downloaded a copy of PhotoReviewer; if not, visit PhotoReviewer's main page at http://www.sticksoftware.com/
software/PhotoReviewer.html. It also assumes that you know all the basics of using the Macintosh in Mac OS X,
including using the mouse, menus, and windows, and opening and saving files.
Right now this "manual" is really an FAQ (frequently asked questions) list, because PhotoReviewer is a simple
enough app that it doesn't seem to merit a full manual — that would just be a lot of work and would probably be
less effective at answering actual user questions. Let us know if you disagree, however; if a full manual is needed
for PhotoReviewer, it can be made.
Please send comments on this manual to us at [email protected]. Thanks!
Questions
What is PhotoReviewer? What does it do?
How and where do I install PhotoReviewer?
What is a typical workflow using PhotoReviewer?
Can I review images that I have imported into iPhoto?
What is the Setup panel I see at launch?
Now that my review is set up, what do I do?
I don't like toolbars; is there a context menu?
Why don't my images stay rotated? Why can't I crop my images?
What is this about duplicates and undisplayable images?
How do "Rename Photo" and "Repeat Last Rename" work?
How do I use user-defined sorting folders?
How exactly are subfolders handled?
How does renaming of images work, for user-defined folders?
How exactly does removal of empty folders work?
What are all these preferences? (Appearance tab)
What are all these preferences? (Behavior tab)
What are all these preferences? (Sorting tab)
What are all these preferences? (Raw Images tab)
How can I best use PhotoReviewer?
What known bugs and issues affect PhotoReviewer?
What is shareware? How do I pay?
What is PhotoReviewer? What does it do?
PhotoReviewer is an application for managing large numbers of incoming photographs. For example, you might
have a digital camera, and take pictures by the dozen (or the hundreds), most of which you ultimately don't keep.
Most methods of weeding a large photo collection down to the "keepers" don't work very well. Viewing the
photos in Preview, for example, is slow, and it's difficult to sort the photos into "keepers" and "rejects" — you
have to keep switching to the Finder. Importing the photos into iPhoto isn't much better; it's very slow, takes up a
huge amount of memory, and doesn't allow for a very rapid review process (partly because you keep having to
wait for iPhoto to "refine" its display). Trying to review the photos directly in the Finder doesn't work either; the
Finder's preview is too small to allow you to compare photos well, and sometimes the Finder just chooses not to
show you a preview for its own secret reasons. So this is the gap PhotoReviewer fills.
PhotoReviewer works very quickly. Getting going on a collection of tens of thousands of photographs has a startup time of less than a second (try doing that in iPhoto!). Moving from one photo to another is almost
instantaneous; you can hold down a key and flip through your photos like riffling through the pages of a book.
Designating a photo as a keeper or a reject is a matter of a single keypress (and you can configure up to 10
additional folders that are also available with a single key). PhotoReviewer will even find duplicate photographs
(for those cases when you downloaded the images off your camera twice by accident) and will weed out corrupted
image files that are not displayable. Once you've pared down your collection to the photos you actually want to
keep, you can then import them into iPhoto (or whatever) much more painlessly.
This may sound like a very simple thing, and indeed PhotoReviewer is a very simple application. But once you've
struggled to wade through a few hundred photos in some other application, and then experienced the ease with
which PhotoReviewer lets you zip through them, we think you'll learn to appreciate its simplicity.
Also worth mentioning is the fact that PhotoReviewer supports file formats that iPhoto, Preview, and most other
applications don't support: in particular, the "raw" file formats generated by digital cameras. Most cameras are
supported (new ones are added all the time, so the best way to tell if yours is supported is to try). And best of all,
PhotoReviewer's policy of blinding speed applies here too; raw photos which take more than a minute to display
in some other applications display in a few seconds in PhotoReviewer. It's so fast that you can truly review your
raw images on the fly as if they were JPEGs, a luxury not found in other photo management applications.
And by the way, if you're looking for a low-rent slideshow application, PhotoReviewer can fill those shoes too!
How and where do I install PhotoReviewer?
PhotoReviewer is a breeze to install. Simply copy the PhotoReviewer application into one of the standard OS X
locations for applications, such as /Applications or ~/Applications (where "~" is short for the location of your
home directory). No further setup is required. Once you've got PhotoReviewer copied to a standard location, just
double-click it in the Finder to launch it, or drag it to your Dock for easy one-click access.
Which folder should you use? ~/Applications is the typical location used if you do not have Administrator
privileges on your OS X machine, or wish PhotoReviewer to be available only to you, not to other users of the
machine. /Applications will make PhotoReviewer available to all users of the machine, but typically requires
Administrator privileges for you to copy things into it. For more information on this, see Apple's documentation
on using OS X; ~/Applications is the safer choice, however, if you are not sure.
Drag PhotoReviewer from the disk image it is distributed on, into the folder where you wish to install it. After it
has been copied, you may 'eject' and throw away the distribution disk image. If you are unfamiliar with the use of
disk images (.dmg files), you can read more about disk images on Stick Software's web site at http://
www.sticksoftware.com/register/diskimages.html.
To uninstall PhotoReviewer, simply drag PhotoReviewer from your hard drive to the trash. You will need to quit
PhotoReviewer before you will be able to empty your trash.
What is a typical workflow using PhotoReviewer?
The first step in using PhotoReviewer is to get a folder of images (and movies and sounds, if you like) that you
want to review. In many cases you will already have such a folder ready to go, but if you're using a digital camera,
you will need to copy your photos from your camera's storage (typically a CF card, memory stick, or some such)
to your computer. There are a few ways to handle this situation.
Some cameras or card readers will, when connected to your Mac, appear in the Finder as a removable disk; in
such cases you may review the contents of that disk directly. When doing so, PhotoReviewer will warn you that
that is not recommended; this is because reviewing your original copy of your photos risks losing data (if you veto
an image you don't want to veto, for example), and because some cameras and card readers have driver issues that
will make the review process work less well than it does for a folder on a local disk (we have heard of the creation
dates seen by PhotoReviewer on a CF card being incorrect, for example). With these caveats in mind, however,
many users choose to review their photos directly in-camera or in-card like this. We would recommend that you
try it first with some test photos that you don't mind losing, to make sure you understand all of the issues for your
particular setup.
The more standard and supported way to review images from a digital camera or card reader is to copy them to a
local drive first. If your camera or card reader appears in the Finder as a removable disk, you can use the Finder to
copy the images to a folder on your local hard drive. Alternatively, you can use the Image Capture application
provided by Apple as part of OS X (at /Applications/Image Capture) to download your photos.
Many users have their computer set up to launch iPhoto and begin an iPhoto import when they connect their
camera or card reader. When you use PhotoReviewer, this is typically no longer desirable. You can change this
behavior inside the Image Capture application; select Preferences from its menu, select the "Camera" tab in the
Preferences panel, and make a new choice in the pop-up menu for "When a camera is connected, open:" (the exact
location of this preference may change in different OS X releases at Apple's whim, but a bit of searching should
turn it up). If you want to use Image Capture to download your photos, you can choose it in that pop-up menu; if
you want to use the Finder to do it, you can just choose "No application".
We plan to add the capability to download photos from cameras and card readers to PhotoReviewer in the future,
which should make this step much less complicated; you would then be able to simply have PhotoReviewer
launch when a camera or card reader was connected, and review your photos directly. However, this feature has
not yet been implemented.
The second step is to review that folder in PhotoReviewer. To initiate the review, you can drag the folder to
PhotoReviewer, or choose the folder in PhotoReviewer's setup panel. Later sections of this manual will describe
the remainder of the review process; for now suffice to say that at the end of your review you will typically have a
folder with your "approved" photos, possibly other folders with "sorted" photos that you directed to those folders,
and possibly a folder of "vetoed" photos (unless you chose to delete them immediately or place them in the Trash).
The third step is to do whatever you want with the results of your review. If you ultimately want to use iPhoto to
store your approved images, you can now drag your approved folder to iPhoto and make an album there (and you
might want to read the next section, about iPhoto's library and PhotoReviewer, next). You could also work with
your photos in any other photo-cataloging application you choose, or simply keep them in folder and use the
Finder to handle them when needed. What you do with your photos after you finish reviewing them is completely
up to you; PhotoReviewer makes no assumptions about that.
Can I review images that I have imported into iPhoto?
When images are imported into iPhoto, iPhoto makes a copy of them inside the "iPhoto Library". Users
sometimes want to run PhotoReviewer on their iPhoto Library, or on a subfolder within it. This is generally not
recommended. The iPhoto Library is a private data store that belongs to the iPhoto application; if images in the
library are moved, renamed or deleted, iPhoto may get confused and be unable to display its entire library. This is
due to the way iPhoto is designed, and is not in any way PhotoReviewer's fault; modifying the iPhoto library in
any way other than using the iPhoto application is simply not supported and is a very bad idea. Deleting things out
of your iPhoto library using the Finder would yield equally bad results.
For this reason, it is reasonable to treat iPhoto's library as a "black box" which photos go into but do not come out
of (except in the ways that the iPhoto application supports). For this reason, some users keep a copy of their
original photographs archived separately from their iPhoto library, and we would recommend this as a
precautionary measure. If you have such a separate archive, you can use PhotoReviewer on that archive (or on a
copy of it) and then re-import the reviewed archive into iPhoto. If you do not have such an archive, then you can
use only the iPhoto application to review your photographs; running PhotoReviewer on your iPhoto library risks
data corruption and loss for the reasons explained here.
In fact, it is safe to run PhotoReviewer on your iPhoto library provided that you do not modify the library in any
way. You can do a review in which approved images are copied and vetoed images are left in place, or a review in
"slideshow" mode that does not allow you to approve or veto images, and such a review will be safe. Be
extremely careful that you set up your review correctly, however, as an incorrect setting may lead to corruption of
your iPhoto library. Also be aware that the format and setup of the iPhoto library is private and may change from
one version of iPhoto to the next, and that the library may contain multiple copies of your images at different
resolutions, with and without changes you have made in iPhoto, etc. Tread carefully and keep backups.
What is the Setup panel I see at launch?
The Setup panel configures what PhotoReviewer will do in the reviewing session you have begun. You set where
PhotoReviewer looks for new photographs, and what it should do with photos you approve and veto.
PhotoReviewer will remember your settings, so if you typically want to do the same sort of review every time,
you can just hit the Start button once you've set it up the first time.
In the top part of the Setup panel, you configure where PhotoReviewer will look for new photographs to review:
The textfield shows the path of the Review Folder you will use for your review. As with all such path textfields in
PhotoReviewer, you can change it in a variety of ways: select and type a new path, drag a folder in from the
Finder, or click the "delta" button to the right of the textfield to get a file browser where you can choose the folder
you want. Additionally, you can drag a folder to PhotoReviewer's icon in the Finder or the Dock (whether
PhotoReviewer is currently running or not), and the folder you have dragged in will automatically be chosen here
as your Review Folder.
The controls immediately below the Review Folder textfield control how the Review Folder is scanned for
photographs to review. You can choose whether PhotoReviewer will scan subfolders of the Review Folder for
photos, or will only find photos at the top level. Additionally, if you choose to scan subfolders for photos, you can
choose how images found in subfolders will be positioned in the order of your review.
The next part of the Setup panel controls what happens to the images you approve and veto during the course of
the review:
First you choose whether your review will entail making changes at all (moving images to different folders,
deleting or copying them) or whether PhotoReviewer will run in "slideshow" mode. In "slideshow" mode, all
approval and vetoing is disabled; nothing you can do will modify your images in any way, so it is a safe mode for
simply viewing photos. On the other hand, if you choose to allow changes, you then select the actions that are
performed when you approve and veto images. If a designated Approved Folder or Vetoed Folder will be used in
your review, you select it in the appropriate textfield, again by typing a path, dragging in a folder from the Finder,
or clicking the "delta" button to bring up a file browser.
Finally, having made these choices, you click the Start button at the bottom:
The Setup panel will disappear, the review window will open, and the first photo in your chosen Review Folder
will be displayed.
Now that my review is set up, what do I do?
Once you've set up your review and you have the review window displaying your first photo, you may wonder:
what next? The basic idea of PhotoReviewer is: make a decision on the currently displayed image, tell
PhotoReviewer your decision, repeat.
So if you like the image you see, you can approve it (by pressing the space bar or the return key,
which are bound to the "approve" action, or by selecting the "Approve Photo" menu item, or by clicking the
"Approve" toolbar button; all of these do exactly the same thing). The approved image is moved or copied to your
Approved folder, or perhaps left where it is on disk, depending upon what you chose in the Setup panel. It is
removed from your list of images to review, and the next image is displayed.
Suppose you don't like the next image as much. You can veto it (by pressing the backspace key, which
may be labeled "delete" on some keyboards, or by selecting the "Veto Photo" menu item, or by clicking the "Veto"
toolbar button; again, these all do exactly the same thing). The vetoed image is deleted immediately, moved to the
Trash, moved to your Vetoed folder, or perhaps left where it is on disk, depending upon what you chose in the
Setup panel. It is removed from your list of images to review, and the next image is displayed.
So as you go along approving and vetoing, the list of images left to review gets shorter and shorter. You can see
where you are at any time by looking at the title bar of the window:
It will say something like "x of y", which tells you the index of the current image being displayed (x) and the total
number of images left to review (y). At some point you will run out of photos to review, and your review will end
(although if more images have arrived in your Review folder in the meantime, you may wish to rescan to find the
new images and continue your review process).
By the way, the little fuzzy spinny thing on the right side of the title bar (shown in the snapshot to the
right, as well as in the title bar snap above; it may not be visible in your review window) indicates that
PhotoReviewer is preloading images for you. PhotoReviewer does that as a sort of side project, to allow it to more
quickly display those images for you later. Its loading will not interfere with your use of the application, and you
don't have to wait for it to finish. Under almost all circumstances, you should not care whether PhotoReviewer is
loading or not; the indicator is there so you understand why your machine may be acting busy and using its disk
even though you're not doing anything.
You don't necessarily have to make a decision on the current image; PhotoReviewer does not force you to work in
a linear fashion. You can use the arrow keys, or the "Move to Next" and "Move to Previous" menu items, or the
corresponding toolbar buttons, to move among the images in your review list freely. You can also jump to an
image based on its filename, its index, or even randomly (if you want to start at a random position in your review
list); there are menu items and toolbar buttons for all of these actions.
I don't like toolbars; is there a context menu?
There is indeed a context menu. First of all, you can of course turn off the toolbar in the Review window by
clicking the white lozenge-shaped button at the right side of the window title bar. Now that that's gone, you can
access most of the common review commands by bringing up the context menu in the review window. To do this,
hold down the control key and click on the photo in the review window (those with two-button mice may also use
their right mouse button, of course). A menu will appear with a variety of choices, including all of the most
common review actions.
Why don't my images stay rotated? Why can't I crop my images?
As you're browsing among your images, you may encounter some images that need to be
rotated. PhotoReviewer provides menu items and toolbar buttons that allow you to rotate your images clockwise
or counterclockwise, so you can do that easily. But there is an issue involved that needs to be discussed.
PhotoReviewer never modifies your images in any way. It moves them from folder to folder, renames them, and
even deletes them; but the image data contained inside the file is never modified in any way. This is a very
deliberate design decision, made for a good reason explained below. As a result of this decision, rotation of
images doesn't "stick". If you rotate an image in PhotoReviewer, it will be unrotated again the next time you
review it, or whenever you view that image in some other application. The only purpose of allowing rotation in
PhotoReviewer at all is to allow you to see your images better, in order to better decide what action to perform on
them.
The reason PhotoReviewer doesn't modify image data is that it gets very messy and there are many hidden
"gotchas" involved. For example, suppose PhotoReviewer is able to read and display an image, but there is some
extra information (such as the EXIF tags that digital cameras generate) that PhotoReviewer doesn't understand.
Ensuring that no information is lost or corrupted, when many image file formats are exceedingly complex and can
contain all sorts of auxiliary data besides the actual image itself, is a very tricky thing to do.
Another "gotcha" is lossy compression. JPEG files, for example, degrade in quality each time they are resaved,
because the JPEG format does not preserve the exact image, but instead a "lossy" approximation of it. If
PhotoReviewer regenerated new JPEG data after a rotation operation, the quality of your JPEG images would
inevitably be degraded, possibly quite noticeably. The only way out of this problem would be to save the rotated
image in a non-lossy format like TIFF instead of using the original format; but then PhotoReviewer has just made
your files balloon in size, perhaps to hundreds of times their original bulk.
These issues are very complex to handle well. iPhoto, for example, creates whole directories containing copies of
your original images, your modified images, thumbnails of your images, etc., in an effort to both allow
modification of images and to preserve the quality of the original. That level of complexity is something
PhotoReviewer wants to avoid; it's part of the reason why iPhoto is so slow (although admittedly powerful) and
PhotoReviewer is so fast, and it comes with a lot of other baggage too. And it's comforting to be guaranteed that
your images are not being corrupted or degraded in any way when handled by PhotoReviewer; that's a guarantee
that no application that actually modifies your images can make.
This concern is also the reason why PhotoReviewer does not (and never will) support cropping of photos, red-eye
removal, or any of the other modifications people like to make to their photos. That is not what PhotoReviewer is
for, and by choosing to embrace that limiting decision, PhotoReviewer becomes a leaner, faster, safer application
for the job it is intended to perform.
What is this about duplicates and undisplayable images?
In some situations, you may get a lot of duplicate images, or a lot of corrupted files that cannot be properly
displayed. Eliminating these can be quite annoying and time-consuming, especially if you're trying to handle
several thousand images at once. PhotoReviewer automates this process for you. Just select the appropriate menu
item, and PhotoReviewer will scan through your files and fix things up.
Duplicates are eliminated by deleting all but one copy. An image is considered a duplicate of another if the two are
exactly the same size in bytes on your disk, and if the two have exactly the same binary contents. Note that two
images can look exactly the same to the eye, but be different sizes on disk and have very different binary
representations. One might be stored as a TIFF file, one as a very high-quality JPEG, for example; while they
might look identical, they are really quite different from the computer's point of view.
Undisplayable files are eliminated by vetoing them (which may mean deleting them, moving them to the Trash,
moving them to the Vetoed Folder, or simply removing them from the list of images left to review, depending on
what you choose in the Setup panel). What is and is not displayable is judged by what Apple's image handling
code thinks of them. PhotoReviewer uses code written by Apple to display images for it (as do most Cocoa
applications). Apple's code, like all code, has idiosyncrasies. There will be images that PhotoReviewer considers
undisplayable that display just fine in, say, GraphicConverter. There will probably be images PhotoReviewer can
display that do not display properly in GraphicConverter, too. This is the reality of life in a world without
standards that are strictly adhered to; exactly what is and is not allowed in a given file format is unfortunately a bit
"fuzzy" and nobody quite agrees on all the details. PhotoReviewer takes a position shared by most other Cocoa
applications, so it should agree with Preview, TextEdit, and Mail. That's about the best one can hope for. If you
find PhotoReviewer's determinations about what is and is not displayable to be unacceptable, then we suggest that
you not use the feature. :->
How do "Rename Photo" and "Repeat Last Rename" work?
One thing users commonly want to do with a set of photos is rename them in a more rational manner than the
auto-generated names they often have. Sometimes the new names depend upon what category the photo falls into;
for example, you might want to end up with "Beach #1", "Beach #2", "Party #1", "Party #2" and "Party #3". For
this type of situation, sorting into user-defined sorting folders with the "Rename images moved to user-defined
folders" feature turned on is often the right solution. How this works is described in detail in the next several
sections. Sometimes, though, the names you want are less predictable ("Janie at the beach", "David and the
beach", "Frisbee on the beach"), or sometimes you may wish to rename your images without using custom sorting
folders. For these sorts of situations, PhotoReviewer has a simple but powerful renaming facility.
To rename a photo, just select the "Rename Photo..." menu item from the Edit menu (or press Command-R). A
panel will appear giving you some choices about the rename operation:
Enter the base name you want to use for the photo in the field at the top. If you want a unique, sequential number
to be added to the base name (so you get "Beach #1" and "Beach #2" for two successive photos), choose a base
name like "Beach #", and then check the sequential number checkbox below. You can choose a starting number
for the sequence, if, for example, you already have "Beach #1" through "Beach #714" stored away elsewhere and
you want to start at 715. Finally, choose how you want the extension of the filename to be treated (if you are not
sure, the second choice, "Standardize to .tif / .jpg / etc.", should be fine for most purposes).
As you are making these changes, you can observe the final filename that will be used for the rename operation,
displayed in the textfield at the bottom of the panel. When you press OK, that is exactly the filename that will be
used for the renamed photo, so look at that field to make sure you're set up the way you want to be.
If you're using the "sequential numbering" feature, you may wish to rename multiple images in your Review
Folder using exactly the same settings. To allow this to be done as rapidly as possible, PhotoReviewer has a
"Repeat Last Rename" menu item. This does exactly the same thing as opening the Rename Photo panel and
immediately hitting the OK button. (If sequential numbering is not in use, you will probably get an error panel,
since reusing the previous rename's settings will probably result in a naming conflict.)
A little clarification of how the sequential numbering scheme works may be helpful. The number chosen is the
first number that is not already taken by an image in your Review Folder, starting at the minimum number given.
For example, if you start a review and you already have an image named "Beach7", a sequential numbering of
other images in the review with a base name of "Beach" and a starting count of 5 will give you "Beach5",
"Beach6", and then "Beach8". On the other hand, the names of images in your Approved Folder and Vetoed
Folder are not consulted when determining the sequence number (because those folders might contain tens of
thousands of images in arbitrary subfolders, which could take a long time for PhotoReviewer to scan through). So
you might rename an image in your review, and then when you approve or veto it, it might end up having to be
renamed again to prevent a name conflict with another image already in the destination folder.
To avoid this being a problem, there are two things you ought to do. One is to use a starting sequence number to
force your sequential numbering to start at a value high enough to avoid conflicts with previously named images.
The other is to either rename all of the images in a review before approving or vetoing any of them, or rename all
of the images in your Approved Folder as a separate post-pass after you're done approving and vetoing.
An example of how this issue can bite you may be in order. Suppose you're reviewing a bunch of beach photos,
and you set up your rename panel with a base name of "Beach #" and sequential numbering starting at 1. You look
at the first image, like it, rename it (giving you "Beach #1"), and approve it (moving it to your Approved Folder).
Now you look at the second image, like it, and do a "Repeat Last Rename". You will get "Beach #1" again,
because the first image named "Beach #1" is no longer in your Review Folder, and only files in your Review
Folder are seen for the purposes of finding naming conflicts.
To continue the example, this could be resolved in two different ways. One would be to rename both of the images
(and any other "beach" images in the Review Folder) before approving or vetoing any of them. If you did this, and
then approved some and vetoed some, this might leave you with approved filenames like "Beach #1", "Beach #3"
and "Beach #7", with gaps where the vetoed images had been. Sometimes this is desirable (if you want the
numbers to reflect the index of the negative on a roll of film, for example), sometimes it is not. The other solution
would be to approve and veto all of the images in your Review Folder, and then, as a post-pass, do a second
review of your Approved Folder's contents, renaming the images at that point. This would give you names for
your approved images without numbering gaps.
For ease of explanation, this problem was presented in terms of the contents of your Review Folder; actually,
though, only files that are still present in the current review session are checked against for naming conflicts. So
even if your "approve action" is "leave in place", not "move to Approved Folder", doing rename-approve-rename
will give you "Beach #1" and "Beach #1", because the first "Beach #1" will, after being approved, no longer be
part of the current review and will thus not affect the filename chosen. The basic rule of thumb is: if you want two
different images to be renamed in a sequential manner, you must rename both of those images as part of a single
review, before approving or vetoing either of them.
If this seems complicated and strange, you may wish to look again at the auto-renaming feature that you can enable
when using user-defined sorting folders. It is quite powerful and simple, and will allow you to avoid these sorts of
technical issues in most cases. However, if you can heed the caveat described above, PhotoReviewer's renaming
feature should serve you well.
How do I use user-defined sorting folders?
PhotoReviewer's sorting of images into "approved" and "vetoed" is simple and clear-cut, but some tasks are more
complex. For them, PhotoReviewer supports the configuration of up to ten user-defined sorting folders. Reviewed
photos can be moved directly to any of these ten folders with a single, user-configurable keypress (or a toolbar
button). The user-defined folders, and the keys that trigger them, are configured in the Sorting tab of the
Preferences panel:
The buttons, here labelled "0" through "9", are for changing the key associated with a given folder. To change the
key for a particular folder, just click on its key button. The key button will remain highlighted, indicating that it is
waiting for you to press a key on your keyboard. Do so, and the key button will change to display the key you
have just pressed. (If it doesn't, you probably pressed one of the reserved keys: space, return, tab, backspace, or
escape. Those keys may not be used for custom folders.) If you set up two different folders to use the same key,
their key buttons will be highlighted with red to indicate the conflict. You can resolve the conflict by simply
changing one of the conflicting keys to some other key.
The textfields are for setting the folders themselves. As with other folder textfields in PhotoReviewer, you may
type in the textfield, drag a folder in from the Finder, or click the "delta" button to get a browser where you can
choose the folder you want. However, there is one caveat: partial versus absolute paths. An "absolute" path is a
folder path that represents a specific folder on your disk; "/Applications", or "~/Pictures". Sorting folders with
absolute paths will, as you would expect, sort images to that specific folder, and you will always get an absolute
path if you drag a folder in or choose one with the browser. A "partial" path, on the other hand, is a path which
(because it does not start with "/" or "~") does not specify one specific folder, but rather any number of different
folders depending upon what it is "relative" to. For example, a path of "landscapes" is partial, because if it is taken
as relative to your home directory, it represents "~/landscapes", but if taken as relative to your Pictures directory, it
represents "~/Pictures/landscapes"; it could mean either one. In PhotoReviewer, partial paths are legal for sorting
folders, and they will always be taken as relative to the Approved Folder chosen for a given review. So if you
choose "~/Pictures/Approved/2004/" as your Approved Folder, then a sorting folder of "landscapes" will move
photos into a folder at "~/Pictures/Approved/2004/landscapes". (If this discussion made your eyes glaze over, you
can simply always use absolute paths for your sorting folders, by dragging them in from the Finder or choosing
them in the file browser with the "delta" buttons).
Finally, you may want to reset PhotoReviewer to its default keys or folder names. That's
what the buttons below the Preference panel's folder configuration area are for. Be careful, though; resetting the
keys or folder names is not undoable.
The option to rename files that are moved into user-defined folders is covered in a later topic, since we should talk
about the handling of subfolders first.
How exactly are subfolders handled?
PhotoReviewer allows you to scan all of the subfolders inside your Review folder for images to review. That's a
very useful thing, but it may not be immediately obvious how the subfolders are handled as images are moved
around due to being approved and vetoed. Happily, this behavior can be configured. It is governed by the three
checkboxes in the upper left of the Behavior tab of the Preferences panel:
These checkboxes are essentially parallel; they all control whether the subfolder "path" that an image was found at
is preserved when the image is moved to a new destination, or whether the image is just moved to the top level of
the destination. One checkbox controls this for approved images, one controls this for vetoed images, and one
controls this for images moved to your user-defined sorting folders.
For example, suppose your Review folder is ~/Desktop/Review, and suppose an image is located inside your
review folder at ~/Desktop/Review/Latest/example.gif. That image will be a part of your review, if and only if you
checked the "Scan subfolders of the review folder for images" checkbox in the setup panel when you began your
review. Assuming you did, what happens to this image when you approve it, veto it, or move it to a sorting
folder? The answer depends upon the settings of the aforementioned checkboxes.
For example, suppose your Approved folder is ~/Desktop/Approved, and "Preserve folders for approved images"
is checked. When this image is approved, it will be moved to ~/Desktop/Approved/Latest/example.gif — its
subpath ("Latest") is preserved. If "Preserve folders for approved images" is not checked, its subpath will be
discarded when it is approved; the example image will be moved to ~/Desktop/Approved/example.gif.
If folders are preserved for moves to user-defined sorting folders, the folders go under the sorting folder's path.
For example, take the same file at ~/Desktop/Review/Latest/example.gif, and suppose a sorting folder is set up
with a name of "Travel". That sorting folder is relative to the Approved folder (~/Desktop/Approved), so it is
located at ~/Desktop/Approved/Travel. If "Preserve folders for user-defined folders" is checked and the example
image is moved to this sorting folder, it will end up at ~/Desktop/Approved/Travel/Latest/example.gif. If "Preserve
folders for user-defined folders" is not checked, it will end up at ~/Desktop/Approved/Travel/example.gif.
This extends to folder paths with multiple components in the natural way. So an image at ~/Desktop/Approved/
Latest/Downloads/example.gif would be sorted into a sorting folder of /Travel/Korea by being placed into either ~/
Desktop/Approved/Travel/Korea/Latest/Downloads/example.gif or ~/Desktop/Approved/Travel/Korea/
example.gif, depending upon the "Preserve folders for user-defined folders" setting. Obviously, typical usage will
be simpler than this sort of case; it is explained here for those power users who actually find this useful and
important.
How does renaming of images work, for user-defined folders?
The previous section explained the subtleties of how subpaths are handled; if you are not clear on that, you should
read that section first. Those rules are used to generate the full path that an image will be moved to when it is
moved to a user-defined sorting folder. Images moved to user-defined sorting folders may also be renamed, using
a checkbox on the Sorting tab of the Preferences panel:
The rule is actually quite simple. The new name for the image is the name of the folder it is going to be placed in,
plus a space, plus a pound sign ('#'), plus a number, plus the proper extension. The number used is the first
number not already used for a file in that folder.
For example, suppose a file called example.gif is located directly inside the Review folder, and it is to be moved to
a user-defined subfolder called "Igneous Rocks". It would then receive a name of "Igneous Rocks #1.gif". If
"Igneous Rocks #1.jpg" already existed, it would be called "Igneous Rocks #2.gif" instead.
The part where this gets tricky is if subpaths are preserved when moving files to user-defined folders. Suppose
our example image is now inside a folder called "downloaded", which is itself inside our Review folder. If
subpaths are preserved when it is moved to our "Igneous Rocks" user-defined folder, it ends up at a path (relative
to the sorting folder) of /Igneous Rocks/downloaded/. The folder it is being placed in is named "downloaded", so
it will be renamed "downloaded #1.gif" (or whatever number is available). So the name given is always the name
of the parent folder the image ends up inside, not the user-defined folder that it was explicitly moved to. This
prevents you from ending up with different images named "Igneous Rocks #1" inside different subfolders of your
"Igneous Rocks" sorting folder.
How exactly does removal of empty folders work?
Suppose you have a Review folder that contains a bunch of images in various subfolders. You go through the
whole review process, vetoing and approving and sorting, and you move all of your images out of your Review
folder. What are you left with? Well, it's hard to tell. Probably a bunch of empty folders; but if you want to make
sure there's nothing important in there (a non-image file that snuck in accidentally, for example), you have to hunt
through all the empty folders one by one.
Instead, you can check a checkbox on the Behavior tab of the Preferences panel:
When this option is enabled, folders that become empty as a result of the review process will be deleted for you
automatically. When you finish your review, your Review folder should be completely empty. If a subfolder is
still hanging around, that means that there is a non-image file somewhere inside it, which prevented
PhotoReviewer from deleting the folder for you.
Unfortunately, we have to do a bit of explanation regarding what exactly an "empty" folder is. The problem is that
the Finder and various other applications may create bookkeeping files inside your folders; those files are normally
invisible, but if you are a power user, you are probably aware of them. They go by names like ".DS_Store" and
".FBCIndex", and they typically contain an index or other such information related to the contents of the directory.
These files should not prevent a folder from being considered "empty", since they are not really data-bearing files
in their own right; they merely contain data that wishes to remain "attached" to that folder. For this reason,
PhotoReviewer will ignore all such "dot-files" when determining whether a folder is empty or not. For the typical
user, this is the correct behavior in all cases. Power users may find cases where this is problematic, however, in
which case this option should be turned off.
What are all these preferences? (Appearance tab)
This section describes the preferences on the Appearance tab of the Preferences panel. There are three sections to
this tab, to control the appearance of the Review window, the Information Overlay, and Thumbnails.
The Review window appearance controls, at the upper left of the Appearance tab, look like this:
The first controls are checkboxes that govern the scaling of images displayed. The first checkbox ("Shrink large
images..."), if checked, will cause images that are larger than the review window's area to be shrunk until they fit
exactly into the review window. When it is not checked, the central portion of the image that fits into the review
window will be displayed, and the remainder will not be visible. The second checkbox ("Enlarge small images..."),
if checked, will cause images that are smaller than the review window's area to be enlarged until they fit exactly
into the review window. If the image is very small, it may become blocky and pixellated as a result, since of
course bitmap images have a limited resolution; for this reason, a third checkbox ("Maximum enlargement...") is
provided which, if checked, will cause the enlargement to be, at most, double the original, so as to prevent
excessive blockiness.
The next checkbox ("High quality...") controls the quality at which scaled images are produced. Higher-quality
scaling (with the checkbox checked, in other words) will produce a better-looking picture, but it may make
PhotoReviewer a bit more slow. In almost all cases, you will want this checkbox to be checked, since image
preloading means that, even if the scaling is slow, you will usually not actually have to wait for it.
Last come the controls for the window background color. You can use the color well to choose the background
color for the Review window. Some images, however, such as PDF files, may be transparent in some areas. In
such cases, one typically wants the image to be displayed against a white background; a checkbox is therefore
provided for that purpose, so that even with a non-white background color chosen, white is used when necessary
with transparent images. If you really want to see transparent images against a non-white background, just
uncheck this option.
Next, we have the controls that govern the Information Overlay:
These control an "overlay" of information about the currently displayed image, displayed in the lower left of the
Review window. The overlay can be turned on and off with the first checkbox; the remaining checkboxes turn on
and off the display of specific pieces of information. In no particular order, the checkboxes control display of the
index of the current image (in an "Image x of y" form similar to that always shown in the review window title
bar), the filename of the current image, its full path in the filesystem, its size on disk in bytes and either K or MB
(depending on how big it is), its file type as determined by both its "HFS type" (a file system attribute) and its
"extension" (the end of its filename, like the ".jpg" in "foo.jpg"), the size of the image in pixels, and the creation
date of the image's file (which may be different from the date the image was actually downloaded/scanned/taken,
of course). The point size of the type used to display the overlay information can be changed with the pop-up at
the bottom.
Finally, there are the controls for Thumbnail appearance:
The settings of these controls govern the appearance of the thumbnail generated by the Copy Thumbnail menu
item (in the Edit menu), as well as of the thumbnail dragged out of the Review window (if you are configured to
drag out a thumbnail, and not a full-size image; see the Behavior tab preferences for more on this). You can set the
size, matting and framing of your thumbnails. These controls should be fairly self-explanatory, so we won't go
into them in detail here. Experiment until you get an appearance you like!
What are all these preferences? (Behavior tab)
This section describes the preferences on the Behavior tab of the Preferences panel. A few were already discussed
in the sections on subfolder handling and empty folder removal, so let's start off with the two checkboxes in the
top section that have not already been discussed:
The first checkbox ("Wrap around...") controls what happens when you try to move past the end or the beginning
of your set of review images, using the Previous or Next toolbar buttons or the equivalent menu or keyboard
commands. If you are set to wrap around, you will move from the last image to the first, and from the first to the
last. If you are not set to wrap around, you will get a beep. Which you should choose is purely a matter of work
style and personal preference.
The second checkbox ("Find images...") controls how PhotoReviewer treats special folders called "bundles".
Bundles appear in the Finder as single files, but they are actually folders, and may have images inside them that
you wish to review. Examples of bundles include applications that have a ".app" file extension, and ".rtfd" rich
text files such as those saved by TextEdit. If you're not sure what all this means, leave it unchecked; but if you
understand what bundles are and want to review images inside them, you can turn this option on.
The next behavior preference is for an "external viewer / editor" for PhotoReviewer:
You can choose an application from a file browser by clicking the Choose button, or type the name of the
application you want (exactly!) into the textfield. The chosen application will then be used by PhotoReviewer
whenever it wants to open an image in a secondary app. Examples of when this might happen include when you
select the "Open Photo in..." menu item (in the Edit menu), or when you click the image in the review window
(depending upon the next preference, which we're about to describe).
The next control lets you choose what happens when you click on the image in PhotoReviewer's Review window:
You can move to the next image (equivalent to clicking the Next toolbar button), run PhotoReviewer's context
menu (you can read more on this in the section on the context menu, or open the image in your chosen external
editor / viewer app (governed by the preference just described, above).
The next preference governs what you get if you click and drag from inside the Review window to outside:
You have two choices: a thumbnail (generated using your Thumbnail Appearance prefs, on the Appearance tab),
or a full-size image. You can drag the thumbnail or image to any application that receives dragged images; drop it
into a Mail.app compose window, for example, or a TextEdit document. Note that the item dragged is not a file,
however; applications which only accept dragged images that are files, such as browsers, Preview.app, and imageediting applications, will not accept the drag. To open reviewed images in applications of that sort, use the "Open
Photo in..." menu item in the Edit menu, after setting your preferred application with the external editor / viewer
preference described above.
Finally, at the bottom of the Behavior tab are controls allowing you to set PhotoReviewer's memory usage policy:
PhotoReviewer can keep images in memory in order to display them more quickly when you come to them in your
review. These controls let you set it to keep a fixed number of images (from 5 to 100), or all previously viewed
images. This should be changed with extreme caution; if you do not know how to use Apple's utilities, or
Terminal.app, to determine how much memory an application is using, or if you do not know how to force-quit an
application, then you should not change this preference (except perhaps to lower it from its default value of 10
down to the minimum of 5).
The reason is that at this time, PhotoReviewer exercises no caution about how much memory it uses. It will just
blindly follow the preference you have set, until it uses up all of the memory your machine has. After that point,
your machine's performance will rapidly degrade, with constant disk access and molasses-slow user interface
updates; things may get so slow that you find it difficult to quit PhotoReviewer (thus the need to know how to
force-quit an app). So you must be very careful about how you set this preference!
For example, if you have TIFF files that are 20-30 MB (which are not uncommon, for high-end digital
photographers and such folk), keeping even 10 such files in memory may use upwards of 300MB of memory. It
adds up fast. The "keep all..." setting is particularly dangerous, as you may forget you set it, open a review with
10,000 images in it, and then wonder why your machine is no longer working. Don't say we didn't warn you.
The virtue, of course, is that by keeping images in memory, PhotoReviewer will be able to do a lightning-fast
review for you, without even touching the disk after it finishes preloading all of the review images. Particularly
when working with files that are very slow to load, such as raw image files from digital cameras, this can make
life much more pleasant. But PhotoReviewer's preloading algorithm is fairly smart, so even if you limit it to
keeping five images in memory at a time, you may find that it usually has the image you want to view next, already
in memory and ready to display. Don't assume you need to preload everything to get a fast review.
What are all these preferences? (Sorting tab)
The preferences on the Sorting tab of the Preferences panel were discussed in the sections on using user-defined
sorting folders, above.
What are all these preferences? (Raw Images tab)
This section describes the preferences on the Raw Images tab of the Preferences panel. These govern the
processing of "raw" format images from digital cameras. Only some digital cameras support saving images in a
raw format, and there are many drawbacks to doing so, from larger image size to a need for more complex
processing once the image is downloaded from the camera to the computer. It is recommended that only those very
comfortable with both digital cameras and digital image editing attempt to use raw format images, and the rest of
this section will assume such a level of expertise.
PhotoReviewer supports most of the raw formats out there at the present time; almost 100 different cameras, at last
count. The easiest way to tell if your camera is supported is to try reviewing some raw images from it. If your
camera is not supported in the version you have, first check that a newer version of PhotoReviewer has not
already been released with support for your camera, and then email us to let us know.
A key thing to keep in mind with PhotoReviewer's treatment of raw images is that the priority here is speed.
PhotoReviewer does not claim to be able to make final-quality images based upon your raw files; indeed, there
isn't even any easy way to save the image that PhotoReviewer has generated, since PhotoReviewer never modifies
your image files. The goal, rather, is to get the fastest display possible. PhotoReviewer's raw image engine has
been hand-optimized to take full advantage of the speed of your computer (including AltiVec optimizations for the
G4 and G5 chips), and it is very fast compared to typical raw image display in other apps. The hope is that you
will be able to see which images have potential, sort them accordingly, and then perform a slow, painstaking, highquality conversion of the "keepers" later.
The first control we'll talk about is the white balance radio control:
You can choose not to perform any white balancing (the raw samples are simply taken as given), auto-white
balancing (an automated attempt to find a white point for the photo and balance using that; sometimes successful,
often not), or white-balancing using a white point supplied by the camera (if available; if not, the fallback chosen is
used). Trial and error will probably lead you to your preferred setting here, and it may depend on the subject of the
photos you're reviewing.
The next controls govern size reduction, a key feature:
Size reduction allows PhotoReviewer to process your raw images much faster than it otherwise could. All of the
pixel-processing need only be done on one-quarter as many pixels if you are using 2x reduction. With 4x
reduction, there is one-sixteenth as much work to do. (You will not see a full 4x, 16x or 64x speed increase,
however, because the initial load of the raw file into memory always takes the same amount of time; with size
reduction turned on, the load time is typically the majority of the total processing time for the image).
At least 2x reduction is strongly recommended, and in fact a case can be made for that being the true size of the
raw image in the first place. Camera manufacturers like to claim as high a number of "megapixels" for their
cameras as they can, but most cameras actually measure only red, green or blue light (not all three) at any given
pixel location, and then they perform an operation called "interpolation" (which can be loosely translated as
"guessing") to reconstruct the red, green and blue values that did not get measured, by looking at measured values
from adjacent pixels. So if you consider a "true" pixel to be a pixel with legitimate, non-interpolated red, green and
blue values, then your camera has 1/3 or 1/4 (depending on exactly what you mean) as many pixels as the
marketing bites claim it does. Using 2x reduction effectively uses this "true" resolution and skips the interpolation
step that is normally performed to reconstruct the double-size image that camera manufacturers have led people to
expect. Those interpolated, enlarged images are usually blurry and full of interpolation artifacts anyway, so you
don't lose much by choosing not to generate them.
You can choose to reduce the image size early (which is how you get the biggest speed benefit from it) or late
(which will still give some speed benefit, and will result in higher-quality images, particularly with Sigma and Fuji
cameras). Reduce the size early unless you notice quality problems in the images you're seeing, and they appear to
be resolved when you change to late reduction.
The next control governs the image interpolation quality:
This setting is used, in most cases, only if size reduction is turned off or "late" reduction has been chosen.
Choosing VNG interpolation will perform an extremely high-quality, and extremely slow, interpolation to generate
the full-resolution image. Don't be surprised if it takes a minute or more to complete. Choosing bilinear
interpolation performs a much faster interpolation that will have more artifacts and problems than the VNG
interpolation; but did we mention how much faster it is?
The last set of controls govern camera-specific preferences:
Some cameras may, depending upon the lenses and filters used, the shooting conditions, etc., produce raw images
that have what you might call a "screen door" pattern in areas with a strong green component (such as blue sky).
You'll know it when you see it. You can eliminate this pattern by checking the "Four-color RGB..." checkbox.
Don't turn it on unless you need to, as it will make the processing of your raw images somewhat slower.
Fuji CCDs have the peculiar feature that every second row is staggered by a half-pixel width. In order to properly
process these images, PhotoReviewer performs a trick, interpreting the CCD as being rotated by 45 degrees,
which places all of the pixels in the right locations. You can view the images rotated, if you wish; that will be
faster, but you may get a sore neck. Or you can rotate them back at the end of processing to get a normal-looking
image, paying a speed penalty in return. The "Rotate Fuji images..." checkbox governs this choice.
The Fuji F700 is unique, at the time of this writing, in having two separate sensors at each pixel location, the S and
the R sensors. They have different sensitivities, and the theory is that when the main sensor (the S sensor) gets
overexposed, the R sensor, which is less sensitive, will have a properly exposed pixel value. By combining the
values from the two sensors in an intelligent way, the theory goes, you get a broader exposure latitude than you
would otherwise get. It is essentially the same as bracketing your exposures high and low and combining them in
PhotoShop. PhotoReviewer does not attempt to combine the S and R data to make one perfect image; it always
shows you either the S or R sensor data, by itself. If "Use R sensor..." is unchecked, it will always show you the
main (S) sensor. If "Use R sensor..." is checked, it will try to determine whether the S sensor was overexposed,
and if it was, it will show you the R sensor instead, so you can determine whether it captured data that will allow
you to compensate for the overexposure in later processing. This feature is in its early stages; we'd love to hear
from an F700 user who understands the relevant issues and has ideas that would make our treatment here better.
"Display raw data as grayscale..." does just that. The sensor values are simply taken as given, without attaching
colors to them, without interpolation, without anything. This produces a grayscale image that can be useful in
some circumstances.
Finally, cameras made by Sigma are unique (for reasons that Sigma owners know, and that we need not go into
here), and PhotoReviewer has specialized interpolation code to work with them. There is a fast and a slow version,
comparable to the bilinear versus VNG interpolation tradeoff for other cameras. We recommend using the fast
interpolation unless you notice artifacts with it that go away using the slower interpolation method.
How can I best use PhotoReviewer?
There are several tricks that will help you use PhotoReviewer to best effect: keyboard shortcuts, the Rescan
Review Directory command, and proper use of the vetoed and approved directories.
Keyboard shortcuts exist for the most commonly used features of PhotoReviewer: approving a photo, vetoing a
photo, and moving to different photos within your review directory. A keyboard shortcut reminder panel can be
displayed using the Show Key Controls command under the Window menu; the panel is small and floats, so you
can keep it open until you get used to the controls. To approve the currently displayed photo, just press the space
bar. To veto the current photo, press backspace (perhaps labeled as "delete" on your keyboard). To move forward
to the next photo without either approving or vetoing the current photo, press the right arrow key. The left arrow
key similarly moves you to the previous photo. You can hold down modifier keys when you press the arrow
keys; shift will make you move by 10 at a time, alternate (perhaps labeled as "option") will move you 100 at a
time, and shift and alternate together will move you by 1000 at a time (should you ever have that many images).
Finally, you can move to a random image in your review directory by pressing the tab key, if you want to
commence your reviewing process at a random point rather than at the alphabetical beginning of the file list.
The Rescan Review Directory command can be very helpful if you have a large number of images in your review
directory. You will find that once you have a few thousand images, eliminating duplicates and undisplayable
images takes a fairly long time, and if you use those options, you have to sit through that process every time you
start a new review process. But there's really no reason to analyze the same images again and again; you really
want to check only those images that have been added to your review directory since you last scanned through
them. This is what the Rescan command is for. When you have added new images to your review directory, just
Rescan and any duplicates or undisplayable images among the new additions will be handled, without looking
again at the files previously there.
This ties into the purpose of the vetoed and approved directories. PhotoReviewer allows you to move vetoed files
to a veto directory, rather than simply deleting them. There is an obvious advantage to this: you can recover images
that you vetoed accidentally. But there is a less obvious advantage, too. PhotoReviewer eliminates duplicates, not
only among the files in your review directory, but also with reference to your approved and vetoed directories.
Suppose you veto a given image, and then suppose, for whatever reason, that same image ends up in your review
folder again later. (Maybe you download it from your camera a second time by mistake, maybe you're importing
photos from a source that contains duplicates, whatever — it happens, and quite often in some situations.) If you
deleted the image when you vetoed it, PhotoReviewer would have no way of "remembering" it, and you would
have to look at the duplicate and veto that too. But if you had PhotoReviewer move it to a veto directory,
PhotoReviewer will notice if a duplicate shows up in your review directory, and will delete the duplicate for you
(all this assuming you use the "delete duplicates" feature at all). The same thing applies to your approved directory;
so you might want to leave approved images there, rather than moving them to some other folder, because as long
as they are there, PhotoReviewer will eliminate any duplicates of them that may crop up.
What known bugs and issues affect PhotoReviewer?
The only known issue affecting PhotoReviewer at this time is the possibility of bugs in Apple's image display
code. PhotoReviewer uses code written by Apple to read in and display images. PhotoReviewer has no control
over the behavior of that code, and no way to fix bugs that may exist in it. Because of such bugs, particular images
may fail to display, even though other applications can display them just fine. (Those other applications are not
using the same Apple code to display images, so they aren't bitten by the same bugs). Some images may even
make PhotoReviewer crash due to bugs in Apple's image handling code; that is quite rare, but not unheard of,
particularly in certain releases of OS X. Again, PhotoReviewer has no control over this; there is nothing
PhotoReviewer can do to keep Apple's code from crashing. If you encounter a problematic image, we suggest that
you complain to Apple through whatever channels may be available to you. You can confirm that it is Apple's bug
by trying to add the image to a document in TextEdit; it should fail to display, or even crash, in TextEdit in the
same way it does in PhotoReviewer.
One behavior of PhotoReviewer's is intentional, but may be surprising, so we'll mention it here. Suppose you are
set up to move approved images to their own directory, and suppose you approve an image whose filename is,
say, "barbecue.jpg". Then suppose you go to a friend's place the next day, there's a barbecue there, you take a
photo, the photo gets named "barbecue.jpg", and it ends up in your review directory. The next time you run
PhotoReviewer, you review that photo and decide to approve it (it really is a splendid barbecue photo).
PhotoReviewer now needs to move it to the approved directory; but the older file named "barbecue.jpg" is already
there. Well. PhotoReviewer is all about speed; it doesn't want to bother you with pesky details like this. So rather
than forcing you to choose a new name to resolve the conflict, PhotoReviewer will generate a unique name by
itself, without saying a word to you. You will discover it later, if you even care, when you look in your approved
folder. Typically, the unique name might look something like "barbecue_73925.jpg"; PhotoReviewer will preserve
the original filename, and add a random number to the end of it. When possible, it will keep using the same
random number over and over, so if you had approved photos named "My barbecue.jpg", "Jim's barbecue.jpg"
and "Molly's barbecue.jpg", and then approved another three photos with the same names, you might end up with
"My barbecue_22534.jpg", "Jim's barbecue_22534.jpg" and "Molly's barbecue_22534.jpg". The hope is that this
would help you keep related photos together; if they end in the same random number, they were probably
processed by PhotoReviewer during the same session.
What is shareware? How do I pay?
As a closing note, we'd like to remind our readers that PhotoReviewer is a shareware product. Shareware is a
method of distribution for software that lets you try the software before you pay for it; shareware is not free, in
other words, only free to try. It is required that you pay the shareware fee if you use PhotoReviewer beyond a trial
usage. PhotoReviewer costs $10. Please be worthy of our trust and pay for the software you use. Information on
how to pay and other registration details can be found at http://www.sticksoftware.com/software.html.
Comments on PhotoReviewer, suggestions for future products, and other feedback are welcomed at
[email protected]. Thanks for your support!