1
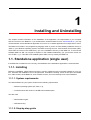
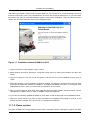
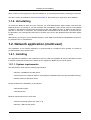
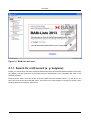
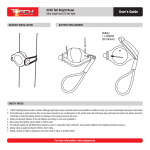
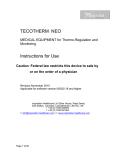
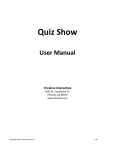
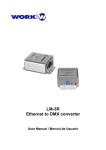
Unter den Eichen 87
12205 Berlin
Germany
Phone: +49 30 8104-0
E-mail: [email protected]
Internet: www.bam.de
User manual
BAM List 2013
Requirements for tanks for the
carriage of dangerous goods
27th of June 2013
9603
© 2013 Federal Institute for Materials Research and Testing (BAM)
Safety and reliability in chemical and materials technologies
Help of BAM List 2013
12th edition
Published 2013-06-27
Copyright © 2013 Federal Institute for Materials Research and Testing (BAM)
Abstract
BAM List 2013 - Requirements for tanks for the carriage of dangerous goods
The BAM List serves as basis for the BAM's substance-related prototype approvals for tank containers and
portable tanks designed for the transport of dangerous goods. Since 2013 this applies also to prototype approvals for demountable tanks and fixed tanks (tank-vehicles). In addition, the list is used as a knowledge
base for the approval of tank-wagons. Furthermore, it serves as a reference for the material related evaluation of other types of containments carrying dangerous goods.
Only those data of dangerous goods are incorporated that may be transported in tanks. Explosives of class 1
are with a few exceptions not included due to the special requirements. Radioactive materials of class 7 have
been completely omitted.
The present document shall give you an easy access to use the BAM List.
Published by the Federal Institute for Materials Research and Testing (BAM)
Team BAM List
Division 3.1 Dangerous Goods Packaging, Division 3.2 Tanks for Dangerous Goods and Accidental Mechanics
Federal Institute for Materials Research and Testing (BAM)
Unter den Eichen 87, 12205 Berlin
Phone: +49 30 8104-1314
Fax: +49 30 8104-1317
E-Mail: [email protected]
Internet: en.bamliste.de
1. Installing and Uninstalling .......................................................................................................... 1
1.1. Standalone application (single user) ................................................................................ 1
1.1.1. Installing ............................................................................................................. 1
1.1.1.1. System requirements ................................................................................ 1
1.1.1.2. Step-by-step guide .................................................................................... 1
1.1.1.3. Demo version ........................................................................................... 2
1.1.2. Uninstalling ......................................................................................................... 3
1.2. Network application (multi user) ...................................................................................... 3
1.2.1. Installing ............................................................................................................. 3
1.2.1.1. System requirements ................................................................................ 3
1.2.1.2. Step-by-step guide .................................................................................... 4
1.2.1.3. Demo version ........................................................................................... 4
1.2.2. Uninstalling ......................................................................................................... 5
2. First steps ................................................................................................................................. 6
2.1. Substance lists by topics ................................................................................................. 6
2.1.1. Search for a UN record (e. g. butylene) ................................................................. 7
2.1.2. Search for a substance ........................................................................................ 9
2.1.3. Material resistance data ....................................................................................... 9
2.2. Create substance lists ...................................................................................................11
3. Usage .....................................................................................................................................14
3.1. Menu bar ......................................................................................................................14
3.1.1. Menu File ...........................................................................................................14
3.1.2. Menu Language .................................................................................................14
3.1.3. Menu Help .........................................................................................................15
3.2. Tool bar ........................................................................................................................16
3.3. Status bar .....................................................................................................................16
3.4. Navigation tree ..............................................................................................................16
3.4.1. Substance lists by topics .....................................................................................16
3.4.2. Create substance lists .........................................................................................17
3.5. Main window .................................................................................................................17
3.5.1. Substance lists by topics .....................................................................................18
3.5.1.1. Table view ...............................................................................................18
3.5.1.1.1. Filter row ......................................................................................18
3.5.1.1.2. Table header ................................................................................20
3.5.1.1.3. Table contents ..............................................................................21
3.5.1.1.4. Status row ....................................................................................21
3.5.1.2. Detail view ..............................................................................................21
3.5.1.2.1. Classification ................................................................................22
3.5.1.2.2. Containments ...............................................................................23
3.5.1.2.3. Material resistance ........................................................................25
3.5.1.2.4. Physico-chemical properties ..........................................................26
3.5.2. Create substance lists .........................................................................................27
3.5.2.1. Tanks .....................................................................................................27
3.5.2.2. Bulk container .........................................................................................29
3.5.2.3. Material resistance ...................................................................................30
3.5.2.4. Substance lists ........................................................................................31
iii
1
Installing and Uninstalling
This chapter contains information on the installation of the application, the requirements of your computer
and the removal of the BAM list. If you download the software BAM List from www.bamliste.de, you may
choose between a local standalone application for one PC or a network application for multiple PCs or users.
The BAM List is written in the programming language JAVA. If you do not have already installed a version of
JAVA on your Windows operating system, the BAM List brings an own Java Runtime Environment (JRE).
These files are stored in the subdirectory "jre" in the installation directory of the BAM List. To execute the
software BAM List JRE 1.6 or higher is required. In the installed subdirectory "jre" you find the current version of JRE 1.7_21. This JRE is not installed system-wide, but only used by the BAM List.
1.1. Standalone application (single user)
If the BAM List is needed for one user only, the installation of the standalone application is recommended.
1.1.1. Installing
Before the installation, please make sure that no version of BAM List 2013 is already installed on your system, otherwise the installation can not be performed. Uninstall the existing version at first prior the installation. Older versions of the BAM List, such as BAM List 2011, do not necessarily have to be uninstalled.
1.1.1.1. System requirements
To install the BAM-List, your system shall meet the following requirements:
• Windows operating system (XP, Vista, 7, 8),
• Local hard drive with minimum 150 MB free hard disk space.
You also need
• Administration rights,
• Valid license key.
1.1.1.2. Step-by-step guide
1
Installing and Uninstalling
After having purchased a valid license to use the BAM List, you will receive an e-mail containing a download
link and a license key. Click on the download link and save the file "BL2013Setup.exe" on your hard disk.
Now make sure that you have administration rights to perform the installation. Open the setup file with a
double click and follow the instructions of the installation wizard:
Figure 1.1. Installation wizard of BAM List 2013
1. At first a welcome screen appears. Click on "Next".
2. Read carefully the license agreement. Accept the license terms by clicking the checkbox and then click
"Next".
3. Copy the license key from the e-mail and paste it into the text box of the installation wizard. Click on
"Next".
4. Select the directory in which the BAM List shall be installed. The directory should be empty and not writeprotected. By default the software is installed to "C:\Program Files\BAM List 2013\" or "C:\Program Files
(x86)\BAM List 2013\". Once you have made your selection, click on "Next".
5. Next you will be asked in which start menu folder the shortcuts of the software should be placed. The default directory is "BAM List 2013". Click on "Install" to start the installation.
6. If you have successfully installed the BAM List, click "Next" to see the last page of the installation wizard.
7. Select the check marks, if you want to start the BAM List immediately and whether a shortcut on the
desktop should be created. Then click "Finish" to complete the installation.
1.1.1.3. Demo version
The demo of BAM List is a fully featured version with a restricted number of dangerous goods in the data2
Installing and Uninstalling
base. It offers you the opportunity to test the software for an unlimited period before purchasing a full license.
The demo version is available for free at www.bamliste.de. No license key is required for the installation.
1.1.2. Uninstalling
To remove the BAM List 2013 from your computer, you need administration rights. Please make sure that
BAM List 2013 is not running on your PC to perform the uninstallation. Open the the overview of all installed
programs in the Windows Control Panel and search for the entry "BAM List 2013" or "BAM List 2013 Demo"
and click on "Remove" or "Uninstall". The uninstall wizard of the BAM List will be opened. It removes the entire application, the corresponding shortcuts on the start menu and on the desktop and the Windows registry
entries.
Alternatively, you can go to your installation directory of the BAM List and start the uninstallation by performing a double-click on "uninstall.exe".
1.2. Network application (multi user)
The installation of the network application is recommended for companies which operate an intranet to
provide the BAM List to several users.
1.2.1. Installing
The application is installed on the network drive (server). After the installation all users of the BAM List have
to execute a setup file stored on the network drive to register the BAM List on the local system.
1.2.1.1. System requirements
The network drive shall meet the following requirements:
• Minimum 150 MB free hard disk space,
• Write access on the network share for unpacking the installation files to a freely selectable directory,
• Read access from Windows clients.
Further needed for the installation on the network:
• Administration rights,
• Valid license key.
Minimum requirements for the client PCs:
• Windows operating system (XP, Vista, 7, 8),
• Minimum 1 MB free disk space.
3
Installing and Uninstalling
1.2.1.2. Step-by-step guide
Server
After having purchased a valid license to use the BAM List, you will receive an e-mail containing a download
link and a license key. Click on the download link and save the file "BL2013NSetup.exe" on your hard disk.
Now make sure that you have administration rights to perform the installation. Open the setup file with a
double click and follow the instructions of the installation wizard:
1. At first a welcome screen appears. Click on "Next".
2. Read carefully the license agreement. Accept the license terms by clicking the checkbox and then click
"Next".
3. Copy the license key from the e-mail and paste it into the text box of the installation wizard. The input of
the license key is only needed for the server installation. Click on "Next".
4. Select a directory on the network drive in which the BAM List shall be installed. The directory should be
empty and not write-protected. Once you have made your selection, click on "Install" to start the installation.
5. If you have successfully installed the BAM List, click "Next" to see the last page of the installation wizard.
6. Select the checkbox "Register client for BAM List", if you want to start the client installation immediately.
Then click "Finish" to complete the installation.
Client
To enable users to start BAM List they have to perform the client installation on their computers.
Open the installation directory on the network drive and execute the file "register.exe" to register a client for
the network version of BAM List. Follow the instructions of the installation wizard:
1. At first a welcome screen appears. Click on "Next".
2. Read carefully the license agreement. Confirm the acceptance of the license terms by clicking the checkbox and then click "Next".
3. Next you will be asked in which start menu folder the shortcuts of the software should be placed. The default directory is "BAM List Network Client 2013". Click on "Install" to start the installation and register the
client.
4. If the installation was successful, click "Next" to see the last page of the installation wizard.
5. Select the check marks, if you want to start the BAM List immediately and whether a shortcut on the
desktop should be created. Then click "Finish" to complete the client installation.
1.2.1.3. Demo version
The demo of BAM List is a fully featured version with a restricted number of dangerous goods in the database. It offers you the opportunity to test the software for an unlimited period before purchasing a license.
Please check the functionality of the BAM List as a network application on your system, especially in virtual4
Installing and Uninstalling
ized environments (eg. Citrix) if it works correctly. If there are any problems, please contact us
[mailto:[email protected]].
The demo version is available for free at en.bamliste.de. For the installation no license key is required.
1.2.2. Uninstalling
To uninstall all client links, click on the file "unregister.exe" on every client PC. This removes all shortcuts in
the Windows start menu, on the desktop and in the Windows registry entries.
After uninstalling all clients, delete the directory on the network drive to uninstall the BAM List from the network drive.
5
2
First steps
If you like to get started using the BAM List without reading through the entire user's guide, use this first
steps section to learn about the essential functions of the software.
The BAM List is divided into two main areas:
• "Substance lists by topics", to search for detailed information of dangerous goods and
• "Create substance lists", to create lists of substances, which include only substances for the transport in certain tanks or bulk containers, considering material resistance compatibility evaluations.
If you start the BAM List, a window opens on the screen that contains a menubar, a toolbar, the information
area consisting of the navigation tree, the main window and at last a statusbar.
In this section you learn how to use the navigation tree and the main window.
2.1. Substance lists by topics
If you start the BAM List using the shortcut in the windows start menu or at the desktop, a splash screen during initialization is displayed. While the window of the BAM List opens, all data is loaded from the database.
The loading process is displayed in the status bar at the bottom left. When all data are loaded, the total number of loaded substances is displayed.
The left side of the application window contains the navigation tree, which is separated from the main window by a displacable vertical divider. After the start the root node "BAM List" in the navigation tree is selected and a graphic in the main window is displayed. (see figure below "BAM List after start")
6
First steps
Figure 2.1. BAM List after start
2.1.1. Search for a UN record (e. g. butylene)
Initially you choose which transport regulation shall be searched: land transport (ADR and RID) or sea transport (IMDG). You find these items if you select the topic "Classification" in the navigation tree. Click on the
selected regulation.
Enter the search term in the main window in the free space above the selected column, e. g. the UN no. or a
part of the name of the UN record (UN name). The search is not case sensitive. It will give you all the corresponding results that contain the search term.
7
First steps
Figure 2.2. Substance lists by topics (classification, land transport)
In our example "butylene" ten entries were found which match with the search term for the UN name. In the
column "BAM Name" you find the substance (or the preparation of a substance) to which the entry applies. If
you move the horizontal scrollbar to the right, you find all other classification criteria (see figure below). You
will notice that some items or parts thereof are highlighted. These marks show you the difference in land
transport between ADR (road) and RID (rail), although these regulations are largely harmonized. Blue highlighted text applies only to RID. Green highlighted text applies only to ADR. In addition, each of the modes
(ADR or RID) are also shown in brackets afterwards.
8
First steps
Figure 2.3. Highlighting of differences between ADR and RID
To select a substance entry click on the requested row. For a better overview the details of that entry ( see
detail view) are displayed below the table. All fields which are yellow highlighted are clickable for an explanation of the codes. An additional dialog window with the explanations will be opened. The dialog can be closed
using the escape key "Esc".
For further information on containments, material resistance and the physico chemical properties click on the
tabs below the detail view.
2.1.2. Search for a substance
If you do not know about the UN record you may search for a substance itself. Type in the search term in the
field above the column "BAM name" and proceed as mentioned above.
2.1.3. Material resistance data
Click on the "Material resistance" tab to find information on construction materials which are suitable for the
selected substance. A green plus sign indicates that the combination of construction material and filling is
generally permitted. A red minus sign indicates that the combination is not permitted. A gray question mark is
displayed if no data is available for this combination of material and filling.
9
First steps
Figure 2.4. Material resistance data
An additional text field is shown behind each material resistance rating of metals. It can show conditions, that
must be strictly met. To obtain the description of the code, e. g. "EK1MN" for mild steel, click on the yellow
highlighted text field. A dialog window with the explanations will be opened. The dialog can be closed again
by using the escape button "Esc".
Figure 2.5. Explanation of material resistance conditions
For more information about the research in the substance lists by topics look in the chapter "Usage" at the
explanations of the navigation tree and the main window.
10
First steps
2.2. Create substance lists
The previous chapter briefly explained how to do the research in the substance lists. Now you will see how
you can create your own lists of substances for specified tanks or construction materials. These lists may be
saved as PDF and printed as well.
Example: if you have a tank for solids having the tank code "S4AH". Additionally the tank is provided with a
vacuum valve with a set pressure of 0.05 bar. The tank is made of unalloyed mild steel (with a normal test
period) and is coated with polyamide.
To find out which substances may be transported by land with this tank, select the item "Tanks" below "Create substance lists" in the navigation tree. An input mask pops up, where you enter the before mentioned
tank parameters. If you have entered all the information the input mask looks like in the figure below.
Figure 2.6. Enter tank parameters
Now click on the button "Create list" at the bottom of the window.
11
First steps
Figure 2.7. Generated list of substances for tank code S4AH
As result a new item appers below "Tanks" in the navigations tree, that reflects the essential criteria of the
previous input mask in its name. This node has been automatically selected and displays a substance list
with suitable substances in the main window. On the right edge of the window you will find your specified
search parameters.
Now you can restrict the result by filtering, sort it by columns and export it to a PDF file. For an export press
the button "Export List as PDF..." in the toolbar or use the shortcut "Ctrl+E". The PDF export dialog will open,
where you may modify the settings (file path, file name, title, description, font size etc). If you click on "Export" in this dialog, the substance list will be saved to a PDF file.
On the first page of the PDF file the document title and an optional description are displayed. In addition, the
search parameters and filter parameters are specified, that the result may be reproduced. From the second
page all substances are listed which apply to the provided search and filter parameters.
12
First steps
Figure 2.8. Exported PDF file
For more information about creating substance lists see chapter "Usage" for further explanation of the navigation tree and the main window.
13
3
Usage
This chapter describes the use of the application in detail. Start the application by clicking the shortcut on the
start menu in Windows, on the desktop or in the installation directory.
The BAM List displays a navigation tree on the left. On the right hand side there is the main window, where
your searched information are presented. You find the menu bar and the tool bar in the upper part and the
status bar below the main window.
3.1. Menu bar
You may access additional functions of the BAM List through the menu bar, which may not be found in the
navigation tree.
3.1.1. Menu File
Click on the "File" menu, to access the sub-menu items listed below.
Export list to PDF...
This menu item is context sensitive and will only be activated when you have already created and selected a substance list in the navigation tree (see "Create substance lists"). By clicking on this menu item, or
by pressing the key combination "Ctrl + E", you can export the substance list to a PDF file and save it. At
first a corresponding dialog box opens in which you can make further adjustments.
Exit
Click on the menu item "Exit" to close the BAM List. Generated lists of substances in the navigation tree
are not automatically saved. Of course all substance lists that are already exported in PDF files are retained.
3.1.2. Menu Language
In the "Language" menu, you may change the language setting of the BAM List. Each user is able to select
individual settings. From this alteration both the user interface (GUI) and the presented data/contents of the
BAM List are affected. For the changes to take effect, you have to restart the application.
German
Click on "German", then the entire application will be changed to German. If German already has been
14
Usage
selected, this action has no effect. Otherwise you are indicated in a dialog box, that the change is available only after restarting the BAM List.
English
Click on "English", then the entire application will be changed to English. If English already has been selected, this action has no effect. Otherwise you are indicated in a dialog box, that the change is available
only after restarting the BAM List.
3.1.3. Menu Help
The "Help" menu contains technical information and instructions for use of the BAM List.
Special provisions
In the menu item "Special provisions" all texts from sections 4.2 in land transport and 4.3/6.8 in the land
and sea transport are listed, which are relevant for tank containers. The menu item is divided into:
• TP - Portable tanks
• TU - Use
• TC - Construction
• TE - Equipment
• TA - Approval
• TT - Test
• TM - Marking
Material resistance
Under this menu item you will find detailed information on the collection of material resistance data. The
menu is further divided into:
• Fundamentals of material resistance evaluation,
• Compatibility evaluation of metallic tank materials,
• Compatibility evaluation of gasket, coating and lining materials and
• Compatibility conditions.
First steps
With this quick start, you can jump directly to the chapter in which an example describes how you can
work with the BAM List.
Help
Click this menu item, if you want to open the complete help information. Alternatively you may access the
help by pressing the key "F1". The help opens instantly and refers to that chapter which is related to the
selected item in the navigation tree.
License
This menu item displays your license information consisting of licensee (company, contact person) and
license (licence type, number of users, license number, date of creation of the license).
15
Usage
Info
Here you will find information about the version of the BAM List and the used software as well as contact
options.
3.2. Tool bar
The tool bar contains commonly used functions from the menu bar for a quick access.
Figure 3.1. Tool bar
You find a context-sensitive button to export a self-generated list of substances in a PDF file (see also the
corresponding menu item) and a button to access the help (see also the corresponding menu item).
3.3. Status bar
At the bottom of the main window of the BAM List there is a text line, which displays status information. It indicates which data during the startup of the BAM List have been successfully loaded from the database.
After the loading of data it displays the total number of records/substances contained in the BAM List.
On the right of the status bar, the licensee of the BAM List is indicated. By clicking on the text a dialog box is
opened in which the full license information (see also the corresponding menu item) is displayed.
3.4. Navigation tree
The navigation tree is always located at the left side of the window, to the right is the actual area to display
the information. Both areas are separated by a narrow beam. If you slide the mouse over the bar between
navigation tree and main window, an icon with a double arrow to the left and to the right appears to move the
bar horizontally. This allows you to provide either the navigation tree or the main window more space to display.
If you have selected the top node "BAM List" in the navigation tree, you will see an information graphic in the
main window, that contains information about the version of the BAM List and its publisher. You can also find
our homepage on the internet www.bamliste.de [http://www.bam.de/en/service/publikationen/bam_liste.htm]
and contact us directly by e-mail [email protected] [mailto:[email protected]].
3.4.1. Substance lists by topics
If you open the node "Substance lists by topcis" you will find all topics which are included in the BAM List:
•
Classification,
•
Containments,
•
Material resistance and
16
Usage
•
Physicochemical properties.
The mentioned topics, except "Physicochemical properties", are divided into further items, to make the
search more comfortable. The topics of "Classification" and "Containments" are each split into the mode of
transport:
•
Land transport,
•
Sea transport and
•
Land and sea transport.
While in "Land transport" or "Sea transport" only the typical characteristics for the selected transport regulation are displayed, "Land and sea transport" contrasts the characteristics of both modes of transport.
The topic "Material resistance" is divided into:
•
Metals and
•
Polymers.
3.4.2. Create substance lists
With this function a substance list for a containment (tanks, bulk container) is created, which are allowed for
transportation in that containment. Additionally you can create a substance list for construction materials or
combinations of these, which are suited for such containments. These lists can be saved as PDF file and
printed. Choose an item from the navigation tree for that:
•
Tanks ,
•
Bulk container or
•
Material resistance.
Each substance list, which you have created, is added to the navigation tree under the selected topic. Such a
node is generated with a short expressive name, that reflects the specified search criteria. The tree is able to
display any number of nodes, so that you may create as many lists of substances as you like. If you want to
remove a substance list from the navigation tree, select it and press the "Delete" key. A deleted substance
list cannot be recovered. In this case re-enter your search criteria and create the substance list again.
3.5. Main window
The main window shows all information which are selected in the navigation tree on the left. It displays either
concise explanations in text form, it prompts you to make your search settings or it lists the search result in a
table view.
17
Usage
3.5.1. Substance lists by topics
Once you have selected a node in the navigation tree, which has further items, you will see a text in the main
window that roughly describes which data are shown in the respective nodes.
If you select a node which has no sub-items, the table view appears in the main window in the upper area
and the detail view in the lower area. The horizontal divider between table and detail view may be moved to
give either the table or the detail more space. Simply move the mouse on the divider so that the cursor
changes to an upward and down double arrow. Hold down the left mouse button and drag the bar to the desired position.
Furthermore, the horizontal divider has two small arrows (triangles), which maximizes the view of one of
these areas. Click on the up arrow so that the lower section with the detail view takes the entire place. If you
click the down arrow only the table view is displayed.
3.5.1.1. Table view
The table view shows the data of individual substances. If the content of the table is not displayed completely
on the screen, then the corresponding scroll bars are provided.
The table view consists of the following components from top to bottom:
• Filter row,
• Table header ,
• Table contents and
• Status row.
Figure 3.2. Table view for topic classification (land transport)
3.5.1.1.1. Filter row
18
Usage
Each column of the table has a separate field on top to enter filter criteria. Each of these fields has a small filter icon in the top right corner. If there is no filter, the filter icon is gray ( ). If filter criteria are set, the icon is
activated and shown in green ( ). All column titles in which a filter is active are indicated in the status row.
If there are only certain filter criteria possible for a column (e. g. for packing group the values: I, II and III), a
popup menu will be opened by left mouse click in the input field offering the predefined filter criteria for this
column.
Example: the popup menu for the column "Class" with filter criteria as shown in the figure below. There are
only values offered which lead to at least one hit, provided that only this column is filtered.
Figure 3.3. Filter popup menu of the column "Class" in land transport
As an additional feature the popup menu allows you to search for those substances with no value specified;
that means the corresponding entry in the table is empty. Furthermore you may reset the filter of the current
column or of all columns of the table by using the last two menu items. If you reset all filters, all records are
displayed again. The reset cannot be undone, but you can re-enter your filter criteria in the corresponding
columns as described.
If you don't want to use the default options of a popup menu, you can even enter the filter criteria in the
search box instead. Close the opened popup menu by pressing the escape key "Esc" or double-click in the
search field. Now the field gets the focus so that you can type in your search criteria.
Filtering the table is usually done by specifying regular expressions (excluded are the numeric columns in the
topic physico-chemical properties). If you are not familiar with regular expressions, it is sufficient to enter the
search text or parts of it. It is irrelevant whether you specify the term in uppercase or lowercase. As a result
all the substances are displayed, in which the substring (e. g. "butane" for UN name) is contained, whether it
is at the beginning, middle or end of the name. If you want to search only the substances, which start with
"butane", enter a regular expression like "^butane". The sign "^" indicates the beginning of an expression.
In the topic physico-chemical properties you may search or filter the numeric columns by means of the following relations (see table below). The relation symbols are given in ascending order, as they would also be
displayed in an ascending sorted column. In each numeric column only one relation can be specified, for example "<= 22.5". If an invalid input filter is given, for example with letters, the result list will always be empty.
Table 3.1. Relation symbols to filter numeric columns (physico-chemical properties)
19
Usage
relation
relation symbol
less than
<
less than or equal
<=
approximately equal
~
equal
not specified or =
greater than or equal
>=
greater than
>
If you use a left click in the filter box and no popup menu opens, just use the right mouse button to open a
popup menu, which has a similar structure to the already mentioned above. As the number of features in
some filter criteria (for example UN name) is not limited, a filter history is offered instead. Each entered filter
criterion is added to the history of the filter column, so that you can quickly access the previous entries via a
right mouse click again. The history filter holds up to 10 recent search values.
The filter history is offered especially for numeric columns (in the physico-chemical properties), but also in
columns like the "UN Number", the "BAM Number", the "UN Name", "BAM Name" and others. Similar column
contents are combined in a single filter history, so that it doesn't matter whether you enter a filter criterion to
the UN name or to the BAM name, it always appears in both filter histories.
Figure 3.4. Filter popup menu in the column "UN Name" with filter history
3.5.1.1.2. Table header
The table header contains all titles of the columns. Click on a column title in table header to see the values of
the table in ascending order. A triangle lying on the ground side appears at the right of the column name.
Slide the mouse over the column title in the table header and a tool tip in the form "column name (sorted in
ascending order)" is displayed. Click again on the same column name to sort the values in descending order.
You will see a downward pointing triangle next to the column name. Slide the mouse over this column title
and a tool tip in the form "column name (sorted in descending order)" is displayed. According to a third click
in the same column all the values are back unsorted.
If you like to alter the width of a column, use the mouse and click on the line between two columns in the table header. When the mouse pointer changes to a horizontal double arrow you can move the boundary to
the left or right.
It is also possible to customize the order of the columns. To do this, click on the corresponding column
name, hold down the left mouse button and move the column left or right to the desired position.
Far right on the edge of the table header, just above the vertical scrollbar of the table contents, there is a fil20
Usage
ter icon. This is to hide the filter row completely and thus to make all substances or lines visible in the table
without filtering. The filter icon allows a fast switching between the filtered and unfiltered state of the table.
3.5.1.1.3. Table contents
The table displays the data of one substance per line. Use the mouse and select a single row to display more
information of this substance in the detail view.
If you use the right mouse button, you can view the filter popup menu of that column where the mouse is currently located. The functionality of the popup menu is described in the section filter row.
If you select a substance in a topic (such as classification, land transport), the line with that substance will
automatically be selected in all other topics which are listed in the navigation tree. However, if you have active filter criteria in another topic not all lines are displayed. This may have the effect that the row of the substance cannot be selected.
Furthermore, there is a special feature included in some columns that applies only to land transport: in some
cases exist different values for the road (ADR) and rail (RID) transport or values for only one regulation.
These values are highlighted in different colors. Values that apply only to ADR are highlighted green and
specified with "(ADR)". Values that apply only to RID, are highlighted blue and marked with "(RID)".
Figure 3.5. Highlighting the differences in land transport (ADR, RID)
3.5.1.1.4. Status row
The status row indicates, how many rows the table contains. If there are filter criteria set in the filter row, the
status row informs you about the column titles with active filters.
3.5.1.2. Detail view
The detail view is below the table view and is divided like the node "Substance lists by topics" in the navigation tree in the items "Classification", "Containments", "Material resistance" and "Physico-chemical proper21
Usage
ties". The individual items may be displayed by clicking the corresponding tab pages.
While subject-specific data is displayed by changing the tabs, the headline shows the "CAS Number", the
"BAM Number" and the "BAM Name" (if available) for clear identification of the substance. The text box uncluding the BAM name is additionally provided with a tooltip to display names which are too long for the field.
In every tab there are fields which are highlighted yellow and where the cursor changes when you hover the
mouse over it. Click on these fields to open a dialog box. The dialog gives a description of the codes in that
field. The explanation from the respective dangerous goods regulation is given. The opened dialog can be
closed by pressing the escape key "Esc".
Advice: The CAS Registration Number is property of the American Chemocial Society and underlies the regulations of that organisation. The declaration through the BAM is for information only and without liability. It
serves for the purpose to make the search more comfortable and the identification of a substance easier.
3.5.1.2.1. Classification
On the tab page "Classification" in the detail view land and sea transport are juxtaposed, so differences and
similarities can be identified. The displayed identification and substance characteristics are listed in the following table.
Table 3.2. Identification and substance characteristics (classification)
characteristic
land transport
sea transport
UN Number
yes
yes
UN Name
yes
yes
Class
yes
yes
Classification code
yes
no
Packing group
yes
yes
Hazard number
yes
no
Hazard label or class + subrisks
yes
yes
Environmentally hazardous
yes
yes
MARPOL
no
yes
Special provisions
yes
yes
Status
yes
yes
22
Usage
Figure 3.6. Detail view of classification
3.5.1.2.2. Containments
On the tab page "Containments" in the detail view land and sea transport are also juxtaposed, but with the
difference that many charactaristics only apply to the land transport and sometimes even just to road transport (see table below).
Table 3.3. Substance characteristics (containments)
characteristic
land transport
sea transport
Tank instruction
yes
yes
Special provisions ch. 4.2
yes
yes
Bulk container
yes
yes
Special provisions bulk
yes
no
Tank code
yes
no
Special provisions ch. 4.3/6.8
yes
no
Transport category
yes
no
Tank vehicle type
yes (ADR)
no
Tunnel code
yes (ADR)
no
The main characteristics for the transport of dangerous goods in tanks are the tank instruction, the tank code
and the special provisions for each.
The tank instruction is an alphanumeric code, which is assigned to an instruction of a portable tank. This
portable tank instruction meets the minimum requirements that shall be met the carriage of the concerned
substance for an approval of this portable tank. If no instruction is given, the carriage in portable tanks is not
permitted. Tank instructions consist of the letter "T" and a number which indicates the applicable minimum
test pressure, the minimum shell thickness (in mm reference steel), the requirements for bottom openings
and the pressure relief device.
23
Usage
The tank code is an alphanumeric code describing a ADR/RID tank type. This tank type corresponds to the
minimum requirements that shall be met for the carriage of the involved substances in tanks according to
4.3/6.8 ADR/RID. If no code is specified, the transport in tanks is not permitted according to chapter 4.3/6.8.
Specifying "(+)" after the tank code means that the alternative use of tanks is permitted only if this is specified in the certificate of type approval.
Figure 3.7. Detail view of containments
If you click on one of the yellow highlighted fields, a dialog window opens (see figure below), in which all of
the field codes are described. Click on the box with the tank code, to get the explanation of the individual
components of the tank code described above.
If you need an overview of all existing special provisions according to chapter 4.2 or 4.3/6.8, you can find
these in the menu bar under the issue "Special provisions".
24
Usage
Figure 3.8. Explanation of a tank code
3.5.1.2.3. Material resistance
The detail view of the material resistance data offers a full view of all contained metallic and polymeric materials in the BAM List with their compatibility evaluations and in the case of metals the potentially necessary
conditions.
Each material is associated with one of the icons listed in the table below (plus, minus, question mark),
provided that you have already selected a row in the table view. In the material resistance evaluation for
metals there are two entries for a metal, namely with short (2.5/3 years) or normal (5/6 years) inspection period (see chapter 6.7 and 6.8 of the regulations for further explanations of the inspection period). If necessary
the conditions are stated behind the icon. In this case the text field is yellow highlighted and contains e. g.
the letter and number combination "AH2N". Click on this text field to open a dialog window, which describes
the meaning of these condition codes.
All materials, whether metal or polymer, are provided with an explanatory tooltip. For example have the cursor over the text "CrNi (short.)" or "ACM" for a moment and the respective tooltip appears which explains the
abbreviation, such as "austenitic chromium-nickel steel (test interval 2.5/3 years)" or "acrylate copolymers".
Table 3.4. Icons for the material resistance compatibility
icon
meaning
compatible, if necessary subject to conditions
not compatible
no data available
25
Usage
Figure 3.9. Detail view of material resistance
3.5.1.2.4. Physico-chemical properties
The detail view of the physico-chemical properties shows the vapor pressure (at 50 °C and at 65 °C), the
density, the melting point, the boiling point, the flash point and the ignition temperature. For each of these
properties, there is a text box with the value followed by an optional remark. On the far right is a number in
parentheses giving a reference to the source from which the data is originated. Click on this number to open
a dialog window in which the source is described.
In addition, the physical state and the state of aggregation during transport are given.
Remark: The specified flash point usually refers a closed cup (c.c.) measurement, unless there is a note given that is explicitly indicating a open cup (o.c.) measurement.
26
Usage
Figure 3.10. Detail view of physico-chemical properties
3.5.2. Create substance lists
If you want to generate lists of substances, you can compile these for the topics tanks, bulk containers and
material resistance based on your search and filter criteria. The created lists may also be saved as a PDF file
and be printed.
To generate lists of substances user provided parameters/entries are necessary that will be explained in the
following subsections. Only when you have made this mandatory entries, the button "Create list" will be enabled. If there are still missing entries, a warning will be displayed directly over the button in a text line.
3.5.2.1. Tanks
Do you have a tank, knowing its identification characteristics such as tank code or tank instruction, and want
to determine which dangerous goods may be transported in the tank, so you may create lists of substances
for tanks.
If you have selected the node "Tanks" in the navigation tree an input mask appears in the main window
which prompts you to specify the requirements of the tanks and other search criteria (see figure below).
Figure 3.11. Create tank list (parameter input)
To generate a tank list, select first which regulations shall be applied. For a ADR/RID tank you may enter the
27
Usage
tank code directly to the enabled text box or use the button "..." to compose a code (see "Compose tank
code").
For a hermetically closed tank (tank code H) you may choose if the tank is equipped e. g. with a bursting
disc. For each tank you can specify whether it is equipped with a vacuum valve, and which opening pressure
it has, whether a flame trap is present or whether it is an explosion-pressure proof tank. Furthermore you
may specify if the tank has a thermal insulation. The additional information have an impact on the resulting
tank code (in the case of the vacuum valve) and the number of the substances contained in the generated
substance list.
Figure 3.12. Dialog "Compose tank code"
If you want to compose the tank code with the help of the dialog, you have to make one selection in each of
the four areas (tank type, calculation pressure, openings and safety valve/device) to receive the tank code.
You need to make sure that you supply an entry in the text field "Calculation pressure in bar" if you did not
select the minimum calculation pressure (G). Enter the calculation pressure in the unit "bar", it is rounded in
the resulting tank code over to the next lower level, which is determined according to the definition of tank
code. For example if you specify a pressure of 7 bar, a resulting tank code for a pressure of 4 bar is adopted.
If you didn't specify a calculation pressure or if it is invalid, you receive a note at the bottom of the dialog. The
tank code can only be accepted if no errors are present and the input is complete.
To enter the tank instruction for a portable tank (UN tank) you need to select at least one mode of transport
in the corresponding area. Thereafter, the selection list with the tank instructions T1 to T22 is enabled. If you
already know which tank instruction you want to search for, simply choose the item in the selection list. Oth28
Usage
erwise you have the option to open the dialog "Compose tank instruction" by clicking the button "...". Some
Information, such as the test pressure and the shell thickness of the tank, are mandatory to determine the
associated tank instruction. For each input the resulting tank instruction is tested on its validity and shown at
the bottom of the dialog. The button to accept the tank instruction is only enabled, if the resulting tank instruction is valid.
Figure 3.13. Dialog "Compose tank instruction"
In addition to the mentioned input of the tank code and tank instruction you can also perform a material resistance compatibility evaluation and further restrict the results either by the aggregate state, the hazard
classes and the maximum density. More information can be found in the section "Create substance lists Material resistance".
3.5.2.2. Bulk container
If you want to know which substances may be transported in a specified bulk container type, you can create
a corresponding list for bulk containers. First you have to choose whether the bulk container is used for land
transport, sea transport or both. Then select the bulk container type: BK1, BK2 or BK3. The button "Create
list" is now enabled. Click on the button to create the list.
Table 3.5. Bulk container types
29
Usage
bulk container type
land transport
sea transport
BK1 - Sheeted bulk container
allowed
allowed
BK2 - Closed bulk container
allowed
allowed
BK3 - Flexible bulk container
prohibited
allowed
Figure 3.14. Create bulk container list (parameter input)
In addition to specifying the mode of transport and the BK-code you may also perform a material resistance
compatibility evaluation as well as restrict the result by the aggregate state, the hazard classes and the maximum density. More information can be found under the section "Create substance lists - Material
resistance".
3.5.2.3. Material resistance
To ensure the compatibility of substances with specific metallic or polymeric materials, you can create a material resistance list with your search criteria. You have to select at least one polymeric material or a metal
and a polymeric material. For metals you can also choose whether it has a shortened or normal inspection
period. If you want to see an explanation of the abbreviation of a material in the form of a tooltip, let the
mouse pointer rest for a moment about the corresponding abbreviation. After one or two seconds the tooltip
is displayed.
When you have selected the desired materials and the button "Create List" is enabled, click on it and view
the list of substances. However, you also have the option to restrict the result with further specifications, for
example the physical state of the substances. Check the box for "Under normal conditions" and click the desired values in any combination of: liquid, solid or gaseous.
If you are only interested in substances with a certain maximum density, you can check the appropriate box
and enter the maximum value. If you don't specify a maximum value, only substances appear in the result for
which a value for the density is stored in the BAM List. Finally, you also have the opportunity to generate a
substance list which is restricted on certain classes of dangerous goods. Check the box "Only dangerous
30
Usage
goods" and select the desired classes.
The functionalities of the material resistance compatibility evaluation and the additional search criteria are
also available in the other areas (Tanks , Bulk container) of "Create substance lists", with the only difference
that you have to check the box "Perform material resistance evaluation" first. Then the component with selectable materials is displayed.
Figure 3.15. Create material resistance list (parameter input)
3.5.2.4. Substance lists
The generated substance lists are added to the navigation tree under the respective parent node independent of the subject area (tanks, bulk containers, material resistance). As a node name the specified search
parameters are used in a shortened form.
For tanks, for example, the tank code is appended with an optional "VV" for an existing vacuum valve, with
an optional "EX" if the vacuum valve is ex-proof and with an optional "TI" for the thermal insulation. If you
have a tank instruction, a "L" for land transport, "S" for sea transport or "M" for multi-modal transportation
(land and sea transport) is added to the beginning. If a material resistance evaluation is carried out, "(Comp.
eval.)" is added to the end.
For bulk containers, the BK-code is prefixed with an "L" for land transport, "S" for maritime transport or "M"
for multi-modal transportation (land and sea transport). Is a material resistance compatibility evaluation carried out, a "(Comp. eval.)" is added.
For a material resistance list, the specified materials are displayed, first the metals then the polymers. The
navigation tree might look like this (see figure below).
31
Usage
Figure 3.16. Navigation tree with created substance lists
Choose one of the nodes with the created substance lists, to see a table with the results in the middle of the
window. Right on the edge you can see "Current search parameters". It is an overview of your specified
search parameters. The result table offers you the same features as described in section "Table view ". The
result can be subsequently filtered and sorted.
Figure 3.17. Created substance lists for tanks
The current created substance list will be exported and saved as a PDF file, when you either click in the
menu bar or in the tool bar "Export List as PDF..." or press the key combination "Ctrl + E". Then a dialog window opens to offer additional export settings.
32
Usage
Figure 3.18. PDF export dialog
In the upper area "Export to PDF" you can specify the path and file name of the PDF file. Use the button with
the three dots "..." to open a file selection dialog. By default, the PDF files are stored on the desktop. The
name of the generated substance list from the navigation tree is proposed as the file name. You can change
the specified title (tank list, bulk container list or material resistance list) of the PDF document as well as you
may specify an optional description in the underlying text box, which will appear on the first page of the PDF
file.
At the lower area "Settings" you can control the PDF-output as you like. You can choose from different paper
sizes, set the page orientation and determine the font size. If you check the box for "Use ratio of column
widths from table", you can manipulate the column widths in the PDF output by changing the column widths
in the created substance list. Check the box for "Open PDF file after export" to immediately display the exported PDF if you have installed a program that can display PDF files. All settings are automatically saved
and restored when you restart the BAM List.
Click on "Export" to save the list of substances now. If the check box to show the PDF file have not been set,
use the file manager of the operating system (e. g. Windows Explorer) to find the PDF file and open it. In the
file your search and filter parameters are listed below the title and the optional description on the first page.
33
Usage
Figure 3.19. Exported PDF file with search and filter parameters
On the second page is the list of substances. The column with the names always shows the UN name in normal font and the BAM name in italics. It can happen that the UN name in land and sea transport is different.
In this case, both may also be added to the BAM name.
Furthermore on each page in the header the version of the BAM List, for whom the BAM List is licensed and
the corresponding license number are indicated.
34
Usage
Figure 3.20. Exported PDF file with substance list
35