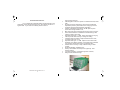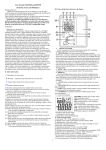
1
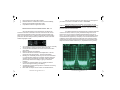
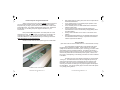
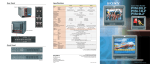
CanaTrans® Warranty
Lentequip warrants the CanaTrans® for a period of one year
from date of purchase when used under normal operating conditions.
Lentequip’s warranty terms are available at lentequip.com in our Terms and
Conditions document. Any unauthorized disassembly of the CanaTrans®
or removal of the silver foil tamper-proof label found to the right of the
power input connector immediately voids the warranty. If you have any
questions regarding the proper operation of the CanaTrans®, please
contact Lentequip. Specifications are subject to change without notice.
In the unlikely event that your transmitter requires servicing,
contact Lentequip for instructions before shipping the unit.
Please read before using!
1365 Morningside Avenue
Unit #5
Toronto, Ontario M1B 4Y5 Canada
Tel: 416.406.2442
www.lentequip.com
CanaTrans® Instruction Manual rev 1.3
16
CanaTrans® Instruction Manual rev 1.3
1
CanaTrans® Menu Guide
Introduction
CanaTrans Start-up Screen - (logo splash)
Thank you for purchasing the CanaTrans®! This specialized unit
integrates outstanding electronic and mechanical engineering along with
robotic circuit assembly to give you state-of-the-art performance for your
uncompromising production requirements. Many years of research and
development have yielded this transmitter that sets a new and longawaited standard for the film and video industry.
The use of this product is strictly governed by the Terms and
Condition of Sale provided by Lentequip and is available on our
website at lentequip.com.
Unit Specific Information- (serial number, ownership and custom lines)
Main Screen - displays current system setup
Pressing any of the 3 left buttons brings up the “Quick Menu”
Quick Menu Items
Each feature will be described in detail to allow you to best setup the unit to your personal preference. A quick reference guide is also
provided to give you an overview of the menu structure.
Television Standard Screen- NTSC or PAL - (show’s unit hardware and software rev.)
Channel Select (default #35)
Selects the transmitted channel frequency from # 20-50 UHF (default #35)
Next
Power Output Select (default 1/4W)
Selects the transmitted power level from 1/16, 1/8, 1/4,1/2, 3/4, 1W
Exit
Next
Video Gain (default 0dB)
Adjusts the Video Gain (brightness) setting from -10 to +10dB (default 0dB)
Next
More...
Press “ENTER” any of the 2 centre buttons
Audible Alert (default
)
Enables/disables audible alert for missing video input or low battery (default ON)
Beep Intensity off, 1, 2 (default 1)
!
!
!
!
!
!
!
!
!
Key Features and Benefits
Microprocessor-based technology means reliability and
upgradability;
State-Of-The-Art design using latest RF components;
Surface mount technology used throughout for miniaturization
(and believe us that it is very small inside!);
Flat membrane switch panel means improved reliability over
conventional mechanical switches;
Quality proven Fischer input connectors, industry standard;
ARRI compatible IVS input, industry adopted standard;
Wide DC input operation on a single input, 12-30VDC coupled
with rugged internal power supply for long-term reliability;
Smart voltage circuitry, 24V or 12V auto detection;
Independently adjustable low battery warning for 24V and 12V
systems;
1W maximum RF output (higher than any other UHF transmitter)
transmits over 1000 feet line of sight when accompanied with
CanaTrans® Instruction Manual rev 1.3
2
Sets the audible warning tone (default 1)
Startup Intensity 1 - 7 (default 6)
Sets the display intensity at start-up, menu and fault conditions
Standby Intensity 1 - 7 (default 5)
Sets the display intensity during normal operation
Extended Menu Items
!
Audio Input (default
1 dim
2
3
4**
5
6
7 bright
)
Enables/disables the audio input
Audio Gain (this selection blanked if audio input OFF) (default 0dB)
Adjusts the Audio Gain setting from -10 to +10dB
12V Low Notify (default 11V)
Sets the low battery warning threshold in 12V operation
24V Low Notify (default 22V)
Sets the low battery warning threshold in 24V operation
Battery Saver (default off)
Turns CanaTrans OFF at 18V on 24V systems and 10V on 12V systems to save you batteries
RF Power Save (default
)
Turns RF output off if video input is missing
Auto Power On (default
)
Turn CanaTrans automatically ON when connected to power, otherwise use power switch
Test Pattern
Select between Video In or internally generated test pattern (zebra stripes)
About...
Scrolls user information and firmware revision
Displays information specific to the transmitter, firmware revision, owner*
*User information screens are custom options which are factory programmed
Back...
CanaTrans® Instruction Manual rev 1.3
15
Exit
CanaTrans® Accessories
For a complete list of available cables and accessories for the
CanaTrans, please visit www.lentequip.com. We maintain the site on a
regular basis. If your cable is not listed, please contact us.
!
!
!
!
!
!
!
!
!
!
!
!
!
!
!
CanaTrans® Instruction Manual rev 1.3
14
high gain flag antennas;
Unit designed and tuned to operate on selected channels, 20-50
UHF;
All power levels are calibrated on all channels (186 discrete
adjustments) made by automated means using high-end test
equipment and automated proprietary algorithms;
6 levels of adjustable output power! No RF pads required means less heat generated in unit!;
BNC video input and combined power & video input connection;
Video absent detection to facilitate the troubleshooting of bad
cables or missing video input;
Adjustable video gain +/- 10dB. Helps compensate for varying
video tap levels without having to change iris setting;
Integrated video test pattern, helps troubleshoot video chain;
Line level audio input, mono;
Adjustable audio gain +/- 10dB. Helps fine tune audio levels;
Graphical menu display interface, a transmitter first! Facilitates
user operation and provides easy to understand setup;
Variable screen intensity, 7 steps, suitable viewing in direct
sunlight;
Keystroke feedback, adjustable tone;
Factory customizable ownership screen (optional) - theft
deterrent feature;
Innovative packaging, compliments high-tech cameras;
Designed “Rental House Tough”;
CanaTrans® Instruction Manual rev 1.3
3
!
!
!
!
Novel universal mounting plate included;
Modular electronic construction means increased reliability;
Electronics assembled at ISO 9001 facility;
Unparalleled customer support and service.
General notes to the new firmware release - Rev: 1.x
Since the introduction of the CanaTrans®, Lentequip has
received constructive comments from users around the world. These
comments were directed at making an already great transmitter even
better. At Lentequip we rely on customer input to deliver great working
products for film and video production professionals. Some of the new
software highlights include:
!
!
!
!
!
!
!
!
Use only one video input at a time, either the one through the 4
pin Fischer connector or the BNC connector - never both.
Remember that the best transmitter in the world is not good
without an equally well-matched receiver. If your transmitter is functioning
correctly but your image is poor, check the receiver. We have seen many
problems that were receiver based.
You will NOT damage the CanaTrans® if it is powered without its
antenna connected, however, a poorly transmitted image is the result.
Ensure that you are using the supplied CanaTrans® antenna(s) at all
times. It is a custom part and is an integral part of the transmission circuit.
No substitutes are approved by Lentequip. The CanaTrans® antenna is
installed by turning the knurled ring at the base of the antenna and then
further tightening (not too tight!) to lock the antenna at the desired angle.
Keep the antenna vertical at all times (i.e. perpendicular to the ground).
An increase of usable UHF channels from 20 to 50 (31 channels)
with the ability to wrap around from channel 20 to 50;
A new push and hold feature to increase channels and video
gain rapidly;
Easier to navigate user interface;
Quick access to the most often used adjustments - channel,
power and video gain selection - this is the Quick Menu;
Redesign of the Standby Screen layout to be more informative,
i.e. all Quick Menu settings are constantly viewable during the
operation of the CanaTrans®. The battery voltage has been
permanently added to the display to give you continuous
readings;
Included new graphical battery icon to display the relative
amount of charge remaining in the battery;
A fivefold rate increase to the presence or absence of incoming
video signal detection;
New easier to interpret “check marks” for enabled features;
CanaTrans® Instruction Manual rev 1.3
4
CanaTrans® Instruction Manual rev 1.3
13
Practical Tips for Using the CanaTrans®
!
Always ensure that you are using the LEAST amount of power to
give you the best reception results. Start at 1/16W (single bar antenna
icon) and work your way up from there as conditions dictate. Small rooms
require little power - long outdoor transmissions require more. Experience
that will allow you to make good power judgements based on your
environment.
!
More power is NOT always better! This latter point can not be
emphasized enough. Too much power in a small room, for example, can
overload many receivers, giving you poor image quality and creating
unwanted reflections or intermodulation within your working environment.
Never transmit on an occupied channel.
!
!
!
!
New written alerts for missing video, this can be coupled with an
associated audible alert;
A new “beating heart” icon to indicate proper operation of the
CanaTrans® processor circuitry;
A new “transmit power” icon with scalable bars to indicate the
selected output power;
A new auto power-down message has been added if the
CanaTrans® turns off due to low battery voltage (Battery Saver
must be Enabled);
Factory reset confirmation is now shown on the screen when
initiated;
Field programmable updates are now possible without sending
the CanaTrans® back to Lentequip. A special communication
cable is required for this feature.
Check for a clear channel before powering-up the CanaTrans®.
Using the Menu
(also refer to the menu tree located further on in this instruction manual)
The CanaTrans® is equipped with 4 soft switches with yellow
triangles pointing towards the display. These switches are of highest
quality and are rated for thousands of cycles. Never dig your nails or other
sharp objects into the membrane switches! The switches are named 1
through 4 starting at the far left of the unit when viewed face-on. Switch 4,
which is also printed with the international power symbol, is used to turn
the unit on or off depending on the setting of the Auto On function selected
in the Menu.
Accessing the menu is as simple as pressing any of the buttons,
1 through 4. The CanaTrans® menu has been designed to provide you
with a quick and intuitive means of accessing the many features of the
transmitter. The most commonly used features such as changing the
channel, power levels and video gain are grouped together and comprise
the Quick Menu. You can also quickly jump to the main menu after poweron by briefly pushing button 4.
Production View of CanaTrans®
CanaTrans® Instruction Manual rev 1.3
12
CanaTrans® Instruction Manual rev 1.3
5
Navigating the Menus
Power/Video Connection to the CanaTrans®
Navigating the menu is done by using the 4 switches below the
graphics screen. These are referred to as soft-switches and their function
changes based on the graphical label above them. To change the channel,
for example, push any of the left-most three switches, then increment the
channel with the + or - key. Holding down the selection button will increase
the selection speed. Selecting “Next” advances you to the subsequent
item. Selecting “More” advances you to the Extended Menu where more
finite adjustments or settings can be made. The continuous selection of
“Next” brings you back to the top of either the Quick Menu or More menu
items, depending on your place within the menu.
The pinouts of the connectors used on the CanaTrans® are
labelled right on the unit for your convenience. The power/video input
combination has been standardized on the ARRI IVS scheme. Cables are
available from Lentequip.
Note: If 15 seconds have elapsed since the last key press within the
Menu, the transmitter will automatically return to the standby screen.
Pin 1
Pin 2
Pin 3
Pin 4
DCGround
Video Ground (the CanaTrans® keeps grounds isolated!)
Video Input, 1V p-p
12-30VDC
The mating Fischer connector to the CanaTrans® power input is a
S102 A053-130+ and can be ordered through Lentequip.
Audio connection to the CanaTrans®
Resetting the Menus to Factory Default
To return the CanaTrans to its factory default setting, do the
following:
1.
2.
3.
4.
5.
Unplug the CanaTrans®
Hold down switch #1 (do not let go!)
Power-up the CanaTrans® (Depending on the last setting of the
Power On feature, either plug in the power cable or push the ON
switch.)
**Factory Reset** is shown on display
Release button #1
Factory reset conditions are now returned to all menu items.
CanaTrans® Instruction Manual rev 1.3
6
The CanaTrans® will accept a line-level mono audio input and
will transmit incoming audio over the same selected UHF channel.
Pin 1
Pin 2
Audio Ground
Audio IN
The mating Fischer connector to the CanaTrans® audio input is a
S102 A051-130+ and can be ordered through Lentequip.
Use and Care of your CanaTrans®
Please remember that the CanaTrans® is a rugged, yet delicate
device. Treat it with care and it will serve you well for a long time to come.
Avoid severe impacts as this may damage the display. Never overtighten
the antenna connector. Never dig your nails or other sharp objects into the
membrane switches! Avoid exposing the CanaTrans to excessive moisture
or rain. Contact Lentequip for answers to any user specific questions.
CanaTrans® Instruction Manual rev 1.3
11
RF Power Save:
When this feature is enabled and the video absent circuitry
indicates that there is no live video at the input (indicated by *NO VIDEO*
on the display) then non-essential transmitting circuitry is disabled to
conserve power. The lack of transmission is clearly recognized by a snowy
picture at the receiving monitor. If this feature were turned off then instead
of a snowy picture at the receiving monitor you would see a black screen
indicating the presence of an RF carrier. If this feature were turned off, you
would see a black screen at the receiving monitor (indicating the presence
of an RF carrier), instead of a snowy picture. This feature is by deafult on.
If you are using tuners that continuously scan for the presence of a
channel, then you may wish to keep this selection disabled.
Auto Power On:
When enabled, the CanaTrans® will turn on when a live power
connector is inserted into the unit. When disabled, the ON switch must be
pressed. This is the right-most switch on the face of the CanaTrans®.
This switch can also be used to turn the transmitter OFF by pressing and
holding the button.
Test Pattern:
A unique zebra test pattern can be generated by enabling this
feature. The benefits are that you can transmit a signal without having live
video available. Two white stripes will appear on the monitor when
enabled. Note: Some receivers do not properly lock onto this internally
synthesized test pattern. Again, receivers like the Sony TU-1041U will
display this zebra pattern correctly.
About:
In the “About” menu you can review the serial number, hardware
and firmware version as well any custom programmed fields requested at
the time of purchase.
The Quick Menu
Channel Select:
This selection allows you to choose any of the 31 available
transmitting channels from 20 to 50 UHF. Holding the + or - button down
accelerates the selection. The channels freely loop around from 20 to 50
and vise versa. Only transmit on a non-occupied channel! Check for a
good channel with either the transmitter switched off or it's power level
turned OFF as described below. A vacant or usable channel is seen at the
receiving monitor as a snowy picture. For best performance, use the
antenna with the red cap for channels 20 to 35 and the yellow one for
channels 35 to 50.
Power:
This feature allows you to select any of the 6 transmission power
levels: 1/16, 1/8, 1/4,1/2, 3/4 or 1W, including OFF. Here again the power
levels freely loop around. The CanaTrans® does not need the use of RF
pads or RF attenuators! Do not install any on this unit. Instead use the
power level adjustments to make this type of change.
Video Gain:
The CanaTrans® is most unique as it allows the user to
compensate for varying video levels right at the transmitter without
changing your video tap iris setting. With the Video Gain feature you can
amplify (increase) or attenuate (decrease) your video level by +/- 10dBs.
0dB is the default factory setting. By changing the gain setting you are
able to brighten or darken your transmitted picture.
Selecting “Back” takes you to the Quick Menu without completely
exiting the menu tree.
Note: There are some TV receivers that will block attempts from
transmitters to boost the video signal levels. Receivers commonly found in
our industry such as the Sony TU-1041U series will allow for video gain
compensation as transmitted by the CanaTrans®.
CanaTrans® Instruction Manual rev 1.3
10
CanaTrans® Instruction Manual rev 1.3
7
Back:
The More Menu
Audible Alert:
This setting will enable or disable the buzzer from making a
sound when either the video input is missing or when the battery is low as
set by the 12V or 24V Low Notify setting. The default setting is ON as
indicated by the check mark. If you do not want audible alerts deselect this
feature. Audible alerts are active when the musical note icon is present
next to the beating heart.
Beep Intensity:
With this setting you can vary the sound of the keystroke
feedback coming from the CanaTrans®. Two different sound options are
available, 1 & 2, including the option of completely turning it off, setting 0.
Startup Intensity:
Here you can set the display's start-up intensity. Any alerts
requiring the operator's intervention (i.e. missing video or a low battery
condition) is also associated with the same start-up screen intensity. For
instance, if you have set a standby intensity of 2 (which is low) and you
lose your video input signal, the CanaTrans® screen will switch to the startup screen intensity setting until the video signal is returned. The same
applies for a low battery condition. Accessing the menu will also force the
CanaTrans® to revert to the start-up intensity.
Audio Gain:
Similar to the video gain feature as described above, changes in
the audio level can be adjusted here. 0dB is the default setting.
12V Low Notify:
The CanaTrans® continuously monitors the incoming battery
voltage with a high degree of precision and displays the voltage on the
screen next to the battery icon. You can set your preferred battery low
warning threshold at this menu item. Voltage threshold selection can be
made from 10V to 12V in 200mV increments. Once this threshold is
reached the battery icon will flash and depending on your Audible Alert
selection it will be accompanied by a warning tone.
24V Low Notify:
Similarly to the 12V Low Notify described above, the user can
set the desired threshold for operation on 24V equipment from 20V to 24V
again in 200mV increments. Once this threshold is reached the battery
icon will flash and depending on your Audible Alert selection it will be
accompanied by a warning tone.
Audio Input:
This setting allows you to turn the CanaTrans® audio input on or
off.
Battery Saver:
The CanaTrans® is also unique in being able to identify the
incoming power standard: either a 12V or 24V source. Based on the
voltage measurement during the power-up sequence, the CanaTrans® will
emulate a 12V or 24V piece of equipment. The big advantage is that the
CanaTrans® can disconnect itself from the power source so that it will not
drain your batteries to a deep discharge level should the unit remain
powered and unattended (the CanaTrans® can operate down to 9V!). If
the Battery Saver feature is enabled (shown by means of a check mark)
then the transmitter will shut itself down at 18V (in 24V mode) or at 10V (in
12V mode). A brief message will appear on the screen confirming the
reason for a shutdown. Once this shutdown occurs, restarting the
CanaTrans® can only be accomplished by means of a power cycle (i.e.
removing the input power connector and re-inserting it with what should be
a charged battery).
CanaTrans® Instruction Manual rev 1.3
8
CanaTrans® Instruction Manual rev 1.3
9
Standby Intensity:
Under normal operation this is where you would set your
preferred screen intensity from 0 to 7. Note: A screen setting of 0 will
effectively turn the display OFF until an error condition occurs or the menu
is being accessed, whereby the unit will revert to the start-up intensity
described above.