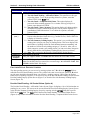
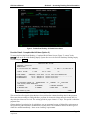
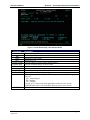
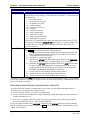
1
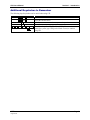
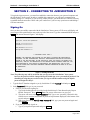
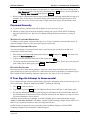
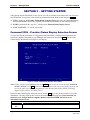
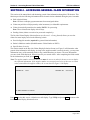
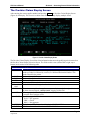
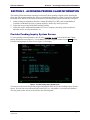
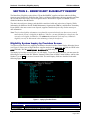
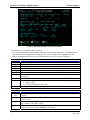
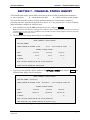
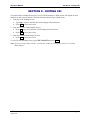
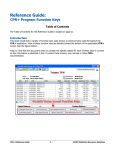
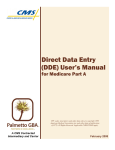
CLAIMS STATUS INQUIRY (CSI)
USER’S MANUAL
CPT codes, descriptors and other data only
are copyright 1999 American Medical Association
(or such other date of publication of CPT).
All Rights Reserved. Applicable FARS/DFARS apply.
August 2007
CSI User’s Manual
Table of Contents
TABLE OF CONTENTS
SECTION 1 – INTRODUCTION
1
Claims Status Inquiry Overview................................................................................................1
General Claim Information .............................................................................................................. 1
Pending Claim Information.............................................................................................................. 1
Beneficiary Eligibility Information.................................................................................................. 1
Financial Information....................................................................................................................... 1
Who to Call, Availability, and Hours of Operation ...................................................................2
Requirements for Performing Claim Status Inquiry ..................................................................2
Troubleshooting CSI..................................................................................................................2
Additional Keystrokes to Remember.........................................................................................3
SECTION 2 – CONNECTING TO JURISDICTION C
4
Signing On .................................................................................................................................4
Password Security......................................................................................................................5
Monthly Password Expiration.......................................................................................................... 5
Optional Password Changes ............................................................................................................ 5
Revoked Passwords ......................................................................................................................... 5
If Your Sign On Attempt Is Unsuccessful .................................................................................5
SECTION 3 – GETTING STARTED
6
Command VPIQ – Provider Claims Display Selection Screen .................................................6
Commands PAME .....................................................................................................................7
SECTION 4 – ACCESSING GENERAL CLAIM INFORMATION
8
The Provider Claims Display Screen.........................................................................................9
SECTION 5 – ACCESSING PENDING CLAIM INFORMATION
11
Provider Pending Inquiry System Screen ................................................................................11
Provider Detail Pending Screens ................................................................................................... 12
Provider Summary Pending Inquiry Screen (Option S)................................................................. 16
SECTION 6 – BENEFICIARY ELIGIBILITY INQUIRY
18
Eligibility System Inquiry by Providers Screen.......................................................................18
Error Messages.........................................................................................................................21
Exiting the Beneficiary Eligibility System (ELGB) ................................................................22
SECTION 7 – FINANCIAL STATUS INQUIRY
23
SECTION 8 – EXITING CSI
25
On behalf of CIGNA Government Services, Jurisdiction C DME MAC EDI Services
will continue to be provided by Palmetto GBA.
JCEDI
August 2007
i
CSI User’s Manual
Section 1 – Introduction
SECTION 1 – INTRODUCTION
Claim Status Inquiry (CSI) allows you to electronically check the status of production claims after they
have passed the front-end edits and received claim control numbers (CCN). The information in this manual,
along with the correct software and a Jurisdiction C-assigned RACF number, will enable you to use your
computer to check the status of your production claims in Jurisdiction C’s claims adjudication cycle.
For claims filed electronically, you will be able to locate your claim in the processing cycle after
approximately three working days. Through CSI, you will know if your claim has been paid, has been
denied, or is pending. If you are checking the status of pending assigned claims, there are additional
screens available containing more detailed status information.
For both electronic and paper claims, payment information is available through CSI.
Claims Status Inquiry Overview
The four primary functions of Claims Status Inquiry (CSI) include general claim, pending claim,
beneficiary eligibility, and financial.
GENERAL CLAIM INFORMATION
This function provides information about the status of all electronic claims submitted during the past
six months (paper and/or electronic, assigned and/or non-assigned). See Section 4 – Accessing General
Claim Information for additional information on this function.
PENDING CLAIM INFORMATION
This function of CSI provides information about pending claims that are under medical review or are
being developed for additional information. Information available on pending claims includes claims that
have been electronically transferred to other DME MACs, processed claims (e.g., paid or denied), and
claims that received no payment because of deductible requirements or payment in full from another
insurer(s). See Section 5 – Accessing Pending Claim Information for additional information on this
function.
BENEFICIARY ELIGIBILITY INFORMATION
This function allows CSI-enrolled DMERC suppliers and their authorized billing agents to access beneficiary
eligibility data. See Section 6 – Beneficiary Eligibility Inquiry for additional information on this function.
FINANCIAL INFORMATION
This CSI function will display the last three check dates made to you from Jurisdiction C, including the
date, dollar amount, and number of checks in each payment. The information displayed is available for
both assigned paper and electronically filed claims. See Section 7 – Financial Status Inquiry for
additional information on this function.
JCEDI
August 2007
Page 1
Section 1 – Introduction
CSI User’s Manual
Who to Call, Availability, and Hours of Operation
If you have a question about the software or about transmitting claims to Jurisdiction C, please call the
Jurisdiction C Electronic Data Interchange (JCEDI) Technology Support Center toll-free at 1-888-6139271 Monday through Friday from 8:00 a.m. to 5:00 p.m. (EST). Please be sure to identify yourself as a
JCEDI supplier or billing service when you call.
If you have questions about correct HCPCS codes, claim payments, insurance crossover, or program
policies, please call the Jurisdiction C Provider Service Center toll-free at 1-866-270-4909.
CSI is available Monday through Friday from 7:00 a.m. to 9:30 p.m. (EST) and Saturdays from 7:00 a.m.
to 5:00 p.m. (EST). CSI and the JCEDI Technology Support Center are unavailable on the following
holidays:
♦ Labor Day
♦ New Year’s Day
♦ Thanksgiving Day
♦ Martin Luther King, Jr. Day
♦ Day after Thanksgiving
♦ Memorial Day
♦ Christmas Eve
♦ Independence Day
♦ Christmas Day
Requirements for Performing Claim Status Inquiry
Before you can inquire about the status of your claims, make sure you have the following:
♦ Communications software (Passport) from Jurisdiction C that can connect you with Jurisdiction C’s
host computer, or vendor software that performs claim status inquiry.
♦ Your JCEDI-assigned RACF Number (begins with the letter D) and password.
♦ Your software vendor’s user’s manual (if applicable).
♦ This manual, which provides specific instructions on performing claim status inquiry.
Note: If you are using vendor software and have questions about how to perform CSI within that
software, you must call your vendor for answers. JCEDI cannot answer questions regarding any
vendor software!
Troubleshooting CSI
While using the CSI function, you may encounter technical difficulty. These problems are often resolved
quickly if you know what to look for when troubleshooting. Before calling the JCEDI Technology
Support Center, be sure to check the following:
♦ When your CSI session is active, you should see “K-LCK” displayed in the bottom left corner of the
screen. This display message indicates that your screen is active and ready to receive the next
command. If “K-LCK” does not display, press CTRL and R together to reset the screen. If you try to
use CSI without “K-LCK” displaying on the screen, the keyboard and/or screen may not respond.
Pressing CTRL and R together should solve this problem.
♦ The problem outlined above may be a result of the NUM LOCK key (located on the right side of most
keyboards, in the upper-left corner of the number keypad) being set, which can cause the CSI
function to not perform as expected. If NUM LOCK is set, there may be a glowing light or another
indicator showing on your keyboard. You must turn this off by pressing the NUM LOCK key.
If you continue to experience problems with CSI after resetting your screen and double-checking the
NUM LOCK key, call the JCEDI Technology Support Center toll-free at 1-888-613-9271 and ask for
Technical Support.
Page 2
JCEDI
August 2007
CSI User’s Manual
Section 1 – Introduction
Additional Keystrokes to Remember
The following keys/keystrokes can be useful when using CSI:
Keystroke(s)
CTRL and C
CTRL and R
PF3
ESC
PF3 PF4 PF12 PF15 PF16 PF24
and Clear Screen ( ESC )
JCEDI
August 2007
System Response
Clears the current screen
Resets the current screen
Exits the current screen and returns you to the previous screen
Clears the current screen
Use of these keys from ELGB will end VPIQ. You must then
reenter the system (type VPIQ on the blank screen) to continue
using CSI.
Page 3
Section 2 – Connecting to Jurisdiction C
CSI User’s Manual
SECTION 2 – CONNECTING TO JURISDICTION C
To begin the sign on process, you must first establish a connection between your personal computer and
the Jurisdiction C host system. In order to establish this connection, you will need a communication
software package (i.e., Passport). If you are using vendor software, you should have the software necessary
to establish the host connection. Check with your vendor first if you have any questions on establishing a
CSI host connection.
Signing On
Once you have successfully connected with the Jurisdiction C host system, a CICS screen will display and
your cursor will be positioned for entry at the top left of the screen. Type the command CSSN and press
ENTER . The screen shown in Figure 1 will display.
TS00P420 - TS00M42
Blue Cross and Blue Shield of SC
03/08 14:44
Type your userid and password:
Userid ===============>
Password =============>
New Password =========>
Verify New Password ==>
** COPYRIGHT APRIL 1995 **
WARNING: THE COMPUTER APPLICATIONS YOU ARE ABOUT TO ACCESS ARE PROTECTED BY
COPYRIGHT LAW AND INTERNATIONAL TREATIES. UNAUTHORIZED DUPLICATION OR DISTRIBUTION OF THE APPLICATIONS, OR ANY PORTION OF THEM, MAY RESULT IN SEVERE CIVIL
PENALTIES, AND WILL BE PROSECUTED TO THE MAXIMUM EXTENT POSSIBLE UNDER THE LAW.
DATA CONTAINED IN THIS SYSTEM IS CONFIDENTIAL AND PROPRIETARY. USE OF THIS
DATA FOR OTHER THAN LEGITIMATE BUSINESS PURPOSES AUTHORIZED BY BCBS OF SC WILL
BE PROSECUTED.
PF 3=End
Figure 1 – CICS Sign On Screen
Note: The following steps will be used each time you sign on to the Jurisdiction C host system;
however, the password will be changed during the initial sign on to a personalized password. You
should begin using that password each time you sign on and discontinue using the default
password assigned in Step 2.
1. Type the RACF Number assigned to you by Jurisdiction C in the Userid field and press TAB .
2. In the Password field, type in your password.
a. If this is your first time signing on…
i. Type in the default password provided on the Jurisdiction C Claim Status Inquiry Report
labeled “Password.” Press ENTER . (Note: The cursor will not move as you type.)
ii. The cursor will move to the New Password field. Type a new “personal” password in this
field (be sure to read the instructions on password requirements displayed at the bottom of the
screen) and press TAB .
iii. With your cursor in the Verify New Password field, type your new password again and
press ENTER .
b. If you have previously signed on…
i. Type in your personal password and press ENTER .
Page 4
JCEDI
August 2007
CSI User’s Manual
Section 2 – Connecting to Jurisdiction C
ii. If you are required to change your password (i.e., after 30 days), the cursor will jump to the
New Password field. Type in a new password and press TAB . Retype your new password in
the Verify New Password field and press ENTER .
3. When you have completed the sign on steps, you should receive a message stating that your sign on is
complete. Note: A User Survey screen may display upon completion of the sign on process. Press
ESC to clear your screen. You are now ready to begin claim status inquiry from the blank screen.
Password Security
♦ To ensure privacy, your password will not display on your screen as you type.
♦ Should you forget your password or need help resetting your screen, call the JCEDI Technology
Support Center toll-free at 1-888-613-9271 Monday through Friday from 8:00 a.m. to 5:00 p.m.
(EST).
MONTHLY PASSWORD EXPIRATION
To enhance system security, all passwords expire every 30 days. In addition, you must make at least 12
password changes before you can repeat a previously used password.
OPTIONAL PASSWORD CHANGES
You may also change your password at any time if you feel that your current password has been
compromised. Follow these steps:
1. After entering your Userid and current password, press TAB (do not press ENTER ). The cursor will
jump to the New Password field.
2. Type in your new password. When you are done typing, press TAB .
3. The cursor will now be positioned at the Verify New Password field. Type in your new password
again. When you are done typing, press ENTER .
REVOKED PASSWORDS
Passwords may be revoked if three attempts to sign on are made using an incorrect password. If your
password has been revoked, you will receive a notice that it has been revoked when you attempt to log in.
Please call the JCEDI Technology Support Center toll-free at 1-888-613-9271 for assistance.
If Your Sign On Attempt Is Unsuccessful
If you complete the sign on steps as outlined in the Signing On information in this section and you receive
the screen message “INVALID SIGN-ON ATTEMPT,” perform the following:
1. Press ESC to clear your screen.
2. Type CSSN and press ENTER . The CICS Sign On Screen (shown in Figure 1) will display again.
3. Re-enter the information as outlined in the Signing On information in this section. Double-check all
typed information. On the password fields, where the characters do not display as you type, be sure to
pay careful attention to what is entered.
After three unsuccessful sign on attempts, your RACF Number will be deactivated and the message
“USER ID HAS BEEN REVOKED” will display. Call the JCEDI Technology Support Center toll-free at 1888-613-9271 to ask for assistance to have your CSI password reset.
If, after having your password reset, you continue to have problems signing on, call the JCEDI
Technology Support Center and ask for Technical Support.
JCEDI
August 2007
Page 5
Section 3 – Getting Started
CSI User’s Manual
SECTION 3 – GETTING STARTED
After signing onto the Jurisdiction C host system, you will see a blank screen from which you can access
all CSI functions. Just type one of the following commands onto the blank screen and press ENTER :
♦ VPIQ—Brings up the Provider Claims Display Selection Screen (for access to general and pending
claim information and beneficiary eligibility, see additional information on this command below)
♦ PAME (pronounced like “pay me”)—Brings up the Financial Status Inquiry Screen
♦ CSSF LOGOFF—To exit the CSI system
Command VPIQ – Provider Claims Display Selection Screen
To access the first three functions of CSI (general claim information, pending claim information, and
beneficiary eligibility information), type VPIQ on the blank screen and press ENTER . The Provider
Claims Display Selection Screen (Figure 2) will display.
Figure 2 – Provider Claims Display Selection Screen (Menu)
Note: If, after you have typed VPIQ and pressed ENTER , you receive the screen message “OPERATOR
ACCESS DENIED,” press ESC if you are using Passport to clear your screen and try again. If you
receive the same error message, document the error message and call the JCEDI Technology
Support Center toll-free at 1-888-613-9271.
In the Provider Claims Display Selection Screen, use the TAB key to move between fields as you enter
information. The entry fields on this screen are described in the following table. Please note that you
must enter your 10-digit Medicare supplier number in the PROVIDER NO field to access
information on this screen.
Provider Claims Display Selection Screen
Field Name
Description
Enter your 10-digit Medicare supplier number.
PROVIDER
NO
Page 6
JCEDI
August 2007
CSI User’s Manual
Section 3 – Getting Started
Provider Claims Display Selection Screen
Field Name
Description
The patient’s Medicare number or a Railroad Retirement Number. Entering both the
HICN
SERVICE
DATE
PENDING
CLAIMS
BENEFICIARY
ELIGIBILITY
supplier number and the HICN lets you inquire about claims for a specific patient.
The date(s) when service was provided. On the two lines, enter the “FROM” and
“TO” dates on which the service was rendered. Be sure to type the service date in the
MMDDYY format specified. For example, services rendered on June 3, 1999 would
be typed as 060399. If the “FROM” and “TO” dates are the same, you may skip the
“TO” date.
To access all pending claim information, enter a “Y” in this field.
To access beneficiary eligibility information, enter a “Y” in this field.
From the Provider Claims Display Selection Screen, to access:
♦ General claim information—Enter data into the Provider No field and the HICN and/or Service
Date fields (see Section 4 for additional information).
♦ Pending claim information—Enter data into the Provider No field and Pending Claims field
(see Section 5 for additional information).
♦ Beneficiary eligibility information—Enter data into the Provider No field, HICN field and the
Beneficiary Eligibility field (see Section 6 for additional information).
Commands PAME
For information on accessing the Financial Status Inquiry (PAME), please refer to the following section in
this manual.
JCEDI
August 2007
Page 7
Section 4 – Accessing General Claim Information
CSI User’s Manual
SECTION 4 – ACCESSING GENERAL CLAIM INFORMATION
This section of the manual deals with obtaining general claim information through the CSI function. This
function provides the following information about electronic claims submitted during the past six months:
♦ Paid or denied claims.
Note: CSI does not display payment amounts for non-assigned claims.
♦ Claims not paid due to full payment by other insurance(s) or deductible requirements.
♦ Claims electronically transferred to another DMERC for processing.
Note: These claims do not display after 45 days.
♦ Pending claims (claims not resolved or processed completely).
The Provider Claims Display Selection Screen (see Section 3 – Getting Started) allows you to select
claims for status inquiry based on the following criteria:
♦ Provider/Supplier number (required for general claim information)
♦ Patient’s Medicare number (Health Insurance Claim Number or HICN)
♦ Specific dates of service
The criteria entered on the Provider Claims Display Selection Screen (see Figure 2) will determine what
general claim information will display. As long as the supplier number is entered correctly, you may enter
information in any of the remaining fields, in any combination that you choose. The more information
you enter in the fields displayed, the more specific your search will be. After completing the fields needed
for the information you want, press ENTER .
Note: The supplier number entered on this screen must be correct in order for the next screen to display
the requested information. If the supplier number was not typed correctly or if there are no claims
in the system under this supplier number, the screen shown in Figure 3 will display.
PROVIDER CLAIMS DISPLAY SCREEN
CARRIER NO:
nnnnn
VMSPI02
PROVIDER NO:
nnnnnnnnnn
NO MORE RECORDS TO DISPLAY
Figure 3 – Provider Claims Display Screen with No Records
Press ESC to clear this screen. A blank screen will display. Type VPIQ and press ENTER to return to the
Provider Claims Display Selection Screen.
Page 8
JCEDI
August 2007
CSI User’s Manual
Section 4 – Accessing General Claim Information
The Provider Claims Display Screen
After entering the correct supplier number and pressing ENTER , the Provider Claims Display Screen
(Figure 4) will display. This screen is a claims status screen, and may display multiple claims.
Figure 4 – Provider Claims Display Screen
The Provider Claims Display Screen lists claim information that meets the qualifying criteria entered on
the Provider Claims Display Selection Screen. The fields on this screen (defined left to right, top to
bottom) are described in the following table:
Provider Claims Display Screen
Field Name
Description
This is the patient’s Medicare number (composed of the patient’s social security
HICN
NAME
DOB
SEX
CCN
TOTAL SUBM
CHG
PD PROV
CAT
PAY TYPE
CHK/EFT DT
STAT DT
JCEDI
August 2007
number preceded or followed by a suffix) or a Railroad Retirement Number. This
number identifies the patient.
The beneficiary’s full name.
The beneficiary’s date of birth.
The beneficiary’s sex.
Jurisdiction C’s internal claim control number.
Total of all submitted charges for this claim.
The total amount paid to the supplier. An amount displays only for assigned claims. If
the claim is non-assigned, “NONASSIGNED” displays in this field.
277 category code and verbiage. Refer to the WPC Web site (www.wpc-edi.com) for
a complete list of category codes.
Type of payment. Valid values are:
ACH = EFT payment
CHK = Check
NON = Non-payment
Check date or EFT effective date. Must be in MM/DD/CCYY format.
277 Claims Status Date. Must be in MM/DD/CCYY format.
Page 9
Section 4 – Accessing General Claim Information
CSI User’s Manual
Provider Claims Display Screen
Field Name
Description
277 Claim Status Code and verbiage for default 277 claim status values. If the 277
STAT
category code begins with A (acknowledged), P (pending), or F (finalized), the
default 277 claim status code and verbiage are:
0 = Cannot provide further status electronically
3 = Claim has been adjudicated and is waiting pay cycle
9 = No payment will be made for this claim
16 = Claim has been forwarded to entity
18 = Entity received claim but returned invalid status
20 = Accepted for processing
45 = Awaiting benefit determination
55 = Claim assigned to an approver/analyst
65 = Claim has been paid
98 = Charges applied to deductible
116 =Claim submitted to incorrect payer
For all other 277 claim status code values, the STAT field displays
XXX = Text not available.
Refer to the WPC Web site (www.wpc-edi.com) for a complete list of 277 category
and status codes.
Beginning and ending date(s) of service. Must be in MM/DD/YY format.
FROM / TO
PROC CODE This procedure code (as entered on the claim) references the service(s) rendered.
The number of days or units.
SVC
SUBMITTED Charges submitted with the claim for services rendered.
REND PROV The rendering provider (supplier) number.
PAYTO PROV Amount paid to the rendering provider.
LN CTRL NBR Line Item Control Number.
To navigate the list of claims displayed, use the following functions:
Keystroke(s)
CTRL and C
ESC
F3
F7
F8 or ENTER
Page 10
System Response
Clears the current screen
Clears the current screen
Return to the Provider Claims Selection Screen
Return to the first screen of listed claims
Pages forward through screens of claims
Note: You cannot “scroll” back to a previous screen of claims.
JCEDI
August 2007
CSI User’s Manual
Section 5 – Accessing Pending Claim Information
SECTION 5 – ACCESSING PENDING CLAIM INFORMATION
The Pending Claim Information function provides details about pending assigned claims, including the
check date and estimated mailing date. It does not include information on a claim if a check for that claim
has already been mailed or if the claim has been denied. Pending assigned claims fall into three categories:
1. Claims waiting for information from the Common Working File (CWF) (such as grandfathered
Certificates of Medical Necessity or patient eligibility) before they can be processed.
2. Claims that are processed with check mailings pending.
3. Claims that require additional information or review to complete processing, such as medical or
utilization review, development letters, etc.
Provider Pending Inquiry System Screen
To access pending claim information, enter Y in the PENDING CLAIMS field of the Provider Claims
Display Selection Screen (Figure 2). You do not have to enter a supplier number. Press ENTER and the
Provider Pending Inquiry System Screen (Figure 5) will display.
Figure 5 – Provider Pending Inquiry System Screen
You can access all screens for pending assigned information from the Provider Pending Inquiry System
Screen. You can also access information about the HICN, sex, and address of your patients/customers.
The entry fields on this screen are described in the following table:
JCEDI
August 2007
Page 11
Section 5 – Accessing Pending Claim Information
CSI User’s Manual
Provider Pending Inquiry System Screen
Field Name
Description
The available functions (other screens) that you can access. Valid options are:
OPTION
OPTION
(cont.)
CARRIER ID
PROVIDER
NUMBER
HICN
A = Provider Detail Pending - All Pended Claims: This option shows all types
of pending claims. To see all the pending claims for a patient, enter that
patient’s HICN in the HICN field.
C = Provider Detail - Completed Held Claims: This option displays all
processed claims awaiting payment. To see claims of this type only for a
patient, enter that patient’s HICN.
R = Provider Detail - Query Suspense: This option displays all claims awaiting
information from the Common Working File, such as patient eligibility or
grandfathered CMN information. To see claims for a patient, enter that
patient’s HICN.
O = Provider Detail - Other Suspense: This option displays claims pending for
reasons other than those listed above (e.g., medical review). Enter a HICN for
a display of claims for a patient.
S = Provider Summary Pending Inquiry: This option is very useful and a good
starting place to begin your query of pending claims. This screen displays the
total number of pending claims, the total submitted amount outstanding, and
the number of claims in each pending category (C, R, and O). After you see
which categories contain your pending claims, you can access those categories
directly from the Provider Summary Pending Inquiry Screen (see below).
Q = Quit: Takes you back to the Provider Claims Display Section Screen.
Enter nothing in this field.
Enter your supplier number. You must enter this number to access other screens.
Enter a HICN for pending claim information on a patient. If there are no pending
claims for the HICN that you entered, the screen message “NO MATCHES FOUND FOR
ENTERED SELECTION” will display.
PROVIDER DETAIL PENDING SCREENS
The other pending screens you can access by entering options A, C, R or O in the OPTION field are
called the Provider Detail Pending screens. They all have the same screen layout; options C, R and O
provide more detailed information about your claims by pending category, while option A displays
claims from all pending categories. You can access any of the Provider Detail Pending screens from the
Provider Pending Inquiry System Screen (Figure 5) or from the Provider Summary Pending Inquiry
Screen (Figure 10).
Provider Detail Pending - All Pended Claims (Option A)
The Provider Detail Pending - All Pended Claims Screen (Figure 8) displays a list of all claims that are
pending for any reason. The screen can be accessed from the Provider Pending Inquiry System Screen
or the Provider Summary Pending Inquiry Screen by entering A in the OPTION field and a specific
HICN in the HICN field. The PAID field of the Provider Detail Pending - All Pended Claims Screen
(Figure 6) may contain information from the Provider Detail Pending - Completed Held Claims Screen.
Page 12
JCEDI
August 2007
CSI User’s Manual
Section 5 – Accessing Pending Claim Information
Figure 6 – Provider Detail Pending - All Pended Claims Screen
Provider Detail - Completed Held Claims (Option C)
To access the Provider Detail Pending - Completed Held Claims Screen (Figure 7), enter C in the
OPTION field on the Provider Pending Inquiry System Screen or the Provider Summary Pending Inquiry
Screen and press ENTER .
OPTION: __
PROVIDER DETAIL PENDING INQUIRY
COMPLETED HELD CLAIMS
PROVIDER: nnnnnnnnnn
BENEFICIARY:
H: nnnnnnnnnnnn NM: THOMPSON
TOTALS: CLAIMS
CLAIM NUMBER
97165860018000
97166836688000
2
SUB
SUBMITTED
100.00
50.00
PAUL
150.00
PAYTO PROV
$$$,$$0.00
$$$,$$0.00
277 CATEGORY LEGEND: AX - ACKNOWLEDGED
TYPE OPTION, PRESS ENTER KEY:
F-FORWARD
B-BACKWARD
H-ANOTHER HICN
S-SUMMARY
B
PAID
VMSPP50
DOB: 11/14/1935 SEX: M
.00
277 CD STAT DATE DESCRIPTION
XX/XXX 00/00/0000 <---------------->
XX/XXX 00/00/0000
PX - PENDING
FX - FINALIZED
P-ANOTHER PROVIDER
Q-MAIN MENU
QQ-QUIT
MORE PAGES TO VIEW
00885
Figure 7 – Provider Detail Pending - Completed Held Claims Screen
This screen lists all assigned claims that have been paid and an estimated mailing date for the payment.
Please note that according to CMS guidelines, payment for electronic claims cannot be issued until 14
days after the claim was received. The waiting period for paper claims is 27 days. This period is called the
payment floor.
Claims that have been denied or for which there was no payment (because of deductible requirements or
full payment by other insurance) are not shown on this screen. The remittance notices for these types of
claims are mailed immediately—there are no “holding” requirements.
JCEDI
August 2007
Page 13
Section 5 – Accessing Pending Claim Information
CSI User’s Manual
Provider Detail Pending - Query Suspense (Option R)
The Provider Detail Pending - Query Suspense Screen (Figure 8) will display when you enter R in the
OPTION field of the Provider Pending Inquiry System Screen or the Provider Summary Pending Inquiry
Screen. You must also enter a HICN number in the HICN field. Claims listed are those awaiting
information from the Common Working File (CWF) to complete processing. Information provided by the
CWF includes patient eligibility or grandfathered CMN information.
Figure 8 – Provider Detail Pending - Query Suspense Screen
Provider Detail Pending - Other Suspense (Option O)
The Provider Detail Pending Inquiry - Other Suspense Screen (Figure 9) will display when you enter O
in the OPTION field of the Provider Pending Inquiry System Screen or the Provider Summary Pending
Inquiry Screen. You must also enter a specific HICN number in the HICN field.
Claims on the Provider Detail Pending - Other Suspense Screen may be pending for medical review or
additional information needed from the supplier, patient, or physician. The screen does not display
pending claims processed and awaiting payment or those waiting for information from the Common
Working File (CWF).
The Provider Detail Pending - Other Suspense Screen (Figure 9) shows the layout and fields for all the
Provider Detail Pending screens (options A, C, R and O). Field descriptions can be found in the table
following Figure 9.
Page 14
JCEDI
August 2007
CSI User’s Manual
Section 5 – Accessing Pending Claim Information
Figure 9 – Provider Detail Pending - Other Suspense Screen
Provider Detail Pending Screens
Field Name
Description
The beneficiary’s HICN.
H
Beneficiary’s full name. (Last name, first name, and middle initial)
NM
Beneficiary’s date of birth.
DOB
Beneficiary’s sex.
SEX
TOTALS: CLAIM The total number of claims in this pending category.
The total submitted charges for these claims.
TOTALS: SUB
The total amount paid on the allowed amount for these claims.
TOTALS: PAID
CLAIM NUMBER The internal claim number assigned by Jurisdiction C for each claim.
The submitted charge for each claim listed.
SUBMITTED
Amount paid to the rendering provider.
PAYTO PROV
277 category code, followed by the 277 claim status code. Valid 277 category
277 CD
STAT DATE
JCEDI
August 2007
codes are:
AX = Acknowledged
PX = Pending
FX = Finalized
For a list of 277 claim status codes and default verbiage for each, see the
DESCRIPTION field or refer to the WPC Web site (www.wpc-edi.com).
277 Claims Status Date. Must be in MM/DD/CCYY format.
Page 15
Section 5 – Accessing Pending Claim Information
CSI User’s Manual
Provider Detail Pending Screens
Field Name
Description
Verbiage for default 277 claim status values. If the 277 category code is AK
DESCRIPTION
OPTIONS
(acknowledged), PX (pending), or FX (finalized), the default 277 claim status code
and verbiage are:
0 = No further stat elec
3 = Claim adj/wait pay cycle
9 = No payment for claim
16 = Claim forwarded
18 = Claim received/inv sta
20 = Accepted
45 = Awaiting benefit det
55 = Claim assigned/analy
65 = Claim has been paid
98 = Change applied deductible
116 = Claim subm/wrong payer
For all other 277 claim status code values, the claim status portion of the 277 CD
field displays XXX and the DESCRIPTION field displays “Text not available.” For
a complete list of 277 category and status codes, refer to the WPC Web site
(www.wpc-edi.com).
The options for moving around all pending claims screens are similar. You must
press ENTER after selecting an option. Valid options are:
F = Scrolls forward to the next page. Note: When you scroll forward, the last
line of claim information on the displayed screen will be the first line of
claim information on the next page.
B = Scrolls back to the previous page.
P = Enter P in the OPTION field and another supplier number in the PROVIDER
field to access the same type of pending claims for a new supplier.
H = Enter H in the OPTION field and another HICN in the HICN field to access
the same category of pending claims for another patient. If there are no
pending claims for the HICN that you entered, the screen message “NO
MATCHES FOR ENTERED SELECTION” will display.
S = Accesses the Provider Summary Pending Inquiry Screen.
Q = Returns to the Provider Pending Inquiry System Screen.
QQ = Returns to the Provider Claims Display Selection Screen.
You will not see data in the PAID field on this screen or on the Provider Detail Pending - Query Suspense
Screen. Once claims are paid, they are displayed on the Provider Detail Pending - Completed Held Claims
Screen until checks are mailed.
PROVIDER SUMMARY PENDING INQUIRY SCREEN (OPTION S)
Viewing the Provider Summary Pending Inquiry Screen when you first begin checking the status of
claims may save you telephone line charges because:
♦ You can find out quickly if you have any pending claims.
♦ You do not incur extra telephone line charges from using options and looking at screens that do not
contain information for you.
♦ You can see at a glance what other screens (functions) you need to access to find out more detail
about your pending claims (e.g., actual claims and HICNs).
Enter your supplier number in the PROVIDER field and S in the OPTION field on the Provider Pending
Inquiry System Screen (see Figure 5) and press ENTER . The Provider Summary Pending Inquiry Screen
(Figure 10) will display.
Page 16
JCEDI
August 2007
CSI User’s Manual
Section 5 – Accessing Pending Claim Information
Figure 10 – Provider Summary Pending Inquiry Screen
This screen displays the total number of claims pending by category and the total outstanding submitted
amount for these claims. You can access any of the other pending screens directly from this screen by
typing A, C, R or O in the OPTION field and pressing ENTER .
JCEDI
August 2007
Page 17
Section 6 – Beneficiary Eligibility Inquiry
CSI User’s Manual
SECTION 6 – BENEFICIARY ELIGIBILITY INQUIRY
The Beneficiary Eligibility option allows CSI-enrolled DMERC suppliers and their authorized billing
agents to access beneficiary eligibility data. This is confidential information, subject to penalties and fines
up to $5,000 under the Privacy Act for illegal disclosure. Beneficiaries eligible for DMERC must be
entitled to Medicare Part B benefits.
The data is also subject to change, and should be considered valid only at the time of inquiry. While
information for Medicare Part B, Health Maintenance Organizations (HMOs), and Medicare Secondary
Payor (MSP) is the most recent at our disposal, suppliers should always develop for the most up-todate information.
Note: The fact that eligibility information is not found for a particular beneficiary does not necessarily
mean that the person is ineligible for Medicare. Likewise, you may find data for a beneficiary who
currently is not eligible for Medicare. The ultimate determination of a beneficiary’s Medicare
eligibility can only be determined when submitting a claim for that person.
Eligibility System Inquiry by Providers Screen
You can access the beneficiary eligibility information from the Provider Claims Display Selection Screen
(see Figure 2). Enter your ten-digit Medicare supplier number in the PROVIDER NO field, the HICN in the
HICN field and a Y in the BENEFICIARY ELIGIBILITY field and press ENTER .
The Inquiry by Providers screen (Figure 11) will display. To use this inquiry function, you must enter the
following six required fields: HIC Number, Surname, Initial, Date of Birth, Carrier Number, and Provider
Number. Use the TAB key to move between fields. The initial inquiry fields are described in the table
following Figure 11.
Figure 11 – Inquiry by Providers Screen
Inquiry by Providers Screen
Field Name
Description
Required Fields
Enter the beneficiary’s Medicare number.
HIC NUMBER
Page 18
JCEDI
August 2007
CSI User’s Manual
Section 6 – Beneficiary Eligibility Inquiry
Inquiry by Providers Screen
Field Name
Description
Enter the last name of the beneficiary, up to six characters.
SURNAME
Enter the first letter of the beneficiary’s first name.
INITIAL
DATE OF BIRTH Enter the beneficiary’s date of birth in MMDDCCYY format.
Enter the number identifying the carrier processing the claim. Jurisdiction C’s
CARRIER NO
PROVIDER NO
Optional Fields
SEX CODE
REQUESTOR ID
NPI INDICATOR
HOST - ID
APP DATE
REASON CODE
RESPONSE
CODE
carrier number for JCEDI is 18003.
Enter the number assigned by Medicare to the provider rendering medical services
to the beneficiary.
Enter the beneficiary’s sex. Valid values are:
M = Male
F = Female
Enter the identification number/name of the person submitting the inquiry (up to
four alphanumeric characters).
Enter the National Provider Identifier or leave the field blank.
This field defaults to the local host (unless otherwise specified), against which the
inquiry is processed. If you receive the error “BENE-ERROR, BENEFICIARY RECORD
NOT FOUND,” it is most likely that the beneficiary is not located at the local host.
Enter another host ID, other than the local host, and perform the inquiry again.
Valid values include:
GL = Great Lakes
GW = Great Western
KS = Keystone
MA = Mid-Atlantic
PA = Pacific
NE = Northeast
SE = Southeast
SO = South
SW = South Western
Enter the date that the beneficiary was admitted into the hospital in MMDDYYCC
format.
Enter the reason for the inquiry. The system defaults to “1.” Valid values include:
1 = Status Inquiry (system default)
2 = Inquiry relating to an admission
Enter whether the inquiry is a test (actual test or CWF Test Inquiry) or production.
The system defaults to “P.” Valid values include:
P = Production (system default)
T = For testing purposes only
X = CWF internal testing
After entering the required and optional information into the initial inquiry fields, press ENTER and the
Beneficiary Information screen will display (Figure 12). Additional information (e.g., Hospice, Screening,
and MSP information; Home Health Benefit Periods; Home Health PPS Episodes) can be accessed by
paging forward and backward through additional screens. Press PF8 to page forward and PF7 to page
backward through the screens. When you have completed your inquiry, press PF1 to return to the Inquiry
by Providers screen (see Figure 11), from which you can initiate a new inquiry. To exit ELGB, see
“Exiting the Beneficiary Eligibility System (ELGB)” at the end of this section.
Field values for the Beneficiary Information screen are described in the table following Figure 12.
JCEDI
August 2007
Page 19
Section 6 – Beneficiary Eligibility Inquiry
CSI User’s Manual
Figure 12 –Beneficiary Information Screen, CWF Information
* The character “n” represents numerical entries.
** The message on this line, “HIGHLIGHTED FIELDS DO NOT MATCH CMS FILE,” will display when
input data does not exactly match the CMS file. This referenced data will be highlighted on the
Beneficiary Information Screen (note the DB field near the top of the screen in Figure 12).
Beneficiary Eligibility Inquiry Screen – Data from Inquiry Request
Field Name Description
The beneficiary’s Social Security, Health Insurance, or Railroad Board Number.
CN
The first six characters of the beneficiary’s last name.
NM
First letter of the beneficiary’s first name.
IT
The beneficiary’s date of birth.
DB
The beneficiary’s sex.
SX
Identifies the carrier processing the claim. This should be 18003 for Jurisdiction C.
CAR
The number assigned by Medicare to the provider rendering medical service to the
PN
AP
REAS
REQ
beneficiary.
Used for spell determination (i.e., admission date, current date), in MMDDCCYY format.
Indicates the reason for the inquiry. Values include:
1 = Status inquiry
2 = Inquiry relating to an admission
The Requestor ID, identifying the person submitting the inquiry.
Beneficiary Eligibility Inquiry Screen – Returned Fields
Field Name Description
CORRECT Provides the corrected claim number. This field is only used if the HIC Number is
CN
incorrect.
Provides the corrected name. This field is only used if the name is not consistent with
NM
IT
DB
Page 20
CMS’s record.
Provides the corrected first initial of the first name. This field is only used if the name is
not consistent with CMS’s record.
Provides the corrected date of birth. This field indicates the date of birth as contained in
CMS’s beneficiary record in MMDDCCYY format.
JCEDI
August 2007
CSI User’s Manual
Section 6 – Beneficiary Eligibility Inquiry
Beneficiary Eligibility Inquiry Screen – Returned Fields
Field Name Description
Provides the corrected sex code. This field indicates the beneficiary’s sex as contained
SX
A-ENT
A-TRM
B-ENT
B-TRM
DOD
LRSV
LPSY
FULL-HOSP
CO-HOSP
FULL-SNF
CO-SNF
IP-DED
DOEBA
DOLBA
PART B YR
DED-TBM
PSYC
PHYS
THER TBM
OCC THER
TBM
FULL-NAME
HMO: PER
CURR ID
OPT
ENTITL
TERM
ESRD:
CODE-1
EFF DATE
CODE-2
EFF DATE
in CMS’s beneficiary record.
Date of entitlement to Part A benefits in MMDDCCYY format. May be zeros.
Date of termination of Part A entitlement in MMDDCCYY format. May be zeros.
Date of entitlement to Part B benefits in MMDDCCYY format. May be zeros.
Date of termination of Part B entitlement in MMDDCCYY format. May be zeros.
Date of beneficiary’s death in MMDDCCYY format. May by zeros if actual day of
death is unknown.
Indicates the number of lifetime reserve days remaining.
Indicates the number of lifetime psychiatric days remaining. This field displays if the
provider number indicates that the requestor is a psych provider (there must be a “4” in
the third digit of the provider number).
Provides the number of inpatient days remaining to be paid at full benefit amount.
Provides the number of inpatient days remaining to be paid at the coinsurance benefit
amount.
Indicates the number of Skilled Nursing Facility (SNF) days remaining to be paid at full
benefit.
Indicates the number of SNF days remaining to be paid at coinsurance benefit.
Indicates the amount of inpatient deductible remaining to be met.
The date of the earliest billing action for the spell of illness.
The date of the latest billing action for the spell of illness.
Indicates the most recent Part B year from the applicable date input field.
This is the amount of the Part B cash deductible remaining to be met.
Indicates the amount of psychiatric deductible used for the year.
Shows the physical therapy deductible used in the Part B year.
Shows the occupational therapy deductible used in the Part B year.
Relates to the Full Name on the master HI record.
A code that indicates that the individual has had 1, 2, or 3 (more than 2) periods of
enrollment in an HMO.
The HMO Identification code.
The HMO Option Code describes the beneficiary’s relationship with the HMO.
The HMO entitlement date in MMDDCCYY format.
The HMO termination date in MMDDCCYY format.
A one-digit code that indicates whether End Stage Renal Disease (ESRD) covered
services are reimbursed under method 1 or method 2.
The date that ESRD benefits began in MMDDCCYY format.
The method of reimbursement for ESRD.
The date that ESRD benefits began in MMDDCCYY format.
Error Messages
Note: Please remember that the information found through the inquiry function does not necessarily
mean that a person is eligible for Medicare. The ultimate determination of a beneficiary’s Medicare
eligibility can only be found when submitting a claim for that person.
The following error messages may display at the bottom of any of the beneficiary eligibility screens:
JCEDI
August 2007
Page 21
Section 6 – Beneficiary Eligibility Inquiry
CSI User’s Manual
Error
A002
Message
Description
INVALID HIC
A004
A005
A006
INVALID SURNAME
INVALID INITIAL
INVALID DATE OF BIRTH
A008
A009
INVALID CARRIER NO
INVALID PROVIDER NUMBER
BENE-ERROR, BENEFICARY
RECORD NOT FOUND
HIC#, NAME, & 1
CHARACTERISTIC MUST
MATCH CMS FIELD
You must enter the beneficiary’s Medicare number in the HIC
Number field.
You must enter 6 characters of the beneficiary’s last name.
You must enter the first letter of the beneficiary’s first name.
You must enter the beneficiary’s date of birth in MMDDYYCC
format.
Enter a valid carrier number.
Enter a valid provider number.
The data entered did not find a match in the CMS data.
The data entered in the HIC number and Name fields, and one
additional characteristic (either the date of birth or the first
initial) must match a CMS data file. Check your records and
correct any invalid data.
Exiting the Beneficiary Eligibility System (ELGB)
To exit the Beneficiary Eligibility System (ELGB), press the PF3 , PF4 , PF12 , PF15 , PF16 , PF24 or Clear
Screen ( ESC ) key. The system will return you to a blank screen from which you can access all CSI
functions. Just type one of the following commands onto the blank screen and press ENTER :
♦ VPIQ—Brings up the Provider Claims Display Selection Screen (for access to general and pending
claim information and beneficiary eligibility, see additional information on this command below)
♦ PAME (pronounced like “pay me”)—Brings up the Financial Status Inquiry Screen
♦ CSSF LOGOFF—To exit the CSI system
Page 22
JCEDI
August 2007
CSI User’s Manual
Section 7 – Financial Status Inquiry
SECTION 7 – FINANCIAL STATUS INQUIRY
The Financial Status Inquiry screen displays the following about your last payments from Jurisdiction C:
♦ date of payment
♦ amount paid on this date
♦ number of checks in each payment
The screen also shows the number of claims and dollar amounts for claims that have completed
processing and where payment is being held due to the 14- or 27-day payment floor. To access Financial
Status information, complete the following steps:
1. From a blank screen, type PAME (pronounced “pay me”) and press ENTER .
Note: If you have just dialed in and signed on with your RACF Number and password, you will be on
a blank screen; or you can access a blank screen from the Provider Claims Display Selection Screen by
pressing ESC to clear your screen.
2. The Financial Status Inquiry Screen (Figure 13) will display.
PALMETTO GOVERNMENT BENEFITS ADMINISTRATORS
DMERC FINANCIAL STATUS INQUIRY
SUPPLIER NUMBER:
AMOUNT PENDING ON PAYMENT FLOOR:
$0.00
# OF CLAIMS ON FLOOR:
0
CURRENT PAYMENT HISTORY
DATE:
AMOUNT:
00/00/00
00/00/00
00/00/00
$0.00
$0.00
$0.00
0
0
0
# CHECKS:
NOTE: MULTIPLE CHECKS CAN BE CUT ON ANY GIVEN DAY
ENTER SUPPLIER NUMBER AND PRESS ENTER
Figure 13 – Financial Status Inquiry Screen
3. Type in your ten-digit NSC supplier number in the SUPPLIER NUMBER field and press ENTER . The
Financial Status Inquiry Screen will display.
PALMETTO GOVERNMENT BENEFITS ADMINISTRATORS
DMERC FINANCIAL STATUS INQUIRY
SUPPLIER NUMBER: nnnnnnnnnnn
AMOUNT PENDING ON PAYMENT FLOOR:
$123,649.00
# OF CLAIMS ON FLOOR: 844
CURRENT PAYMENT HISTORY
DATE:
AMOUNT:
# CHECKS:
06/25/97
06/23/97
06/22/97
$2,244.15
$2,492.48
$41,851.28
1
1
13
NOTE: MULTIPLE CHECKS CAN BE CUT ON ANY GIVEN DAY
INFO DISPLAYED, KEY ANOTHER SUPPLIER OR CLEAR TO EXIT
Figure 14 – Sample Financial Status Inquiry Screen
JCEDI
August 2007
Page 23
Section 7 – Financial Status Inquiry
CSI User’s Manual
Note: If you enter an incorrect supplier number or a number for a supplier who has not filed assigned
claims, the message “SUPPLIER NUMBER NOT FOUND. TRY AGAIN OR CLEAR TO EXIT”
will display.
A description of the fields in the Financial Status Inquiry Screen can be found in the following table:
Financial Status Inquiry Screen
Field Name
Description
The supplier number you are inquiring about.
SUPPLIER NUMBER
The total payment amount being held for the 14-day or 27-day payment
AMOUNT PENDING ON
PAYMENT FLOOR
floor before payment is released.
The actual number of claims on the payment floor.
# OF CLAIMS ON FLOOR
CURRENT PAYMENT HISTORY
The date payment was made in MMDDYY format.
DATE
The total dollar amount for all payments released on that date.
AMOUNT
The number of checks released on the payment date displayed.
# CHECKS
If you want to see the same information for another supplier, enter another supplier number in the
SUPPLIER NUMBER field and press ENTER .
To exit the Financial Status Inquiry Screen, press ESC . At the blank screen, type in one of the following
requests:
♦ VPIQ—To access another part of CSI
♦ PAME—To access the Financial Status Inquiry Screen
♦ CSSF LOGOFF—To exit the program
Page 24
JCEDI
August 2007
CSI User’s Manual
Section 8 – Exiting CSI
SECTION 8 – EXITING CSI
You must return to a blank screen before you exit CSI. Returning to a blank screen will depend on what
function you have just performed. Follow the directions below to get a blank screen.
1. From any of the pending screens:
a. Type QQ to return to the Provider Claims Display Selection Screen.
b. Press ESC to clear your screen.
2. From the Provider Claims Display Screen:
a. Press PF3 to get to the Provider Claims Display Selection Screen.
b. Press ESC to clear your screen.
3. From the Financial Status Inquiry Screen:
a. Press ESC to clear your screen.
To exit CSI from the blank screen, type CSSF LOGOFF and press ENTER .
Note: If you are using vendor software, consult your vendor for instructions on how to exit Claim
Status Inquiry.
JCEDI
August 2007
Page 25