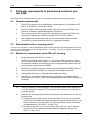
1
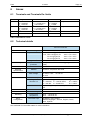
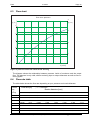
User's manual Pressurized enclosure system F 840 manual_f840_v1.0.doc, rev 4 F840 1 Introduction Page 2 Contents 1 Operation instruction explosion proofed devices.......................................................................3 2 Particular requirements to pressurized enclosure system F840 ...............................................4 2.1 General requirements ................................................................................................................4 2.2 Determination of pre- purging period .........................................................................................4 2.3 Mechanical requirements to the EEx nP- housing.....................................................................4 2.4 Purge medium requirements......................................................................................................6 2.5 Temperature class of the EEx nP- housing ...............................................................................6 3 Introduction: pressurized enclosure system F 840.....................................................................6 3.1 Pressurized enclosure system for zone 2..................................................................................7 3.1.1 Pressurized enclosure system without pre- purging ..........................................................7 3.1.2 Pressurized enclosure system with pre- purging................................................................7 4 Mounting and Connecting..............................................................................................................9 4.1 Mounting, Dimensions ...............................................................................................................9 4.1.1 Control device FS840 .........................................................................................................9 4.1.2 Optional solenoid valve for purging ....................................................................................9 4.2 Connecting and starting .............................................................................................................9 4.2.1 Terminals of the FS840 ......................................................................................................9 5 Configuration and operation........................................................................................................10 5.1 Display .....................................................................................................................................10 5.2 Monitor Lamp ...........................................................................................................................10 5.3 Keyboard..................................................................................................................................10 5.4 Indication modes during normal operation...............................................................................10 5.5 Configuration............................................................................................................................10 5.5.1 The menu format ..............................................................................................................11 5.6 How to enter and leave the bypass mode ...............................................................................13 6 Annex .............................................................................................................................................14 6.1 Terminals and Terminals Ex- limits..........................................................................................14 6.2 Technical details ......................................................................................................................14 6.3 Flow chart.................................................................................................................................15 6.4 Flow rate table..........................................................................................................................15 6.5 Type sign..................................................................................................................................16 6.6 Problems and solutions............................................................................................................16 6.7 Type code ................................................................................................................................16 6.8 List of Parameters ....................................................................................................................16 Gönnheimer Elektronic GmbH phone: +49(6321)49919-0, fax: -41 Email: [email protected] F840 1 1 Operation instructions Page 3 Operation instruction explosion proofed devices Application and Standards This instruction manual applies to explosion protected control panels of type of protection types below. This apparatus is only to be used as defined and meets requirements of EN 60 079 particularly EN 60079-14 "electrical apparatus for potentiality explosive atmospheres" It can be used in hazardous locations which are hazardous due to gases and vapours according to the explosion group and temperature class as stipulated on the type label. When installing and operating the explosion protected distribution and control panels the respective nationally valid regulations and requirements are to be observed. General Instructions Please take care for adept transportation, storage and mounting, as well as accurate service and maintenance. Operation of this device should only be implemented by authorised persons and in strict accordance with local safety standards. The electrical data on the type label and if applicable, the "special conditions" of the test certificate TÜV 03 ATEX 2095X is to be observed. For outdoor installation it is recommended to protect the explosion protected distribution and control panel against direct climatic influence, e.g. with a protective roof. The maximum ambient temperature is 40°C, if not stipulated otherwise. Terminal compartment in Increased Safety ! When closing, it is to be ensured that the gaskets of the terminal compartment remain effective, thus maintaining degree of protection IP 54 to DIN 40 050. Unused entries are to be closed off by impactproof stopping plugs, which are secured against self-loosening and turning. Maintenance Work The gaskets of Ex e enclosures are to be checked for damages and replaced, if required. Terminals, especially in the Ex-e chamber are to be tightened. Possible changes in colour point to increased temperature. Cable glands, stopping plugs and flanges are to be tested for tightness and secure fitting. , Safety Measures: to read and to comply Work on electrical installations and apparatus in operation is generally forbidden in hazardous locations, with the exception of intrinsically safe circuits. In special cases work can be done on nonintrinsically safe circuits, on the condition that during the duration of such work no explosive atmosphere exists. Only explosion protected certified measuring instruments may be used to ensure that the apparatus is voltage-free. Grounding and short circuiting may only be carried out, if there is no explosion hazard at the grounding or short circuit connection. Warning! Extreme caution is advised when handling this device. High electrical discharge is possible and can be fatal. Gönnheimer Elektronic GmbH phone: +49(6321)49919-0, fax: -41 Email: [email protected] F840 2 2 particular requirements to F840 Page 4 Particular requirements to pressurized enclosure system F840 The FS840 can be combined with every EEx nP- housing that full fills the following requirements. 2.1 2.2 General requirements 1 The EEx nP system must be inspected by a skilled person of accordance to IEC 60079 –2, EN 60079 –14 and this manual. 2 Mount the solenoid valve (purging medium input) and control unit FS840 to an maximum of distance (optimal arrangement is diagonal) 3 The operator must not do any technical changes to the control unit FS840. Any change will invalidate the conformity statement TÜV 03 ATEX 2095 X. 4 Any maintenance activities has to be done by Gönnheimer Elektronic GmbH 5 Corrupt EEx p- pipe connections have to be repaired immediately Determination of pre- purging period If its not sure, at power up, that the atmosphere inside of the enclosure and the appropriate pipes is below 25% of the lower explosive limit (LEL) (EN 60079 – 14 chapter 13.4), a pre- purging of the pressurized enclosure is necessary. 2.3 Mechanical requirements to the EEx nP- housing 6 Regard particularly IEC 60079-2, section 7 7 The EEx nP- housing must hold the 1,5 – fold of the maximum pressure, which can be reached inside of the cabinet, 2 mbar at least. The operator has to define the maximum pressure of the housing and has to program this pressure value as monitored max. pressure into the FS840. 8 The EEx nP- housing must pass a impact test according DIN EN 50021 Table 13 9 The protection class of the EEx nP- housing must be greater than IP40. 10 Cable glands must have a protection class greater than IP54. 11 If the EEx nP- housing has surface made of synthetics (e.g. windows) with an area greater than 100 cm², than a warning sign against electro static discharge is necessary. Caution ! Danger of static discharge. Clean only with humid cloth! 12 There is no danger of static discharge, if the synthetic surface has a thickness of ≤ 0,2 mm (Group IIC) respectively 2 mm (Group IIB) or less and it is mounted on a metallic ground. 13 If the EEx nP- housing posses internal compartments the installer has to obey the following rules: a) Components with a free internal volume less than 20 cm³ are not considered to be internal compartments requiring purging as long as the total volume of all such components is not more than 1% of the free internal volume of the pressurized apparatus. (IEC 60079 – 2; Abs. 5.5.4) b) Provide not less than 1 cm² of vent area for each 1000 cm³, with a minimum vent size of 6,3 mm diameter should be allow for adequate purging. (IEC 60079 – 2; Abs. 5.5.2) Gönnheimer Elektronic GmbH phone: +49(6321)49919-0, fax: -41 Email: [email protected] F840 2 particular requirements to F840 Page 5 c) Place the vents in a diagonal order, as shown on the picture below, with a minimum vent size of 6,3 mm diameter Vents Vents d) Installer can also remove covers or doors of internal housings if they provide adequate vent diameters alternatively. e) If the topics above are not applicable, a separate piping must be added to the internal compartment. The purge medium flow through the compartment must be high enough to make sure that the air in the compartment is exchanged at least 10 times higher. For instance: FS Nozzles to distribute air Pressurized enclosure Gönnheimer Elektronic GmbH phone: +49(6321)49919-0, fax: -41 Email: [email protected] F840 2.4 2.5 2 particular requirements to F840 Page 6 Purge medium requirements 14 The purging medium must not be derived from hazardous area, it must be contamination free ( dry, free of oil and dust) 15 The temperature of the purge medium should not exceed 40°C. 16 If another purge medium than air is used, it is important to regard the minimum oxygen content of the ambient. Maybe it is necessary to install a exhaust pipe from the FS840 to out-of-door. 17 The pressure lost an the solenoid valve (PValve) must not be higher than 500 mbar, while pre- purging. 18 The introduction of flammable gas into the EEx nP- housing, e.g. for gas analyser application, is prohibited. Temperature class of the EEx nP- housing The installer has to define the maximum ambient temperature and the resulting maximum temperature class of the EEx nP- housing. To determine the temperature class, measure, on worst conditions, the hottest point on the surface of the EEx nP housing and recalculate it to the maximum ambient temperature. The minimum temperature class is the one of the FS840 and its surface temperature. If some parts inside of the housing get hotter than the temperature class, the installer has to determine the time in which the temperature of those parts falls below the temperature class. He has to place a sign on the EEx nP- housing with the following sentence: Power off the apparatus and wait for x minutes for cool down ! X is the determinate time multiplied with a safety factor 1,5. 3 Introduction: pressurized enclosure system F 840 The use of simplified pressurized enclosures allows the operation of ‘non explosion protected’ devices in hazardous areas inside zone 2. The protection type ‘pressurisation’ is based on the principle of maintaining a constant pressure using air or a protective gas to prevent an explosive mixture forming near the apparatus inside the pressurized enclosure. Generally before start-up, the pressurized enclosure must be purged with air or protective gas to remove any explosive mixture that may be inside the enclosure. This automatic procedure is called purging process. An simplified pressurized enclosure system consists of two components and the enclosure. 1. control unit FS840 for process control and monitoring 2. Sinter metal throttle SD840 to control air input fed by pressured air network See manual F840 for requirements of pressurized enclosure and integrated ignition capable apparatus. If the operator is not sure, that the atmosphere inside of the enclosure and the appropriate pipe infrastructure is below 25% of the lower explosive limit (LEL) (EN 60079 – 14 chapter 13.4), the enclosure must be purged to achieve a safe atmosphere inside of the enclosure. The F840 system can purge the enclosure automatically using the solenoid valve SVD.L. In this case the SVD.L replaces the sinter metal throttle. Gönnheimer Elektronic GmbH phone: +49(6321)49919-0, fax: -41 Email: [email protected] F840 3.1 3 Configuration and operation Page 7 Pressurized enclosure system for zone 2 The control device FS840 provides all necessary functions to install a pressurized enclosure system according EN 60079-14 section 13 : 1998, resp.. IEC 60079-2 : 2001 „pz“ . The FS840 measures the internal pressure and alarms or powers off, if the pre- defined minimum pressure is reached. The FS840 can also pre purge the housing before automatic powering on the housing. In this case connect a digital working 2/2 way solenoid valve to the appropriate terminals. The solenoid must have a separate certification for zone 2. FS840 programmable outputs monitoring outputs nc/no): Te1 keys purging medium outlet Te2 Te3 µP Te4 Te5 Ex p protection ok Bypass aktive Purging P < monitoring pressure P > P max Output solenoid valve Te6 U P ~ = Te9/10 Mains Te7/8 particle barrier solenoid valve SVD.L as option EEx nP - housing nozzle A P Bypass throttle adjustable alternative with prepurging without prepurging adjustable throttle Figure 1 Block diagram 3.1.1 Pressurized enclosure system without pre- purging If the operator is sure, that the atmosphere inside of the enclosure and the appropriate pipe infrastructure is below 25% of the lower explosive limit (LEL) (EN 60079 – 14 chapter 13.4) at power up, he can abandon the pre purging of the enclosure in zone 2. In that case the FS840 monitors only the pressure inside of the enclosure on 0.8 mbar at minimum and maximal 18.0 at maximum. If any limit is exceed, the FS840 changes the state on relay(s) output(s). The purge medium flows through an adjustable sinter metal throttle into the housing while reducing its pressure (see block diagram). The FS840 has an mechanical output valve which opens at approximately 5 mbar to let the purge medium out. Before this valve is a spark lattice located thus the purge medium can be exhausted directly to the hazardous area. 3.1.2 Pressurized enclosure system with pre- purging To pre- purge the housing connect a digital working 2/2 way solenoid valve (SVD.L) to the terminal 5 and 6 of the FS840. Also configure the pre- purging period into the structure menu of the control device. After pre- purging the valve closes automatically and the adjustable throttle of the SVD.L lets a small amount of purging medium into the housing to hold pressure. The installer can determine the pre- purging time once by doing the attenuation test according EN 50016 section 14.3. As an alternative he can calculate the purging time without the elaborate attenuation test see below: The purging time depends on minimum flow (Qmin), free internal volume (V) and the free volume of the connected pipes (Va). Final the calculated time must be multiplied by 10. The purging time tpurge is: Gönnheimer Elektronic GmbH phone: +49(6321)49919-0, fax: -41 Email: [email protected] F840 3 Configuration and operation t purge = Page 8 10 × (V + Va) Qmin The minimum flow (Qmin) depends on the minimum pre pressure (Ppremin), the pressure lost at the valve (PValve), internal pressure of the EEx nP- housing (PInt) and the nozzle diameter (d). The pressure lost at the valve (PValve) should not exceed 500 mbar. The maximum internal pressure of the housing is defined to be less than 20 mbar. The minimum flow Qmin can be calculated by: Qmin = 2 × ( Ppre min − PValve − PInt ) ρ d 2 ×π × 4 ρ is the density of the purging medium. The density of air is ρ =1,2393 kg/m3, the density of nitrogen is 1,25 kg/m3. WE calculate the ρ of air for all gases, because the difference is only 3%. The installer can calculate the purging time of ist own or he can use the automatic calculation in the menu of the FS840 (see also section 5.5.1) Example: QBeispiel = 2 × (2 − 0,5 − 0,025) × 105 QBeispiel ≈ 0,0015 kg 1,293 3 m kg m m s2 2 × 0,002 × m × π , 4 2 2 mit 1 bar = 105 kg m s2 m2 m3 l ≈ 1,5 s s Gönnheimer Elektronic GmbH phone: +49(6321)49919-0, fax: -41 Email: [email protected] F840 4 Mounting and Connecting 4 Mounting and Connecting 4.1 Mounting, Dimensions Page 9 4.1.1 Control device FS840 The control device FS840 is suitable for mounting in hazardous area zone 2. The installer can place it in or outside of the EEx nP housing. The installer can mount the control device using the 4 mounting holes in the housing rear, but the fixing on the air in- or outlet is sufficient. , Warning , Warning Observe local safety guidelines and the regulative: EN 60079-14 Additional see conditions to EEx nP System in section 2 in this manual. 4.1.2 Optional solenoid valve for purging The installer can mount the solenoid valve in or outside of the EEx nP housing, see details from manufacturer documentation. 4.2 Connecting and starting Note the following item while connecting: , Warning! • LINE VOLTAGE Extreme caution is advised when handling this device. High electrical discharge is possible and can be fatal. • See Installation regulative EN 60079-14 as well as Conformity statement TÜV 03 ATEX 2095X • Do not exceed terminal safety limits of each terminal See limits in technical details or declarations of conformity. • The internal solenoid valve fuse must be adapted to the solenoid valve 4.2.1 Terminals of the FS840 Terminal Comment 1,2 3,4 5,6 7,8 9,10 + Relay contact 1 Relay contact 2 Terminal for solenoid valve Mains, according to model conductor N or minus by DC Mains, according to model conductor L1 or plus by DC Gönnheimer Elektronic GmbH phone: +49(6321)49919-0, fax: -41 Email: [email protected] F840 5 5 Configuration and operation Page 10 Configuration and operation Configure the F840 with the 4 keys and the display. 5.1 Display The built-in 8- figures display indicates operation modes, present pressure or flow rate data, as well as malfunctions. 5.2 Monitor Lamp The FS840 has a monitor lamp below the display. This red lamp (LED) blinks if the pressure inside of the EEx p- housing is below the defined minimum pressure. In bypass mode the LED is permanently on and in normal operation the lamp is off. 5.3 Keyboard The four multi-functional keys have different meanings and functions depend on the present operation mode. Key „Shift right“-button BYPASS Operation mode Function normal operation none running menu Shift cursor one position right. normal operation Activates Bypass; i.e. enable toggle ignition-capable device on or off independently of the purging status ! (Be sure, that no explosive atmosphere is in environment) „Up“-button INFO running menu normal operation Get next menu item Changes indication of the display: present pressure, flow rate, remaining purge time and present state of the purging system running menu Get previous menu item normal operation Enters main menu running menu Initiates and confirms parameter input „Down“-button MENÜ „Enter“- button 5.4 Indication modes during normal operation The actual status of the EEx nP- System is generally shown on the info display. Using the “Down- button the user can toggle to the pressure and remaining purge time indication. 5.5 Configuration You must configure and enter the parameters of the control unit FS840 to achieve a desired mode of operation. All parameters of the control unit are structured in form of a menu. Gönnheimer Elektronic GmbH phone: +49(6321)49919-0, fax: -41 Email: [email protected] F840 5 Configuration and operation Page 11 5.5.1 The menu format In the following table below shows explanations of the menu items. The table works as a reference guide for programming the desired system structure and to set the appropriate parameters correctly. The menu items are roughly sorted by class. Please note that the viewable conditions of parameters are not included. Classification 1.Level 2.Level 3.Level Language Structur Purging Purg. Y. Purg. N. Auto Auto. Y. Auto.N. O1 Func. none O-Ex ok O-Bypas O-Purg. O-.Signal O-Pmax O2 Funkt. none O2 no/nc. no O2 no/nc. no Gönnheimer Elektronic GmbH Description, Explanation Define the language shown on the display of the FS840 in this menu item. Available languages are: German, English, French, Dutch, Spanish „Purg. Y.“ means that the EEx nPhousing will be pre purged before “Ex Ok” Message is set „Purg.N.“ means that the housing will not be pre- purged. The “Ex Ok” Message is set and the min. Pressure is monitored Automatic purging time Yes: The FS840 calculates the purging time out of pre- pressure, nozzle diameter Automatic purging time No (= Enter the purging time directly): Define the function of output O1 (te. 1/2). Explosion protection is ok: The output is set, if the pressure is higher than minimum. Bypass- output: The output is high, if the bypass is active Purging- output: The output is high as long the pre- purging procedure is running Signal pressure- output: the output is high, if the actual pressure inside of the EEx nP- housing is below the signal pressure level Maximum pressure- output: the output is high, if the actual pressure inside of the EEx nP- housing is higher the maximum pressure level Define the function of output O2 (te. 3/4). See functions O1 above define the circuit-opening connection of output O1 (terminal (1/2) no (= normal open) nc (=normal closed) define the circuit-opening connection of output O2 (terminal (3/4) no (= normal open) nc (=normal closed) phone: +49(6321)49919-0, fax: -41 Email: [email protected] F840 Param. 5 Configuration and operation Pur. Time Pur. Vol. Pre.-Pres Nozzle Min.Pres.P Min.Pres.R Max. Pres Sig. Pr. Codes M-Code By-Code Gönnheimer Elektronic GmbH Page 12 Purge time [h/min/sec]: Enter the purge time directly. The parameter only appears, if “automatic = no “ is chosen. If „automatic = Yes“ the following parameters will be asked: • Purge volume [dm³] • Pre- pressure [bar]: pressure of the purge medium pipe or pre pressure controller • Internal nozzle diameter [mm]: • Minimum pressure while prepurging [mbar]: During pre- purging procedure the FS840 monitors a increased pressure inside of the EEx nP housing to achieve the defined flow on the output valve. This increased pressure is monitored with this parameter (range = 7.0 mbar ... max. pressure) Minimum pressure at normal operation [mbar]: Monitored minimum pressure Maximum pressure at normal operation [mbar]: Monitored maximum pressure Signal pressure at normal operation [mbar] Menu code: Code word to start the main menu It is not possible to deactivate this code with „0000“. Bypass code: Code word to start bypass mode. The code can be disabled with „0000“ . The sequence „9999“ disables the bypass in general phone: +49(6321)49919-0, fax: -41 Email: [email protected] F840 5 Configuration and operation 5.6 How to enter and leave the bypass mode , Warning Page 13 The use of the bypass is only allowed, if its sure that no explosive atmosphere is inside and around the EEx nP- housing (1) 1. Press the “up”- button By-CODE 0002 (2) The bypass code is needed (3) The ex works Bypass code is ‘0002’. Enter is right code using the arrow keys and confirm with the ENTER- key. Bypass , NB The bypass mode is now active. Leave the bypass mode in the same way to enter. Gönnheimer Elektronic GmbH phone: +49(6321)49919-0, fax: -41 Email: [email protected] F840 4 Annex Page 14 6 Annex 6.1 Terminals and Terminals Ex- limits Terminal 1, 2 3, 4 5, 6 7/8, 9/10 Voltage Um = 250VAC Um = 250VAC Um = 30V DC Um = 250VAC Um = 250VAC Um = 30V DC Current Im = 5A bei AC1 Im = 1,2A bei AC15 Im = 5A bei DC1 Im = 5A bei AC1 Im = 1,2A bei AC15 Im = 4A bei DC1 Power Pm = 1500VA Pm = 300VA Pm = 150W Pm = 1500VA Pm = 300VA Pm = 150W Comment Relay contact 1 Relay contact 2 Terminal for solenoid valve mains Um = 250VAC Table 1 Terminals Ex- limits 6.2 Technical details Control unit FS 840 General Mounting Ex-protection class inside hazardous area II 3 G, EEx nAC [P] IIC T6 II 3 G, EEx nAC [P] IIC T5 Ex nAC [pz] IIC T6 Ex nAC [pz] IIC T5 EC- type certificate Housing -20°C ≤ TA ≤ 40°C -20°C ≤ TA ≤ 60°C -20°C ≤ TA ≤ 40°C -20°C ≤ TA ≤ 60°C TÜV 03 ATEX 2095 X Environment protection IP65 (Remark: without considering purge medium outlet) Dimensions H x W x D: 120 mm x 122 mm x 90 mm Electrical specifications Material Main voltage Aluminium, lacquered / Ral 7035 AC: 230V, 115V ; 48 ..62 Hz DC: 24V Power consumption Working circuits Terminal 1-4 ca. 2 VA, without solenoid valve Um = 250VAC, Im = 5A bei AC1, Um = 250VAC, Im = 1,2A bei AC15, Um = 30V DC; Im = 4A bei DC1, Pm = 1500VA Pm = 300VA Pm = 150W Solenoid valve te. 5/6 Output voltage is equal to mains, protected by internal fuse Max. wire diameter Pneumatic Pressure range Mounting Environment temperature EEx p Configuration Parameter input 2,5 mm² 0 ... 22 mbar -20°C ...+40°C bei T6 -20°C ...+60°C bei T5 LC-Display, menu guided Different languages : German, English, French, Dutch, Spanish See certificate TÜV 03 ATEX 2095 X for more information Gönnheimer Elektronic GmbH phone: +49(6321)49919-0, fax: -41 Email: [email protected] F840 4 Annex 6.3 Page 15 Flow chart flow verus pressure 20 Q Q [m³/h] [l/s] 5 15 4 3 10 2 5 1 4 6 8 10 12 14 16 18 P [mbar] Figure 2: pressure versus flow inside Ex nP- housing The diagram shows the relationship between pressure inside of enclosure and the output flow. The diagram is only valid, without reducing input or output diameters as well as flow reducing pipes. 6.4 Flow rate table The table below shows the flow rate depending on pre- pressure and nozzle diameter Pressure Flow rate [l/s] ρ Air = 1.293 kg/m3 [bar] 5 Nozzle diameter [mm] [10 Pa] 0,3 0,5 0,7 1 1,5 2 3 4 1,5 0,0275 0,076 0,149 0,304 0,693 1,208 2,676 4,653 2 0,0338 0,094 0,184 0,374 0,838 1,48 3,27 5,651 2,5 0,0391 0,109 0,213 0,433 0,968 1,708 3,759 6,471 3 0,0438 ,0121 0,238 0,484 1,063 1,908 4,186 7,177 3,5 0,048 0,133 0,261 0,53 1,195 2,087 4,569 7,804 4 0,0518 0,144 0,282 0,573 1,28 2,252 4,917 8,37 4,5 0,0554 0,154 0,301 0,612 1,367 2,404 5,239 8,883 Gönnheimer Elektronic GmbH phone: +49(6321)49919-0, fax: -41 Email: [email protected] F840 4 Annex 6.5 Page 16 Type sign Gönnheimer FS840 Überdruckkapselung Steuergerät Gönnheimer Elektronic GmbH; Dr.-Julius-Leberstraße 2; 67433 Neustadt TÜV 03 ATEX 2095 X 0032 II 3 G II 3 G 6.6 EEx nAC [P] IIC T6 EEx nAC [P] IIC T5 TA 40°C TA 60°C Ex nAC [pz] IIC T6 Ex nAC [pz] IIC T5 TA 40°C TA 60°C Problems and solutions Code forgotten - turn the device off (e.g. disconnect from power supply) - press the very right (red) key, turn the device on - hold the key, until "RESET" appears - all data is set to ex work defaults 6.7 • Type code • Control unit FS840 Solenoid valve SVD.L.x FS840 .x mains: 230V AC ......................................... .0 115V AC ......................................... .2 24V DC ........................................... .6 We can offer you the complete Solution: System F 840 with EEx p- housing and mounting of your apparatus inclusive system test and ATEX report • SVD.L .x nozzle: 1 mm ............................................. 1,5 mm ......................................... 2 mm ............................................. 3 mm ............................................. 4 mm ............................................. 5 mm ............................................. .1 .1.5 .2 .3 .4 .5 adjustable Sinter metal throttle SD840 6.8 List of Parameters Gönnheimer Elektronic GmbH phone: +49(6321)49919-0, fax: -41 Email: [email protected] F840 4 Annex Page 17 System identification Installation no.: Date: FS 840. . Production no.: Solenoid valve Inputs Description Language FS840 language Display Value/ state Language Structure Purging Should the FS840 pre- purge the pressurized enclosure ? Purg. Y. Purg. N. Auto Auto. Y. Auto. N. Output function O1 O1 Func. none Exp. Protect. Ok Bypass Purging out Signal pressure Max.pressure Output function O2 O2 Func. None Exp. Protect. Ok Bypass Purging out Signal pressure Max.pressure O1 circuit opening connection O1 no/nc no nc O2 circuit opening connection O2 no/nc no nc Purging Automatic or direct purging method volume input Parameters Purge time Pur. Time Purge volume Pur. Vol. Pre pressure Pre.-Pres Internal nozzle diameter Codes Purging Nozzle Minimum pressure while purging Min. Pres.P Minimum pressure at normal operation Min. Pres.R Pressure monitor, maximum pressure Max. Pres Pressure monitor, signal pressure Sig.. Pr. Code for main menu M-Code Code for bypass By-Code Gönnheimer Elektronic GmbH phone: +49(6321)49919-0, fax: -41 Email: [email protected]


![VERUS PRO User Manual [3980kb PDF File] - Snap](http://vs1.manualzilla.com/store/data/005690474_1-9ff68923f14d7698ce72469cabae3990-150x150.png)