1
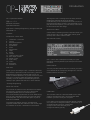
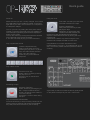
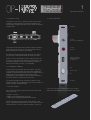
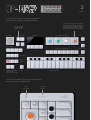
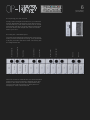
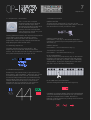
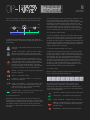
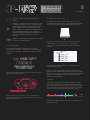
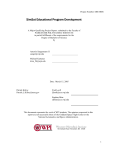
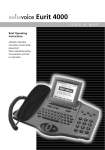
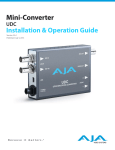
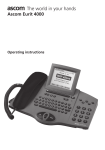
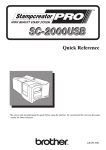
Introduction
OP-1 Operators Manual
運営マニュアル
Benutzer Handbuch
Opérateurs Manuel
©2010-2011 Teenage Engineering. All rights reserved.
VERSION 1.0
Contents
Introduction / Quick Start
1.
2.
3.
4.
5.
6.
7.
8.
9.
10.
11.
12.
13.
14.
15.
16.
17.
Hardware – Overview
Layout
Musical Keyboard
Main Modes
Synthesizer
Drum
Sequencers
Tape
Mixer
Tempo
Help Pop-Up & Tools
Mic / Input / Radio
Album / Com
SHIFT Key
LFO’s
Exercises
Reference
Dear user,
Thank you for choosing the OP-1 musical instrument.
This device is precision made to last many years and
designed to be practical, intuitive and to give you
hours of creative pleasure. To get the most out of your
new OP-1, be sure to read this operators manual
carefully. For even deeper understanding and the
latest pro tips, please visit the OP-1 users website.
Although the OP-1 is designed to be totally intuitive,
reading this manual will give you deeper
understanding of the concept behind many of OP-1’s
functions and modes. Anyway, don’t be afraid to just
play around and explore, you can always come back
to this manual at a later stage.
What’s in the Box?
Check that the following items are included when you
open the box: OP-1 Unit, USB Cable, Quick guide
Overlay and a Set of rubber bands.
Quick Guide Overlay
OP-1 comes with a transparent overlay for quick
reference of the keyboard layout. Keep this for future
reference.
Rubber bands
You may use the PaperFoam box in which your OP-1
came delivered as a temporary storage box. Use the
rubber bands to seal the box.
-Teenage Engineering
About this manual
This manual is written more or less with one chapter
for every key you find on your OP-1 (Except the
musical keyboard which is counted as one).
You create sounds (Synthesizer or Drum Mode keys)
that you may Sequence before you record to TAPE
and finally MIX. You also have the option to print a
final mix to ALBUM.
To make things easier, all keys, encoders and
important modes that are relevant to the current page
are marked on the OP-1 illustration in the header.
USB Cable
The included cable is a standard USB to mini USB
cable for charging the OP-1 and to transfer data
between your OP-1 and your computer.
If you want to use an external power adaptor instead
of a computer to charge the battery, make sure it’s a
5V USB standard charger. A dedicated
charger works more efficiently and
charges the battery quickly.
Quick guide
Power on
Using the mixer
Make sure that your OP-1 is fully charged. If not, insert
the USB cable into the USB port located on the short
right side of your OP-1 and connect it to a computer or
a USB power adaptor.
Turn on your OP-1 by sliding the white power switch
located on the short right side of the unit towards you.
The Teenage Engineering symbol will be displayed
briefly on the screen.
Turn up the volume by turning the white knob located
on the left side of the screen clockwise.
3. You are now ready to play your new instrument.
Play a synthesizer sound
Press the Synthesizer key.
Select a synthesizer sound by
pressing any key from 1-8. (These
keys are called Sound selection
keys 1-8 in this manual.)
Press any key on the Musical
Keyboard.
First make sure that you have some
recorded material on the tape.
Press the MIXER key.
Now press the PLAY key to start
playing the tape.
Depending on which track that
contains recorded material, the
related VU meter will indicate the sound level.
Adjust the individual track level by turning the color
related knob.
Hold down the SHIFT key while turning the color
related knob to adjust the PAN for each track.
Congratulations! You have learned the basic
fundamentals of your OP-1. To understand all of your
OP-1’s functions, please read this operators manual
carefully.
Play a drum sound
Press the Drum key.
Select a drum sound by pressing
any key from 1-8.
Press any key on the Musical
Keyboard.
Recording to tape
Press the TAPE key.
Select TRACK by pressing any of
the 1-4 keys located under the
screen. (These keys are called T1T4 in this manual)
Press REC + PLAY to start rolling
the tape.
Play the MUSICAL KEYBOARD.
Press the STOP key to stop recording. Rewind to the
starting point by pressing and holding the REWIND
key. Now press PLAY to listen to your recording.
A good way to start is to follow the Quick guide printed
on the plastic overlay that your OP-1 comes with.
1
Hardware Overview
1.1 Power On / Off
To power on your OP-1, slide the white power switch
located on the right side of the device towards you.
The display will light up and the OP-1 loads necessary
system data.
1. 4 OP-1 Side view
For strap
3.5 mm
Audio Out / Headphones
To power off, slide the power switch upwards. Data is
always stored on-the-fly, so you don’t have to worry
about saving your sound or recordings.
3.5 mm
Audio In
Everything will still be there the next time you power
on your OP-1 exactly the same as when you left it.
NOTE: The more samples or other data you store on
your OP-1, the longer the start-up process will be. It’s
a good habit both for start-up time and for safety to
back-up and clear your OP-1 occasionally.
1.2 Charging the Battery
The first thing you should do is to connect your OP-1
to a computer (or optional charger) via the USB port
located on the short right side of the unit. Make sure to
keep your OP-1 connected until you have fully
charged the internal battery. This will be indicated by
the same LED’s as used for the VU meter.
To check the battery level, press the Help key. The
LED’s will light up to indicate the level. Five lit LED’s is
equal to a fully charged battery.
USB for Charging
the battery and to
transfer files
Off
Power switch
On
For strap
1.3 In and Outputs
OP-1 has three ports located on the short right hand
side of the unit.
• Audio in / Line in
• Audio out for headphones / line out
• USB port for charging and transferring files
NOTE: To adjust the input level press SHIFT + Mic
key. To adjust the output level, turn the volume knob or
set the master L / R level output located in mixer T4.
If you turn your OP-1 upside down, you will find
symbols and braille text that indicates I/O location.
2
Layout
2.1 The layout of the OP-1 is divided into different
groups for easy reading and intuitive workflow.
The four color encoders are related to
the graphical interface on the display.
A green graphical element or text gives
a hint that you should turn the green
encoder to change its value or position.
Turn the Volume
knob to sets the
master volume.
Speaker
Volume
Display
Color Coded Encoders
Mic / Input
Main Modes
Help
Tempo
Sound 1 -8 / Tape tricks
Album / Com
T1 - T4
Tape edits
Sequencer
Tape
Transport
Rewind / Forward
Octave shift +/Step Forward / Back
Shift
Musical Keyboard
2.2 On the right side of your OP-1 you find the built in
Microphone and VU / Battery LED’s:
Built in
Microphone
VU / Battery
indicator
3
Musical Keyboard
3.1 Playing a Sound
Press any key on the musical keyboard and you
should instantly hear a sound. If it is silent, turn
up the master volume located next to the speaker.
Or press the Synthesizer or Drum key.
PRO-TIP: Press and hold HELP
while playing the musical keyboard
to let your OP-1 display the current
note.
3.2 Octave shift
Use the Arrow keys to transpose
octave while in Synthesizer or Drum
mode.
NOTE: Before you start to create your first
masterpiece, read this manual carefully to avoid
deleting or over-recording your work.
4
Main Modes
4.1 The Four Main Modes
4.2 Main Modes Screen examples
Your OP-1 is designed to be easy to use, so the most
important functions are located on the first keys to the
left on the upper row. The four keys are grouped
together and are called Main Modes:
Synthesizer – String Engine
The four main modes are: Synthesizer, Drum, Tape
and Mixer. Each key has a dedicated symbol and color
to make it easy to navigate through the different
screens and to find the appropriate key related to the
active mode.
Drum
Example: All keys with orange symbols are related to
the Tape because the tape symbol is orange.
4.2 Using SHIFT + any Main mode key
By pressing SHIFT + a Mode key you invoke special
settings or functions for that mode.
For Synthesizer and Drum you enter the sound Preset
Browser. For tape you enter Tape erase function.
And for Mixer you enter the Signal Flow screen. See
dedicated section for in-depth descriptions of Tape
erase and Signal Flow.
Tape
Mixer
5
Synthesizer Mode
5.1 Synthesizer Mode – Introduction
OP-1 has several original synthesizer engines. Each
one has its own personality. The synthesizer engine is
always located under T1 and is also the first screen
that will show up when you change or select a sound.
A sound is built up from four modules located under
the T1, T2, T3 and T4 keys found just under the
display:
NOTE: The T1-T4 are soft keys, which means that in
Synthesizer and Drum mode they function as
described here. In Tape mode they are track keys T1T4 and in Mixer Mode they are Mixer (T1), EQ (T2),
Master Effect (T3) and Master Out / Drive (T4).
To enter Synthesizer Mode, press
the key with the blue wave symbol
on it. This enables both T1-T4 and
sound selection keys 1-8.
When you have pressed the
Synthesizer key, first select a sound
from 1-8 with the Sound keys:
To do this, first select the Sound you want to change.
Then use the T1 to T4 keys to select a specific
module.
To change the Engine press SHIFT + T1.
This opens the Browser screen, with the list
of possible Engine choices:
FM – Frequency Modulation synthesis made easy.
This is the type of engine that is found in the classic
DX7 synthesizer.
Cluster – Up to six oscillators chained in a cluster.
Dr Wave – Raw 8-bit style engine.
Digital – Pure digital raw engine.
String – Physical modeling of a string instrument.
Pulse – Square wave engine.
Phase – Phase distortion type engine.
Use the Blue encoder to scroll through the list and
press T1 when your choice is highlighted to exit.
To learn more about the different Synthesizer engines
parameters, see the Reference chapter.
5.3 Envelope
To shape the envelope, press the T2 key.
The envelope controls the amplification of a
sound and is triggered when a note is
played. You can control the attack, decay,
sustain and release. This is called an ADSR envelope.
Then use T1-T4 keys to shape the sound:
T1 – Synthesizer engine
T2 – Envelope
T3 – Effect
T4 – LFO / G-force
Here follows a description of how a Sound is built up.
For an in-depth description of all individual
Synthesizer engines, the Envelope, Effects and LFO,
please refer to reference chapter.
Use the four color encoders to shape the Envelope.
5.2 Synthesizer Engines
The first module of a sound is its engine. This is the
heart of the sound and is the most important part.
It is possible to change an engine of a sound but keep
the Envelope, the Effect and the LFO or G- force
setting.
Blue – Attack, Green – Decay. White – Sustain.
Orange – Release
This will be indicated by a color change in the
graphical interface as soon as an encoder is turned.
5
Synthesizer Mode
(Continued)
5.4 Play Mode
To enter Play mode press SHIFT while you are in the
Envelope screen which is located under the T2 key. In
play mode, you can select if you want your sound to
be Polyphonic, Monophonic, Legato or Unison.
In play mode, you also have the portamento
parameter setting.
5.5 Synthesizer Effect
To add an effect to a sound, press the T3
key. You may toggle an effect on and off by
pressing the T3 key a second time.
amount, destination (engine, envelope or effect) and
the destination parameter.
RANDOM – randomize all parameters in a module.
Set the speed, amount, LFO envelope and destination
(engine, envelope or effect).
TREMOLO – Let you create different types of vibrato
effects to your sound by modulating the pitch and
volume. Set the speed, pitch amount, volume amount
and LFO envelope curve. The envelope curve applies
an attack or decay curve to the speed of the LFO.
VALUE – Use this classic LFO type to change one
parameter only. Set amount, speed, destination and
parameter.
NOTE: Turn the ENCODERS all the way for all options
under, for example, destination. The encoder have a
click, but that is not to be mistaken for turning just a
click to change a value. Sometimes you need to turn a
couple of clicks to change a value.
Example: ELEMENT LFO
As described earlier the Element LFO uses different
external elements to control any parameter of a
Synthesizer engine, Envelope or Effect. Use the Blue
encoder to select your source. The options are:
To change effect, press SHIFT + T3. This enters the
effect browser screen. Use the Blue encoder to scroll
through the list and press T2 to make your selection.
For a detailed description of the effects see the effects
chapter.
5.6 Synthesizer LFO
The LFO lets you modulate any Synthesizer Engine,
Envelope or Effect parameters.
A) G-force
B) Mic / Line / Radio
Option A is straightforward and you don’t need to
make any further settings. When selecting option B,
you need to select the input source. Press SHIFT +
Input key to select input and to adjust the gain. If
Radio is selected, here you may tune in to a radio
station to get satisfactory results.
To add an LFO to a sound, press the T4 key.
You may toggle an LFO on and off by
pressing the T4 key a second time.
To change LFO, press SHIFT + T4. This opens the
Browser screen, with the list of possible LFO’s:
ELEMENT – let’s you use external elements like the
built in Microphone, Line in, G-force sensor or FM
Radio to modulate a sound. Select the element,
For more information about LFO’s please refer to the
LFO reference section of this manual.
5
Synthesizer Mode
(Continued)
5.7 Change Sound
5.9 Sound File structure
Consider sound selection keys 1-8 as your instant
access keys. To change any of sound 1-8 presets,
press SHIFT + any key from 1 to 8 and a list of all
available sound presets is shown. Select a preset by
turning the Blue encoder for Engine type and Green
Encoder for Preset choices.
When you connect your OP-1 to your computer and
press SHIFT + COM key and select DISK mode the
OP-1 shows up on your desktop:
Double click the disk icon to reveal the internal OP-1
files. All Sounds, Album recordings and Tape Tracks
show up as .aif files.
NOTE: The difference between changing just a
Synthesizer Engine (SHIFT + T1) and a Sound
(SHIFT + 1-8) is that the later changes all four T1- T4
settings.
5.8 Saving a Sound
To save a sound, you have two options:
A) DUMP TO TAPE – Use the LIFT key while in
Synthesizer or Drum mode. Then switch to Tape,
locate empty space on the tape and press the
DROP key. The sound will now be converted to
sound-data. To recall a sound that was dumped to
Tape, press LIFT, switch to Synthesizer or Drum
and press DROP.
B) SAVE SOUND 1-8 – Tweak your sound on any of
the sound slots from 1-8. Then hold down the
current sound key for five seconds. Connect your
OP-1 to a computer using the USB cable. Sounds
1-8 are located in the USER FOLDER located
inside Synth and Drum folders. Drag the sound you
want to save to your desktop and rename it, or
rename the sound inside the folder. Keep in mind
using names with a maximum of ten characters.
Avoid uncommon symbols.
PRO-TIP: You may create your own folder and place it
in either Synth or Drum folder to organize your files.
NOTE: Sound presets use a special OP-1 version of
the .aif format, which includes BOTH a sound preview
and synthesizer data. In other words, the OP-1
synthesizer engines are not sample based but
modeled sounds.
6
Drum Mode
5.1 Drum Mode – Introduction
The Drum Mode, entered by
pressing the key with the green
drum symbol on it is very similar to
the synthesizer mode except it is
specially designed for shorter
drum / percussion sounds. It relies
heavily on the dedicated Drum
sampler as its engine.
As with Synthesizer mode, pressing the Drum key
enables both T1-T4 and Sound selection keys 1-8.
When you have pressed the Drum key, first select a
sound (drum-kit) from 1-8 with the Sound keys.
Then use T1-T4 keys to shape the sound:
5.3 Laying out a Drum Kit
To layout a Drum Kit, press any key on the musical
keyboard and start to set the In point of the sound.
This can be anywhere on the sample. Then set the
Out point and hit the same key on the musical
keyboard. You should now hear the part of the
sampling you have dedicated to that key.
The tools you have to set up your drum kit are:
PITCH
Set the pitch of a part by turning the Blue
encoder.
DIRECTION
Press SHIFT and turn the Blue encoder to
change direction of a part.
IN POINT
Set the in point by turning the Green encoder.
FINE TUNE IN POINT
Press SHIFT and turn the Green encoder to
fine tune the position of the in point.
T1 – Sampler engine
T2 – Dynamic Envelope
T3 – Effect
T4 – LFO / G-force
5.2 Drum Sampler Engine
The difference compared to the Synthesizer sampler
engine is that the Drum sampler has 12 seconds of
recording time (vs. 6 seconds in the Synthesizer
sampler) and has a layout function so you can lay out
parts of the sampling to dedicated keys on the musical
keyboard (compared to pitch of the sound when
playing the musical keyboard using the synthesizer
sampler).
OUT POINT
Set the out point by turning the White encoder.
FINE TUNE OUT POINT
Press SHIFT and turn the White encoder to
fine tune the position of the out point.
PLAY TO END, LOOP, PLAY ONCE
Turn the Orange encoder to set the play mode
of a part.
LEVEL
Press SHIFT and turn the Orange encoder to
set the volume level of a part.
NOTE: Remember to always select the key on the
musical keyboard where you want to change sound.
5.4 Dynamic Envelope
The basic concept here is to record all drums in a row
and keep that recording to 12 seconds. Then set in
and out points of that recording and dedicate it to a
certain key on the musical keyboard.
Dynamic Envelope is specially designed for short
drum sounds. Set the attack level with Blue Encoder,
Mid part level with Green Encoder, Release Level with
Encoder and use the Orange Encoder to adjust the
region.
6
Drum Mode
(Continued)
6.5 Importing your own sounds
Simply create a single sound file from your selected
sounds. Remember to keep the audio file maximum
12 seconds long. Then save the sound as an .aif file.
And transfer the file to the User folder located inside
the Drum folder. See chapter 5.8-9 how to transfer
files to your OP-1.
6.6 Using OP-1 standard layout
Base 5
Base 4
Base 3
Base 1
14
13
Base 2
Crash cymbal
12
Ride cymbal
PRO-TIP: A trick to create fill-ins, is to have the same
sequence running but switching between drum kit’s
based on the same sounds but mapped differently.
You may also map some keys to silent parts of a
sampling to “mute” certain sounds.
11
10
09
Open Hi-hat
Closed Hi-hat
08
Tambourine
Hand Clap
Rimshot
Snare
Kick
Kick Alternative
Snare Alternative
To make sound switching between kits more logical
when you have a sequence running, it’s a good habit
to layout your kits in the same order. The factory kits
are mapped like this:
7
Sequencers
7.1 Sequencers – Introduction
OP-1 comes with 3 original
sequencers that let you arrange
notes in different ways. Both
Synthesizer and Drum mode have
its own dedicated sequencer
memory and can have separate
types active even though only one
can be played at a time.
The big difference between the Tape and a Sequencer
is that Tape is pure audio recordings, and the
sequencer stores note data. The reason to use
sequencers is that you may change sound but still
keep playing the same stored notes.
7.2 Selecting Sequencer
To select Sequencer type press SHIFT + the
sequencer key to enter the Sequencer Browser
screen. Turn the Blue encoder to make your selection,
then press the Sequencer key again to exit.
7.4 Endless Functions:
INSERT NOTES
To Insert a note, press SHIFT + any key on the
musical keyboard. Keep holding down SHIFT until you
are done with ALL notes you want to insert.
INSERT LONG NOTES
Press SHIFT + any key on the Musical Keyboard.
Continue to hold the keys while pressing the Forward
Arrow key (>).
INSERT SPACE
Press SHIFT + the Forward Arrow key (>).
TO DELETE LAST NOTE
Press SHIFT + the Rewind Arrow key (<).
PLAY A SEQUENCE
To play a sequence just press any key on the Musical
Keyboard. The pitch of the played notes will change
depending on what key you press. This is called Key
Transposition. To play the original pitch of the notes
play the C key on the Musical Keyboard.
7.3 ENDLESS Sequencer
Endless is a very effective way to get sequencing
done quickly. Just hold SHIFT + press any key on the
musical keyboard to store a note. It automatically
moves one step forward when you release the key.
Keep holding down shift until you are done. Then
release shift and press any key on the musical
keyboard to play your sequence. The maximum
number of notes that can be stored is 256.
C
PLAY AND HOLD A SEQUENCE
Turn the Orange Encoder until HOLD lights up.
CHANGE PLAYBACK DIRECTION OF A SEQUENCE
You have three different options for how you want the
notes to be played back. Forward, Reverse or
Random. Change direction by holding SHIFT and turn
the Orange Encoder.
7
Sequencers
(Continued)
SET NOTE LENGTH
Note length is basically a way to define how many
notes (beats) that will be played in one bar. This is
related to the Master Tempo that you set in Tempo and
to the bars in Tape mode. If you set 1/16, one bar in
tape will be 16 notes or beats. Change note length by
turning the Blue Encoder.
SWING
Swing is a way to slightly alter the timing of notes
played in a sequence. To add swing turn the Green
Encoder. No swing is a 50% setting.
NOTE: Remember to check if you have applied swing
when you record multiple layers of sequenced material
to tape if you want them to be in absolute sync.
APPLY A PATTERN TO YOUR SEQUENCE
The Endless sequencer has an function let you add a
pattern to your sequence. Turn the White Encoder to
apply a pattern.A single dot means there’s no pattern
applied. (turn the White Encoder counter clockwise all
the way until only a single dot is shown)
7.6 Pattern Functions
INSERT NOTES
To Insert a note press SHIFT + any key on the Musical
Keyboard. Keep holding down SHIFT until you are
done with ALL notes you want to insert.
ERASING NOTE
Hold down SHIFT and turn the Blue encoder.
MOVING THE VERTICAL CURSOR LINE
Press Arrow keys or turn the Blue Encoder to move
the horizontal cursor line, by doing this you also select
which note you want to focus on when erasing.
SWING
Swing is a way to slightly alter the timing of notes
played in a sequence. To add swing turn the Green
Encoder. No swing is a 50% setting
NOTE: Remember to check if you have applied swing
when you record multiple layers of sequenced material
to tape if you want them to be in absolute sync.
ROTATE NOTES
Press SHIFT + turn the Green Encoder to rotate all
notes. This might be good when you have entered the
notes in Live Mode.
LIVE MODE
Turn the Orange Encoder until HOLD lights up. The
sequencer starts, and the white horizontal cursor
moves across the sequence. Press SHIFT + any key
on the Musical Keyboard to insert a note at the current
cursor position.
ROTATE A PATTERN
By holding SHIFT + turning the White Encoder, you
can rotate the dots within the pattern.
NOTE: In Endless, you may use the arrow keys to
change octave in playback mode.
7.5 PATTERN Sequencer
Pattern is a classic grid type of sequencer found in
many hardware and software instruments. This is a 16
step sequencer, useful for sequencing drum patterns.
LIVE EDIT MODE
Press SHIFT + any Arrow key while the sequencer is
running to break the cursor connection and let you edit
the notes as you would in normal stopped mode.
SET SEQUENCER LENGTH
Turn the White Encoder to adjust the playback length
of the sequence.
MOVE SECTION
If you hold SHIFT + turn the White encoder you may
move the played back section around within the
sequence. Great for fill-ins!
PLAY AND HOLD A SEQUENCE
Turn the Orange Encoder until HOLD lights up.
7
Sequencers
(Continued)
NOTE: To key transpose a Pattern sequence, switch
to Synthesizer, Drum, Tape or Mixer mode and press
any key on the Musical Keyboard. To play the original
pitch of the sequenced notes, play the C key on the
Musical Keyboard.
ADJUST BOUNCINESS
Turn the Orange Encoder to adjust the bounciness of
the notes. The harder a note hits the wall of the the
tombola the louder it will play. This is measured in
amount of mass.
C
ADJUST HEAVINESS
This is measured in amount of Gravity. Turn the Green
Encoder to set the gravity.
CHANGE PLAYBACK DIRECTION OF A SEQUENCE
You have three different options for how you want the
notes to be played back. Forward, Reverse or Cycle.
Change direction by holding SHIFT and turn the
Orange Encoder.
RELEASING NOTES
Turn the White Encoder to open the tombola and
release the notes.
7.6 TOMBOLA Sequencer
Use tombola when you want to create a random
sequence. Just throw a couple of notes into the
tombola and then set the gravity, mass and speed of
the tombola. The harder / faster a note bounce the
louder the sound will play.
TOMBOLA SPEED
Turn the Blue Encoder to adjust the speed and the
direction of rotation of the tombola.
PRO-TIPS: Keep the tombola open and set a high
rotation speed and use Tombola as an effect on a
sound. This creates a random type of echo effect.
7.7 Tombola functions
DROP NOTES INTO TOMBOLA
Play any key on the Musical keyboard to drop a note
into the tombola.
8
Tape Mode
8.1 Tape – Introduction
Your OP-1 has a built in tape
feature with 6 minutes recording
time (in normal tape speed, 44.1
kHz / 16 bits) and 4 individual
tracks.
To enter the Tape Mode press the
Tape key with the orange tape
symbol on it.
8. Press Rewind (left arrow) to rewind the tape.
9. Press Play to listen to your recording.
8.3 Overdubbing
The Tape always overdubs if there’s recorded material
on the same track. To avoid overdubbing, lift any prerecorded takes out from the tape location.
8.4 Rewind and Fast Forward
Use the arrow keys to rewind and fast forward the
playback of the tape.
8.5 Jump to the start of the tape
Press STOP + Left Arrow key to jump to the very
beginning of the tape.
This mode changes the function of T1-T4 which
becomes track 1-4 and Sound selection keys which
becomes Tape Tricks 1-8
8.6 Jump to the end of the Tape
Press STOP + Right Arrow to jump to the end of the
last take on the tape.
8.7 Reverse Playback
To play the tape reverse you have two choices:
And Sound selection keys which becomes Tape
Tricks:
Press SHIFT + Play.
Press the Reverse Tape Tricks Key when the tape is
rolling.
8.8 Recording Level
Turn the Orange encoder to set the recording level.
8.9 Tape Editing
8.2 Record to tape
1. Select the sound which you want to record.
2. Press the Tape key to enter Tape Mode.
3. Select a recording track by pressing any of the
track keys T1-T4.
4. Set recording level with the Orange encoder. (This
is also the main level for Synthesizer and Drum
sounds.)
5. Press REC + Play to start recording.
6. Play the Musical Keyboard.
7. Press STOP when done.
First select the track you want to edit. Recorded
material shows up as grey lines and is referred to as
takes. When an active track has recorded material, the
8
Tape Mode
(Continued)
lines turn orange. To edit a take, use Scrub, Rewind,
FF or press STOP to center it under the tape head:
You may also save a sound to tape by pressing Lift in
any of the Synthesizer or Drum sounds and then
select Tape mode and press Drop. This creates a data
recording of all parameters and/or samples on the
active tape track. To recall the sound, Lift it from tape
and drop it back into any sound from 1-8. For this
function to work, the take has to be exactly the same
and an isolated take as it was when it was dropped.
8.11 Changing Tape Speed
A take turns blue when it’s in position and ready for
editing or moving. These are the editing actions for an
active take:
SCRUB – Use Blue encoder to scrub though
the tape.
SLIDE – Use SHIFT + Blue encoder to slide a
take. You may slide a take until either of its
start or end point interferes with another take.
LIFT – Press the Lift key (Arrow up) to lift a
take. The take is now in the memory. To undo
press the Drop Key to place it at the center of
the tape head. You may repeatedly press the
Drop key to paste multiple takes. The tape
moves each time to the end of a dropped take.
Lift is also used as a way to delete a take.
DROP – Use this as way to place the last take
stored in memory.
You may change the speed of the tape whenever you
want, even during recording. To do this, turn the White
encoder. If you hold down SHIFT and turn the White
encoder the tape speed is changed in fixed steps. The
sound quality changes in the same way as a real tape
when changing speed – the faster the tape speed, the
higher quality of the recording.
8.12 Advanced Recording Techniques
A quite special recording technique is to put the tape
in Rec Arm mode and control the speed yourself. To
do this press SHIFT + Rec. You are now recording but
the reels are still. To move the tape back and forth,
turn the Blue encoder. Depending on how quick you
turn the encoder the pitch of the recording will vary.
Another great recording trick is to turn the out-to-in
function on, found under the Mic key. This let’s you
record everything you hear to a selected track. This
also works as a bounce recording function.
8.13 Tape Tricks
When in Tape (or Mixer mode) the sound selection
keys 1-8 turns into Tape Tricks keys:
SPLIT – This splits a take.
LIFT ALL – Hold down SHIFT + Lift to lift all
tracks into memory.
JOIN – Press SHIFT + Split to join takes. This
function joins the next closest take on either
side of the active one. You may repeatedly
use Join to join multiple takes.
REGION LIFT – Use the loop in and out points
to define the part you want to lift.
The Tape Tricks are shown under numbers 1-8.
Tape Tricks are a collection of functions made to
interfere with the Tape or the Mixer in different ways.
They are implemented to open up for live tweaks and
quick key mixing effects.
LOOP IN – Sets the loop in point of the tape.
8.10 Advanced LIFT
LOOP OUT – This sets the loop out point.
Besides recording, the tape can also be used as a
sketchpad for creating layered sounds. Using the tape
this way let’s you build up a sound layer by layer on all
four tracks and lift it (use lift all to lift all tracks) and
then drop it in either the Synthesizer sampler or Drum
sampler.
LOOP TOGGLE – Toggles loop on and off.
BREAK – Stops the tape. If a loop is active it
will continue in the background to keep the
break in time.
REVERSE – Change direction of the tape.
8
Tape Mode
CHOP – A tempo locked repeat type of
effect.
MEMO 1 – Memorize any parameter in Tape
or Mixer for instant recall. To use this, hold
down the key and turn any encoder while in
Tape or Mixer screen. Release key when
done. Press the key again to instantly recall
the changed parameter. This is great for
switching between different EQ settings or
turn up the effect level when the tape is
running.
MEMO 2 – Memorize any parameter in Tape
or Mixer for instant recall.
8.14 Erasing Tape
8.15 Backing up your Tape
To backup your tape, connect your OP-1 to your
computer and press SHIFT + COM. Select Disk Mode.
The OP-1 will show up on your desktop as a disk.
Locate the folder named “tape” and copy the files
named “track_1.aif”, “track_2.aif”, “track_3.aif”,
“track_4.aif”. Drag all trackfiles to your computers
desktop.
To completely erase the tape and all recorded
material, press SHIFT + Tape key. For good reasons
you have to press all T1-T4 keys to start the erasing
process.
You have now made a backup of the Tape as four
individual audio tracks.
Once all keys are pressed there’s no way back. Your
tape will be wiped forever.
NOTE: No Mix, EQ, Master effects or Drive will be
applied to individual Tracks when exported. To make a
final mix of your Tape, record to Album and backup the
Album file. The album file will be located in Album,
“SideA.aif” or “SideB.aif”
8.16 Bars
When Beat matching is turned on in Master Tempo,
you’ll notice bar markers just above the tape tracks.
One bar is 16 beats which means if you enter 16 steps
in the Endless step Sequencer and set it to 1/16 and
record it it will fit exactly in one bar on the tape.
NOTE: Connect your OP-1 to your computer and
transfer the Tape if you want a backup or need to free
up space. See 8.15
To jump from Bar to Bar, press SHIFT + Rewind (<) or
SHIFT + FF (>)
9
Mixer
9.1 Mixer – Introduction
Mixer is the final stage of the sound
path. Its main function is to set the
individual level and pan of the four
tape tracks (T1), to adjust the
master EQ (T2), add a master
Effect (T3) and to add drive to your
mix (T4). But as it is also the final
destination for all sound. You need
to know how the sound travels inside your OP-1. This
is called the signal path.
9.2 Sound Path
The sound path is the way the the sound moves from
the moment you hit a key on the musical keyboard or
press play on tape, until it reaches the speaker or line
out. To help you keep an eye on this, there is a Sound
Path screen in Mixer mode that you may check at
anytime. To enter the Sound path screen, press
SHIFT + the Mixer key.
In the Mixer main screen, you adjust the individual
level and Pan Left / Right of Tape tracks 1-4
To adjust the level of a tape track:
Turn any encoder to set the level from 0-99
Track 1 level – Blue encoder
Track 2 level – Green encoder
Track 3 level – White encoder
Track 4 level – Orange encoder
To set the Pan Left / Right
Hold down SHIFT + turn the appropriate Encoder for
targeted Track to adjust the Pan Left / Right.
9.4 EQ
EQ stands for equalizer and is the word for a filter that
let’s you adjust the low, mid and high frequencies of
the final mix. When the sound enters the EQ it comes
as a mixed down stereo signal (This is done in the
main Mixer screen).
Press T2 in Mixer mode to adjust the EQ:
NOTE: A warning symbol will lit up when any critical
level is set to zero.
893 Mixer
The mixer transforms the four Tape tracks into one
stereo signal. To enter the mixer, press the Mixer key.
Then press T1 to enter the mixer main screen.
• Low (bass) – Turn the Blue encoder to adjust the low
frequencies.
• Mid – Turn the Green encoder to adjust the mid
frequencies.
• High (treble) – Turn the Green encoder to adjust the
higher (brighter) frequencies.
• EQ Amount – Turn the Orange encoder to adjust the
overall EQ level. Turn counter clockwise for a clean
signal with no EQ applied.
9.5 Master Effect
Master effects are the same effects found in
Synthesizer and Drum mode, but modified for stereo.
9
Mixer
(Continued)
To add a master effect, press the T3 key. You may
toggle an effect on and off by pressing the T3 key a
second time.
To change effect, press SHIFT + T3. This enters the
Master effect browser. Use Blue encoder to scroll
through the list and press any key (except the musical
keyboard) to make your selection.
9.6 Master Out
The master out screen is found under T4:
Here you adjust:
• The master balance Left / Right
• Add DRIVE
• Adjust the RELEASE of the Drive
DRIVE narrows the difference between high and low
audio levels, and makes the output sound louder and
more compact. At very high levels of drive, the audio
starts to sound distorted.
RELEASE sets how quick the drive will narrow the
difference between high and low audio levels, and at
mid to long release, you’ll start to notice the drive as a
“pumping” sound.
You may also use drive to add a texture and to make
your final mix more dirty and raw.
PRO-TIP: Hold down SHIFT while turning Blue or
Green encoder to adjust both LEFT and RIGHT at the
same time.
10
Tempo
10.1 Tempo – Introduction
In Tempo, you set the master tempo
for all sequencers, you switch Beat
Matching on and off. You’ll also find
the Metronome here.
10.2 Setting the Tempo / Tap Tempo
To set the tempo you have two choices:
A) Turn the Blue encoder
B) Tap the tempo – Do this by hitting the tempo key
multiple times until you get the desired tempo.
10.3 Using the Metronome
To use the metronome, turn the Orange Encoder until
you get your desired pitch. To start the metronome,
press Play.
10.4 Beat Match
Beat Match is a concept of keeping the Tempo and the
Tape speed in sync. When beat match is turned on,
(Turn the Green Encoder until Beat Match lights up)
the current tempo is locked to the Tape speed and is
dimmed. This means that you now have to adjust the
tape speed to change the tempo.
If you turn beat match on and switch to Tape mode,
you’ll notice that Bars have appeared above the tape
tracks. (see 7.16 Bars) These Bars are your guidelines
when recording in sync. One bar is 16 beats long.
Now play a sequence and adjust the tape speed, you
will hear the sequence play slower if you turn down
the tape speed, and faster if you turn tape speed up.
However, the pitch won’t change.
This is the beauty of Beat Match, to have a drum beat
playing using the sequencer and have recorded
material played back from the tape in sync at the
same time. Add some tape tricks to that and you have
a nice live tweaking set-up.
PRO-TIPS: Record different variations to single Bars
and use the arrow keys explained in the Bars section
8.16 to easy move the play-backed loop between the
variations.
11
Help & Tools
11.1 Help
Your OP-1 has a built-in Help function. Pressing the
Help Key at anytime brings up a Speech Bubble which
tells you what mode you are in and what Sound is
selected. By HOLDING down the Help Key and
pressing any key you get the Key name and function
of that specific key.
PRO-TIPS: Hold down Help while playing the musical
keyboard to get note information.
11.2 Tools
Press SHIFT + Help key to enter TOOLS. Here you
set the time and date, and maybe you’ll find a
calculator here in the future...
BLUE encoder – MONTH / YEAR
GREEN encoder – DAY
WHITE encoder – HOUR
ORANGE encoder – MINUTE
11.3 Battery level
When you hold down the Help key
you can check the battery level
indicated by the VU / Battery meter
located on the right side of your
OP-1.
The Battery level is indicated by the LED
array on the right side of your OP-1.
All LED’s lit (including the red) indicates
a fully charged battery good for around
16 hours of heavy use. The stand-by
time is approx. 2 years.
12
Mic / Input key
12.1 Using the Mic / Input Key
The Mic / Input key (with the
microphone symbol on it) is used
when you need to record any
external audio.
The different sources you may record are:
• Built-in Microphone
• Line in
• Radio
• Out to In (the ear symbol)
The Mic / Input key works quite similar in any mode on
the OP-1:
IN SYNTHESIZER MODE
A) Use the Mic / Input key when you have a Sampler
engine selected to start to sample. Choose any
source by turning the Blue Encoder.
B) Use external audio to control the Element LFO
IN DRUM MODE
Same functionality as in Synthesizer Mode
IN TAPE MODE
Pressing the Mic / Input key in Tape mode let’s you
toggle external audio ON / OFF. This let’s you mix in
some nice radio playing in the background or use the
Line In and mix it with your recorded material. (A great
way to connect a second OP-1 and controlling both
with one Master Volume Knob.)
IN MIXER MODE
Same functionality as in Tape Mode.
NOTE: To switch source in Tape or Mixer mode, press
SHIFT + Mic / Input key. This let’s you switch source
and adjust the level.
12.2 Using the Radio
Use the Blue Encoder while in Mic / Input screen to
switch source to Radio. Use the Green Encoder to
tune in to any station.
PRO-TIPS: Connect a 3.5 mm audio cable (or
headphones) to Line in and use as an external
antenna.
13
Album / COM
13.1 Album
13.4 Controller Mode
Album let’s you mix down all four
tracks from the tape (you may also
play the synthesizer
simultaneously) to a stereo file.
Album is also useful when you want
to record any Tape Tricks or EQ
effects.
Defines OP-1 as a MIDI controller keyboard. Use Shift
+ the encoders to set the behavior of the encoders
and Arrow Keys. You may also switch MIDI Channel
by holding SHIFT + turn the Green encoder.
Knobs RELATIVE or
ABSOLUTE
You have two sides of the record – Side A and Side B
each have a recording slot of 6 minutes.
To record press the RECORD Key (T1) and then
switch to Tape and press play. When you are done
switch back to Album and press STOP.
MIDI Channel
ARROW Keys behavior
13.5 DISK Mode
By pressing the DISK Key, your OP-1 turns into a
storage device and will show up on your computer’s
desktop if connected via USB.
The Album records directly from Master out, which
means that any EQ, Master Effect or DRIVE you have
added will be applied to the sound.
13.2 COM
By pressing SHIFT + Album key, you enter COM
mode, which turns your OP-1 to a controller or disk.
13.6 Using OP-1 sequencers with external equipment
Your OP-1 is always sending MIDI data out, even if
you’re not in controller mode. This way you may
connect OP-1 to a computer via USB and use any of
OP-1‘s built in sequencers controlling your software
synthesizers or other hardware connected.
13.3 OP-1 Mode
Press the OP-1 Key (T1) for standard OP-1 mode. In
this Mode, the OP-1 works as a stand-alone unit.
When connected via usb, the OP-1 listens to midinotes on MIDI channel 3.
14
SHIFT Key
14.1 Using SHIFT
14.4 SHIFT + Arrow keys
Well, using SHIFT may not be a big
thing to explain and dedicate a
chapter to., but on the other hand
why not?
The main reason to write about it, is the function to
change individual modules in Synthesizer and Drum
mode.
In tape mode:
Bar step back Bar step Forward
In Tape Play
+ Loop On
< Move Loop
In Synthesizer:
Move Loop >
Pitch Bend - Pitch Bend +
14.2 Change a single Module
As you have learned in the Synthesizer and Drum
chapter, you press the T1-T4 keys to tweak Engine or
Sample kit, Envelope, Effect and LFO.
Let’s say you have made settings for a perfect LFO
and added a great Effect to that. The only thing that is
not perfect is the Engine. So, by pressing SHIFT + T1
you are allowed to change ONLY the Engine and keep
the rest of the settings, like the LFO, Effect and
Envelope intact. This is also great to do live, having a
sequence running and just swapping different samples
or effects.
Of course you always have the option to switch a
complete sound by pressing SHIFT + Sound 1-8.
14.3 SHIFT + Main Modes
Using SHIFT in main modes opens up the Sound
Browser in Synthesizer and Drum mode and Erase
Tape and the Signal Path screen when pressing Tape
or Mixer keys.
Switch Sound
Switch Sound
Erase Tape
Signal Path
14.5 SHIFT + Encoders
In most other modes the encoders have double
functions if SHIFT is pressed. But also depending on
for example if the tape is running or in standby the
encoders change function. See appropriate chapter for
more details.
15
LFO REFERENCE
Your OP-1 has four built-in LFO’s. This section
explains how they work.
15.1 ELEMENT LFO
The Element LFO uses external elements to modulate
a sound. Use the Blue encoder to choose
Blue encoder sets Speed. Green encoder sets Pitch.
White encoder sets Volume and Orange encoder sets
the envelope Attack / Decay.
A) The built-in G-Force sensor
B) External input like Radio, Line-in or Mic.
If you selected external input, Press Shift + the Mic
key to define the input source.
Blue encoder sets destination (Engine, Envelope, FX
or Pitch & Volume. Green encoder sets Amount. White
encoder sets Destination. Orange encoder sets
destination Parameter. Dimmed colors in the color
wheel represent shifted encoders.
15.5 VALUE LFO
The Value LFO modulates one single parameter
value. Blue encoder controls the speed. Green
encoder the Amount. White encoder sets Destination.
Orange encoder sets destination Parameter. Dimmed
colors in the color wheel represent shifted encoders.
15.2 RANDOM LFO
Random LFO modulates ALL parameters in a selected
destination. It also have it’s own envelope curve to
control attack and decay
15.6 The LFO clock
The LFO clock found in Tremolo and the Value LFO
indicates a tempo locked clock with numbers and a
free running clock with hand.
Blue encoder sets Amount. Green encoder sets
speed. White sets Destination and Orange encoder
sets the envelope Attack / Decay.
15.4 TREMOLO
This LFO let you modulate the pitch and the Volume to
create tremolo effects.
15.6 The “F” indication
In some LFO’s you’ll see the destination symbol
followed by an “F”. This means that the LFO don’t retrigger on every note played when for example a
sequencer is running. This together with a slow clock
let’s you create long sweeping effects.
16
Exercises
A great way to learn how to model a sound on the
OP-1 is to try to create a specific sound from real life.
It might be a fat bass sound, a police siren or singing
birds. The goal here is not to create a perfect ultra
realistic replica, rather to learn how to combine
different modules and understand their functions.
Before you do the exercises here, remember to set all
modules in the Mixer to clean settings and to turn off
any sequencers:
• Set all channels to around 80 and Pan to center (T1)
• Set the EQ to clean by turning the Orange encoder
counter clockwise so the arrow points to CLEAN.
(T2)
• Toggle any effect to OFF. (T3)
• Set master levels Left / Right to 99 and set Drive and
Release to 0.
• Toggle any Sequencer to OFF.
• Enter Synthesizer mode by pressing the Synthesizer
Key.
HELICOPTER
SYNTHESIZER ENGINE: Digital
ENVELOPE: Mid ATTACK and long RELEASE
FX: Punch
LFO: Parameter LFO
First. set the Master Volume to comfortable listening
level.
1. Select any Sound (from 1-8) and press SHIFT + T1
to enter the Synthesizer engine browser. Select
Digital from the list and press any key to exit
(except the musical keyboard). The Digital
synthesizer engine is simple but very flexible and
good for all-round synthesizer sounds.
2. When in Synthesizer engine screen, turn any
encoder until you get a noisy sound. To get a clean
noise without any tone you need to set the Octave
to +4. Do this by pressing > until the Octave pop-up
says “Octave +4”.
3. Set the Envelope to long attack by turning the Blue
encoder until you get a sloped curve. Turn the
Orange encoder counter clockwise to get a mid- to
long release. Set both the Green and the White
encoder to maximum by turning them clockwise.
4. Enter the Effect screen by pressing the T3 key.
Now set the effect to Punch by entering the Effect
Browser (SHIFT + T3) and choose Punch from the
list. Press any key to exit.
5. The Punch Effect is great for adding punch to
drums and final mixes, but also as a multi purpose
resonance filter as used here. Set the Punch effect
like this: Blue parameter to middle, Green to
around 50-65, White to 24 and Orange to 99.
6. Now play a note on the musical keyboard and turn
the Blue encoder simultaneously. You will now hear
the noise going through the filter and when you turn
the Blue encoder clockwise you open up the filter
and let the sound through. The next step is to
control the Blue parameter (equals to the Blue
encoder) and make it automatically increase and
decrease at a certain speed. This is done by the
Parameter LFO.
7. Press T4 to enter the LFO screen and the Press
SHIFT + T4 to enter the LFO browser and select
Value from the list. Press any key to exit.
8. The Value LFO is made to modulate one parameter
value only. To control the Blue Parameter in the
Punch effect set Speed to mid (12 o’clock), Amount
to 50-100, Destination to FX and Parameter to
Blue.
9. Now play the musical keyboard and you should
hear a helicopter type of sound.
If you now go back to the Effect screen you will
actually see that the blue parameter is moving up and
down. Try to turn the Blue encoder as you play a note
and you will be able to set the range for the blue
parameter to act within.
SINGING BIRDS
SYNTHESIZER ENGINE: FM
ENVELOPE: Short ATTACK, short DECAY, low
SUSTAIN and long RELEASE
PLAY MODE: MONO, Portamento: 60
FX: Spring
SEQUENCER: Tombola
To create a sound like singing birds, start with the FM
engine which is good for metallic and distinct sounds
but also clean sinus wave sounds when the FM level
is turned down. Here we also use the tombola to play
the notes in a natural and random way and add some
portamento to let the notes glide. Sometimes using a
sequencer as tool for shaping a sound can be very
useful.
1. Select any sound from 1-8 and change it’s engine
to FM.
2. Turn the Blue encoder counter clockwise until you
get a clean sinus wave sound.
3. Set the Octave to +3 (use arrow keys)
16
Exercises
4. Set the Envelope to very short ATTACK, short
DECAY, low SUSTAIN and mid RELEASE.
5. By pressing SHIFT in Envelope screen you enter
the Play mode settings. Set PLAY MODE to MONO
and PORTAMENTO to 60.
6. Choose the Spring effect and set the TONE to
bright (white color), mid amount of TURNS,
maximum DAMP and mid LEVEL.
7. Choose the TREMOLO LFO and set the SPEED to
9 o’clock, PITCH to 20-30, VOLUME to 20-50 and
ENVELOPE to straight.
8. Now press SHIFT + Sequencer key and select
TOMBOLA. Press any key to exit.
9. Drop some notes into the Tombola and set the
speed to 2.
As mentioned earlier the use of a sequencer as one of
the key elements can be very useful when you need to
create melodic type of effects.
Reference
Cluster
Digital
TYPE
Multi layered oscillator cluster
Number
of waves
(0-6)
Wave
Envelope
Spread
Unitor
String
TYPE
Tension
TYPE
Wave
Shaper
True digital Synthesis
Octave
Detune
and
Ringmod.
On / Off
Digitalness
Pulse
Waveguide string model
Impulse
Decay
Detune
TYPE
Impulse
Type
Filter
Dual Pulsetrain Oscillator
Amplitude
Second
Pulse
Modulation
Reference
FM
TYPE
Topology
Phase
Four operator FM synthesis
Freq.
FM
Amount
Detune
Dr Wave
TYPE
Wave
Type &
Length
TYPE
Phase
Shift
Phase Distortion
Distortion
Amount
Phase
Filter
Phase
Tilt
Synthesizer Sampler engine
Frequency Domain Synthesis
Filter
Phase
Chorus
TYPE
Teenage Sample Player
Start
Loop In
Loop Out
End
Reverse
On / Off
Loop In
Fine tune
Loop Out
Fine tune
Gain
Reference
Effects Reference
Drum Sampler engine
Delay – Solid State Delay
TYPE
Teenage Percussion Sample Player
Blue - Size
Green - Speed
White - Feedback
Orange - Mix
Grid – Three Dimensional Feedback Plate
Blue - X Size
Green - Y Size
White - Z Feedback
Orange - Mix
Phone – Hacked Telephone System
Blue - Tone
Green - Phonic
White - Baud
Orange - Telematic
Note /
Pitch
Reverse
On / Off
In
In
Fine tune
Out
Out
Fine tune
Loop Off /
Once / On
Gain
Punch – Hard Hitting Low Pass Filter
Blue - Frequency
Green - Punch
White - Rounds
Orange - Power
Spring – Mathematic Reverb
Blue - Tone
Green - Turns
White - Damping
Orange - Send
Specifications
HARDWARE
Mechanical
Body
CPU
• Low profile keyboard module
• Scissor-switch ultra low profile design
• Expected lifespan of 10 million
keystrokes per key
• Advanced CNC:d one-piece Aluminum
design.
• 2 X M6 Mounting holes for accessories.
• 2 X Cuts for strap accessory.
Encoders
Color
• Industrial Grade Incremental Encoders
• Rotational life: Up to 1,000,000
revolutions
• Excellent indexing feel (remains
consistent over life)
• Zinc diecast and fiber enforced high
performance plastic
• Used in Avionics Operating temperature
range: -40 to +85°C2.8
• Light grey powder coated body and EDM
textured keyboard
• 400 MHz Processor Core (800 MMACS
performance)
• 64 MB Low-Power SDRAM (12ns)
• 512 MB Nand Flash storage
• 24-bit 96kHz ADC/DAC
Battery
•
•
•
•
Li-Ion 1800 mAh
16 hours active Battery Life
2 Years stand-by time
Charge via USB port
I/O
•
•
•
•
•
•
USB 2.0 high speed (OTG)
3.5 mm Line Input, Output
Built-in microphone
High output mini speaker 8 Ohm 1 Watt
3-axis accelerometer (G-force) sensor
Worldwide FM band support (64-108
MHz)
Dimensions
L 282 mm, H 102 mm, D 13.5 mm
Packaging
The OP-1 comes shipped in a reusable
environmental friendly package made out
of Paperfoam material.
Motion Sensor
• 3 Axis Motion sensor (G-Force)
• Assignable to any synth, envelope, effect
parameter or to pitch
Display
•
•
•
•
•
•
•
Amoled display running in 60 fps
320 x 160 pixel resolution
Color Depth: 16.7 M
Contrast: 10000:1 (good for outdoor use)
Viewing Angle: 170°
Life Time: 30,000 hrs
2500mAh li-ion Polymer Battery
Credits
Many thanks to Matthew Williams for proof reading and suggestions
concerning this manual. And to all beta testers for extensive testing.
Big thanks to George and Kent. And to our families and friends.
OP-1 with optional Studio System rig.