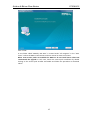
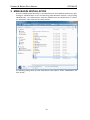
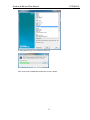
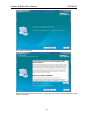
1
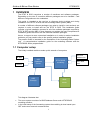
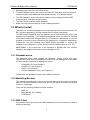
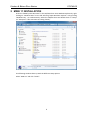
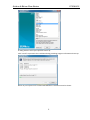
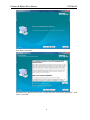
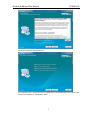
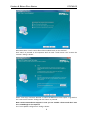
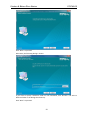
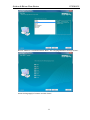
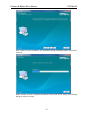
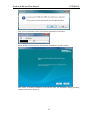
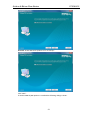
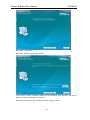
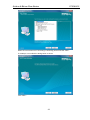
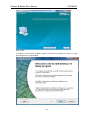
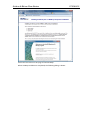
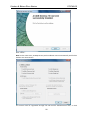
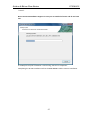
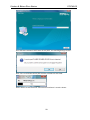
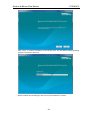
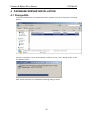
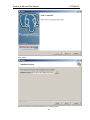
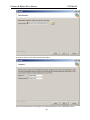
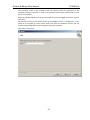
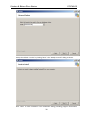
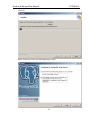
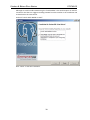
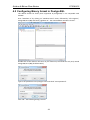
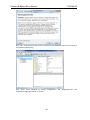
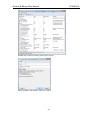
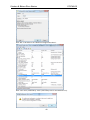
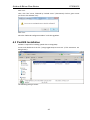
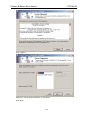
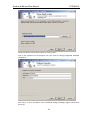
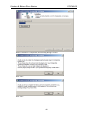
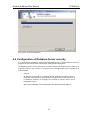
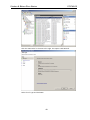
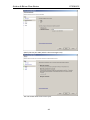
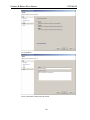
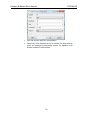
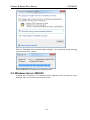
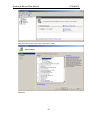
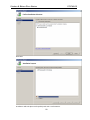
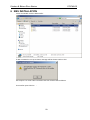
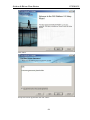
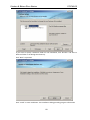
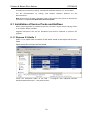
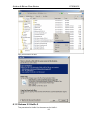
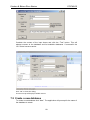
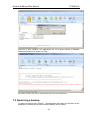
Government of Maharashtra Water Resources Department Hydrology Project II IBRD Loan No: 4749-IN Real Time Streamflow Forecasting and Reservoir Operation System for Krishna and Bhima River Basins in Maharashtra (RTSF & ROS) Installation Guide for Knowledge Base System (KBS) and RTSF&ROS Modelling Packages June 2012 DHI Water Environment Health Real Time Streamflow Forecasting and Reservoir Operation System for Krishna and Bhima River Basins in Maharashtra (RTSF & ROS) DHI (India) Water & Environment Pvt Ltd 3rd Floor, NSIC Bhawan, Okhla Industrial Estate New Delhi 11 00 20 India Installstion Guide Tel:+911147034500 Fax:+911147034501 June 2012 [email protected] www.dhigroup.com Client’s representative Client Superintending Engineer Chief Engineer, Planning & Hydrology Project Project No Real Time Streamflow Forecasting and Reservoir Operation System for Krishna and Bhima River Basins in Maharashtra (RTSF & ROS) 63800247 Authors Date: Guna Paudyal Anders Klinting Dhananjay Pandit 18 June 2012 Approved by Hans G. Enggrob Revision By Description 0.1 Initial Version Checked Approved ANK Key words Date 15/6-12 Classification Real Time, Streamflow, Flood, Forecasting, Reservoir Operation, Forecast Models, Hydrology, Hydraulics, River Basin, Capacity Building Open Internal Proprietary Distribution No of copies Client: PDF File DHI: PDF file Krishna & Bhima River Basins RTSF&ROS Table of Contents 1 OVERVIEW ..................................................................................... 1 1.1 Computer setup ................................................................................... 1 1.2 What to Install ...................................................................................... 2 1.2.1 Database server ...................................................................................................... 2 1.2.2 Modelling Machine ................................................................................................... 2 1.2.3 KBS Client ............................................................................................................... 2 1.2.4 Web Server.............................................................................................................. 3 2 MIKE 11 INSTALLATION ............................................................... 4 3 MIKE BASIN INSTALLATION ...................................................... 16 4 DATABASE SERVER INSTALLATION ........................................ 32 4.1 PostgreSQL ........................................................................................ 32 4.2 Configuring Binary format in PostgreSQL ...................................... 39 4.3 PostGIS Installation ........................................................................... 43 4.4 Configuration of Database Server security ..................................... 47 5 .NET FRAMEWORK 3.5 SP1 INSTALLATION............................. 53 5.1 Windows 7 or Windows XP ............................................................... 53 5.2 Windows Server 2008 R2 .................................................................. 54 6 KBS INSTALLATION.................................................................... 58 6.1 Installation of Service Packs and Hotfixes ...................................... 62 6.1.1 Release 2.2 Hotfix 1 ...............................................................................................62 6.1.2 Release 2.2 Hotfix 2 ...............................................................................................63 6.1.3 Release 2.2 Hotfix 3 ...............................................................................................64 6.2 Configuring Databroker .................................................................... 64 6.2.1 Copy driver .............................................................................................................64 6.2.2 Modify runtime.config ..............................................................................................64 6.2.3 Modify DataBroker config........................................................................................64 6.2.4 Installing and starting the DataBroker service .........................................................64 6.3 The Event service .............................................................................. 66 7 DATABASE MANAGEMENT UTILITY ......................................... 67 7.1 Connecting ......................................................................................... 67 i Krishna & Bhima River Basins RTSF&ROS 7.2 Create a new database ...................................................................... 68 7.3 Restoring a backup ........................................................................... 69 7.4 Updating a database .......................................................................... 70 7.5 Passwords .......................................................................................... 70 ii Krishna & Bhima River Basins RTSF&ROS 1 OVERVIEW The RTSF & ROS comprises a number of machines and software packages. Depending on the role of a machine different packages are to be installed – and different configurations to be undertaken. This guide is intended to be used as a reference during training and during installation of the RTSF & ROS and the Knowledge Base System (KBS). A number of different software packages (see what to install in next sections) are required in order to install and run the RTSF & ROS. This installation guide includes a typical installation process for all of the software packages required by RTSF & ROS and the KBS. It does however not replace the more comprehensive installation guides that come with the individual software packages. Hence, to support a more customized installation or in order to resolve installation problems you may need to refer to the specific product installation guides. The present Guide is intended for the installation of the Knowledge Base System only. A comprehensive installation guide for the modelling software and the RTSF&ROS will be prepared later. 1.1 Computer setup The initially installed machines make up this network of computers QPF from RIMES Server RT-DAS Satellite KBS Database Server KBS Client(s) RTSF&ROS modelling Webserver This diagram illustrates that The cores system consists of a KBS Database Server and a RTSF&ROS modelling machine. In the initial setup of the forecasting system the modelling is done based upon QPF and current reservoir measurements 1 Other Web Data Krishna & Bhima River Basins RTSF&ROS Modelling results are sent to the Web server The KBS Database server will retrieve and store RT-DAS data once they become available together with additional data added manually, e.g. Satellite images The KBS Database server will retrieve data from the modelling machine (QPF, measurements, forecasts) and store them The KBS Clients access the KBS database Model runs are executed directly on the modelling machine 1.2 What to Install The KBS is a software package which builds upon Microsoft .Net Framework 3.5 SP1 and thus depends on it being installed for the correct functionality. The KBS uses PostgreSQL 9 as the database server and PostGIS 2.0 as the GIS extension to PostgreSQL. The PostgreSQL database server can either be installed on the same machine as the application in a “Professional” deployment or it can be installed on a server machine located on the network on a “Corporate” deployment. Furthermore, the DHI modeling tools MIKE BASIN and MIKE 11 need to be installed to run simulations. Current version of these modeling tools is 2011 SP 7. MIKE BASIN, in its current form, is an extension to ArcMap and thus requires ArcMap to be installed. Required version is ArcMap 10 SP1. 1.2.1 Database server The database server shall operate the database, serving clients with data. Furthermore it shall host the DataBroker Service and Job Manager recurrent tasks to import real-time data and modelling time series. o o o o PostgreSQL 9.0, see Chapter 4 PostGIS 2.0, see Chapter 6 DSS 2.2, see Chapter Custom DataBroker driver, see Chapter 6.1 Furthermore, the database needs to be created or restored. 1.2.2 Modelling Machine The modelling machine will retrieve time series data from the internet (and later also from the KBS database server) and will run the regular forecasts and publish results on a web page. To do this the following software must be installed o o o MIKE 11 MIKE BASIN, incl. ArcMap RTSF&ROS 1.2.3 KBS Client Any machine wanting to access the KBS database server will at minimum need to install the following: 2 Krishna & Bhima River Basins o o RTSF&ROS DSS 2.2 Time Series Package or a MIKE Zero product (MIKE 11 or MIKE BASIN) 1.2.4 Web Server It is assumed to be a simple web hotel, i.e. no software needs to be installed 3 Krishna & Bhima River Basins RTSF&ROS 2 MIKE 11 INSTALLATION Insert the "MIKE by DHI 2011 DVD" in the CD/DVD drive. Start Windows Explorer by rightclicking on “Windows Start" menu and selecting "Open Windows Explorer" or by pressing "Windows Key" + E simultaneously. Select the CD/DVD drive and double click on "Setup" (or "Setup.exe" if file extensions are being shown): The following window shows up with the different setup options: Select "MIKE 11" and click "Install": 4 Krishna & Bhima River Basins RTSF&ROS A dialog with the list of pre-requisites shows up: Click "Install" to proceed. The installation dialog providing progress information shows up: When all pre-requisites are installed the MikeZero installation wizard is shown: 5 Krishna & Bhima River Basins RTSF&ROS Click "Next" to proceed: Read the license agreement and check "I accept the terms of the license agreement". Click "Next" to proceed. 6 Krishna & Bhima River Basins RTSF&ROS The license selection dialog shows up: If you already have a valid DHI license installed select "Unchanged. Keep the current type of license management" followed by "Next". 7 Krishna & Bhima River Basins RTSF&ROS Otherwise select "Local. License file will be installed locally on the machine" Click "Next" to proceed as all computers shall run with a local license. The "License File Location" dialog is shown: Select "Local copy" and click "Browse" to select the DHI license. Click "Open" to go back to the "License File Location" dialog and click "Next" to proceed. Note: Contact DHI Software Support in case you are entitled a license and don't have one. A USB dongle is also required. The "Auto Update Configuration" dialog is shown: 8 Krishna & Bhima River Basins RTSF&ROS Uncheck "Enable DHI Auto Updater to run as startup". Click "Next". If another MIKE by DHI product is installed the following dialog is shown: 9 Krishna & Bhima River Basins RTSF&ROS Click "Next" to proceed. Otherwise, the following dialog is shown: If you want to specify a different folder for the installation, click "Browse" and select a different folder in the dialog that shows up. Click "Next" to proceed. 10 Krishna & Bhima River Basins RTSF&ROS Be sure "MIKE 11" is selected and click "Next". The "Language Selection" dialog is shown: Select the language(s) of interest and click "Next": 11 Krishna & Bhima River Basins RTSF&ROS Click "Install" to start installation. The installation dialog providing progress information shows up: When finished, and the completed installation comes with service packs, the following dialog (or similar) is shown: 12 Krishna & Bhima River Basins RTSF&ROS Click "Yes" to install the service pack. Service pack files are extracted: When all files are extracted the "Service Pack Installation" wizard is shown: Click "Start" to initiate installation of the service pack. The installation dialog providing progress information shows up: 13 Krishna & Bhima River Basins RTSF&ROS When finished, the last dialog for the service pack installation is shown: Click "Finish". The last dialog for the MikeZero installation is shown. 14 Krishna & Bhima River Basins RTSF&ROS Click "Finish". A new folder called "MIKE by DHI 2011" is created under "All Programs" in the "Start menu". Follow the MIKE 11 instructions and user manual on how to use these. When new services packs are available for MIKE 11 do not install them unless DHI recommends the upgrade. In such case, launch the service pack installation by double clicking on the service pack installer executable and follow the procedure as described above. 15 Krishna & Bhima River Basins RTSF&ROS 3 MIKE BASIN INSTALLATION Insert the "MIKE by DHI 2011 DVD" in the CD/DVD drive. Start Windows Explorer by rightclicking on “Windows Start" menu and selecting "Open Windows Explorer" or by pressing "Windows Key" + E simultaneously. Select the CD/DVD drive and double click on "Setup" (or "Setup.exe" if file extensions are being shown): The following dialog shows up with the different setup options. Select "MIKE BASIN" and click "Install": 16 Krishna & Bhima River Basins RTSF&ROS A dialog preparing for the installation shows up After some time the MIKE GIS installation wizard is shown: 17 Krishna & Bhima River Basins RTSF&ROS Click "Next" to proceed: Read the license agreement and check "I accept the terms of the license agreement". Click "Next" to proceed. 18 Krishna & Bhima River Basins RTSF&ROS The license selection dialog shows up: If you already have a valid DHI license installed select "Unchanged. Keep the current type of license management" followed by "Next". 19 Krishna & Bhima River Basins RTSF&ROS Otherwise select "Local. License file will be installed locally on the machine" Click "Next" to continue as all computers shall run with a local license. The "License File Location" dialog is shown: Select "Local copy" and click "Browse" to select the DHI license. Click "Open" to go back to the "License File Location" dialog and click "Next" to proceed. Note: Contact DHI Software Suport in case you are entitled a license and don't have one. A USB dongle is also required. The "Auto Update Configuration" dialog is shown: 20 Krishna & Bhima River Basins RTSF&ROS Uncheck "Enable DHI Auto Updater to run as startup". Click "Next". If another MIKE by DHI product is installed the following dialog is shown: 21 Krishna & Bhima River Basins RTSF&ROS Click "Next" to proceed. Otherwise, the following dialog is shown: If you want to specify a different folder for the installation, click "Browse" and select a different folder in the dialog that shows up. Click "Next" to proceed. The "Feature Selection" dialog is shown: 22 Krishna & Bhima River Basins RTSF&ROS Make sure the selections are according to the dialog above and click "Next". If ArcMap is not installed the dialog below is shown. Click "Next": 23 Krishna & Bhima River Basins RTSF&ROS Click "Install". If ArcMap is not installed, ArcMap Installer is automatically launched as well as a page describing how to install ArcMap. 24 Krishna & Bhima River Basins RTSF&ROS Follow the instruction on this page to install ArcMap. When ArcMap installation is completed, the following dialog is shown: 25 Krishna & Bhima River Basins RTSF&ROS Click "Finish": Note: At the same time, ArcMap Service pack installation starts automatically and finishes without user intervention. The license must be registered through the DHI License Administration later, so click 26 Krishna & Bhima River Basins RTSF&ROS ”Cancel”. Note: Contact DHI Software Support in case you are entitled a license and do not have one. If ArcMap service pack installation is still running, wait for its completion. Completing the ArcGIS installation will let the MIKE BASIN installer continue installation. 27 Krishna & Bhima River Basins RTSF&ROS Since the DHI installation comes with service packs, the following dialog is shown: Click "Yes" to install the service pack. Service pack files are extracted: When all files are extracted the "Service Pack Installation" wizard is shown: 28 Krishna & Bhima River Basins RTSF&ROS Click "Start" to initiate installation of the service pack. The installation dialog providing progress information shows up: When finished, the last dialog for the service pack installation is shown: 29 Krishna & Bhima River Basins RTSF&ROS Click "Finish". The last dialog for the MIKE GIS installation is shown. Click "Finish". A new folder called "MIKE by DHI 2011" is created under "All Programs" in the "Start menu". With a subfolder called "MIKE GIS" Follow the MIKE BASIN instructions and user manual on how to use these. When new services packs are available for MIKE BASIN do not install them unless DHI recommends the upgrade. In such case, launch the service pack installation by double clicking on the service pack installer executable and follow the procedure as described 30 Krishna & Bhima River Basins RTSF&ROS above. 31 Krishna & Bhima River Basins RTSF&ROS 4 DATABASE SERVER INSTALLATION 4.1 PostgreSQL Locate and double-click the "postgresql-9.0.0-1-windows.exe" (if file extensions are being shown): Some pre-requisites may be automatically installed. In such case a dialog similar to the one below is shown: After all pre-requisites are installed the following dialog is shown: 32 Krishna & Bhima River Basins RTSF&ROS Click "Next": Accept the default "Installation Directory" by clicking "Next": 33 Krishna & Bhima River Basins RTSF&ROS Change the drive for the data to D and click "Next": Type in the password for the postgres user (the administrator for the database server). 34 Krishna & Bhima River Basins RTSF&ROS This password needs to be compliant with the domain policy for passwords if the computer belongs to domain. In such case, password shall contain capital letters, small letters and numbers. Make the password different from the password for currently logged in windows account (you own). The password chose for the initial version of the database server is “DssAdmin1”. If this needs to be changed for some reason make sure both the Windows Account and the corresponding PostgreSQL account change to the same password. Click "Next" to proceed: Accept the default "Port" by clicking "Next": 35 Krishna & Bhima River Basins RTSF&ROS Accept the default "Locale" by clicking "Next". The "Ready to Install" dialog is shown: Click "Next" to start installation. The installation dialog providing progress information 36 Krishna & Bhima River Basins RTSF&ROS shows up: When installation is done, the following dialog is shown: 37 Krishna & Bhima River Basins RTSF&ROS Although we could install PostGIS using the "Stack Builder" this would require an internet connection and thus we suggest installing PostGIS from the installer in the Installation CD as described in the next section. Uncheck "Launch Stack Builder at exit?” Click "Finish" to exit the installation. 38 Krishna & Bhima River Basins RTSF&ROS 4.2 Configuring Binary format in PostgreSQL The default format for binary data supported by PostgreSQL is not compatible with PostGIS. Start "PGAdmin III" by clicking on "Windows Start" menu, followed by "All Programs", PostgreSQL 9.0 (x86) and finally "pgAdmin III". The main PGAdmin window is shown: Double click on the node for the server in your machine (it should be the only one) named PostgreSQL 9.0 (x86) (localhost:5432): Type in the password for the postgres user and check "Store password". Click "OK". The following dialog is shown: 39 Krishna & Bhima River Basins RTSF&ROS Click "OK". A connection to the server is performed and PGAdmin shows the contents of the database (still empty): Click "Tools" menu followed by "Server Configuration" and "postgresql.conf". The "Backend Configuration Editor" is shown: 40 Krishna & Bhima River Basins RTSF&ROS Double click on the line starting with "bytea_output": Check "Enabled" and change "Value" to "escape": 41 Krishna & Bhima River Basins RTSF&ROS Click "OK" to be back to the “Backend Configuration Editor". Click "File" menu, followed by "Save" (alternately click on the diskette icon): 42 Krishna & Bhima River Basins RTSF&ROS Click "Yes". Then, click "File" menu, followed by "Reload server" (alternatively click on green arrow just next to the diskette icon): Click "Yes". Close the “Backend Configuration Editor" and close pgAdmin. 4.3 PostGIS Installation PostGIS is required for handling spatial data in PostgreSQL. Locate and double-click the file "postgis-pg90-setup-2.0.0-3.exe" (if file extensions are being shown): The following dialog is shown: 43 Krishna & Bhima River Basins RTSF&ROS Click "I Agree": Make sure "Create spatial database" is unchecked. Click "Next": 44 Krishna & Bhima River Basins RTSF&ROS Accept the default "Destination Folder by clicking "Next". Type in the password of the postgres user (the same as during PostgreSQL database installation) Click "Next" to start installation. The installation dialog providing progress information shows up: 45 Krishna & Bhima River Basins RTSF&ROS When installation is completed, the following dialog is shown: Click "Yes": Click “Yes”: 46 Krishna & Bhima River Basins RTSF&ROS Click "Close" to finish installation. 4.4 Configuration of Database Server security In a “professional installation” where the PostgreSQL service is a local database service for programs in the same machine the settings are by default appropriate. The following section is only relevant for situations where the database server shall act as a central service to many clients. If a central server is being installed some settings need to be modified: o Firewall By default the firewall of a Windows Server 2008 R2 operating system is restrictive with respect to what and who can gain access to the resources. It is therefore necessary to configure the firewall to permit access to the PostgreSQL service. Open Server Manager and local Windows Fire Wall and Inbound Rules 47 Krishna & Bhima River Basins RTSF&ROS Click the “New Rule” in the meu to the right. This opens a Rule Wizard: Select “Port” type and click Next: 48 Krishna & Bhima River Basins RTSF&ROS Specify the TCP port 5432 (which is the one Postges uses). The rule should allow access on this port. 49 Krishna & Bhima River Basins RTSF&ROS For all profiles… Enter a description and Finish the wizard 50 Krishna & Bhima River Basins RTSF&ROS And the new rule is visible in the list of Inbound rules. o PostgreSQL service The database service itself also includes an access permission system which b defaults only allows local access from the same computer. For the server to work as a server in a network environment the permissions must be opened up. Permissions can be given at different levels, see more details here: This server is set up to allow access from machines in the same subnet as the server itself, i.e. machines in the same organization. This is done like this: Open pgAdmin and connect to the database service Open menu item Tools -> Server Configuration -> pg_hba.conf Double-click the empty line and configure it 51 Krishna & Bhima River Basins RTSF&ROS Click OK and the Save the configuration. Finally click File->Reload Server to activate the new settings. Verify the settings by attempting access via pgAdmin from another machine in the network. 52 Krishna & Bhima River Basins RTSF&ROS 5 .NET FRAMEWORK 3.5 SP1 INSTALLATION 5.1 Windows 7 or Windows XP .Net Framework 3.5 SP1 is part of Windows 7 and it is not possible to uninstall it. However, Service Pack 1 is required and must be installed if not present in other platforms Insert the “Installation disk" in the CD/DVD drive. Start "Windows Explorer" by rightclicking on “Windows Start" menu and selecting "Open Windows Explorer", or by pressing "Windows Key" + E simultaneously. Select the CD/DVD drive, followed by “.Net Framework 3.5 SP1" folder and double click on "dotnetfx35" (or "dotnetfx35.exe" if file extensions are being shown): The dialog providing progress information for files extractions is shown: If Service Pack 1 is already installed, the dialog will simply close and installation is finished. If Service Pack 1 is not installed, the following dialog shows up: 53 Krishna & Bhima River Basins RTSF&ROS Click on “Reinstall using recommended settings”. The installation dialog providing progress information is shown: When installation is completed, the dialog closes. 5.2 Windows Server 2008 R2 Installing .NET Framework 3.5 in a Windows Server 2008 R2 is done through the Server Manager. Open it and activate the Features section: 54 Krishna & Bhima River Basins RTSF&ROS Click Add Features and select .NET framework 3.5 SP1: Click Next. 55 Krishna & Bhima River Basins RTSF&ROS Click Next. Installation will take place and hopefully end with a confirmation: 56 Krishna & Bhima River Basins RTSF&ROS Click Finish to close the installer. 57 Krishna & Bhima River Basins RTSF&ROS 6 KBS INSTALLATION Locate and double-click the DSS installer If .NET Framework is not up to date a message will be shown similar to this: See Chapter 5 to install .NET Framework and then resume DSS installation. The installer opens like this : 58 Krishna & Bhima River Basins RTSF&ROS Click “Next” Accept the license agreement and click “Next”: 59 Krishna & Bhima River Basins RTSF&ROS If you want to specify a different folder for the installation, click "Browse" and select a different folder in the dialog that shows up. Click "Next" to proceed Click "Install" to start installation. The installation dialog providing progress information 60 Krishna & Bhima River Basins RTSF&ROS When finished, the completed installation dialog is shown: Click to "Finish" installation to close the installation wizard. A new folder called "DHI Solution Software" is created under "All Programs" in the "Start menu". 61 Krishna & Bhima River Basins RTSF&ROS The KBS can be started by clicking " DHI Solution Software Platform 2.2" in this folder. The API documentation by clicking "DHI Solution Software Platform 2.2 API Documentation". Note: Before using the KBS, a database needs to be created. This process is described in the below in Chapter Error! Reference source not found.. 6.1 Installation of Service Packs and Hotfixes When system upgrades are release by DHI they can either require simple copying of files or an installer will be provided. Upgrade instructions will also be distributed and shall be followed to perform the upgrade. 6.1.1 Release 2.2 Hotfix 1 Hotfix 1 is a zip-file with a number of files which needs to be copied into the binfolder Open the zip-file and copy the files inside: Locate the installation folder of the KBS – "C:\Program Files (x86)\DHI Solution Software\DSS Platform\bin" – and paste the files: 62 Krishna & Bhima River Basins Copy and Overwrite all files: 6.1.2 Release 2.2 Hotfix 2 The procedure for Hotfix 2 is the same as for Hotfix 1. 63 RTSF&ROS Krishna & Bhima River Basins RTSF&ROS 6.1.3Release 2.2 Hotfix 3 The procedure for Hotfix 3 is the same as for Hotfix 1. 6.2 Configuring Databroker The DataBroker is a service which can control regular data import from external sources- This is used for retrieval of real-time data from RT-DAS. The service is installed with the KBS, but needs to be configured with the tailormade driver for the KrishnaBhima RT-DAS. This is only required at the Database Server which will also be in charge of data import. 6.2.1 Copy driver Locate the driver DLLs and copy it to the bin-folder: o LumenWorks.Framework.IO.dll o DHI.Solutions.Projects.Krishna.Driver.dll o DHI.Solutions.,Generic.UnitTest.dll 6.2.2 Modify runtime.config Edit runtime.config file with Notepad (or similar text editor). Add the following lines to the end of the DHI.Solutions.DataBrokerManager plugins section: <Plugin Name="DHI.Solutions.Projects.Krishna.Driver.KrishnaSCADADriver" Type="DHI.Solutions.DataBrokerManager.Interfaces.ITransfer" Enabled="DHI.Solutions.Projects.Krishna.Driver.dll" /> 6.2.3 Modify DataBroker config Edit DHI.Solutions.DataBrokerManager.Service.exe.config file with Notepad (or similar text editor). Modify the line containing key=” key="IncludePlugins"” – add SpreadsheetManager and TimeseriesManager to the value separated by semi-colons, so the line looks something like this: <add key="IncludePlugins" value="DataBrokerManager;EventManager; SystemManager;Generic;SpreadsheetManager;TimeseriesManager" /> 6.2.4 Installing and starting the DataBroker service Update the file token.store in the bin-folder to hold the name of the database which the DataBroker shall work with: <tokens> <token name="Default" connection="host=localhost;port=5432;database=KrishnaBhima;dbflavour=Postg reSQL" user="admin" password="dssadmin" workspace="workspace1" /> </tokens> Once updated two bat-files should be run from the bin-folder: 64 Krishna & Bhima River Basins RTSF&ROS o DHI.Solutions.DataBrokerManager.Service.Install.bat o DHI.Solutions.DataBrokerManager.Service.Start.bat This should ONLY be done in the Server 65 Krishna & Bhima River Basins RTSF&ROS 6.3 The Event service Update the file token.store in the bin-folder to hold the name of the database which the Event Service shall work with: <tokens> <token name="Default" connection="host=localhost;port=5432;database=KrishnaBhima;dbflavour=Postg reSQL" user="admin" password="dssadmin" workspace="workspace1" /> </tokens> Once updated two bat-files should be run from the bin-folder: o DHI.Solutions.EventManager.Service.Install.bat o DHI.Solutions.EventManager.Service.Start.bat This should ONLY be done in the Server 66 Krishna & Bhima River Basins RTSF&ROS 7 DATABASE MANAGEMENT UTILITY Before KBS can run a database must be created. For this use the KBS installation comes with the Database Management Utility The program opens like this: 7.1 Connecting The application must connect ot the database service before performing it tasks. To establish a commection click Connection -> PostgreSQL 67 Krishna & Bhima River Basins RTSF&ROS Consider the content of the input boxes and click the “Test” button. This will attempt connect to the database and list available databases. If successful the “Ok” button becomes active. Click “OK” to close the dialog. The menu strip will display available actions. 7.2 Create a new database To create a new database click “New”. The application will promopt for the name of the database to create. 68 Krishna & Bhima River Basins RTSF&ROS Click OK to start creation. The application will run a large number of databse scripts and present the output in the log: Successful creation may end as shown above (this error can be ignored). 7.3 Restoring a backup To restore a backup click “Restore”. The application will prompt for the name of the database to create with the restore and the backup file to restore. 69 Krishna & Bhima River Basins RTSF&ROS 7.4 Updating a database When the KBS application is updated existing databases must also be updated. To update a database click “Update”. The application will prompt for the name of the database to update. Make sure the name is entered precisely as listed in the log during the connection test (see 7.1).. 7.5 Passwords Machine login details including passwords are provided to authorized officials and users. 70


![Les besoins des plantes [expériences] séq2](http://vs1.manualzilla.com/store/data/006425426_1-d260fe3404863812e90a2af157c2db5a-150x150.png)