1
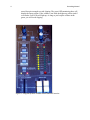
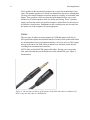
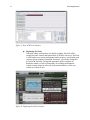
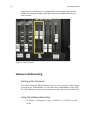
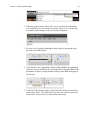
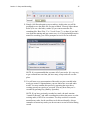
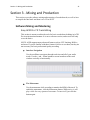
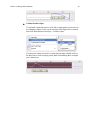
Recording Studio User’s Manual
Table of Contents
Table of Contents
Introduction ................................................................................... v
Section 1 - Equipment and Preparation ......................................... 1
Hardware Equipment ............................................................ 3
Software Equipment ............................................................. 7
Important Precautions .......................................................... 9
Section 2 - Setup and Recording .................................................... 11
Setting up the Hardware ....................................................... 12
Software and Recording ........................................................ 14
Section 3 - Mixing and Production ................................................. 19
Mixing and Mastering ........................................................... 21
Finalizing and Burning to Media ............................................ 24
Index (Appendix) ............................................................................ i
iii
Introduction
v
Introduction
Welcome
Dear reader, thank you for choosing Panhandle House Recording for your studio
recording and production. This manual is designed to teach artists like yourself
how to utilize our state-of-the-art studio to record and produce your own
professional quality recordings.
We believe that we can save you money and allow you more freedom during your
hours in the studio by letting you use the equipment yourself, rather than pay
extra for a recording engineer to run it for you. However, the responsibility of
utilizing our equipment comes with several serious risks both to our company and
to your safety and quality of recording, so it is imperative that you read this
manual thoroughly before proceeding to record. Please take the time to read
through the manual before considering using our record-yourself feature. If you
decide for any reason that you would prefer to have one of our recording
engineers assist you, we will be more than happy to oblige.
NOTE: In order to use the equipment yourself, it is almost imperative that you
have more than one person present during each session. Though it is possible to
manage and record simultaneously with only one person, it can be extremely
tedious and unpredictable.
The Sections of this Manual
This manual includes the following.
Section 1 – Equipment and Preparation
This chapter describes all of the available equipment and software we
carry at the studio. It also contains important safety information regarding
the proper use of the equipment and steps to take before you get started.
Section 2 – Setup and Recording
This chapter contains step-by-step instructions to setup the equipment,
start the software, and begin recording.
Section 3 – Mixing and Production
This chapter explains how to mix and master your tracks to produce the
best quality recording, as well as how to encode and burn your files onto
the media of your choice.
Section 1
Equipment and Preparation
Section 1 - Equipment and Preparation
3
Section 1 - Equipment and Preparation
This section covers the hardware and software you will be using during your sessions, as
well as any preparations and precautions necessary before you begin.
Hardware Equipment
Mixer
Figure 1: Mixer
Our studio uses several professional digital 16-track recording mixers with
mastering racks complete with EQ, compressor, limiter, and gate with a
monitoring booth offering high definition sound. If you already know how to use
the mastering rack options, feel free to master your sound as you see fit. But since
you probably aren‟t a recording engineer, we preset all the mastering rack options
to produce the best quality sound.
The mixer will be preset with 12 channels and mics ready for you to use. In order
to get a channel ready to record, you simply setup the corresponding mic to your
instrument, amplifier, or vocalist, and adjust the volume control as shown in
figure 2. The ideal recording volume is to make the volume loud enough to get
4
Recording Manual
sound, but quiet enough to avoid clipping. The green LED monitoring bars will
display the input volume. If the volume is too loud, the higher up yellow (and if
even louder, red) LEDs will light up. As long as you keep the volume in the
green, you will avoid clipping.
Figure 2: Diagram of mixer volume control and LED monitor
Section 1 - Equipment and Preparation
5
Mics
Figure 3: Dynamic, condenser, and drum mics (left to right) and their respective
directional receptions
We have several types of microphones available for use in our studio. For those
who are unfamiliar on the subject, there are three main types of microphones for
use in musical recording and performance: Dynamic, Condenser, and drum mics.
Condenser microphones are much more delicate and expensive, but
provide much clearer and much more sensitive recording capabilities. In
addition, the Condenser mics usually record in a cardioid or sub-cardioid
(shown in Figure 3) direction, which means stereo recording is an option.
For recording purposes, a condenser mic is generally preferable in almost
every situation. They are harder to setup, but provide much clearer sound.
Dynamic microphones are the standard „stage mic.‟ They are almost
always omnidirectional (Fig. 3) (which for our purposes means unable to
record in stereo) and are sturdier and allow for high gain before feedback.
The only situations in which a dynamic mic would be preferable for
recording are when recording directly from an amp with lots of distortion
and effects, or if recording the entire band in one take (as the dynamic mic
is less sensitive, it will pick up less background noise).
Drum mics are dynamic mics that are specifically made to record
different drum sounds. They are setup in different areas around the drum
set, and generally have less sensitivity than regular dynamic mics. These
mics are also almost always omnidirectional, as each is only meant to pick
up one sound.
Monitor Speakers
6
Recording Manual
The 2 speakers in the monitoring booth provide crystal clear monitoring of your
input. The monitor speakers are a booth out channel from the mixer, meaning that
you may select which channels to monitor, though it is usually set to monitor total
output. These speakers will let you hear the input channels before you record.
Another set of smaller speakers allow for editing and mixing. These 2 speakers
simply run from the master out from the computer, which allows for the source to
be altered in virtual mixers. Headphones in the recording room are also run from
the master out of the computer, for syncing purposes.
Cables
The two types of cables our mixer supports are XLR and quarter inch (Fig. 4).
XLR provide the highest and sturdiest transfer of sound, while quarter inch cables
are smaller and necessary for instrument hookup. All of our mics use XLR output,
and you will want to use XLR cables in almost every situation, unless directly
recording from an instrument or interface.
NOTE: Only use BALANCED quarter inch cables. If using your own quarter
inch, make sure that they are the balanced, not the unbalanced, type. Figure 4
illustrates this.
Figure 4: The two lines on the tip of the quarter inch cable show that it is balanced. If
there is only one line, then it is unbalanced.
Section 1 - Equipment and Preparation
7
Software Equipment
Computer
Our studio only uses PC Windows systems. Contrary to popular belief, Mac
computers are neither the best for music and audio nor the necessary platform for
the software. In fact, PC systems are more flexible, perform better, allow more
control of computer functions, are generally easier to use, and support many more
software options (including Mac software) than Mac systems do. And since PCs
are easily upgradable, our computers are comprised of the latest very powerful
hardware configurations, to offer the best performance and sound quality.
The master out of the mixer goes to the main audio input of the computer. All you
have to do is set your channel levels, press record on the computer, and start
playing.
Digital Audio Workstation (DAW)
A digital audio workstation is a kind of software providing a digital interface
designed for recording, editing, and mixing audio. Examples of DAWs are Logic,
ProTools, ACID Pro, Cubase, Reason, and many more. Our studio is equipped
with a variety of options when it comes to software, and each offers certain
advantages. For the purpose of this manual and your recording session, only two
options are necessary.
Sony ACID Pro 7.0
Though ProTools is more widely used, we highly recommend using the
ACID Pro software. The loop-based interface is intuitive, the engine is
professional, and the software works with real hardware, rather than
require special computer controlled hardware. ACID Pro offers ReWire
support, VST chaining and mastering, quality tempo and pitch alteration,
Soft synth and bus management, and more.
8
Recording Manual
Figure 5: Sony ACID Pro interface
Digidesign ProTools
The most widely used interface for digital recording, ProTools offers
roughly the same control and features that ACID does. However, ProTools
is a bit harder to use (most professional studios require a certification) and
requires special computer controlled “hardware” specifically designed to
be used with ProTools. Though this guarantees perfect software-tohardware control, we believe that quality of recording and hardware
control is better achieved with real, professional hardware, which you
cannot use with ProTools.
Figure 6: Digidesign ProTools interface
Section 1 - Equipment and Preparation
9
It is your choice which software you decide to record with. However, if you have
no experience with ProTools, we recommend ACID as you will have a much
easier time quickly learning the interface. For this reason, we will not cover
ProTools in this manual. The basic instructions for using ACID Pro can be found
in Section 3 of this manual.
Important Precautions
Do not bring food or drink into the studio.
Do not bend, twist, or stand on cables.
Do not enable the monitor speakers or master out unless the mixer
channels you are using stay in the green.
Do not interface your own recording equipment with ours (unless it is
specifically to produce a certain sound for recording). This is mostly to
preserve the quality of your recording.
Do not attempt to reassemble, move, or alter equipment other than the
mics. The equipment is already setup and configured for easy professional
recording and does not need to be changed.
Do not install your own software into the computer. The only exception to
this is if you require a certain VST that we do not carry.
Do not change to hardware mastering controls unless you absolutely know
what you are doing. Doing this even slightly incorrectly will completely
ruin recording quality and can even potentially damage equipment.
Do not allow any volume controls to be active unless they are being used.
If you encounter any problems, do not hesitate to contact one of our staff
to assist you.
Section 2
Setup and Recording
Section 2 - Setup and Recording
13
Section 2 - Setup and Recording
This section will outline step-by-step instructions for how to setup the equipment and
software and begin recording.
Setting up the Hardware
Getting Ready to Record
Before setting up any studio equipment, begin by moving any of your equipment
such as instruments, drum sets, amps and effects, etc. into the studio. If using one
of our large recording rooms, you may move all equipment into the room. If using
our smaller, single-size recording rooms, only keep the equipment you are using
during each take in the room, so as not to disturb the acoustics.
Setting up the Mics
First, decide which mics you will be using for each instrument or voice. Then,
assemble these using the corresponding micstands provided in the studio. If
recording a drum set, assemble the drum mics around the drum set as shown in
the drum mic set manual (which will be provided with the mics). If recording
vocals, it is recommended to use a condenser mic with a voice screen. Use
condenser mics for other instruments as well unless recording directly from a
distorted amp or for a band playing simultaneously. In these cases, use a dynamic.
When setting up mics, position them roughly 6 inches away from the sound
source.
NOTE: For condenser mics, be certain they are facing towards the sound source.
The cardioid pickup range will record the source very sensitively in stereo.
NOTE: Be sure to remember which mic corresponds to which channel on the
mixer. You may want to write down this information, or multitrack recording
could become confusing.
Setting up the Mixer
First, make sure all volume levels (Fig. 8) on the mixer (especially the master) are
turned all the way down, and then turn on the power. At this point, start turning
up your first channel while making sound in the corresponding mic. If the LEDs
start lighting up, you have a signal. Since, by default, the monitor speakers are set
to unity and all channels are enabled for monitoring, you should begin hearing the
signal from the mic through the speakers. Adjust the volume to make sure the
14
Recording Manual
signal never exceeds the green. Congratulations, you have just setup your first
channel for recording. Simply repeat these steps for any additional tracks you
want to record.
Figure 8: Mixer Controls
Software and Recording
Setting up the Computer
Turn on the Computer. When Windows boots up, you may choose which software
you wish to use. In this manual, we will outline our recommendation, Sony ACID
Pro. The following are step-by-step instructions to get ready to record with ACID.
Using the Software/Recording
1. Go to Start > All Programs > Sony > ACID Pro 7 > ACID Pro 7 to start
ACID.
Section 2 - Setup and Recording
15
2. When the program starts, choose File > New, and enter the information
you would like to be saved such as track title, artist, etc. You do not have
to setup the audio settings, as they are already configured.
3. For ease of use, begin by disabling the loop feature by moving the loop
bar to the start of the project.
4. If you decide to use a metronome while recording (highly recommended)
make sure you set the BPM in the ACID interface to equal the BPM of the
metronome. Do this by simply double-clicking on the BPM and typing in
the new one.
5. To the left of the mixing window, right click in the open space and select
Insert Audio Track. You will do this every time you want to record a new
track to mix. You may have as many tracks as necessary.
16
Recording Manual
6. At this time, go back to your mixer and set the master volume to unity
(displayed by a U on the volume control). This will enable sound to pass
from the mixer to the computer unaltered.
7. Now, on the control for the Track you just created, click Arm for Record
(the icon with two concentric red circles).
8. You should now see a signal being passed to the computer (represented by
a digital version of the LED monitors). This means the track is ready to
record.
NOTE: Since we are using the simple ACID interface and for the purposes
of this manual, the computer only has one recording input: The master out
of the hardware mixer. This means that when you record to a track in
ACID, you will be recording every active track in the mixer at the time, so
be sure that you have all channels turned down except the ones you are
using before each recording take.
9. Move the flashing position bar to the point where you wish to begin
recording your track.
NOTE: When you start getting tracks recorded, you may want to position
the bar ahead of the actual recording spot, to give the performer a measure
or two to monitor the existing sounds to get the timing right.
10. Now, get your sound source or performer ready with metronome or
headphone monitors, countdown, and click Record. The position bar will
move across the screen at the tempo you set while recording the master
out to any audio tracks with “Arm for Record” enabled.
Section 2 - Setup and Recording
17
11. Simply click Record again to stop recording. At this point you will be
prompted to save the audio file you just recorded. You may either choose
delete (if it was a bad take), rename (if you want to name the file –
something like “Bass Take 1” or “Vocals Verse 2”), or done (if you don‟t
care about the naming and just want to save it). If you had multiple tracks
armed for recording, you will be prompted to save a file for each track.
NOTE: It is recommended that you name all of your tracks. It is very easy
to get confused later on when you have many, many tracks all over the
place.
12. You will now see a representation of the audio you just recorded in the
track you created. Congratulations, you now know how to record audio
tracks! You may continue this process by repeating the steps above,
creating as many new tracks as you need. You may hear what you‟ve
recorded by pressing Play (Hotkey: Spacebar).
NOTE: If you have previously recorded to a track, the track remains
“Armed for Record,” and while recording the position bar passes over the
existing audio, it WILL be overwritten. You may use this to overwrite
unsatisfactory takes, but be careful not to do this accidentally. Always
remember to unarm any tracks you do not want to record to before hitting
record.
18
Recording Manual
13. You may now manipulate many aspects of these tracks including position,
tempo, volume, pan, chopping, and more. This editing phase will be
covered in the next Section.
Section 3
Mixing and Production
Section 3 - Mixing and Production
21
Section 3 - Mixing and Production
This section covers the software mixing and mastering of recorded tracks, as well as how
to compile the final track and burn it to a CD or DVD.
Software Mixing and Mastering
Sony ACID Pro 7.0 Track Editing
This section is meant to outline the tools for basic recorded track editing in ACID
Pro in an instructional manner. It is not a reference section, and as such will only
cover the basics.
NOTE: ACID supports many advanced features such as VST chaining, ReWire,
and more. If you are familiar with these features feel free to use them, but they are
not necessary for basic professional quality recording.
Interface Navigation
Use the scrollbars to navigate through track time and all of your audio
tracks. Use the + and – Zoom buttons to zoom in and out of the track
window vertically or horizontally.
The Metronome
Use the metronome while recording to monitor the BPM of the track. To
enable the metronome, click the Metronome button. While active, it will
play a click for every quarter of a measure. To turn it off, just click the
button again.
22
Recording Manual
Moving Audio
Simply click and drag the track to the position you want to move an audio
track.
Resizing Audio
Move the cursor to the edge of the track until the resize icon appears, then
click and drag to make the track longer, or to crop it shorter.
Track Audio/Software Mixer
Use the volume controls on the left of the track window to alter the
volume of each track. Use the master volume slider at the bottom to
change the master out.
Fading Edges
Move the cursor to the top-right or top-left corner of a track until you see
the fade icon. Click and drag toward the middle of the track to fade the
edges in or out.
Section 3 - Mixing and Production
23
Volume/Pan Envelopes
To pan tracks (make them move to the left or right speaker in stereo) or to
use changing volume levels, use the envelope tool. Right click on a track,
then click Insert/Remove Envelope > Volume or Pan.
You may now adjust your track‟s volume/pan envelope. Double click on
the blue line to create envelope points, then click and drag these to adjust
your volume/pan.
24
Recording Manual
Finalizing the Project and Burning to Media
Final Track
When you have finished recording, editing, and positioning your audio, listen to
your final track several times through. This will help you be sure there are no
mistakes or issues before you compile. While doing this, watch the soft mixer to
make sure the monitor never goes above the green. If it does, you may want to
find the source of the dynamic volume change and either use an envelope or alter
the track volume to lower the hot track.
Ideally, you want the master soft mixer to be overall as loud as possible without
ever going over the green. If you go over the green you risk clipping, which is
very bad. If you have trouble achieving this, ask one of our recording engineers to
help you with soft mastering. While ACID Pro is capable of this, it is too detailed
and complicated to outline in this manual.
Compile and Burn
When you are satisfied with your final track, be sure to position the start of the
track at the beginning of the mixing window. To compile, save, and burn:
1. Click File > Save As, and then name your project file. This file is the
actual project you are working with and is necessary if you ever need to
reopen the project.
2. Click File > Render As. This window allows you to compile, compress,
and render your track to an actual audio file such as mp3 or WAV. You
may choose from a number of audio file types to render to. For general
listening and CD recording purposes, mp3 is recommended. The higher
the kbps, the higher quality the file will have. 320 kbps is recommended,
as it will give you the best quality basic mp3 file. However, if you wish to
put a lot of songs on a single CD, 256 kbps or even 128 kbps might be
better because it is a smaller file size. Click OK to render.
3. You may now use a CD burning program such as Windows Media Player
to burn your rendered file to an audio CD!
Index
i
Index
Burn ............................................................................................................................................................ 23
Cables............................................................................................................................................................ 6
Computer ................................................................................................................................................ 7, 14
Digidesign ProTools ..................................................................................................................................... 8
Digital Audio Workstation (DAW)............................................................................................................... 7
Envelopes .................................................................................................................................................... 22
Fading Edges............................................................................................................................................... 22
Hardware ....................................................................................................................................................... 3
Metronome .................................................................................................................................................. 21
Mics ........................................................................................................................................................ 5, 13
Mixer ....................................................................................................................................................... 3, 13
Mixing ......................................................................................................................................................... 21
Monitor Speakers .......................................................................................................................................... 6
Moving Audio ............................................................................................................................................. 22
Navigation ................................................................................................................................................... 21
Precautions .................................................................................................................................................... 9
Resizing Audio............................................................................................................................................ 22
Software .................................................................................................................................................. 7, 14
Software Mixer ........................................................................................................................................... 22
Sony ACID Pro 7.0 ....................................................................................................................................... 7
Table of Contents ......................................................................................................................................... iii