Transcript
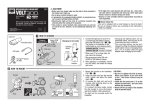
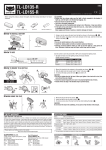
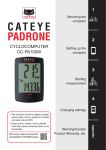
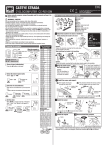
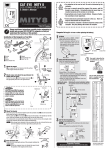
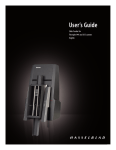
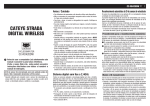
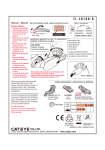
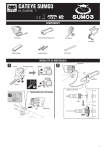
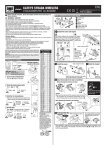
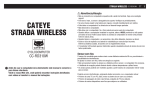
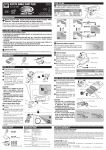
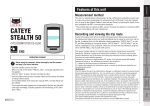
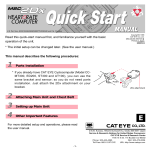
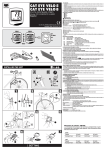
RECHARGEABLE HEADLIGHT
ENG
HOW TO REPLACE BATTERY
HOW TO MOUNT
Lock cap
HL-EL540RC
Bracket
Close
Rubber pad
Dial
1
Open
1
Pat. and Design Pat. Pending
Copyright© 2012 CATEYE Co., Ltd.
EL54RC-120123 066640830 3
2
INTRODUCTION
3
Before using the light, please read this manual
and the attached “NiMh Batteries” thoroughly,
and keep them for future reference.
NO!
Strap
Switch
FOR SAFE OPERATION
• Before your trip, please make sure the light is firmly
mounted to the bracket, it lights up, and the light is not
blocked by baggage, etc.
• Do not place it within children’s reach.
• In preparation for unexpected battery shutoff, we recommend you carry a spare battery.
• Mount the light unit more than 7 cm away from the wireless meter. When it is mounted too close, the transmission may be affected adversely.
• This product is water-resistant under normal daily use
and can be used in the rain. However, do not intentionally
submerge it in water.
• If the light unit or parts become dirty with mud, etc., clean
with a soft cloth which is moistened with mild soap. Never
apply paint thinner, benzine or alcohol; damage will result.
HOW TO MOUNT THE LIGHT
*1
Inner unit
2
Screw
How to remove batteries
Rubber gasket
3
Release button
Press the lens side
of the upper battery.
Before Initial Use
This unit is shipped with a small charge to check the light.
Be sure to charge it before use, according to the instructions
“How to charge”.
COMPONENTS
AA alkaline batteries can be used for this unit.
1 Turn the lock cap on the back of the light counterclockwise to remove.
2 Press the switch slowly, and pull out the inner unit from the front.
3 Install the lower battery first. Remove the upper battery
first by pressing the arrowed point as shown.
4 After replacement, check that the two rubber gaskets for
the inner unit are in place, place it into the body, and fix it
with the lock cap.
DANGER!!: Dry batteries (primary battery) cannot be charged.
Light unit
FlexTight™ bracket (H-34N)
Rechargeable battery x 4
Battery charger
(Various forms according to the specifications)
SPECIFICATIONS
Light source .............High-intensity white LED x 1
Battery .....................AA Ni-MH 2.2Ah (GP220AAH) rechargeable battery x 4,
or AA alkaline battery x 4
Battery charger ........CHA-2.2AH-4.8V (Only the rechargeable batteries supplied can be used.)
Operating time (Alkaline battery)
.................................Hi : Approx. 5 hours (Approx. 2 hours),
Low : Approx. 15 hours (Approx. 9 hours),
Flash : Approx. 60 hours (Approx. 30 hours)
Standard charging time ...Approx. 5-7 hours
Temperature range ...Charging : 41˚F – 104˚F (5˚C – 40˚C),
Operating : 14˚F – 104˚F (-10˚C – 40˚C)
Recharge/discharge number of times
.................................About 300 times (until the rated capacity drops to 50%)
Dimensions/weight...4-1/2” x 2-13/64” x 2-3/32” (114 x 56 x 53 mm) / 8 oz
(227 g) (Including rechargeable batteries supplied)
*The specifications and design are subject to change without notice.
CAUTION!:
• To pull out the inner unit from the light, be sure to hold the lens.
Otherwise, the inner unit may fall out and become damaged.
• Do not use a dry battery (primary battery) together with a
rechargeable battery. Do not use a new battery in combination with an old battery.
• Be sure to install batteries in the correct direction.
• Install the two rubber gaskets correctly to maintain
waterproof features.
• Remove and store batteries when you will not use the
light for a long period of time. Otherwise, batteries may
leak liquid, which may result in failure.
HOW TO USE
ON ↔ OFF : Long press
Hi ↔ Low : Single press
Flash
: Quick double press
(Flash even from OFF)
ON
*2
OFF
Double press
1 sec.
5338827N
UL : 5336760
UK : 5336761
EC : 5336762
AS : 5336763
CHA-2.2AH-4.8V
*2
Flash
2
Charge jack cover
1
SPARE PARTS
To AC power outlet
5341891
: Approx. 5 hours
(Approx. 2 hours)
: Approx. 15 hours
(Approx. 9 hours)
Flash : Approx. 60 hours
(Approx. 30 hours)
Low
When the switch (indicator) lights up, the remaining battery
level is low. Charge or replace the battery as soon as possible.
2 How to charge
DANGER!!:
• Do not to charge when dry batteries are installed.
• Be sure to use CatEye rechargeable battery and battery
charger. The battery charger is indoor use only.
• Commercially available rechargeable batteries should
be charged with a compatible battery charger.
1 Open the charge jack cover at the back of the light unit to
connect the battery charger plug.
2 Plug the battery charger to an AC outlet.
When the switch (indicator) lights up, charging starts.
* When the switch flashes, it indicates a charge error.
Disconnect the plug, and reconnect it.
3 When the switch lights off, charging is completed.
Remove the plug, and close the charge jack cover.
Switch (indicator) state
2
Special nickelhydride rechargeable battery x 4
(Ni-MH 2.2Ah
GP220AAH)
Hi
Remaining battery capacity
Low
1 sec.
Standard operating time (For
alkaline batteries)
*2 When returning from Flash to ON (Hi or Low), it returns
to the ON mode used previously.
Hi
CatEye products are warranted to be free of defects from materials and workmanship for a period of 2 years from original purchase. If the product fails to work
during normal use, CatEye will repair or replace the defect at no charge. Service
must be performed by CatEye or an authorized retailer. To return the product, pack
it carefully and enclose the warranty certificate (proof of purchase) with instruction
for repair. Please write or type your name and address clearly on the warranty
certificate. Insurance, handling and transportation charges to CatEye shall be borne
by person desiring service. For UK and REPUBLIC OF IRELAND consumers, please
return to the place of purchase. This does not affect your statutory rights.
FlexTight™
bracket
(H-34N)
Switch operation
Switch
(indicator)
LIMITED WARRANTY
[For US Customers]
CATEYE AMERICA, INC.
2825 Wilderness Place Suite 1200,
Boulder CO80301-5494 USA
Phone : 303.443.4595
Toll Free : 800.5CATEYE
Fax
: 303.473.0006
E-mail : [email protected]
1 Switch operation (switching the lighting mode)
The ON/OFF and lighting modes are selected using a switch.
1
2-year Warranty: Light unit / Battery charger
(Deterioration of the battery is excluded.)
2-8-25, Kuwazu, Higashi Sumiyoshi-ku,
Osaka 546-0041 Japan
Attn: CATEYE Customer Service
Phone : (06)6719-6863
Fax
: (06)6719-6033
E-mail : [email protected]
URL : http://www.cateye.com
1 Wind the bracket strap around the handlebar, and put the
strap through the opening.
2 Screw the dial into the bracket to secure it temporarily.
* Insert the light unit to the bracket until it clicks, and
adjust the beam angle. (Refer to “HOW TO MOUNT THE
LIGHT”)
3 Securely tighten the dial, and cut off any excess bracket strap.
* To remove the light unit, pull out it forward while pressing
the button.
* To re-adjust the beam angle, loosen the dial enough to
move the bracket, and securely tighten it after adjustment.
CAUTION!:
• Be sure to tighten the dial by hand. When you tighten it
too hard with a tool, the screw thread may be stripped.
• Check the dial and screw (*1) on the bracket periodically,
and use them without any loosening.
• Round off the cut edge of the bracket strap to prevent injury.
ON : Charging OFF : Charging is completed
Flash : Charge error
Battery charger
Standard charging
time
Approx. 5-7 hours
* Charging and lighting times are approximate values, and
will vary by environmental and user conditions.