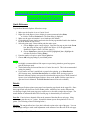
1
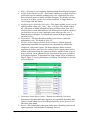
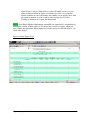
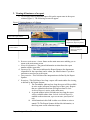
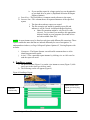
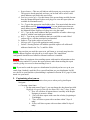
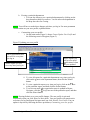
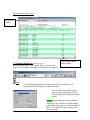
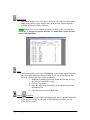
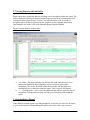
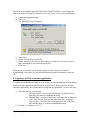
Report Navigator
Users Manual
Information Technology Services
October 2005
I. Introduction.................................................................................................................... 3
II. Report Navigator Features ........................................................................................... 3
1. Getting Started.................................................................................................. 3
Figure 1 Main Menu ................................................................................................ 4
2. Viewing a Report Online ............................................................................... 6
Figure 2 Online Report View.................................................................................. 7
3. Viewing all instances of a report ................................................................ 8
Figure 3 Viewing Instances of a Report ............................................................... 8
4. Emailing a report ............................................................................................. 9
Figure 4 Emailing a Report..................................................................................... 9
5. Customizing what you see ........................................................................... 10
Figure 5 Updating your user profile..................................................................... 11
6. Gaining Access to Particular Reports (Report Security) ................ 12
III. Report Explorer Options ........................................................................................... 12
Figure 6 Online Report View................................................................................ 13
1. Navigation Buttons (from left to right) ................................................................ 13
2. Viewing Reports with an Index.................................................................... 16
Figure 7 Online Reports with an Index................................................................ 16
3. Downloading a Report..................................................................................... 16
4. Copying a .prf file to another application ................................................ 17
Appendix A: Printing Report Data with Monarch Report Explorer.............................. 19
Appendix B: Report Prefixes & Associated Departments.............................................. 22
Report Navigator Users Manual
2
I. Introduction
Report Navigator is a system that enables the UWF campus to view reports online via a
web browser. These reports are produced through an overnight cycle and are requested
via CICS, Report Request, or via an ITS programmer. University departments responsible
for report data (termed Report Sponsors) define what reports are available online through
Report Navigator. Department heads may appoint a particular individual within their
department to define report security, retention, and report availability. For a list of Report
Sponsors, see the Sponsors List link on the main menu.
To gain access to the system you must have a CICS account and a Monarch Report
Explorer license. If you do not have a CICS account contact your local workstation
manager.
If you have a CICS account and only need the Monarch Report Explorer license contact
Information Technology Services, Glenna Sirmans, at x2591. The licenses are purchased
by Information Technology Services and are provided to University employees free of
charge.
The Report Navigator system is accessed through Argus, the university’s secure web
portal. Access links are located in several Argus channels: Administrative Tasks for
staff (My Office tab) and Course and Scheduling Tasks for faculty (My Office tab).
II. Report Navigator Features
1. Getting Started
a.
b.
c.
d.
e.
Open your web browser
Go to Argus at http://argus.uwf.edu/cp/render.userLayoutRootNode.uP
Log in as prompted with your ArgoNet account username and password
Click on My Office tab
Click on Report Navigator from the Administrative Tasks channel (staff) or
Course and Scheduling Tasks channel (faculty).
Report Navigator Users Manual
3
The following page will appear:
Figure 1 Main Menu
Main menu
Click here to see
archived reports
Click here to see
all instances of a
report
Click here
to view the
most
current
instance of
a report
This is the main menu of Report Navigator and enables the following functions:
a. Create/Update User Profile—This feature enables you to define what reports
you would like to see each time you log in. Yo u can also sign up here to
receive an email when your report is available in Report Navigator.
b. Refresh Report List—This feature will refresh the report list.
c. Search—This feature enables you to search for a particular report by
keywords, department, organization, report name, or report title.
d. Sponsor List—This feature shows a list of people/departments that are
responsible for reports. If you want to get a report online or need access to
one, use this feature to determine whom to contact.
Report Navigator Users Manual
4
e. Help—Click here to see Frequently Asked Questions about Report Navigator.
f. Profile disabled/Enable profile—This feature enables you to toggle between a
profile that you can customize enabling you to view reports that you select,
and viewing all reports available in Report Navigator. The default, each time
you log in, is to show you the view you last requested. To toggle between
views simply click this feature.
g. Highlight reports within the last xx days—This feature enables you to view all
reports available (Show All), 1 day, 7 days, or 30 days. The default is Show
All. (All reports available in Report Navigator will show when Show All is
selected, however each individual user has differing access to these reports. If
you don’t have access to view a particular report when you click view, a
denial message will appear. You should then contact the Report Sponsor if
you need access.)
h. Departments—This drop down box enables you to choose a particular
department to view. The default is Show All.
i. Exclude Archived Reports/Include Archived Reports—Report Sponsors
(departments responsible for report data) are responsible for defining the
retention of each of their reports. The Report Sponsors define an initial
timeframe up to three years for active viewing. Once a report passes its first
defined retention timeframe the report may then be available in the Archived
Reports Section, for an additional seven years (total of ten years) as defined
by the Report Sponsor. To determine how long a report will be available see
Page 8, Figure 3, Viewing all Instances of a Report. The default is to Exclude
Archived Reports.
j. Department Name (Report Order)—Reports are ordered by University
departments. Departmental Report Sponsors are responsible for making their
reports viewable online. For a list of Report Sponsors, see the Sponsors List
link on the main menu.
k. Report—This column shows the report names most commonly printed on all
reports generated via Information Technology Services.
Report Navigator Users Manual
5
l.
Title—This column shows the Report Title most commonly printed on reports
generated via Information Technology Services.
m. Latest—This column shows when the report was last generated. The date is
generated when the report is actually run at the data center (NWRDC or
SAMAS), which means if requested today it will have today’s date if it is run
before midnight, and tomorrow’s date if run after midnight.
n. Action—This feature enables you to view the latest version of the report, as
indicated by the latest date, by clicking on view. Clicking email will enable
you to email the latest version of the report.
2. Viewing a Report Online
a. On the main menu screen (as depicted above in Figure 1) to find the report
you are looking for, scroll down until you find the department who is
responsible for the report, with the exceptions of Departmental Ledgers and
Purchase Orders. Most all reports are ordered under their responsible
department; however, these two are parsed or assigned to individual
departments in Report Navigator by the Controller’s Office and Purchasing
respectively. Using the drop down box titled Departments will quickly take
you to that department’s reports.
OR click search on the main menu. The following screen will appear,
enabling you to search by keywords, department, organization, report name,
or report title.
b. Once you locate the specific report, click the report name. This will show
information about the report and each previous request or “instance” of the
Report Navigator Users Manual
6
report (Figure 3 below). Then click view; this will enable you to view your
report as depicted below in Figure 2. Each time you click view a separate
window launches in your web browser; this enables you to quickly move from
one report to another, or to have side-by-side viewing. (See #3 below,
Viewing all instances of a report, for instructions).
NOTE: Each Report Sponsor (departments responsible for report data) is responsible for
defining the security of their reports. If you do not have access to a report, which you
need, contact the appropriate Report Sponsor to request access (see the link Sponsor List
on the main menu).
Figure 2 Online Report View
Report Navigator Users Manual
7
3. Viewing all instances of a report
a. To see every run of a particular report click on the report name in the report
column (Figure 1). The following screen will appear:
Figure 3 Viewing Instances of a Report
This is the report number
This is the responsible
department (Report Sponsor)
Shows how long a report
will be online
These are all the
instances of Report
AD360R01
b. Return to main menu—A new feature on the main menu area enabling you to
return to the main menu screen.
c. General information—The general information section shows the report
number and the report title.
d. Sponsored by:-- This section indicates the Report Sponsor (the department
responsible for the report data) and is whom you should contact if you have
questions or need access to the report.
e. Interpretation—This field shows the interpretation as defined by the Report
Sponsor.
f. Retention—This field shows how long a report will remain online for viewing,
as defined by the Report Sponsor.
i. The first number indicates how long the report will be available
in active mode in Report Navigator, up to three years. Reports
that are within this timeframe will appear when Exclude
Archived Reports is active on the main menu.
ii. A second number in this field indicates how long the report
will be available online when Include Archived Reports is
enabled on the main menu, up to seven more years (total of
ten).
iii. A third notation in this field is either set to delete or write to
annual CD. The Report Sponsor defines this information, as
their long-term record retentions require.
Report Navigator Users Manual
8
iv. If you need the report for a longer period you can download it
to your hard drive or print it. (Explained in Section III Report
Explorer Options)
g. Search key—This field shows a common search reference to the report.
h. Instance date—This column shows all requested instances of the specified
reports.
i. The date shows when a report was created.
ii. The file extension .prf stands for portable report file and
indicates it will be viewed via Monarch Report Explorer.
• Other file extensions might be .xls (Excel) or .mdb
(Access). To view these you must have the appropriate
software loaded on your computer (Excel and Access
are both available from ITS).
NOTE: A report instance may be listed several times with different file extensions. These
reports contain the same data but are indexed differently for ease of navigation. To
understand tree indexes, see Page 16 Report Explorer Options #2, Viewing Reports with
an Index.
i.
Comments—The Report Sponsor can add useful comments here to aid in
identifying particular reports.
j. Action—View a particular report instance by clicking view or click email to
send the report via email.
4. Emailing a report
a. On the main menu (Figure 1) or on the view instances screen (Figure 3) click
email next to the report you wish to email.
b. The following screen will appear (Figure 4)
Figure 4 Emailing a Report
Send text
version only
Report Navigator Users Manual
Shows name of the
report you are trying
to email
9
c. Report banner:--This area will indicate which report you are trying to email.
The report is already attached, and once you hit send will be sent to valid
email addresses specified in the areas below.
d. Send text version only:--Use this feature if the person being emailed does not
have the Monarch Report Explorer web plug- in to view the report (also not
available for Macintosh users.)
e. To:-- Type in the appropriate email address here. You must include the entire
email address such as [email protected]. You can include more than one
email address separated by a comma or semicolon. The recipient must have
the Monarch Report Explorer web plug- in to view the report.
f. CC:-- Type in any email addresses that you would like to send a carbon copy
email to, with the associated report attached.
g. BCC:-- Type in any email addresses that you would like to send a blind
carbon copy to, with the associated report attached.
h. Subject:--Type in the subject of your email
i. Message area:--Type in the appropriate email message.
j. Submit:--Pressing Submit will send the specified report to all valid email
addresses listed in the To, Cc, and Bcc fields.
NOTE: Any one that you email the report to in .prf format vs. text only must have the
Monarch Report Explorer web plug- in to view the report. The “stand-alone”
configuration should be used whenever Monarch software is installed.
Caution: Please be cognizant when emailing reports with sensitive information such as
social security numbers. If you are the report sponsor, rather than emailing the report
consider giving view access to those needing to see it.
TIP: If you need to send the report to a distribution list (which you have set up in your
email client, Outlook), email the file to yourself and then use your distribution list OR
save the file to your hard drive (downloading is explained in Section III #3, page 16) then
attach it to your email.
5. Customizing what you see
There are many ways to customize what you see when you log into Report
Navigator.
a. Choosing a time frame
i. On the main menu (Figure 1) you can change the drop down box titled
Highlight all reports within the last Show All; 1 day; 7 days; 30 days
1. Show All will show all reports that are currently in the Report
Navigator in an active format.
2. 1 Day will show reports with a run date of today (beginning at
12 midnight).
3. 7 Days will show reports with a run date within 7 days of
today.
4. 30 Days will show reports with a run date within 30 days of
today.
Report Navigator Users Manual
10
b. Viewing a particular department
i. You can also choose to see a particular department by clicking on the
drop down box titled Departments. You can select one department in
the drop down box for viewing.
NOTE: You will have to make these changes each time you log in. For more permanent
customization use your user profile, explained below.
c.
Customizing your user profile
i. On the main menu (Figure 1) choose Create/Update User Profile and
the following screen will appear (Figure 5).
Figure 5 Updating your user profile
Shows departments that
you will see every time
you log in
Shows reports you will
see every time you log in
Shows reports you
will receive email
notification of when
they are updated
ii. To view all reports for a particular department every time you log in,
click on the next to the department name, then click the Submit
button.
iii. To view a particular report every time you log in, click on the next
to the particular report, and then click the Submit button.
iv. To receive an email when a particular report is updated in Report
Navigator, click the Notify box next to the particular report, and then
click the Submit button.
NOTE: Pressing Submit saves your profile changes. The new profile is activated
immediately when you click Return to Main Menu. Your user profile will remain active
each time you log into Report Navigator until you click Disable User Profile. You can
update it any time by following the above procedures, Customizing your user profile.
Report Navigator Users Manual
11
To see all reports, click the Disable User Profile/Enable User Profile button on the main
menu (Figure 1); this enables you to toggle between the two views - your customized
profile and the view all mode.
6. Gaining Access to Particular Reports (Report Security)
To use the Report Navigator system you must have a CICS account. Contact your
workstation manager if you need a CICS account. Refer to the workstation manager list
from the Who to Contact channel in Argus (IT Help tab) or at
https://nautical.uwf.edu/unitapp/view/group.cfm?group=wsm.
Report Sponsors (departments that are responsible for report data) define the security of
each of their reports. It is the Report Sponsor’s responsibility and decision to enable or
deny access to others. Many reports contain social security numbers or other sensitive
information that Report Sponsors may not want to publish online. To view a report
online, via Report Navigator, which you do not have access to, contact the appropriate
Report Sponsor. For a list of Report Sponsors see the Sponsors List link on the main
menu.
III. Report Explorer Options
Monarch Report Explorer is a web plug- in provided by the ITS department. You must
have a copy of this software to review your reports online. To obtain a copy call
Glenna Sirmans at x2591. If you need help installing this software, please place a work
order by emailing [email protected] or calling the ITS Help Desk at x2075.
This software comes with a user’s manual, which will describe in detail the functions
listed below. For detailed information, please consult the Monarch Report Explorer
manual.
After clicking view on Report Navigator’s main menu screen (Figure 1) or the view
instances screen (Figure 3), your web browser will open via the Monarch Report Explorer
web plug- in and the selected report will appear. As depicted below:
Report Navigator Users Manual
12
Figure 6 Online Report View
Navigation
buttons
Use this page number
when printing
1. Navigation Buttons (from left to right)
Each button has mouse over enabled; thus if you hover your
mouse over the button, a description of its function will appear.
Print
a. Click this button to print your document to your local printer. It will
bring up the print dialogue box as depicted below:
i.
Report Navigator Users Manual
You can choose to print the current
page, a range of pages, print to a file,
and any other option supported by your
printer.
NOTE: When printing use the page number
depicted by your web browser rather than the
page number on the report, as noted in Figure 6
above. Click inside the report window to see
the current page.
13
Print Preview
b. This button enables you to view how your report will look once printed, and
brings up the follow screen with the same print preview options normally
provided in Microsoft Office products.
NOTE: Print Preview is not available in Internet Explorer if the web plug- in is
loaded into IE. Be sure to load the software as a stand-alone version in order
to have full capabilities.
Copy
c. This button enables you to copy a highlighted section of the report and paste it
into other applications like Notepad, Word, Excel, etc. When copying into
Excel the columns and rows will be maintained.
i. Highlight by holding down your mouse and moving over the
area that you would like to copy.
ii. Click the copy button.
iii. Open the application into which you would like to paste the
information into.
iv. Click the paste key in that application.
Find &
Find Next
d. This button enables you to find something quickly that is contained within the
report you are viewing. It will bring up the following box where you can
search for key words.
Report Navigator Users Manual
14
Font
e. This drop down box enables you to choose the font of your choice. When you
exit the report your selected font will become your default.
Font Size
f. This drop down box enables you to choose the font size of your choice. When
you exit the report your selected font size will become your default.
Size Font to Display Width
g. This button will change the font size to fit the maximum size of your screen.
Greenbar
h. This button turns on and off the greenbar lines. You must click inside the
report window first before clicking the greenbar button. When you exit the
report your current setting (greenbar on or off) will become your default.
Index View (Tree Option View)
i. This button turns the index view on and off.
Previous Page & Next Page
j. These buttons will move you backwards and forward one page at a time.
Help
k. This button provides help for the Monarch Report Explorer web plug- in
software.
Report Navigator Users Manual
15
2. Viewing Reports with an Index
Some reports have predefined indexes providing ease of navigation within the report. The
index is defined by the Report Sponsor and will appear in the far left windowpane when
viewing an online report (Figure 7 below). The major function of the tree index is
navigation and is all that is explained in this section. For more in-depth information
concerning the tree index, refer to the Monarch Report Explorer Manual.
Figure 7 Online Reports with an Index
a. Tree index:--The index includes a predefined data field from the report. Tree
indexes are defined by Report Sponsors and are useful for quick report
navigation. Click on the first field within the tree index and the report will
automatically go to that field within the report. This is a quick find feature.
b. + :-- Clicking on the + will reveal any additional sub- indexes, again for ease of
navigation. Clicking on these fields will take you to that data point within the
report.
3. Downloading a Report
If the defined retention period is not long enough for your needs you can save the report
to your local hard drive. Monarch Report Explorer saves files with a .prf extension,
Report Navigator Users Manual
16
which stands for portable report file. This type of file does not allow you to change the
data of the report, but opens the report in a view only mode. To save a file in this mode:
a. Locate the appropriate report.
b. Click view.
c. The following screen will appear:
d. Select Save.
e. Choose a location to save the file.
f. Choose a name for the file (the default name is admin.prf, so be sure to select a
name meaningful to you when saving the file.)
g. Click Save.
The next time you require use of the file, open it via My Computer or Network
Neighborhood; click on the file, and Monarch Report Explorer will launch to open the
file.
4. Copying a .prf file to another application
To quickly move the data presented in a .prf format you can cut and paste the information
into other useful applications like Microsoft Word or Excel. When you move the data
into other applications, the column and row integrities are maintained. To move the data:
a. Select the data you want to copy.
i. Selecting a block—click on the first character of the block, and
then drag your mouse to highlight the block.
ii. Selecting lines—to select a single line, click in the line section area
to the left of the line; this will select the entire line. To select a
range of lines, click in the line section area to the left of the first
line, and then drag up or down to highlight the range.
b. Press the copy button, or Ctrl+C.
Report Navigator Users Manual
17
c. Open the desired application (Word, Excel, Access, etc).
d. Position the cursor in the new application where you want to insert the data.
e. Select Paste in the new application or press Ctrl+V.
Report Navigator Users Manual
18
Appendix A: Printing Report Data with
Monarch Report Explorer
Quick Reference
To print from Monarch Explorer follow these steps:
1. Make sure the font/size is set to Courier New 9
2. Right click in the Report view to display its context menu and select Print,
or click the Toolbar's Print button. The Print dialog is displayed.
3. Make sure the paper orientation is set to landscape (the default)
4. Click within the report window and notice the current page number listed in the windows
bar at the bottom of your screen
5. Select the print range. Choose All to print the entire report.
a. Choose Pages to print a range of pages. Enter the first page to print in the From
box, then enter the last page to print in the To box. (Use the page number
identified in Figure 6 above. See Note, page 13)
b. Choose Selection to print only the selected [highlighted] data. (Highlight the
selection first before clicking Print.)
6. Enter the number of copies to print in the Copies box.
7. Choose OK to begin printing to your default printer
NOTE:
•
•
•
It is highly recommended that if the report was previously printed on green bar paper to
print in landscape mode.
The default setting for font and font size is Courier New and 9. This is the recommended
setting for printing.
If you want to see how it would look on paper before printing, go to Print Preview.
(For Netscape users, the Print Preview button is available while viewing a report in
Monarch. Internet Explorer users must first download the report (Save to Disk) instead of
Open to view in Monarch Report Explorer. Once saved, double click the report icon to
open and view in Monarch. The Print Preview button will now be available.)
Details
Monarch Report Explorer prints report pages based upon the page breaks in the report file. Since
these page breaks may have been set for another printer, which may have used a different font
size and page length, each report page may require more or less than a single sheet of paper. The
actual amount of information that will fit on each page is determined by several factors:
Font Size Font size has a dramatic effect on the amount of data that fits on each page. Many
wide reports print best at 6 or 7 points. Normal 80 column reports often print best at 10 or 12
points. (See Selecting a Font for Printing below.)
Margins The margin affects how close data is allowed to print to the edge of the page. You can
use the margin settings to make small adjustments to the amount of text that will fit on each page.
Report Navigator Users Manual
19
The Top and Bottom margin settings affect where the data will break onto a new page. If it’s a
matter of a few lines not fitting on a page, try decreasing the top and bottom margin settings. If
the problem involves more lines, you may need to decrease the font size or change the paper
orientation. (See Setting Margins below.)
Orientation The paper orientation setting specifies the direction that text will print. For wide
reports, which may be clipped at the right margin when you print, set the paper orientation to
Landscape. For longer reports that break onto two pages, set the orientation to Portrait.
(See Setting Paper Size and Orientation below.)
As you experiment with these settings, you can use the Print Preview command to observe the
effects. (See Note - Print Preview above.)
Selecting a Font for Printing
You can select a font and font size for the Report view using the Font and Font Size drop down
lists on the Toolbar. The selected font and font size are used for both displaying and printing the
report. To select a font and font size:
1. To select a font: The Font box on the Toolbar displays the name of the currently
selected font. Use its drop down list to select another font.
Fixed Pitch vs. Proportional Fonts Only fixed pitch fonts are available. Monarch
Report Explorer disallows proportional pitch fonts, since their use would cause
columns to be misaligned when displayed and printed.
2. To select a font size: The Font Size box on the Toolbar displays the current font size.
Use the drop down list to choose another font size. The point sizes available may
vary depending upon the font selected. The Font Size drop down list displays all
available font sizes from a minimum of 6 points to a maximum of 20 points. If the
size you want is not available for the current font, try selecting another font.
Setting Margins for Printing
The margin affects how close data is allowed to print to the edge of the page. To set margins:
1. Right click in the Report view to display its context menu, and then select the Page
Setup command. The Page Setup dialog is displayed.
2. Enter the Top, Bottom, Left and Right margins.
Top specifies the distance between the top of the paper and the first line of text.
Bottom specifies the distance between the bottom of the paper and the last line of
text. Left specifies the distance between the left edge of the page and the beginning
of each line of text. Right specifies the distance between the right edge of the paper
and the end of each line of text.
3. Choose OK to accept the new margin settings.
Setting Paper Size and Orientation
The paper size setting is used to specify the size of the paper you intend to print on (typically 8.5”
x 11” in the US). The paper orientation setting specifies the direction that text will print.
Report Navigator Users Manual
20
The Landscape setting prints text sideways on the page, the Portrait setting prints text normally.
For wide reports, which may be clipped at the right margin when you print, try prin ting with the
Landscape setting. For longer reports that break onto two pages, use Portrait. To set paper size
and orientation:
1. Right click in the Report view to display its context menu, then select the
Print Setup command. The Print Setup dialog is displayed.
2. Examine the Paper Size box. If the paper size displayed does not match the paper
you intend to use for printing, choose the appropriate paper size from the drop down
list.
3. Choose the text orientation. To print the image sideways on the paper, choose the
Landscape radio button, otherwise choose Portrait. For wide reports, choosing
Landscape will allow you to fit more of each report page on the paper. For 80
column reports, choosing Portrait is best; otherwise the report pages may be too long
to fit on the paper.
4. Choose OK to accept your changes.
Report Navigator Users Manual
21
Appendix B: Report Prefixes & Associated
Departments
Report Prefix
AA
AC
AD
AD
AG
AL
AL
AM
AP
AR
AR
AR
AS
AS
AU
AW
CC
CF
CG
CG
CO
CS
ED
EG
ER
ER
EX
F9
FA
FA
FE
FS
HD
Departmental Report Sponsor
Alumni
Advising
Admissions
Admissions
Admissions
Alumni/Developme nt System
Alumni
Admissions
Payroll/Personnel
Accounts Receivable
Cashiering System
Uwf Payroll
Auditron Charges
Auditron System
Auditron Charges
Athletics
Records & Registration
Cashiering System
Payroll/Personnel
Pars
Records & Registration
Central Stores
Records & Registration
Records & Registration
Records & Registration
Financial Aid
Records & Registration
Financial Aid
Financial Aid
Financial Aid
Advising
Financial Aid
Records & Registration
Report Navigator Users Manual
22
I9
IC
ID
IN
IR
IR
IR
MI
NA
NA
NT
NT
OB
PE
PR
PY
PZ
PZ
RA
RA
RC
RG
RG
RI
RL
RP
RP
RQ
RR
RR
RS
RX
SC
SC
SD
SD
SF
SF
Institutional Research
Records & Registration
Nautilus Card Interface
Financial Aid
Institutional Research
Records & Registration
Institutional Research
Records & Registration
Records & Registration
Financial Aid
Nautilus Card Office
Nautilus Card Interface
Budgets
Payroll/Personnel
Uwf Payroll
Property
Payroll
Uwf Payroll
Records & Registration
Athletics
Records & Registration
Records & Registration
Admissions
Records & Registration
Records & Registration
Records & Registration
Room Scheduling
Records & Registration
Records & Registration
Room Scheduling
Records & Registration
Records & Registration
Payroll/Personnel
Records & Registration
Sass
Bor Reporting/Academic
Records & Registration
Admissions
Report Navigator Users Manual
23
SH
SH
SH
SI
SS
SS
SS
SV
TC
TC
TF
TS
UR
UW
UW
UW
UW
Housing
Records & Registration
Student Housing
Space Inventory
Records & Registration
Sass
Advising
Vehicle Registration Tickets
Teacher Education
Teacher Certification
Records & Registration
Admissions
Records & Registration
Uwf Payroll
Admissions
Sass
Financial Aid
Report Navigator Users Manual
24