1
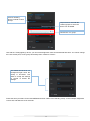
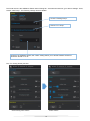
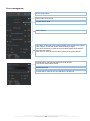
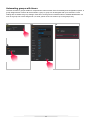
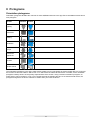
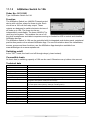
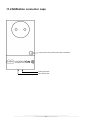
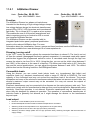
Manual AQStation-System iOS and Android Altenburger Electronic GmbH Schlossweg 5 77960 Seelbach Germany Phone: +49 7823 5090 Fax: +49 7823 50997 [email protected] www.altenburger.de Version 1.0 1 Content 1 General information ................................................................................................................................................. 3 2 AQStation System.................................................................................................................................................... 4 3 Initialisation .............................................................................................................................................................. 5 4 App Settings ............................................................................................................................................................. 7 5 Configure a newly installed AQStation device ..................................................................................................... 9 6 Groups .................................................................................................................................................................... 13 7 Timer ....................................................................................................................................................................... 21 8 Pictograms ............................................................................................................................................................. 24 10 Factory settings ................................................................................................................................................. 26 11 AQStation devices ............................................................................................................................................. 27 11.1 11.1.1 AQStation Universal .............................................................................................................................. 28 11.1.2 AQStation Dim 3x 250W ........................................................................................................................ 30 11.1.3 AQStation Switch 3x 10A ...................................................................................................................... 33 11.2 13 AQStation rail-mount devices ...................................................................................................................... 27 AQStation connector caps ............................................................................................................................ 35 11.2.1 AQStation Dimmer ................................................................................................................................. 36 11.2.2 AQStation Switch ................................................................................................................................... 38 Help ..................................................................................................................................................................... 40 2 1 General information Before activating the AQStation System, make sure to carefully read the entire manual, including all specific instructions for individual devices. Comply with safety signs when using AQStation devices. All user manuals are available on www.altenburger.de and www.aqstation.de. Documentation © 2015 Altenburger Electronic GmbH, Seelbach, Germany All rights reserved. This document may not be reproduced, made available, distributed or stored in any form, whether wholly or in part, without the prior written consent of Altenburger Electronic GmbH. Altenburger Electronic GmbH accepts no liability for any errors in this documentation due to printing and technical errors and/or any technical modifications of the device. This documentation is reviewed on a regular basis to make sure it is up to date. Updated documentation can be downloaded on www.altenburger.de or www.aqstation.de. All trademarks and property rights apply. Altenburger Electronic GmbH reserves the right to make any technical modifications it deems necessary to improve the product at any time. The AQStation App is intended exclusively for the operation and control of the AQStation products of Altenburger Electronic GmbH. Make sure that your mobile device complies with the following system requirements: Android version 2.3 or later, iOS version 6.0. To control AQStation products with the AQStation App, you need a wireless router. If your Wi-Fi uses two cryptographic protocols at the same time (CCMP and TKIP), it is recommended to use only CCMP. Apple and Apple logo are trademarks of Apple Inc., registered in the U.S. and other countries. App Store is a service mark of Apple Inc. Google Play™ is a trademark of Google Inc. 3 2 AQStation System The AQStation System is an efficient system for building automation as well as building visualisation and control. With the AQStation System you can integrate your devices into a reliable system and control these devices via your smartphone and tablet computer. The AQStation System uses the LAN/ Wi-Fi interfaces of its devices as a bus system. Advantages: for instance, the system requires only a Wi-Fi router as an interface. All AQStation devices have a Wi-Fi chip and can be connected to the existing network infrastructure. Thanks to the decentralised structure of the AQStation System, you can add to or remove from the system as many AQStation devices as you want without having to reconfigure the existing System. Thanks to its decentralised structure, you can effortlessly expand and rebuild the AQStation System whenever you want. Designed for smartphones and tablet computers You can control the AQStation System with smartphones and tablet computers running both on Android and iOS. All functions, including comprehensive system administration, visualisation, programming and activation, are operated via your smartphone / tablet computer. The AQStation App is available from App Store and Google Play Store. To find it, search for "AQStation". Each change is saved locally on AQStation devices. All changes are immediately shown on all system-connected smartphones and tablet computers. There is no need to re-programme other, non-connected smartphones and tablet computers, if any. To control the existing AQStation System with a new smartphone or tablet computer, you only need to connect the smartphone or tablet computer to the Wi-Fi of the AQStation System and start the AQStation App. The contents of the AQStation App are instantly and automatically loaded. The System is ready for use within a few seconds. 4 3 Initialisation Quick start: 1. 2. 3. 4. 5. 6. Download the AQStation App from the store of your choice and install the application Plug the first AQStation Dimmer / Switch into a socket or provide the AQStation devices with power supply through flush mounting or rail mounting. Wait up to one minute until the control push-buttons light up. Connect your smartphone / tablet computer to the AQStation Wi-Fi. Wi-Fi Name: „AQStationNewDevice…“. Start the AQStation App, select your Wi-Fi network and provide the network password (key). The AQ Station device needs about two minutes to load the settings. In the meantime, connect your smartphone / tablet computer again to the Wi-Fi. After about two minutes, the new AQStation device will appear in the AQStation App. Step-by-step instructions Install the AQStation devices as instructed in their individual user manuals. If the AQStation devices are to be installed and activated using rail mounting and flush mounting, make sure this is done by qualified electricians. 1 Download the AQStation App from App Store or Google Play Store. Search term: AQStation 2 Connect the first AQStation Dimmer / Switch to a socket or provide the AQStation devices with power supply through flush mounting or rail mounting. (initialise the AQStation devices one by one, NOT all of them at the same time) 3 Make sure that your router as well as smartphone / tablet computer and the AQStation device receive the WiFi signal or connect the AQStation devices by cable to the LAN network. 4 The start-up takes up to two minutes. As soon as the Wi-Fi status LED starts to blink, you can initialise "AQStationNewDevice...". 5 Go to the settings menu of your smartphone / tablet computer, select Wi-Fi settings and connect your smartphone / tablet computer to the "AQStationNewDevice..." Wi-Fi. 6 Make sure that you are connected to the "AQStationNewDevice..." network. 5 7 Start the AQStation App. 8 A message window will appear to guide you through the operation of the AQStation device. Read the instructions carefully. To close the message window, choose "OK". 9 To connect your AQStation device to your network: choose Wi-Fi or LAN (LAN is for rail-mounted devices only). Choose the network in which you want to use your AQStation device. Provide the password for the Wi-Fi you have selected. Confirm entry with the keypad and push the "Save" pushbutton. If the Wi-Fi of your choice does not show up, run the network search again. 10 The AQStation device is now establishing connection with your Wi-Fi. This can take up to two minutes. Do not disconnect the AQStation device from power supply. Do not interrupt the network connection. 11 Go to the settings menu of your smartphone / tablet computer, select Wi-Fi settings and connect your smartphone / tablet computer to your Wi-Fi. 12 Start the AQStation App. 13 After a successful initialisation, your AQStation device will appear automatically in the App. 14 If the software does not recognise or show the AQStation device after about two minutes, check whether your smartphone / tablet computer is connected to the right Wi-Fi. Restart the App, if necessary. Should these measures fail, restore your AQStation device to factory settings and re-initialise. 6 4 App Settings Use the cogwheel icon (main view, bottom left) to go to General Settings. There, you can manage all the App's settings. This menu also provides an overview of all existing devices, building structures, applications and timers. You can also use the menu to manage the software updates of your AQStation devices. General Settings Use this device for time synchronization: To activate the timers, the AQStation devices must, once they have been started, synchronise their internal clock times either via the AQStation App or the web. Activate this setting if the AQStation devices are off-line. Always show advanced settings: The device settings will normally feature advanced settings. Show preview pictograms: Use preview pictograms to demonstrate different device settings. Show hidden: This option enables you to show hidden devices, sensors and groups in the AQStation App. Theme: Change the colour scheme of the App. Return to the home screen: If you have the AQStation open with no activity for longer than you have specified, you will be automatically redirected to the chosen section of the building structure. VPN-Options: To learn more about VPN settings, go to the relevant chapter. AQStation device list - - An AQStation device entry contains: The IP Address of the AQStation device Device – the AQStation device model Name – AQ Station device's name provided during the initialisation - Wi-Fi signal strength for AQStation devices with Wi-Fi connection Ver. – version number of the AQStation device's software Information about available software updates To access more configuration options of the AQStation device, tap on the AQStation device's name field Check for updates – automatic checks for available AQStation device updates at regular one-hour intervals. Use this push-button to start checking for updates. - Update push-button – launches software update for all AQStation devices. - New device – (beta version) for easier initialisation (available for Android systems only). Building structure overview The building structure of your AQStation System, including the buildings, floors and rooms, is shown as a hierarchic structure similar to folders in a computer data system. Re-name the building, floor or room: 1. Tap on the building, floor or room. 2. Enter new name. 3. Confirm the change with the save button. The change will appear in the AQStation System in a few seconds. Group entries - A group entry contains: Name Group location (building, floor, room) Type – group type, dimmable, on/off or scene Delete AQStation System group Group configuration button 7 Timer list This list contains all timers set to start within a week. It is structured chronologically, from the first to the last timer set to start within the period. A timer entry contains: Name; Date and start date; Name of the relevant group (yellow) or device (turquoise) to which the timer is connected; Location (e.g. building, floor, room) of the group or device; Function or value – e.g. "Start" of the timer starts a scene or a percentage value to be reached by a dimmable device; Timer-configuration push-button. 8 5 Configure a newly installed AQStation device After the AQStation device is initialised, all the outputs in the App's home screen will be listed under the "Devices". To go to device settings, tap on the arrow. Settings Tap on the arrow to go to device settings (output). The following settings are available: Rename the device Assign a new icon to the device Assign the device to an existing building structure or create a new building structure. Rename the device. Assign an icon, from seven main groups, to the device. Assign the device to a building or create a new building structure. Create a new group with the device or assign the device to an existing group. Control the device with a timer. 9 Advanced settings Tick the box to open advanced settings. Advanced settings Hide: Unlock: Max: Min: Manual brightnessvalue setting: Voltage-recovery value Device: Channel: IP: Choose "Yes". When this option is chosen, the output is no longer shown in the App. All the hidden devices can be displayed in the toolbar. Hidden objects cannot be controlled using the main icons of the building structure. This option is used for a better overview, and to hide hidden processes. When the unlock option is set at "No", the output is locked and the status cannot be changed. Locked outputs are always hidden. Even if unlocked, the device remains hidden until you tick "No" in the "Hide" option. Set the maximum brightness value that the device may reach. For this purpose, the App always shows a scale of 0 to 100 percent. Set the minimum brightness value that the device should maintain. For this purpose, the App always shows a scale of 0 to 100 percent. The Max and Min limits help to avoid the potential flickering of LED lamps at high or low voltages. The brightness value to be set when manually operating the device keypad. The value is set as a percentage (only for dimmable outputs) After losing connection to a power supply (e.g. a blackout), the device automatically restores the light value to the pre-defined value (a percentage of the maximum). Provides the type of the AQStation device used. (AQS Switch, AQS Dimmer, etc.) Provides the physical connection channel of the AQStation device. Provides the network addresses used by the AQStation device. Use Save to accept the settings or Cancel to delete the settings. 10 Dimmable output: Icon: 100% switch on / off Activate motion control Settings Slider Brightness value set as percentage This value appears after tapping on the motion control icon. For dimmable lamps, the brightness values for the connected electrical-load devices can be set at 0 to 100 percent. Tap on the entry icon to turn the light on (100%) or off (0%). Use the slider to freely set the desired brightness value. The percentage value will appear on the right side of the slider. When the "Motion Control" is activated in the toolbar, an additional icon appears on the left side of the slider. By clicking this icon, you activate the motion-detecting mode for the relevant AQS Dimmer. In this mode, you can set the brightness by inclining your mobile device upwards or downwards and save the setting by tapping the screen's surface. 11 Switchable output Icon: Settings Entry When switching electrical load devices, the connected devices are turned on and off. Tap on the entry icon to turn the device on or off. General Settings To access general settings, tap on the cogwheel icon in the bottom left of the home screen of the AQStation App. There, you can manage all the App's settings. This menu also provides an overview of all existing AQStation devices, building structures, groups and timers. You can also use the menu to manage the software updates and network settings of your AQStation devices. 12 6 Groups Groups are used to collectively control (dimming, turning on and off, activating a scene) multiple devices. The groups are arranged in a couple of simple steps in the AQStation App. Each group can have its timer functions. Each device can be assigned to multiple groups. The following groups are available: On/Off Group In the on/off group, multiple devices are turned on and off together. Dimmable (0% - 100%) and switchable devices can be integrated into an on/off group. As an option, you can set automatic turn-off times for individual devices in the group. Dimmable Group The dimmable group devices are controlled together. Dimmable devices can be assigned to this group. Scene In a scene, all values of the devices integrated into the scene can be recorded, accessed and re-configured. Devices can be integrated into multiple scenes. Creating a group: 1. Groups are created in device settings. In the settings menu, scroll down until you see "Add group" and choose this option. 2. A new window with group settings will appear. 3. Create a new group or choose an existing group. 4. Choose "New Group". 5. Assign a name to the group and choose the building, floor and the room in which you want to save it. 6. Next, choose the group type (On/Off, Dimmable or Scene). 7. Depending on the group type, you can, for instance, set brightness values, fade times, etc. 8. Save the settings. Add new devices to the group following the same procedure. However, instead of creating a "New Group", choose the "Existing Group" option and select an already created group. 13 Step-by-step instructions To create a group, go to your device's settings. To access settings, tap on In the settings menu, scroll down to and tap on "Add Group". Below is a step-by-step demonstration of how to create a group. Example: Four devices are used in this example. These include three AQStation Dimmers and one AQStation Switch. They are located in the living room (Building Structure: My Home / Ground Floor / Living Room. In the below example, a "TV" scene is created to provide a quick and simple way to achieve a pleasant lighting effect in the living room. The navigation bar shows the location of the living room within the building structure. AQS Switch All four devices have been given names according to their location in the living room. Three AQS Dimmers Go to the settings of the AQS Dimmers called "Ceiling Lamp". There, scroll down to and select "Add Group". The following box will appear. 14 Choose a new or existing group. "New Group" is chosen in the example. This option shows up in the existing groups only. This shows the device for which the group is created and the location of this device within the building structure. Name the group. The group is named "TV" in the example. The group can be saved anywhere within building structure (regardless of the devices involved). Next, choose the group "Type" (On/Off, Dimmable or Scene). "Scene" is chosen in the example. "Value" is used to set the desired brightness value (from 0% to 100%). "Fade time" indicates the time the AQS Dimmer needs to reach the set brightness value after the group has been started. Use Save to accept the settings or Cancel to delete the settings. 15 A "TV" entry will appear below "Groups". This means that the AQStation Dimmer is assigned to the "TV" group. To remove the AQStation Dimmer from the group, tap on the pushbutton. To go back to the "TV" group settings, use To leave the AQStation Dimmer settings menu, tap on "Save". This will move you back to the "Living room" level. A "TV" scene is shown below "Groups". The second "TV" group device will be added. Go to the settings of the AQS Dimmer called "TV background light". There, scroll down to and select "Add Group". Change "New Group" into "Existing Group. 16 Choose "Existing Group" instead of "New Group". Tap on here to reveal all the created groups to which the device can be added. Choose the "TV" group. Like with the "Ceiling lighting" device, you can set the brightness value and the desired fade time. You cannot change the name at this point, as the group has already been created as "Scene". The values can be set in "TV background light" when the Group is accessed. Use Save to accept the settings or Cancel to delete the settings. Follow the same procedure for the third AQStation dimmer called "Floor Standing Lamp". In this example, brightness is set at 5% and fade time at 30 seconds. 17 The fourth device is the AQStation Switch called "Ceiling fan". Like with other devices, go to device settings. There, choose "Add Group". The following settings will be available: Choose "Existing Group". Choose "TV" Group. As this is an AQStation Switch, the "Value" setting allows you to decide whether the device should be turned on or off. The "TV" Group (Scene) function: Current living room values Scene values 18 Group settings Change the group name. Change the group name here. Change the building-structure location. Hidden groups will not be shown in the building structure. Delete the group. Use "Cancel" to close the window without saving changes. Use "Save" to close the window and save changes. Opens scene management. Shows the devices involved. Tap on to remove a device from the group. Tap on to go to the group settings of the device. Here, you can add, adjust or remove group timers. Group controls Dimmable group controls: On/Off group controls: "0%" turns off all devices "On" turns on all devices "100%" turns on all devices with 100% brightness "Off" turns off all devices "-" decreases dimming "+" increases dimming Use "Start" to start a scene. Use the arrow to go to the settings of individual groups. This icon will take you to scene management. 19 Scene management Scene group name Saved value in the scene. Current device value. Scene devices Use "Start" to start the scene. Devices adjust to the saved value (yellow). Use "Cancel" to close the window without saving changes. Use "Save and leave" to save the current values (white) of the devices and close the window. Use "Save" to save the current values (white) of the group devices. Activate this to overwrite the fade times of all devices. The current values will be saved. Choose fade time. Activate this to overwrite only the fade time of all devices. 20 7 Timer A timer is a setting for a group or a device within the AQStation System. A timer can trigger an action of a device or a group. By extension, timers enable the automation, timing and time control of your AQStation System. Each timer has one entry in the group-device settings. Using this entry, you can adjust or remove timers. The timer can be set to perform an automated function at a specific time on a defined day of the week to achieve a desired result. For instance, this way, devices can be turned on or off, dimmable lighting can be adjusted to a specific value or window blinds can be moved to a specific position. In the AQStation System, devices can work independently. They do not need any central executive unit. With the App, you only need to assign a timer to the device or group, and the device will execute the timer function on its own. Even if your smartphone or tablet computer is not connected to the System, the timer function is executed punctually. The execution takes place independently through the AQStation System. Timer activation To activate timers, the AQStation devices must, once they have been started, synchronise their internal-clock times either via the AQStation App or the Internet. If the AQStation devices are off-line, make sure to have a time transmitter (smartphone / tablet computer with activated AQStation App) in the system at all times when you are starting AQStation devices. After a restart or a blackout, AQStation devices must synchronise their internal-clock times. In "General Settings" of the AQStation App, run the "Use this device for time synchronisation" function to use your mobile devices as a time transmitter. AQStation devices that are off-line and have no active time transmitters disable the timer function until the time has been updated. To avoid problems with timers, make sure to have a time transmitter in the system at all times or that AQStation devices are on-line. 21 Automating devices with timers Timer-based automation provides enhanced convenience and better energy efficiency. A timer can be assigned to any controllable AQStation device. Timers are used to trigger a number of different device actions. A single device can be assigned with up to 100 timers. Timer settings are accessible via device or group settings. Each timer can be given an individual name to facilitate identification. As soon as a device has a timer assigned to it, a turquoise clock icon will show up in the device's entry. 1. 3. 4. 2. 22 Automating groups with timers The timer function in groups enables a comprehensive enhancement of the functionality and configuration options. A group-assigned timer controls all devices within a group. A group can be assigned with up to 100 timers. Timer settings are accessible via group settings. Each timer can be given an individual name to facilitate identification. As soon as a group has a timer assigned to it, a small, yellow clock icon will show up in the group's entry. 1. 3. 4. 2. 23 8 Pictograms Orientation pictograms Orientation pictograms facilitate the overview of active AQStation devices in the App. Each controllable section has its own pictogram. Section Inactive Active Lighting Multimedia Heating Ventilation Pumps Household appliances Sockets Window blinds The orientation pictograms in the App's main window enable you to locate where an electrical-load device is running at the moment. It does not matter in which room or on which floor the electrical-load device is located, as the orientation pictogram is always shown as the primary representative of the section. Using a relevant orientation pictogram, an entire section can be turned on or off. If you navigate through the building structure to an electrical-load device, the pictogram assigned to the device will also be shown when you reach the device. 24 Toolbar pictograms Section Inactive Active Tap on the pictogram to access the General Settings of the App. There, in addition to setting options, you can view all the AQStation devices connected within the system. By tapping on this icon, you activate the motiondetecting mode for the AQS Dimmer. In this mode, you can set the brightness by inclining your mobile device upwards or downwards and save the setting by tapping on the screen's surface. General Settings Motion control Filter – Hidden show or hide By tapping on this pictogram, you show all the AQStation devices that are set as hidden. Hint – pictograms Section Inactive Active Device with a timer This pictogram indicates that the output has been integrated with a timer. Device within a group This pictogram indicates that the output has been integrated with a group. 25 10 Factory settings To make a factory reset of the AQStation device, press the reset switch for about 10 seconds with a thin pointed object (e.g. a ball pen refill). Do not disconnect the device; it takes the device 2 minutes to restart. After the restart, the AQStation device is restored to its factory settings. The previously saved functions (timers, groups, scenes, etc.) are deleted and cannot be recovered. 26 11 AQStation devices 11.1AQStation rail-mount devices Casing Loosen the seal screw, grasp the device with both hands and open it as demonstrated on the picture below. Open Loosen the seal screw before opening Reset push-button Seal screw Control push-buttons for circuit 1, 2 and 3 27 11.1.1 AQStation Universal Order No.: 90.10.200 Type: AQS UNIVERSAL Function The AQStation Universal is a LAN/Wi-Fi-based control device for three circuits. Each circuit has a combination interface (0-10 V + 3mA / 1-10V 100mA) and a 10A volt-free relay output. The three circuits are independently controllable. The inhouse LAN/Wi-Fi is used as a bus system. This enables the use of off-the-shelf smartphones and tablet computers running on Android or iOS to control and visualise AQStation devices. The combination interface is suitable for the control of all ALTOQUICK load dimmers, the DALI converter DC NV and all off-the-shelf ECGs with 1-10 V interface. The AQStation Universal can be controlled with its integrated keypad, peripheral push-button panels or the relevant AQStation App. For more information about the visualisation, scenes, groups and timer functions, see the AQStation App description available from www.altenburger.de or www.aqstation.de. Dimming, turning on/off In the "OFF" mode, the load is disconnected through relays (µ load contact, function separation). In the "OFF" mode, the 0-10 V/1-10 V interface goes dark (0 or 1V). Using the App and the control keys, you can adjust the interfaces between 0 and 100%. The control push-buttons have the following functions: On/Off/Brighter/Darker Connectible loads At ohmic load, a switching capacity of 10A can be used. Otherwise cos φ is taken into account. Technical data Designation Type Order Number Supply Voltage Protection Mounting form Dimensions, weight Internal displays Internal controls Wi-Fi LAN Operating temperature Power consumption Protection class Protection category Degree of contamination Load contact (µ) Interface Qualification AQStation Universal AQS Universal 90.10.200 110V-240V AC 50/60HZ, DC not allowed external 6A, internal microfuse DIN rail housing WxHxD=175 x 83.5 x 58 mm, approx. 200 gr. 1x green LED (Wi-Fi mode) 3x green LED (switch mode) on control push-buttons 3x push-buttons for the manual control (on/off) 1x reset push-button (factory settings, including Wi-Fi) 2.4 GHz 802.11n RJ45, 100-MBit-Ethernet (Fast Ethernet) 0°C … +35°C <2W II (protective isolation) IP 20 2 (dry non-conductive) 3x max. 10A at 230V ohmic load 3 x combination interface 0-10V + 3mA/1-10V - 100mA CE, RoHS, WEEE 28 Wiring diagram Safety and installation instructions – WARNING Before installation, read the user manual thoroughly and keep it for future reference. The device may be installed and put into operation by qualified electricians only. Any maintenance works involving the device, wiring and replacing lamps may be done only with the power off. To do the wiring, loosen the seal screw and remove the device from the housing base. Wire the device terminals according to the wiring diagram and the imprint. The device must be snap fitted onto the relevant DIN rail. It may be operated only in a horizontal position (with terminal clamps at the bottom). The device must be installed through rail mounting or switch cabinets. Any applicable safety regulations must be complied with. The device may not be disassembled nor operated without the housing or the housing base. You will lose your warranty if you improperly handle or disassemble the device. The device generates heat and must be sufficiently ventilated. The device may be operated only in dry, closed rooms at a temperature of 0°C to 35°C. In the "OFF" mode, the load is separated through the µ contact. You may not connect the outputs of multiple AQStation devices. Do not rely exclusively on the App's status confirmations as these might differ from the actual status. 29 11.1.2 AQStation Dim 3x 250W Order No.: 90.10.100 Type: AQS DIM 3x 250W Function The AQStation Dim 3 x 250 W LAN/Wi-Fi-controlled load dimmer for three circuits. Each circuit has a 250W/VA phase-cut load dimmer intended for the dimming of high-voltage halogen lamps, low-voltage halogen lamps (via electronic transformers), powerLEDs (230 V), LED converters and incandescent light bulbs. The three circuits are independently controllable. The in-house LAN/Wi-Fi is used as a bus system. This enables the use of off-the-shelf smartphones and tablet computers running on Android or iOS to control and visualise AQStation devices. The AQStation Dim 3x 250W can be controlled with its integrated push-button panel, peripheral push-button panels or the relevant AQStation App. For more information about the visualisation, scenes, groups and timer functions, see the AQStation App description available from www.altenburger.de or www.aqstation.de. Dimming, turning on/off In the "OFF" mode, the dimmer adjusts the connected load down to almost 0. The load is not disconnected from the network (disengaged function/no galvanic isolation). A command made with a push-button triggers the programmed switch-on value. A command made through the App icon causes the value to rise from 0% to 100%. Using the App, you can set the initial value (between 0 and 100%) of the dimmer in the case of a blackout. The factory-set initial value is 0%. Using the App and the control push-buttons, you can adjust the dimmers between 0 and 100%. The control keys have the following functions: On/Off/Brighter/Darker Connectible loads Using the dimmer, you can control loads (ohmic loads, e.g. incandescent light bulbs) and capacitive loads (e.g. electronic transformers) within a range of 15W/VA to 250W/VA. The total capacity of the connected load may not exceed the maximum load of the dimmer. The power dissipation and cos φ of the electronic transformers should be taken into account as well. The dimmer's maximum output current may not be exceeded as well. You may not connect the outputs of multiple dimmers. Electronic transformers may be connected to the dimmers on the mains (primary) side only. Their loads must comply with the manufacturer's data and they must be designed for appropriate mains electricity. Open-loop operation is not allowed. Electronic transformers may be connected only when they are designed for phase-cut operation. The operation of conventional transformers or inductive loads is generally not allowed, as it might damage the dimmer or the transformers beyond repair. Load output Electronic current limitation (short-circuit current) Downward adjustment when maximum allowed temperature is exceeded Switching off when the temperature is too high (thermal cut-off, permanent) Switching off when the current is too high (microfuse, permanent) Switching off when voltage peaks are too high (inductive load), switching ON again after disconnection of supply voltage 30 Technical data Designation Type Order Number Supply Voltage Protection Mounting form Dimensions, weight Internal displays Internal controls Wi-Fi LAN Operating temperature Power consumption Protection class Protection category Degree of contamination Dimmer output Loading capacity Qualification AQStation Dim 3x 250W AQS DIM 3x 250W 90.10.100 230V~ 50Hz, DC not allowed external 6A, internal microfuse DIN rail housing WxHxD=175 x 83.5 x 58 mm, approx. 200 gr. 1x green LED (Wi-Fi mode) 3x green LED (switch mode) at control push-buttons 3x push-buttons for the manual control (on/off, brighter/darker) 1x reset push-button (factory settings, including Wi-Fi) 2.4 GHz 802.11n RJ45, 100-MBit-Ethernet (Fast Ethernet) 0°C … +35°C <2W II (protective isolation) IP 20 2 (dry non-conductive) 250W/VA (max. 1.0A~) - Electronic current limitation (short-circuit current) - Downward adjustment when maximum allowed temperature is exceeded - Switching off when the temperature is too high (thermal cutoff, permanent) - Switching off when the current is too high (microfuse, permanent) - Switching off when voltage peaks are too high (inductive load), switching ON again after disconnection of supply voltage max. 250W/VA (max 1.0 A~) ohmic load, capacitive load(incandescent light bulbs, electronic transformers) CE, RoHS, WEEE Wiring diagram 31 Safety and installation instructions – WARNING Before installation, read the user manual thoroughly and keep it for future reference. The device may be installed and put into operation by qualified electricians only. Any works involving the device, wiring and replacing lamps may be done only with the power off. To do the wiring, loosen the seal screw and remove the device from the housing base. Wire the device terminals according to the wiring diagram and the imprint. The device must be snap fitted onto the relevant DIN rail. It may be operated only in a horizontal position (with terminal clamps at the bottom). The device must be installed through rail mounting or switch cabinets. Any applicable safety regulations must be complied with. The device may not be disassembled nor operated without the housing or the housing base. You will lose your warranty if you improperly handle or disassemble the device. The device generates heat and must be sufficiently ventilated. The device may be operated only in dry, closed rooms at a temperature of 0°C to 35°C. In the "OFF" mode, the load will not be disconnected from the network (disengaged function / no galvanic separation). You may only connect and control loads that are suitable and allowed for use with a phase-cut dimmer (phase-cut operation). These include ohmic loads (e.g. incandescent light bulbs), capacitive loads (e.g. electronic transformers). Inductive loads are not allowed, as these might damage the dimmer and transformers. Relevant manufacturer's data and instructions must be complied with. You may not connect the outputs of multiple AQStation devices. Do not rely exclusively on the App's status confirmations, as these might differ from the actual status. 32 11.1.3 AQStation Switch 3x 10A Order No.: 90.10.000 Type: AQStation Switch 3x 10A Function The AQStation Switch is a LAN/Wi-Fi-based control device with volt-free relays for three circuits. Each circuit has a 10A volt-free relay output. These outputs are designed to switch electronic devices of all kinds up to 10A. The three circuits are independently controllable. The home LAN/Wi-Fi is used as a bus system. This enables the use of offthe-shelf smartphones and tablet computers running on Android or iOS to control and visualise AQStation devices. The AQStation Switch 3x 10A can be controlled with its integrated push-button panel, peripheral push-button panels or the relevant AQStation App. For more information about the visualisation, scenes, groups and timer functions, see the AQStation App description available from www.altenburger.de or www.aqstation.de. Switching on/off In the "OFF" mode, the load is cut off through relays (µ load contact). Connectible loads At ohmic load, a switching capacity of 10A can be used. Otherwise cos φ is taken into account. Technical data Designation Type Order Number Supply Voltage Protection Mounting form Dimensions, weight Internal displays Internal controls Wi-Fi LAN Operating temperature Power input Protection class Protection category Degree of contamination Load contact (µ) Qualification AQStation Switch 3x10A AQStation Switch 3x10A 90.10.000 110V-240V AC 50/60HZ, DC not allowed external 6A, internal microfuse DIN rail housing WxHxD=175 x 83.5 x 58 mm (10 TE), approx. 200 gr. 1x green LED (Wi-Fi mode) 3x green LED (switch mode) at control keys 3x push-buttons for the manual control (on/off) 1x reset push-button (factory settings, including Wi-Fi) 2.4 GHz 802.11n RJ45, 100-MBit-Ethernet (Fast Ethernet) 0°C … +35°C <2W II (protective isolation) IP 20 2 (dry non-conductive) 3x max. 10A at 230V ohmic load CE, RoHS, WEEE 33 Wiring diagram Safety and installation instructions – WARNING Before installation, read the user manual thoroughly and keep it for future reference. The device may be installed and put into operation by qualified electricians only. Any works involving the device, wiring and replacing lamps may be done only with the power off. To do the wiring, loosen the seal screw and remove the device from the housing base. Wire the terminals according to the wiring diagram and the imprint. The device must be snap fitted onto the relevant DIN rail. It may be operated only in a horizontal position (with terminal clamps at the bottom). The device must be installed through rail mounting or switch cabinets. Any applicable safety regulations must be complied with. The device may not be disassembled nor operated without the housing or the housing base. You will lose your warranty if you improperly handle or disassemble the device. The device generates heat and must be sufficiently ventilated. The device may be operated only in dry, closed rooms at a temperature of 0°C to 35°C. In the "OFF" mode, the load is disconnected through the µ contact. You may not connect the outputs of multiple AQStation devices. Do not rely exclusively on the App's status confirmations, as these might differ from the actual status. 34 11.2AQStation connector caps Control push-button (On/Off) with status confirmation Reset push-button Wi-Fi Status LED 35 11.2.1 AQStation Dimmer black: Order No.: 90.00.100 Type: AQS DIMMER - black white: Order No.: 90.00.101 Type: AQS DIMMER – white Function The AQStation Dimmer is a phase-cut load dimmer intended for the dimming of high-voltage halogen lamps, low-voltage halogen lamps (via electronic transformers), power-LEDs (230 V), LED converters and incandescent light bulbs. The in-house Wi-Fi is used as a bus system. This enables the use of off-the-shelf smartphones and tablet computers running on Android or iOS to control and visualise AQStation devices. The AQStation Dimmer can be controlled with its integrated push-button panel, peripheral push-button panels or the relevant AQStation App. For more information about the visualisation, scenes, groups and timer functions, see the AQStation App description available from www.altenburger.de or www.aqstation.de. Dimming, turning on/off In the "OFF" mode, the dimmer adjusts the connected load down to almost 0. The load is not cut off from the network (disengaged function/no galvanic separation). A command made with a panel push-button triggers the programmed switch-on value. A command made through the App icon causes the value to rise from 0% to 100%. Using the App, you can set the initial value (between 0 and 100%) of the dimmer in the case of a blackout. The factory-set initial value is 0%. Using the App and the control push-buttons, you can adjust the dimmers between 0 and 100%. The control push-button has the following functions: On/Off/Brighter/Darker Connectible loads Using the dimmer, you can control loads (ohmic loads, e.g. incandescent light bulbs) and capacitive loads (e.g. electronic transformers) within a range of 15W/VA to 350W/VA. The total capacity of the connected load may not exceed the maximum load of the dimmer. The power dissipation and cos φ of the electronic transformers should be taken into account as well. Also, the dimmer's maximum output current may not be exceeded. You may not connect the outputs of multiple dimmers. Electronic transformers may be connected to the dimmers on the mains (primary) side only. Their loads must comply with the manufacturer's data and they must be designed for appropriate mains electricity. Open-loop operation is not allowed. Electronic transformers may be connected only when they are designed for phase-cut operation. The operation of conventional transformers or inductive loads is generally not allowed, as it might damage the dimmer or the transformers beyond repair. Load output Electronic current limitation (short-circuit current) Downward adjustment when maximum allowed temperature is exceeded Switching off when the temperature is too high (thermal cut-off, permanent) Switching off when the current is too high (microfuse, permanent) Switching off when voltage peaks are too high (inductive load), switching ON again after disconnection of supply voltage 36 Technical data Designation Type Order Number Supply Voltage Protection Mounting form Dimensions, weight Internal displays Internal controls Wi-Fi Operating temperature Power consumption Protection class Protection category Degree of contamination Dimmer output Loading capacity Qualification AQStation Dimmer AQS Dimmer black: 90.00.100 white: 90.00.101 230V~ 50Hz, DC not allowed external 16A, internal microfuse Rail housing WxDxH= 121x66x56mm, approx. 200 gr. 1x green LED (Wi-Fi mode) 1x green LED (switch mode) on control push-buttons 1x push-button for the manual control (on/off, brighter/darker) 1x reset push-button (factory settings, including Wi-Fi) 2.4 GHz 802.11n 0°C … +30°C < 1.5 W I (electrical grounding) IP 20 2 (dry non-conductive) 350W/VA (max. 1.5A~) - Electronic current limitation (short-circuit current) - Downward adjustment when maximum allowed temperature is exceeded - Switching off when the temperature is too high (thermal cut-off, permanent) - Switching off when the current is too high (microfuse, permanent) - Switching off when voltage peaks are too high (inductive load), switching ON again after disconnection of supply voltage max. 350W/VA (max 1.5 A~) ohmic load, capacitive load(incandescent light bulbs, electronic transformers) CE, RoHS, WEEE Safety and installation instructions – WARNING The device may not be disassembled nor operated without the housing. You will lose your warranty if you improperly handle or disassemble the device. The device may be plugged into off-the-shelf sockets only. The device may be operated only in dry, closed rooms at a temperature of 0°C to 30°C. Before installation, read the user manual thoroughly and keep it for future reference. In the "OFF" mode, the load will not be disconnected from the mains (disengaged function / no galvanic separation). You may only connect and control loads that are suitable and allowed for use with a phase-cut dimmer (phase-cut operation). These include ohmic loads (e.g. incandescent light bulbs), capacitive loads (e.g. electronic transformers). Inductive loads are not allowed, as these might damage the dimmer and transformers. Relevant manufacturer's data and instructions must be complied with. You may not connect the outputs of multiple AQStation devices. Do not rely exclusively on the App's status confirmations, as these might differ from the actual status. 37 11.2.2 AQStation Switch black: Order No.: 90.00.000 Type: AQS SWITCH - black white: Order No.: 90.00.001 Type: AQS SWITCH – white Function The AQStation Switch is a Wi-Fi-controlled switch. It is designed to connect a mains socket (230 V, 50 Hz) and an electrical-load device. The module has a 16A volt-free relay output. It is designed to switch electronic devices of all kinds up to 16A. The in-house Wi-Fi is used as a bus system. This enables the use of off-the-shelf smartphones and tablet computers running on Android or iOS to control and visualise AQStation devices. The AQStation Switch can be controlled with its integrated push-button panel, peripheral push-button panels or the relevant AQStation App. For more information about the visualisation, scenes, groups and timer functions, see the AQStation App description available from www.altenburger.de or www.aqstation.de. Switching on/off In the "OFF" mode, the load is cut off through relays (µ load contact, function separation). Connectible loads The switch is intended for all this socket-approved devices. At ohmic load, a switching capacity of 16A~ can be used. Otherwise cos φ is taken into account. Technical data Designation Type Order Number Supply Voltage Protection Mounting form Dimensions, weight Internal displays Internal controls Wi-Fi Operating temperature Power consumption Protection class Protection category Degree of contamination Load contact L' (µ) Loading capacity Qualification AQStation Switch AQS Switch black: 90.00.000 white: 90.00.001 230V~ 50Hz, DC not allowed external 16A, internal microfuse Rail housing WxHxD=121 x 66mm x 56mm, approx. 200 gr. 1x green LED (Wi-Fi mode) 1x green LED (switch mode) on control push-buttons 1x push-button for the manual control (on/off) 1x reset push-button (factory settings, including Wi-Fi) 2.4 GHz 802.11n 0°C … +30°C < 1.5 W I (electrical grounding) IP 20 2 (dry non-conductive) Internal relay contact (closing contact) Function switching (On/Off), no safe separation (µ contact opening) max. 16A~ ohmic load CE, RoHS, WEEE 38 Safety and installation instructions – WARNING The device may not be disassembled nor operated without the housing. You will lose your warranty if you improperly handle or disassemble the device. The device may be plugged into off-the-shelf sockets only. The device may be operated only in dry, closed rooms at a temperature of 0°C to 30°C. Before installation, read the user manual thoroughly and keep it for future reference. In the "OFF" mode, the load is separated through the µ contact. You may only connect and control loads that are suitable and allowed for use with this sockets. Relevant manufacturer's data and instructions must be complied with. The maximum switching capacity must be observed. You may not connect the outputs of multiple AQStation devices. Do not rely exclusively on the App's status confirmations, as these might differ from the actual status. 39 13 Help Definitions AQStation device Device Sensors and pushbuttons AQStation device means the entire hardware unit. General settings such as network settings and software updates apply to the entire AQ Station device. During the initialisation, each AQStation device is given a name. After the AQStation device has been initialised, all the outputs in the App's home screen will be listed under the "Devices". These outputs will be named as "devices" in the App. An AQStation device can comprise multiple devices in the App. Consequently, each device (output) can be individually adjusted and configured in the App. After the AQStation device has been initialised, all the inputs in the App's home screen will be listed under "Sensors and push-buttons". These entries will be named "Sensors and push-buttons" in the App. An AQStation device can comprise multiple sensors and push-buttons in the App. Consequently, each input can be individually adjusted and configured in the App. Which Wi-Fi encryptions are supported by the system? The following encryptions are supported: WPA Personal, WPA2 Personal with either the TKIP or the CCMP (no mixed mode) In the case of mixed-mode networks (TKIP and CCMP), the system functionality might be limited depending on the Wi-Fi router. WPA Enterprise encryptions are not supported. The Wi-Fi list shows no networks during the initialisation Close the App and exit the App via Taskmanager. Which network sizes are supported by the system? Net mask 255.255.255.0 Corresponds to 253 AQStation devices Which network ports are supported by the system? The system uses the following ports: Port Protocol 12000 UDP and TCP 12001 UDP and TCP 12002 UDP and TCP 123 UDP and TCP 443 UDP and TCP 80 UDP and TCP 53 UDP and TCP The system works with broadcast communication, which must be supported by the router. 40 Can I hide my Wi-Fi SSID? During the initialisation, the Wi-Fi SSID may not be hidden. This option can be re-activated on your router after the initialisation. How long must an AQStation device be connected to power during an update? AQStation devices may not be disconnected until the update has been successfully completed. An update should take up to 5 minutes. If the AQStation device is disconnected too early, the software might be damaged beyond repair. Which Android version is suitable for the App? The AQStation App is compatible with Android 2.3 and later versions. Which iOS version is suitable for the App? The AQStation App is compatible with the iOS 6.0 and later versions. All rights reserved. This user manual might contain some printing or technical errors. However, the information contained in this user manual is revised on a regular basis and, if necessary, corrected for subsequent editions of the manual. We accept no liability for technical or printing errors and their consequences, if any. Technical modifications with a view to improving the product can be undertaken at any time without notice. FAQ WORKING AQSTATION SYSTEM IS NOT SHOWN? Please check your wireless connection. Ensure that your mobile device is on the same network as your AQStation devices. Make sure that your AQStation device is powered. The startup of the equipment can take up to 2 minutes. If your device does not indicate that it is ready in 2 minutes by flashing of the status LED (flashes repeatedly once) please power supply your device. Make sure that your device is connected to the network. Make sure there is sufficient Wi-Fi coverage at your AQStation devices. Make sure that your router is working properly. NEW SYSTEM – HOW TO START? In order to use your AQStation devices you need to connect each one with your network. Supply to the AQStation device with power. Wait up to two minutes. Connect your smartphone/tablet to the AQStation device network. Start AQStation App. Select your network and enter your network key. Make sure that your network has at least 25% signal strength. Connect your smartphone/tablet to your network. The new device appears in the AQStation App after about 1 minute. If you are not sure, that the device is in factory settings, you can always reset the device to factory settings (see manual). Make sure that only one AQStation device with factory settings is powered. 41 NEW SYSTEM – PROBLEMS? Frequent mistakes: o selecting a wrong network o wrong Wi-Fi password Make sure sufficient signal strength is at your AQStation device. Make sure that you are connected to the configurated network. If your AQStation device indicates by flashing the status LED 3 times every 3 seconds the device has no connection to the Wi-Fi network. signal strength less 25% wrong Wi-Fi password no Wi-Fi signal Reset the AQStation device to factory settings, and reconfigure the device. (NEW SYSTEM HOW TO BEGIN?) 42 For more information, visit www.altenburger.de or www.aqstation.de ALTENBURGER ELECTRONIC GMBH Schloßweg 5 77960 Seelbach Germany Phone: +49 7823 5090 Fax +49 7823 50997 [email protected] http://www.altenburger.de http://www.aqstation.de All rights reserved. It is possible that this manual has undergone pressure technical defects or typographical errors. The content of this manual are regularly checked and corrections made in the next issue. For technical or printing error type and its consequences, we assume no liability. Changes in the sense of technical progress can be made without notice. 43