1
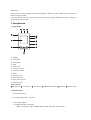
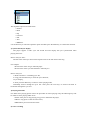
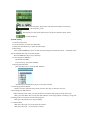
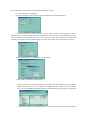
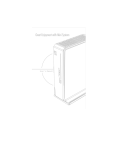
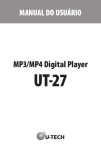
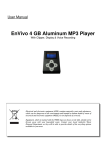
DF042 USER MANUAL Revision: V0 Release Date: 2006-03-25 Prepared: Checked: Approved: R&D department of SHARETRONIC Year month day Declaration Thank you for choosing digital products from Digimate. Please read this manual for user instruction before using the product. For improvement of service, the content of this manual may change without notice due to changes in product design and function. 1. Introduction 1.1 Appearance ① Display ② Loop Hole ③ Phone jack ④ MIC ⑤ USB cover ⑥ Increase volume ⑦ Decrease volume ⑧ Menu ⑨ Power switch ⑩ Play next track ⑾ Play previous track ⑿ Play/Pause key 1.2 Accessories MP3 player, user manual, driver CD, USB extension cable, earphone, 1.3 Main features: 1.Li-Polymer battery 2. Continuous play time: > 10 hours 3. File format support: 3.1 Supported audio file formats: MP3 (32-320 kbps, support VBR), WMA, WMV, ASF, WAV music format warranty card AMV movie function JPEG Picture browse function 3.2 Supported text format: Support ID 3 display Support lyric display (LRC) 4. Support digital equalizer: Natural Rock Pop Classic Soft Jazz DBB ⒌ Language support: English, simplified Chinese, traditional Chinese, 17 languages in all. 6. USB port support Support USB 2.0 (full speed) Support systems: Windows 98SE/2000/ME/XP, MAC 9.2x or above. (Note: Driver installation is needed on Windows98SE) 7. FM radio Support FM radio FM recording 8. Main input/output interfaces 1.5 inch color display Keys (6 soft touch buttons, 1 power switch) Mini 5 pin USB port Built-in Mic Standard earphone jack 9. Functional description of the control keys : Power switch (physical shutdown) On/Off/Play/Pause/Stop Next track/fast forwards/Next item/FM tuning (optional) Previous track/Fast backwards/Previous item/FM tuning (optional) Increase volume Decrease volume Menu 10. Play modes: Normal mode Repeat track Play directory Repeat directory Repeat all Shuffle play Browse and play 11. If the battery is low, the LCD will display the message "Low Battery" and the player will be turned off. 1.4 Menu structure and functions: 1. Description of key functions definitions: PR - Press and release, PH - Press and hold Play: PR to start or pause music playing Play: PH to switch on, to stop playing or to shutdown the player Next: PR to skip to next track, to skip to next channel (FM, optional), to skip forward 0.1 MHZ (FM, optional), to select next menu (Menu) Next: PH to play fast forward, quick switch channels (FM, optional), forwards search (FM, optional), quick switch between the menu items (Menu) Prev: PR to skip to previous track, to skip to previous channel (FM, optional), skip backward 0.1 MHZ (FM, optional), to select previous menu (Menu) Prev: PH to play fast backward, quick switch channels (FM, optional), backwards search (FM, optional), quick switch between the menu items (Menu) Menu: PR to enter the menu of confirm the selection Menu: PH to return to the interface of playing (from all the Menu interfaces) REC: PR to set points A and B or to cancel the A-B repeat/Auto tuning (FM, optional)/Store the channel (FM, optional) REC: PH to start recording V +: PR to increase the volume by steps V+ : PH to continually increase the volume V- : PR to decrease the volume by steps V- : PH to continually decrease the volume 1.5 Basic functions 1 } Enter the menu Press the Menu key to enter into various menus. There are main menus (Entered by press and hold when in the stopped state), submenus during playing (entered by press and release) and submenus in the stopped state (entered by press and release). 2 } Browsing function ○ Select the menu item for song browsing ○ Fast forward or backward during music playing 3} Enter into different function modes Different function modes can be entered from the main menu. Main menu: (entered by press and hold the Menu key) Optional Music playing mode: Recording mode: Recording play back mode: FM mode (optional): Picture browsing: System setup: Games: USB mode when connected to a PC: 4 } Adjusting the volume Press and release the VOL- key to decrease the volume; Press and release the VOL + to increase the volume. 5 } Switch on/shutdown When in the off state, press and hold the Play key to switch on the player; When in the on state, press and hold the Play key to switch off the player; (Note that the power should be switched on) 6} Start of stop playing; Exit from submenu In music playing mode, press and release the Play key to play music. During playing, press and release the Play key to stop playing. 7 ) Record/Pause (press and release), to stop recording (press and hold) During recording, press and release the Play key to pause recording. Press and hold to stop recording. 2 Key operation 2.1 Functional definitions 1. PLAY key: On/play/stop. 2.Menu: selecting, entering. 3.REC :entering repeat mode, entering recording mode. 4.VOL +: volume increasing, fast increasing. 5.VOL -: volume decreasing, fast decreasing. 6.NEXT: next item, fast forward. 7.PREV: previous item, fast backwards. 8.USB: Mini USB jack. 9.Earphone jack: Standard earphone jack. ● Notice: There are 4 ways to press a key: Short press, long press, press and release, press and hold. In the following, key press means short press unless otherwise stated. Short press: press the key and the action will be carried out. Long press: press the key and keep it pressed for more than 1.2 seconds, the action will be carried out only once. Press and release: press the key, and the action will be carried out as soon as the key is released. Press and hold: press and hold the key, before the key is released the action will be carried out many times in definite frequency, like fast forward or fast backward. 2.2 Playing music 1} Basic operation 1. Plug the earphone into the earphone jack. 2. Press and hold the Play key will switch on the device and entering into the "Music playing mode", then short press the Play key to start playing music. 3. Music track selection: PRE key: to select the previous track Next key: to select the next track 4. Volume control: Short press the VOL - key to decrease the volume. Short press the VOL + to increase the volume. 2} Equalizer mode During music playing: Short press the Menu key to enter the Play Submenu: Press the Next key the select the "Equalizer" menu: Short press the Menu key to enter the Equalizer selection menu: Equalizer selection: The Equalizer options are listed below: Natural Rock Pop Classical Soft Jazz DBB bass Use the Next key to select the equalizer option and short press the Menu key to confirm the selection. 3} Synchronized lyric display The player support "*.LRC" lyric file format and will display the lyric synchronized when playing the music. How to use lyric files? The file name of the lyric file must be kept the same as the file name of the song. For example: The file name of the song is "butterfly.mp3" The file name of the lyric file should be: "butterfly. lrc" How to use lyric? 1. Make sure there is a matching lyric file; 2. Long press the Menu key to enter the lyric submenu; 3.Lyric display; 4. Short press the Menu key to return to music playing mode; 5.Manually browse through the lyric text: short press the VOL keys to browse forwards or backwards through the lyric text. 4} Playing AMV files For AMV music playing please refer to the procedure for music playing. Only the following keys will be effective when playing AMV music. PLAY: short press to stop playing, long press to shutdown the player; MENU: long press to enter the main menu; PRE/NEXT: previous track/next track. 5) Voice recording Make sure the power supply is sufficient when recording; The device can store up to 99 recording files under each directory. 6} Recording in the "recording mode" 1. Enter the main menu: 2. Use the Next key to select the recording mode. 3. Short press the Menu key to enter the recording mode, as shown in the following picture: 4. Short press the Play key to start recording. The recorded voice will be stored in the directory as preset in the "Recording submenu/main disk directory". If the display shows "disk full", meaning there is no space left for storing the new recording file, please delete other files to release disk space. If the display shows "directory full", meaning there are already 99 recording files under this directory, please change to another directory. During recording, only the "Play" key is effective. 7} Selecting the recording type 1. In the recording stopped status; 2. Short press the Menu key to enter the recording submenu; 3.Use the Next key to select the "recording type" submenu, short press the Menu key to enter this submenu. 4.Use the Next key to select the recording type and short press the Menu key to confirm the selection. ● Recording type: High quality record wav format, better sound quality. For long time recording act format, normal sound quality. High quality voice controlled recording wav format, (voice controlled recording, the recording will be paused when there is no sound) Long time voice controlled recording act format, (voice controlled recording, the recording will be paused when there is no sound) 5. Press Play to start recording. 2.3 Playing record files 1} Enter into the main menu; 2} Use the Next key to select "Voice mode"; 3) Short press the Menu key to enter the voice playing interface; 4} Press the Play key to start playing; 5} Select record file; PRE key: select previous record file Next key: select next record file 6} Volume control Short press the VOL- key to decrease the volume. Short press the VOL + to increase the volume. 2.4 Converting ACT record file to WAV format Records in ACT format may be converted into WAV format using the tool kit provided with the installation software. 1) Running the "Sound Converter" program, click the "Open" button 2} Select the ACT file to be converted 3) Click the "Convert" button to start the conversion. Besides the conversion function, the tool can also play WAV and MP3 format files. 2.5 Using the FM radio (Optional) When first entering the FM mode, the current channel is the channel with the lowest frequency. 1} Interface description : :Indicating the current frequency, the position will follow the change of frequency. : :The frequency scale。 : : :The frequency of the preset channel, up to 20 preset channels can be stored. :Current frequency. 2} Radio tuning 1. Enter the main menu: 2. Use the Next key to select the "FM mode" 3. Short press the Menu key to enter the "FM mode" 4Auto tuning Press and hold PRE/Next for 2 seconds, the auto tuning will search forward or backward with a step of 100 KHz and stop at a found channel; Press the PRE/Next key to stop searching. 5.Fine tuning Press PRE key: Backwards 100 KHz Press Next key: Forwards 100 KHz 6.Storing channels Short press the Menu key to enter the FM submenu And short press the Menu key again to store this channel. 7. Choosing prestored channel. If there are more channels stored, short press the Play key to select the next one. 8. Recording from FM channel. When listening to the radio, it is also possible to record the radio program at the same time. Short press the Menu key to enter the FM submenu, select high quality recording or long time recording mode to record the current radio program. Short press the Menu key to stop recording. 9. volume control. Short press the VOL- key to decrease the volume. Short press the VOL + to increase the volume. :Up to 20 preset channels can be stored in "normal frequency band" or "Japanese frequency band" :For deleting stored channels please refer to page 30 "deleting files". 2.6 JPEG picture display JPEG format pictures which are commonly found in the internet will be supported. 1} File choosing mode When entered from main menu, the file choosing mode interface as the following picture: JPEG mode - file choosing - selecting file 05.bmp If there is no files, the directory is empty. Press the Play key to display the picture Use Next/Last to select next/last file. Press the Menu key to enter submenu. The submenus are: 1. directory selection, 2. playing setup, 3. deleting files, 4. exit. When in playing mode, there are 1. manual playing, 2. 2. auto playing. When in auto playing mode, the display time can be set from 1 second to 8 second. Other keys are not effective. 2} Picture displaying mode Enter the picture displaying mode, as is shown below: Short press Next/Last key to display the next/last picture. Short press the Play key to return to file choosing mode. Long press the Menu key to return to the main menu. Other keys are not effective. 2.7 Using USB disk This play supports standard USB disk function, operating systems supported include Windows 98 (driver installation needed), Windows 2000 and above (no driver installation needed), Mac OS 10.3 and above, Linux Redhat 8.0 and above. This player can use the power supply from the USB interface and is able to function without battery. From the "waiting state", short press the Menu key to return to the main menu and select the desired working mode. This player supports the "Suspend mode". When connected to the PC, the player has 3 kinds of displaying modes: 1. waiting state 2. Data downloading 3. Data uploading 3. System setup 3.1 Entering the system setup menu System parameters can be setup here, which will be changed by firmware upgrade. 1. Enter the main menu: 2. Use the Next key to select "system setup"; 3. Short press the Menu key to enter "system setup". 3.2 Description of the Parameters (Recording time) set the date and time of recording file storage (Display setup) setup the screen brightness, darkness and black mode (Language selection) selecting different national language (Shutdown setup) setup a countdown time (minute) to shutdown the player. (Recharge setup) setup whether recharge is enabled. (Repeat playing setup) setup repeat playing (Online mode) options for the "separate space" function (Storage usage) show the memory size and storage usage (Firmware Version) display the firmware version of the player (Firmware upgrade) To upgrade the firmware (Exit) Exit the menu interface 3.3 Operation instructions 1} Set up "record time" 1.System setup interface 2.Short press the Menu key to enter the recording time interface Recording time: 3.Short press the VOL + key to set up the year (VOL - for opposite direction), the display for the year begins to flash. 4. Use the Next key to increase the value (use the PRE key to decrease the value) 5.After the right value is set, press the Menu key to exit. 2} "Language selection" Refer to "Equalizer mode" for setup procedure. 3} "Screen display setup" 1. Brightness to adjust the brightness 2. Blank screen mode (0-30) to setup a time after which the screen goes blank when no key is pressed.(Unit: second) 3. Exit "Brightness adjustment": to adjust the brightness.15 is the maximum brightness, 0 the minimum brightness. Use PRE/NEXT to move the cursor, "MEMU" key to return to the upper menu.For "Darkening mode", "Blank mode" adjustment please refer to "Brightness setup". 4} "Shutdown setup" "Saving mode": To setup a time (second) after which the player will be shutdown when no key is pressed; A value of 0 will disable this function. "Sleeping mode": To setup a time after which the player will be shutdown from any running mode when no key is pressed, this function is used for listening to music before going asleep.Note: The sleeping mode will only be effective one time after setup and the time set will be cancelled after shutdown. The time will need to be set again for next usage. 5) "Recharging setup" Refer to "Equalizer mode" for setup procedure. 6} "Repeat playing setup" Refer to "Equalizer mode" for setup procedure. "Manual mode" means there is no automatical break at ends of passages when repeating for A to B, it is necessary to manually set the breakpoints. "Auto mode" means there is automatical breaks at ends of sentences. (When playing back English text without music) 7} "Contrast Adjustment" Please refer to "Shutdown setup" for the operation procedure. 8} "Online mode" Refer to "Equalizer mode" for setup procedure. Some operating systems (prior to Windows 2K SP4) don't support a USB disk with 2 disk symbol names, therefor when using the "Separate Space" function, it is necessary to select the disk to be connected after connecting with a PC. 9} "Storage usage" The number indicates the total capacity of the disk, the percentage indicates the space used. 10} "Firmware version" Display the currently installed firmware version. 11} "Firmware upgrade" Interface for upgrading the firmware. When upgrading the firmware, first enter into this interface. Tip: short press the Menu key to setup the parameter, then short press the Play key to quickly exit the menu. The Play key as a quick exit is effective for all menus. 3.4 Other settings 1} Select different directories (Stop submenu) The user can store different files into different directories (the directories should be pre-established in the PC) for easy management. This player supports up to 9 first level sub-directories. 1. In the Stop interface.(This example is in music mode, directory selection is also possible in recording and play back modes) 2. Press the Menu key to enter into the Stop submenu 3. Press the Menu key to enter into the directory selection interface 4. Press the Next or PRE key to select the directory 5. Press the Menu key to confirm the selection Note: different corresponding directories can be set for music mode, recording mode and playback mode. That is, each mode may have a different directory. 2} Deleting files (Stop submenu) Corresponding files and stored channels can be deleted under music mode, playback mode and FM mode. 1. In the Stop interface.(There is no Stop interface under FM mode(optional)) 2. Short press the Menu key to enter into the Stop submenu 3.Use the Next or PRE key to select "File deletion" from the menu items. 4.Short press the Menu key to enter the Deletion interface 5.Select the file to be deleted and short press the MENU key to enter the interface: 6. Use the Next or PRE key the select "File deletion" and short press the MENU key to confirm. "Delete all" will delete all corresponding files for the current mode (i.e., under music mode, all music files will be deleted but the recording files will not be deleted). For FM mode (optional), the deletion interface is simpler and only consists of three steps.The pre-stored channels will be deleted here. When deleting files from the PC it is necessary to first savely remove the USB device before pluging out the USB cable, otherwise it is possible that the files may not be completely deleted. 3} Playing mode (Playing submenu) When playing music and recording files, different playback modes can be selected (like repeating or shuffle replay) The first item in the Playback menu is the "Playback mode", if selected and confirmed, the playing will start according to the preset mode. ○ Repeat (Normal mode) After playing of all files in the current directory is completed, the playing of the files in the next directory will be followed, and so on. After all files are played, the player will stop. (Repeat One) Repeatedly play a single music file (Folder) Play all files within the directory (Repeat Folder) Repeatedly play all files within the directory (Repeat All) Repeatedly play all music files ○ (Shuffle) (Random) Play files in the current directory in random order ○ (INTRO) (Intro) Play the first 10 seconds of all files in the current directory. 4} Playback speed (Playing submenu) When playing music (only effective for MP3 files), it is possible to select different playback speed (faster or slower). 1. During music playing; Short 2.press the Menu key to enter the Play Submenu: 3.Use the Next key to select the "Playback speed" menu item; 4. Short press the Menu key to enter the "Playback speed" interface; 5.Use the Next key to increase the speed, use the PRE key to decrease the speed. Note: the change of speed will be stored with the corresponding music file untill next change is made. 5} Repeat play mode (Playing submenu) ■ The operation is described below. ■ Enter from the Playing submenu: ○ A-B repeat 1. During music or record playing; 2. Short press the Menu key to enter the Play Submenu: 3. Use the Next key to select the "Repeat Mode" menu item; 4. Short press the Menu key to enter the "Repeat Mode". Repeat mode: In the icon for Repeat "A-B", the "A" is flashing awaiting for the start point A to be confirmed. 5. Use the Next key to confirm the starting point A; The "B" in the icon "A-B" begins to flash, awaiting for the end point B to be confirmed. 6. Use the Next key to confirm the point B. The flashing in the "A-B" icon stops. The repeat play between points A and B begins, after the preset repeating time the repeat mode exits; When in the repeating mode, short press the PRE key to set a new starting point A. (The setup of the repeating time is described below in section "Repeating Time") When in the repeating mode, directly use the VOL + or VOL - key to setup "Playing speed". 3.5 Separated Space Function The disk space can divided into two parts by using the tools provided with the player. The user will have two disk partitions shown in the PC. For Windows 2K, SP4 will need to be installed, otherwise only one partition can be seen. To use the other partition, it is necessary to select the "single normal disk" or "single encrypted disk" in the "System setup/Online mode" menu.Among the two partitions, one can be encrypted and hidden so that access will only be possible with a password. (If not encrypted, the user will have tow partitions available for usage.) 1} Connect the player with the PC. 2) Run the MP3 Player Disk Tool provided with the player installation tool kit. 3) In the formating tool which is shown up first, select "Partition and Encryption", select a suitable capacity for the encrypted partition, check select the option for user name and password, in the "New user name" field, input the user name, in the "New password" field, input the password, in the "Confirm new password" field, input the same password, click "Start" to start the partition process. 4} The partition process is completed, as shown below 5) Press "OK" and confirm to reboot the PC. 6)After the reboot two new disk partitions can be seen on the PC (Windows prior to Windows 2K SP4 will only have one ), click open the encrypted disk (the second one), there are three files in it, two are hidden files and the other is a executable file, the disk space is only 300 k. 7} Run the executable file "RdiskDecrypt.exe", in the dialog, input user name and password, if they are correct, the disk can be opened and files can be copied into it. 8) Everytime when connected to a PC, user name and password are required to open the encrypted disk. Note: dividing the disk into two partitions will cause all files on it to be deleted, please backup the files before proceeding.Also combining the partitions will delete all files on it. Warning: don't lose the user name and password or the encrypted disk can not be used anymore.The only way in such case is to combine the partitions to delete the encrypted disk, but the encrypted files will be lost. 4. Technical specification Physical dimension 63.8x42x13mm Weight 32g Display 1.5 inch color screen PC connection interface full speed USB 2.0 Memory Flash: memory 32 MB to 1 GB Power supply Play time > 10 hours Record sampling rate 8 KHz Recording format WAV (32 K bps), ACT (8 K bps) Recording time 35 hours (ACT, 128 M Flash) Max output by MP3, WMA, WMV, ASF (L) 5 mW + (R) 5 mW (32 Ohm) MP3 bit rate 8 K bps - 320 K bps WMA , WMV , ASF bit rate 5Kbps -384Kbps Frequency response 20 Hz to 20 KHz Signal Noise Ratio 85dB Distortion ≥ 0.01% - 0.1% FM frequency range 76 MHz - 96 MHz / 87 MHz - 108 MHz Preset channels 20/20 Headphone maximum output (L)5mW +(R)5mW (32Ohm ) Signal Noise Ratio 45 dB Music format MP 3, WMA , WMV , ASF , WAV Usage temperature -5 to 40 degree centigrade Languages English, simplified Chinese, traditional Chinese, 17 languages in all. Operating System supported Windows 98/SE /ME /2K/XP , Mac OS 10, Linux 2.4.2 Pictures shown in the specification may differ from the UI in the product 5 Q and A Q: The player will not start after long pressing the "Play/Stop" key? ◆ Battery is low, try again after recharging; ◆ "Power" switch should be on the "ON" position. Q: No sound in the playing mode? ◆ There is no music file in the player; ◆ The volume is too low, long press the "VOL +/Next" key to increase the volume; ◆ The Headphone is not correctly inserted. Q: No USB device shows up on the PC after connected? ◆ USB cable is not correctly connected; ◆ The PC does not support USB device; ◆ Under Windows 98, driver installation is needed. Q: PC can not function normally after the player is connected? ◆ Files are still being transferred when the player is disconnected. Don't disconnect the player while files are being transferred and the red indicating lamp is flashing; ◆ Note: Plug out the MP3 player abnormally may cause the data in the player to be damaged. Q: The player will suddenly hang up or shutdown in playing mode? ◆ Battery is low, try again after recharging; ◆ Faulty operation, switch off with the "Power" switch and switch on again.