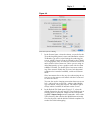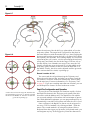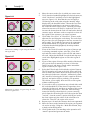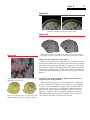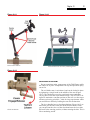
1
User Manual version 1.7.9 Your Serial Number is: Rogue Research Inc. 4398 Boul. St. Laurent, #206 Montreal, QC H2W 1Z5 Phone: +1 (514) 284-3888 Toll Free (North America) 866-984-3888 Fax: (514) 284-6750 E-mail: [email protected] User Manual version 1.7 Technical support: Rogue Research will provide one year (from the date of the invoice) unlimited e-mail support for Brainsight-related problems. Rogue Research will provide software upgrades (software improvements and/or bug fixes) by disk media (CD ROM) and by Internet and FTP transfer whenever possible. Rogue Research will provide one year support (parts and labour) for manufacturer defects. Brainsight™ is a trademark of Rogue Research, Inc. Polaris® and Vicra™ are registered trademarks of Northern Digital, Inc. Macintosh®, Mac OS® and QuickTime ® are registered trademarks of Apple Computer, Inc. Intel® is a registered trademark of Intel Corporation or its subsidiaries in the United States and other countries. Velcro ® is a registered trademark of Velcro Industries B.V. X-keys is a trademark of P.I. Engineering, Inc. X-Acto is a registered trademark of Elmer’s products Inc. Rogue Research Inc. 4398 Boul. St. Laurent, #206 Montreal, QC H2W 1Z5 Telephone: +1 (514) 284-3888 Toll Free (North America): 866-984-38888 Fax: +1 (514) 284-6750 http://www.rogue-research.com Version 1.7 Brainsight image analysis and Neuronavigation software. © 2001–2007. Our products are: Brainsight™ Brainsight™ TMS Brainsight™ Primate Contents Legal: Terms and Conditions_________________ xi End-User Software License Agreement....................... xi License........................................................................ xi Permitted Uses and Restrictions.................................. xi Copyright..................................................................... xii Transfer........................................................................ xii Safety........................................................................... xiii Declaration of Conformity............................................ xiii Manufacturer............................................................ xiii Authorized European Representative...................... xiii European Distributor................................................ xiii Chapter 1: Overview________________________ 1 How This Document is Organized................................ 1 Operating System Environment................................... 1 Concepts of Frameless Stereotaxy.............................. 1 Subject–Image Registration . .................................. 2 Brainsight Terms.......................................................... 2 Hardware Terms...................................................... 2 polaris optical position sensor................................ 2 tracker. ..................................................................2 tools.......................................................................3 Software Terms........................................................ 3 tool calibration file................................................. 3 tracker characterization file (“rom” file)................. 3 polaris control window........................................... 4 What’s New: List of Upgrades...................................... 4 Automatic Update Notification.................................. 4 Friendlier Preferences and Tool Control Panes........ 4 Data Groups Window Information Pane................... 5 File->New/Reset Project menu ............................... 5 vi Brainsight 1.7 Segmentation Tool................................................... 5 Task Assistant for Talairach registration................... 5 Annotations.............................................................. 5 Convert to Markers.................................................. 5 New LabJack DAQ Trigger Input Support................ 6 Chapter 2: Installing Brainsight______________ 7 Install and Connect the Hardware................................ 7 Polaris....................................................................7 Poalris Vicra. ......................................................... 8 Install Brainsight.......................................................... 8 installing brainsight software. ................................ 8 Brainsight First Run..................................................... 10 setting preferences................................................. 10 Chapter 3: Planning a new TMS study_________ 13 Arrange the Setup........................................................ 13 determining the camera location.............................. 13 choosing the subject tracker.................................. 14 Configure the Coil for Use............................................ 15 Attach the Coil Tracker............................................. 15 attaching the coil tracker....................................... 15 Calibrate the TMS Coil............................................. 16 following the calibrate coil task assistant. ............. 16 Prepare the Brainsight Environment............................. 19 Chapter 4: Transfer Images to the Brainsight Computer________________________________ 21 Prepare the Brainsight Images Folder.......................... 21 Direct DICOM Transfer................................................. 21 File Transfer Protocol................................................... 22 using ftp to transfer files....................................... 22 using the finder for ftp........................................... 22 Copy Files from an External Disk................................. 22 About Storage Media............................................... 23 Contents vii copying files to the brainsight computer. ................ 23 Chapter 5: Preparing a Brainsight Project_ ____ 25 Reload a Project.......................................................... 25 Brainsight 1.5 (or Earlier) Projects............................ 26 Creating a New Project................................................ 27 loading anatomical images........................................ 28 Functional Images................................................... 28 overlaying functional images. .................................. 28 Save the Project........................................................... 29 Prepare the Project for the Study................................. 30 Perform a 3D Reconstruction.................................. 30 creating a curvilinear reconstruction..................... 30 Add a Skin Segmentation ....................................... 31 creating a skin segmentation.................................... 31 Select Landmarks and Targets................................ 33 Quit the Project............................................................ 34 Chapter 6: Perform the Study________________ 35 Register Subject to Images.......................................... 35 using the registration task assistant. ...................... 35 Position the Coil........................................................... 38 Using a Trajectory to place the coil.............................. 39 Record Location of Coil................................................ 40 Rapid Fire Configuration and Operation.................. 40 using rapid fire with the coil.................................... 41 Save the Project........................................................... 41 Export Images and Movies.......................................... 41 Chapter 7: Software Reference_ ______________ 43 Menus.......................................................................... 43 Brainsight................................................................. 43 File........................................................................... 43 Edit.......................................................................... 44 viii Brainsight 1.7 Window.................................................................... 44 Help......................................................................... 44 Data Groups Window................................................... 44 Polaris Control Window................................................ 45 Tracking................................................................... 46 Reference Frame..................................................... 46 Tools List and Controls............................................ 46 Calibration File......................................................... 46 Tracker ROM File..................................................... 46 Status...................................................................... 46 Position Camera...................................................... 47 Precision Test.......................................................... 47 Volume View Window.................................................. 48 Image Controls........................................................ 49 threshold controls................................................. 49 zoom control. ......................................................... 49 layout selector.......................................................49 Image View Pane..................................................... 49 export view to file................................................... 49 export view to quicktime movie................................. 50 print view . ..............................................................50 2D Mode.................................................................. 50 2d image view .......................................................... 50 view selection..........................................................50 3D Mode.................................................................. 51 3d image view........................................................... 51 camera zoom............................................................ 51 translate objects.................................................... 51 rotate objects.........................................................51 3d cursor ...............................................................52 3d object selection. ................................................ 52 orientation selection .............................................. 53 Advanced Procedures.................................................. 53 Importing Target Coordinates.................................. 53 Using Electrode Recording...................................... 55 Contents ix using electrode recording for locator. .................. 55 Converting To MNI/Talairach Coordinate Space ..... 56 Errors and Troubleshooting.......................................... 58 Chapter 8: Tools and Controls________________ 61 Cursor Tool ................................................................. 61 General Description................................................. 61 Control Pane Description......................................... 61 Typical Usage Notes................................................ 62 Ruler Tool ................................................................... 63 General Description................................................. 63 Control Pane Description......................................... 63 Typical Usage Notes................................................ 63 Marker Tool.................................................................. 63 General Description................................................. 63 Control Pane Description......................................... 63 Typical Usage Notes................................................ 64 Trajectory Tool............................................................. 65 General Description................................................. 65 Control Pane Description......................................... 65 Typical Usage Notes................................................ 66 Segmentation Tool....................................................... 66 General Description................................................. 66 Control Pane Description......................................... 67 Manual Segmentation Controls............................... 68 Fast Skin Controls................................................. 69 Typical Usage Notes................................................ 69 Fast Skin Segmentation........................................... 69 Manual Segmentation. ............................................. 69 Curvilinear Tool............................................................ 71 General Description................................................. 71 Control Pane Description......................................... 71 Typical Usage Notes................................................ 72 Grid Targeting Tool....................................................... 74 General Description................................................. 74 x Brainsight 1.7 Control Pane Description......................................... 75 Typical Usage Notes:.............................................. 75 Detailed Steps. ...................................................... 75 Chapter 9: Hardware Reference______________ 81 Hardware Components................................................ 81 Tool Box................................................................... 81 Calibration Block...................................................... 81 Pointer..................................................................... 81 Coil Tracker ............................................................ 82 Subject Tracker........................................................ 82 Reflector Spheres.................................................... 83 replacing tracking spheres...................................... 83 X-keys Switch.......................................................... 83 connecting the x-keys switch................................... 84 LabJack Interface.................................................... 85 Maintenance................................................................ 85 Polaris Optical Position Sensor................................ 85 Tracker Spheres....................................................... 85 Trackers and Tools................................................... 85 Head Strap.............................................................. 85 Tracker Glasses....................................................... 85 Subject Head Holder................................................ 85 Forehead Rest and Coil Holder Articulated Arm...... 85 Chapter 10: TMS Frame Assembly____________ 87 Assembling The “A” Frame (Second Generation Frame) 87 Using The Frame For Subjects Sitting Up................ 90 repositioning the tms frame..................................... 91 Setting Up the TMS Chair/Coil Holder (Third Generation System)............................................................. 92 Assembly.................................................................92 Operating The Chair................................................ 96 Index_____________________________________ 97 Feedback__________________________________ 101 Legal: Terms and Conditions End-User Software License Agreement Please read this Software License Agreement carefully before using the Software. By using the Software, you are agreeing to be bound by the terms of this license. If you do not agree to the terms of this license, promptly return the Software to Rogue Research Inc. ROGUE RESEARCH INC. AND ITS SUPPLIERS DO NOT AND CANNOT WARRANT THE PERFORMANCE OR RESULTS YOU MAY OBTAIN BY USING THE SOFTWARE OR DOCUMENTATION. ROGUE RESEARCH AND ITS SUPPLIERS MAKE NO WARRANTIES, EXPRESSED OR IMPLIED, AS TO NON INFRINGEMENT OF THIRD PARTY RIGHTS, MERCHANTABILITY, OR FITNESS FOR ANY PARTICULAR PURPOSE. ANY LIABILITY DUE TO FAILURE OF BRAINSIGHT WITHIN THE ONE (1) YEAR WARRANTY PERIOD SHALL BE LIMITED TO REPLACEMENT OF THE SOFTWARE AND/OR THE REPAIR OF BRAINSIGHT EQUIPMENT. IN NO EVENT WILL ROGUE RESEARCH OR ITS SUPPLIERS BE LIABLE TO YOU FOR ANY CONSEQUENTIAL, INCIDENTAL OR SPECIAL DAMAGES, INCLUDING ANY LOST PROFITS OR LOST SAVINGS, EVEN IF A ROGUE RESEARCH REPRESENTATIVE HAS BEEN ADVISED OF THE POSSIBILITY OF SUCH DAMAGES, OR FOR ANY CLAIM BY ANY THIRD PARTY. BRAINSIGHT IS A RESEARCH APPLICATION, AND HAS NOT BEEN APPROVED FOR ANY APPLICATION BY ANY MEDICAL AUTHORITY. IT IS THE RESPONSIBILITY OF THE END-USER TO ENSURE THAT BRAINSIGHT IS USED IN ACCORDANCE ANY APPLICABLE LAWS. License The Software accompanying this License, whether on compact disc or any other media, the related documentation and other materials (collectively, “Brainsight Software”) are licensed, not sold, to you by Rogue Research Inc. The Brainsight Software in this package and any copies which this agreement authorizes you to make are subject to this License. The Brainsight Software accompanying this License may include various “shareware” and other commercial Software whose use is governed exclusively by the terms of their respective End User License agreements. Permitted Uses and Restrictions This License allows you to use this version of Brainsight Software in the following manner. You may: • Install the Software in a single location on a hard disk or other storage device of one (1) computer (“Permitted Number of Computers”). xii Brainsight 1.7 • • • Provided the Software is configured for network use, install and use the Software on a single file server for use on a single local area network for either (but not both) of the following purposes: —Permanent installation onto a hard disk or other storage device of up to the Permitted Number of Computers; or —Use of the Software over such a network, provided the number of users does not exceed the number of licenses. For example, if there are 100 computers connected to the server, but the Software will be used on 25 different computers at various times, the Permitted Number of Computers for which you need a license is 25. You may use Brainsight or Brainsight for investigational use. You may not use Brainsight for therapeutic applications or surgery guidance. Copyright The Software is owned by Rogue Research and its suppliers, and its structure, organization and code are the valuable trade secrets of Rogue Research and its suppliers. The Software is also protected by Canadian Copyright Law and International Treaty provisions. You must treat the Software just as you would any other copyrighted material, such as a book. You may not copy the Software or the Documentation, except as set forth in the “Permitted Uses and Restrictions” section. Any copies that you are permitted to make pursuant to this Agreement must contain the same copyright and other proprietary notices that appear on or in the Software. You agree not to modify, adapt, translate, reverse engineer, decompile, disassemble or otherwise attempt to discover the source code of the Software. Trademarks shall be used in accordance with accepted trademark practice, including identification of trademark owner’s name. Trademarks can only be used to identify printed output produced by the Software. Such use of any trademark does not give you any rights of ownership in that trademark. Except as stated above, this Agreement does not grant you any intellectual property rights in the Software. Transfer You may not rent, lease, sublicense, or lend the Software or Documentation. You may, however, transfer all your rights to use the Software to another person or legal entity provided that you transfer this Agreement, the Software, including all copies, updates and prior versions, and all Documentation to such person or entity and that you retain no copies, including copies stored on a computer. Brainsight is a trademark of Rogue Research, which may be registered in certain jurisdictions. All other trademarks are property of their owners. Legal xiii Safety Never look away from the subject while you are using the pointer tool. Use both hands to steady the pointer as you register the landmarks. For this reason, you should have an assistant interact with Brainsight while you register the subject. Do not reposition major components of the TMS Frame while the subject is in place. Components can slip and personal injury can occur. Always connect the power cable to the Polaris optical position sensor while its power switch is OFF. Failure to do so may cause serious damage to the Polaris camera. If you use a coil clamp with the TMS Frame, be careful not to over-tighten it, as the coil handle can be damaged due to clamp pressure. Declaration of Conformity Manufacturer Rogue Research Inc. 206-4398 boul. St-Laurent, Montreal, Quebec, H2W 1Z5 Canada Product: Brainsight TMS We herewith declare that the above-mentioned product complies with the EC Directive No. 93/42/EEC concerning Class I Medical Devices, in conformance with Annex IV and Annex VII. Montreal, Canada Roch M. Comeau, Ph.D. Authorized European Representative The Magstim Company Spring Gardens, Whitland SA34 0HR United Kingdom +44 (0)1994 240798 www.magstim.com European Distributor The Magstim Company Spring Gardens, Whitland SA34 0HR United Kingdom +44 (0)1994 240798 www.magstim.com xiv Brainsight 1.7 The following applies to the software library supplied with the LabJack D/A board used for TTL triggering: -----------------Copyright (c) 2001-2008 LabJack Corporation Permission is hereby granted, free of charge, to any person obtaining a copy of this software and associated documentation files (the “Software”), to deal in the Software without restriction, including without limitation the rights to use, copy, modify, merge, publish, distribute, sublicense, and/or sell copies of the Software, and to permit persons to whom the Software is furnished to do so, subject to the following conditions: The above copyright notice and this permission notice shall be included in all copies or substantial portions of the Software. THE SOFTWARE IS PROVIDED “AS IS”, WITHOUT WARRANTY OF ANY KIND, EXPRESS OR IMPLIED, INCLUDING BUT NOT LIMITED TO THE WARRANTIES OF MERCHANTABILITY, FITNESS FOR A PARTICULAR PURPOSE AND NON INFRINGEMENT. IN NO EVENT SHALL THE AUTHORS OR COPYRIGHT HOLDERS BE LIABLE FOR ANY CLAIM, DAMAGES OR OTHER LIABILITY, WHETHER IN AN ACTION OF CONTRACT, TORT OR OTHERWISE, ARISING FROM, OUT OF OR IN CONNECTION WITH THE SOFTWARE OR THE USE OR OTHER DEALINGS IN THE SOFTWARE. ------------------ Chapter 1: Overview W elcome to Brainsight™ TMS version 1.7 (v1.7). This software, in addition to being written to support both the PowerPC and Intel® -based Macintosh computers, contains several new features and enhancements over the previous version. We hope you find the enhancements useful, and we look forward to your feedback, as solicited at the end of the manual. —The Rogue Research development team. How This Document is Organized This chapter gives a brief description of terms to prepare the new user for subsequent sections. It also describes software enhancements since v1.5. Red text in the content of this manual is text that is hyperlinked in the PDF version, available from the Help-> View User Manual menu. Operating System Environment Brainsight requires Mac OS X v10.3.9 or higher; we recommend v10.5 in order to enjoy all of Brainsight’s functionality. We assume you are familiar with Mac OS X. We no longer support Mac OS 9. If you are new to the Macintosh, it would be an excellent investment of your time to take an hour or so right now to go over the Macintosh introduction tutorials. A little time now will save you a lot of effort later. Remember that the Command key has a z symbol on it. For meanings of terms specific to Macintosh descriptions and usage (for example, shift-click), access Mac Help by the Help menu in the Finder. Concepts of Frameless Stereotaxy There are many aspects of TMS that are the subject of ongoing innovation. These include the following: • Focality of the coil • Power and frequency output of the coil • Techniques to improve accuracy and consistency of coil placement In many neuroscience applications of TMS, one stimulates a small set of selected neurons to observe their functional significance. Accurate coil placement is necessary, however, it is difficult to know the exact brain tissue that receives stimulation given the location of the coil on the subject’s scalp. Brainsight TMS displays the location and orientation of the TMS coil in real time on the magnetic resonance images (MRI) of the subject. You can use this display to guide the placement of the coil directly over your desired stimulation site. This new way of coil positioning is called Image-Guided TMS. 2 Brainsight 1.7 Subject–Image Registration Registering the subject means performing a calibration that determines the spatial relationship between the image data and the subject during the experiment. Registration is accomplished by selecting a series of common points on both the image data (with the computer mouse) and the subject (with the pointer tool). These points are referred to as homologous point pairs. These homologous point pairs are used by Brainsight to calculate the spatial transformation from the subject’s head to his or her image data. This transformation, in turn, is used to map the position of tools in three-dimensional space to the image space for display. Figure 1‑1 Brainsight Terms This guide frequently refers to the items defined hereafter. Hardware Terms In addition to the Macintosh computer running the software, the following hardware components are integral to the Brainsight product. polaris optical position sensor A B A: The top image shows proper tracker orientation so that it faces the camera. The lower illustration shows that in the Polaris’ view, all the spheres are clearly visible and do not interfere with each other. B: Poor tracker orientation results in the camera not having a good view of all the spheres. In the lower illustration, the camera cannot see all the spheres clearly, and thus would not be able to track the subject. Figure 1‑2 Coil tracker The Polaris® optical position sensor contains two infrared cameras, emitters, and associated electronics. It plugs into a power supply, and connects to the Brainsight computer by a serial cable. It monitors the space in front of the lenses for trackers (see “Arrange the Setup” on page 13). The spherical ref lectors on the trackers require a signal emission in order to ref lect their positions to the camera. tracker A tracker is an object that has ref lectors in a pattern recognizable by the Polaris. Each tracker has a unique tool characterization file (“ROM” file) that describes the tracker ref lector pattern to the Polaris. The orientation of the tracker with respect to the Polaris is important both for accuracy and for consistent tracking. See Figure 1‑1 for examples of proper and poor tracker orientation. Trackers can be attached to various tools (for example, the coil tracker, as shown in Figure 1‑2, which is attached by a coil ring) or tools can have trackers built into them (for example, the pointer tool, as shown in Figure 1‑3). The subject tracker is a tracker attached to the subject’s head or head holder to monitor the position of the subject’s head. Chapter 1 3 Figure 1‑3 Pointer tool tools A tool is an object whose position and orientation is monitored (or tracked) by the Polaris. There are two tools that are commonly used with Brainsight: the pointer and the coil tool. In this text, referring to a tool usually means referring to a tool and tracker pair (that is, “coil tool” refers to a tracked TMS coil). The tool is tracked by either designing it with a tracker built into it (such as the pointer) or has a tracker attached to it (such as the TMS coil). The position reported is the location of a point defined as the tool’s origin. In the case of the pointer, the origin is the tip of the pointer. The tool’s orientation is the orientation of a prominent axis of the tool. Again, in the case of a pointer, the orientation axis is the orientation of the pointer’s shaft. In the case of a coil tool, the orientation is the axis of the magnetic field of the TMS coil. Refer to Chapter 8 for a discussion of software tools. Software Terms The software is described in detail in Chapter 7, “Software Reference”. However, the following items are described here, as they are necessary components to calibrate your Brainsight installation. tool calibration file Brainsight requires a tool calibration file to relate the tool to its associated tracker (for example, a coil tracker attached to TMS coil). The pointer and the subject tracker come with their own calibration files, while calibration files for the TMS coil tool are created when it is calibrated by the user (refer to “Calibrate the TMS Coil” on page 16). tracker characterization file (“rom” file) The Polaris needs to recognize the expected dimensions of a tracker in order for it to track it. This information is kept in a description file and can be recognized by the .ROM extension. Each tracker comes with a ROM file, whose file name usually matches the serial or part number of the tracker itself. 4 Brainsight 1.7 polaris control window When the Polaris is connected to the computer, you can control its functions within Brainsight using the Polaris Control window. Among other things, it enables you to configure the tools and trackers you are using, as well as start and stop tracking. This will be covered in more depth in “Polaris Control Window” on page 45. What’s New: List of Upgrades The Brainsight features in this section are new or have been upgraded in v1.7. Automatic Update Notification If your Brainsight computer connects to the Internet, you can now check for product updates through the Preferences window, or set the time frame for automatic updates. If, at Brainsight start-up, a new version is found, the following dialog appears: Figure 1-4 Update dialog If you check for the product update and your version is up-todate, the following dialog appears: Figure 1-5 No update required Friendlier Preferences and Tool Control Panes The default values given to various preferences are more useful. The control panes for various tools are cleaner, more efficient, and in some cases are more powerful, allowing you greater options in controlling your data (for example, for both selecting and removing a subject registration file from a project). Chapter 1 5 Data Groups Window Information Pane This pane indicates the number of markers, trajectories, surfaces, and registrations associated with an image data set, as viewed when an image set is selected in the Image Data list. This describes a fundamental change in how Brainsight stores its data. In previous versions, data including markers, trajectories, and curvilinear surfaces were kept as part of the View window. Closing the window deleted the associated data. This is no longer the case and all data is associated with the image data as shown in the Data Groups window. Opening a second window, for example, will inherit any markers, trajectories, and so on, that were created in a different window. Closing all Volume View windows will not delete associated data. To close a project, quit Brainsight (Command-Q) or use File-> Reset Project (Command-N), as discussed in the next section. File->New/Reset Project menu This menu item clears the current project from Brainsight’s memory, essentially creating a new project. If the current unsaved project has any data in it, this command also prompts you to save it before it is cleared. Segmentation Tool This is not a new tool. It has been a work-in-progress since v1.0. It can be used to segment structures of interest and create a 3D mesh for viewing in a 3D image view pane in order to simplify their identification. Skin can be segmented to ease subjectimage registration. See Chapter 5, “Add a Skin Segmentation” on page 31 for more information. Task Assistant for Talairach registration This assistant is available through the Data Groups window. It allows you to co-register the subject’s MRI to MNI/Talairach coordinate space. This allows you to easily use Talairach coordinate targets for stimulation, or determine Talairach coordinates on any marker recorded during a study session. Brainsight requires you to first set the default Talairach template file in the preferences. This file is provided with the software. Annotations Annotations from v1.5 of Brainsight are now specifically called markers in v1.7, and the Annotation tool is now called the Marker tool. Annotation is now a general term for both markers and trajectories. Convert to Markers This new function of the Trajectory tool takes the trajectories and projects them a user-defined distance into the brain. You can access this tool from the Trajectories tool control panel. 6 Brainsight 1.7 New LabJack DAQ Trigger Input Support As of v1.7.7, Brainsight now supports a new TTL and switch based trigger method for the rapid-fire annotations and trajectories. The LabJack Chapter 2: Installing Brainsight Figure 2‑1 T his chapter is for primarily for new users installing Brainsight™ TMS and its associated hardware for the first time (for assembling the TMS Frame and a description of hardware components and their care, refer to Chapter 9 and Chapter 10). It also applies to users who have recently upgraded from Mac OS 9 to the required Mac OS X operating system. Upgrading from a previous version of Brainsight has no special steps or considerations; it is like a new installation, as described in this chapter. For meanings of terms specific to using the Macintosh (for example, shift-click), access Mac Help by the Help menu in the Finder. We assume you are familiar with Mac OS X. Install and Connect the Hardware If you already use a previous version of Brainsight and you are upgrading, you already have all the required hardware. Skip to the next section, “Install Brainsight” on page 8. The hardware required for using Brainsight TMS is the following: • the Macintosh computer • the Polaris or Polaris Vicra optical position sensor • the transcranial magnetic stimulator (TMS) coil Connection hook ups between Macintosh computer and Polaris. It is important to always connect the power cable to the Polaris while the power is off. Failure to do so can cause serious damage to the Polaris. Figure 2‑2 Brainsight TMS optionally comes with a TMS Frame, which is not required in order for the system to function. It assists in stabilizing the subject and experimental apparatus during the course of the study. Its assembly instructions are in Chapter 10, “TMS Frame Assembly” on page 87. Polaris The Polaris has two connections (refer to Figure 2‑1). One is to the power supply, and the second is a serial port (for the USB– serial adapter to the Brainsight computer). First connect the power supply, and then the serial port. The camera has two different serial port connections: an RS-232 connection and an RS-422 connection. Use the RS-232, and ensure that the selector switch between the two ports is set to RS-232. For more information, see the Polaris System Guide. Connect the Macintosh end of the Polaris serial cable to the serial port on the USB–serial adapter (Figure 2‑2). Connect the USB end of the USB–serial adapter to the USB port on the Mac, and connect the serial cable to the serial port on the Polaris. Review the documentation of the USB–serial adapter to ensure that the correct driver software has been installed and is properly configured. USB–Serial adapter After all the connections are made, power up the Polaris. Use the On-Off switch on the Polaris box. (This is on the back panel 8 Brainsight 1.7 Do not use a USB port on the keyboard as it may not provide enough power to the adapter, such that intermittent problems may occur. Figure 2-3 of the cart if you have the turnkey system. The main power switch of the cart must be On.) Poalris Vicra Before connecting the Vicra for the first time, run the Vicra driver installer found on the Brainsight CD (or disk image) described in the next section. The driver should be named “Polaris Vicra FTDI USB Serial Driver” or something similar. The Vicra has one cable conected to it which provides both communications and power (Figure 2-3). At the other end, a small dongle has a USB connector to connect to the Macintosh computer and a power connector to connect to the included power supply. Note that the dongle contains a USB-Serial adapter similar to that used with a standard Polaris so when the manual refers to a USB serial adapter, it also refers to the dongle. Connect one end of the cable to the Vicra. Connect the USB cable to the dongle at one end, and to a USB port on the computer (or powered USB hub connected to the computer) at the other end. Do not connect it to a USB port on the keyboard as this will yield an unreliable connection. Connect the power supply to a power outlet, and the other end to the dongle. Note that the power supply does not have a switch, so the Vicra should power up at this point. After a few seconds, you should hear the Polaris’ characteristic beep sequence. This indicates that the Polaris has successfully reset itself and is ready for use (warm-up time notwithstanding). If you do not hear that sound, refer to the Polaris System Guide for more information. Figure 2-3: Polaris Vicra wiring diagram. Turn on the Mac by pressing the power button on the Macintosh computer. In the case of the cart-based system, you will have to open the rear door to access the power button. Turn the two thumb screws at the top of the door one-quarter turn counter-clockwise, then tip the door towards you and lift it off the guides. Install Brainsight You must have Administrator privileges to install software on your Macintosh. installing brainsight software 1. 2. Log in to your Macintosh user account. Do either of: a) Insert the CD into the optical drive. If you are using a tray-loading (not slot-loading) CD drive, and it does not have an open button, use the eject key on the keyboard number pad. -orb) Double-click the downloaded .dmg file to mount the disk image. See Figure 2-4. Chapter 2 If you have multiple Brainsight users on this Macintosh, keep in mind that the application preferences can be changed by each user, and the changes affect every user account. There are no user-specific preferences. 9 Figure 2-4 Figure 2-5 Mounted disk image 3. Typical Braisight folder structure. In the Applications folder of your hard disk, navigate to or create a folder called Brainsight. 4. Open the CD or disk image and read the installation instructions. 5. Optional: Install the Smart Crash Reports application. This will enable you to send a crash report directly to Rogue Research if, for any reason, Brainsight crashes. This may allow us to reproduce the problem and provide faster updates. 6. Open the Brainsight folder, if there is one. 7. Drag the Brainsight TMS application file and the Talairach template folder into the Brainsight folder you created or opened in step 3. The folder/file structure of your Brainsight installation should resemble that of Figure 2-5. 8. If this is a new installation, drag the Tools folder into the Brainsight folder as well. Do not do this for an upgrade. You will delete any pre-existing coil calibrations if you do. 9. If this is an upgrade from an older version of Brainsight, delete the “Brainsight Frameless” application as we have changed the name of the application to Brainsight TMS. 10. If this is an upgrade from an earlier version of Brainsight Frameless, please note that you no longer need the files “Figure8Box.3dmf:, “Sphere.3dmf ” or “TrajectoryStick.3dmf ”. Feel free to delete them from the Tools folder. 11. To create a shortcut to the application on the Dock, drag the Brainsight TMS application from inside the Brainsight folder onto your dock.This will not move the application, but add an icon to the dock for Brainsight TMS. If you have a shortcut on the dock for an older version of 10 Brainsight 1.7 Brainsight, remove it from the dock by dragging the icon off the dock onto the desktop. Obtain Software Updates Periodically, Rogue Research releases updates to Brainsight, either to enhance functionality or address customer feedback. The “Check for new Brainsight release” in the General preferences checks for you on schedule, or you can click “Check Now”. You can also check for and download updates from the Rogue Research web site, at http://www.rogue‑research.com. Brainsight First Run The first time you run Brainsight, you need to review and update the preferences. As with the previous version (and with other Macintosh applications), launch Brainsight by doubleclicking on the Brainsight brain icon. You can also drag the Brainsight icon to the Dock so that you can launch it from there in the future. setting preferences 1. 2. 3. 4. 5. 6. Have your USB–serial adapter (or Vicra dongle) plugged in to your computer, and the necessary drivers installed. Connect the Polaris to the power supply if there is a power switch (as is the case on the Polaris, and not the case for the Vicra), turn it on. Launch Brainsight. Enter the serial number at the prompt. Make sure you also type in the dashes, and then press OK. If the OK button remains disabled, then you have mis-typed the serial number, or the number you have is invalid. Contact Rogue Research to get a new number if the number you have does not work. Yoy may be prompted for your Administrator password so Brainsight can correctly set the file permissions of several files, including the preferences file. Select Brainsight‑>Preferences. The window in Figure 2‑6 appears. Chapter 2 11 Figure 2‑6 General Preferences dialog 7. In the General pane, select the colours you prefer for the 3D rendering background, cursor and annotation colours. 3D Render type refers to performing the rendering Onscreen, which is faster but can be limited by the VRAM on your graphics card, or Offscreen, which is slower but more reliable. Select Onscreen. Unless you are using an older Macintosh (e.g. has a graphics card with less than 64MB of VRAM), you should select Onscreeen rendering. If the textures within the 3D views look abnormal (random noise instead of an MRI), switch to Offscreen mode. Slice increment refers to the step size when using the arrow keys or the mouse scroll wheel with the Cursor tool to move the cursor. You can also set the imaging convention between screen left = subject left or screen left = subject right (Radiology convention, facing the subject). The subject right is always labelled with the R indicator on the screen. 8. In the Default File Paths pane (Figure 2-7), select the default directories for your images. These defaults act as starting points to find your images for the corresponding File->Import Images menu commands. Also set the Tools directory that contains the ROM characterization files for the tools, and the default Talairach template file needed for Talairach mapping. 12 Brainsight 1.7 Figure 2-7 Default File Paths 8. In the Polaris pane (Figure 2-8), if your USB–serial port is connected and configured, select the default port for the Polaris position sensor. Figure 2-8 Polaris configuration 9. Choose the volume. Volume refers to the calibrated volume of the Polaris camera. Select Extended Pyramid.for the standard Polaris, and Vicra for the Vicra. Click OK to close and save the preferences. Chapter 3: Planning a new TMS study Figure 3-1 P erforming a TMS study can involve coordinating several different activities at the same time. Careful preparation can ensure that the experiment is performed accurately and quickly, and minimize the chances of an unexpected problem arising after the subject has arrived. Arrange the Setup The Polaris optical position sensor used with Brainsight™ requires an unobstructed line of sight of the trackers on the coil, pointer and subject. Achieving this while allowing free movement around the subject requires planning, as there are three locations to keep in mind: 1. the camera location 2. the location and orientation of the subject tracker 3. the location and orientation of the coil tracker Generally, the best location for the Polaris is above the subject’s head, looking down (Figure 3-1). This allows the Polaris to see the entire area surrounding the subject’s head, while minimizing the chances that you would have to stand between the camera and a tracker while performing the experiment. Figure 3-1 is an illustration of a good setup for an experiment where the subject is sitting upright. The Polaris is high (mounted on the ceiling) and pointing down on the subject’s head. This arrangement allows you to access the anatomical landmarks for registration, and allows for movement of a TMS coil around the head. Note that the Polaris Vicra has a different field of view. In general, it is a bit smaller, but can also be put closer to the subject’s head (optimum 1m) simplifying the setup in many situations. determining the camera location Prior to beginning this procedure, plug in and turn on (in that order only!) the Polaris optical position sensor, in order to give it time to warm up. The standard Polaris requires up to 30 minutes while the Vicra requires up to 10. Illustration of the Polaris’s view of the subject. The green area indicates the field of view of the Polaris given the setup shown. A good way to evaluate a proposed setup is to use the pointer and the Position Camera function in Brainsight (see Figure 7-4). To use this tool, set the camera location and experimental setup to your proposed setup, and perform the following steps: 1. Launch Brainsight. 2. Make sure the Polaris is connected to the workstation and that it is on. Select Window‑>Polaris Control (for more information, see “Polaris Control Window” on page 45). Note that your pointer and subject tracker should appear in the list of tools in the window. If the list is empty, make sure that the default tools folder prefer- 14 Brainsight 1.7 3. 4. Figure 3-2 5. 6. ence is correctly set (see Brainsight first run in Chapter 2). Select a tool to view, such as the Pointer by selecting it from the list of tools. First Run: If this is the first time you are using Brainsight, please verify that the pointer and subject tracker files (both calibration and ROM files) agree with the tool serial numbers. If they do not match, contact Rogue Research before proceeding. If the Polaris is not already tracking (as seen by the red or green box indicating that the selected tool is visible or not), start tracking by clicking the ON button in the Polaris Control window. Click on the Position Camera button. A new window opens with a representation of the camera’s calibrated volume (pyramid, silo or Vicra, depending on which calibration is in use). Place the pointer in the area where you intend to use it during the subject–image registration, and notice the dot representing the pointer in the two views on the screen. See Figure 7-4. Use this display to position the camera so that the tool is well within the volume. choosing the subject tracker A B Two methods of attaching a tracker to monitor head movement. A: Head strap, B: Glasses Figure 3-3 Close-up of a hex rod and collar The subject tracker should be fixed onto the subject’s head so it cannot move during the study, nor interfere with the TMS coil or any other objects on the subject’s head (for example, EEG electrodes). Brainsight comes with two methods of fixing a tracker onto the subject: a head strap or modified glasses (Figure 3-2). In either case, the tracker is attached to the head strap or glasses by a small hex rod which fits into a collar on the tracker and another collar on the head strap or glasses. To insert the hex rod into a collar, follow these steps: 1. Use the small hex key (included in your tool box, as listed on page 81) to loosen the small set screw in the collar (see Figure 3‑3) enough to fully insert the hex rod into the collar. Be careful not to loosen it to the point where it might come out. 2. Insert the hex rod fully into the collar. 3. Turn the hex rod until a f lat face of the rod faces the set screw in the collar. 4. Using the hex hey, tighten the set screw while ensuring that the screw itself comes in contact with one of the faces of the hex rod rather than an edge between two faces. The head strap is the most common method of attaching a tracker to the subject head. It is comfortable and securely holds the tracker on the head. The elastic band has Velcro ® on the ends, allowing you to tailor the length to fit different head sizes. Chapter 3 15 The collar allows you to insert the hex rod in one of two holes, either vertically or horizontally, to ensure that you can find an orientation that best presents the tracker to the camera. See Figure 3-4 for hex rod attachment, and see Figure 3-1 and Figure 1‑1 for proper tracker orientation. Figure 3-4 Examples of where the hex rods go into collars to attach a tracker to the subject. The glasses have a collar at both ends of the frame. The head strap has a single collar, however the collar has two holes (one horizontal and one vertical) to allow more flexibility in positioning the tracker. In cases where the elastic strap interferes with other objects on the head, for example, if the subject is wearing EEG electrodes, a pair of glasses equipped with fixation collars for the subject tracker can be used. The glasses have fixation collars at either end of the frames, allowing you to put the tracker on either side of the subject’s head. There is also a hole in the lenses allowing access to the nasion (the bridge of the nose) during the subject–image registration. In addition to selecting the fixation method, place the tracker in the hex rod collar in such a way that the tracker faces the camera during the experiment (see Figure 1-1). Configure the Coil for Use Attach the Coil Tracker As with the subject, Brainsight monitors the position and orientation of the coil by attaching a tracker to it. Instead of a head strap or glasses, the coil tracker is fixed to the coil using a hex rod and a coil-specific adapter, usually a ring. The coil ring is a round ring cut in half and is attached to the TMS coil handle (see Figure 3-5). The ring includes a fixation collar that fits a hex rod, onto which the TMS coil tracker is attached. Different sized coil rings can be attached for TMS coils with different shaped handles. Other adapters are available for certain coils in cases where a ring is not suitable. attaching the coil tracker 1. Attach the ring to the coil handle as shown in Figure 3-5. Use the included hex tool to tighten the two screws until the ring is secure. 16 Brainsight 1.7 Figure 3-5 The coil ring comes in two halves that are placed around the handle of the TMS coil. 2. 3. 4. 5. 6. After the ring is attached, loosen the set screw on the hex collar, and insert the hex rod into the collar. Tighten the set screw while ensuring that the screw itself comes in contact with one of the faces of the hex rod, rather than an edge between two faces. Loosen the set screw on the tracker collar, and place the tracker on the hex rod now attached to the coil collar. Rotate the tracker around the rod so that it faces the Polaris (when you are using it for stimulation on the subject), using the principle as described for the subject tracker (see Figure 3-1 and Figure 1‑1 for proper tracker orientation). Tighten the set screw while ensuring that the screw itself comes in contact with one of the faces of the hex rod, rather than an edge between two faces. Calibrate the TMS Coil Coil calibration using a calibration block is quite simple. The menu item to perform a coil calibration is Window‑>Calibrate Coil…. following the calibrate coil task assistant Prior to beginning this procedure, plug in and turn on (in the case of the standard Polaris) the Polaris optical position sensor, in order to give it time to warm up. 1. In Brainsight, select Window‑>Calibrate Coil…. Follow the steps in the Task Assistant window as shown in Figure 3-6. 2. Identify the coil hotspot. Chapter 3 17 Figure 3-6 A: Identify the hot spot (see the coil manufacturer specifications). 3. Click Go to Next Step. The dialog in Figure 3-7 appears. Figure 3-7 B: Attach the tracker to the coil. 4. As you have attached the tracker to the coil as shown in Figure 3-5 (if this figure represents your coil and tracker type), click Go to Next Step. The dialog in Figure 3-8 appears. 18 Brainsight 1.7 Figure 3-8 Step 3 6. Enter a name for the tool (for example, “coil”), select the tracker’s ROM file, and enter the file name for the calibration file. This file is saved to the Tools folder in your Brainsight folder. Be sure to choose a name that will make it easier to identify it later during the TMS session. For example, for a Figure-8 coil, use Fig8_Aug10.txt if it was calibrated on August 10.The “.txt” extension is added automatically. 7. Click Go to Next Step. The dialog in Figure 3-9 appears. Chapter 3 19 Figure 3-9 You should be able to manually hold the coil in position for this process. The other two pins on the plate are to help you keep the coil stabilized during this process. Their height can be adjusted to accommodate different coils. The correct position is such that the centre pin of the calibration block is directly beneath the coil’s hot spot, and the coil held straight so that the centre pin is in line with the field. Lining up the calibration block pins with the coil’s axis helps Brainsight calculate the Inline and Inline 90 views, as described in “Position the Coil” on page 38. It might be useful to take a moment and make a small shallow divit on the coil’s face corresponding to your preferred hot spot using a small drill bit (held between your fingers) or using a small knife (e.g. “X-Acto”). This will simplify calibration as the coil will “clip” into place as the pin goes into the divot. This will simplify placing the coil over the pin and improve consistency between calibrations. Step 4 8. Place the calibration block on a f lat surface, or attach it to the chin rest assembly on the TMS Frame, so that the spheres are visible within the Polaris’s field of view, and so that the tracker on the coil is in the field of view (green square) when in the calibration position. 9. Examine the calibration block. Ensure that height of the two pins (in front and in back of the centre pin) are such that they support the coil during the calibration process. 10. At the prompt (Figure 3-9, Step 4), place the coil in the calibration position (the centre pin on the hot spot) and click the “Calibrate” button. After clicking “Calibrate”, you have a five-second countdown to give you time to ensure the coil is in the calibration position. After the countdown, the computer beeps once, then monitors the coil location for another five seconds. The computer beeps a second time, indicating that the calibration is complete. 11. If you are not going to prepare any studies, you can quit Brainsight. Prepare the Brainsight Environment If you want to use a project you created in another version of Brainsight, you first need to set up your environment. The project opens with all the states of the environment it was saved in, which will not necessarily work with your new setup. To set up your environment, do the following: 1. Make sure that you have set your Preferences (“Setting Preferences” on page 10), including Polaris preferences. 2. Check that the Polaris on. 20 Brainsight 1.7 3. Remember that your coil calibrations need to be stored in the Tools folder. Open Brainsight and select Window-> Polaris Control to see if the software can communicate with the Polaris (you should hear the characteristic 2 beeps) and that the pointer and subject tracker are automatically loaded. The Reference Frame (as shown in the reference popup menu) should be Subject Tracker. If not, correct your Brainsight Preferences. If the Polaris was in use when the project was last saved, upon opening your project, Brainsight asks you whether to load the Polaris information for the project. If you are using the Polaris, check “yes.” Note that if you are going to use a newer coil calibration than the one before, you must replace the old calibration with the new one. To replace the old file with the new: 1. Select the old tool (Coil) in the tools list in the Polaris window. 2. 3 Click “Remove” to remove the old tool Click “Add...”, then select the tool calibration file from the file select dialog. Chapter 4: Transfer Images to the Brainsight Computer C Many MRI scanners can archive images on various media. Unfortunately, some of these systems use a proprietary format that can only be read by their own equipment. Figure 4-1 opying images to the workstation can be done from any of the following sources: • CD-ROM • External drives and other mountable storage media • Network transfer (File Transfer Protocol, Secure Copy, and file sharing) • DICOM server application transfer Regardless of the method of transferring images from the MRI laboratory’s scanner workstation (referred to as an archive), there are some initial concepts and actions you need to address at your Brainsight computer. The issues are the following: • folder organization for MRI files used by Brainsight • server addresses, user names, and passwords at the archive computer and for local File Transfer Protocol (FTP) software Prepare the Brainsight Images Folder It is important to properly organize files on a computer hard disk for quick and easy access and minimize software file errors. Managing image files can be deceptively complex, particularly if more than one scan is analysed. A simple folder organizational strategy is shown in Figure 4-1: create a root folder called Subject Data. Inside the folder Subject Data, place individual folders for each subject. You can use the subject’s name or some identifying piece of information likely not to be duplicated. Both forms of identification can be used, as in Figure 4-1. If there is only one scan for that subject, you can place that image file in their general folder. We recommend that you create sequential scan folders within the subject’s generalized folder to accommodate this possibility. Example of folder organization for structuring files on the computer hard drive. Direct DICOM Transfer There are public domain, Mac and UNIX-based DICOM server applications available that enable you to have image data transferred by DICOM transfer directly to the Macintosh. For example, you can use OsiriX to act as both a DICOM storage client to transfer images directly from the scanner, or to scan a DICOM CD drive to allow you to easiy select the study of interest from the other files on the CD and transfer them to your hard disk. Additional software can be used to automatically convert these images into formats used by other software, including MINC and Analyze. Contact Rogue Research for more details. 22 Brainsight Primate File Transfer Protocol You are generally required to have an account on the computer system to access information on computers by FTP. Ensure that your account has the required privileges to access the images. FTP is a nearly-universal protocol for transferring files from one computer to another. With some organization, FTP can be a simple and fast method for transferring MRI images from your scanner or database computer (the archive) to the Brainsight computer. Contact the archive system administrator to find out if they support FTP transfers. If the host computer is a UNIX workstation, it is highly probable that there is a FTP host application running. using ftp to transfer files The steps involved are: 1. Determine the Internet Protocol (IP) address of the archive server, or the computer storing the desired images. The IP address can be specified in two forms: the IP name based address (e.g. studies.edu.ca) or the actual IP number (e.g. 123.123.123.000). 2. Ensure that the archive server has an FTP server application running. 3. Obtain a user name and password to allow FTP access to the server. 4. Ask for the location of, or find, the image files on the archive server. 5. Create a folder on the Brainsight computer for the image files. 6. Run the FTP program on the Brainsight computer to initiate an FTP session with the archive. 7. Using the FTP software, locate the desired images on the archive server. 8. Transfer the desired images from the archive to the new folder on the Brainsight computer. The first three steps are performed only the first time you transfer images from a particular archive. After the FTP application is set up, future transfers begin at the fourth or fifth step. using the finder for ftp 1. 2. 3. 4. In the Go menu, select “Connect To Server…” In the Address: text box, type ftp:// and the name of the server. Finder prompts you for a username and password. When the server appears on your desktop, you can navigate it as if it were a disk on your computer. When you have located the desired file, copy it to the prepared folder, or another location in your hard disk. Copy Files from an External Disk If there is no network connection possible between the Brainsight computer and the archive workstation, copy the images Chapter 4 23 from the archive to a mass storage device or disk (such as an external hard drive or CD ROM) and mount that disk on the Brainsight computer. After it mounts, the images can simply be copied from the storage device to a folder on the Brainsight computer. About Storage Media There are many other types of disk media and disk formats. It is important to note that it is not just the actual disk media that counts, but the disk format as well. Before copying files from a CD ROM, the format of the CD must be established. The Brainsight computer likely has a CD ROM drive installed. This drive can read many common CD formats. Make sure that it is supported on the Macintosh workstation. If a disk containing data fails to mount or if an operating system error appears, talk to your system administrator or contact Rogue Research. copying files to the brainsight computer The steps required to copy images to and from a CD ROM or other external disk are the following: 1. Mount the disk by inserting it into the appropriate workstation drive, or attach it by cable to one of the ports on the back of the archive workstation. 2. Copy the image files to the disk. You should be familiar with the file naming strategy and folder tree on the disc. If you are not, contact the person who created the directory. 3. Eject the disk. 4. On the Brainsight computer, create a new folder for the image files. 5. Mount the external disk on the Brainsight computer by inserting it into the appropriate drive, or attach it by cable to one of the ports on the back of the Macintosh. After a few seconds, an icon should appear on the top right area of your screen. If after ten seconds or so the icon does not appear, or if an error message appears, the disk may not be in a format that is supported by the Macintosh workstation. 6. Open the mounted disk in the Macintosh Finder by either double-clicking the disk drive icon, or clicking on it and selecting the Open item in the File menu. 7. Copy the images from the external disk. Command-click multiple images to select them, then drag them to the prepared folder on the Brainsight computer. During file transfer, a dialog displays the copy progress. After it completes, the files are ready to be examined using Brainsight. 24 Brainsight Primate Chapter 5: Preparing a Brainsight Project T he concept of a project in Brainsight™ is different than in other software applications, which support multiple documents and projects. In Brainsight, only one project can be open at a time. This is ref lected in the title of the Data Groups window, where an unsaved project is named “Untitled.bproj,” and an opened or saved project shows its name. The project saves the state of all the data, essentially a snapshot of all the data at that point. You cannot open multiple projects (which save as documents); in the past, doing so combined them together. This is why we have the File->New/Reset Project menu item, to clear the current project from Brainsight’s memory and enable you to create a new project. Resetting, creating a New project, or opening a project clears the current project as well; you will see a Save Project prompt if you choose the File-> Open Project… or File->New/Reset Project menus while working on an unsaved project. Because Brainsight saves the entire state of the software within the project file, it is inadvisable to work on more than one subject at a time. Brainsight does not save files according to subject, and cannot differentiate between two separate subjects’ data, or, for example, between anatomical and functional data. If two subject files are open at one time, at least one subject project saves with the state of having multiple subject data open. The steps to preparing a study in Brainsight are 1. Create a new, or open a previously-created, Brainsight Project. 2. Load the images. 3. Create 3D reconstructions of the brain and possibly the skin surface of the subject’s head. 4. Optionally register your images to MNI/Talairach space to enable you to use Talairach coordinates as targets. 5. Add markers for targets and landmarks. 6. Save and quit Brainsight (or Save, and select “New/Reset Project” to begin preparing a new study. For instructions on transfering images from another source to the Brainsight computer, see Chapter 4. Reload a Project To reload any project, find the project file and: • double-click it. Note: Do not use this method if you have multiple versions of Brainsight on your computer. • drag it to the Brainsight TMS application icon in the Dock. • launch Brainsight and select File‑>Open Project (Command-O). Select the project as shown in Figure 5-1. 26 Brainsight 1.7 Figure 5-1 Open Project dialog, with Brainsight Project icon To reload a recently-used project, you can use the Apple>Recent Items menu, if it is displayed in the Documents submenu. If the project file referenced any images, Brainsight loads them. If it cannot find the images (if they were moved, or the directory structure changed), Brainsight prompts you to select them. When you load a project, any guide curves from curvilinear reconstructions are reloaded, and the 3D reconstruction occurs automatically. Brainsight 1.5 (or Earlier) Projects If your project was created using v1.5, Brainsight prompts you to save it under a new name. It also appends “.bproj” as the file extension for 1.7 projects. See Figures 5-2 and 5-3. Figure 5-2 Project file conversion dialog Chapter 5 27 Figure 5-3 Save converted project dialog Creating a New Project Launch Brainsight from the Applications folder, or from the Dock if you have a shortcut there. When Brainsight launches, it implicitly begins a new, unsaved project. Typically, the first step is to import images. From the File-> Import Images menu, select the appropriate file format: [MINC…] [NEMA/DICOM/Philips ANI] [Analyze/NIfTI (.img & .nii)…] A dialog appears, showing the image data in the folder you indicated in the default file path preferences (Chapter 2). Analyze Format Issues Most implementations of this format omit the orientation information. The orientation field is present in the header, and when left blank, reads to the computer as 0. Unfortunately, 0 is defined in the Analyze format as transverse (not undefined). Therefore, when using this format, you must ensure that the orientation field is properly set, or the images must be restricted to transverse. The standard file dialog on the Macintosh has a pop-up menu at the top to identify the current folder (directory) and allow you to navigate to other folders. In the appropriate folder, if more than one image file is needed, shift-click the number of files you need (it helps to always use a separate folder for each study). You can remove any unwanted entries from the selected files list by Command-clicking to deselect it. Once the files have been selected, click Open. This initiates the loading sequence. For the multi-file DICOM format, select all the files in the directory by shift-clicking the first and the last in the list (this should highlight all files) and click the Open button. Brainsight scans all the selected files to sort the individual slices during the loading sequence. If more than one sequence was selected, a dialog appears, requesting that you select the desired sequence. The following are the file types to look for: • MINC requires .mnc files • Analyze requires .hdr and .img files • NIf TI images can be either .hdr-.img pairs or .nii 28 Brainsight 1.7 • If you choose Manual, remember that your image data could be 8-, 15-, or 32-bit, but the actual minimum and maximum voxel values are only a portion of each corresponding range (1 to 28, 216, or 232). Figure 5-4 Mapping Style Figure 5-5 DICOM has no official extension specification but .dcm or .ima are often encountered. loading anatomical images 1. Launch Brainsight. 2. Select File-> Import Images-> [example format] and select the images (.mnc, .hdr, .nii or multiple files and types) corresponding to the anatomical data set. 3. If your anatomical data uses 16 or 32 bit integers, a second dialog (Figure 5-4) prompts you to select a voxel mapping style. Select the appropriate mapping style to load the images. If you are unsure which mapping style is best, experiment with the styles until you find the best one. 4. For Analyze and NIf TI, if the .img file associated with the .hdr file is not in the same location, Brainsight prompts you to find it. Locate the file and click Open. 5. If you cannot obtain a satisfactory display, remove the images from the project by clicking on the data set in the Data Groups window (Figure 7-2) and clicking Remove. This also closes the Volume View. 6. Repeat steps 2 to 5 until you find which style works for your images. Take note of this for the future. 7. After the images load, the Volume View display window opens with the image file name in the title bar. Manipulate the image using the Brightness/Contrast threshold controls (see Figure 5-5) on the lower left of the view window. Functional Images After importing anatomical MRI images, you can import and then overlay a functional MRI image, such as f MRI or PET. The functional data must have been preprocessed by your f MRI processing software to register to the anatomical data. The functional data must also have been resampled so that the image file has the same dimensions and orientation as the anatomical data set. When opening f MRI and PET images, the Volume View should look like any other anatomical data Volume View window. There are, however, some subtle yet important differences. If the functional data you imported in the previous section was the same size and orientation as the anatomical data, then it is eligible for overlay on the anatomical data. overlaying functional images Image manipulation panel You can activate the overlay by performing the following steps: 1. Select the functional data in the Overlay pop-up menu at the bottom left of the display window (Figure 5-5). 2. Select the functional image overlay in the Main Data Set pop-up above the image Brightness/Contrast thresh- Chapter 5 3. 29 old controls, and set the threshold values. The window should appear as in Figure 5-6. Set the overlay to the desired opacity by manipulating the slider in the overlay controls. Figure 5-6 Screen shot showing functional image data superimposed on anatomical data. The functional data can be seen on any 2D view as well as the curvilinear view. Save the Project After the data loads, save the project. The project file saves the state of the software, essentially a snapshot of all that is going on, including loaded images, open windows, control settings, and loaded data sets. The first time you save a project, go to either File-> Save or File-> Save As. You can choose Save As at any time to create a project clone, or create a project template at an early stage of a study. Brainsight prompts you for a file name. Fill in a name and press Enter. When naming the project, the software appends “.bproj” as the extension. This helps you distinguish the Brainsight project file from other types of files. After the first save, subsequent saves (File-> Save, or Command-S) automatically save to the project file. When creating a new project (Command-N, or File-> New/ Reset Project), opening another project (File-> Open Project… or Command-O), or quitting the application, Brainsight prompts you to save the project if you’ve made changes since your last save. This eliminates the possibility of accidentally quitting the application without saving your work. This also gives you the 30 Brainsight 1.7 mechanism to revert a project to its last save point, by choosing “Don’t Save.” Prepare the Project for the Study These are the following tasks in this section: 1. Perform a 3D reconstruction of the brain 2. Perform a skin segmentation of the subject’s head 3. Optionally register the anatomical images to MNI/Talairach space. 4. Select landmarks and targets for the subject-image registration and for the area of study. Perform a 3D Reconstruction Curvilinear reconstruction helps you view the brain and plan the experiment. It is not always necessary to do this procedure for an experiment, but most users find it helpful. Use the Curvilinear Tool to draw guide curves on MRI slices, which the tool uses to construct a 3D model of the brain based on the image data that intersects with the guide curves. The Peel depth function displays image data at various depths from the surface generated by the guide curves. These depths are called offset surfaces. creating a curvilinear reconstruction Figure 5-7 Curve drawing grazing the top of the sulci; depth generation during reconstruction. Refer to “Curvilinear Tool” on page 71 for the dialogs and descriptions. 1. Click the Curvilinear tool button. 2. In the tool control pane, click the New button. A dialog appears (Figure 8-18). 3. Enter a name for the surface family. 4. Select the plane in which you want to draw the guide curves. It is the coronal plane by default. 5. For more settings, see “Curvilinear Tool” on page 71. 6. Enter the desired surface offsets (series of curves) in one of the two following ways: a) Click the Add button. Enter the desired depth offset, then click OK. Usually, one starts with a 0 mm offset surface, and then enters subsequent offsets (for example, 2, 4, and 6 mm). -orb) Click Add Series. Enter a start depth, an end depth, and a step size. For example, enter a start depth of 0 mm and end depth of 20 mm in steps of 2 mm. 8. Click OK. 9. Find a view showing the orientation you selected as your reconstruction plane (it contains a curved arrow). Create a guide curve. Do not place control points into the sulci, but rather create an outline of the overall curvature of the brain (roughly along the dura) as shown in Figure 5-7. Chapter 5 31 10. Click in another orientation (you no longer need to command-click as you did in previous versions of Brainsight) or use your mouse’s scroll wheel to change the location of the cursor, and return to the selected orientation to start a new guide curve. There are no arbitrary rules as to the spacing of the guide curves; you are free to decide how to space them. However, it helps to have one guide curve in the middle of the brain and one at each extremity, in the plane of your choice. Then add new guide curves between pairs of existing guide curves to subdivide the sections between them, until the interpolated curves agree sufficiently with the actual brain outline. 11. Start a new guide curve as you did in step 9. Repeat steps 9 and 10 at least three times, with guide curve indicators well-spaced. The more guide curves, the better the representation. 12. To view the 3D reconstruction in a 3D view (click the 3D mode button in an image view pane), click the 3D Object Selection button (see page 52). 13. Scroll through the list and make sure that the curvilinear surface you created and named are checked off. Click OK. The 3D image pane updates to display the curvilinear reconstruction. 14. Use the Peel depth slider in the Curvilinear Tool control panel to navigate the 3D reconstruction. Add a Skin Segmentation This section is optional, however it is a way to model the subject’s face in order to simplify the task of identifying the landmarks reaquired to register the subject to his or her MRI. For details of the tool options and dialogs, see “Segmentation Tool” on page 66. Figure 5-8 The segmentation tool functions in two modes. The manual mode, which allows you to control each step of the segmentation process, and the “fast skin” mode, designed to segment the skin with minimal work. For this tutorial, the fast skin method will be used. Refer to Chapter 8 for more details regarding segmentation. creating a skin segmentation Data entry screen for creating a segmented object 1. Choose the Segmentation Tool. 2. Click New… to create a segmentation volume. Enter the information in the screen (Figure 5-8). You can edit the name of the volume and the colour or accept the default. Select the orientation you wish to work in, however Transverse is usually the best orientation. Once the information has been entered, click OK 3. The Threshold window appears. Ensure that the Fast Skin tab is selected. Pull the upper threshold down to remove the purple threshold colour from the MRI data (that is, select the background and not the image data for the head). The goal is to colour-fill all the air, and none 32 Brainsight 1.7 4. Figure 5-9 of the scalp . Note that there will be structures within the head that have similar intensity values and will highlight as well (Figure 5-9). Enable the “Smooth Image Data” and “Make Smooth Mesh” (available for isotropic data only). It is often desirable to segment a subset of the entire head. For example, we are usually only interested in the Example of a good threshold selection (purple) of the area surrounding the head, and the bounding box limiting the reconstruction to the relevant part of the head. 5. area of the head that encompases the face, nose, eyes and the ears. Set the limits of the reconstruction by dragging the upper and lower horizontal lines of the bounding box in either the sagittal or cornal views so that only the face is inside the bounding box (Figure 5-9) Click on the “Segment & Update” button to initiate the automatic segmentation and mesh building function. The process may take a minute. Figure 5-10 Example of a good result in segmenting the skin. The head should be highlighted and the mesh seed should be on the edge of the skin. If the mesh seed is off the skin (due to noise in the scan), move the cursor to the edge of the skin in the transverse view and click on “Tweak Seed & Update”. Chapter 5 Figure 5-12 33 Figure 5-11 Example of a good 3D skin. 6, A 7. Once the mesh is built, the 2D displays should look like Figure 5-10). Set one of the image views to 3D mode, then click on the list selector and select the skin. The object should appear as in Figure 5-11. If the skin object does not appear, then verify in the transverse view that the mesh seed (an indicator of the edge of the skin) is indeed on the edge of the skin. If it is not, move the cursor to the edge of the skin and click “Tweak Seed & Update”. This will attempt to build the skin again using the corrected seed point. If this does not yield a satisfactory skin object, refer to Chapter 8 for more detailed instructions on performing manual segmentation (e.g, on noisy data). Select Landmarks and Targets B Select the landmarks in preparation for the subject–image registration, using the Marker tool (refer to “Marker Tool” on page 63). Good landmarks must satisfy some guidelines: First, they must be unambiguously identifiable on both the subject and images. Second, they must be in the same location w.r.t. brain at the time of the study as they were during the scan. From our experience, the best points to mark for registration are the bridge and tip of the nose, and the notch above the tragus (inter-tragal notch) of each ear. These points can be selected by moving the cursor to the location on the 2D views (see Figure 5-12) and using the Marker tool to record them. The 3D skin object can also be used to verify the landmark locations identified on the 2D views, or to select the landmarks directly on the 3D skin (Figure 5-13). In the view where a 3D skin is being displayed, bring up the list selector and select the “Pointer sphere” to represent the cursor location with a small blue sphere. Select the 3D cursor tool for that view, and click directly on the skin object to move the cursor to that point. C Bridge (A) and tip (B) of nose, and inter-tragal notch of ear (C) on MRI scan. You should use the 2D and 3D views at the same time to take advantage of all the available information to select the best landmarks. 34 Brainsight 1.7 Figure 5-13 Registration landmarks and simple motor cortex target shown in 3D view with skin and brain. As with the registration landmarks, use the 2D views and the 3D brain reconstruction to identify your target(s) and, using the Marker tool, record the target(s). While this was not covered in this short tutorial, targets can also be selected by superimposing functional image data as well as by using MNI305/Tailarach coordinates. See Chpater 7 for more details on registering your images the MNI305 space. Quit the Project When quitting the project (File-> New/Reset Project, File-> Open Project… , or quit the application [Command-Q]), Brainsight asks you if you want to save the project. This eliminates the possibility of accidentally quitting the application without saving your work. At this point, you are ready to perform your study. You can quit Brainsight if you are not immediately continuing to the next section (proceeding with subject-image registration). Chapter 6: Perform the Study W hen it’s time to perform the study, open the project (see “Reload a Project” on page 25). Notice that the windows return to the state they were when the project was saved at closing. If you are planning to perform several TMS sessions with the same subject and want to keep the session data separate, after loading the project, treat it as if it were a template, and select “Save as…” to create that day’s session prior to modifying any data. Start each session in this manner by loading the original “template” project. Register Subject to Images First, comfortably position the subject as you normally would. Hold the pointer steady as you register the landmarks. For this reason, you should have an assistant interact with Brainsight while you register the subject. using the registration task assistant There is a registration Task Assistant to guide you through the registration process. All interactions are centralized into a single window. To start the registration process, follow these steps: 1. Select the Cursor tool. 2. Select “New Assisted Reg...” from the pop-up menu at the bottom of the Cursor tool control pane. Figure 6-1 appears. Figure 6-1 Step 1 summarizes what we already did in preparing the study. It is here to remind you of the steps. 36 Brainsight 1.7 3. Click Go to Next Step. Figure 6-2 appears: Figure 6-2 Step 2 4. In this step, you configure the Polaris position sensor. The list box at the bottom right shows a list of the tools the Polaris will be asked to track. The default tools, namely the pointer and subject tracker should already be in that list. If not, this indicates that Brainsight is not configured correctly and you should halt the registration process and verify that the Tools folder in the “Default File Paths” tab preferences is set correctly (see Chapter 2). If the pointer and subject tracker are present, and you intend to use a tracked coil, click on the Add Tool button, and select a coil calibration (assuming you have calibrated a coil as described in Chapter 3). The coil should now appear in the list. You can remove a tool (other than the pointer and subject tracker) by selecting it in the list, and clicking the Remove Tool button. Click Go to Next Step. Figure 6-3 appears: Chapter 6 37 Figure 6-3 Always try to hold the pointer in such a way as to show the top of the spheres to the position sensor camera. Never look away from the subject while you are using the pointer tool. This is to prevent the pointer drifting off target or pushing into the skin while registering the subject which can yield a poor registration and an uncomfortable subject. Step 3 5. 6. If either the pointer or subject tracker is not visible to the Polaris, its indicator in the step window will be red, and the Sample Point button wil be greyed out (disabled). Move the tools into the field of view to enable the Sample Point button. If either box remains red no matter where you move the tools, you may have a Polaris problem. See “Determining the Camera Location” in Chapter 3, or contact Rogue Research to arange to have the camera tested and/or serviced. Brainsight automatically brings the cursor on the screen to the first landmark marker recorded earlier. If this location corresponds to a registration point (not a target), bring the pointer to that point and click Sample Point; otherwise, click Skip Point to proceed to the next marker on the list without sampling it. The Task Assistant cycles through all the markers in the list (which you identified earlier). When all the registration points have been sampled, click Go To Next Step. Figure 6-4 appears. 38 Brainsight 1.7 Figure 6-4 Step 4 7. The Task Assistant automatically sets Brainsight to use the pointer as the cursor input. Verify the registration by placing the pointer at various locations around the head, and check that the cursor on the screen agrees with the pointer location. 8. If the registration is acceptable click the Done button to close the Task Assistant window to complete the registration process. If it is not, click Go to Previous Step to repeat the registration. Position the Coil 1. 2. 3. 4. 5. 6. If you have not already done so, set one of the image views to 3D to display the 3D curvilinear surface. Click on the 3D Object selection button in the 3D view, and then select the box next to the name of the surface family (see “Creating a Curvilinear Reconstruction” on page 30). Scroll to Axes/Probes and select either pointer stick, pointer lines or pointer sphere and “Figure 8 Coil”, if so desired, to add a representation of the coil location. Click OK. Select the Curvilinear tool, select the surface family in the list shown in the tool control pane. Slide the Peel depth slider to choose the offset to view. Select the Marker tool, then select your target from the list of markers by clicking on it in the list. Set two other 2D view panes to Inline and Inline-90. You can also use the targeting tool. In one of the 2D views, select Marker Targeting. This brings up a bull’s eye view of the target from the coil’s perspective (see Figures 6-5 and 6-6). Chapter 6 Figure 6-5 7. 8. Illustration of a TMS coil seen from above. The red cross hair illustrates the hot spot of the coil identified when the coil was calibrated and also the Bull’s eye view. The black dot represents the target. To line up the dot with the cross hair, move the coil in the direction of the arrows represented in the coil’s view. Select the Cursor tool and set the Input Mode as Coil. Brainsight uses the coil input to drive the display. As you move the coil close to the target, you can see all the views in the window continuously update according to the coil location. The bull’s eye view shows the distance from the target to the coil’s projected axis (e.g. the centreline of the calibrated “hot spot”). A value of 0 means that the coil is pointing directly at the target. Figure 6-6 During a targeting task, you can use the 3D views, the inline views, and the bull’s eye view to help manipulate the coil location with respect to the target. Using a Trajectory to place the coil There are many instances where you might want to replicate a position and orientation of the coil for targeting. For example, you may have created a grid of trajectories to perform a mapping exercise or you wish to replicate a stimulation recorded during a previous session. In either case, the trajectory targeting bull’s eye view will be helpful. The bull’s eye view for markers displays a simple crosshair representing the center of the coil and a dot representing the target. The bull’s eye view for trajectory builds on that by adding representations of the angle of the coil as well as the twist relative to the trajectory. Figure 6-7 illustrates how the bull’s eye relates the desired target position and approach trajectory to the coil’s position and orientation. Think of the Bull’s eye as a plane on the face of the coil. The trajectory target projects towards the coil and the bull’s eye. A green circle is displayed 39 40 Brainsight 1.7 Figure 6-7 Figure 6-8 where the trajectory hits the bull’s eye plane (think of it as the scalp entry point). The target itself is projected to the plane in the same manner as with the marker bull’s eye, that is taking the shortest path from the target to the bull’s eye plane (NOT taking the trajectory into account). The resulting display is a cross hair representing the coil’s center, a circle representing the trajectory (scalp entry) and finally the dot for the target. The best way to use this display is to remember two steps. First, move the coil laterally towards the green circle until it is in the middle at the scalp entry point. Second, tilt the coil until the black dot is in the middle. Finally, the twist can be adjusted until the green tab (like a minute hand in a clock) is pointing up. Record Location of Coil You can record the coil position using the Trajectory tool. Select the tool in the tool bar, and when you wish to record the coil location, click New in the tool control pane. Enter a name for the trajectory. For more information, see “Trajectory Tool” on page 65. If you are recording more than one location, you can use the Rapid Fire feature. Proceed to the next section. Rapid Fire Configuration and Operation A: Place the coil near the target. B: Translate the coil towards the green circle, C: Tilt the coil until the dot is in the middle. D: Twist the coil until the green tab is pointing up. If you wish to record multiple coil locations rapidly, click on the Rapid Fire button in the Trajectory tool control pane (this also works with the Marker tool). The Rapid Fire tool enables you to record multiple coil locations with a minimum of interaction. With additional equipment, you can program Rapid Fire to automatically record the coil location each time the coil is fired. Once configured, the Rapid Fire feature can be triggered in two ways. The first method is by clicking on Mark + with the mouse. The second method is by using the keyboard. Select Keyboard from the trigger pop-up menu. In keyboard mode, you can designate any key as the trigger key. Enter the character in Chapter 6 41 the key value field, then click the “Active” checkbox to enable it. The third method uses a “LabJack” interface box included in certain Brainsight systems. You can connect the TTL trigger to the stimulator device (if it has a TTL trigger out) or by using a foot-pedal or hand-held switch. using rapid fire with the coil 1. Figure 6-9 Rapid Fire Trigger windows (Marker tool and Trajectory tool), trigger via mouse click, keyboard key (typically for use with the X-Keys switch interface) or using the TTL input via the LabJack interface on certain Brainsight systems After launching Brainsight and performing the subject– image registration, select either the Marker or Trajectory tool (whichever you wish to record). 2. Click on the Rapid Fire button in the tool control pane. A Rapid Fire Trigger window, as shown in Figure 8-6, appears. 3. Enter the name and index number you wish to use as a template name for the markers. 4. Select Mouse in the trigger mode pop-up menu in the Rapid Fire window. 5. If you are using rTMS and the X-Keys or LabJack trigger mode (see below), then enter a dead time value that is slightly longer than the pulse train duration (e.g. 1 second, or 10 1/10ths of a second since the field is in 0.1 sec increments). This will allow the rapid fire to trigger on the first pulse and ignore the other pulses in a train to minimize the number of recordings to a number that is relevant (you only need to store the first pulse). 6. When you are ready to record a location, click on the Mark+ button. This creates a new marker, and the index value in the window increments for the next marker. 7. Save the project for later review. To take advantage of the X-keys Switch to drop Rapid Fire keyboard annotations, see “Connecting the X-keys Switch” on page 84. To use the LabJack interface, see “Connecting and configuring the LabJack interface on page 84. If you have recorded the coil position during the study, save the project file before you quit Brainsight. Also, if you are planning to review the data off-line, close the Polaris Control window before the last save so that it cannot automatically open and configure the Polaris the next time you load the project again (unless you want it to). Save the Project If during the TMS sessoin, you have recorded new markers and trajectories, remember to save the project to record the session to disk. Export Images and Movies If you need a still picture from Brainsight, click the hard disk icon in either the 2D or 3D view of any Image View pane. 42 Figure 6-10 Brainsight 1.7 This function allows you to link a view to a QuickTime movie to save a dynamic view of your images. Every time the view is updated in any way, a new frame is added to the movie of your images. Clicking the Export to QuickTime button causes Brainsight to prompt you for a file name, and then the recording control window appears (Figure 6-7). To record the movie, Brainsight appends an image each time the view window refreshes. Click the rectangular Stop button to save the movie to the file name. Chapter 7: Software Reference U se this chapter as a reference to the user interface of Brainsight™ TMS. Although you may already be familiar with Brainsight, you will find a review of this material helpful. For meanings of terms specific to using the Macintosh (for example, shift-click), access Mac Help from the Help menu in the Finder. We assume you are familiar with Mac OS X. Remember that the Command key has a z symbol on it. Menus Brainsight About Brainsight TMS displays the About box, which contains the version number of the software, a warning or acknowledgement of its intended use, and the copyright information. Preferences… allows you to configure the general preferences for how data is displayed, where specific files are located, and how your position sensor operates. File Figure 7-1 New/Reset Project clears the current project from Brainsight’s memory, essentially creating a new project. If the current project has any data in it, this command also prompts you to save it before it is cleared . Open Project… opens a pre-existing Brainsight project. Use this option for subjects whose data you have prepared for a study, and to open completed studies. Import Images menu Brainsight does not have a File > Open Recent [Projects] > menu. Brainsight can only have one project open at a time. If you want to view or open a recently used project, use the Apple > Recent Items menu. Brainsight projects are in the Documents section of this menu. Import Images is the first step to create a new project by importing a subject’s MRI scan (import anatomical images first). You can also import data to overlay on image data in an existing project. See Figure 7-1 for the Import Images options and keyboard shortcuts. Close closes the frontmost Volume View window including some other windows in Brainsight (for example, Polaris Control, Manual Trajectory, any Task Assistant, Rapid Fire, Threshold). If you close the Volume View, the images and project data stay loaded in the Data Groups window. Save Project saves the project as a Brainsight file. Make sure you retain the file extension .bproj when you choose a name. Save Project As… saves a project with a new file name. You can use this any time you want to create a template for other projects, a clone of the current project, or change the name of the project for current and future saves. Page Setup configures your printer preferences for when you use the Print View (on page 50) button in either the 2D Mode or 3D Mode. The only printing available is at the individual image pane. 44 Brainsight 1.7 Edit Undo, Cut, Copy, Paste, Delete and Select All are standard software functions. They can be used only when you work within text fields in Brainsight, with the exception of the Segmentation tool, which supports Undo in a limited fashion. See “Segmentation Tool” on page 66 for more details. Window Data Groups brings the Data Groups window to the front. It lists the images which have been opened in the current Brainsight project. If you double-click on a data set in the list (or click on it, then click on View), a new Volume View opens, displaying that data. The Data Groups window cannot be closed. Electrode Recording is a simple utility to record and save the locations of EEG electrodes. See “Using Electrode Recording” on page 54 for the procedure. Electrode Recording for LOCATOR is an expanded version of Electrode Recording for electrode, anatomical, and head locations. It can be used in conjunction with a sequence file in the Locator format for the order of the samples. See “Using Electrode Recording for Locator” on page 55 for the procedure. Calibrate Coil… is used to calibrate a TMS coil using the calibration block. This is an automated software Task Assistant. Manual Input is a tool that allows you to enter X, Y, and Z coordinates and the orientation of the pointer (essentially to simulate the Polaris position sensor). You can set the cursor position using the Manual window (:1, :2, :n depending on how many are displayed) as the Input Mode in the Cursor Tool. Polaris Control opens the Polaris Control window, which allows you to configure the Polaris optical position sensor, helps position the subject and the tools, and chooses the tool used on the subject. Help View User Manual opens a screen-resolution PDF version of this guide. Red text is hyperlinked for ease of navigation. Send Email to Rogue Research will open your default mail program and create a message addressed to [email protected]. Visit Web Discussion Forum opens your default browser at the support pages of the Rogue Research website. Data Groups Window Launch Brainsight. Select Window->Data Groups, or open a project file or import some images. The Data Groups window (Figure 7-2) gives the name of the project file in the title bar (in the figure, the project has yet to be saved and named), lists the images opened in Brainsight, as well as information about the Chapter 7 45 markers, trajectories, registrations, and surfaces created and added to each data set. Figure 7-2 Data Groups window The data sets names are the filenames of the images that Brainsight has loaded. Double-clicking (or click once, then click View) any data set in the Data Groups window opens a new Volume View window in the forefront of all other View windows. Any other data set in the list that is compatible with this main data set can become an overlay data set. This is why it is best to add anatomical data first; subsequent data sets are potential overlays, and the order matters for the display of data. You can minimize the Data Groups window to send it to the Dock and declutter your screen. Polaris Control Window Launch Brainsight. Select Window‑>Polaris Control. Two events occur: first, if the system has been properly connected, you will hear the Polaris reset sound. Second, the Polaris Control window opens. Most of its settings are configured in the Preferences window. Thus, you should not normally have to set or configure ports, volumes, and tools, except the coil tool. If the default serial port in the Preferences window has not been set, or if the Polaris has not been connected or properly powered up, the Polaris does not beep and the Polaris Control window takes several seconds to open. Check the connections and the Polaris itself. It is important that you always connect the power cable to the Polaris while the power is off (not applicable to the Vicra). Failure to do so can cause serious damage to the Polaris. After the Polaris is connected, close and re-open the Polaris Control window to reset it. After the Polaris is powered up and the Polaris Control window is open, configure the tools (with trackers). The controls allow you to load and unload tools, activate tracking, and set the reference tool controls (Figure 7-3). It also allows you to verify the pointer precision and activate the position camera function. 46 Brainsight 1.7 Figure 7-3 Tracking These buttons command the Polaris to start and stop tracking. When ON, the Polaris begins tracking and sends data to the computer. Reference Frame This menu sets the tool used as the reference tool. That is, all other tool locations will be calculated with respect to this reference tool. If Brainsight has not automatically loaded the subject tracker as a tool, check your preferences. See “Errors and Troubleshooting” on page 58. Because the reference tool is normally set to the subject tracker, all tool coordinates (pointer and coil tool) are calculated with respect to the subject tracker. This allows you to move the camera without losing the subject–image registration. If the subject tracker is being worn by the subject (not on the head holder), the subject’s head can move without loss of registration, as long as the subject tracker moves with the head. If the subject tracker moves with respect to the head (for example, it gets shifted or bumped), then you must re-register the subject. Polaris Control window. Tools List and Controls This list shows the tools currently loaded into the Polaris. Clicking on one of the tools selects it, and detailed information regarding that tool is displayed below the list. Clicking on the “Add” button brings up a dialog box to allow you to select a tool to load into the Polaris. Select a coil calibration file to load a coil calibration you may have created as described in chapter 3. Remove a tool by selecting the tool in the list and pressing the “Remove” button. Calibration File This displays the current tool calibration file for the selected tool. Each tool has a characterization file, as described in Chapter 1. This file contains the offset information and the name of the appropriate passive tracker characterization file (.rom file). When you select a tool calibration file, it loads along with the .rom file. Tracker ROM File This field displays the name of the .rom file associated with the currently selected tool. Status While tracking, status information is returned with each position sample. The key information here is whether the tool is visible or missing, or if the reference tool is visible or missing. These are dislayed using green/red indicators, green representing visible and red representing missing. Chapter 7 47 Position Camera This button opens a new window (figure 7-4) with a representation of the camera’s calibrated volume (pyramid, silo or Vicra, depending on which calibration is in use), as well as the location of the currently selected tool within that volume. See “Determining the Camera Location” on page 13 for an example of its use. Figure 7-4 Position representation of a tool that is in the calibrated volume (Vicra volume in this example). Use this display to position the camera so that the tool is well within the volume. The box represents the shape of the field of view of the camera, and the green dot represents the location of the tool currently selected in the tools list. The small dot is green when inside the calibrated volume. The dot disappears when the pointer exits the volume. Precision Test This function tests the precision of a pointer tool when you suspect the spheres have been damaged or the pointer shaft has been bent. The button initiates and ends the precision test. The precision test is done by placing the tip of the pointer into a divot hole in the old or new calibration block (or any fixed location) and clicking on the Precision Test button. Brainsight stores the current pointer location, and the Polaris takes samples while you rotate the pointer. The display shows the maximum position error encountered while moving the pointer. When the test is complete, click the Precision Test button again. Contact Rogue Research to find out if a precision test is necessary, and to obtain the expected results for the precision test according to your pointer tool. 48 Brainsight 1.7 Figure 7-5 Layout Selector Tool Bar Tool Control Pane Image views Image Controls Volume View window Volume View Window You can only see this window by importing some images. Go to File-> Import Images-> MINC, and choose roch_mri_corrected.mnc from the Sample Data folder copied to your hard drive from the Brainsight CD. After the images load, the Volume View window appears (Figure 7-5). It holds six independent Image View panes, a Tool Bar, a Tool Controls pane, and an Image Controls pane. The title bar of a Brainsight Volume View has the following format: <name of the data set>:n n is equal to :1, :2, :3, or any other number, depending on how many view windows have been opened of that data set since the beginning of the Brainsight session. • The Image Controls allow you to change cosmetic parameters of the images like the zoom, and the Brightness/ Contrast threshold level of the data displayed. — When functional data are displayed (statistical maps), and the file is a f loating-point format, the numbers shown on the controls correspond to the actual data Chapter 7 Figure 7-6 • • • 49 values, allowing you to easily set the threshold for the display. Image View panes contain the images, along with controls to configure how they are displayed. The Tool Bar is where you select a tool. The Tool Controls are specialized controls that change depending on the tool you have selected. Image Controls The image controls allow you to manipulate certain image parameters of the data set being displayed. threshold controls 2D and 3D Image View Panes This slider allows you to change the Brightness/Contrast level of the image data displayed by click-dragging on the control thumbs, that is, the black triangles. If you are overlaying functional data, use the pop-up Main Data Set | [Overlay Data Set] (showing the name of the data set) to select the data set affected by the Brightness/Contrast Threshold controls. zoom control Zoom control allows you zoom all of the 2D views simultaneously within each layout mode. To zoom the views, use the slider at the bottom left of the window. layout selector Brainsight supports three layouts for the image view window: The 6-up, a 4-up and a 1-up view. You can select the layout by clicking one of the three tabs at the top of the window. Image View Pane The image view pane is where the actual image is displayed. Controls above the image allow you to configure each view to your needs. The image view pane functions in two view modes: 2D and 3D. The controls for the view automatically adapt depending on the mode. You can change from 2D to 3D mode by selecting either the 2D or 3D view mode buttons on each image view pane. See Figure 7-6. The • • • following tools are available in both view modes: export view to file export view to QuickTime ® movie print view export view to file Clicking on the Export button activates a dialog requesting the file format for the new image file. Select the format, then enter a name for the file and press Save. 50 Brainsight 1.7 export view to quicktime movie Figure 7-7 QuickTime Movie Record Controls This function allows you to link a view to a QuickTime movie to save a dynamic view of your images. Every time the view is updated in any way, a new frame is added to the movie. Clicking the Export to QuickTime button prompts you to enter a name for the new QuickTime movie file. Press Save. A recording control window appears (Figure 7-7). This window controls the movie recording process. Pressing the red record button starts the process. Every time the view is updated, a new frame is appended to the movie. If you want to pause the recording, press the Pause button. This suspends the recording process, but keeps track of where you are in the movie. Press Pause again to resume recording. If you press record again, it erases the previous movie to start a new movie (using the same name). In order to stop recording and write the movie to file, press the rectangular Stop button. Close the window after stopping the record process. print view This function takes a snapshot of the current view and sends it to the printer. There are no options to control the print size or to include annotations in the printed image. 2D Mode The 2D mode displays individual slices of the MRI scan in different orientations. The tools available to the 2D mode are described here. Note that the tools common to the 2D and 3D modes have been described earlier in this section. 2d image view The 2D view mode controls allow you to select one of the available image planes to view, and allows you to export the image in the view to an external file, QuickTime movie, or to a printer. See Figure 7-8. Figure 7-8 2D view tools view selection Select the viewing plane by clicking on the View pop-up menu. The standard views are grouped into three categories: 1. multi-planar reformatting (MPR), which includes the familiar sagittal, coronal, and transverse planes 2. oblique views, which include in-line, in-line 90, and perpendicular. Chapter 7 3. 51 targeting view for markers and trajectories, which appears as a bull’s eye. It displays the shortest distance from the coil’s trajectory to the target. The oblique views are arbitrarily-oriented viewing planes that are normally used when the display is being driven by a tracked tool, such as the pointer or coil. The display can also be controlled off-line by opening the manual trajectory interface (Window‑>Manual Input) and selecting it to drive the display. 3D Mode The tools available to the 3D mode are described here. 3d image view The 3D view mode controls allow you to take any of the 2D planes and display them in a 3D context. This view can give you a better understanding of the three dimensional relationships of the various structures. Because interaction with the 3D view is different from the 2D view, it uses a different series of tools. See Figure 7-9. Figure 7-9 3D view tools camera zoom This tool allows you to change the magnification of the objects in the 3D view. To use it, select the tool, click the mouse in the view and, while holding the mouse button down, drag the mouse up to zoom in, and down to zoom out. The rate at which you approach or move away from the objects is proportional to the amount of movement of the mouse, that is, a large mouse movement makes the zoom fast. translate objects Figure 7-10 This tool allows you to move your point of view up, down, left and right. Select the tool, and click the mouse in the view. While holding the mouse down, move it in any direction you wish to move the objects. rotate objects Object Rotation This tool allows you to rotate the objects in the view. Because rotation is a three-dimensional operation, and the mouse only allows two dimensions of movement, depending on where you click the mouse, the movement is different. The view is divided into two zones, as shown by the yellow circle in Figure 7-10. 52 Brainsight 1.7 While the mouse is inside the yellow circle, click-dragging (dragging the mouse while holding down the click button) rotates the 3D scene in the direction of the mouse movement. If you click-drag outside of the circle, the object rotates in a twist fashion as shown by the outer red arrow. When you click the mouse, look at how the cursor changes. If the cursor has a twist arrow, it twists the image. If it does not have the arrow, it performs the grab-style rotate. 3d cursor Figure 7-11 If you see an object or structure in the 3D view that you wish to examine, click on the structure using the 3D Cursor tool. The cursor location in both the 3D and 2D views moves to that point. You will also notice that the orientation as seen in the inline and inline-90 and any tool representation in the 3D view will automatically orient itself to the normal at that surface. Note that in contrast to previous versions of Brainsight, objects other than 3D image planes, curvilinear surfaces and segmented objects will be invisible to the picking. That is, clicking on a marker on a surface for example, will result in the cursor being put on the surface, not the surface of the marker itself. 3d object selection There are many 3D objects that can be displayed in the 3D view, as shown in Figure 7-11. You can choose what you want displayed: any or all of the MPR views, oblique views, 3D axis indicator, trajectory indicator, and any annotations. In addition, you can view any curvilinear or segmented surface created. Dialog listing all the 3D objects. To select an object for display, click the box next to the object’s name. You can select one object, more than one object, or an entire group. To select an entire group (the MPR planes, for example), enable the checkbox next to the group’s name. You can also hide objects from view by deselecting the object’s checkbox; for example, if you find that the axis object is in the way, you can remove it. Coordinate Views coordinates movement and orientation of the view for the panes that have it enabled. That is, any movement in one of the 3D views will be applied to any other 3D view where Coordinate Views is active. If this box is left unselected, the view remains independent of the other 3D views. If “Automatically Add New Markers”or “Automatically Add New Trajectories” and/or “Automatically Add New Grids” is enabled, all markers and/or trajectories and/or grids that are created will automatically be displayed in the 3D view. This eliminates the need to re-open the list selector to display newly created markers and trajectories. Chapter 7 Figure 7-12 53 orientation selection This brings up the selection window for the virtual position of the subject. The camera view can be moved to a series of preselected orientations (Figure 7-12). Choose from the series of presets by clicking on the desired orientation, then click OK. Advanced Procedures 3D camera orientation selection You may require any of the following advanced procedures in the course of your study: • Importing target coordinates • Electrode Recording • Electrode Recording for Locator • Converting to MNI/Talairach Coordinate Space Importing Target Coordinates You can perform image analysis using other software to find target coordinates for TMS studies. For example, you can use software capable of displaying functional images over anatomical images. It is possible to register the coordinate space to the Brainsight™ TMS coordinate space and translate coordinates from one to the other. The images in the other software must be in the subject’s native MRI space, not in a normalized space. This procedure is similar to the subject–image registration you may be familiar with (see “Register Subject to Images,” on page 35 for that procedure). Follow these steps: 1. In your analysis software, select at least four landmarks that are easily and accurately identifiable. Note their locations and the coordinates shown within the analysis software’s coordinate space. Also note the coordinates of your target(s). 2. In Brainsight, load the MRI. Use the Marker tool to identify the same landmarks as you did in your analysis software (except the target). 3. Select Windows‑>Manual Input. A Manual input window opens with entry fields for X, Y, and Z, as well as sliders for A-P, Lat & twist. 4. In the Cursor tool control pane, select “New Manual Reg...”. The Registration Tool window in Figure 7-13 appears. 54 Brainsight 1.7 Figure 7-13 Registration Tool window 5. Figure 7-14 Electrode Locations In the pop-up menu in the Registration Tool window, select Manual as a Pointer source. 6. In the Marker tool, double-click on the first anatomical landmark to bring the cursor to its location. 7. In the Manual Trajectory window, enter the X, Y, and Z coordinates you obtained from your analysis software for that same landmark. Click on the Sample button in the Registration Tool window. You should see a registration entry with the coordinates you entered as one set of X, Y and Z coordinates. 8. Repeat steps 6 and 7 for all the anatomical points you identified. 9. When that is done, press “Apply” in the Registration Tool window and save and apply registration. Note that the registration will be listed as “Foreign” in the registration popup menu. 10. In the Cursor tool, select Manual as the Input Mode. Then select Active (just as you would for the pointer tool). Now, enter the X, Y and Z coordinates of any target from your analysis software into the Manual Trajectory window. The cursor should go to the homologous spot in Brainsight. 11. As an additional check, move the cursor to various brain locations in Brainsight and confirm that the coordinates displayed in the Manual Trajectory window agree with those of your analysis software at the same location. If they do not agree: a) An error was made in the registration process. -orb) The images in your analysis software were normalized. In case of a), change the pointer input back to mouse, delete the registration points in the registration window, and repeat the registration procedure (steps 5-11). In case of b), use the original, non-normalized images. Chapter 7 Figure 7-15 55 Using Electrode Recording 1: 2: 3: 4: 5: 6: 7: Place the subject tracker (using the tracker glasses) on the subject, being careful not to disturb the EEG electrodes. In Brainsight, open the Polaris window, and set the tracker status to ON. Ensure that the Polaris is configured to track the pointer and subject. This should be automatic. Open the Electrode Recording window by selecting Windows->Electrode Recording. The window in Figure 7-14 appears. Set the pointer input to pointer by selecting it in the popup menu. Use the pointer to identify each electrode. When the pointer is on each electrode, click on Sample to record the location. If the sample button is disabled or you hear a beep when sampling, either one or both of the pointer and subject trackers are not visible to the Polaris. Check that the camera is positioned correctly and try again. When all electrode locations are selected, click on the Save… button. At the prompt, navigate to the desired directory, and enter a file name. Close the window by clicking on the close window button. using electrode recording for locator 1: 2: Locator Electrode Locations 3. When we refer to Talairach space, we really refer to the MNI305 implementation of the Talairach coordinates, which may have subtle differences to the original Talairach and Tournoux atlas. 4. 5. 6. 7. 8. Place the subject tracker (using the tracker glasses) on the subject, being careful not to disturb the EEG electrodes. In Brainsight, open the Polaris window, and set the tracker status to ON. Ensure that the Polaris is configured to track the pointer and subject. This should be automatic. Select Windows->Electrode Recording for LOCATOR. The window in Figure 7-15 appears. Press Load Sequence… and select the sequence file, which is a file type that Locator uses. See the Locator or BESA user manual for more details about the sequence file. From the Pointer pop-up menu, choose Pointer. Type the Subject Name. According to the sequence given, sample the electrode locations, anatomical locations, and locations on the subject’s head, using the sample button beneath each list. If you made an error sampling a point, delete the point by selecting it in the list and pressing the delete button. Type the name of the electrode or anatomical landing in the “Next sample” test field and resample the point. Press Save LOCATOR…, Save Opt3D…, or Save BESA any time you want to save data. These three options are essentially variants of the Locator file format. The underlying coordinate system has subtle differences 56 Brainsight 1.7 9. between these formats. You may need to experiment and validate to see which one is most compatible with your EEG analysis software. Using the wrong format can lead to 2 mm of error in electrode locations. Close the window when you are finished. Converting To MNI/Talairach Coordinate Space Brainsight provides a simple conversion procedure that results in a conversion from MNI//Talairach co-ordinates to Brainsight coordinate space, and displays co-ordinates using both systems in the Volume View window. The transformation used is a simple affine transform, and may not be suitable for all applications. If you require accurate Talairach co-ordinates, you must reverify your data using your preferred Talairach software. First, in order to use Talairach co-ordinates on your data in Brainsight, set the default Talairach template file in Brainsight’s preferences. We provide a verified file, average_305_tal_lin_ mask.mnc, for this purpose. 1. After setting the preferences, import your subject data into Brainsight. 2. Go to the Data Groups window and select the data in the Image Data list. 3. Click the MNI/Talairach… button. The Talairach Task Assistant appears. 4. As the task assistant describes, use the cursor to locate the anterior commissure, and use the Set AC button to set it. See Figure 7-16. Figure 7-16 Set the Anterior and Posterior Commissures Chapter 7 57 5. Locate and set the posterior commissure. Click Go to Next Step. 6. Drag the bounding box limits to fit the edges of the brain in each view. If the head appears tilted in the coronal view, either due to the scan or the setting of the anterior and posterior commisures, use the Alignment bar to rectify the tilt. See Figure 7-17. Figure 7-17 Set the bounding box 7. Click Go to Next Step. If the overlay of the Talairach template the Task Assistant shows you is slightly off, click Go to Previous Step either once or twice and reset the AC, PC, and bounding boxes until you obtain the desired overlay. See Figure 7-18 for an example of the overlay. 58 Brainsight 1.7 Note that as in any linear registration between 2 objects that differ in the way an individual’s head may differ from the MNI/Talairach template, the registration will never be perfect. It is up to the investigator to determine if the registration obtained here is sufficient for their application. Figure 7-18 Talairach template overlay Figure 7-19 8. When you are finished, close the task assistant window, or press Done. In the Data Groups window, the data set will now have one more registration shown in the Information pane. Along the bottom of the Volume View window, you can now view the co-ordinates in Brainsight, World or MNI/ Talairach coordinates, as in Figure 7-19. Information along bottom of Volume View window. If a template file is verified MNI/Talairach, then after the transformation, “World” becomes “Talairach.” You can load other data sets, and if you perform the Talairach reigstration on them, you can warp the images to overlay on the main data set (the first data set in the Data Groups window). Select the data set to warp, perform the Talairach registration, and then click the Warp button in the Data Groups windown. You can now select the data set to overlay on the main data set. Errors and Troubleshooting From time to time, as with all software, Brainsight will give you an error code or other unexpected dialog during the performance of an activity. This section presents some of these dialogs in likely chronological order. At certain times when using Brainsight, the software will look for the Polaris. If there is a problem with the connection, any of three error messages appears (Figures 7-20, 7-21, 7-22). Chapter 7 Figure 7-20 Figure 7-21 Figure 7-22 If you receive the dialog in Figure 7-23, you have a version checking error: Figure 7-23 Version checking error 59 60 Brainsight 1.7 To solve this problem, either connect the computer to a network that connects to the Internet, or go to Brainsight > Preferences and turn off version checking in the General preferences. Figure 7-24 Analyze file mismatch error This dialog usually occurs when the header of the Analyze image file is incorrect. If you selected a header file (.hdr), make sure it is the correct one for the data images it imports (or you choose to import). The following Figures 7-25 and 7-26, are self-explanatory and will receive more attention in future documentation. Figure 7-25 Figure 7-26 Chapter 8: Tools and Controls Figure 8-1 Tool bar - the control pane below the six icons changes according to the selected icon T he Brainsight™ Tool bar (see Figure 8-1) provides the main interface between you and the software. The Tool Bar contains the six following tools: • Cursor • Ruler • Marker • Trajectory • Segmentation • Curvilinear Cursor Tool General Description Figure 8-2 This tool controls the position of the 3D volume cursor, which in turn controls the slice displayed in each of the 2D views in the Volume View window. There are three basic ways of moving the cursor location: using the mouse, using the scroll wheel, or using arrow keys on your keyboard. However, there are other inputs through the control pane. Control Pane Description For the Cursor tool control pane, refer to Figure 8-2. When the Polaris is in use, and a subject-image registration has been performed, you can select from the following Input Modes to act as input to drive the display: • Mouse • Pointer • Coil Subject appears in the list, however, there are no meaningful instances where you would select it. If the manual trajectory window is open, it also appears in the Input Mode menu. The behaviour of the mouse has two settings: Live enabled and Live disabled. When in Live mode, the cursor updates continuously with the movement of the mouse while the button is held down (click-drag action). When not in Live mode, the cursor updates only when the mouse button is released. Subject, Pointer, and Coil are available from the Input Mode pop-up menu if the Polaris Control window is open and tracking. Then, you can enable or disable the Active checkbox to freeze the display. Cursor tool control pane To move the cursor using manual coordinates, you first have to select the Window–> Manual Input menu. (This menu is available at all times, and brings up the Manual window which 62 Brainsight 1.7 If your mouse has a scroll-wheel, rotating it forwards and backwards has the same effect as using the up and down arrow keys. Figure 8-3 A: B: Closeup of the cursor tool’s control pane. A: The tip offset slider and indicator. B: The registration popup menu. allows you to manually set the coordinates and angles of a simulated tool. This window outputs these values and becomes available from the Input Mode pop-up menu, allowing you to enter coordinates to drive the display and the volume cursor. The Distance to Marker box shows the distance between the current location of the cursor and both the selected marker (from the Markers list in the Marker Tool control pane) and the closest marker (to the cursor). Figure 8-3A shows a closeup of the controls, highlighting the tool offset control. This control allows you to add an offset from the currently tracked tool’s tip, along the tool’s trajectory. This makes it easy to project the cursor tip from the scalp into the head while tracking the pointer or TMS coil. The visible/hidden green/red display will turn green/amber to indicate that the currently tracked tool (and subject tracker) are visible but the amber is to remind you that the displayed tip is not the true tip location, but the projected location using the offset value from the slider. The popup menu at the bottom of the control pane (Figure 8-3B) allows you to select the current registration that is applied to map external coordinates (e.g. the pointer,) to the underlying Brainsight’s image coordinates. For example, after performing a subject to image registration, the “Subject” to brainsight registration is used to map the pointer coordinates to Brainsight’s coordinate system. The menu allows you to select any pre-existing registration or to initiate a Subject Registration by selecting either “New. Manual Reg..” for the manual registration or “New Assisted Reg...” using the task assistant. Typical Usage Notes Use the Cursor tool to initiate a subject–image registration by choosing “New Assisted Reg...” from registration pop-up menu. When the Cursor tool is active, you can click the mouse on any 2D view to move the volume cursor to that point. The position of the cursor is shown by the cross-hairs in each 2D view. To use the arrow keys or the mouse’s scroll wheel (if one is present) to move the cursor, place the mouse over any of the 2D views and strike either the up or down arrow keys. This causes the cursor to move into and out of the plane of that view by steps of one millimetre, or any other value set in the General Preferences. For example, place the cursor over the sagittal view and press the up arrow key. The cursor moves either deeper or more superficially through the image (subject left-right), perpendicular to the sagittal plane. While moving various objects (for example, cursor and markers) you can constrain their movements to either the vertical or horizontal axis by holding down the shift key during movement. You can use the Manual Input (with Cursor Tool Input Mode set to Manual, Active), for instance, to rapidly enter co-ordinates for annotations that have been exported from a different time or project using the same subject’s MRI data. Chapter 8 63 Ruler Tool General Description The accuracy of the measurement depends on the voxel size information in your image header being correct. Perform a validation before making any measurements. The Ruler tool provides an easy way to make measurements in any 2D view. Control Pane Description The Ruler tool has no control pane objects. Typical Usage Notes Activate the Ruler tool by clicking the button, and click-drag the mouse in any 2D view. Clicking the mouse button down sets one end of the ruler to that point. While holding the mouse button down, drag it around. While the button is down, the other end of the ruler follows the mouse. A line is displayed between the ends of the ruler, and the length in millimetres is displayed between the two ends. The Ruler tool constrains movements to the horizontal or vertical axis while the shift key is held down. Figure 8-4 Marker Tool General Description Use the Marker tool whenever you wish to place (or “drop”) a marker in the volume. In this way, you can recall recorded locations for later review, such as landmarks for subject–image registration or targets. When the tool is active, you have three ways to drop a marker: • Clicking the Mark+ button when the cursor is over the desired spot • Clicking the mouse within a 2D view over the desired spot (only if Lock checkbox is disabled) • Using the Rapid Fire feature when tracking a tool Control Pane Description For the Marker tool control pane, refer to Figure 8-4. Marker tool control pane The Markers list box in the Tool control pane shows all the markers. Clicking on a marker in the list will highlight it in the list and in the 2D and 3D views by changing its colour to the highlight colour. Double-clicking on a marker snaps the cursor to the marker’s location. The Mark + button drops a marker at the cursor location. Both the Mark + and the Edit buttons bring up the Edit Marker dialog, as seen in Figure 8-5. This allows you to change the name, 2D and 3D sizes, and colour of the marker. The normal colour is displayed when the marker is not the selected marker in the list, while the highlight colour is used when the marker is selected. 64 Brainsight 1.7 Figure 8-5 This makes it simple to distinguish a particular marker in a crowded screen. The “Rapid Fire…” button opens the Rapid Fire window. The Rapid Fire option, while Active, allows you to successively drop several markers with a minimum of interaction with the software interface. For more information about the Rapid Fire feature, see “Rapid Fire Configuration and Operation” on page 40. In the Rapid Fire edit box, the contents of the Prefix and Index fields determine the names of the markers as they are created. For example, if the Prefix is “Sample_” and the Index is “1,” then the first marker is called “Sample_1.” For subsequent markers, Rapid Fire automatically increments the Index number, while the Prefix name remains the same. Edit Marker dialog Enabling or disabling the Display in 2D checkbox allows the markers to be shown or hidden. The Display labels box displays or disables (hides) the marker labels on the image. Figure 8-6 If you wish to save the coordinates of the markers to a text file, press the Export button. Brainsight prompts you for a file name. After entering it and pressing Save, it creates a file containing the names and 3D locations of all the markers. The 3D locations of the markers are stored in Brainsight’s internal coordinate space. The origin of this space is the anterior-inferior-right corner of the image data, with the X direction going towards the left, the Y direction towards the anterior, and the Z direction towards the superior. The units are in millimetres. To prevent accidental movement of the markers, click on the Lock checkbox. With the lock on, you can select markers by clicking on them without accidentally moving them. Typical Usage Notes To drop a marker at the current cursor location, click the Mark + button in the tool control pane. After entering the name and pressing OK, Brainsight places a new marker at the current cursor location. Alternatively, make sure that the “Lock” checkbox is unchecked and click the mouse in any 2D view. A marker is dropped at that location. Immediately after clicking the mouse, you receive a prompt to name the marker. Enter a name and press OK. Pressing Cancel instead avoids creating the marker. Rapid Fire Trigger windows (Marker tool and Trajectory tool), trigger via mouse click, keyboard key (typically for use with the X-Keys switch interface) or using the TTL input via the LabJack interface on certain Brainsight systems To select a marker, click on its name in the Markers list. To delete a marker, select it in the list box, and click the Delete button, or press the Delete key. To change the colour of a marker, Command-double-click on the entry in the list, and change the colour in the corresponding window. With Rapid Fire mode, you can use a keyboard trigger in conjunction with an external USB device (such as the X-keys Switch) to trigger recording of markers from the coil signal. In rTMS applications, it may be desirable to record the first pulse of a pulse train, and ignore the rest of them. Set the “Dead Time” to a value just higher than the pulse train duration to ignore the remainder of the pulse train. Chapter 8 Figure 8-7 65 If you are not happy with the location of a marker, you can move it without having to delete it. Disable the Lock checkbox, then double-click on the marker entry in the list, which snaps the cursor location to that of the marker. Then, in any 2D view, click and drag (keep the mouse button down) the marker to the desired location. The Marker tool constrains the movements of the marker to horizontal or vertical axes while the shift key is held down. Trajectory Tool General Description The Trajectory tool stores the position and orientation of the cursor. This tool is useful at times when recording the position and orientation of tools are of interest. It is similar in functionality to the Marker tool. Control Pane Description For the Trajectory tool control pane, refer to Figure 8-7. The Trajectories list box in the tool control pane shows all the trajectories. The Mark + button creates a new trajectory. It brings up the New Trajectory dialog (Figure 8-8) where you can change the name, size, or colour of a trajectory. Trajectory tool control pane To change an existing trajectory’s name, size, or colour, select an entry in the list and click the Edit… button, or command double-click the entry in the list to obtain the Edit Trajectory window (Figure 8-8). The Delete button is active when a trajectory in the list is selected. Press it to remove the trajectory. Figure 8-8 The “Rapid Fire…” button opens the Rapid Fire window. The Rapid Fire option allows you to successively drop several trajectories with a minimum of interaction with the software interface. In the Rapid Fire edit box, the contents of the Prefix and Index fields determine the names of the trajectories as they are created. For example, if the Prefix is “Sample_” and the Index is “1,” then the first trajectory is called “Sample_1.” For subsequent trajectories, Rapid Fire automatically increments the Index number, while the Prefix name remains the same. For more information about the Rapid Fire feature, see “Rapid Fire Configuration and Operation” on page 40. Enabling or disabling the Display in 2D checkbox allows the trajectories to be shown or hidden. The Display labels box displays or disables (hides) the trajectory labels on the image. Trajectory edit window The Convert to marker... button enables you to create markers based on trajectories, with a user-defined offset along the trajectory. Use a unique Prefix for markers created by this tool so you do not confuse them with other markers. 66 Brainsight 1.7 Typical Usage Notes Use the Trajectory tool whenever you wish to store a trajectory (position and orientation) in the volume. You typically use this tool to record the location and orientation of the TMS coil during a stimulation experiment. To record a trajectory, click the Mark + button in the tool’s control pane. The box in Figure 8-8 appears. To select a trajectory, click on its name in the list (doubleclick on it to orient the views of the Brainsight window to that orientation). To delete the trajectory, select it in the list box, and press the Delete button in the Control pane. To change the colour of a trajectory, Command-double-click on the entry in the list, and change the colour in the corresponding window. When you click the Convert to marker... button, the window in Figure 8-9 appears. Enter a unique Prefix and the Offset (distance along the trajectory) for the markers you want to create, and click OK. Figure 8-9 Convert to Markers window Segmentation Tool General Description The Segmentation tool is used for segmenting volumes to measure the volume of certain anatomical structures (for example, the hippocampus). It can also be used to render surfaces for structures, for example, you can render a skin surface of the subject’s head (skin segmentation). Chapter 8 Figure 8-10 67 A surface is created in two steps. The first step is called segmentation. This involves selecting the voxels that define the object we wish to represent as a 3D surface. The second step is to initiate a process called “Marching Cubes” which will, as the name implies, march over the surface of the segmented voxels to create a mesh that can be displayed in the 3D view. The starting point of this march is defined by a seed point placed on a lower edge of the segmented voxels. Control Pane Description The control pane for the Segmentation tool is shown in Figure 8-10. The Volume Objects field contains the volume segments you have created. The New button will open a new window to allow you to enter the required information to create a new volume object (Figure 8-11). The Delete button will delete the currently selected object and the Edit button will open the New dialog box again to allow you to change the name, colour or opacity of the object. Segmentation Tool control pane Figure 8-11 The Opacity slider changes the opacity of the segmented voxels displayed in the 2D view during the segmentation process. The Display All check box allows you to view all segments at one time as opposed to the currently selected volumes. It will also show all volumes even when another tool (e.g. cursor tool) is active. The Show Volumes… button displays a dialog (Figure 8-12) that lists the volume calculation, in mm 3, of the segmented structures. New Volume input window. Use the Opacity slider with cvaution as the resulting translucent volume may result in slow display performance. After you have clicked on the New button and entered the required information, the Threshold window appears, as shown in Figure 8-13. Figure 8-13 Figure 8-12 Show Volumes dialog A) B) Segmentation Tool Threshold window. A: Manual segmentation controls. B: Fast skin controls. The threshold controls on the left side allow you to set the range of intensity values within the volume you wish to select. The threshold opacity and colour allow you to set the colour and 68 Brainsight 1.7 opacity of the selection to allow you to see the selection as well as the underlying image data. The “Smooth Image Data” function allows you to smooth the images to obtain a surface with a smoother appearance. It is recommended when generating skin and/or skull surfaces. The “Make Smooth Mesh” employs an improved algorithm to generate smoother and more accurate meshes. It is disabled for non-isotropic image data. There are two methods for segmenting objects, “Manual” and “Fast Skin”, both are described in the typical usage section below. Manual Segmentation Controls The manual method allows you to control each step of the segmentation while the fast skin method allows you to generate a skin segmentation with minimal interaction. Choose the method by selecting it in the tabs along the top of the window. In the manual mode, you can select which segmentation tool to use (e.g. Seed Area) by selecting the button. The selected tool will act when you click the mouse in the image view, so the tool’s description below applies when the tool is active and you click in the image view. • Seed Area (default) creates a seed object at the click location and then fills all areas connected to the seed whose intensities are within the threshold range, similar to a paint bucket tool in a drawing program. Moving the cursor to another slice will pull the seeds along with it and re-apply the fill from those points to the new slice automatically. • Add Line and Fill Region work together to manually fill a region delineated by structures, which can be isolated or missed by using the Threshold range control. Typically you add a line around a structure to delineate, then select the fill region tool and click (or stay in the add line tool and use the option-click short-cut) in the region to fill the region. • Cut Line and Clear Region work together to clear a region incorrectly filled by a seed fill. It functions in the same way as the Add Line/Fill Region tools, except that they clear selected pixels rather than select them. • Clear Slice will remove all seeds and selected regions from the slice. Use this tool if some seeds have migrated (as you move from slice to slice) outside the region of interest, and you want to clear the slice and drop new, better located seeds and move on. Invert allows you to invert the segmentation selection of the volume. For example, you may set a low threshold and drop seeds in the surrounding area outside the head (the air) and them Chapter 8 69 propagate that throughout the volume. Clicking invert will invert the selection, selecting the head and clearing the air. This function is most useful in segmenting the skin manually (in instances where the automatic fast skin function fails due to image volumes that are inhomogeneous). + Mesh Seed places a mesh seed where the cursor is located. For best results, position the cursor by command-clicking as close to the edge of the segmented area as possible (use the Zoom to help you with this), and then click + Mesh Seed. If you drop the mesh seed in a bad location, you can simply move the cursor and click +Mesh Seed again to move it to the new location. Update mesh allows you to create a 3D surface based on the segmented voxels, using the mesh seed as the starting position. Fast Skin Controls The Fast skin controls are much simpler than the manual controls. The Segment & Update buttons initiates the automatic process of segmenting the volume within the box (delineated on the 2D views) using the threshold range set by the threshold controls. Once segmented, a mesh seed is dropped at the lower edge of the segmented voxels and the marching cubes function is initiated. Figure 8-13 If the initial attempt to “Segment & Update” yielded an acceptable segmentation, but the seed was improperly placed, the Tweak Seed & Update button allows you to tweak the seed location and restart the marching cubes step. Typical Usage Notes Original Image Fast Skin Segmentation The “Fast Skin” segmentation is described in the tutorial (Chapter 5). Manual Segmentation Threshold Displayed Seed Applied Illustration of the threshold-seed process. Some steps in this procedure depend on what you are attempting to segment. If the structure has a clear range of intensities that differentiate it from surrounding structures, then the segmentation process will mostly involve setting the upper and lower thresholds to select the intensity range corresponding to the structure of interest, and dropping seeds in the area. If the structure has similar intensity values as the surrounding structure, then you will have to depend more on the Add Line/ Fill Region and Clear Line/Clear Region tools to delineate the objects slice by slice. 1. Choose the Segmentation Tool. 2. Click New… to create a segmentation volume. You can edit the name of the volume and the colour or accept the default. Decide on the orientation in which you wish to work in in delineating the structure of interest. 3. The Threshold window appears. Select the manual tab. 70 Brainsight 1.7 4. 5. Figure 8-14 Thresholded Seed Applied 6. Add Line Fill Region Illustration of adding a region using the add line/ Fill region tools. 7. Figure 8-15 8. 9. Thresholded Draw Clear Line Seed Applied Clear-Fill Region 10. Illustration of clearing a region using the clear line/clear region tools. 11. 12. 13. Move the cursor to the slice in which you want to start. Verify that the threshold highlights the desired structure, select “Seed Area” and drop a seed in the highlighted area (see figure 8-13). Note that the seed will apply a fill starting at the seed point using the intensity range displayed by the threshold colour. Choose the seed location keeping in mind that as you move to other slices, the seed will follow to these slices. Choosing a location where the structure will likely be in the next slice will increase the chance that the seed will land on the desired structure again. Add more seeds as required to select all the regions of the structure you want to segment. Click either “Prev Slice” or “Next Slice” to move to the adjacent slice and bring the seeds along. The seeds from the previous slice will propagate to the new current slice and re-apply. Verify that the structure to be segmented has been delineated. If a region was left out and falls within the threshold (highlighted), then drop another seed in the region. If one of the seeds fell outside the region of interest and is selecting unwanted regions, select the “Clear Slice” tool and click on the image to clear all fills and remove all seeds. Adjust the threshold if required and drop new seeds in the highlighted regions to select the region of interest. If part of the region of interest falls outside of the threshold, you can draw it manually to select it. Select the Draw Line tool, and draw a closed outline around the region of interest (see figure 8-14). Select the Fill tool and click inside the region of interest. The fill operation will start at the click point, and f lood until it reaches the outline drawn in the previous step (or any other pixels that were selected). Alternatively (short cut), instead of selecting the fill tool, remain in the draw line tool, and option-click to perform a fill operation. This allows you to rapidly draw and fill several regions without switching tools. If you need to clear a region that was selected either with the seed-threshold fill or the draw-fill operations, then select the Cut-line tool, and draw an outline of the region to be cleared (Figure 8-15). Note that while drawing, instead of drawing coloured pixels, you are removing pixels from the selected region. Once the region has been “excised”, clear the centre by option-clicking (to invoke the clear region tool) the centre of the selection to be cleared to “clear-fill” the region to be erased. Repeat steps 6-10 until the structure has been segmented. Move the cursor to the bottom of the region you segmented, and on an edge. Using the + Mesh Seed button, drop a mesh seed at that location. Click Update mesh. The marching cubes operation will “march” upward and generate the mesh. Chapter 8 71 14. In a 3D view pane, click on the list selector button, and select the newly segmented object. The mesh of the segmented object will appear. Curvilinear Tool General Description Figure 8-16 Curvilinear surfaces derived from guide curves drawn in the sagittal (left) and coronal (right) planes. Note that in the sagittal derived surface, the temporal lobes are not represented while the coronal derived surface lacks anterior and posterior poles. Figure 8-17 The Curvilinear Tool allows you to create detailed 3D reconstructions of the brain. Create a reference surface by drawing guide curves on several slices of a given image plane, which act as ribs for the surface. The Curvilinear Tool uses the reference surface to automatically create a series of surfaces that are concentric and iso-distant from each other, at progressively deeper cuts. It is analogous to peeling the layers of an onion. Because the curves are drawn in a single plane, they cannot be completely defined over the entire surface of the brain. For example, when using the coronal plane to the draw curves, the resulting reconstruction will have well defined temporal and parietal lobes, but the poles of the frontal and occipital lobes are omitted. In contrast, if the sagittal plane is used to draw the curves, the frontal and occipital lobes will be well-defined but the poles of the temporal lobes are omitted. Examples of reconstructions using the sagittal and coronal planes are shown in Figure 8-16. Control Pane Description The control pane for the Curvilinear tool is shown in Figure 8-17. The Surface Families are the 3D surfaces you have created. Each can be viewed as a 3D Object in a 3D view pane. New... and Edit bring up the Curvilinear Surface Family Preferences dialog (Figure 8-18) to create or change a new or a selected surface family. Delete discards the surface family. Curvilinear tool control pane. 72 Brainsight 1.7 Figure 8-18 Figure 8-19 Curvilinear Surface Family Preferences Cornal image with a guide curve drawn along the cortical surface. Each control point is shown with an X. Figure 8-20 The Quality bar is mirrored in the Curvilinear Surface Family Preferences. It defaults to high quality. It controls the trade-off between memory usage and quality for the curvilinear surface. Lower the quality if you encounter rendering problems. The Peel slider control allows you to select the depth of the surface you want to view, essentially navigating through the layers. If Edit Curves is checked, the view pane displays the guide curves (Figure 8-19), interpolated curves, and guide curve indicators of the current surface family. When you begin to draw any new guide curve, a short line appears in the other two perpendicular MRI views (see Figure 8-20). These lines are Guide Curve Indicators, representing the position of the guide curves within that plane. They enable you to find any guide curve for editing. The process bar indicates how much of the current surface has been calculated. Brainsight calculates only one surface at a time. Typical Usage Notes Guide curve indicators are in red 1. Click New button in the Curvilinear tool control pane. 2. In the Curvilinear Surface Family Preferences dialog that appears (Figure 8-18), enter the information required: a) surface family name b) guide curve plane c) quality (default is high; lower if you have rendering problems) d) the 2D interpolation to Nearest Neighbour or Linear (if you don’t know which you prefer, use the default value) e) Optional, if using the MinIP or MaxIP renderer: set the slice thickness. f) desired iso-distant depths (surface offsets) Chapter 8 • -or• Figure 8-21 3. 4. A B Illustration of the drawing direction for curvilinear surfaces for the two display conventions (A: Normal, B: Radiology). R indicates the subject’s right side. Figure 8-22 Curve drawing grazing the top of the sulci; depth generation during reconstruction 5. 6. 7. 73 Click Add. Usually, one starts with a 0 mm offset surface, and then enters subsequent offsets (for example, 2, 4, and 6 mm). Click Add Series. Enter a start depth, an end depth, and a step size. For example, enter a start depth of 0 mm and end depth of 20 mm in steps of 2 mm. Click OK. Draw the guide curves. Make sure you draw the curves in the same direction (clockwise or counter-clockwise) as shown by the direction indicator in the top left of the image view. The direction of drawing (clockwise or counter-clockwise) is dependent on the imaging convention (normal or Radiology, Figure 8-21, which is set in Brainsight’s General Preferences). If you are in Radiology mode, you need to draw curves in counter-clockwise direction, and clockwise if you are in normal mode. In order to get a consistent depth throughout the surface, proper drawing of the guide curves is essential. The goal is to have the curve graze the tops of each gyrus. Do not try to have the curves dip into the sulci. See Figure 8-22. When you have finished drawing the curve for this slice, click to another location in the direction perpendicular to the reconstruction plane (in one of the other views: sagittal or transverse in this example) to move the cursor, or use your mouse’s scroll wheel. This changes the slice displayed in the view in which you are drawing the guide curves. There are no arbitrary rules as to the spacing of the guide curves; you are free to decide how to space them. However, it helps to have one guide curve in the middle of the brain and one at each extremity, in the plane of your choice. Then add new guide curves between pairs of existing guide curves to subdivide the sections between them, until the interpolated curves agree sufficiently with the actual brain outline. Repeat steps 4 and 5 no less than three times. To view the results, set a view to 3D mode, click on the list selector and select the object you just created from the list. It will then appear in the 3D view. You can manipulate the object in the 3D view as you can with any object, and you can also set the peel depth using the slider in the curvilinear tool’s control pane. The following are useful tips for adjusting or removing guide curves: • Move any guide curve control point on the curve by click-dragging it to the desired location. To remove a point on the curve, click to highlight it (in red), and press the Delete key. Also, if you click the mouse between two 74 Brainsight 1.7 • • Figure 8-23 • • • Example of a grid over the motor cortex and surrounding area. points, a new control point is inserted in between the two points. To edit a curve, click the desired guide curve indicator. This brings you to the corresponding MRI slice that you wish to edit. Note: with multiple windows open, only one will allow you to edit a surface. If you go to a slice between guide curves, the software displays where the surfaces intersect that slice by displaying dark-green curves on that slice. This indicates how well the interpolated surface conforms to the actual surface at that slice. If, as you add more guide curves, the interpolated curves conform to the surface you want, you need not add more. If the interpolated curves do not conform well to the surface, add a new guide curve. To change the offset values after you have begun drawing the surfaces, select the surface family in the list located in the Tool Control panel. Once selected, click Edit to display the Curvilinear Surface Family Preferences window (Figure 8-18). Make changes to the offset values. If you create a surface family and the concentric surfaces seem to expand in size rather than contract (or vice versa), you drew the curves in the wrong direction. Delete the surface and start again, paying attention to the red curve drawing indicator in the top left of the view. If you want to remove a surface family, select the Surface in the Surface Offsets panel, and click the Remove button. Grid Targeting Tool General Description In many TMS applications, it is necessary to perform a mapping operation where one or more stimuli are delivered sequentially to a grid of points covering an area of cortex. For example, you may want to stimulate a series of points over a motor area while measuring the MEP response. The grid tool allows you to place a grid of any dimensions over an area of the brain and use it as a template to create a series of markers or trajectories on the scalp (as defined by the skin segmentation) or the cortex as defined by a curvillinear reconstruction. It is important to keep in mind that when creating and manipulating a grid, you are essentially preparing a template. You are not manupulating Markers or Trajectories directly, but rather you are manipulating a template that you will use to create a series of Markers or Trajectories in the last step. Chapter 8 Figure 8-24 75 Control Pane Description Grids are created, edited and deleted by clicking on the “New..”, “Edit...” and “Delete...” buttons respectively. Like the Marker and Trajectory tools, the 2D display of the nodes and their labels are controlled by the “Display in 2D” and “Display Labels” checkboxes. If the “Perisitent Display” checkbox is toggled, the grid will be displayed regardless of the current tool. Toggling it off will hide any created grids when other tools (e.g. cursor, Marker) tools are selected. Typical Usage Notes: Control pane for the grid control. The grid tool is usually used to create an array of markers or trajectories by following these steps: • Use the segmentation tool to create a 3D skin object (see page 66) or use the curvilinear reconstruction tool to create a 3D curvilinear surface. • Configure a 3D view to see the surface and a representation of the cursor e.g. cursor sphere or trajectory stick). Configure 2 of the 2D views to display the inline and inline-90 views • Use the 3D cursor tool to select the centre spot where you wish to place a grid • Select the grid tool and create a grid by clicking “New...” in the tools control pane. • Set name, the number of rows and columns as well as the spacing between the rows and columns. • Use the AP and Lat angle sliders to tweak the overall angles of the grid to ensure that it is normal to the surface. • Use the twist angle slider to rotate the grid until you have the desired orientation. • Use the Curvature slider to project the grid to the curved surface. • If you are planning to create a series of trajectories, use the trajectory twist angle to orient the trajectories in the desired orientation (the orientation you will want to have the coil be at for stimulation). • If the grid is where you want it, click either the “Copy to Markers” or “Copy to Trajectories” to create a series of markers or trajectories for each node of the grid. • Select the Marker or the Trajectory tool to confirm that the grid was copied to the appropriate list. • Use the Markers or Trajectories during your normal TMS session. Detailed Steps Step 1: Use the segmentation tool to create a 3D skin object or use the curvilinear reconstruction tool to create a 3D curvilinear surface. The easiest way to place and orient a grid is to have a 3D surface to select the location. When you use the 3D cursor tool 76 Brainsight 1.7 to click on a skin or curvilinear reconstruction, the position of the cursor is set to the location of the click. The orientation (as observed with the inline and inline-90 views and by the trajectory stick object in the 3D view) is also set to the normal of the surface at the location of the click. One can use the skin or brain as the location for the grid. Using the brain has advantages, the main one being that the targets will be cortical targets rather than scalp targets. Using a cortical target will make your procedure more tolerant of small changes in the orientation of the coil. For example, Fig 8-25 illustrates the coil placed over a trajectory whose origin is scalp based. The trajectory projects into the cortex from the scalp. If the position and are perfect, then the correct part of the cortex will be stimulated. This result is somewhat indirect, like trying to put a key in the lock by tying the key to a long stick. A small error in orientation of the coil results in a targeting error in the cortex. Figure 8-25 Left image shows a correctly placed coil over a target and trajectory defined at the scalp that projects into the cortex to a desired target. Right image shows the same target and trajectory definition but the coil has been placed with an error in orientation. Despite being placed on the scalp target, a different part of the cortex will be stimulated. Fig 8-26 shows a similar setup where the target was defined in the cortex. The left image shows the same target whith a similar orientation error as before. Since the user was able to center the coil over the target, the only change is a slightly different approach to target than desire. In the end, the desired part of cortex will still be stimulated. Thus the end result will be more acceptable than using a scalp based target as shown above. Chapter 8 77 Figure 8-26 Illustration of the increased robustness of cortex based targets. Left image shows a correctly placed coil over a target and trajectory defined at the cortex. Right image shows the coil placed over the cortex-based target with a similar error in trajectory as described in Figure 8-25. In this case, since the coil is still pointing to the target (e.g. using the trajectory targetting bull’seye) the desired brain tissue will still get stimulated, albeit from a slightly different angle. Step 2: Configure a 3D view to see the surface and a representation of the cursor (e.g. cursor sphere or trajectory stick). Configure 2 of the 2D views to display the inline and inline-90 views Figure 8-27 Preferred layout for placing a grid Step 3: Use the 3D cursor tool to select the centre spot where you wish to place a grid Note that when you use the 3D cursor tool to click on a surface, the orientation of the display (as seen by the inline and inline-90 and 3D view) will automatically be set to the normal to the surface at the click point. 78 Brainsight 1.7 Figure 8-28 Step 4: Select the grid tool and create a grid by clicking “New...” in the tools control pane As soon as you click on the new button, a few things will happen. First, a window will open allowing you to view and edit key parameters of the grid (Figure 8-28). Next, you should see the grid in its default format appear in the 3D view and in the oblique 2D views. Step 5: Set name, the number of rows and columns as well as the spacing between the rows and columns. You can enter a different number of rows and columns as well as different spacing for the rows and columns. The colours and sizes will be applied to all the nodes in the grid. Grid configuration screen. You can edit all the relevant parameters for the grid Figure 8-29 Step 6: Use the AP and Lat angle sliders to tweak the overall angles of the grid to ensure that it is normal to the surface. Normally, the angle should have automatically be set to the normal. This is an approximate value and can be adjusted to accommodate for the overall curvature of the surface under the entire grid. Fig 8-29 illustrates the concept. Step 7: Use the twist angle slider to rotate the grid until you have the desired orientation. Once the orientation is correct, you can rotate the grid about its central axis to optimize coverage over your area of interest. Fig 8-30 illustrates this. Figure 8-30 Illustration of using the Twist slider to rotate the grid about its center. Moving the A/P. Lat and Twist sliders can be used to tweak the orientation of the grid. Step 8: Use the Curvature slider to project the grid to the curved surface. So far, the shape of the grid is f lat. You can approximate the curvature of the surface by adjusting the curvature value. The curvature is spherical in nature so it only approximates the curvature of your surface. Choose the curvature value that best approximates the surface (fig 8-31). Note that the normals of the trajectories also spread out according to the curvature (fig8-32). Chapter 8 79 Figure 8-31 Curvature adjustment using the Curvature slider Figure 8-32 Figure 8-33 Adjusting the curvature also adjusts the normals of the trajectories. Increasing the curvature spreads the orientations out in a spherical manner. Step 9: Set the trajectories’ twist angles When using trajectories for targeting, you can make use of the twist angle in addition to the position and orientation (review the operation of the trajectory targeting view (page 40). You can set this angle by using the twist angle slider. Note how the direction of the vectors change (fig 8-33). The arrow at the base of the vector should point forward in the coil’s perspective (away from the handle) The twist slider allows you to twist each trajectory about their respective axes. The twist can be used to set the twist angle of the TMS coil using the trajectory targetting assistant, Step 10: Use the grid template to finally create markers or trajectories for each grid node. While the grid displays an array of trajectories, it cannot be used as a sequence of targets yet. The grid serves as a template to create a series of markers or targets. Once you are satisfied with the grid, you can use it to generate the markers or trajectories. If you want a sequence of markers, click on “Copy To Markers”. A marker will be created for each node in the grid. The naming convention will be Grid Name: row#,col#, where Grid Name is the name you entered for the grid 80 Brainsight 1.7 Chapter 9: Hardware Reference T his section describes the Brainsight™ TMS hardware and provides care instructions. Hardware Components Tool Box The • • • • • • • Figure 9-1 tool box (for the non-cart system) typically includes: the pointer two trackers (coil and subject) coil handle ring (prior to attachment to coil) or other coil adapter subject tracker glasses and headstrap coil calibration block and mounting lug hex keys and rods three spare ref lector spheres. Items may vary according to your site needs. Calibration Block The plate has three threaded pins. One pin is the point on which you place the hot spot of the coil for coil calibration. Two pins are to help you line up the axis of the coil and keep it stabilized over the plate during the calibration process. Their height can be adjusted up or down to accommodate different coils. See Figure 9-1. Included with the calibration block is a lug bolt for installation on the underside of the block, so that the calibration block can be installed into the TMS Frame receptacle normally used for the chin rest. This is practical, as the TMS Frame is often already placed in the field of view of the Polaris, and it holds the calibration block stable while you use both hands to steady the coil during calibration. Pointer Coil calibration block stabilizing pins The pointer tool is used to identify anatomical landmarks on the subject and to verify the subject–image registration. It consists of a narrow metal shaft connected to a handle which also holds three ref lective spheres. See Figure 9-2. Handle the pointer with care, as the accuracy of the system depends on the pointer shaft being straight. If it gets bent, contact Rogue Research. 82 Brainsight 1.7 Figure 9-2 Pointer tool and various trackers Coil Tracker The hardware to track a coil consists of three parts: • coil tracker, which is a triangular array of three spheres • coil-specific coil handle ring (sometimes referred to as a coil handle collar) • hex rod Figure 9-3 Refer to Figure 9-3. The coil handle ring is usually fixed permanently onto a coil, therefore, if you have more than one coil, you can buy one for each coil. Two screws hold the ring halves together in place on the handle. One tracker can be used with many coils. The hex rod is used to attach a tracker to the handle. The hex rod and tracker can be removed and fixed to a coil handle ring quickly, so you can easily move the tracker from coil to coil. You can also vary the position (orientation) of the hex rod at either end. This enables you to orient the tracker to face the position sensor camera when the coil is in the stimulating position over the subject. Subject Tracker Coil tracker The subject tracker allows the Brainsight system to monitor the position of the head by attaching a tracker to it. By tracking the head, Brainsight can make it the reference for all other tools (such as pointer and coil tracker). These tools can be localized in the head’s coordinate space rather than the camera. This has two benefits: • The system detects and shows both coil movement and head movement, both of which can cause you to miss the target. • The position sensor camera can be moved without loss of the registration from the subject to the images. This is important if adjustments to the setup are required after the registration. Chapter 9 83 There is more than one way to attach the tracker to the head to accommodate different experimental setups. The most common subject tracker is the head strap. It is a simple elastic strap with Velcro ® ends, allowing it to fit snugly and comfortably on any head. There is a small f lat pad that rests on the head to stabilize the hex rod collar connected to the tracker itself. See Figure 3-3. If the subject is wearing electroencephalograph (EEG) electrodes, the strap can obscure them. In this case, use the tracker glasses. Tracker glasses consist of a pair of safety glasses with hex collars mounted on either side of the frame. The glasses’ arms and frame can limit access to frontal areas of the brain. In that case, the head strap would be more suitable. In cases where attaching a tracker to the head is impossible, use the forehead rest mount for the subject tracker. This method is the least accurate. The forehead rest of the head and coil holder, which has two hex-rod mounting points, does not track the head directly. It can be used in cases where you are confident of head stability during the experiment, while allowing for movement of the camera without loss of registration. Reflector Spheres Trackers use ref lector spheres that are visible to the Polaris camera. These spheres are connected to special posts. The spheres are fragile and sensitive to dirt. Any physical damage or dirt on the spheres can affect the accuracy of the tracker. Therefore, avoid touching the spheres directly with your hands as the oils can harm the ref lective surface. Use a lint-free cloth or dust-free latex glove to manipulate them. Each ref lector should be inspected before every use, and replaced if any visible dirt or damage is noticed. replacing tracking spheres Remove the damaged sphere by pulling it off the post. Some force may be required. Then, using a lint-free cloth, push a new replacement sphere onto the post until you feel it click into place. An improperly placed sphere can have an adverse affect on accuracy, or can result in the camera failing to track the tool at all. X-keys Switch The X-keys Switch Interface (Figure 9-4) is used in conjunction with the coil tool for the Rapid Fire feature of the Marker and Trajectory tools. 84 Brainsight 1.7 Figure 9-4 The X-keys switch box is programmed to send a specific key stroke (such as the ‘a’ key) when it receives a TTL trigger pulse. The Rapid Fire control in Brainsight must be set to trigger on that same key. Thus, when a TTL trigger is sent to the X-keys, it sends the keystroke to Brainsight, which in turn triggers the rapid fire tool to record a marker or trajectory. X-keys Switch Interface Many TMS tools come with a transistor-to-transistor logic (TTL) signal feature (see Figure 9-5) that allows you to trigger external devices from the coil. The X-keys Switch device works with this TTL pulse to send a signal to the Brainsight computer. Brainsight’s Rapid Fire keyboard trigger mode receives this signal from the X-keys Switch. The signal value must be programmed as a character at both the X-keys Switch and the Rapid Fire trigger. When Brainsight receives this character, it triggers the Rapid Fire feature of either the Trajectory or Marker tool to automatically drop a marker. Rapid Fire behaves as if you had typed that key on the keyboard. The X-keys switch is manufactured by P. I. Engineering. Their website is http://www.xkeys.com. connecting the x-keys switch 1. Figure 9-5 No Yes Ensure that the TMS trigger output is configured to go from logical 1 to logical 0 when the coil is fired. Ensure that the trigger is set to output a signal that goes low (see Figure 9-5) during stimulation (refer to the stimulator documentation). 2. Connect the TMS trigger (or manual hand switch “pickle”) output to a switch input of the X-keys Switch using the appropriate cable and adapter. 3. Connect the USB cable from the X-keys Switch (X-Keys USB) to the Brainsight computer. 4. Note the character associated with that particular switch port. 5. When, in the course of the study, you are ready to record points, click on the Rapid Fire button in the Marker or Trajectory tool. 6. Select Keyboard. In the Key field, enter the keyboard character associated with the X-keys Switch port. Chapter 9 85 7. Enable the Active checkbox. A new marker is automatically created whenever a signal is received from the Xkeys Switch (which happens when the TMS coil is fired). 8. When the experiment is complete, deselect the Active checkbox to stop monitoring the stimulator. LabJack Interface Figure 9-5 More recently, a new interface was adopted based on a “LabJack” analog to digital acquisition system. The box has a USB connector and two BMC connectors. Connect the USB to your Macintosh (do not use a USB connector on the keyboard). One BNC connector is designed to accept TTL pulses (e.g. from the stimulator) and requires a TTL pulse width of at least 200µsec and can accept both low-high and high-low signal triggering. The second BNC can be connected to any switch for manual triggering. Maintenance Polaris Optical Position Sensor Refer to the Polaris System Guide for maintenance instructions. Tracker Spheres Dust can be removed from a ref lective sphere using compressed air, or by lightly brushing it with a photographic lens brush. Trackers and Tools Clean with a lint-free cloth. If required, dampen the cloth with water, or water and mild soap. Do not use water or soap on the spheres. Head Strap Clean the strap and foam pad with a cloth dampened with water and mild soap. Do not use any detergents that can cause skin irritations when wearing the strap. LabJack interface with BNC connectors for TTL and switch triggering. Tracker Glasses The glasses frame can be cleaned with a cloth dampened with water and mild soap. The lenses can be cleaned with a lint-free cloth, either dampened with water (and mild soap) or a lens cleaning solution. Subject Head Holder Clean with a lint-free cloth. If required, dampen the cloth with water and mild soap. Forehead Rest and Coil Holder Articulated Arm Clean with a lint-free cloth. If required, dampen the cloth with water and mild soap. Do not add lubricant to the ball joint. Arm 86 Brainsight 1.7 slippage can result when bearing weight. Forehead rest pads may be cleaned by soaking them in water and mild detergent. Replacements are available for when they become worn. Contact Rogue Research or your local distributor for details. Chapter 10: TMS Frame Assembly T he TMS Frame, or subject head and coil holder, consists of several parts: • Main frame assembly, which consists of the legs and adjustable vertical bar • Accessory mounting frame, which serves to hold the head holder and coil holder parts There are two frames used with Brainsight: legacy “C” frames (consult your v1.5 documentation), and the “A” frame as documented here. Assembling The “A” Frame (Second Generation Frame) 1. Open the box and lay out parts as in Figure 10-1. Figure 10-1 Unpacked frame, ready for assembly 88 Brainsight 1.7 2. Figure 10-2 Leg with L brackets Figure 10-3 Assemble left and right legs: a) Loosen “T” nuts on “L” brackets just enough so that the T-nut fits into the extrusion slot in legs without falling off. b) Place the L brackets on one leg first (call one bracket the rear one and the other the front one. Use the first leg as a template for the second leg to ensure that they are at the same position along the horizontal bar. See Figure 10-2. 3. Attach the vertical bars to the horizontal legs: a) Fix the diagonal braces to the vertical bars so they look like the base in Figure 10-3. b) Carefully slide each vertical bar on to the horizontal legs (you may have to adjust the T-nuts on the bottoms of the vertical bar. c) Make sure that they are aligned with the L-brackets on the horizontal bar. Tighten the nuts in the vertical bar and diagonal braces so the vertical bar is fixed firmly. Figure 10-4 shows the finished side of the base, in preparation for connecting the left and right sides with a horizontal bar. Figure 10-4 Base of head-holder frame, left side, and horizontal bar belonging to base 4. Base with brace and vertical bar Attach the horizontal base to the horizontal legs assembled above. a) Loosen the T-nuts on the L brackets on both left and right sides of the base. b) Slide the base bracket into the ends of the left and right sides. c) Tighten the T-nuts again. 5. Assemble the basic frame (See Figure 10-5): Chapter 10 Figure 10-5 Horizontal bar Figure 10-6 a) Loosen the remaining T-nuts and slide the horizontal cross bar down the vertical bars until the bar is about 30 cm from the lower cross bar. b) Make sure the cross bar is level by ensuring that the bar is the same distance from the cross bar at both ends. c) Tighten the T-nuts to secure the horizontal cross bar in place. d) Place the 4 rubber stops (Figure 10-6) on the vertical bars (two per bar) by loosening the T-nut on each, and slide them down the inside faces of the vertical bars. Tighten them at the desired height. The rubber stops prevent accidental sliding of the horizontal accessory bar down to the horizontal cross-brace. The height of the bumpers should be set low enough to not interfere with the movement of the horizontal accessory bar. 5. Set up the horizontal accessory bar: a) Set the horizontal accessory bar onto the frame just enough for it to be stable on the frame, but leave the ends of the bar exposed so that tools can be added. b) Slide the TMS bar onto the exposed horizontal bar. c) Place the square plastic bar ends onto the ends of the sliding accessory bar. d) Slide the horizontal accessory bar down the frame until it is at the desired height. 6. Make sure the horizontal accessory bar can slide up and down reasonably well. If it sticks, particularly when raising the bar, try loosening the T-nuts in the middle horizontal cross bar and pulling the vertical bars slightly apart (1 - 2 mm) and tightening them again. 7. Place all the plastic end caps on the ends of the bars to protect the user from scrapes and provide an aesthetic finish to the frame. See Figure 10-7. Figure 10-7 Rubber stops 89 End caps 90 Brainsight 1.7 Some sticking is normal as there is a bit of play that can cause the accessory bar to become slightly tilted while raising, which causes it to stick. When raising the bar, try to raise both sides as evenly as possible. Using The Frame For Subjects Sitting Up 1. 2. Assemble the horizontal head holder bar by placing the chin rest bar on the end, and sliding the bar into the holder on the horizontal accessory bar on the frame. Place the forehead rest articulated arm into the accessory mounting block and position the forehead rest as desired. It should resemble Figure 10-8. Figure 10-8 Figure 10-9 Assembled TMS head frame Head rest, which mounts on the accessory mounting bar Alternatively, for subjects lying down, a head rest can be used. See Figure 10-9 for the head cradle for supine position, and Figure 10-10 for the head holder with a facial cradle for the prone position. Chapter 10 Figure 10-11 Coil arm articulation 91 Figure 10-10 Prone head rest on accessory mounting block Figure 10-12 repositioning the tms frame Do not reposition major components of the TMS Frame while the subject is in place. Components can slip and personal injury can occur. The coil holder arm is articulated, and can be locked in place by tightening a single knob in the middle of the arm (Figure 10-11). The forehead rest can be positioned to accommodate varying head sizes and experimental setups. The coil arm is designed to maintain a constant position of the coil over the target without you having to hold it—ideal for long experiments where you would have difficulty holding the arm for the duration. Clutch mechanism The lever handles have a clutch mechanism (Figure 10-12) so that when you turn the crank into obstruction with the frame, you can pull out the sleeve of the clutch and turn the lever handle back to the starting position, without turning the bolt. This is like a ratcheting action. 92 Brainsight 1.7 Setting Up the TMS Chair/Coil Holder (Third Generation System) Figure 10-13 New TMS Chair with TMS coil holder arms Figure 10-14 Assembly 1. Carefully unwrap all items and lay them out on the f loor 2. Note that parts are joined using one of two methods. The first is by using a “double butt-joint” while the other uses standard bolts and T-nuts. In both cases, T-bolts are slid into the slots of the extruded aluminium. In the case of the butt-joint, the joint is secured by tightening the bolts embedded in the slot (see figure 10-14) using a 1/4” allen tool, while the standard bolts are tightened using the 3/16” allen key. In both cases, you will have to loosen the bolts to create space for the T-nut to fit into the slot. Before assembling a joint, loosen all the associated bolts as much as possible without having the T-nut actually come off the bolt, and slide the T-nut into the slot. Open Butt-joint 3. Find the main horizontal and main vertical bars and the front foot. Loosen the butt-joint bolts on the end of the horizontal bar so that the T-nuts slide into the front slots of the vertical bar. Adjust the location of the joint using the length of the vertical portion of the front foot as a guide (about 7” from the bottom). Tighten the 4 bolts of the butt-joint to secure the joint. Double check the 4 bolts. Take care to ensure that the threaded end of the vertical Chapter 10 93 bar is on top. If needed, adjust the location of the chin rest slider on the vertical bar by loosening the 4 bolts securing it to the bar, and sliding it up or down the bar and finally tightening the bolt again (Figure 10-15). Figure 10-15 Horizontal and vertical bars. Figure 10-15 4. Loosen the bolts of the butt-joint for the front foot (Figure 10-15A). Hold the assembly from the previous step up and insert the front foot into the end of the horizontal bar and tighten the butt-joint screws. A: Front foot B: Rear foot 5. Locate the rear foot (Figure 10-15B). Loosen the 8 nuts inside the 2 corner brackets to loosen the T-nuts. Lift the rear part of the assembly and lower the vertical bar onto the rear foot such that the slots of the vertical bar go onto the T-nuts of the foot. You may need to loosen one of the corner brackets to get it to fit, and you may need to align the T-nuts for them to enter the slots. Watch out for your fingers! Once the T-nuts are aligned, the bar may fall into place quickly, pinching your fingers in the process. Figure 10-16 Assembled main frame 94 Brainsight 1.7 Figure 10-17 6. Add the slider block for the chair by loosening its lever and sliding it onto the and of the horizontal bar (Figure 10-17). Slider block 7. Place the coil rail assembly onto the vertical bar: First, loosen the T-nuts that will be going into the vertical bar. These consist of the 4 middle nuts of the front plate and 3 pairs of T-nuts inside L-brackets (one at the rear and 2 on the lower-sides) as shown in figure 10-18. It may also help to loosen one side of the nuts holding the bracket together (e.g. 2 of the nuts on one side of the front plate) to give the assembly more play. Next, lift the assembly over the vertical post and, while keeping the T-nuts aligned (so they don’t twist and bind rather than enter the slot) lower the assembly into the post. Stop when the top of the assembly Figure 10-18 Loosen these nuts (circled in red) before inserting into the vertical bar Figure 10-19 is f lush with the top of the vertical bar and secure it by tightening all the T-nuts. 8. Add the forehead rest mounting plate to the top of the vertical bar using the 4 bolts that are supplied with the mounting plate (Figure 10-19). 9. Add the 2 sliding accessory blocks to the coil arm rails by removing the end-caps, sliding the blocks onto the rails, and replacing the end-caps. Forehead rest mounting plate 10. Add the chair to the stand: Have an assistant hold the retaining pin of the chair mounting block open by pulling the cable attached to the pin at the base of the block. While holding the pin open, lower the chair so that the round metal f lange at the base of the chair fits into the brass receptacle of the base. Twist the chair back and forth until the f lange is completely into the base. Release the pin. The pin is designed to fix the chair at the 0 and 180˚ orientations. Once locked into place the chair will not rotate unless the pin is released by pulling on the wire under the chair. Chapter 10 95 11. Insert the head rest into the chair Figure 10-20 12. Add the forehead rest and coil holder arms by inserting the ends into the receptacles of the forehead rest mounting plate and one of the sliding accessory blocks respectively (Figure 10-20). Note that there is a f lat spot on the cylindrical ends of the arms. Align the f lat spot with the Top of stand with head rest and the arms in place Figure 10-21 retaining set screw on the mount to prevent the arm from twisting in the mount. Tighten the set screws to lock the arms on place. 13. Add the chin rest horizontal bar by inserting it into the slider mount of the vertical bar. Add the vertical bar of the chin rest into the slider receptacle end of the horizontal bar, and finally insert the chin rest into the hole at the top of the vertical chin rest bar (Figure 10-21). Chin rest assembly 96 Brainsight 1.7 Operating The Chair 1. The chair can reclined by pushing down on the reclining knob on either side of the chair. Figure 10-22 Recliner knob Figure 10-23 2. When needed (e.g. when using the chair in the reclined position), insert the adjustable leg supports by loosening the 2 knobs under the front of the chair and inserting the rail ends of the supports into the receptacles under the chair, and tightening the knobs. 3. Rotate the chair by pulling the cable under the chair to release the locking pin, and while holding the cable, rotate the chair. The pin will lock at the 0˚ or 180˚ positions. 4. Move the chair forward/backwards by loosening the latch of he sliding block under the chair (see Fig 10-17), and moving it forward and backward. Figure 10-24 Leg supports Chair in upright configuration Index Symbols 2D view 50 selection 50 tools 50 3D cursor 52 3D objects selection 52 Window 52 3D reconstruction 30, 71 3D view 51 camera orientation 53 tools 51 16- or 32-bit 28 1, 43 A anatomical structures 66 annotations distance between 63 distance to current 62 export button 64 list of markers 63 Rapid Fire 64 registration landmarks 33 annotation targeting 38. See also bull’s eye view Annotation tool 63–64 control pane 63 Assisted Registration 35 Axes/Probes 38 B Brightness/Contrast threshold threshold 49 bull’s eye view. See targeting view using 38 C calibration file 46 camera location 13–20. See also position sensor Polaris 2 zoom 51 coil attaching the tracker 15 holder 85, 91 location 38 Pointer Mode 39, 61 tool. See also tools: coil tracker 2, 82 Coil Calibration 16 block 81 v1.0 44 Command key 1, 43 connecting cables 7 Rapid Fire 41 X-keys Switch 41 control pane 61–80 using Rapid Fire 41 coordinates 64 coronal. See image: view selection Cursor tool control pane 61 curvilinear reconstruction 30 surface family 72 surface family preferences 74 Curvilinear tool control pane 71, 75 using 30–34, 38 D description Brainsight 2 hardware terms 2, 81–86 ROM file 3 software 3, 43–60 dialogue. See window distance between image objects 63 dropping a marker 63 E EEG 15, 83 electroencephalography. See EEG environment. See operating system export annotations 64 image 41, 49 QuickTime movie 41, 50 F file path default preferences 43 file type ACR-NEMA 27 Locator 44 MINC 21 forehead rest 85 Frameless Stereotaxy 1 98 Index frame levers 91 FTP 22–23 functional image overlay 28 G guide curve indicator 72 H hardware 81–86 cleaning and maintenance 85–86 connecting 7 description 81–85 installing 7–12 header file. See .hdr head strap 85. See also subject: tracker I image 2D 50 3D 51 controls 49 print 49, 50 view pane. See pane: Image View view selection 50 images folder organization 21 opening 28 image types anatomical 28 fMRI 28 functional 28 overlay 28 PET 28 imaging convention 73 setting 11 importing images anatomical 28 File menu 27 functional 28 inline and inline 90 19, 38 installing hardware 7 L Landmarks 33 launching Brainsight 10 layout 49 selector 49 location camera 13–15. See also position sensor Locator 44 M Macintosh 1 application preferences 9 file copy 22–23 multiple users 9 Mac OS X 7 Dock 10 Magnetic Resonance Images (-ing). See MRI Manual Pointer 51 MINC 21 MPR 50 3D object view 52 MRI 1 file archive 21 folder organization 21 laboratory scanner 21 slices 50 multi-planar reformatting. See MPR N Neurology convention setting 11 O object translation 51 oblique views. See 2D view selection offset 30–31 ROM file information 46 open images 28 operating system 1 error 23 UNIX 21, 22 orientation tracker 2 orientation selection 53 overlay functional images 28 P page setup 43 pane Image View 49 tool control 61 peel curvilinear surface 71 perpendicular. See image: view selection pointer 3, 81. See also tools: pointer Pointer lines 38 Manual 51 sphere 38 stick 38 Pointer Mode Index coil 39 Polaris camera 2 configuration 35 connections 7 Control Window 4, 45 location 13–14 maintenance 85 position sensor. See position sensor power 7, 45 troubleshooting 46 position sensor 13, 47 precision test 47 print 43, 49–50 project Brainsight icon 26 loading. See also open open 35, 41 save 41 Q QuickTime movie export 41, 50 R Radiology convention setting 11 Rapid Fire annotations 64 coil 41 configuration 83–85 keyboard 40 trajectories 65 using 40–42 reference frame 46 reflector spheres 83, 85 replacing 83 Registration Task Assistant 35 replacement parts 81 ROM file tracker 3, 46 rotate objects 51 Ruler tool 63 control pane 63 S safety xiii sagittal. See image: view selection save project 29 Segmentation tool 66–79 control pane 67 threshold 67 99 serial number ii, 10 software description 43–60 Macintosh application preferences 9 preferences 43 setting preferences 10–12 updates 10 status 46 structures 51 anatomical 66 study preparing and performing 35 targets 33 subject head holder. See TMS: Frame subject–image registration 2, 35. See also Assisted Registration landmarks 33 v1.0 tool 54 subject tracker 82 fitting 14 fixation equipment 15 surface families 71 setting preferences 72 surface peeler 38 T targeting view. See image: view selection targets 33. See also markers study 33 Task Assistant 5 Coil Calibration 16–20 Registration 35–40 threshold Brightness/Contrast 49 Segmentation 67 Window 67 TMS accessory mounting frame 87 coil 7, 15. See also coil experiment 13 Frame 7 Frame assembly 87–96 TMS Frame TMS 87–96 tool Annotation 63 calibration file 3, 46 Ruler 61, 63 Segmentation 66 Trajectory 65 Tool Bar 61 tool box 81 tool calibration file 3 tools 3, 85 100 Index 2D view 50 3D view 51 coil 3, 46, 83 pointer 3 tracker 2, 85 coil 2, 15, 82 ROM file 3, 46 subject 2, 14–15, 82–83 tracker glasses 85. See also subject: tracker tracker spheres. See reflector spheres tracking on and off 46 status 46 trajectories Rapid Fire 65 recording 40 Trajectory tool 65 control pane 65 Transcranial Magnetic Stimulation. See TMS translate objects 51 transverse. See image: view selection troubleshooting Polaris 46 U UNIX FTP 22 operating system 22 V v1.0 calibration 44 Registration Tool 54 viewer orientation selection 53 view mode. See layout: selector Volume View 48 voxel 28 W window 3D Objects 52 Brainsight Preferences 11 Curvilinear Surface Family Prefs 30, 72 Data Groups 44, 45 Electrode Locations 54 Electrode Locations for Locator 55 file transfer progress 23 Open Project 26 Polaris Control 4 Polaris Positioning Aid 47 Registration Tool 54 Threshold 67 Volume View 48 X X-keys Switch 83, 85 connecting 84 X, Y, and Z 44, 53–58, 64 Z zoom camera 51 control 49 Feedback A t Rogue Research, we are interested in your experience in using the Brainsight™ TMS version 1.7 User Manual. Please take the time to fill out the following survey and mail it to us at the address on the back cover. Alternatively, if you are viewing the document with a PDF viewer, you may paste the body of this survey into an e-mail, complete it, and send it to [email protected]. This information will be used in our documentation planning activities to improve our products and service. Most questions are based on a scale of 1 to 5, where you feel: 1 = Very dissatisfied 2 = Dissatisfied 3 = Neutral 4 = Satisfied 5 = Very satisfied In the Comments region, indicate which parts of the document most resemble the problems you had, or kinds of structure or information quality you are looking for. Append any notes you have to contribute. Survey questions I found the technical accuracy of this document to be: 1 2 3 4 5 Comments :______________________________________________ ____________ I found the technical depth of this document to be: 1 2 3 4 5 Comments: _______________________________________________ ___________ I found the accessibility of this document to be: 1 2 3 4 5 Comments: _______________________________________________ ___________ 102 Brainsight 1.7 I found the thoroughness of this document to be: 1 2 3 4 5 Comments: _______________________________________________ ___________ I found the brevity or length (circle one) of this document to be: 1 2 3 4 5 Comments: _______________________________________________ ___________ I found the Plain English (or translation) of this document to be: 1 2 3 4 5 Comments: _______________________________________________ ___________ I found the explanation of concepts in this document to be: 1 2 3 4 5 Comments: _______________________________________________ ___________ I found the procedures in this document to be: 1 2 3 4 5 Comments: _______________________________________________ ___________ I found the illustrations and examples in this document to be: 1 2 3 4 5 Comments: _______________________________________________ ___________ I found the publication quality of this document to be: 1 2 3 4 5 Comments: _______________________________________________ ___________ Feedback 103 After using this document, I have a better understanding of the product. True False In future versions of this document and related documents, I would like to see the following document organization, changes of format or content, or new topics: Comments:______________________________________ _______________________________________________ _______________________________________________ _______________________________________________ _______________________________________________ _______________________________________________ _______________________________________________ _______________________________________________ ___________________________________ Rogue Research Inc. 4398 Boul. St. Laurent, #206 Montreal, QC H2W 1Z5 Phone: (514) 284-3888 Toll Free (North America): 1-866-984-3888 Fax: (514) 284-6750 http://www.rogue-research.com