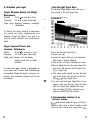
1
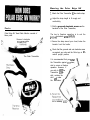
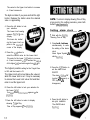
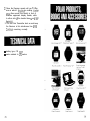
Y
Polar Electra Oy
Professorintie 5
F,N-90440 KEMPELE
Finland
FBR 17310Z.A
GBR
Wearing
the
Polar
Edge
NV
1, Attach the Polar Transmitter to the elastic strap,
2. Adjust the strap length to fit snugly and
comfortably,
Parts
3, Wet the grooved electrode areas on the
backside of the Polar Transmitter,
Polar Edge NV Heart Rate Monitor consists of
three parts:
The key to flawless operation is to wet the
groaved electrode areas carefully~
Grooved electrode
areas are on the
~:+-A
The Polar Transmitter
4 Secure the strap around your chest, below the
breasts. Lock the buckle.
5~ Check that the grooved and wet electrode areas
are against your skin and the Polar logo is ln a
central upright position,
It is recommended that you wear
the Transmitter against your bare
skin to ensure a flawless
operation. However, if
you wish to wear the
Transmitter over a
shirt, moisten the
shirt well under
the electrodes.
on an ordinary watt
To mount the Receiver module in the Polar Bike
Mount, detach the Receiver from the wrist band
by turning it as shown (fig. 1) and carefully push
it out from the backside (fig 2). Keep the Receiver
module mounted within the transmission range (1
meter).
1, Wear the Transmitter and
the Receiver as descrrbed earlier
2. Begin wrth display
showing Time of Day.
3. To start, choose from
these alternatives:
It is important that the electrodes are wet during
the exercise. However, after exercising, wash and
toweldry the Transmitter carefully to save the
electrodes and battery life.
4. You can now start exercising with
the heart rate monitor
See t h e heart rate
-
1, Press and hold the right button. Release,
Symbol fi disappears (Target Zone alarm
sionai is OFF).
2, Press and hold again. Release,
Symbol & appears (Target ZOne a/arm
signal is ON),
Target Zone alarm signal informs you with alarm
sound with each heart beat if your heart rate is
outside the Target Zone (above the Upper Limit
or below the Lower Limit). See Setthg of Tar-
get zone.
appearing in the left side of the display, one
block after every ten minutes spent in the
Target Zone (between the Low Limit and
the High Limit).
Noie: Also a flashing heart iate reading informs
you of being outside the Target Zone.
Check
the time of
day
Whilst exercising you don’t have 10 press any
button to check the time of day momentarily.
Bring the Receiver near the Transmitter’s POLARlogo. and wait for a beep signal.
Stop
the
stopwatch
You can see the total elapsed time in the lower
line of the display
1. Press the left button shortly.
The stopwatch stops.
2. Press the left button briefly agaln.
The stopwatch continues running.
Your last training information is in the memory of
the Polar Edge NV until the next time you measure
heart rate. To review this last training information,
in the display showing Time of Day, press the left
button three times. After this, to return to Time of
Day, press the left button once. Note: When you
start heart rate measurement again your previous
training information will be replaced by the new
one. You cannot recall the replaced information
later.
You may need this function for example if you
have to stop your exercise momentarily because
of traffic lights etc.
Stop heart rate measurement,
recall training information and
return to Time of Dav
Press and hold the left button
for 1 second to stop heart
rate measurement and to
II training informa-
NOTE: To return to display showing Time of Day
at any point in the setting procedure, press both
buttons simultaneously.
Begin with display showing
Time of Day.
& appears in the
upper iine of the dispiay
appears on the lower line of
the display
Press the left button
briefly to return to display
showing Time of Day.
Time of Day appears in
the display
10
-
Press the left button to
enter Target Zone setting.
The Upper Limit reading
appears fiashing in the
display
The upper bat indicating the Upper Limit, appears in the upper left
corner of the display
Press the right button to select the correct
value for the Upper Limit.
The value for the Upper Limit starts to increase
in 5 beat increments.
The digits run faster if you press and hold the right
button. Release the button when the desired
value is approaching.
4. Press the left button to lock
your selection
The Lower Limit reading
appears fiashing in the
display
The lower bar, indicating the Lower Limit, appears in the iower ieft
corner of the display
F
5. Press the right button to
select the correct value tor the Lower Limit.
The value for the Lower Limit starts to increase
in 5 beat increments untii it reaches the vaiue
of the Upper Limit and starts again from value 15.
The highest possible setting for the Target Zone
is 240 and the lowest is 15.
The Upper Limit will not set below the value at
which the Lower Limit is set. It may be necessary
to reduce the Lower Limit value first and then
return to set the Upper Limit.
NOTE: To return to display showing Time of Day
at any point in the setting procedure, press both
buttons simukaneously.
Setting
alarm
clock
1, Start with the display
showing Time of Day.
2. Press both buttons
simultaneously to enter
the setting of the alarm
clock.
Alarm Signal Symbol i%
starts flashing.
3 Press the right button to
set the alarm clock
ON/OFF
The alarm ciock is ON
(symbol i% appears) or
OFF (symbol .G%
disappears).
6. Press the left button to lock your selection for
the Lower Limit
Your iast training InformatIon appears In the
d/splay
7. Press the left button to return to display
showing Time of Day.
Time of Day appears in the dispiay
12
4. Press the left button to
lock your selection.
The AM/PM starts
fiashing.
--_^
5. Press the right button to
select AM or PM for your
alarm clock time.
8. Press the left button to
lock your selection.
The digit representing
tens of minutes starts
flashing.
6. Press the left button to
lock your selection.
The digits representing
hours start flashing.
9. Press the right button to
select tens of minutes
7 Press the right button to
select the desired hours.
10. Press the left button to
lock your selection.
The digit representing
minutes starts flashing
The digits run faster if you press and hold the right
button. Release the button when the desired
value is approaching.
15
Setting
11, Press the right button to
select the desired
minutes
time
of
day
NOTE: To return to display showing Time of Day
at any point in the setting procedure, press both
buttons simultaneously.
With display showing Time
of Day, press both
buttons simultaneously
Alarm symbol i% ,
representing the setting
of alarm ciock, starts
fiashing.
12. Press the left button to
lock your selection.
The AM/PM of the time
of day starts flashing.
The seconds of the
time of day appear
on the display
13. To return directly to display showing Time of
Day without setting the time of day, press
both buttons simultaneously. To set the time
of day contrnue with Setting time of day,
step 3.
16
Press the left button 5
trmes to skrp the alarm
clock settrng.
AM/PM of time of
day is fiashing.
Seconds of the time of
day are running.
Press the right button to
select AM or PM for the
time of day
I
4. Press the left button to
lock your selectlon.
The first digits representing the hours of the time
of day start flashing.
7. Press the right button to
select the desired tens
of minutes.
1
r
5. Press the right button to
select the desired hour.
6. Press the left button to
lock your selection.
The digit representing
the tens of minutes of
the time of day starts
flashing.
’
8. Press the left button
to lock your selection.
The digit representing
the minutes of the time
of day starts flashing.
-_
1
j
9. Press the right button to
select the desired
minutes.
’
10. Press the left button to
lock your selection and
to restart the seconds,
To return to display showing the Time of Day
without restarting the seconds press both buttons
simultaneously.
In the display showing the Time of Day you can
activate the backligtlt for a few seconds by
prewng the right buttor briefly
Regular exercise helps you to sustain and improve
your health as well as feel and iook better, The
heart rate fells you the exertion level of the body
during physical or mental loading, The changes
11. the heart’s beating rate can be followed by a
Polar Heart Rate Monitor wirelessly. continuously
and accurately during any type of activities~
The following steps will help you to get the most
out o f y o u r Polar Hearf Rate h/lonifor a n d fo
ach,e”e your targets,
1. Determine your physical activity
readiness
It is important that before starring exercising or
prior to using your Polar Heart Rate MoWor, you
determIne your readiness for phys~caI activity,
Beiore beginning any type of exercise program
consult your doctor
* if you are over 35 years of age
* if you have not been following a regular
exercise program during the past 5 years
l if you smoke
l if you have signs of high blood pressure
l if you have signs of high blood cholesterol
* if you have any signs or symptoms of any
disease
l or ii you use a pacemaker or another implanted
electronic device.
2. Determine your target
3. Find the right Target Zone
The following Target Range Chart helps you to
keep yourself in the right Target Zone.
Target: Moderate Activity and Weight
Management
Duration:
30 min - 1 h (even up to 2 hrs)
Frequency:
3-5 times a week (even daily)
Target group: beginners, sedentary, overweight,
rehabilitators
Heart Rate/Beats
Per M i n u t e
To achieve this target, exercise is easy-paced
and causes only slight breathlessness and
sweating. Choose this target if your goal is to
improve overall wellness and cardiovascular
health.
Target: Improved Fitness and
Increased Performance
Duration:
30 min - 1 h (even up to 2 hrs)
Frequency:
3-5 times a week (even daily)
Target group: Persons who are already
exercising and have no health
problems.
To achieve this target, exercise is intermediate or
heavy paced and it causes clear breathlessness
and sweating. Choose this target if your goal IS to
increase your endurance capacity and fitness
performance.
c
How to find the right Target Zone ?
a) Locate your age.
b) Locate the target, which you just determined.
Each target is shaded differently.
c) Read up from your age to the target you chose.
d) Draw a straight line from the upper edge of the
target to the left and you find the Upper Limit
of your Target Zone.
e) Then draw another straight line from the lower
edge of the target to the left and you find the
Lower Limrt for your Target Zone.
f) You have now found your Target Zone. As you
exercise, make sure that your heart rate stays
within the Target Zone (between the Lower
Limit and Upper Lrmit) you selected to get
maximum benefit from your workout.
4. Recommended structure of an
exercise session
Begin each workout slowly and give your body a
chance to warm up for at least 5 minutes so that
your heart rate is below your Target Zone. Gra-
22
23
2. Move the Receiver around until you find an
area in which it displays no reading, lnterfw
ence often comes from directly in front of
exercise equipment display boards, while
to either side of the boards there IS no intw
ference~
3. Put the Polar Transmitter back on and keep
the Receiver in this interference free area
Continue exercising normally
. . ...*.... ,.,.
. battery type, CR 2025
a water resistant to 20 meters
.,...;i ,..,
Receiver battery and Polar Transmitter should
be replaced only by Polar authorized service
centre. The estimated average battery life of
the Polar Transmitter is 2500 hours of use.
When your Polar Transmitter battery IS depleted, contact your dealer or distributor to
obtain a replacement and arrange for recycling
of your old Transmitter.
c
*
Note: Any service carried out by a party other
than Polar authorised service centre during the
warranty period voids the warranty.
NO HEART RATE READING
1. Check that the elastic strap IS trght enough.
2. Check that the electrodes of the Polar
Transmitter are moistened and that you are
wearing It as instructed.
3. Check that you have kept the Polar Transmitter
clean. See care and maintenance.
HEART SYMBOL FLASHES IRREGULARLY
1, Check that your Wrist Receiver is Inside the
transmission range (1 meter)
2. Check that the elastic strap has not become
loose during exercise
3. Make sure that the electrodes of the Polar
Transmitter are moistened.
BLANK MONITOR
Have the batteries checked See Service
YOU DON’T KNOW WHERE YOU ARE
IN THE SETTING CYCLE
Press both buttons simultaneously and you are
back in the display showing Time of Day.
IRREGULAR OR ERRATIC READINGS
Reset the Polar Edge NV:
’ Wear the Polar Transmitter as described earlier
in this manual.
Simultaneously press both buttons and hold
the face of the Receiver to the Polar logo
of the Polar Transmitter.
Dispiay becomes fuli of digits.
Press the right button once.
You hear a iong beep.
Resetting clears the memory and enters the
default settings.
26
*
*
EXTREMELY HIGH HEART RATE READINGS
(above 200)
When exercising with your Polar Edge NV Heart
Rate Monitor you may come within range of other
strong electromagnetic signals, causing the heart
rate readings to elevate to abnormal levels.
Common sources of electromagnetrc signals are
televisions, computers, cars, TV antennas, hrgh
voltage power lines and exercise equipment that
is motor driven. Signals from more than one Polar
Transmitter within the 1 meter transmission range
will also cause Incorrect readings. Check your
surroundings and move away from the source of
Interference.
EXERCISE EQUIPMENT IS CAUSING
INTERFERENCE
This Interference can usually be overcome by
relocating the Receiver:
1, Remove the PolarTransmitter from your chest
and use the exercrse equipment as normal.
27
Polar B o o k s a n d B o o k l e t s :
Sally Edwards, The Heart Rate Monitor Book
Dr. Peiei J~G.M. Janssen~ Training: Lactate.
Pulse Rate
Roy Benson: Precision Running
Ed Burke Ph.D,: Precision Cycling
Ed Burke Ph.D : Precision Mountain Biking
Ed Burke Ph~D : Straight from the Heart
Dr, James M Rippe: Target Your Fitness and
Weight Management Goals
Dr. James M. Rippe: The Polar Fat Free and Fit
Forever Program
Dr. Matthew Brick: Precision Mult~sport
Polar A c c e s s o r i e s
Elastic straps of different lengths
Extra Transmitter for other family members
Ask your local dealer or distributor for more
de,a,ls
To insure proper servicing of your Polar Edge NV
please complete and mail the enclosed Warranty
Registraflon Card within two weeks of the date of
purchase.
Please remember that the Polar Service is to help
you get the most out of your Polar Edge NV Heart
Rate Monitor, Should your Polar Edge NV need
service. please follow the ~nstruct,ons below :
1~ Carefully pack the product with all parts to
avoid further damage,
2~ Include a proof of purchase (a receipt or its
photocopy) if the product is under warranty
3~ Include a detaIled description of the problem
4, Include your name. ret”m address ar,d
daytime telephone rnumber.
5, Ship postage prepaid lo your dealer or d!st~
rlhufor, For contact detail& see the back cover
of [his manual
Any service procedures are recommended to be
done al Polar’s authorised service centie. Any
unauthorised service will void the warrantv,
Polar Electra Oy warrants to the origrnal consumer/purchaser of this heart rate monitor that
the product will be free from defects in material
or workmanship for one year from the date of
purchase. Please, save the receipt, which is
your proof of purchase!
This material in this manual is for informational
purposes only. The products it describes are
subject to change without prior notice due to
manufacturer’s continuous development program.
Polar Electra Oy makes no representations or warranties with respect to this manual or with respect
to the products described herein. In such an
event shall Polar Electra Oy not be liable for any
damages, direct or incidental, consequential or
special, arising out of or related to the use of this
material or the products described herein
Warranty does not cover damages due to
misuse, abuse, accidents or neglrgence of the
precautions; Receiver battery, improper maintenance, commercral use, cracked or
broken cases.
Warranty is void if repairs are made by
persons not authorised by Polar Electra Oy.
During the warranty period the product will be
either reparred or replaced (at your distributor’s
option) without a charge.
For more details, please see the warranty card.
Copyright 0 1995
Polar Electra 0% FIN-90440 KEMPELE, Finland
All rights reserved. No part of this manual may be
used or reproduced in any form or by any means
without prior wrrtten permissron of Polar Electra Oy.
Polar logotype is a registered trademark
of Polar Nectro Oy