1
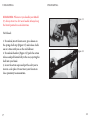
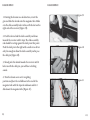
PREFACE:
CONTENTS
Preface . . . . . . . . . . . . . . . . . . . . . . . . . . . . . . . . . 2
History . . . . . . . . . . . . . . . . . . . . . . . . . . . . . . . . . 2
Features . . . . . . . . . . . . . . . . . . . . . . . . . . . . . . . . 3
Care and Maintenance . . . . . . . . . . . . . . . . . . 4
Safety . . . . . . . . . . . . . . . . . . . . . . . . . . . . . . . . . . 11
Loading . . . . . . . . . . . . . . . . . . . . . . . . . . . . . . . . 13
Unloading . . . . . . . . . . . . . . . . . . . . . . . . . . . . . . .17
Disassembly . . . . . . . . . . . . . . . . . . . . . . . . . . . . .19
Reassembly . . . . . . . . . . . . . . . . . . . . . . . . . . . . . 23
Warranty . . . . . . . . . . . . . . . . . . . . . . . . . . . . . . . 29
Contact Information . . . . . . . . . . . . . . . . . . . . 30
The following information is intended to provide you with
knowledge that will allow for the safe operation, proper
care and maintenance of your new Ithaca Gun firearm.
Ithaca encourages all individuals to use extreme caution
when handling any firearm. Treat the gun as if it is loaded
at all times. Always practice safe shooting habits and
remember that safe operation of any firearm depends
entirely on your actions.
Congratulations on purchasing your very own Ithaca Gun,
Americas most reliable firearm.
HISTORY:
With more than 125 years of history behind this trademark,
we still produce firearms to exact standards that made this
gun a preferred choice of the American sportsman. Ithaca
Guns are still crafted and assembled in the United States by
American workers with emphasis on high quality, reliability
and safety.
1
2
FEATURES:
3” Chamber
Briley Choke Tubes (Full, Modified, Improved)
Bottom Ejection and Loading
Machined Steel Receiver
(Except for the Aluminum Ultralight)
Steel Trigger Housing
Lengthened Forcing Cones to Reduce Recoil and
Shot Deformation
5 Shot Capacity (4+1) with Follower and Duck Plug
Crisp 4-6 Lb. Trigger Pull
CARE AND MAINTENANCE:
ATTENTION!
Your new Model 37 has been treated at the factory with
protective oils. General cleaning should be done before
and after every use to maintain its functionality and
appearance. Please follow the instructions to ensure the
safe operation of your new firearm.
Readers should be aware that this manual is a guide to
care and maintenance of a Model 37. With the use of
illustrations you will be guided through the
disassembly as far as needed to clean and care for the
firearm.
Tools Needed for Cleaning;
Small flathead screw driver
Soft cloth and cleaning solution
Quality firearm cleaning kit with cleaning
patches and rod.
Note: When cleaning, your firearm be sure not to lose or
damage any parts.
Owners of the Ithaca Model 37, DSII, DSIII,
Home Defense and Turkeyslayer with fixed barrels must
be aware that the barrel is not intended to be removed.
3
4
CARE AND MAINTENANCE:
CARE AND MAINTENANCE:
All new Model 37’s will accept 2 3/4 or 3 shells.
The ONLY exception to this is in 16 and 28 gauge:
chambered 2 3/4” Only.
Figure 1
Cleaning Instructions:
1- Keeping the barrel pointed in a safe direction with
the safety on, press back on the action release and
pull the forend back to open the action (Figure 1).
Check to make sure the gun is unloaded by looking
and feeling in the chamber and magazine tube
(Figure 2 and 3).
Action Release
Figure 2
The only disassembly required for general cleaning is
to remove the barrel and the choke tube.
Figure 3
5
6
CARE AND MAINTENANCE:
CARE AND MAINTENANCE:
Cleaning Instructions Continued:
Figure 4
2- With the firearm held upright, turn the magazine nut
clockwise until its snug against the magazine tube yoke
(Figure 4).
Magazine Nut
3- Next turn the barrel a 1/4 turn (Figure 5) and
pull it straight out away from the receiver (Figure 6).
[Note: This will be all you need to disassemble the
firearm for general cleaning].
4- Assemble your cleaning rod and place the correct
attachment on the tip, place a cleaning patch on the end
of the rod tip that is saturated in cleaning solvent.
5- Start the rod into the firearm by feeding it slowly into
the breech end about 3-4 inches. Now grasp the handle
and push the rod in, through the bore and out the
muzzle using only necessary force. Do not force a rod
that is overly tight in the bore.
Figure 5
1/4 Turn
Figure 6
6- Repeat step five with another saturated patch,
working the rod the entire length of the bore in both
directions. Do not switch direction in the middle of
the bore.
7
8
CARE AND MAINTENANCE:
CARE AND MAINTENANCE:
Cleaning Instructions Continued:
General Cleaning Tips:
Wipe down wood stocks and forends with linseed oil,
this will help protect the wood on your gun. This does
not apply to camo coated guns, forends or synthetic
stocks.
7- Replace with a dry patch on the cleaning rod and
swab until the barrel is dry. Repeat steps 6 and 7 until
the dry patch comes out clean.
8- Examine the bore, if no dark spots are seen, saturate
a patch with lubricating oil and push it slowly through
the bore. This lubrication will prevent the barrel from
rusting. If dark spots are seen repeat steps 5, 6 and 7.
9- A bristle brush on the end of a cleaning rod is helpful
to clean when removing hard deposits. Repeat this until
stubborn deposits are removed.
Then repeat steps 5, 6 ,7 and 8.
Putting a light coat of oil to all external metal parts
will prevent and protect against rust.
Use a soft cloth and cleaning solvent to wipe down
the inside of the chamber.
Use a soft bristle brush to scrub threads of the barrel
and internal threads of the receiver.
*Cleaning and maintenance should be done with
caution. Any further internal problems should be
done by a qualified gunsmith. Call our Ithaca Service
Department at (419) 294- 4113, or contact a local
gunsmith in your area.
9
10
SAFETY:
WARNING! Any firearm has the ability to cause
fatal injuries to yourself or others around you.
Practice Safe Firearm Habits at all times.
SAFETY IS YOUR RESPONSIBILITY
Safety rules are very important for the protection of
you and other. Firearms are dangerous if handled
inappropriately causing serious damage to property,
serious injury or death.
1- Always treat a firearm as it is loaded
2- Never point a firearms at anyone or in the
direction of others; keep the muzzle pointed in a
safe direction at all times.
3- Never receive or hand a firearm to anyone
without the action being opened.
4- When loading and unloading a firearm, be sure
the safety is on!, and keep your fingers away from
the trigger.
5- Become familiar with the firearm you are using
prior to loading it with ammunition
6- Make sure the barrel is free from obstruction
prior to loading the firearm.
11
SAFETY:
7- Always be sure of your target and what’s beyond it
before shooting.
8- Keep your finger off the trigger until your sights are
on the target.
9- Wear proper hearing and eye protection when
shooting your firearm.
10- Always store ammunition in a separate
location from firearms.
11- Keep firearms out of reach of children and
untrained adults.
12- Never mix the use of alcoholic beverages with the
handling or operation of any firearm.
13- When cleaning any firearm, do it in a well
ventilated areas; free from open flames and wash
hands thoroughly after exposure to cleaning solvents
and oils.*
14- Never handle or operate any firearm while taking
medication unless your doctor approves it.
15- Prior to any maintenance of a firearm make sure
that the chamber, carrier and magazine are completely
empty of ammunition.
*Make sure to follow user instructions on cleaners and
solvents of your choosing. Some may require gloves therefore
be sure to follow there guidelines.
12
LOADING:
REMEMBER: Whenever you handle your Model
37, Always treat it as if it were loaded. Always keep
the barrel pointed in a safe direction.
LOADING:
Figure 7
safety
To Load:
1-Place safety on “safe” position . Make sure the
red indicator is not visible by pushing left to right.
This indicates that the safety is ON (Figure 7).
Figure 8
2- Invert the firearm and place the shell into the
bottom opening (Figure 8) and push forward past
the shell stop (Figure 9). Repeat until magazine
takes desired quantity up to four shells.
Figure 9
13
14
LOADING:
REMEMBER: Whenever you handle your
firearm always treat it as if it were loaded. Always
keep the barrel pointed in a safe direction.
Loading Continued:
3- Press action release, pull forend fully to the
rear to release the shell from magazine then push
forward until it locks in the battery position.
Note: Please observe your state’s rules and
regulations regarding shell capacity.
As delivered (less duck plug) your Model 37 is
4 plus 1. Simply stated, 4 in magazine, 1 in
chamber.
15
TEN COMMANDMENTS OF SAFETY:
1. Treat every gun with the respect due a loaded gun.
This the cardinal rule of gun safety.
2. Carry only empty guns, take down or with the action
open, into a vehicle, home or camp.
3. Always be sure the barrel and action are clear of
obstructions and that you have only ammunition of the
proper size for the firearm you are carrying.
4. Always carry your gun so that you can control the
direction of the muzzle, even if you stumble. Keep the
safety on until you are ready to shoot.
5. Be sure of your target before you pull the trigger.
6. Never point a gun at anything you do not want to
shoot (regardless loaded or empty).
7. Never leave your gun unattended unless you unload it
first. Also, be sure to store guns and ammunition
separately beyond reach of children or careless adults.
8. Never climb a tree or fence or jump a ditch with a
loaded gun, and never pull a gun to you by the muzzle.
9. Never shoot a flat, hard surface or the surface of water.
10. Avoid alcoholic drinks before or during shooting.
16
UNLOADING:
REMEMBER: Whenever you handle your Model
37, Always treat it as if it were loaded. Always keep
the barrel pointed in a safe direction.
UNLOADING:
Figure 11
To Unload:
1- To unload, invert firearm over, press down on
the spring shell stop (Figure 11) and release shells
one at a time until you see the red follower.
2- To unload chamber (Figure 12) push the action
release and pull forend fully to the rear, ejecting the
shell into your hand.
3- Leave the action open and put the safety on to
store in a safe place. Do not store your firearm in
close proximity to ammunition.
17
Figure 12
18
DISASSEMBLY:
DISASSEMBLY:
1- Keeping the firearm pointed in a safe direction with
the safety on, pull back the action release and pull the
forend back to open the action. Check to make sure
the gun is unloaded by looking and feeling in the
chamber.
Figure 13
Magazine Nut
2- With the firearm held upright, turn the
magazine nut counter clockwise until it is snug against
the magazine lug (Figure 13). Then turn the barrel a
1/4 clockwise turn (Figure 14) and pull it straight out
away from the receiver (Figure 15 ).
3- Grasp the magazine nut, turn it clockwise making
sure you keep light pressure on the cap while
unscrewing because it is spring loaded, until you
completely remove it.
4- Pull the spring gently out of the magazine tube
being careful not to overstretch or bend the spring.
19
Figure 14
1/4 Turn
Figure 15
20
DISASSEMBLY:
Continued:
5- Turn the firearm upside down and using your
finger, push the red follower loose, place your hand
over magazine tube to catch the follower; when
inverted, the follower will slide into your hand
(Figure 16).
6- Using a small flathead screw driver, remove the
yoke screw located in the yoke at the end of the
magazine tube (Figure 17).
DISASSEMBLY:
Figure 16
Figure 17
7- Gently spread the yoke apart and slide it off of the
magazine tube. Slide the forend forward until the
action locks .
8- Invert the firearm and look into the load area and
locate the slide pin the slide. Using the same Flathead
screw driver, push the slide pin to the left (Figure 18).
Then pull the forend off the magazine tube.
Figure 18
Note: No additional disassembly is required for
cleaning. If further disassembly is needed contact our
service department 877-648-4222 or email Ithaca at
[email protected]
21
22
REASSEMBLY:
1- Pointing the firearm in a safe direction, invert the
gun and slide the forend onto the magazine tube. Make
sure the slide assembly rod is in line with the slot on the
right side of the receiver (Figure 19).
2- Push the forend and the slide assembly rod down
towards the receiver until it stops. The slide assembly
rod should be resting against the slide pin at this point.
Push the slide pin to the right with a small screw driver
only far enough to allow the slide assembly rod to pass
the slide pin (Figure 20).
REASSEMBLY:
Figure 19
Figure 20
3- Slowly push the forend towards the receiver until it
locks in with the slide pin; you will hear a clicking
sound.
4- Turn the firearm over so it’s in sighting
position and place the red follower in the end of the
magazine tube with the tapered end down and let it
slide down the magazine tube (Figure 21).
23
Figure 21
24
REASSEMBLY:
Continued:
5- Pull the action release and forend towards the receiver
to open the action. Next place the yoke on the end of the
magazine tube with the pinch cut side up and align it
with the notch on the end of the tube (Figure 22).
6- With a small screwdriver screw in the yoke screw, but
be sure not to over tighten it
(Figure 23). Then slide the spring back into the magazine
tube and be careful not to bend or over stretch the spring
while doing so.
REASSEMBLY:
Figure 22
Figure 23
7- Gently place the magazine cap on the end of the
spring (Figure 24) and slowly push down until the cap
securely sits on the end of the tube.
8- Turn the cap clockwise until it rests against the yoke.
Be cautious not to cross thread this piece.
25
Figure 24
26
REASSEMBLY:
REASSEMBLY:
Figure 25
Continued:
9- Grasp the barrel in your hand, muzzle end pointed
away from you and the barrel lug pointing to the left
(Figure 25).
10- Slide the barrel into the receiver and turn it counter
clockwise 1/4 of a turn, aligning it with the dimple on
the magazine cap.
11- Turn the magazine cap until it is snug against the
barrel lug. You will hear it click a few times (Figure 26 ).
Figure 26
Magazine Nut
12- Your firearm is now reassembled. Cycle the action to
make sure everything is in working order (Figure 27).
Figure 27
27
28
WARRANTY:
Ithaca Gun Company warrants to you the original
purchaser that this firearm was manufactured free of
defects in material or workmanship; and for a period of
1 year after the date of purchase. The manufacturer
agrees to correctly repair or replace (with the same or
comparable quality model) your firearm. Ithaca Gun
Company reserves the right to inspect, examine, and/or
test the firearm to assess any claim made under Limited
Warranty.
This warranty is void if the firearm has been abused,
misused, damaged by accident, fired with hand loaded
and/or reloaded or improper non-SAAMI standard
ammunition or obstruction in the barrel, or damaged by
failure to provide reasonable and necessary
maintenance.
This warranty does not apply to normal wear of any
parts, including metal, wood, plastic, rubber, other
materials, or of the surface finish: This warranty is also
void if any unauthorized repair and/or alteration has
been performed on the firearm.
SALES
Phone - (419) 294-4113
Email - [email protected]
SERVICE AND PARTS
Phone - (419) 294-4041
Email - [email protected]
GENERAL INQUIRIES
Fax (419) 294-3230
Toll Free (1-877-648-4222)
420 N. Warpole Street
Upper Sandusky, Oh 43351
29
WWW.ITHACAGUN.COM
30