1
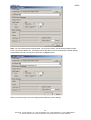
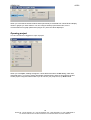
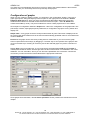
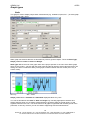
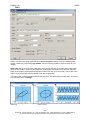
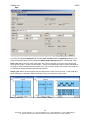
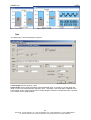
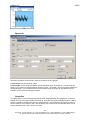
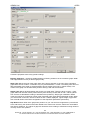
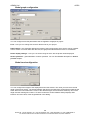
 User Manual
MMS6850/A3760
Data Viewer for control rooms
Ver. 20062011 AKP
ADASH Ltd..
A3760
Content:
Quick start................................................................................................................. 3
First View – Demo version .................................................................................................4
Editor Mode .......................................................................................................................5
Creating New Panel ...........................................................................................................6
Adding Graph ....................................................................................................................7
Graph Colors .....................................................................................................................9
Graph Modes ...................................................................................................................10
Graph Sizes.....................................................................................................................11
Real project ............................................................................................................. 12
Creating new project ........................................................................................................12
Starting and stopping data reading ..................................................................................15
Opening project ...............................................................................................................16
Automatic opening of the project at startup ......................................................................17
Configuration of graphs....................................................................................................18
Graph types .....................................................................................................................19
Static ........................................................................................................................................... 19
Orbit ............................................................................................................................................ 20
Aps.............................................................................................................................................. 21
Time............................................................................................................................................ 22
Spectrum .................................................................................................................................... 23
Centerline ................................................................................................................................... 23
Global configuration.........................................................................................................25
Global graph configuration ......................................................................................................... 26
Global trend configuration .......................................................................................................... 26
Sensor positions ..............................................................................................................27
Global configuration.................................................................................................................... 27
Sensor positions from Template DB........................................................................................... 28
Sensor positions for individual graphs........................................................................................ 28
Showing actual sensor positions ................................................................................................ 28
Advanced configuration......................................................................................... 30
2
Adash Ltd., Czech Republic, Tel.: +420 59 6232670, Fax: +420 59 6232671, e-mail: [email protected]
For further technical and contact information consult www.adash.net, www.adash.eu
ADASH Ltd..
A3760
Quick start
A3760 is data visualization software. It displays the data gathered by A3750 software from A3716
units.
Graph – Basic element of A3760 - graphic object that displays data from one measurement. Some
graphs have more than one way of displaying data.
Panel – one screen in A3760 with background picture (e.g. machine schema) and graphs
Project – definition of one or more panels
3
Adash Ltd., Czech Republic, Tel.: +420 59 6232670, Fax: +420 59 6232671, e-mail: [email protected]
For further technical and contact information consult www.adash.net, www.adash.eu
ADASH Ltd..
A3760
First View – Demo version
Demo version is the simplest way how to begin with the A3760 software. Demo version contains one
project with endless loop of data. This allows you not to bother yourself with the source of the data.
You can fully concentrate on the A3760 itself.
When you run A3760 demo, the demo project will appear in the A3760 window.
The greatest part of the screen is occupied by a panel. You can see the panel’s tabs in upper part of
the window. Active tab shows the name of the current panel. Green colour of some tabs indicates that
values in all graphs on the panel are not exceeding defined alert and danger limits. Grey colour of the
tab means that there are no graphs with defined limits on the corresponding panel.
Panel on image above contains four graphs. Three of them have green bar – their values are not
exceeding defined alert and danger limits. These three graphs are also displaying trend. Trend lines
doesn’t exist at the moment of start of the program and are drawn subsequently. The fourth graph has
grey bar. This graph has no defined limits.
When you right click any graph, menu will be displayed.
You are now in Viewer mode. This mode is used only for viewing the data. You are unable to do any
changes in the project. Only “Configuration” menu item is enabled, but any graph configuration dialog
is in read-only mode. You can try it by clicking “Configuration” and trying to change anything in
4
Adash Ltd., Czech Republic, Tel.: +420 59 6232670, Fax: +420 59 6232671, e-mail: [email protected]
For further technical and contact information consult www.adash.net, www.adash.eu
ADASH Ltd..
A3760
displayed dialog. There are different types of graphs and each one has different configuration dialog.
Feel free to click through the panels and graphs in the demo project. You can also change a graph
display mode by double-clicking.
Editor Mode
The next step is creating your own panel and graphs. You need to switch A3760 to the Editor Mode
first. This is done by logging in.
A3760 will ask you for a password. In this demo version the password is pre-filled so you can just click
Ok. In your real project you can set any password to protect the project from being edited.
If the password is correct A3760 switches to the Editor mode. This is indicated in the title of the A3760
window and by the icon in the lower right corner of the window as shown in next picture.
5
Adash Ltd., Czech Republic, Tel.: +420 59 6232670, Fax: +420 59 6232671, e-mail: [email protected]
For further technical and contact information consult www.adash.net, www.adash.eu
ADASH Ltd..
A3760
Now you can access Editor functions. You will be automatically logged out after 30 minutes of
inactivity. Automatic logout is indicated by following window.
Creating New Panel
Start with creating a new panel by clicking the item “New” in the “Panel” menu. A “Create a New
Panel” dialog will appear.
Here you can write a name of new panel and select a panel’s background. You can select a
background color or a picture for the backround. In the Picture listbox are listed all pictures in the
project folder. Leave the rest of the settings for later and click OK.
6
Adash Ltd., Czech Republic, Tel.: +420 59 6232670, Fax: +420 59 6232671, e-mail: [email protected]
For further technical and contact information consult www.adash.net, www.adash.eu
ADASH Ltd..
A3760
Adding Graph
Your will now see your new panel‘s tab among others. When you click it your new empty panel will be
displayed. Next step is adding new graph. In menu “Graph” select “New”. There are six types of
graphs listed there. Choose “Static”.
A “Create a New Static Graph” dialog will pop-up. First you have to choose the source of data from a
dropdown list. The list contains all appropriate measurement for this type of graph that can be found in
the source project. Select “Speed”.
7
Adash Ltd., Czech Republic, Tel.: +420 59 6232670, Fax: +420 59 6232671, e-mail: [email protected]
For further technical and contact information consult www.adash.net, www.adash.eu
ADASH Ltd..
A3760
This will enable the rest of the dialog. Leave the default values for now and click OK. New graph will
appear in a corner of your panel. You can drag the graph with mouse and drop it on the desired
location. Another way to move the graph is by arrow keys.
You can see that the graph value is out of its range. Right-click the graph and go to the graph
configuration. Adjust maximum of the graph’s y-axis to the value of 3000 and click OK.
8
Adash Ltd., Czech Republic, Tel.: +420 59 6232670, Fax: +420 59 6232671, e-mail: [email protected]
For further technical and contact information consult www.adash.net, www.adash.eu
ADASH Ltd..
A3760
When you add a graph into the project, A3760 tries to get as many information about the graph as he
can. So mainly you just have to move the new graph to a desired location and set its axis limits.
Graph Colors
You probably noticed that different panels tabs have different colors. The color of panel’s tab indicates
the status of the graphs on the panel. You can set Alert and Danger levels for a static graph.
Exceeding of Alert level is indicated by yellow color of the bar. Exceeding of Danger level is indicated
by red color of the bar. If the there are no Danger or Alert levels set, the bar is grey. Otherwise the bar
is green. The worst state achieved by any graph within the panel is then set as the color of the panel’s
tab. A panel without graphs has light blue tab. You have seen that when you created your new panel.
You can now try to enter value to Danger High edit box in the configuration of your graph (e.g. 2200).
Don’t forget to check a checkbox next to High. Otherwise the value won’t be used. Confirm the change
by clicking OK.
9
Adash Ltd., Czech Republic, Tel.: +420 59 6232670, Fax: +420 59 6232671, e-mail: [email protected]
For further technical and contact information consult www.adash.net, www.adash.eu
ADASH Ltd..
A3760
Graph Modes
Almost every graph type has different modes. You can cycle through graph modes by double-clicking
the graph. Your Static graph can display Bar or Bar + Trend. When changing modes, the graph will
automatically change its size to accommodate to new mode. You can select initial mode for each
graph in its configuration window.
The time length of the displayed trend is a global parameter for all graphs. You can change it in menu
Graph, by selecting Global and then Statics.
“Global Static Configuration” dialog will appear. You can change there the length of all trends. Value
entered is the maximal length of a trend. A3760 is always trying to display at least 75% of this length.
10
Adash Ltd., Czech Republic, Tel.: +420 59 6232670, Fax: +420 59 6232671, e-mail: [email protected]
For further technical and contact information consult www.adash.net, www.adash.eu
ADASH Ltd..
A3760
Graph Sizes
You probably noticed that the size of graph window is automatic. Only way to affect size of a graph
window is globally for all graphs in one panel. There are two list boxes in the panel configuration
dialog. First lets you choose one of four pre-defined graph sizes. Second list box lets you choose one
of four pre-defined lengths of a trend. These setting affects all graphs in selected panel.
Comparison of different graph sizes.
11
Adash Ltd., Czech Republic, Tel.: +420 59 6232670, Fax: +420 59 6232671, e-mail: [email protected]
For further technical and contact information consult www.adash.net, www.adash.eu
ADASH Ltd..
A3760
Real project
The Quickstart is short introduction to basic A3760 functions. Now is time to take a closer look on all
settings and possibilities.
Creating new project
The biggest difference between demo version and real operation is the source of measured data. The
creation of new project starts with selecting source of measured data. Every A3760 project is based
on A3750 project. Process of creating A3750 project is described in A3750 manual. All important
terms are defined there too.
Make sure you have access to A3750 project folder or its copy (on local PC or over network) and
switch A3760 software to Editor mode. This enables item New in Project menu.
Default password for A3760 is ASD258. It is stored in A3760.cfg configuration file and can be
changed. Password is used here mainly to protect project from unwanted changes rather than to
protect access to Editor mode from unauthorized users.
Click on New and a dialog will appear. If you are running A3760 for the first time, actual folder will be
filled in A3750 folder. If you are running A3760 from different folder than A3750, click Find and select
appropriate folder.
12
Adash Ltd., Czech Republic, Tel.: +420 59 6232670, Fax: +420 59 6232671, e-mail: [email protected]
For further technical and contact information consult www.adash.net, www.adash.eu
ADASH Ltd..
A3760
Note: You must select A3750 working folder, not the project folder. (A3750 working folder is folder
where your project folders are). All A3750 projects that does not have A3760 project created already
will be listed. If you do not see your project here try Open instead.
When you select project, rest of the dialog will be filled with project settings.
13
Adash Ltd., Czech Republic, Tel.: +420 59 6232670, Fax: +420 59 6232671, e-mail: [email protected]
For further technical and contact information consult www.adash.net, www.adash.eu
ADASH Ltd..
A3760
You can set here size of the project panels and position of the panel switching tabs. Please note that
you are entering size of the panel, not the size of the window or the screen resolution. If you enter
same size as is your screen resolution, your panels will have scrollbars. The size entered can be
changed later.
In the bottom of the window you can see Online database settings. There are listed here mainly for
your information. Only if you are using only A3760 to display data gathered by A3750 software, make
sure you check Delete Old Data. This tells A3760 software, that it should delete old data from Online
database, which improves performance of the whole system.
Click OK to create your new project.
You have successfully created your own project! Now you have to create panels and add graphs to
them. This was described in the Quickstart.
Do not forget to save your new project!
14
Adash Ltd., Czech Republic, Tel.: +420 59 6232670, Fax: +420 59 6232671, e-mail: [email protected]
For further technical and contact information consult www.adash.net, www.adash.eu
ADASH Ltd..
A3760
Creating the new measurement is same as in the Quick start too. Please note, that if any type of
graph is grayed in New, it means that there is no measurement of this type defined in your source
project.
Starting and stopping data reading
Demo version described in the Quick start was automatically reading data. In real project you have to
start it by yourself, at least the first time. You can start reading data by buttons in toolbar or in menu
Control.
15
Adash Ltd., Czech Republic, Tel.: +420 59 6232670, Fax: +420 59 6232671, e-mail: [email protected]
For further technical and contact information consult www.adash.net, www.adash.eu
ADASH Ltd..
A3760
When you click start the A3760 software starts periodically to read data from online DB and display
values in graphs you have defined. You can configure whole project without this, but it is
recommended to set graph parameters (ranges etc.) with real values displayed.
Opening project
You do not need to be logged in to open a project.
When you click Open, a dialog will appear. It looks almost the same as New dialog, which was
described above. You have to select appropriate A3750 directory and then all projects that have
A3760 project configured will be listed. If you do not see your project here, try New instead.
16
Adash Ltd., Czech Republic, Tel.: +420 59 6232670, Fax: +420 59 6232671, e-mail: [email protected]
For further technical and contact information consult www.adash.net, www.adash.eu
ADASH Ltd..
A3760
Select project you want to open and click OK.
Automatic opening of the project at startup
You can set a project to be automatically opened and started at startup of the A3760 software. You
can do this in Configuration dialog under Help menu.
In this dialog you can check Load Last Opened Project to let the A3760 software automatically open
your previously running project on startup. This is the recommended option.
17
Adash Ltd., Czech Republic, Tel.: +420 59 6232670, Fax: +420 59 6232671, e-mail: [email protected]
For further technical and contact information consult www.adash.net, www.adash.eu
ADASH Ltd..
A3760
The other way to automatically open and run project on start of the A3760 software is the list below
checkbox. Here you can directly select from previously used projects.
Configuration of graphs
When you are creating or editing a graph, you are doing in the configuration window. Their look is
graph-type specific. But generally they have two parts. In the upper part of the window is Online
Database Data Cell block. Here you select a measurement that will be displayed in the graph.
Additional informations for selected measurement are listed in this part – online Id, Status and
measurement Unit (or units). This part is loaded from source A3750 project and it is not editable.
Second part of configuration window is Graph block. Here is the configuration of the graph itself. This
part always contains, apart graph-specific parameters, a configuration of graph’s name, position and
display unit.
Graph name – every graph must have a unique name within its panel. This name is displayed in the
top of the graph itself. Default name is the same as automatically generated name for a measurement
in online database.
Position of the graph can be set here by writing down a coordinates or you can move the graph
around a panel with mouse simply by dragging in. The third way to set a position of the graph is with
cursor movement keys. Pressing an arrow key moves the selected graph one pixel in a direction of
arrow.
Display Unit is set just as plain text, so you must specify the appropriate coefficient (and offset, if
needed) that should be used to achieve right value in this unit from value in unit defined in the online
database. You can use listbox, where you can find some predefined unit conversions. Choose the
conversion you want and the box will be filled with the appropriate coefficient.
Some graphs have third block, named Sensor positions. Sensor positions are described in its own
chapter.
18
Adash Ltd., Czech Republic, Tel.: +420 59 6232670, Fax: +420 59 6232671, e-mail: [email protected]
For further technical and contact information consult www.adash.net, www.adash.eu
ADASH Ltd..
A3760
Graph types
Static
This graph is used to display simple static measurement (e.g. wideband, speed, DC…) as a bar graph
or a bar graph with a trend.
Static graph has sections that are not described in previous general chapter. Those are Start Type,
Graph y-axis and Limits for Alert and Danger.
Start Type defines the look of the graph when is the project opened. In the case of the Static graph
there are two modes – only bar with the actual value and the bar with the actual value and trend. The
setting here does not affect the ability of the graph to switch between this two modes (even only in
Viewer mode).
Bar only
Bar + Trend
Graph y-axis sets the minimum and maximum displayed values for y-axis.
You can set boundaries of Limits for Alert and Danger. By checking appropriate checkbox and
setting that limit value you are telling A3760 software to guard the state the actual value is in and
signalize it with the bar color. The worst state from all graph is signalized with the background of the
panel tab, so at every moment you can see what is happening with the measurements.
19
Adash Ltd., Czech Republic, Tel.: +420 59 6232670, Fax: +420 59 6232671, e-mail: [email protected]
For further technical and contact information consult www.adash.net, www.adash.eu
ADASH Ltd..
A3760
Orbit
Orbit is one of the two graph types that have Sensor positions settings. You can override global
Sensor positions by unchecking Use Globals.. More on Sensor positions can be found in its own
chapter.
Start Type defines the look of the graph when is the project opened. In the case of the Orbit graph
there are two modes – Orbit only and Orbit with Time signals. The setting here does not affect the
ability of the graph to switch between this two modes (even only in Viewer mode). The modes of the
graph can be switched by double-clicking it with left mouse button.
The Orbit graph is always displayed around the [0,0] point with same range for both axes, so there is
only one edit box for the Range.
Orbit only
Orbit + Times
20
Adash Ltd., Czech Republic, Tel.: +420 59 6232670, Fax: +420 59 6232671, e-mail: [email protected]
For further technical and contact information consult www.adash.net, www.adash.eu
ADASH Ltd..
A3760
Aps
The range of displayed Amplitude can be set by Min and Max values in Amplitude groupbox. The
range of displayed phase can be switched in Global Graph Settings between -180/180 and 0/360.
Start Type defines the look of the graph when is the project opened. In the case of the APS graph
there are two modes – Graph only and Graph + Trends. The setting here does not affect the ability of
the graph to switch between this two modes (even only in Viewer mode). The modes of the graph can
be switched by double-clicking it with left mouse button.
Graph Type defines what will display the APS graph itself. There are two choices – Polar graph and
Bars. Graph type is defined in Editor mode and cannot be changed in Viewer mode.
Polar, Graph Only
Polar, Graph + Trends
21
Adash Ltd., Czech Republic, Tel.: +420 59 6232670, Fax: +420 59 6232671, e-mail: [email protected]
For further technical and contact information consult www.adash.net, www.adash.eu
ADASH Ltd..
Bars, Graph Only
A3760
Bars, Graph + Trend
Time
This graph type is used to display time signals.
Y-axis Range sets the range for y-axis.
X-axis Range can be switched between auto and defined value. It is better to use auto when the
length of your Time measurements changes in time – the graph x axis range will be adapted to the
actual length. If your measurements have constant length it is better to use defined value, it enables
you to better use the graph window.
22
Adash Ltd., Czech Republic, Tel.: +420 59 6232670, Fax: +420 59 6232671, e-mail: [email protected]
For further technical and contact information consult www.adash.net, www.adash.eu
ADASH Ltd..
A3760
Spectrum
Spectrum properties are almost the same as properties of time graphs.
Y-axis Range sets the range for y-axis.
X-axis Range can be switched between auto and defined value. It is better to use auto when the
length of your Spectrum measurements changes in time – the graph x axis range will be adapted to
the actual length. If your measurements have constant length it is better to use defined value, it
enables you to better use the graph window.
Centerline
This graph type is used to display two channel static measurements. This graph type is meant to
display the movement of the shaft in the bearing. There are two types of displayed values. Values
named A and B are directly from sensors. Values X and Y are recalculated according to defined
sensor positions. The values X and Y should display the movement of the shaft the same way as
anyone standing next to the machine can see it.
23
Adash Ltd., Czech Republic, Tel.: +420 59 6232670, Fax: +420 59 6232671, e-mail: [email protected]
For further technical and contact information consult www.adash.net, www.adash.eu
ADASH Ltd..
A3760
Centerline properties have many specific settings.
Bearing Clearance – checkbox enables drawing of bearing clearance in the centerline graph. Width
and height defines its size (in defined graph units).
Start Type defines the look of the graph when is the project opened. In the case of the Centerline
graph there are two modes – Centerline only only and Centerline + Trends. The setting here does not
affect the ability of the graph to switch between this two modes (even only in Viewer mode). The
modes of the graph can be switched by double-clicking it with left mouse button.
Graph Type defines what will display the Center Line graph itself. There are three choices – Polar
graph, Bars with A and B values (values directly from sensors) or Bars with X and Y values (values
from sensors recalculated according to defined sensor positions). Graph type is defined in Editor
mode and cannot be changed in Viewer mode. Selected graph types affects displayed trends. When
you select Polar or Bars X,Y trends of values X and Y will be displayed. Typical usage of type Bars
with A and B values is the initial configuration of the Gap Refer parameters (see below).
Gap Refer defines offset of the graph zero position. As you can see from image above (A and B next
to the edit boxes), the values entered are related to the values from sensors, before the recalculation
with Sensor Positions. The values of gap refer should be set according to measured running values to
correctly set the zero position.
24
Adash Ltd., Czech Republic, Tel.: +420 59 6232670, Fax: +420 59 6232671, e-mail: [email protected]
For further technical and contact information consult www.adash.net, www.adash.eu
ADASH Ltd..
Polar, CenterLine only
A3760
Polar, CenterLine + Trends
both with Bearing Clerance displayed
Bars A,B, Centerline + Trends
Global configuration
Global configuration can be found in menu Graph.
25
Adash Ltd., Czech Republic, Tel.: +420 59 6232670, Fax: +420 59 6232671, e-mail: [email protected]
For further technical and contact information consult www.adash.net, www.adash.eu
ADASH Ltd..
A3760
Global graph configuration
You can configure here few parameters that are applied to all graphs in project.
Font – here you can change font used for all the texts in your project.
Data Timeout – this parameter defines the length of the interval during which are the values consider
actual. If there is no new value after this time, the graph will indicate that there are no actual data.
Phase display settings – here you can set the range in which are the phase values displayed.
Sensor positions – global definition of sensor positions. You can find detailed description in Sensor
position chapter.
Global trend configuration
You can configure the length of the displayed trend in this window. The value you set here is the full
length of the trend (100%). The A3760 software will start to load data from Online DB and will draw the
trend. When the trend reaches the 100% of the defined length, the trend will be shifted by 25% of the
length and the drawing will continue. So at the runtime the A3760 software always displays data
between 75% and 100% of the length defined in this dialog.
26
Adash Ltd., Czech Republic, Tel.: +420 59 6232670, Fax: +420 59 6232671, e-mail: [email protected]
For further technical and contact information consult www.adash.net, www.adash.eu
ADASH Ltd..
A3760
>
The second parameter that can be configured here is the time that should be used to display graph.
When “from now” is selected, all graphs will show the trend from actual time. This will keep all graphs
actual. If there are no new data, the graph will be empty.
If you select “from online DB”, last stored data will be always displayed.
Sensor positions
Definition of sensor positions makes sense only for two channel measurements – Orbit and
Centerline. Sensor positions can be defined in global configuration of graphs.
Definition of sensor positions is used to recalculate and display values from sensors in the same view
as you are viewing the machine. This is needed because the graph’s axis x is always horizontal and
the graph’s axis y is always vertical, but real sensors are positioned in different positions.
Global configuration
Global configuration of graph positions can be found in Global Graph Configuration dialog
Here you can set angles for the pairs of sensors and the direction of rotation. The angle is determined
from vertical direction. Direction of positive values is clockwise. Sensor positions that were set in this
dialog are then used in all graphs, unless they have defined their own sensors positions. If you are not
sure with angles, click Help button – a help dialog will appear. There you can see examples of sensor
positions and their relevant angles.
27
Adash Ltd., Czech Republic, Tel.: +420 59 6232670, Fax: +420 59 6232671, e-mail: [email protected]
For further technical and contact information consult www.adash.net, www.adash.eu
ADASH Ltd..
A3760
Sensor positions defined in global configuration will be used for all graphs, that uses sensor positions.
These global settings can be overridden by settings in Template DB and by defining different sensors
position in properties of each graph.
Sensor positions from Template DB
There is another place where are sensor positions defined, if you have DataAdmin part of the A3750
project defined. It is Template DB. Sensor definitions in Template DB are configured and used by the
DDS 2011 software. The A3760 is able to read and use them.
On the start of the project A3760 software checks sensor positions in the Template DB and if at leas
one difference is found, the following question will appear.
If you choose Yes, the A3760 software will copy all Sensor positions from Template DB to your A3760
project. If you are in Editor mode, you can store them. If you are just in Viewer mode, the loaded
sensor positions will be used for this time and next time you start this project you will be asked again.
Sensor positions for individual graphs
Sensor positions can be set individually in configuration dialog of every graph.
Showing actual sensor positions
You can see that every orbit and centerline graph has small red square in the upper right corner (or
somewhere in the middle of the top, if the graph is expanded). If you double-click this square it will
expand into small scheme showing the actual position of the sensors defined for this graph.
28
Adash Ltd., Czech Republic, Tel.: +420 59 6232670, Fax: +420 59 6232671, e-mail: [email protected]
For further technical and contact information consult www.adash.net, www.adash.eu
ADASH Ltd..
A3760
You can hide the scheme by double clicking.
29
Adash Ltd., Czech Republic, Tel.: +420 59 6232670, Fax: +420 59 6232671, e-mail: [email protected]
For further technical and contact information consult www.adash.net, www.adash.eu
ADASH Ltd..
A3760
Advanced configuration
Some parameters of the A3760 software are hidden in the configuration file A3760.cfg. Only
experienced users should change those parameters. Please be sure that you know what are you
doing, before you edit the configuration file. Entering wrong values can cause malfunction of A3760
software.
Warning: Change of this parameters will affects all projects!
Parameters hidden in configuration file:
Password
In section [Application]
Password=ASD258
Here you can define password that is used to enter the Editor mode of A3760.
Graph sizes
Definition of graph sizes has its own section [Graph sizes]. You can set here the size for the four
defined graph sizes. The size is defined in pixels and it means the height of the graph. Width
maintains the same ratio to height.
small=200
medium=220
large=240
xlarge=260
Trend sizes
Trend size is a coefficient that multiplies internally defined width of the graph. It has its own section
[Trend sizes]. There are four defined trend sizes.
short=1
middle=1.25
long=1.5
xlong=2
Warning: You can set medium graph to be smaller than small in general, but it is recommended to
keep the settings within the logic defined by the names.
30
Adash Ltd., Czech Republic, Tel.: +420 59 6232670, Fax: +420 59 6232671, e-mail: [email protected]
For further technical and contact information consult www.adash.net, www.adash.eu