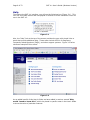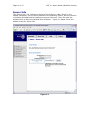
1
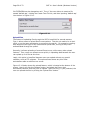
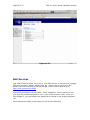
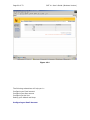
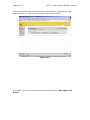
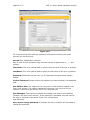
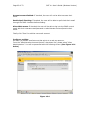
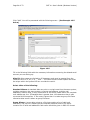
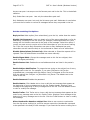
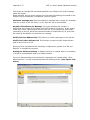
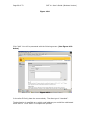
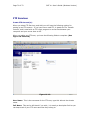
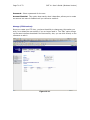
Page 1 of 72
SMT 4.1 User’s Guide (Windows Version)
Server Management Tool (SMT) 4.1
User’s Guide
(Windows Version)
Advanced Internet Technologies, Inc.
AIT Center
September 22, 2004
Search All Your Favorite Engines from a Single Source with tyBit!!!
(Download Now)
Revision History:
This is version 4.1 of the SMT User’s Guide for Windows. All updates to this
document will be noted below.
Version 4.1
•
•
Updated Graphical User Interface.
Updated navigation from version 4.0 to include “Add” functions
rather than “Provision” functions.
Version 4.0
•
•
Updated Graphical User Interface.
Ability for I-MHIP plans to add and remove domains by the SMT
functions.
Integration of Billing Director into the SMT Interface.
•
Preface:
This document is the user’s manual for the Server Management Tool 4.1
offered by AIT to all Windows web hosting customers.
Target Audience:
AIT Customers
Page 2 of 72
SMT 4.1 User’s Guide (Windows Version)
FTable of Contents
To view a section, click on the link. This will take you directly to the area of your
choice.
1.0 Introduction
2.0 Reseller Login
2.1 Help
2.2 Bandwidth
2.2.1 Bandwidth for the previous day
2.2.2 Bandwidth by month
2.2.3 Bandwidth calendar
2.3 Server Info
2.4 Customer Care Center
2.5 Customer Console
2.5.1 Manage (Default view)
2.6 Web Services
2.6.1 Add
2.6.1.1
Add Virtual Host
2.6.1.2
Password Protected Directories
2.6.1.3
Enable Web Logs
2.6.1.4
Add 3rd Level Site
2.6.2 Manage
2.6.2.1
Change Server Password
2.6.2.2
Web Stats Analyzer
2.6.2.3
Manage Account Quota
2.6.2.4
Manage Virtual Host
2.6.2.4.1 Add/Manage Virtual Directories
2.6.2.4.2 Start Site
2.6.2.4.3 Stop Site
2.6.2.4.4 Pause Site
2.6.2.4.5 Continue Site
2.6.2.4.6 Delete Site (Virtual Host)
2.6.2.4.7 Site Properties
2.7 Mail Services
2.8 FTP Services
2.8.1 Manage (default view)
2.8.1.1
Edit
2.8.1.2
Change password
2.9 Additional Services
2.9.1 Add
2.9.1.1
FrontPage 2002 Extensions
2.9.1.2
FrontPage 2002 Email Settings
2.9.2 Order
2.9.3 Manage
2.9.3.1
Manage ODBC DSN
2.9.3.2
Webmail
2.9.3.3
Web Stats Analyzer
2.9.3.3.1 Add Stats Server
2.9.3.3.2 Stats Server Configuration
2.9.3.4
Etools
2.9.3.5
Premium Tech Support
2.9.3.6
Billing Director
2.9.3.7
Manage Payment Gateway
Page 3 of 72
SMT 4.1 User’s Guide (Windows Version)
2.9.3.8
Program Director
3.0 Webadmin Login
3.1 Bandwidth
3.1.1 Bandwidth for the previous day
3.1.2 Bandwidth by month
3.1.3 Bandwidth calendar
3.2 Server Info
3.3 Web Services
3.3.1 Add
3.3.1.1
Password Protected Directories
3.3.1.2
Enable Virtual Host Logs
3.3.1.3
Add Virtual Directory
3.3.2 Manage
3.3.2.1
Change Server Password
3.3.2.2
Web Stats Analyzer
3.3.2.3
Manage Account Quota
3.3.2.4
Directory Management
3.3.2.5
Manage Virtual Host
3.3.2.5.1 Start Site
3.3.2.5.2 Stop Site
3.3.2.5.3 Pause Site
3.3.2.5.4 Continue Site
3.3.2.5.5 Delete Site (Virtual Host)
3.3.2.5.6 Site Properties
3.4 Mail Services
3.4.1 Manage (Default view)
3.4.2 Add Email Accounts
3.4.3 Add Mail List
3.4.4 Add Email Addresses to a Mail List
3.4.5 Display List of Email Addresses in a Mail List
3.4.6 Remove Email Address to a Mail List
3.4.7 Setup Email Forwarding
3.4.8 Configure Email Responder
3.4.9 Manage Email Accounts
3.4.10 Clear Mail
3.4.11 Modify User
3.4.12 Delete User
3.4.13 Manage Mail Lists
3.4.14 Delete Mail Lists
3.4.15 Manage Email Forwarding
3.4.16 Configure Default Mail Drop
3.4.17 View Aliases
3.4.18 Reset Anti-Relay Data File
3.4.19 Remove Auto Responders
3.4.20 Spam Prevention Tool
3.5 FTP Services
3.5.1 Add (default view)
3.5.1.1
Create FTP Account(s)
3.5.2 Manage
3.5.2.1
Manage FTP Services
3.6 Additional Services
3.6.1 Add
3.6.1.1
FrontPage 2002 Extensions
Page 4 of 72
SMT 4.1 User’s Guide (Windows Version)
3.6.1.2
3.6.1.3
3.6.2 Manage
3.6.2.1
3.6.2.2
3.6.2.3
3.6.2.4
Web Stats Analyzer
Web Stats Analyzer for Virtual Host
Manage ODBC DSN
Webmail
Etools
Program Director
Page 5 of 72
SMT 4.1 User’s Guide (Windows Version)
Introduction
The Introduction screen can be seen by users going in a web browser to
http://cpanel.theirdomain.com. Figure 1-1 below shows the login screen that users
will see.
Figure 1-1
There are 2 different login criteria for the SMT 4.1 for Windows. They are as follows:
Generic name:
Reseller
Login credentials: [email protected]
Description:
The Reseller login is used to manage Webadmin accounts. This
is the quota manager for the site. Some functions are not available for Reseller’s to
use as they should be managed by the Webadmin user.
Generic name:
Webadmin
Login credentials: [email protected]
Description:
The Webadmin login is used to manage each website and its
characteristics.
Note: These are not email addresses, but usernames for the SMT 4.1 logins. If the
password has not been changed by the user, then it is the same password that AIT
Page 6 of 72
SMT 4.1 User’s Guide (Windows Version)
provided the user after the setup of the account. In this User’s Guide, we’ll show
the user how each login is different and what options can be used under each login.
Note: It is required that users of the SMT 4.1 (Windows Version) use Microsoft
Internet Explorer version 4.0 or better. Using other browser applications will cause
some or all of the SMT 4.1 functions to not operate properly.
Page 7 of 72
SMT 4.1 User’s Guide (Windows Version)
Reseller Login
Once logged in as the reseller login, the user will see the SMT Introduction screen,
which should look something like what is displayed below in Figure 2-1.
Figure 2-1
If you are a first time user of the SMT 4.1, please review the instructions indicated in
the middle of the screen.
Page 8 of 72
SMT 4.1 User’s Guide (Windows Version)
Help
Throughout the SMT 4.1 interface, you will see the following icon (Figure 3-1). This
icon is a short help section and is displayed on almost all of the interfaces a user will
use in the SMT 4.1.
Figure 3-1
Also, the “Help” link at the top of the screen provides the user with simple links to
areas that provide additional help. These areas include AIT101 for Beginners,
Frequently Asked Questions (FAQ’s), and other support systems. Figure 3-2 below
shows an example of this screen.
Figure 3-2
As an added benefit of this User’s Guide, we have added in sections named “Why
would I need to know this?” which are placed in specific areas in the User’s Guide
to show the value of particular features.
Page 9 of 72
SMT 4.1 User’s Guide (Windows Version)
Bandwidth
The “Bandwidth” link is located under “Home” in the navigation menu, and is also
located on the top of the screen. Once the page loads, the user will see something
like what is in Figure 4-1 below. This interface shows the data transfer that the
user’s account has used during a specific period of time. This graphically displays
the amount of data transferred for HTTP, SMTP, POP and FTP services, as well as
other Internet services that are less common. Also, this interface displays the raw
data that can be viewed in several different formats.
Figure 4-1
Bandwidth for the previous day
On the upper right hand corner of the interface, the user will see the data
transferred, by service, for the past 24 hours. Figure 4-2 below shows an example.
Figure 4-2
Bandwidth by month
Figure 4-3 below shows the total data transferred for the month. The bandwidth
total is listed on the far right hand side, and each service common to web hosting is
listed to the left of the total.
Page 10 of 72
SMT 4.1 User’s Guide (Windows Version)
Figure 4-3
Bandwidth calendar
On the upper left hand side, a user will notice a calendar. If the user selects a date
by clicking on a day of the month, the right hand side of the interface will update
with the data transfer information for the date selected. The user can select the year
and month options as well by clicking the drop down menus or by clicking the arrow
buttons to the left and right of the month/date drop down menus. Figure 4-4 below
shows an example of the calendar and how it displays.
Figure 4-4
Why would I need to know this? This information is good for analyzing site
traffic, and overall bandwidth usage. This tool will prevent your account with AIT
from going over its allotted data transfer limit without you knowing ahead of time.
Page 11 of 72
SMT 4.1 User’s Guide (Windows Version)
Server Info
The “Server Info” link, located on the top of the screen or under “Home” in the
sidebar navigation, can be used to determine the operating system, and the versions
of software and applications installed on the user’s account. Also, this area has
separate links to show the Detailed Disk Utilization. Figure 5-1 below shows the
default screen for Server Info.
Figure 5-1
Page 12 of 72
SMT 4.1 User’s Guide (Windows Version)
Disk Utilization
The bar at the bottom of the “Server Info” page is a link for “Click to View” for disk
utilization. This provides the user with a list of how much disk usage is being used
for what website. When run, the report will look something like Figure 5-3 below.
As you can see, different dates can be selected.
Figure 5-3
Why would I need to know this? Much like the Traffic Monitor that is listed in the
beginning of the User’s Guide, this tool shows users what their disk utilization is at
any time, along with a history (see above) of disk usage for the past 30 to 60 days.
This will ensure the user stays within the allotment that comes with their AIT hosting
package.
Page 13 of 72
SMT 4.1 User’s Guide (Windows Version)
Customer Care Center
The AIT Online Customer Care center is used to order new products and services. To
login, use your customer number and your billing password. If a user has forgotten
their password, they can click the link below the login section (See Figure 6-1 below)
and provide their customer number. The password will be emailed to the account
owner. If a user has forgotten their Customer number, the AIT Sales team can
provide it after verifying that the person claiming to be the account owner really is.
In addition, the Care Center allows users to view their most recent invoices and
statements. For the best view of all transactions, use the “View Statement” option
available after login.
Figure 6-1
Page 14 of 72
SMT 4.1 User’s Guide (Windows Version)
Customer Console
The “Customer Console” link on the left navigation will display the “Manage” section
by default. In this section, a user can login to SMT 4.1’s for all the Webadmin users
that are on the account. To login, simply click the link to the virtual host that the
user wishes to login to, and then enter the username/password combination to
access the SMT 4.1. Figure 7-1 below shows an example of what the screen will look
like.
Figure 7-1
Page 15 of 72
SMT 4.1 User’s Guide (Windows Version)
Web Services
The default view when selecting Web Services is the “Add” view. Under this section,
users can manage services used to view web sites, including addition and
management of domain names, mirror domains, logs, password protected
directories, etc.
Figure 8-1 below shows the default screen when clicking on “Web Services”.
Figure 8-1
Add Virtual Host
To add a virtual host domain name to the account, while at the screen displayed in
Figure 8-1 above, click the “Add Virtual Host” link. Figure 8-2 (see below) will then
be displayed. To complete the form, the user must enter the following information:
•
•
•
•
Site Name – This is the fully qualified domain name (ex. domain.com).
Ensure the user does not include ‘www’ in front of the domain name.
Reseller Email Address – A welcome letter with the webadmin username
and password will be sent to this address.
Enabled Default Document – This is set to checked, and does not need to
be unchecked for most resellers.
Default Document Names – This is a default list of files that will be loaded
first, listed in order of files to be loaded first when your domain name is called
in a browser.
To add the domain name, just click the “Add Site” button.
Page 16 of 72
SMT 4.1 User’s Guide (Windows Version)
Figure 8-2
NOTE: Please be aware that if you have a legacy account (i.e. Windows Reseller,
etc), the feature to add a domain will be disabled, and you can only add a domain
name through the Customer Care Center link.
Password Protected Directories
This feature only displays the Password Protected Directories (PPD) that are setup on
the server. Logged in as the Reseller, the user can not add a PPD. If the user
selects a domain, and attempts to add a PPD, they will receive the error: Virtual
Directory can only be created by the web administrator who owns the web site.
Why would I need to know this? From time to time, some of a user’s customers
may want to have a members-only or protected area. This allows AIT account
holders to quickly setup password protected areas of a website, limiting access to
specific users. Please note that this is NOT providing someone with FTP access only
to their directory. This is for web browsing only, not for FTP services.
Page 17 of 72
SMT 4.1 User’s Guide (Windows Version)
Enable Web Logs
To create web server logs for a domain name, click the “Enable Web Logs” link.
Figure 8-3 below shows an example of what the user will see. To create web logs for
a domain name, select the domain’s radio button and then click the “Enable Logs”
link.
Figure 8-3
After the link is clicked, a screen like Figure 8-4 will appear. This form just confirms
that the user would like to generate logs or to stop logs.
Page 18 of 72
SMT 4.1 User’s Guide (Windows Version)
Figure 8-4
To enable or disable logs, simply click the appropriate radio button and click “Update
Site”.
Add 3rd Level Site
Adding a 3rd level site is the same as adding a virtual host, with the exception that
the domain name is not ‘domain.com’ but something like ‘x.domain.com’ where
domain.com is a domain name that you already host. For example, someone who
has a top level domain name of ‘top.com’ and a virtual host domain of ‘virt.com’ can
add a 3rd level domain of ‘sales.virt.com’. sales.virt.com can be pointed to a
separate website than virt.com, or it can be made into a mirror of virt.com, however
it is still considered a 3rd level site due to the domain structure.
Figure 8-5 below shows an example of what the user could submit.
Page 19 of 72
SMT 4.1 User’s Guide (Windows Version)
Figure 8-5
Manage (Web Services)
In this section, users can manage the web services (virtual hosts, PPD, etc) that
have been added. The key area of the Managed Web Services area for the reseller
login is the quota manager. Figure 8-6 below shows the options available for a
reseller login.
Page 20 of 72
SMT 4.1 User’s Guide (Windows Version)
Figure 8-6
Change Server Password
This option allows the reseller to change the reseller’s password. Note that the only
option available is to change the reseller’s password, and not the password of any
webadmins. Figure 8-7 below shows the form that is available to the reseller.
Page 21 of 72
SMT 4.1 User’s Guide (Windows Version)
Figure 8-7
Web Stats Analyzer
This option installs the web statistics software for virtual host, and top level
accounts. This software provides the user with statistics such as the number of hits
and views a website has generated, and referring URL’s. When stats are configured
for a virtual host, the software will also create logs. The logs can be set to several
different log formats, and users have the ability to add several different options to
the stats application to suite the business need.
Below is Figure 8-8, and an example of the addition of a Stats Server.
Page 22 of 72
SMT 4.1 User’s Guide (Windows Version)
Figure 8-8
Why would I need to know this? Web logs validate traffic to a website, and
provide information about visitors, including but not limited to the date and time
they visited the web site, the files and directories they visited, the operating system
and browser type of the visitor, the web site they can from, and many other
features. For AIT Resellers, this is a valuable feature to sell your customers because
it means their logs can be analyzed by the most commonly used programs available,
like Webalizer, Analog, Urchin, and Web Trends. AIT only supports this stats
analyzer on its hosting platform; however, logs can be downloaded and analyzed by
any application.
Manage Account Quota
The ‘Edit Quota’ feature at the top of Figure 8-9 requires that a domain name be
selected at the bottom of the page. Once selected, a screen like Figure 8-10 will
display that shows the editable quota fields for each type of service that the reseller
can offer.
Page 23 of 72
SMT 4.1 User’s Guide (Windows Version)
Figure 8-9
Page 24 of 72
SMT 4.1 User’s Guide (Windows Version)
Figure 8-10
The ‘Check Personal Quota’ option will display the overall quota of the Reseller. The
Reseller can divide the quota any way he/she likes.
Why would I need to know this? This portion can be used when creating plans
and offerings by the reseller. For example, the Reseller can offer 0 ODBC
connections for their entry level hosting plan, but maybe 5 for their higher level
plans. Or, the Reseller can provide 1 ODBC connection with each plan. Again, this is
up to the reseller.
Page 25 of 72
SMT 4.1 User’s Guide (Windows Version)
Figure 8-11
Manage Virtual Host
The default screen under ‘Manage Virtual Host’, displayed below in Figure 8-12,
shows all virtual host domain names, and several options at the top of the screen.
Each option is detailed below, along with the details of the links of each virtual host.
In the chart of domain names, it indicates several important pieces of information.
Moving from left to right, you have the type of site it is. The site can be an FTP site
) or a ‘WWW’ or Website (indicated by this icon
). Note
(indicated by this icon
that only the top level domain name has the FTP icon as all domains on the account
will FTP to the same FTP service, however each WWW or Website has it’s own WWW
service.
Next on the list is the radio button for each domain name, the domain name itself,
the state of the site (running or stopped), the IP address, the type of service and the
owner of the site.
Page 26 of 72
SMT 4.1 User’s Guide (Windows Version)
Figure 8-12
The user can note that the Site Name or domain name is a link. If the user clicks the
link, they will find a screen much like Figure 8-13 below.
Page 27 of 72
SMT 4.1 User’s Guide (Windows Version)
Figure 8-13
The user will note that in this location the user can add a virtual directory, or review
current virtual directories or password protected directories.
Add Virtual Directory
Virtual Directory can only be created by the web administrator who owns the web
site. To add a Virtual Directory, login as the webadmin for the website.
Start Site
The ability to disable or enable (start/stop services for) a virtual host is done directly
from the “Manage Virtual Hosts” area. Simple clicking the link will update the web
server configuration files, and the site will become disabled. Figure 8-14 below
shows an example of the site ‘testing14.com’ being started. Note that only Web
Services (HTTP) are disabled; FTP, SMTP and POP services are not. It is
recommended that any FTP user account be removed during a disabled action.
Page 28 of 72
SMT 4.1 User’s Guide (Windows Version)
Figure 8-14
Why would I need to know this? The ability to disable and enable a domain is
very important to those that provide paid-for web services. At times, users will not
pay for services rendered. This disable feature allows web services resellers to
suspend accounts until payment is received.
Stop Site
The ability to disable or enable (start/stop services for) a virtual host is done directly
from the “Manage Virtual Hosts” area. Simple clicking the link will update the web
server configuration files, and the site will become disabled. Figures 8-15 and 8-16
below shows an example of the site ‘smtw2ktest.com’ being stopped. Note that
only Web Services (HTTP) are disabled; FTP, SMTP and POP services are not. It is
recommended that any FTP user account be removed during a disabled action. This
option goes together with the ‘Start’ option above and should NOT be used with
‘Pause’ or ‘Continue’.
Page 29 of 72
SMT 4.1 User’s Guide (Windows Version)
Figure 8-15
Figure 8-16
Why would I need to know this? The ability to disable a domain is very
important to those that provide paid-for web services. At times, users will not pay
for services rendered. This disable feature allows web services resellers to suspend
accounts until payment is received.
Pause Site
The ‘Pause’ option is used to temporarily disable requests. The difference between
Stopping a site and Pausing a site is stopping a site will stop all connections for that
service. If a site is paused, it will serve any connections that are currently open,
however it will not serve any new connections from that time.
Page 30 of 72
SMT 4.1 User’s Guide (Windows Version)
Figures 8-17 and 8-18 below shows an example of what happens when a site is
paused.
Figure 8-17
Figure 8-18
Continue Site
This option should be used if a site is paused. Do NOT use this option for a site that
is stopped or running.
Delete Site
To delete a site, click the radio button next to the domain. Then, click the ‘Delete
Site’ link. Figure 8-19 below will be displayed. The user should double check that
Page 31 of 72
SMT 4.1 User’s Guide (Windows Version)
they want to remove the site, as data and configurations are removed upon removal
of a domain name.
Figure 8-19
Site Properties
The site properties will display the base properties for each site selected, however
the only major option available in this section is the turning on or off of web server
logs.
Page 32 of 72
SMT 4.1 User’s Guide (Windows Version)
Mail Services
The “Mail Services” link on the left navigation will display the “Manage” section by
default. In this section, users can select the domain name they wish to login and
administer. Figures 9-1 and 9-2 below show the default view, and the links that will
be displayed at this main “Mail Services” menu.
Figure 9-1
Page 33 of 72
SMT 4.1 User’s Guide (Windows Version)
Figure 9-2
To manage the mail services, the user will need to login as ‘webadmin@domain’ into
the iMail interface. All further documentation on mail services administration is
under the Mail Services section under ‘Webadmin Login’.
Page 34 of 72
SMT 4.1 User’s Guide (Windows Version)
FTP Services
FTP, or File Transfer Protocol, services are for users who wish to upload data to the
server. Usually, this data is web files for websites, such as images (i.e. .jpg or .gif
files) or HTML, Perl or PHP files. This section will help users create, and manage FTP
options, including adding FTP users, anonymous FTP access, and welcome messages.
The main screen of the FTP services section is the “Manage” interface, and should
look something like what is displayed in Figure 10-1.
Figure 10-1
Edit
To edit the password for an existing FTP account, the user will select the ftp
username from the list displayed and click the ‘Edit’ link at the top. The user must
already exist. The user will then modify the form fields based on the desired
changes to the ftp account. Figure 10-2 below shows the form fields that are
displayed.
• User Name – This field is not editable based upon the user selected.
• Full Name – This field is the user’s full name, if applicable.
• Description – Normally, this indicates the domain name that the account is
used for, however this can be changed. AIT does not recommend that the
description be changed from the default of domain name.
Page 35 of 72
•
•
•
•
SMT 4.1 User’s Guide (Windows Version)
Please check to change password – This option must be selected if the
user wishes to change the password for the user.
Old Password – This is the current password for the user.
New Password – This is the new password that is selected.
Account Disabled – This is a lock out feature that the Reseller can use.
Then, the user selects the ‘Update User’ button and the configurations for that user
that were altered were updated.
Figure 10-2
Change password
Figure 10-3 below shows the screen that the Reseller login will receive. This section
will allow the changing of the password, but only for the Reseller login. The reseller
must provide the current password in order to change the password for the account.
Page 36 of 72
SMT 4.1 User’s Guide (Windows Version)
Figure 10-3
Page 37 of 72
SMT 4.1 User’s Guide (Windows Version)
Additional Services
This section will allow users to order or manage additional services, and allow users
to see what specials and additional services that AIT has recently added.
FrontPage 2002 Extensions
This feature is used to install the Microsoft FrontPage extensions for virtual hosts.
While the MS FrontPage software is not supplied by AIT (it must be purchased by the
client), AIT does install the FrontPage server side extensions, which are required to
utilize many of the features of MS FrontPage.
Figure 11-1 below shows the base screen under FrontPage Extensions installation.
This screen will show all the actions that can take place. They are listed below.
•
•
•
•
Add Extensions – Select the site that the FrontPage extensions should be
added to, and click the ‘Add Extensions’ link. Before this is done, the user
should ensure that…
o The current state of the site is ‘No Extensions’
o There has been an FTP user added for the site (as the site requires an
FTP username and password to connect through FrontPage).
Check Extensions – Select the site that the users wants to check FrontPage
extensions, and click the ‘Check Extensions’ link. This validates that the
extensions are installed correctly. If they are not installed correctly, the SMT
4.1 will report the error, and instruct the user on what steps need to be
taken. In most cases, a removal and reinstallation of the extensions will
correct most of the errors reported by the SMT 4.1.
Upgrade Extensions – For some users, they have FrontPage 2000
extensions installed. If the user wishes to install FrontPage 2002, or upgrade
the extensions to that, they can do so by selecting the site to upgrade, and
then clicking the ‘Upgrade Extensions’ link.
Uninstall Extensions - Select the site that the users wants to remove
FrontPage extensions from, and select the ‘Uninstall Extensions’ link. This will
completely remove FrontPage extensions, including most themes and shared
border settings.
Page 38 of 72
SMT 4.1 User’s Guide (Windows Version)
Figure 11-1
NOTE: When a user connects with FrontPage to the server, they will need to do the
following to login:
1. Open the FrontPage application.
2. Under the File menu, click on "Open Web".
3. A pop box will appear, enter the domain's URL without the www extension;
for example:
http://domainname.com
4. Another pop box will appear for the username and password, enter the FTP
username and password assigned for that domain's FrontPage extensions. Be
sure to include the "nt\" in front of the username. Otherwise, you can not
connect to FrontPage; for example
Username: nt\username
Password: password
Page 39 of 72
SMT 4.1 User’s Guide (Windows Version)
5. The user is now connected to your domain through FrontPage via http (port:
80). The user can now design the web pages as desired or open the files
from your local computer and upload them to your domain. The same
username and password combination (using the “nt\”) would be used to
publish a web as well.
FrontPage 2002 Email Settings
Figure 11-2 below shows the screen for FrontPage Email Settings. This can be seen
when you click on the domain name in the list from Figure 11-1 above.
Figure 11-2
Order
In this section, users will be able to order or request additional services. Some of
these services are free, while others are paid; however, they will require the user to
move through the SMT to another location to order the service.
Manage (Additional Services)
Upon ordering services, users will want to manage them. Links to the default
installations or locations of the applications and services are put in this section.
Users can select from the list of Quick Links for the appropriate services they wish to
manage.
Manage ODBC DSN
ODBC (Open Database Connection) DSN’s or Data Source Names are created by the
Webadmin, and not the Reseller account. The Reseller can view and manage ODBC
DSN connections after they are added by the Webadmin user.
Page 40 of 72
SMT 4.1 User’s Guide (Windows Version)
Webmail
This link will direct a user to the URL for Webmail for an account. The link
traditionally will go to http://mail.domain.com:8383, or http://domain.com:8383.
From there, users must login and administer Webmail as the Webadmin user.
Web Stats Analyzer
Figure 11-3 below shows the main menu for configurations for the Web Stats
Analyzer. There are three (3) options on this screen.
•
•
•
Log into stats server – This option will allow a reseller to login to a stats
server for a particular domain. The user must first select the domain from
the list by selecting the appropriate radio button.
Add Stats Server – This feature allows Resellers to add a stats server for a
specific domain name.
Delete Stats Server – This option will delete the specified Stats Server.
Figure 11-3
Add Stats Server
To add a Stats Server for a domain name, click the ‘Add Stats Server’ link, and
proceed through to the form, shown in Figure 11-4 below. In this form, the user will
find the following fields.
•
•
Select Website – This is a drop down menu of all the web sites listed on the
account that do not already have a stats server setup.
Date Format – This is a selection based upon how the user would like the
date format of the logs. The number value is based upon the type of format
that is shown to the right of the drop down menu.
Page 41 of 72
•
•
•
•
•
•
SMT 4.1 User’s Guide (Windows Version)
Log Path – This required field is looking for the log file to analyze. By
default, this is setup in the logs directory for the top level domain. Use the
‘Browse’ button to change this from the default, but the default selection is
used in most instances.
Log Scan - This option is how often the logs will be scanned and re-read.
Having logs reviewed every 24 hours is the default option (7) and this should
be selected in most instances. Reviewing logs more frequently, which good
for getting the most up-to-the-minute statistics is good, it does drive up
server load, which is attributed to your account, and could cause you to have
to upgrade your account to continue scanning at that rate of time.
Default Account – This is the default account that the statistics server will
run as. The default username and password are in a dropdown menu. The
user should select the site that is being added, and the ‘webadmin’ username
that is associated with that site should be used.
Aliases – When a site is selected in the ‘Select Website’ dropdown, the alias
for ‘www.domain’ is added into the ‘Aliases’ menu as this is normally the only
alias for that site. In short, users should input comma separated values for
other site names that point to this site and should be analyzed with the same
log data. For instance, if a user has x.com, www.x.com, and web.x.com all
pointing to the same website, then the user would input ‘www.x.com,
web.x.com’ into the input box.
Exclude – Users will typically want to include IP addresses of their own firm
in this area. This section removes IP addresses and visitations from those IPs
from being analyzed as not to ‘skew’ the stats with data that is collected from
employees of a specific company’s website.
Suspend – This option is specifically for users who wish to setup the stats
server, but not have it operate until a certain event in the future has taken
place. For example, if a reseller knows that a customer of theirs will use the
stats server, but have not yet paid for it, the stats server can be added, just
suspended until it needs to be fully used. Thus, the configurations are in
place, but the Log Scan is not running.
Page 42 of 72
SMT 4.1 User’s Guide (Windows Version)
Figure 11-4
Stats Server Configurations
Clicking on the domain name link will display the configurations. The configurations
can be changed from what was used when the Stats Server was added. The same
fields as are listed above in ‘Add Stats Server’ apply.
Etools
This feature is no longer supported technically by AIT; however, the suite of products
is still included. Etools accounts can be utilized through the SMT 4.1 by this link.
Premium Tech Support
This service, if ordered, provides users with a guaranteed response of 30 minutes or
less for any issue. More information on the PTS service is located on the AIT website
at http://aitcom.net/premiumtechsupport.php
If the user clicks this link, it will take them to
http://www.aitpts.com/wonderdesk/wonderdesk.cgi.
From there, users must login to submit trouble tickets.
Billing Director
NOTE: For more information on Billing Director and the features listed
above, please visit their User’s Guides, located at
http://support.aitcom.net/.
Manage Payment Gateway
Page 43 of 72
SMT 4.1 User’s Guide (Windows Version)
This option takes users to their Secure Payment Gateway login, after it has been
ordered.
Program Director
This link provides users with the login interface for the following services.
• Power Ads
• Email Marketing
• Form Builder
From there, users must login and administer each of the services listed above.
NOTE: For more information on Program Director
(http://pd.nameservices.net) and the features listed above, please visit
their User’s Guides, located at http://support.aitcom.net/.
Page 44 of 72
SMT 4.1 User’s Guide (Windows Version)
Webadmin Login
As the reseller login is used as a ‘quota manager’ the Webadmin login is used to
‘manage a domain name’. Through this management system, webadmin’s will be
able to review basic administrative information about their account. The figure
below (Figure 12-1) is a screen shot of what the Webadmin will see upon login.
Figure 12-1
Bandwidth
This is the same information that is available in the Bandwidth section under the
‘Reseller Login’.
Bandwidth for the previous day
This is the same information that is available in the Bandwidth for the previous day
section under the ‘Reseller Login’.
Bandwidth by month
This is the same information that is available in the Bandwidth by month section
under the ‘Reseller Login’.
Bandwidth calendar
This is the same information that is available in the Bandwidth calendar section
under the ‘Reseller Login’.
Page 45 of 72
SMT 4.1 User’s Guide (Windows Version)
Server Info
This is the same information that is available in the Server Info section under the
‘Reseller Login’. The only difference is under the Disk Usage section, when a user
clicks the ‘Click to view’ link, it will only display disk usage for that account, and not
give a by account breakdown of the domains listed on the account. As the
Webadmin login is only one account, it will only show the disk utilization for that
account.
Figure 13-1
Page 46 of 72
SMT 4.1 User’s Guide (Windows Version)
Web Services
The default screen under ‘Web Services’ is the ‘Add’ screen. The options here are
similar to what is in the Web Services section under ‘Reseller’, however here the
Webadmin has more control for specific configurations for those web services, that
the Reseller does not.
Figure 15-1
Password Protected Directories
This section will allow users to setup Password Protected Directories (PPD). A PPD is
a directory that when accessed in a browser, prompts users for a username and
password to view the contents of a site. Figure 15-2 below shows the base screen
for PPD’s and the list of sites available for the Webadmin to setup PPD’s for.
Page 47 of 72
SMT 4.1 User’s Guide (Windows Version)
Figure 15-2
Why would I need to know this? This feature is great for members-only areas, or
areas for collaboration of internal employees or members of an organization. For
example, password protected directories have been used as areas that once users
pay a fee, they have access to. The user can then download files, or read
information that is valuable.
Once the site has been selected (be sure to select the ‘WWW’ site and not the ‘FTP
site), the user should click the ‘Add Password Protected Directory’ link. This link will
bring up a screen similar to Figure 15-3 below. The user should complete the form .
•
•
•
•
Alias for Password Protected Directory – This is the directory name.
Physical Path – This is the full directory path to the directory. Not that this
will always start with D:\home\[email protected]\[email protected]
Access Permissions – The permissions for accessing can be read, write or
modify.
Assign access to User – The users listed in this drop down menu are FTP
users under this Webadmin account. The user creating the PPD must select
at least one user that will have access to the PPD.
Page 48 of 72
SMT 4.1 User’s Guide (Windows Version)
Figure 15-3
Enable Virtual Host Logs
To enable or disable both Error and Access (traffic) logs for a specific domain, select
the domain name at the bottom of the screen, and click “Enable Virtual Host Logs”.
Figure 15-4 below shows the basic list of sites, and the screen that users will seen
when they want to enable logs for a virtual host.
Page 49 of 72
SMT 4.1 User’s Guide (Windows Version)
Figure 15-4
Upon selection of a domain, the user will see a screen similar to Figure 15-5 below.
The users will select whether the logs should be enabled or disabled and update the
site.
Page 50 of 72
SMT 4.1 User’s Guide (Windows Version)
Figure 15-5
Why would I need to know this? Web logs validate traffic to a website, and
provide information about visitors, including but not limited to the date and time
they visited the web site, the files and directories they visited, the operating system
and browser type of the visitor, the web site they can from, and many other
features. For AIT Resellers, this is a valuable feature to sell your customers because
it means their logs can be analyzed by the most commonly used programs available,
like Web Stats, Analog, Urchin, and Web Trends. AIT only supports the Stats
Analyzer on its hosting platform; however, logs can be downloaded and analyzed by
any application.
Add Virtual Directory
A virtual directory is much like an “alias” for the web server. The directory (for
example x.com/directory) does not actually exist at the document root location that
it would seem to existing based upon directory structure. Rather, a virtual directory
is an alias for IIS for a directory that exists in another location.
To setup a virtual directory, select the site (Figure 15-6 below) and then click “Add
Virtual Directory”. Ensure this is a ‘WWW’ site, and not an ‘FTP’ site.
Page 51 of 72
SMT 4.1 User’s Guide (Windows Version)
Figure 15-6
On the next screen, the user will have the ability to enter the following information,
as Figure 15-7 shows:
•
•
•
•
Alias for Virtual Directory – This is the directory name that a user will put
into a browser. For example, the Alias may be named ‘member_data’.
Physical Path – This is the directory path to the actual directory where data
will be displayed. For example, the ‘member_data’ directory may not exist on
the server as a directory, however the files for this folder will be located in the
…\www\members\data\archive directory. This way, people who visit the
website do not have to type in x.com/members/data/archive. They can
simply type in x.com/member_data/
Allow Anonymous – This option will create the site as a password protected
directory (PPD) unless anonymous access is applied to it.
Access Permissions – This will allow users to have read or write
permissions based upon what files are located in this virtual directory. For
instance, if a user uses an application that updates a text file in this directory,
then the virtual directory would need to have writable permissions. By
default, both read and write are enabled.
Page 52 of 72
SMT 4.1 User’s Guide (Windows Version)
Figure 15-7
Manage (Web Services)
Under the Manage Web Services options is a group of good management tools for
web site owners. In this section, you will see a quick link menu (Figure 15-8).
Page 53 of 72
SMT 4.1 User’s Guide (Windows Version)
Figure 15-8
Manage Site Services
Under this section, users can stop, start, enable or disable websites. The options
below will show users how and when to utilize these functions.
Manage Virtual Host
This section mirrors the instructions set forth in the Manage Virtual Host section
under the Reseller Login.
Start Site
This section mirrors the instructions set forth in the Start Site section under the
Reseller Login.
Stop Site
This section mirrors the instructions set forth in the Stop Site section under the
Reseller Login.
Pause Site
This section mirrors the instructions set forth in the Pause Site section under the
Reseller Login.
Continue Site
Page 54 of 72
SMT 4.1 User’s Guide (Windows Version)
This section mirrors the instructions set forth in the Continue Site section under the
Reseller Login.
Delete Site (Virtual Host)
This section mirrors the instructions set forth in the Delete Site section under the
Reseller Login.
Site Properties
This section mirrors the instructions set forth in the Site Properties section under the
Reseller Login.
Directory Management
This section is a great file manager for the Webadmin account. This will allow the
Webadmin users to upload, download, edit, delete and rename files on the server.
The default screen, listed below in Figure 15-9, shows the actions that can be taken.
On the left hand side of the directory manager, the user will note the directory
structure. If the directory is expanded (
) the contents will be shown in the main
frame, to the right of the sidebar. If the directory is not expanded (
linked image, and can be clicked on to expand its contents.
), it will be a
The main frame of the directory manager is the contents of the directory. The
contents will be broken down into files and directories. Along the top of this
directory manager are the following headings.
•
•
•
•
•
File Name – The file name is the name that is given to the file when created
or when uploaded. This will normally have a file extension, if it is not a
directory, which will most commonly be .html, .htm, .asp, or .txt.
File Type – The type of the file will either be ‘Folder’ for directories/folders,
‘ASP auto file’ for active server page (ASP) documents, ‘HTML Document’ or
‘Text Document’ for HTML or text files respectively.
File Size – This is the size, in KB of the file or directory.
Last Modified – This is the date of the last time the file was modified.
Actions – This section allows users to take appropriate actions on files and
directories. The chart below shows some of the actions that can be taken.
- This icon deletes a file or directory.
- This icon renames a file or directory.
- This icon is only displayed for text files (with the extension .asp, .txt, .html,
or .htm) and will allow a user to edit the file through the browser.
Page 55 of 72
SMT 4.1 User’s Guide (Windows Version)
Figure 15-9
Create Directory
To create a directory, simply click on the link ‘Create Directory’. This option will
display a java pop-up menu, like what is displayed in Figure 15-10 below. The user
should input the name of the new directory, and click ‘OK’. The Directory Manager
will then refresh and display the directory created.
Figure 15-10
Create Text File
Much like creating a directory, the Create Text File option allows users to create a
simple text file. The file will have a default name of ‘File1.txt’, however this can be
changed (see Figure 15-11 below). Not only can the file NAME be changed, but the
Page 56 of 72
SMT 4.1 User’s Guide (Windows Version)
file EXTENSION can be changed as well. Thus, if the user wishes to create a file
named ‘default.asp’, clicking the Create Text File link, and then inputting ‘default.asp’
into the box in Figure 15-11.
Figure 15-11
Upload Files
The feature of uploading files through the SMT is beneficial for several reasons.
First, it allows users to upload files from anywhere. They do not need to be in their
office, or on the same workstation to connect to the server. For example, traveling
web designers can login to any machine and upload files, as long as they have
authenticated through the cpanel.
Secondly, it allows uploading of several files at once, unlike many other upload
features. Thus, users can operate more quickly in uploading data because the user
can upload up to 4 files at one time.
Lastly, this option is beneficial because users can upload without any special
software, such as FTP software. This option allows almost any thin client
workstations able to add files to a server.
Figure 15-12 below shows the upload feature, which is located at the bottom of the
screen. User’s will click the ‘Browse’ button, and select the file on their
workstation/network that they wish to upload. After the file(s) is (are) selected, the
user can upload the files by clicking the ‘Upload Files’ button.
Page 57 of 72
SMT 4.1 User’s Guide (Windows Version)
Figure 15-12
Directory Manager – Edit a file
). This will display the file in a
To edit a file, the user can click the ‘Edit’ icon (
web based file editor. From here, the user can edit the text, and save the changes.
Figure 15-13 below shows the base screen that will be displayed when a file is
edited.
Page 58 of 72
SMT 4.1 User’s Guide (Windows Version)
Figure 15-13
Change Server Password
In this section, the Webadmin user can change the server password for their
account.
NOTE: This does not change the password for the mail services. The Webadmin
account for mail services needs to have it’s password changed in the iMail
administration section.
Manage Account Quota
With the webadmin user, you will be able to view your current quota for the domain
in question, but not modify it. (See Figure 15-14 below)
Page 59 of 72
SMT 4.1 User’s Guide (Windows Version)
Figure 15-14
Mail Services
Your control panel provides you a link to your IMAIL server so that you may manage
POP email accounts, aliases, address lists, etc. Simply click on the link for the
domain you wish to access on the left side bar of your control panel or go to
http://your_domain.com:8383.
You will be prompted to log into IMAIL. Enter “webadmin” as our username, and
then type the password provided to you in your initial customer email. Once you
have logged in, you can change your password by clicking on the change password
link.
Upon entering the IMAIL control panel you will see the following:
Page 60 of 72
SMT 4.1 User’s Guide (Windows Version)
Figure 16-1
The following subsections will help you in:
Configuring an Email account
Configuring an Alias account
Configuring a Mail List
Setting your default mail-drop.
Configuring an Email Account
Page 61 of 72
SMT 4.1 User’s Guide (Windows Version)
From the “Administrative Account Options” drop down box, please select “User
Administration”. You will be presented with the following screen.
Figure 16-2
Click “Add”. You will be presented with the following screen: (See Figure 16-3
below)
Page 62 of 72
SMT 4.1 User’s Guide (Windows Version)
Figure 16-3
Fill in the following fields with the necessary information concerning the email
account you are setting up:
UserID: User Identification (UserID)
May be from 3 to 30 characters long and must consist of alphanumeric, '_','-' and
periods.
First Name: This is an optional field to specify the first name of the user in question.
Last Name: This is an optional field to specify the last name of the user in question.
Password: Passwords may be from 3 to 30 characters long and cannot contain
spaces.
Confirm Password: Please confirm the password you have entered in the password
field.
Max Mailbox Size: The maximum size (in bytes) for each mailbox created in the
user's mail account. If a mailbox exceeds the maximum, any new mail for the
mailbox is returned to the sender. Enter 0 for unlimited size.
Max Messages: The maximum number of messages (the total for all mailboxes
created in the user's mail account). If the maximum is exceeded, any new mail for
the user is returned to the sender. Enter 0 for unlimited size.
User Attributes
User cannot change password: If checked, the user in question will be unable to
change the password.
Page 63 of 72
SMT 4.1 User’s Guide (Windows Version)
Account access disabled: If checked, the user will not be able to access their
email.
Enable Spell Checking: If checked, the user will be able to spell check their email
through the IMAIL interface before sending.
Allow Web access: If checked, the user will be able to log into the IMAIL control
panel with their username and password to administrate and send/receive their
email.
Finally click “Save” to add the new email account.
Configure an Alias:
An alias is a placebo email account that points to a real pop account.
From the “Administrative Account Options” drop down box, please select “Alias
Administration”. You will be presented with the following screen. (See Figure 16-4
below)
Figure 16-4
Page 64 of 72
SMT 4.1 User’s Guide (Windows Version)
Click “Add”. You will be presented with the following screen: (See Example 16-5
below)
Figure 16-5
Fill in the following fields with the necessary information concerning the aliased email
account you are setting up:
Alias ID: Alias names are limited to 45 characters and must be created from the
character set of A-Z, a-z, 0-9, '_' and '-'. The name cannot contain spaces and must
be unique within the system but can override the userid.
Select either of the following:
Standard Aliases: A standard alias can point to a single userid on the same system,
multiple userids on the same system, a remote mail address, multiple mail
addresses, another alias, or any combination of the same. Please enter one complete
mail address per line. If Standard alias is greater than 128 characters then it gets
converted into Group alias. If file name is given then it is taken as group file name
otherwise alias name is taken as group file name.
Group Aliases: A group alias points to a file that contains a list of valid mail
addresses, one per line. Please type the complete path and name of file which
contains list of valid mail addresses. Path name should be given in DOS 8.3 format.
Page 65 of 72
SMT 4.1 User’s Guide (Windows Version)
Group Filename: Enter the file name of the group you are creating.
Destination: Enter the email address(es) that the email is forwarding to.
Click “Send” to complete the addition of the alias.
Configure a Mail List
From the “Administrative Account Options” drop down box, please select “List
Administration”. You will be presented with the following screen. (See Figure 16-6
below)
Figure 16-6
Name: In the “Name” box enter a name for the list server mailing list; this name is
the e-mail address that people who want to post to the list will send mail to. For
example, if you enter the name "Birdinfo," users will send mail to the list by
specifying the “To” address: [email protected]. The name must be from 3 to
23 characters in length, with no spaces between characters.
Description: In the “Description” box, enter a description of the list.
Administrator: In the “Administrator” box, enter the user ID of the person who will
be the list administrator.
Page 66 of 72
SMT 4.1 User’s Guide (Windows Version)
Click “Create” to proceed to the next step. You will then be presented with the
following screen:
(See Figure 16-7)
Figure 16-7
This page also allows you set and modify the parameters for the selected list-server
mailing list. You can modify:
List Files
Click the “Help.txt” button to view or edit the help text that is sent to anyone who
requests help or sends an invalid command to this list.
Click the “Subscrib.txt” button to view or edit the confirmation text that will be sent
to each person who submits a successful subscribe request to this list.
List Options:
Select the security options you want to use located at the top of List Options, and
then click “Set List Options”.
Page 67 of 72
SMT 4.1 User’s Guide (Windows Version)
Anyone can post: Lets anyone on the Internet post mail to the list. This is the default
selection.
Only Subscribers can post: Lets only the subscribers post mail.
Only Moderator can post: Lets only the list owner post mail. Moderator is used when
you want the list owner to review all messages before they are posted to the list.
Set the remaining List Options
Reply to List: Make replies (from subscribers) go to the list, rather than the sender.
Disable List Command: A user can obtain a list of the users subscribed to a list by
addressing a message to the list server (for example, [email protected]) and
issuing the list listname command in the body of the message. Select this option if
you do not want users to receive a list of the subscribers to your list-server mailing
list. If the list is set to Only Subscribers can post or Only Moderated can post,
subscribers can still send the Help or List command to obtain a list of subscribers.
Disable Subscriptions (Private List): When selected, a Subscribe request will be
rejected. The List Administrator must add new users manually
Enable Digest Mode: Groups the messages sent to this list into a digest, then
sends the digest periodically.
Enable Posters List: Enables the e-mail addresses that are listed in the poster's
list.
Enable Subject Modification: To prepend a text string to the subject line of every
message sent to the list. For example, if you enter [Discussion List] as the
prepended text, a message with the subject, Parrot, will appear on the list server
with the subject line: Subject: re:[Discussion List] Parrot. The default text is the
name of this list.
Enable Password: Enables the password.
Enable Header: Click Header.txt to view or edit the text message that appears at
the beginning of every message sent to the list. Enable Header. Displays a text
message at the beginning of every message sent to the list. Click the Header button
to view or modify the message.
Enable Trailer: Click Trailer.txt to view or edit the text message that appears at the
end of every message sent to the list. Enable Trailer. Displays a text message at the
beginning of every message sent to the list. Click the Trailer button to view or modify
the message.
Allow Unsubscribe based on subject line: When a user wants to unsubscribe
from the list-server mailing list, most list servers expect the Unsubscribe command
to be specified in the body of mail message. If you want the list-server mailing list to
Page 68 of 72
SMT 4.1 User’s Guide (Windows Version)
also accept an Unsubscribe command specified in the Subject line of the message,
select this option.
When selected, the list-server mailing list will accept the following commands in the
Subject line to unsubscribe: unsubscribe, remove, signoff.
Maximum message size: Enter the Maximum message size in bytes of a message
that can be sent to this list. Enter 0 if you want the size to be unlimited.
Number of Recipients per Message: You must calculate this number; it
determines the number of recipients each SMTP process will send to. If you expect
under 2000 users subscribing to the list, enter 25. If you expect over 2000 users
subscribing to the list, divide the expected number of subscribers by 25, and enter
the result as the Number of recipients per message.
Modify List User Address List: This function is used to add users to the mail list.
Modify List Poster Address List: This function is used to modify those that are
able to post to the mail list.
Once you have completed all the necessary configurations, please click “Set List
Options” to complete the process.
Setting the default mail-drop. A default mail-drop is created when it is necessary
to direct all misaddressed email to a default location.
From the “Administrative Account Options” drop down box, please select “Alias
Administration”. You will be presented with the following screen. (See Figure 16-8
below)
Page 69 of 72
SMT 4.1 User’s Guide (Windows Version)
Figure 16-8
Click “Add”. You will be presented with the following screen: (See Figure 16-9
below)
Figure 16-9
In the alias ID field, place the name nobody. The alias type is “standard”.
The destination is specified as to which email address you would like misdirected
email sent to. Click “Save” to complete the process.
Page 70 of 72
SMT 4.1 User’s Guide (Windows Version)
FTP Services
Create FTP Account(s):
When you select FTP Services, and Add, you will have the following options for
setting up an FTP account. If you have never used FTP, it stands for File Transfer
Protocol, and is used with an FTP client program to moves files between your
computer and your server here at AIT.
When you add a new FTP user, you have the following fields to complete: (See
Figure 16-10 below)
Figure 16-10
User Name: This is the username for the FTP user; type this without the domain
name.
Full Name: This can be left blank if you wish; it is merely a description field so you
can keep track of your FTP users and who they belong to.
Page 71 of 72
SMT 4.1 User’s Guide (Windows Version)
Password: Select a password for the user.
Account Disabled: This option does exactly what it describes; allows you to create
an account but leave it disabled until you choose to enable it.
Manage (FTP Services):
Once you create your FTP User, you have the ability to change any information you
wish, or to delete the user entirely if you no longer need it. The “Edit” option brings
up the same interface described in the last section; also, you can click directly on the
username to edit it.
Figure 16-11
Page 72 of 72
SMT 4.1 User’s Guide (Windows Version)
Additional Services
Much like the Additional Services section for the Reseller Login, this section will allow
users to manage additional services, or install services that are allocated to their
Webadmin account. Most of these services work on the quota system that the
Reseller will set. The default section under Additional Services is the ‘Add’ section,
and that is where we will start our documentation for this section.
FrontPage 2002 Extensions
This section is identical to the documentation listed in the FrontPage 2002 Extensions
section of the Reseller Login section of this User’s Guide.
Install Web Stats Analyzer
This section is identical to the documentation listed in the Web Stats Analyzer section
of the Reseller Login section of this User’s Guide.
Install Web Stats Analyzer for Virtual Host
Manage (Additional Services)
Manage ODBC DSN
This section is identical to the documentation listed in the Manage ODBC DSN section
of the Reseller Login section of this User’s Guide.
Webmail
This section is identical to the documentation listed in the Webmail section of the
Reseller Login section of this User’s Guide.
Web Stats Analyzer
This section is identical to the documentation listed in the Web Stats Analyzer section
of the Reseller Login section of this User’s Guide.
Etools
This section is identical to the documentation listed in the Etools section of the
Reseller Login section of this User’s Guide.
Program Director
This section is identical to the documentation listed in the Program Director section
of the Reseller Login section of this User’s Guide.