1
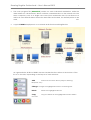
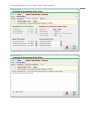
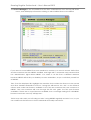
Streamlining Drawing Offices since 1992
USER'S MANUAL
(November 2012)
Contact Details:
Tel: (RSA) 011 452 5824
(INTL) +2711 452 5824
Fax: (RSA) 0866 134 178
(INTL) +2786 613 4178
Mobile:
082 822 9094
(INTL) +2782 822 9094
Postal:
PO Box 256, Edenvale, 1610, South Africa
Email:
[email protected]
Web Site: www.LDAcomputing.com
Drawing Register Professional – User’s Manual 2013
1
SOFTWARE LICENCE AGREEMENT
Drawing Register Professional (DRPRO)
OWNERSHIP - The source code and all the intellectual property rights in DRAWING REGISTER
PROFESSIONAL (herein called the software), and user documentation are owned by LDA
COMPUTING and are protected by South African copyright laws, other applicable copyright laws,
other laws and international treaty provisions. LDA COMPUTING retains all rights not expressly
granted.
USE - The registered licensee may use one copy of the software on one computer at any one time.
The software is "in use" when it is resident in RAM memory or installed in the hard disk or other storage
device. Because software is inherently complex and may not be completely free of errors, the
registered licensee is advised to make backup copies of the files produced and/or updated by the
software at regular intervals.
RESTRICTIONS - The registered licensee may not alter, modify, merge, adapt, translate, disassemble
or decompile this software in any way. The registered licensee may not loan, lease, rent, license or
copy this software or any part thereof or any diskettes or documentation supplied under this
agreement to any third party.
LIMITED WARRANTY - This software is licensed AS IS. If any materials or disks or any other media
contained in this package are defective, return them within 90 days of the date of purchase, and
they will be replaced at no charge.
Except as specifically provided herein, LDA COMPUTING makes no warranty or representation, either
express, implied or tacit, with respect to the software or user documentation, including their quality,
performance, merchantability or fitness for a particular purpose. In no event will LDA COMPUTING
be liable to you for damages, including without limitation, any loss of profits, lost savings or other
incidental or consequential damages arising out of your use or inability to use the software, even if
LDA COMPUTING or an authorized representative has been advised of the possibility of such
damages, whether or not LDA COMPUTING was negligent or not.
CUSTOMER SUPPORT - LDA COMPUTING will offer free email, telephonic and facsimile support for a
period of 90 days from date of purchase, after which period a support fee may be charged, which
may vary from time to time. LDA COMPUTING will attempt to answer your technical support request
concerning the software within reasonable working hours. However, this service is offered on a
reasonable efforts basis only, and LDA COMPUTING may not be liable to resolve every support
request. LDA COMPUTING supports the software only if it is used under the conditions and on the
operating system for which the software was designed. LDA COMPUTING reserves the right to
decide how and when customer support for an old version of the software will cease to exist.
UPDATE POLICY - LDA COMPUTING reserves the right to modify or update the software without
notice. Such updates or new versions will be made available to the registered licensee upon
payment of the update fee.
DEMO SOFTWARE - You are free to use the demo version of this software for testing and evaluation
purposes only. You may not use it for any other purpose until payment of the prescribed price for the
full package is effected.
GENERAL - This agreement is covered by the laws of South Africa and both parties accept the
jurisdiction of the courts of South Africa.
Drawing Register Professional – User’s Manual 2013
This page left intentionally blank !
2
Drawing Register Professional – User’s Manual 2013
DRPRO
3
2013
DRAWING REGISTER PROFESSIONAL
Copyright 1999-2013 LDA COMPUTING. All rights reserved Worldwide
Check out www.LDAcomputing.com for future releases of this User’s Manual
DRPRO has been designed to be as user friendly as possible, and most of the functions
included are obvious to anyone involved in a drawing office and with some knowledge of
how Windows works.
INSTALLING DRPRO:
It is highly recommended that the person that will be responsible for the running and
upkeep of this program in your office has a sound knowledge and understanding of
Windows, computers and networks, as no support will be given by LDA Computing on the
operating system software that you may be running in your office.
Download the latest Setup-Drpro2013.zip file from www.ldacomputing.com web site, and
save it in a temporary folder in your computer.
For local area networks, the installation of DRPRO is divided into two stages:
1. First the Data portion of the program, named ‘Data Files’ which is installed on a server,
i.e. where your data is going to reside. This data must be accessible to all the
workstations in your network that will be used to access to DRPRO. All users of DRPRO
must have full Read+Write access to this network folder and the correct permissions
must be given by the network administrator.
2. After the Data portion is installed, re-run the same installation program again from each
of the workstations that will have access to DRPRO. Select the ‘Program Files’ option this
time. Please note that one Workstation Licence is required for each computer where
DRPRO is going to be installed. While in demo mode (i.e. after downloading from our
web site) only one licence will be installed. Only after you receive a Registration File
from LDA Computing via e-mail, must you install the remainder of the workstation
licences.
Alternatively, if you are planning to use DRPRO in single user mode, i.e. everything on one
computer, you may then select the ‘Single User’ option from the installation program, which
installs both the Data and Program portions in the same folder in the same computer.
The images below shows the main installation screen and the three different installation
options for DRPRO, all from the same installation file:
Drawing Register Professional – User’s Manual 2013
4
Drawing Register Professional – User’s Manual 2013
5
Logging in for the first time:
The first time that DRPRO is accessed from any of the workstations, it will prompt you to
select the location of your data files (on the network). Specify the required location, click
the Save button and restart DRPRO again.
For first time access, please note that the username ‘administrator’ must be used, with no
password in the password field. You may need to press the ‘tab’ key to activate the “GO”
button!
Your Login name must be pre-entered in the ’Users List’ for access to be granted. The
password is optional, but it is recommended that anyone with ‘Administrator’ status has a
password, or else, your DRPRO setup could be left open to anyone to ‘fiddle’ with the
default parameters.
For obvious security reasons, if you lose your user name and/or password, there is no
backdoor way that you can use to get to this information. You’ll have to email the file
‘USERS.TPS’ (found in the DATA folder) to LDA Computing and we’ll extract it for you and reemail the information back to you again.
Drawing Register Professional – User’s Manual 2013
6
USING DRPRO:
A user name must be used to access the program. The user names are allocated by the
system administrator and are accessible from the 'Administrator's' Button on the Control
Panel.
Access level of 'Administrator' gives access to all functions of DRPRO, while 'Operator'
level blocks access to administrative functions.
It is a good idea to give the administrator a password so as to keep proper control over
the use of the program. It is recommended that at least two people have administrative
rights in DRPRO, just in case one of them is not available.
If the 'Main Menu' is not visible on the screen (closed), it can be opened again by
clicking on the 2nd button on the Toolbar on top of the main screen.
Drawing Register Professional – User’s Manual 2013
7
The Select Discipline button is used to change from one discipline to another. When
changing from one discipline to another, only the information relating to that discipline
is displayed. The only items that are common to all Disciplines are Projects, Portions and
Recipients.
To select a new Discipline, click on the “Select Discipline” button from the toolbar on top of
the screen, and double-click on the desired discipline from the list. Doing this while viewing
a Drawing List will change the list so as to display only the drawings that belong to the
selected discipline. The Blue icon
on the left column is an indication that there are
drawings listed under that discipline for the current project. The current project is displayed
at the top of the list.
Drawing Register Professional – User’s Manual 2013
8
The main program file (DRPRO.EXE) resides on each individual workstation, while the
data resides on a Data Server, which could be somewhere else on the network or in the
same computer, such as in single user cases. Each workstation has its own licence as
well as its own defaults about where the data files are located, the default printer to be
used,
etc.
A typical DRPRO deployment on a network would look something like this:
As a general rule, all lists in DRPRO have 4 standard buttons either at the bottom of the
list or on the side, depending on the layout of each window:
Add
Add a new record to the list (Project, Drawing,
Recipient, etc.)
Change Change the highlighted record to something else.
Delete
Delete the highlighted record.
Copy
Copy the details of the highlighted record to Add a
new one.
Drawing Register Professional – User’s Manual 2013
9
Projects Database: This is where you keep your list of projects. It also allows you to divide
a project into Portions (or Areas or Zones) as well as into Sub-Portions (or Sub-Areas or
Sub-Zones). Each project can have its own revision system. If the revision system of a
project is modified half-way through the project, it may have an impact on the display
sequence of past issues, so it is a good idea to decide before hand which revision
system is going to be used. It is also a good idea to adhere to an office standard in this
respect, and not have each individual decide on how to sequence the revisions.
Drawing Register Professional – User’s Manual 2013
10
Master Company List is a list of ALL companies that you normally have dealings with,
from which the individual recipients for a project will be extracted. A link is maintained
between the company name and the recipient in a project, so you can display all
projects that a particular company has worked on.
Drawing Register Professional – User’s Manual 2013
11
List of Emailed Transmittal Slips – This list displays all transmittals slips that have been
sent via email from within DRPRO. An internal database is maintained by DRPRO, but
does not include the actual attachments sent with the email. Only the attachment
file name is recorded, as well as the CC names if any.
The ‘Resend Email’ button is intended to be used only in cases where the original email did
not go out due to a communications error. Those emails will be displayed in Red on the list.
DRPRO will take all the ingredients of that email and try to send it exactly as it was originally,
without allowing you to change anything. If there are any attachments, they should still be
in the same original folder for this operation to work.
The ‘Forward Email’ button is identical, except that it will allow you to alter some details of
the email, such as attachments and recipients, but not the transmittal slip itself.
A NOTE about emailed Transmittal Slips: If you send a copy of a Transmittal Slip as a “CC” to
another recipient, DRPRO will NOT record that as being an official issue to that recipient.
They are simply getting a copy of a Transmittal Slip that is addressed to someone else. If you
need to keep an official record that this “CC’d” company has received the
drawings/documents, then add them to the standard list of recipients for that specific
project and include them in a normal issue.
Drawing Register Professional – User’s Manual 2013
12
Recipients Database gives you a list of all the companies involved in a single project.
Apart from some basic information about each company, you can also include
addresses, telephone and fax numbers as well as email address, default issue remarks
and a list of contact names and numbers for individual persons within this company.
Most of this information will be copied from the Master Company List when adding a
new company, provided this information has been entered in the Master Company List.
On the right side of the window is the list of contact names for each recipient listed on the
left. You can add more names to this list from this list or alternatively from the Recipients
Entry Form as shown in the next images.
From this list, you can also “merge” all the issue records of two recipients. This is useful in
cases when a recipient was added twice by mistake, with a different abbreviation to the
original one, and now you need to get everything back together under one name.
You may also copy all recipients in the list (or one recipient only) to another project, where
for example, the project team is almost identical to the original project, thus avoiding
spending time building up the whole list of recipients again.
The yellow CC button on the right list is for the purpose of activating an automatic CC of
every transmittal slip that is emailed from DRPRO to this particular company.
Drawing Register Professional – User’s Manual 2013
13
In the Recipients Entry Form, you can enter many known details about each company on
each of the four tabs available, and pre-define others that will be used at issue time. As a
general rule, the more information you enter here, the quicker your drawing issues are
going to be. Pre-define as much as you can here, and it will make the issuing process a
breeze!
On the 3rd Tab, you can pre-define up to 10 Issue Remarks or Reasons for Issue for each
recipient, so that at issue time you don’t need to change them individually. Generally,
you’ll find that these remarks tend to stay in the spot through most of a particular phase of
the project, only changing when for example it goes from design to construction stage.
When that happens, change the remarks to the new set and save again. However, any of
these remarks can be changed at issue time every time, but that will slow you down, and
that’s is not the philosophy behind DRPRO
The 4th Tab is essentially a repeat of is already displayed on the main recipients list. You can
do any changes or additions from this entry form or from the main recipients list. The effect is
the same.
Drawing Register Professional – User’s Manual 2013
14
The 5th tab in the Recipients Entry Form (new as from v2011) is used for the purpose of setting
defaults on recording drawings received from a particular company. Enter the required
details only if you are going to receive drawings from this company on a regular basis AND
then re-issue them again. A typical application of this would be if you’re a contractor that
receives drawings from the team of consultants and then re-issue them to your
subcontractors or site teams.
Drawing Register Professional – User’s Manual 2013
15
Drawings & Documents Database is the main repository of all Drawings and/or Documents
for each project. A drawing or document can be a single sheet, such as a drawing, or a
multi-page bound document. Each drawing belongs to a user defined category (each
Discipline has its own set of categories. (See Disciplines).
To view the drawings belonging to another discipline, select the discipline from the list on
the left (new as from v2011) and they will be displayed.
The category will define if the Drawing Number is alpha-numeric or if it follows a numeric
sequence which can be generated in batches, plus a user defined prefix. The document
number is upper case only, up to 40 characters long, is alpha numeric and follows the
normal computer (ASCII) sequencing for alpha numeric characters, which is not the same
as a purely numeric sequence. In numeric sequence you have:
1,2,3,4,5,6,7,8,9,10,11,12,13,14,15,16,17,18,19,20,21, etc.
But in alphanumeric sequence the sorting would be:
1,10,11,12,13,14,15,16,17,18,19,2,20,3,4,5,6,7,8,9.
To get this properly sequenced you would need to renumber your drawings as:
01,02,03,04,05,06,07,08,09,10,11, etc. to get the correct display sequence.
If your numbering system goes into three characters then use 001,002,003,004, etc.
Drawing Register Professional – User’s Manual 2013
16
Drawing Register Professional – User’s Manual 2013
17
Drawing Register Professional – User’s Manual 2013
18
The “History” Button allows you to view the issue history of any drawing in a project.
You may also print the listed issue history on paper or to PDF by clicking on the button ‘Print
This Dwg’s History’, or view the original transmittal slip where this one particular drawing and
revision was included by clicking on the button ‘View / Reprint Transmittal’.
Drawing Register Professional – User’s Manual 2013
19
Drawing ManHours is used for the purpose of recording time against drawings. As
each employee spends time on a particular drawing, this time is then recorded daily
against each drawing. Each drawing also has a certain number of budgeted hours
allocated to it. The dates displayed will change colour depending on the time stats
of each drawing. A printed report will then show calculated columns indicating
whether each drawing is running on target, as well as grand totals for each
discipline as a whole.
Drawing Register Professional – User’s Manual 2013
20
Drawing COS Hours refers to ‘Change Of Scope’ hours, such as when the scope of
the project has changed significantly that additional hours will be required to
produce a certain number of drawings. DRPRO allows you to keep track of these
COS Hours. There are two types of COS Hours (new as from v2011):
1. Internal COS Hours – Due to design changes initiated by your own company.
2. External COS Hours – Due to changes initiated by your client.
Furthermore, it also allows you to keep track of the approval of each COS Hours entry,
together with a document reference for the approval.
Drawing Register Professional – User’s Manual 2013
21
View Revisions is for the purpose of keeping track of revision text for any drawing,
together with any other additional comments that go with the revision being done (like
who’s to blame for the change!) Please note that these additional comments are NOT
included in the information sent to others when creating a DRPRO READER file.
Drawing Register Professional – User’s Manual 2013
22
Issue Drawings is where you prepare and print the transmittal slips. First select the project
number and then click on the 'Select Dwgs To Issue' button to select the drawings to be
issued from a separate list.
NOTE: The red triangle icon on the left column indicates that that specific drawing and
revision has already been issued to the company name as shown on top of the list (or
highlighted on the opposite list. Essentially it means that you are duplicating something that
has already been done in the past.
However, please bear in mind that in the printed Issue Registers, DRPRO will always show
the issue date of the first time this drawing and this revision was issued, not the date of the
subsequent repeat issues.
Drawing Register Professional – User’s Manual 2013
23
You may select a batch of drawings by clicking on the ‘Tag’ column in the browse list,
by using the space bar, or by highlighting the first drawing and then clicking 'Select One
Dwg' repetitively. When the whole list of drawings has been marked, click on 'Copy to
Issue List'. This returns you back to the Issue Drawings window.
Similarly for 'Select Recipients'. If a full issue is required, (recipients pre-defined to be
included in every issue), click on the 'Full Issue' button and they will all be automatically
marked. You may then select more recipients or deselect those not required for this
issue.
Drawing Register Professional – User’s Manual 2013
24
Once again, click on ' Copy to Issue Slip'. You may then go to each individual
company name on the Issue Slip and modify the details for this issue only, such as
attention names, issue methods, number of copies, issue remarks and additional notes.
Drawing Register Professional – User’s Manual 2013
25
Drawing Register Professional – User’s Manual 2013
26
You may also change some of the details relating to each individual drawing by
double-clicking on it. In the Update Form you may then override some of the default
parameters. Please note that these overrides are applicable to only the highlighted
drawing and for the highlighted recipient on the other list.
To change the revision numbers of each drawing, there is a faster way: Click on the red
button labelled “R+1” and all revisions listed will be increased by a factor of 1, either
from 1 to 2 or from A to B, depending on the revision system specified for the project.
The “R=” button will make all revisions the same (you define what it is), and the “R-1”
button will obviously go back one revision number or letter, but it’s only active after
you’ve pressed the ‘R+1” button.
Drawing Register Professional – User’s Manual 2013
27
Before you ‘Proceed’ to the final stage of recording your issue in the database and
printing out the transmittal slips and emailing them you can preview what is being issued
before committing to the database. Click on the “Preview First’ button, at the bottom of
the Issue Window. The ‘Clear Lists’ button will clear the issue window and reset
everything back to ‘zero’ for the start of a new issue. No need to exit the issue window
and get back in again as in previous versions:
Please note: Once you click the ‘PROCEED’ button, DRPRO will start recording
everything in its database, send out emails (if applicable), print out all transmittal slips
and update the revision numbers in the drawing list to the new ones just issued. After this
there is no going back to change the issue details. The only way around it is to cancel
the issue slips individually (See List of All Transmittals) and re-issue again.
Drawing Register Professional – User’s Manual 2013
28
Another useful feature of DRPRO when re-issuing drawings is the ability to re-select the
previous transmittal slip, change which side is different for the new issue (Drawings or
recipients) and re-issue it again without having to re-select everything all over again. To
access this feature, click this button before clicking on ‘Select Drawings’ or ‘Select
Recipients’:
Once you’ve completed an issue and press the ‘Clear Lists’ button, the ‘Repeat Previous
Issue’ will become available again at the start of a new issue, in case you need to repeat
the previous issue but to a different set of companies (or vice-versa, a different set of
drawings to exactly the same group of companies).
Drawing Register Professional – User’s Manual 2013
29
List of All Transmittals displays all the transmittals produced up to date, with the option to
view and reprint. Please note that only the issue slips relevant to the current discipline
are displayed. You can filter the list by project:
This list displays ALL Transmittal Slips issued for ALL Disciplines together in one list. Clicking on
the ‘By Project No.’ tab or the ‘By Project & Recipient’ tab you can filter the list to display
only those transmittal slips issued for the selected project or for the selected recipient within
a project.
If a mistaken issue has been made, you can cancel it by clicking the ‘Cancel Transmittal
Slip’ button. The whole line will switch to Red and a red X icon will show on the left column.
DRPRO will not remove the issue slip from the database, but it will tag it as cancelled and it
will not include it in the printed reports.
Should you have cancelled the wrong transmittal slip by mistake, you can click on the
‘Cancel/Uncancel Transmittal Slip’ button to re-instate it again as a valid transmittal slip.
Drawing Register Professional – User’s Manual 2013
30
Transmittal Slip Contents: While on the “List of All Transmittals”, clicking the button “Issue Slip
Contents” will display all the relevant details of what was included in that one transmittal
slip, allowing you to navigate to the “Next” and “Previous” transmittal slips at the click of a
button.
Alternatively, if you want to view the full graphical layout of the transmittal slip and then
print it again, then click on the “View & Reprint” button, select which printer you will use for
this purpose (you may just view it and skip the printing part as well). An example is shown in
the next page.
Drawing Register Professional – User’s Manual 2013
31
Drawing Register Professional – User’s Manual 2013
32
Contact Names displays a list of names of all the people involved in all the projects on
record, sorted by name or by project and recipient. From this list you can dial the
contact's telephone, fax or cell number directly if your computer is properly connected
to a modem and a telephone or fax is also connected. Refer to the experts on how to
connect these items. You may also send an email by clicking on the email address at
the bottom of the screen (if available).
Drawing Register Professional – User’s Manual 2013
33
The Printed Reports Menu gives you the option of choosing from various different reports.
Each one of these will prompt you for additional information to fine-tune your request.
Drawing Register Professional – User’s Manual 2013
34
Drawing Registers:
1. Drawing Register [Plain] - Printed Drawing List showing some basic information about
each drawing. Does not show concrete issue dates. For that purpose rather use one
of the “Issue Registers” as described below.
2. Plain Drawing Register Showing Vendors – Printed Drawing List that also shows the
vendor’s name next to each drawing.
3. Plain Drawing Register Showing Resources – Printed Drawing List together with the
names of the people doing the drawings.
4. Plain Drawing Register Showing Comments – Printed Drawing List showing a one line
comment about each drawing. This comment is the first few words of what you enter
in the ‘Comments’ tab of the ‘Drawing Entry Form’.
5. Plain Drawing Register With Squad Check Dates – Printed Drawing List showing
squad check dates as entered for each drawing in the Entry Form.
6. Plain Drawing Register Showing Dwg/Doc Status – Printed Drawing List showing the
Drawing / Document Status for each drawing recorded.
Issue Registers:
1. ALL Revisions – This printed register will print the issue date of every revision of every
drawing on record (subject to the filters selected). It prints one set of pages for each
recipient selected to be included in the report.
2. NEW Revisions – Similar to the ALL Revisions above, but with one difference: It will
include only the drawings actually issued between the two selected dates (from &
to).
3. LATEST Revisions – This printed register is probably the most useful of the batch. It’s a
more condensed report, showing the company names (recipients) on the top of
each column and the issue date of the “latest” revision only. If you spot any empty
cells in this report, then it’s because that recipient did not get the latest revision of
that drawing. They may have received the previous revision, but not the very latest!
4. LATEST Revisions - Showing Reason for Issue – Identical to the register above, except
that it will print issue dates for one recipient on each set of pages, and will also show
a series of coloured icons and numbered columns indicating the reason for issue,
the issue method and if an email was sent.
5. LATEST Revisions - Register of Drawings Received and Re-Issued Again – Use this
register to show when a drawing has been received as well as the subsequent issue
dates of the same drawing.
Other Registers:
1. Projects Register – Prints a list of all projects on file, either in numerical order (by
project number) or alphabetical order (by project name)
2. Recipients Register – Prints a list of all recipients for the selected project, including
some basic information about each recipient.
3. Drawings Received – Prints a list of drawings received for one project and one
recipient as selected by the user.
4. Tel/Fax Directory – Company Details Only – Single line list of all recipients for one
project, at company level that could be used as a telephone/fax directory.
5. Tel/Fax Directory – All Contact Names - Single line list of all individual names within
each of the recipient companies for one project, that could be also be used as a
telephone/fax directory.
Drawing Register Professional – User’s Manual 2013
35
ManHours Registers:
1. ManHours Detailed Report by Drawing [Plain] - This report will print a calculated page
(or pages) showing how each drawing is performing regarding the number of
budgeted hours allocated to it vs. the actual number of hours spent on each
drawing.
2. ManHours Detailed Report by Drawing [+ Resources] – This report will print a
calculated page (or pages) showing how each drawing is performing regarding the
number of budgeted hours allocated to it vs. the actual number of hours spent on
each drawing. It will also show the resources allocated to each drawing.
3. ManHours Detailed Report by Drawing [+ Dates] – Similar to the above report, this
report will print a calculated page (or pages) showing how each drawing is
performing regarding the number of budgeted hours allocated to it vs. the actual
number of hours spent on each drawing. It will also show certain key milestone dates
for each drawing.
4. ManHours Summary Report Grouped by Portion – Similar to the detailed report
above, but with all the drawings for each ‘Portion’ (or ‘Area’) of the project
condensed in one line.
5. ManHours Summary Report Grouped by Sub-Portion - Similar to the Grouped by
Portion report above, but with all the drawings for each ‘Sub-Portion’ (or ‘Sub-Area’)
of the project condensed in one line.
6. ManHours Detailed Report –COS Hours Only – This report will show only the COS
(Change Of Scope) Hours for each of the drawings listed.
Before each report is printed, you may select the target printer by clicking on the button
labelled “Change Default Printer for this session only”. That printer selection will stay active
until you restart DRPRO again, at which time it will revert to the default printer allocated to
DRPRO.
As you start each report, DRPRO will prompt you with additional screens where you can
select or set some of the following items:
Select if Hidden Drawings are to be included in the report or not
Select ‘Single Line Report’ or ‘Double Line Report showing Reference Drawing
Numbers’ (or ‘Double Line Report showing Transmittal Slip numbers in the case of the
Issue Registers))
Select Project Number
Select Portion (or Area)
Select Sub-Portion (or Sub-Area) if applicable.
Select Drawing Category
Select which Recipients to include in the report
Select Page Orientation (Landscape or Portrait)
Select which Drawing Numbers to print (yours or the client’s numbers)
Select Preview, Print Now or Cancel printing
IMPORTANT NOTE ON PRINTED REPORTS: DRPRO will print each report for one discipline only,
the one displayed on the toolbar at the top of the screen. For additional disciplines, you’ll
need to repeat the same report for each after re-selecting it from the discipline list on the
Drawing Register Professional – User’s Manual 2013
36
left of the Printed Reports Menu, or alternatively from the big ‘Select Discipline’ list on the
left of the window or from the button on the top toolbar.
Standard Notes is a list of notes that you would normally add at the end of a transmittal slip.
The purpose of this list is to keep a record of those notes most often used, so you don't have
to retype them every time an issue is done. These notes would be added to each individual
recipient when doing an issue.
Drawing Register Professional – User’s Manual 2013
37
Export to Reader allows you to create a file containing a complete set of drawing and
issue information for one selected project. This file is then sent via email, ftp, disk, CD or
any other electronic method to the other parties involved in the same project for their
perusal. Form their side, all they need to view the information contained in the file is
DRPRO READER, a companion program to DRPRO, available for FREE from our web site
at
www.ldacomputing.com
Drawing Register Professional – User’s Manual 2013
38
Export to MS Excel allows you to create text files that are compatible with spreadsheet
programs such as MS Excel™ or OpenOffice. Once in CSV format, these files can be resorted and manipulated by the end user at their discretion.
Once the files have been created, an ‘MS Excel’ icon will appear on the right of each file
name. Click that button to open the file just created. If MS Excel is installed in your
computer, it will automatically start and open the CSV file at the same time. Alternatively,
you could also use other spreadsheet applications such as “Open Office” to open these
CSV files.
Drawing Register Professional – User’s Manual 2013
39
Drawings Received is a database of drawings received from any of the recipients listed
in your Recipients database. The drawing information only needs to be entered once.
Thereafter, only the revision information has to be entered for every new revision
received for each drawing. A printout of this list is also available.
Each drawing received needs to be entered once only on the left list and the first revision
received on the right. Thereafter, if the same drawing is received again, but with a new
revision, then only the new revision needs to be added to the list on the right side and at
the same time click the button ‘Mark Revision as Latest’. You need to do this step, because
DRPRO does not know if the latest revision available for that drawing, due to the many
different Revision Systems in use out there, which may not be the same as the one you are
using for this specific project.
Drawing Register Professional – User’s Manual 2013
40
Drawing Register Professional – User’s Manual 2013
41
IMPORTANT NOTE: The List of Drawings Received has a different record structure to the list
where you keep your own list of drawings, therefore you cannot issue out of this list. If you
need to re-issue a drawing received, then click on the button ‘Copy this Dwg to Main Dwg
List’ and a new window will appear asking you some more detail before saving it in your
own list of drawings. We suggest placing these drawings under a different ‘Category’ and
also give each drawing a specific prefix for ease of identification. By default, DRPRO will
prompt you with the same prefix as the recipient company you received these drawings
from.
Drawing Register Professional – User’s Manual 2013
42
Select Printer allows you to obviously select which printer to be used. The “Printer” icon
on the toolbar at the top of the screen will set which printer will be used as the default
printer just for DRPRO only, regardless of which printer is used as the default Windows
Printer. Obviously they can both be the same. Under the Reports Menu, you can select
an alternative printer just for this DRRO session only. When restarting, DRPRO will revert
back to the printer as originally setup on the top printer icon.
FTP Hyperlinks is a user defined list of links to FTP sites where you upload your drawings
to. Each hyperlink should ideally be copied and pasted here to maintain accuracy. The
‘Test’ icon is for the purpose of checking the validity of each hyperlink.
Drawing Register Professional – User’s Manual 2013
43
As of version 4, there is a new feature in DRPRO called ‘I Want To…’to guide you to the
correct window in the program, depending on what you want to do. The screenshot below
shows the current contents, which no doubt will be expanded in the future. To access any
of the items listed, click on the button on the left side:
Drawing Register Professional – User’s Manual 2013
44
ADMINISTRATOR’S MENU:
The Administrator's Menu is divided into various utilities:
1.
2.
3.
4.
5.
6.
7.
8.
Capacities
Disciplines & Categories
Designations
File Formats
Issue Methods
Media Sizes
Media Types & Costs
Project Types
9. Revision Systems
10. Scales
P. Printing Costs
U. Users List
G. Global Defaults
T. Transmittal Slip Templates
L. Licence Manager
A. User Activity Log File
R. Printed Report Headings (new in v2011)
The following pages will show a screenshot of each of these Menu options. Most are selfexplanatory, and others have additional explanations about them.
Drawing Register Professional – User’s Manual 2013
45
Drawing Register Professional – User’s Manual 2013
46
Drawing Register Professional – User’s Manual 2013
47
Drawing Register Professional – User’s Manual 2013
48
Drawing Register Professional – User’s Manual 2013
49
The Licence Manager is also accessible from the item ‘Administrator’ from the top pull-down
menu, and will display information relating to which DRPRO licence is installed:
If you need to move DRPRO from one machine to another, you need to access this list from
another machine that has DRPRO installed, and login with a username and password that
has ‘Administrator’ rights within DRPRO. You need to do this from a different machine
because DRPRO will not let you disable your own workstation, as you could lock yourself out
of DRPRO!
Then, from the displayed list, highlight the machine that contains the licence to be moved
and click “Disable Workstation Licence”. Doing this will remove the ‘tick’ on the leftmost
column and make that licence available to the first new machine that next connects to
DRPRO. That new machine will scan through this list and ‘grab’ the first open licence
available. If there are no open licences available, then a message stating that “All DRPRO
licences have been used up” will appear…
This list may also assist you in finding out who’s using DRPRO regularly and who’s not, so you
can re-allocate the licences to those individuals that really need them.
Drawing Register Professional – User’s Manual 2013
50
View User Activity Log File – Displays a background log that DRPRO keeps of all important
activities, such as logging in and out, issuing drawings, deleting projects and drawings,
sending out transmittal slip emails, etc.
Additionally, three extra utilities are available to the Administrator item in the pull-down
menu at the top of the screen, namely:
1. Mass Email & Domain Change Utility – Seldom required, but should be a time-saver
for cases when one of you recipient’s internet domain changes and email addresses
change, affecting many entries already in DRPRO. See typical example below.
2. View Error Log File – This file keeps track of certain error conditions and at what stage
n the program they occurred. It can be useful for forensic purposes.
3. File Manager (NOTE: Switch to Maintenance Mode and Backup all data before
tackling this one! Use at your own risk. Please contact us should you feel you need to
use this tool)
4. System Maintenance ON/OFF - Switch Maintenance Mode ON or OFF. For use at
times such as introducing a new version of DRPRO. Switching Maintenance Mode to
ON will broadcast a message to all current users of DRPRO stating that they have 5
minutes to complete their current DRPRO task and exit. If they don’t exit, DRPRO will
automatically kick them out after the 5 minute count-down timer has reached zero.
Drawing Register Professional – User’s Manual 2013
51
Printed Report Headings (new as from v2011):
With this utility, you can override the default headings for most printed reports. You can
change the Font Settings (Style, Size and Colour). Simply highlight the text heading you
want to change (one line at a time), then click on the button labelled “Change Font
Settings”. When complete, click ‘Save’ to exit back to the Administrator’s Menu. You may
need to wait until all changes are implemented.
You can also define ISO Reference Codes to each printed report on the entry line below
each heading. These ISO Reference Codes will print on the bottom right hand corner of the
printed page. You can also change the Font Settings (Style, Size and Colour) of the ISO
Reference Codes.
There is an option to reset all headings (the text only) to installation defaults (you will lose all
your changes!), as well as for resetting all heading Fonts (Style, Size and Colour) to
installation defaults.
You can also reset all the ISO Reference Codes to installation defaults, which essentially
means that they will be cleared. A warning window will appear first before it is cleared.
Drawing Register Professional – User’s Manual 2013
52
Mass Email & Domain Name Change:
This option is available only from the “Administrator” pull-down menu at the top of
the screen.
This utility is used only in the rare cases where a company’s internet and/or email
domain name has changed and you need to modify all instances of the old
domain name in the DRPRO database to the new one.
Various options are available depending on how you want the change to be done.
Tick the appropriate boxes as show below.
Due to its nature, this process could take a while to complete, depending on how
many records are affected by the change.
Drawing Register Professional – User’s Manual 2013
53
Keeping track of PRINTING COSTS
DRPRO can track printing costs of all drawings and documents issued through it. For that, it
needs to know the pricing parameters of the various different types of Printing Media
regularly used in your office for each size available. The “Media Types and Costs”
screenshot above show how this information is displayed.
Because DRPRO can also keep track of historical price changes in the printing media, every
time there is a price change in the printing media you need to ADD a new line with the
new price for each size, as well as the date from which that new price is applicable. DO
NOT simply change the Cost and Charge prices that are already there, as that would result
in all printing being calculated based on the more recent price only!
To calculate the printing costs, select the “Printing Costs” button in the “Administrator
Functions” menu. Other select screens will follow requesting you to specify which discipline
to be calculated as well as between which project numbers and between which dates:
After this, DRPRO will start a scanning process to identify which records in the database
match the parameters requested and will create a temporary Cost file in the local
machine. When the scanning process is complete, a new Menu screen will appear, showing
the various cost report options available:
Drawing Register Professional – User’s Manual 2013
54
The set of eight buttons at the top will print the Cost and Charge reports showing both the
‘Cost’ figures as well as the ‘Charge’ figures on the same page.
The buttons at the bottom will print an identical set of reports as the left, except that the
‘Cost’ column is blanked out, i.e. it only prints the ‘Charge’ figures. This would be the report
you would normally give your client to claim for disbursements.
Please note that the ‘Detailed Report’ will print every single line of every transmittal slip
issued for that project (within the dates requested obviously!) and should only be used if
there is a major argument about printing costs. Printing it on paper will lead to more
additional printing costs on your part, so avoid it if you can! As an option, you could
alternatively print it to PDF, then email it to whoever requested it and let them print it if they
want to! You’ll save yourself a bundle just on paper…
Once you exit this menu, the temporary file in your local computer will be deleted and a
new one will need to be created again for the next ‘Cost’ calculation.
Drawing Register Professional – User’s Manual 2013
GLOBAL DEFAULTS
This screen is used to define global parameters that affect the operation of DRPRO across
the whole network, not just the individual workstations.
55
Drawing Register Professional – User’s Manual 2013
56
The screenshot above and the one on the next page show the information required to
enable emailing of transmittal slips from within DRPRO. DRPRO has its own built-in email
engine, and does not rely on external emailing software such as Outlook or Outlook Express
to send emails.
PLEASE NOTE: These email settings need to be setup before you can start sending out
Transmittal Slips via DRPRO. Please contact your system administrator or ISP provider for the
necessary information as required above.
Drawing Register Professional – User’s Manual 2013
57
NOTE: The item “Authorised Login Required” in the Email Security tab is only required to be
activated if you (or your IT department) have heavy security settings switched ON in your
Mail Server, typically with ‘MS Exchange Server’ as an example, but also with other mail
server software. As a general rule, first try sending out an email (transmittal slip) with this
setting OFF. If you get an error message with an error code along the lines of “Error 550 –
Relay prohibited”, then you will need to set this item ON.
In the line “Authorised Email User Name” enter the email user name of one of the users
registered with your mail server. Similarly for the password below.
It is recommended that you rather create a new email account within your Mail Server just
for DRPRO only, so there is no danger of this email account being disabled or deleted if
somebody else’s details are used and that person leaves the company, which would lead
to DRPRO not being able to send out emailed transmittal slips.
The table on the next page shows most of the typical errors you may get if an email
connection hasn’t been established by DRPRO while trying to send a Transmittal Slip. Based
on the information below you may then adjust your email setup accordingly.
Drawing Register Professional – User’s Manual 2013
58
Code
Enh.
Code
Message
Description
500
5.5.1
Command unrecognized
The SMTP command currently used was unrecognized or is not supported
by your MailServer.
501
5.5.2
Domain name required
Sender has no domain specified (usually in MAIL FROM)
501
5.5.2
Unbalanced
SMTP session syntax invalid. (usually unbalanced brackets)
Syntax error in parameters
scanning
HELO/EHLO requires domain
address
Common syntax error. You probably mistyped last command or last string is
invalid.
Usually when there was blank or invalid string sequence after HELO/EHLO
command.
501
5.5.4
501
5.5.1
501
5.0.0
Authentication cancelled
The process of authentication was cancelled for any reason.
501
5.7.0
Authentication failed
The username/password combination provided during authentication was
invalid.
501
5.7.1
You are not allowed to send.
502
5.5.1
Sorry, we do not support this
operation
503
5.5.1
Incorrect command
sequence
A supported command was issued out of sequence. For example
command RCPT TO used before MAIL FROM or DATA command used when
RCPT TO command was not accepted.
503
5.5.1
Authentication already done
Error occurs by re-authentication.
503
5.5.1
HELO/EHLO command
required
Greeting error. HELO/EHLO command is required.
503
5.5.1
HELO/EHLO already specified
Greeting used again.
Unrecognized authentication
type
Authentication required
[AUTH]
This operation is not allowed.
504
5.7.6
530
5.7.1
550
5.7.1
We do not relay
550
5.7.1
We do not relay, account
limits apply
550
5.7.1
You have rights to send mail
to local domains only
The user who gets this error is allowed to send mail only to local domains.
550
5.7.1
Access not allowed
1) MailServer is blocking access by a black list filter. Or 2) Reject if
originator's domain is local and not authorized option turned on. Or 3)
Sending to a mailing list set to members only.
550
5.7.1
Permission denied
550
5.1.1
Unknown user local
550
5.1.1
Unknown user; rejecting
Unknown user account. The recipient is not local, thus reject the message.
551
5.1.1
No such user found
User account is not local.
551
5.1.1
No such mailing list found
Mailing list is not local.
552
5.5.3
Too many recipients
The number of recipients exceeds the maximum of allowed recipients.
554
5.3.4
Message size exceeds fixed
maximum message size
Too much data was sent by the user. User account has an amount
limitation.
554
5.7.1
Message cannot be
accepted, virus found
Virus was found in the message body or in the message attachment.
554
5.7.1
554
5.7.1
554
5.2.2
Maximum size exceeded.
554
5.3.1
Maximum message size exceeded.
554
5.7.1
Message cannot be
accepted, content filter
rejection
Message cannot be
accepted, spam filter
rejection
Message cannot be
accepted, filter rejection
Invalid authentication type. Incorrect or none type of AUTH specified.
Authentication with command AUTH is required.
Server is not open for relay.
Content filter applied and the message was rejected.
Message is probably spam.
The message was rejected.
Drawing Register Professional – User’s Manual 2013
59
CUSTOMIZING THE
TRANSMITTAL SLIP TEMPLATE:
Under Issue Slip template, you may design your own transmittal slip headings, logo and
wording. The top portion is reserved for a logo occupying the size of 7.4" x 1.25" (188mm
x 32mm) or in the same proportion. This logo is user defined, and can be of any of the
following formats: BMP, PCX, JPG, WMF, and GIF. The JPG format is preferred because it
is usually smaller is size and reduces the time taken to print each transmittal slip. For
some ideas on what can be done with this logo, refer to the sample image files
provided with this program located in the Data directory.
Drawing Register Professional – User’s Manual 2013
60
Please note that if your logo is to occupy only a small area of the allocated image size,
you must still create a blank image of the size described above and then put your logo
anywhere in this space. The text is superimposed on top the image, and is also user
definable. Click on the buttons on top of the Issue Slip Template for all the different
options available. The fonts selected must be available on every computer that will
have access to this program.
Some typical Logo sizes in Pixels:
100dpi = 740 x 125 (will look coarse and dotty!)
200dpi = 1480 x 250 (reasonable resolution)
300dpi = 2220 x 375 (sharp resolution – Good for including text in the logo as well)
Drawing Register Professional – User’s Manual 2013
61
Drawing Register Professional – User’s Manual 2013
62
Drawing Register Professional – User’s Manual 2013
63
SEARCH FILTERS:
Some of the Windows described above have a button called 'Search Filters'. This button
allows you to do a search for a subset of information to be displayed. Depending on
how complex the query is, it could take a while for it to be displayed. To return the list
back to the original display, delete all entries in the Query List.
Drawing Register Professional – User’s Manual 2013
64
BACKING-UP DRPRO &
PROTECTING YOUR VALUABLE DATA:
It is your responsibility to keep proper backupsof your data. Computers and software
are inherently complex and data can get corrupted due to a variety of reasons,
namely, power fluctuations or failures, faulty components in a PC, especially network
cards, operating system hiccups, such as closing files before being instructed to do so
by the client software, thus causing possible file truncation and therefore data loss, and
many other causes (such as bugs, we admit). Although we have attempted our best to
keep your data clean and the referential integrity maintained between the files, we
cannot however guarantee 100% that no corruption will ever occur. Therefore we
recommend that you keep a rotating set of backups of the DRPRO data files in case of
emergency. At worst, you could lose a day’s worth of information, which could at least
be partly reinstated if your memory is in good nick, but not year’s worth of it.
Please remember that LDA Computing cannot be held responsible for loss of data due
to lack of backups or due to any of the reasons mentioned above.
If you want to backup the data files only, then only the DATA folder needs to be
backed up, as it contains ALL the data generated by DRPRO. First prize would be to
backup your data every day, and keeping a rotating set of backup media, so that you
can go back to an older set of data if need be.
However, if you are running DRPRO as a single-user system (Program and Data both in
the same computer), then it is recommended that the whole of DRPRO be backed up
as a complete unit, with all its sub-folders, so that in case all is lost and you need to reinstate your information, there is no need to re-install DRPRO and re-enter the
registration file again (which could very well be also lost!).
Another strong recommendation is that you have your workstations and Server
connected to a decent UPS (Uninterruptible Power Supply), as any sort of power hiccup
can cause data corruption, as stated above, which is beyond the control of DRPRO.
PLEASE READ THE FOLLOWING DOCUMENTS INCLUDED IN THE DRPRO4\DOCS FOLDER:
Resolving network and other file problems with Topspeed.pdf
Opportunistic Locking and Read Caching on MS Windows Networks.pdf
Advice from those who have lost everything.pdf
Causes of General Protection Faults and Troubleshooting Tips.pdf
Network / file problems, such as those with symptoms like error 1477 and 2172, can take
many forms. They can be caused by one or more of the following:
Drawing Register Professional – User’s Manual 2013
65
Kinked or damaged network cable - just because it looks ok doesn't mean it is - test it or
swap it out for another one you may have.
Cable running close to a fluorescent light ballast (fixture).
Loose connector/plug on a network cable.
Old "worn out" cables, particularly coax cables that have been around for years.
Out of date drivers.
Bad hub or a bad port on a hub.
Failed/failing network card.
Power problems (PLEASE protect your systems with a UPS, power problems are one of
the
biggest troublemakers we know of. Yes, a UPS might cost $79 to $450 depending on how
big a unit you buy, but how much is your computer and a day's worth of business
worth? Consider it much less than the time to fix a power-caused mess.
Network setup and/or configuration problems.
Inadvertent shutdowns.
Shutting down servers while workstations are still in the program.
Out of date network drivers (even those right out of the box are sometimes a problem).
Improper or less than desirable network bindings/settings.
Loss of network connections caused by server-management-induced timeouts. Check
out http://support.microsoft.com/kb/297684
NOTE: Remember that having backups is a saving grace in the face of file/network
problems. Network problems can corrupt your files in a heartbeat. If you have no backups,
you are in big trouble (future or present - trouble will occur). Having backups is a
responsibility you must take VERY seriously.
For more detailed information on the above items, please read the file Resolving network
and other file problems with Topspeed.pdf . This file is included in the DRPRO\DOCS folder
on your local workstation.
[ Special thanks to Mark Riffey of RescueMarketing.com for the above information. This
information was extracted from http://www.rescuemarketing.com/network.htm ]
Drawing Register Professional – User’s Manual 2013
66
DRPRO - General notes on Networks
How DRPRO Network Installation Works:
The DRPRO network installation process places the DRPRO DATA files in the server or shared
network folder. DRPRO users execute the program from their local workstations, with the
data files in the server being shared among multiple DRPRO users. One license per
workstation is required.
Network Installation Notes:
1. DRPRO requires that the workstation have a drive letter mapped to the directory, which
contains the DRPRO data, or alternatively the UNC (Universal Naming Convention)
equivalent. Note: The drive letter may be assigned to a parent directory -- the only
requirement is that DRPRO on the user's machine points to the data using a drive letter.
e.g.
Drive Letter Option:
"K:\DRPRO"
UNC Naming Option:
"\\SERVER1\DRPRO"
This information is stored locally in each workstation.
2. DRPRO users must have FULL Read-Write access to the network shared directory as well as
the necessary user permissions. Please consult your network administrator in this respect.
3. DRPRO installation program offers the user a choice of various installation types. Run the
installation program more than once to install various parts of the program. The “Program
Files Only” installation option must be done locally from each workstation that will access
the shared DRPRO data on the server.
4. On a network, the Data installation must be completed BEFORE users can install the
“Program Files Only” option on the local workstations.
5. If a local version of DRPRO has been installed followed by a subsequent network client
install, the users menu system and window's DRPRO shortcuts will be updated to reflect the
shared database location. Thus they will have to be manually adjusted including the new
"Target Path" and "Start in:" folder setting for each shortcut.
6. DRPRO's Uninstall only works for workstation installations, not for the Data portion of the
program. This prevents a network client user from inadvertently erasing the database.
7. Faulty Network Cards - In not so rare cases, database corruption on shared databases
have been shown to be caused by faulty or noisy network cards. This situation can be
extremely difficult to diagnose. Experience has shown that using the process of elimination
to take network cards off-line to locate the offending card on the network is effective.
Drawing Register Professional – User’s Manual 2013
67
ANNUAL SUBSCRIPTION OPTION:
(IMPORTANT INFORMATION)
By selecting this option you will be entitled to download, install and run updates to DRPRO,
as they become available.
This Annual Subscription Option costs only 20% per year, based on the prevailing price of
the package purchased. A renewal notification will be e-mailed to you about one month
before the expiry date. This option is automatically included for the first year after the
original purchase. The price is calculated on the full set purchased and not on a partial set.
You may opt not to renew the Annual Subscription for a few years then decide to join in
again. In this case, the cost the Annual Subscription will be based on 20% per year for each
year that lapsed, plus another 20% for the year ahead, as this option is purchased in
advance.
PLEASE NOTE that if you do NOT renew the Annual Subscription after the first year, you will
NOT be able to use any of the new updates that will be regularly made available for
download from our web site, as new features are added. However, your version of DRPRO
will not stop working!
One month before your DRPRO’s next expiry date, a message window will appear:
PLEASE NOTE: To find out your Annual Subscription status, click on "Who's Logged In" on the
pull-down menus at the top of the screen and read the details shown at the bottom of the
window displayed. If you need assistance or clarification, please give us a call.
Drawing Register Professional – User’s Manual 2013
68
Alternatively, if you have ‘Administrator’ rights within DRPRO, you can also view the
workstation list in the ‘Licence Manager’ as already described in an earlier page.
Drawing Register Professional – User’s Manual 2013
69
INDEX TO USER’S MANUAL
Abort Issue Slip .............................................. 27
Designations ................................................. 45
Access level..................................................... 6
Disable Workstation Licence ..................... 49
Activity Log File ............................................. 50
disbursements ............................................... 54
Add ................................................................... 8
Discipline.......................................................... 7
administrator ................................................... 5
Disciplines ...................................................... 45
Administrator ................................................... 6
Double Line Report ..................................... 35
Administrator's Menu ................................... 44
Drawing Categories .................................... 45
ALL Revisions .................................................. 34
Drawing Comments .................................... 34
Annual Subscription Option ...................... 67
Drawing COS Hours ..................................... 20
Annual Subscription status ......................... 67
Drawing Database ...................................... 15
Authorised Login Required......................... 57
Drawing Issue History ............................. 15, 18
Backing-up DRPRO ...................................... 64
Drawing ManHours ...................................... 19
Budget Hours per Drawing......................... 16
Drawing Number ......................................... 15
Cancel Transmittal Slip ............................... 29
Drawing Register .......................................... 34
Capacities ..................................................... 45
Drawings Received ......................... 14, 34, 39
Categories ..................................................... 45
Drawings Received and Re-Issued ......... 34
CC ................................................................... 11
DRPRO Reader ....................................... 21, 37
CC button...................................................... 12
Email Authentication .................................. 57
Change ............................................................ 8
Email Error Messages ................................... 58
Change Of Scope ....................................... 20
Email Server Settings ................................... 56
Clear Lists ................................................. 27, 28
Email Transmittal Slip ................................... 27
Company Abbreviation ............................. 55
Emailed Transmittal Slips............................. 11
Contact Names ...................................... 12, 32
Emailing of transmittal slips ........................ 56
Control Panel .................................................. 6
Emails.............................................................. 27
Copy ................................................................. 8
Error 550 ......................................................... 57
Copy to Issue Slip ................................... 23, 24
Error Log File .................................................. 50
CSV File........................................................... 38
Excel ............................................................... 38
Data Files ......................................................... 3
Export to CSV File ......................................... 38
Date Formatting ........................................... 55
Export to MS Excel ....................................... 38
Date Milestones ............................................ 16
Export to Reader .......................................... 37
Default Media Type ..................................... 55
Faulty Network Interface cards ................ 66
Default Revision System .............................. 55
File Manager ................................................. 50
Delete ............................................................... 8
Forward Email ............................................... 11
demo mode .................................................... 3
FTP Hyperlinks ................................................ 42
Drawing Register Professional – User’s Manual 2013
70
General notes on networks ....................... 66
Master Company List .................................. 10
Global Defaults ............................................ 55
Media Costs .................................................. 46
Hidden Drawings .......................................... 35
Media Sizes .................................................... 46
History ............................................................. 18
Media Types .................................................. 46
How Do I ........................................................ 43
Merge ............................................................. 12
Hyperlinks ....................................................... 42
MS Excel ......................................................... 38
I Want To ........................................................ 43
Network Deployment.................................... 8
Increase All Revisions by 'One' .................. 26
Network Installation Notes ......................... 66
installation ....................................................... 3
Networks ........................................................ 66
installation program ................................ 3, 66
'New' Revisions .............................................. 34
Installing DRPRO ............................................. 3
Number of Issue Slips to Print ..................... 55
ISO Reference Codes ................................. 51
numbering system ....................................... 15
Issue Drawings............................................... 22
Open Office.................................................. 38
Issue Registers................................................ 34
OpenOffice ................................................... 38
Issue Slip Remarks ......................................... 13
Operator .......................................................... 6
Issue Slip Starting Number .......................... 55
Other Registers ............................................. 34
Issue Slip template ....................................... 59
Outlook .......................................................... 56
Latest Revisions ............................................. 34
Page Orientation ......................................... 35
Licence.................................................3, 49, 68
password ......................................................... 5
Licence Agreement....................................... 1
Portions............................................................. 9
Licence Manager ........................................ 49
power ............................................................. 64
List of All Transmittals.................................... 29
Preview........................................................... 35
Locking/Unlocking a Project ....................... 9
Preview First ................................................... 27
Loging into DRPRO......................................... 5
Printed Report Headings ............................ 51
Logo sizes ....................................................... 60
Printed Reports ............................................. 33
Logos in Transmittal Slips ....................... 59, 61
Printing Costs ................................................ 53
Mail Server ..................................................... 57
Printing Costs Menu ..................................... 54
Mail Server Settings ...................................... 56
Proceed ......................................................... 27
Maintenance Mode .................................... 50
Program Files................................................... 3
ManHours Detailed Report ........................ 35
Project Types................................................. 46
ManHours Registers ...................................... 35
Projects Database ......................................... 9
ManHours Report with COS Hours Only .. 35
Projects Register ........................................... 34
Man-Hours Spent on a Drawing ............... 15
Projects Worked on ..................................... 10
ManHours Summary Report ....................... 35
Reader ........................................................... 37
Mark Dwg for Issue ....................................... 23
Reason for Issue ........................................... 34
Mark Revision as Latest ............................... 39
Recipients Database .................................. 12
Mass Email & Domain Name Change .... 52
Recipients Entry Form .................................. 13
Mass Email Change ..................................... 47
Recipients Register ...................................... 34
Drawing Register Professional – User’s Manual 2013
71
Reference Drawing Numbers .................... 35
spreadsheet .................................................. 38
Registration File............................................... 3
Squad Check ............................................... 34
re-issuing drawings ....................................... 28
Standard Notes ............................................ 36
Repeat Previous Issue ................................. 28
Sub-Portions .................................................... 9
Resend Email ................................................. 11
System Maintenance .................................. 50
Resources....................................................... 34
Tel/Fax Directory .......................................... 34
Revision numbers ................................... 26, 27
Templates ...................................................... 60
Revision system ............................................... 9
Transmittal Slip Contents ............................ 30
Revision Systems ........................................... 46
Transmittal Slip Layout ................................ 31
Revisions ......................................................... 21
Transmittal Slip Remarks.............................. 13
Revisions Entry Form..................................... 21
Transmittal Slip Template............................ 60
Search Filters ................................................. 63
Transmittals .................................................... 29
Select Date Range ...................................... 53
Uncancel Transmittal Slip ........................... 29
Select Discipline ....................................... 7, 36
UPS .................................................................. 64
Select Drawings for Issue ............................ 23
User Names ................................................... 46
'Select Dwgs .................................................. 22
username......................................................... 5
Select Printer ................................................. 42
Using DRPRO ................................................... 6
Select Recipients .......................................... 23
Vendors .......................................................... 34
Select Recipients for Issue .......................... 23
Vendor's Drawing Number ........................ 16
Setup.exe ......................................................... 3
View & Reprint .............................................. 30
Single Line Report ........................................ 35
View History ................................................... 18
Single User ........................................................ 3
View Revisions............................................... 21
SMTP Server Address .................................... 56
Web site ......................................................... 37
Software Licence Agreement ..................... 1
Who's Logged In .......................................... 67