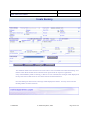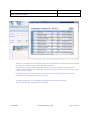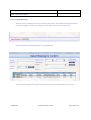
1
Stanford Systems UK Ltd
Online Management of Interpretive Services (OMIS)
User Manual for OMIS Administrators
Version 4.1
Online Management of Interpretive Services (OMIS)
Version: 4.1
Date: 15-Nov-2004
OMIS Administrator Manual
Neither the whole nor any part of the information contained in this document may be adapted, copied, photocopied,
reproduced, translated or reduced to any electronic medium or machine readable form without the prior written
approval of the Copyright owners.
The software described in this document is furnished under a license by Stanford Systems and may not be used or
copied except in accordance with the terms of such license.
The right to change the specification of any products described herein at any time and without notice to anyone is
reserved.
The information provided in this manual is subject to development and change due to Stanford Systems’ policy of
continuing improvements to its products. While every care has been taken in the preparation of this manual to ensure
accuracy, all information of any nature and particulars of the products and their use are given by the manufactures in
good faith. We welcome any information concerning errors and omissions which may have escaped notice, and any
comments which may help us to improve the manual.
© Copyright 2004 Stanford Systems UK Ltd. All rights reserved.
Trademark acknowledgement
All other trademarks mentioned herein are the property of their respective owners.
Stanford Systems UK Ltd
Tel : (44) (0) 7000 000728
Fax : (44) (0) 7000 728329
Confidential
© Stanford Systems, 2004
Page 2 of 184
Online Management of Interpretive Services (OMIS)
Version: 4.1
Date: 15-Nov-2004
OMIS Administrator Manual
Table of Contents
1.
Introduction and Overview
1.1
Overview
6
6
2.
Organisational Administration
2.1.1 Systems administrator
7
7
3.
2.1.2 Customer support officer
7
2.1.3 Interpreter support officer
7
2.1.4 Finance officer
7
2.1.5 Interpreter
7
2.1.6 Customer Administrator
7
2.1.7 Customer bookings officer
7
2.1.8 Summary of users of the OMIS System
8
System Administration and Registration
3.1
Customer Registration
9
10
3.1.1 Account Holder Registration
10
3.1.2 Agree Terms & conditions
11
3.1.3 Account Details - ‘Required Fields’ and Validation
12
3.1.4 Registration complete for ‘Another PCT’ Account
15
3.1.5 Creating Departments or Clinics
16
3.2
Maintaining Customer Accounts
20
3.2.1 Login into System
20
3.2.2 Login Validation
21
3.2.3 Valid Login
21
3.2.4 OMIS Account Privileges
22
3.2.5 Creating a New Customer Account
23
3.2.6 Activating/Deactivating Accounts
27
3.2.7 Amend a Customer Account
32
3.2.8 Viewing Customer Account Details
34
3.3
Maintaining Users
35
3.3.1 OMIS Users
35
3.3.2 Customer Users
43
3.3.3 Interpreter Users
52
Confidential
© Stanford Systems, 2004
Page 3 of 184
Online Management of Interpretive Services (OMIS)
Date: 15-Nov-2004
OMIS Administrator Manual
3.4
Version: 4.1
Bookings
66
3.4.1 Booking Creation
66
3.4.2 Booking Amendments
70
3.4.3 Booking Confirmation
73
3.4.4 Un-confirming Bookings
81
3.4.5 Booking Cancellation
83
3.4.6 Booking UnCancellation
86
3.4.7 Booking Sign-off
88
3.4.8 Booking UnSignoff
93
3.4.9 View Booking
96
3.4.10 Booking History
99
3.4.11 Print Booking
100
3.4.12 Follow-Up Bookings
102
3.4.13 Creating Regular Sessions
104
3.4.14 Creating Block Bookings
106
3.4.15 Urgent Bookings
108
3.5
Reports
123
3.5.1 Month End/ Error Check
123
3.5.2 Month End Reports
126
3.5.3 Operations Performance Reports
136
3.5.4 Management Batch Summary Report
140
3.5.5 Activity Trend Analysis Report
142
3.5.6 Customer/OMIS User Activity
144
3.5.7 Agency Volume Report
145
3.5.8 Interpreter DNA Report
147
3.5.9 Customer Account Reports
148
3.5.10 User Login Report
158
3.5.11 Unconfirmed Bookings Report
160
3.5.12 Daily Confirmation Report
162
3.6
Administration
162
3.6.1 Languages
162
3.6.2 St Mary’s Upload
162
3.7
Amend Interpreter Diary
162
3.7.1 Selecting the Interpreter
Confidential
162
© Stanford Systems, 2004
Page 4 of 184
Online Management of Interpretive Services (OMIS)
Version: 4.1
Date: 15-Nov-2004
OMIS Administrator Manual
3.7.2 Selecting the Date
162
3.7.3 Selecting Day/Week/Month Views
162
3.7.4 Viewing Bookings by Status
162
3.7.5 Booking Status Colours
162
3.7.6 View Booking Notes
162
3.7.7 Enter Interpreter ‘Unavailability’
162
3.7.8 Deleting Interpreter Unavailability
162
Confidential
© Stanford Systems, 2004
Page 5 of 184
Online Management of Interpretive Services (OMIS)
Version: 4.1
Date: 15-Nov-2004
OMIS Administrator Manual
User Manual for OMIS Administrators
1.
1.1
Introduction and Overview
Overview
The OMIS system allows remote users to book and schedule appointments for language interpreters. The
system is Web based, which means that any users that have an active Username and Password are able to
use the system via the NHSNet. In the case of OMIS users, they can access the system via the Intranet.
NHS Organisations such as GRIP provides language interpretation services to a number of organisations,
including healthcare, Social Services, housing and occasionally solicitors.
The services provided include the following:
•
•
•
•
Face to face interpreting
Specialised interpreting in sensitive areas such as mental Health and HIV
Telephone interpreting, normally only provided when unable to provide a face to face
interpreter
Translation of documents and letters.
Rapid growth of the NHSNet and e-applications within the NHS caused the Interpretive Service Providers
to consider providing their service on the Web.
The OMIS system should allow the NHS to improve the service provided to their customers and also allow
staff resources to be diverted from manual bookings to on-line support.
Confidential
© Stanford Systems, 2004
Page 6 of 184
Online Management of Interpretive Services (OMIS)
Date: 15-Nov-2004
OMIS Administrator Manual
2.
Version: 4.1
Organisational Administration
This section describes the users of the system:
2.1.1
Systems administrator
The objective of the Systems Administrator is to ensure the efficient running of the OMIS system.
Accepts or rejects on-line applications from customers for new accounts. Accepts or rejects on-line
applications from OMIS users, customers and interpreters.
Configure reports for on-line users. Configure user access to the on-line system
2.1.2
Customer support officer
The objective of the Customer support officer will be to provide support to customers via the on-line
system, telephone, text-messaging and email. This is primarily for unconfirmed booking requests. The
support will be offered for bookings where the interpreter has tentative availability and also where an
interpreter is not available for a particular date/time. The support officer will need to call interpreters in
order to fill the slots.
2.1.3
Interpreter support officer
The objective of the Interpreter support officer will be to provide on-line, telephone, text-messaging and
email support for interpreters so that the interpreter’s diary gives an up-to-date view of availability. This
role will also play a part in assisting the Customer Support Officer complete unconfirmed booking.
2.1.4
Finance officer
OMIS user who requires finance information for invoicing and payments
2.1.5
Interpreter
Mixture of employees and freelance, full-time and part-time staff. There are approximately 640
interpreters, approximately 70% of who are active.
2.1.6
Customer Administrator
Responsible for creating customer Account and users. This user is based at the customer site.
2.1.7
Customer bookings officer
Responsible for creating and following bookings at the customer site.
Confidential
© Stanford Systems, 2004
Page 7 of 184
Online Management of Interpretive Services (OMIS)
Date: 15-Nov-2004
OMIS Administrator Manual
2.1.8
Version: 4.1
Summary of users of the OMIS System
Name
Description
Type
Service manager
In charge of all staff at the Host Site
OMIS user
Performance
manager / Systems
administrator
Reports to the service manager and Responsible for the
interpreters and all other staff
OMIS user
Customer support
officer
Provide support to customers
OMIS user
Interpreter support
officer
Provide support to interpreters
OMIS user
Uses Finance information for payments and invoicing
OMIS user
Mixture of employees and freelance, full-time and parttime staff. There are approximately 640 interpreters,
approximately 70% of who are active.
Interpreter
Responsible for Creating customer Account and users
within the customer site
Customer
Responsible for making bookings
Customer
Finance officer
Interpreters
Customer
Administrator
Customer bookings
officer
Confidential
© Stanford Systems, 2004
Page 8 of 184
Online Management of Interpretive Services (OMIS)
Version: 4.1
Date: 15-Nov-2004
OMIS Administrator Manual
3. System Administration and Registration
This manual has been created for the OMIS System administrators. It describes all the administrative tasks
that are necessary to ensure the efficient running of the System. The first section describes the registration
process that the Customers carry out. This has been included in this manual so that administration staff are
familiar with this process and will then be able to complete the Activation process that is necessary to
ensure that Customers are able to login.
This section is written to familiarise the OMIS user with the System Administration and registration
process. Customers and users must be able to register on the system and receive the required
activation/deactivation from the administering organisation.
Confidential
© Stanford Systems, 2004
Page 9 of 184
Online Management of Interpretive Services (OMIS)
Date: 15-Nov-2004
OMIS Administrator Manual
3.1
Customer Registration
3.1.1
Account Holder Registration
Version: 4.1
The Administrator at the Customer Site will need to create the account for the Customer and the Systems
Administrator. This will need to be started at the Sign-in form. The administrator will not be able to loginin with a user id and password unless this account is created. The Administrator or Account Manager will
need to follow this process. The process is started by clicking the ‘Register’ button on the Sign-on form.
On clicking the ‘Register’ button for the first time an ‘Anonymous account’ is created. It is this anonymous
account that is used to register all subsequent accounts and users with the ‘Register’ Button. The ‘Register’
button is only to be used for creating NEW customer accounts and should NOT be used to register existing
users of the same organisation.
The procedure for opening this account is shown below:
Click the ‘Register’ Button
This will take you to the ‘OMIS Online home Page’. This will give the instructions for registering an
account. You will also be asked to agree to the Terms and Conditions for creating an account.
Confidential
© Stanford Systems, 2004
Page 10 of 184
Online Management of Interpretive Services (OMIS)
Date: 15-Nov-2004
OMIS Administrator Manual
3.1.2
Version: 4.1
Agree Terms & conditions
Select the ‘I Agree’ Terms & Conditions and then Click on the ‘Create’ button so that your account details
can be entered.
Confidential
© Stanford Systems, 2004
Page 11 of 184
Online Management of Interpretive Services (OMIS)
Date: 15-Nov-2004
OMIS Administrator Manual
3.1.3
Version: 4.1
Account Details - ‘Required Fields’ and Validation
If you click on the ‘Submit’ button without entering any data and then press ‘OK’ to update the details,
Then the error messages for the required fields will be displayed. These are the fields where information
must be entered in order to ‘Register’ the account.
You may have noticed that messages are not displayed for the drop-down list boxes although these are
mandatory. This is because a default value is always displayed in the dropdown list box. You may select
another value, if required.
A summary of the error messages is displayed at the top of the form and a star (*) is displayed beside the
field that is required.
Confidential
© Stanford Systems, 2004
Page 12 of 184
Online Management of Interpretive Services (OMIS)
Version: 4.1
Date: 15-Nov-2004
OMIS Administrator Manual
Enter the details for your Account. Details of the ‘Another PCT’ account are shown below. Any fields that
still generate an error will display the Star (*) as soon as the typing is complete. E.g. the postcode will
display an error message as soon as an invalid postcode is entered.
The Account Type is set to ‘Customer’ by default. And the ‘Organisation’ to ‘Self’. This means that the
‘Account Holder’ Account needs to be defined First and then any departments. ‘Another PCT’ is being
registered as the ‘Parent’ or Account Holder organisation and will be responsible for administration and
payments of the departments that will subsequently registered. This is the method used for registering the
Customer account of all Parent Organisations, where the Customer is initiating the registration process.
The other option is for staff at the Hosting site to enter the details of the organisation and activate the
accounts.
On entering the details, once the postcode is corrected, the (*) error will disappear.
Confidential
© Stanford Systems, 2004
Page 13 of 184
Online Management of Interpretive Services (OMIS)
Version: 4.1
Date: 15-Nov-2004
OMIS Administrator Manual
If the postcode is invalid and the ‘Submit’ button is pressed, then the form will be re-displayed with the
appropriate error. On correcting and re-submitting, the error will disappear and the details will be saved on
the on-line system.
The start date and the end dates for the account do not need to be entered. These will be generated and
displayed by the system as appropriate.
Once the account details have been entered, the Administrator details for this account will be requested as
shown. Enter the details for the ‘Administrator’. Example details are shown below for ‘Another PCT’.
Please make sure that you note the password that you have used.
Again, any mandatory fields and error messages will be displayed on top of the form. Make sure all the
details are entered and submit the form, confirming the update.
Confidential
© Stanford Systems, 2004
Page 14 of 184
Online Management of Interpretive Services (OMIS)
Date: 15-Nov-2004
OMIS Administrator Manual
3.1.4
Version: 4.1
Registration complete for ‘Another PCT’ Account
Confidential
© Stanford Systems, 2004
Page 15 of 184
Online Management of Interpretive Services (OMIS)
Version: 4.1
Date: 15-Nov-2004
OMIS Administrator Manual
3.1.5 Creating Departments or Clinics
Once the Account Holder ‘Account’ has been created, you may create the departments for your
organisation. These can be created by using the menu option as shown above. Click on the ‘Create’ button
and enter the details as shown below.
Confidential
© Stanford Systems, 2004
Page 16 of 184
Online Management of Interpretive Services (OMIS)
Version: 4.1
Date: 15-Nov-2004
OMIS Administrator Manual
This time you’ll notice that the Parent organisation is set to the ‘Account Holder’ account that was
previously created (Another PCT). Enter the details for the department and press the ‘Submit’ button.
Confidential
© Stanford Systems, 2004
Page 17 of 184
Online Management of Interpretive Services (OMIS)
Version: 4.1
Date: 15-Nov-2004
OMIS Administrator Manual
The screen above shows the confirmation on creating the department. You can create as many departments
as you require for your organisation. These will then be reviewed by OMIS staff. The Account Holder and
departments will be activated by OMIS staff as appropriate.
You can logout from the system after all the departments have been completed by using the ‘Logout’ menu
option as shown below:
Confidential
© Stanford Systems, 2004
Page 18 of 184
Online Management of Interpretive Services (OMIS)
Version: 4.1
Date: 15-Nov-2004
OMIS Administrator Manual
Account Holder
Another PCT
Clinic
Department
Administrator
Users
Administrator
GP Practice
Users
Administrator
Users
The Organisational structure for ‘Another PCT’ is shown above. The Registration process allows the Account Holder
to create this structure. OMIS administrators will then authorise the structure by activating the various accounts and
notifying the Account Holder administrator. OMIS Administrators will also create the administrator (users) at each of
the departments and notify the users of the details in order to login to the system. The administrators at each
department can then create
Confidential
© Stanford Systems, 2004
Page 19 of 184
Online Management of Interpretive Services (OMIS)
Date: 15-Nov-2004
OMIS Administrator Manual
3.2
Version: 4.1
Maintaining Customer Accounts
Customer accounts can only be maintained by OMIS Administrators. This section describes the tasks that
are required to Create, Amend, Activate and Deactivate Customer Accounts.
3.2.1
Login into System
In order to carry out the various administrative tasks the required security access must be supplied to all
OMIS Administrators. Whenever an OMIS administrator or user is created, the account is auto-activated.
I.e. all OMIS users will be activated on creation and will not require activation.
The following screen shows details required for the creation of an OMIS Administrator: This is covered in
the section – Creating an OMIS User account.
Confidential
© Stanford Systems, 2004
Page 20 of 184
Online Management of Interpretive Services (OMIS)
Version: 4.1
Date: 15-Nov-2004
OMIS Administrator Manual
3.2.2
Login Validation
Pressing the submit button with out entering any information will display error messages on invalid
username and password.
3.2.3
Valid Login
Login using the username and password provided by your OMIS administrator.
This should allow you to login, if the account details have been entered and the account is active
Confidential
© Stanford Systems, 2004
Page 21 of 184
Online Management of Interpretive Services (OMIS)
Date: 15-Nov-2004
OMIS Administrator Manual
3.2.4
Version: 4.1
OMIS Account Privileges
3.2.4.1 Administration of Customer Accounts
The OMIS administrator should be able to access the following menu options for the Account/Department
option on the system.
A summary of these options is given below:
Create – Create a New Account for Customer
Amend – Amend an existing Customer Account
Activate – Activate an inactive account
Deactivate – Convert an active account to an inactive account
View – View customer account details
Logout – Logout from current session
Confidential
© Stanford Systems, 2004
Page 22 of 184
Online Management of Interpretive Services (OMIS)
Date: 15-Nov-2004
OMIS Administrator Manual
3.2.5
Version: 4.1
Creating a New Customer Account
Customer accounts can be created in two ways
(1) by the customer using remote registration
(2) by the OMIS administrator entering the details supplied by the Customer
This section shows the latter method
After Login, the OMIS administrator selects the Account/Department, Create option from the Menu as
shown below:
A blank form will be displayed as shown below and the required fields will need to be completed for the
Customer:
Confidential
© Stanford Systems, 2004
Page 23 of 184
Online Management of Interpretive Services (OMIS)
Version: 4.1
Date: 15-Nov-2004
OMIS Administrator Manual
Once the required fields are completed, Submit and save the form. An example ‘Another PCT’ has been
created and the details are shown below. Note that the details completed here and those completed by the
Customers that Register on the system are the same.
The Organisation/Self field is important since it determines whether the Customer you are creating is an
‘Account Holder’ or a department. If you select ‘Self’, then an Account Holder will be created, where the
Customer will not have a parent Account. If you select an existing name, then this will become the Account
Holder of the Customer you are creating. As an example you may select ‘St Mary’s NHS Trust’ as the
Parent and enter ‘General Surgery OPD’ in the Organisation name/Department, therefore a Department will
be created as ‘General Surgery OPD’ and it’s account holder will be ‘St Mary’s NHS Trust’. This is
important when Reporting for Invoice purposes since the Invoice will be sent to the Account Holder and
All on the appointments for ‘General Surgery OPD’ will be included in the ‘St Mary’s NHS Trust’ Invoice.
Confidential
© Stanford Systems, 2004
Page 24 of 184
Online Management of Interpretive Services (OMIS)
Version: 4.1
Date: 15-Nov-2004
OMIS Administrator Manual
3.2.5.1 Creating an ‘Account Holder’
The details above are for the creation of an Account Holder (PCT) in this case.
After submitting and confirming the update, the above message confirms that the Account has been created.
Confidential
© Stanford Systems, 2004
Page 25 of 184
Online Management of Interpretive Services (OMIS)
Version: 4.1
Date: 15-Nov-2004
OMIS Administrator Manual
3.2.5.2 Creating a Department
When creating departments for the above Account Holder, you will need to enter the details similar to those
shown on the following page. Again use the ‘Account/Department’, ‘Create Menu option to access the
screen:
Again after submitting and confirming you should receive a message confirming the creation of this
account
Confidential
© Stanford Systems, 2004
Page 26 of 184
Online Management of Interpretive Services (OMIS)
Version: 4.1
Date: 15-Nov-2004
OMIS Administrator Manual
3.2.6 Activating/Deactivating Accounts
Once Customer accounts have been created, they need to be activated, before the customer can create users
and login to make bookings.
The section shows what needs to be done to activate accounts. It also shows how to deactivate accounts that
are no longer in use or that should not be used by Customers.
3.2.6.1 Activating a Customer Account
Select the ‘Account/Department’, Activate option from the main menu:
Then select the Organisation that is to be activated and click on the ‘Search’ button:
Confidential
© Stanford Systems, 2004
Page 27 of 184
Online Management of Interpretive Services (OMIS)
Version: 4.1
Date: 15-Nov-2004
OMIS Administrator Manual
Finally, click on the number that displays the Organisation’s Account number:
You will then see all the details for this organisation to Submit and ‘Activate’ the Customer Account
Confidential
© Stanford Systems, 2004
Page 28 of 184
Online Management of Interpretive Services (OMIS)
Version: 4.1
Date: 15-Nov-2004
OMIS Administrator Manual
You should see the confirmation screen showing that the customer’s account has been activated.
Please note that you also need to create the Administrator for this Customer, who will then create Users that
can then make bookings on the system.
Also note that each of these users will need to be activated before they can login to make bookings.
Confidential
© Stanford Systems, 2004
Page 29 of 184
Online Management of Interpretive Services (OMIS)
Version: 4.1
Date: 15-Nov-2004
OMIS Administrator Manual
3.2.6.2 Deactivating a Customer Account
Select the ‘Account/Department’, Deactivate option from the main menu:
Select the ‘Customer’ account that needs to be deactivated and click on the ‘Search’ button as shown
below:
Confidential
© Stanford Systems, 2004
Page 30 of 184
Online Management of Interpretive Services (OMIS)
Version: 4.1
Date: 15-Nov-2004
OMIS Administrator Manual
Click on the button showing the Customer account number to display the customer details and then press
the Submit button to deactivate the Account:
.
Again you should get the confirmation that the Customer account has been deactivated
Confidential
© Stanford Systems, 2004
Page 31 of 184
Online Management of Interpretive Services (OMIS)
Version: 4.1
Date: 15-Nov-2004
OMIS Administrator Manual
3.2.7 Amend a Customer Account
This section described the tasks required to amend the details of an existing account. This may be necessary
in case the address, phone number/fax or other details of the account need to be changed.
Select the Account/Department, Amend option from the menu as shown above and then select the
organisation from the list or enter other search criteria to find the relevant Customer Account:
You can search using the Account number, the postcode, the Old account number, part of the account name
or selecting the ‘Parent’ (Account Holder) from the list and pressing the ‘Search’ button:
Once the Customer has been found, press the button with the account number to reveal the details for this
customer:
Once you have made the changes to the Customer details, press the Submit button and confirm the update
Confidential
© Stanford Systems, 2004
Page 32 of 184
Online Management of Interpretive Services (OMIS)
Version: 4.1
Date: 15-Nov-2004
OMIS Administrator Manual
You should then receive the amendment confirmation message shown below:
Confidential
© Stanford Systems, 2004
Page 33 of 184
Online Management of Interpretive Services (OMIS)
Version: 4.1
Date: 15-Nov-2004
OMIS Administrator Manual
3.2.8 Viewing Customer Account Details
In order to view customer details use the ‘Account/Department’, View option from the main menu:
Then select the organisation from the list or enter other search criteria to find the relevant Customer
Account:
You can search using the Account number, the postcode, the Old account number, part of the account name
or selecting the ‘Parent’ (Account Holder) from the list and pressing the ‘Search’ button:
Once the Customer has been found, press the button with the account number to reveal the details for this
customer:
Once you have viewed the Customer details, press the ‘Home’ button to return to the home page.
Please note that you cannot amend any of the details for the Customer in the View option. You will need to
use the ‘Amend’ option if changes are required.
Confidential
© Stanford Systems, 2004
Page 34 of 184
Online Management of Interpretive Services (OMIS)
Date: 15-Nov-2004
OMIS Administrator Manual
3.3
Version: 4.1
Maintaining Users
The OMIS administrator is responsible for maintaining users on the system. There are three types of users:
OMIS Users – Users working at the Host Site
Customer Users – Users at Customer sites
Interpreter Users – Users that provide the interpretive Services to Customers
The OMIS Administrator requires access to all three types of users so that their details are as accurate as
possible on the system. The administrator is also responsible for creating new user accounts and
activating/deactivating accounts for users that join and have left the various organisations/positions.
3.3.1
OMIS Users
OMIS users need to be created by the OMIS Administrator. Their username and password can be set by the
administrator and can later be changed by the user.
3.3.1.1 Create OMIS Users
In order to create a OMIS user, select the ‘User’, ‘OMIS’, ‘Create’ option from the main menu:
Confidential
© Stanford Systems, 2004
Page 35 of 184
Online Management of Interpretive Services (OMIS)
Version: 4.1
Date: 15-Nov-2004
OMIS Administrator Manual
Enter the details for the user/administrator as shown above, then submit and confirm the details.
Use the User Privilege selection to create an administrator or an ordinary user for the OMIS Account.
Confidential
© Stanford Systems, 2004
Page 36 of 184
Online Management of Interpretive Services (OMIS)
Version: 4.1
Date: 15-Nov-2004
OMIS Administrator Manual
3.3.1.2 Activate/Deactivate OMIS Users
Once users have been created, they normally need to be activated; however, OMIS users do not require
activation. In order to activate a Customer ‘User’ see the next section.
Once users have left or moved to another department, their user account should be deactivated. This is done
by selecting the ‘User’, ‘OMIS’, ‘Deactivate’ option from the main menu:
Then enter the ‘Search’ criteria to find the user you need to de-activate. Or just press the ‘Search’ button to
list all the OMIS Users.
Then click on the user’s number button to display the details
Confidential
© Stanford Systems, 2004
Page 37 of 184
Online Management of Interpretive Services (OMIS)
Version: 4.1
Date: 15-Nov-2004
OMIS Administrator Manual
Amend the details for this user as required and then submit and confirm the details
Confidential
© Stanford Systems, 2004
Page 38 of 184
Online Management of Interpretive Services (OMIS)
Version: 4.1
Date: 15-Nov-2004
OMIS Administrator Manual
3.3.1.3 Amend OMIS User Details
In order to amend OMIS user details select the ‘User’, ‘OMIS’, ‘Amend’ option from the Main Menu
Then select the user details by searching with the appropriate search criteria:
Then click on the button showing the User number:
Confidential
© Stanford Systems, 2004
Page 39 of 184
Online Management of Interpretive Services (OMIS)
Version: 4.1
Date: 15-Nov-2004
OMIS Administrator Manual
Then amend the details, submit and confirm the update.
Confidential
© Stanford Systems, 2004
Page 40 of 184
Online Management of Interpretive Services (OMIS)
Version: 4.1
Date: 15-Nov-2004
OMIS Administrator Manual
3.3.1.4 View OMIS User Details
In order to view User details without making any amendments use the ‘User’, ‘OMIS’, ‘View’ option from
the main menu:
Then enter the appropriate search criteria to find the user:
Click on the button that displays the User number and view the User’s details. Then click on the ‘Home’
button to return to the Home Page.
Confidential
© Stanford Systems, 2004
Page 41 of 184
Online Management of Interpretive Services (OMIS)
Date: 15-Nov-2004
OMIS Administrator Manual
Confidential
Version: 4.1
© Stanford Systems, 2004
Page 42 of 184
Online Management of Interpretive Services (OMIS)
Date: 15-Nov-2004
OMIS Administrator Manual
3.3.2
Version: 4.1
Customer Users
Customer users need to be created by the OMIS Administrator. Their username and password can be set by
the administrator and can later be changed by the user. The Customer administrator can also be created by
the Customer during registration. After activation, the Customer administrator can then create either
administrators or users for their own organisation.
In this section the maintenance of Customer users is described so that OMIS administrators can carry out
the appropriate tasks.
3.3.2.1 Create Customer Users
Customer users can be created by selecting the ‘User’, ‘Customer’, ‘Create’ option from the main menu:
Enter the details of the user and submit/confirm the details. Please note that the ‘User Type’ is set to
‘Customer’ by default can cannot be amended since a Customer user is being defined. You can also select
the Organisation that the user belongs to in the ‘Department’ field.
Confidential
© Stanford Systems, 2004
Page 43 of 184
Online Management of Interpretive Services (OMIS)
Date: 15-Nov-2004
OMIS Administrator Manual
Confidential
Version: 4.1
© Stanford Systems, 2004
Page 44 of 184
Online Management of Interpretive Services (OMIS)
Version: 4.1
Date: 15-Nov-2004
OMIS Administrator Manual
3.3.2.2 Activate/Deactivate Customer Users
Once users have been created, they normally need to be activated. Customer users can be activated by
selecting the ‘User’, ‘Customer’ ‘Activate’ option from the main menu:
3.3.2.2.1 Activate Customer User
Then enter the appropriate search criteria and press the ‘Search’ button to find the user you need to deactivate.
Then click on the button with the User number to display the details and activate the user account.
Confidential
© Stanford Systems, 2004
Page 45 of 184
Online Management of Interpretive Services (OMIS)
Version: 4.1
Date: 15-Nov-2004
OMIS Administrator Manual
3.3.2.2.2 Deactivate Customer user
Once users have left the Customer Organisation or moved to another department, their user account should
be deactivated. This is done by selecting the ‘User’, ‘Customer’, ‘Deactivate’ option from the main menu:
Confidential
© Stanford Systems, 2004
Page 46 of 184
Online Management of Interpretive Services (OMIS)
Version: 4.1
Date: 15-Nov-2004
OMIS Administrator Manual
Then enter the appropriate search criteria and press the ‘Search’ button to find the user you need to deactivate.
Then click on the user number button to display the user’s details. Finally click on the Submit button and
confirm to deactivate the Customer user’s account
Confidential
© Stanford Systems, 2004
Page 47 of 184
Online Management of Interpretive Services (OMIS)
Version: 4.1
Date: 15-Nov-2004
OMIS Administrator Manual
3.3.2.3 Amend Customer Users
In order to amend the user details for a Customer, Select the ‘User’, ‘Customer’, ‘Amend’ option from the
main menu:
Enter the appropriate search criteria to find the user:
Then click on the button with the user number that required amending:
Confidential
© Stanford Systems, 2004
Page 48 of 184
Online Management of Interpretive Services (OMIS)
Version: 4.1
Date: 15-Nov-2004
OMIS Administrator Manual
Amend the details and submit/confirm the details
Confidential
© Stanford Systems, 2004
Page 49 of 184
Online Management of Interpretive Services (OMIS)
Version: 4.1
Date: 15-Nov-2004
OMIS Administrator Manual
3.3.2.4 View Customer Users
In order to View the Customer user details select the ‘User’, ‘Customer’, ‘View’ option from the Main
Menu:
Then enter the appropriate search criteria to find the user’s details:
Then click on the User Number button to display the details:
Confidential
© Stanford Systems, 2004
Page 50 of 184
Online Management of Interpretive Services (OMIS)
Version: 4.1
Date: 15-Nov-2004
OMIS Administrator Manual
After viewing the details, click on the ‘Home’ button to return to the Home page. Please note that you
cannot amend any User details in the View screen.
Confidential
© Stanford Systems, 2004
Page 51 of 184
Online Management of Interpretive Services (OMIS)
Date: 15-Nov-2004
OMIS Administrator Manual
3.3.3
Version: 4.1
Interpreter Users
This section describes how to maintain Interpreter’s details.
Interpreters require more information to be entered on their screen. This relates to the languages they can
interpret, their grade and payment details, gender and address. These must be entered correctly to ensure
that the interpreter’s are paid the correct amount.
3.3.3.1 Create Interpreter Users
In order to create an Interpreter’s account select the ‘User’, ‘Interpreter’, ‘Create’ option from the main
menu.
Interpreter’s details require additional information that relate to the Interpreter’s payments. All these details
must be entered for the interpreter to be setup correctly.
Enter details as shown below and submit/confirm.
Confidential
© Stanford Systems, 2004
Page 52 of 184
Online Management of Interpretive Services (OMIS)
Version: 4.1
Date: 15-Nov-2004
OMIS Administrator Manual
3.3.3.2 Amend Interpreter Users
3.3.3.2.1 Create Interpreter’s languages
In order to add the Interpreter’s languages. Select the ‘User’, ‘Interpreter’, ‘Amend’ option from the main
menu:
Confidential
© Stanford Systems, 2004
Page 53 of 184
Online Management of Interpretive Services (OMIS)
Version: 4.1
Date: 15-Nov-2004
OMIS Administrator Manual
Then enter the appropriate search criteria to find the Interpreter:
Then click on the button which contains the user number of the required interpreter:
When the interpreter’s details are displayed, click on the ‘Amend Languages’ ‘Search’ button
In our case we have a new interpreter and no languages have been defined for this interpreter:
When the Pop-up window is displayed, click on the ‘Add… Interpreter Languages’ button
Confidential
© Stanford Systems, 2004
Page 54 of 184
Online Management of Interpretive Services (OMIS)
Version: 4.1
Date: 15-Nov-2004
OMIS Administrator Manual
Then the first row of the ‘Grid’ data entry will be displayed. Double click on the Language_ID blank
section of the GRID
Confidential
© Stanford Systems, 2004
Page 55 of 184
Online Management of Interpretive Services (OMIS)
Version: 4.1
Date: 15-Nov-2004
OMIS Administrator Manual
Then from the Combo select the Interpreter’s Language
Confidential
© Stanford Systems, 2004
Page 56 of 184
Online Management of Interpretive Services (OMIS)
Version: 4.1
Date: 15-Nov-2004
OMIS Administrator Manual
To add another Language, click on the Add…Interpreter Languages and repeat the above actions
Confidential
© Stanford Systems, 2004
Page 57 of 184
Online Management of Interpretive Services (OMIS)
Version: 4.1
Date: 15-Nov-2004
OMIS Administrator Manual
When all the Languages have been selected, Click on the ‘Update’ button and press ‘OK’ to confirm the
update.
Confidential
© Stanford Systems, 2004
Page 58 of 184
Online Management of Interpretive Services (OMIS)
Version: 4.1
Date: 15-Nov-2004
OMIS Administrator Manual
Then close the window and amend any other changes you may require for the Interpreter. Finally submit
the changes and confirm to update.
Confidential
© Stanford Systems, 2004
Page 59 of 184
Online Management of Interpretive Services (OMIS)
Date: 15-Nov-2004
OMIS Administrator Manual
Confidential
Version: 4.1
© Stanford Systems, 2004
Page 60 of 184
Online Management of Interpretive Services (OMIS)
Version: 4.1
Date: 15-Nov-2004
OMIS Administrator Manual
3.3.3.3 Activate/Deactivate Interpreter Users
In order to activate an interpreter, select the ‘User’, ‘Interpreter’, ‘Activate’ option from the main menu
3.3.3.3.1 Activating Interpreters
Enter the appropriate search criteria and the click on the ‘Search’ button. In this case we knew the
Interpreter’s User Number and this was used to search for the interpreter. You can also use the Interpreter’s
surname (or beginning of the Surname) to search.
Click on the Interpreter’s number button to display the details
Confidential
© Stanford Systems, 2004
Page 61 of 184
Online Management of Interpretive Services (OMIS)
Version: 4.1
Date: 15-Nov-2004
OMIS Administrator Manual
Click on the ‘Submit’ button and confirm the update. The Interpreter will now be able to login and use the
system.
Confidential
© Stanford Systems, 2004
Page 62 of 184
Online Management of Interpretive Services (OMIS)
Version: 4.1
Date: 15-Nov-2004
OMIS Administrator Manual
3.3.3.3.2 Deactivating Interpreters
In order to deactivate an Interpreter, select the ‘User’, ‘Interpreter’, ‘Deactivate’ option from the main
menu
Enter the appropriate search criteria and click on the ‘Search’ button:
Then click on the button which contains the Interpreters User number
When the Interpreter’s details are displayed, click on the Submit button and then confirm the update:
Confidential
© Stanford Systems, 2004
Page 63 of 184
Online Management of Interpretive Services (OMIS)
Date: 15-Nov-2004
OMIS Administrator Manual
Confidential
Version: 4.1
© Stanford Systems, 2004
Page 64 of 184
Online Management of Interpretive Services (OMIS)
Version: 4.1
Date: 15-Nov-2004
OMIS Administrator Manual
3.3.3.4 View Interpreter Users
In order to view Interpreter’s details, click on the ‘User’, ‘Interpreter’, ‘View’ option from the main menu
Then enter the Interpreter’s search criteria, such as surname or User Number and click on the ‘Search’
button
After viewing the Interpreter’s details, click on the ‘Home’ button to return to the Home Page.
Confidential
© Stanford Systems, 2004
Page 65 of 184
Online Management of Interpretive Services (OMIS)
Date: 15-Nov-2004
OMIS Administrator Manual
3.4
Version: 4.1
Bookings
This section describes the process for creating and maintaining bookings by OMIS staff. OMIS staff enter
bookings on behalf of Customers where the booking information is sent by the customer by Fax. The ‘Front
Office staff create bookings, Back office staff then confirm and finally Sign-off the bookings.
This section will describe the entire process from Creation of Bookings to Sign-off and Invoicing of
Bookings.
3.4.1
Booking Creation
To create a new booking, select the ‘Booking’, ‘Create’ option from the main menu:
3.4.1.1 Booking Search
To create a booking, you must first identify the Customer and the venue that the interpreter is to visit. This
can be done by searching for the Customer Number (Usually supplied on the Fax supplied by the
Customer), part of the account name, or the Postcode.
In our case we are going to make an appointment for the department we had created for ‘General Surgery
OPD’ for ‘Another PCT’ account holder:
The account name for this department is 41957. This could also have been entered to search for the
customer.
Confidential
© Stanford Systems, 2004
Page 66 of 184
Online Management of Interpretive Services (OMIS)
Version: 4.1
Date: 15-Nov-2004
OMIS Administrator Manual
Once the criteria has been entered and the ‘Search’ button pressed, a list of customers will be displayed that
fit the criteria. Sometimes no customers are found and the list can be empty.
There are two important check fields on the search screen:
Display History – If this field is checked, then whenever the Booking is displayed, it will also display all
the history associated with the Booking – i.e. Booked By (Who Created the Booking), Confirmed By (Who
Confirmed the Booking), Sign-off By (Who Signed off the booking).
If this field is checked, it can make the booking screen too long, therefore you may prefer to leave the
check off so that the minimum data is displayed.
Preserve Selection – The preserve selection check field allows you to move to other screens and then
return to the Booking selection screen with the ‘Search Criteria’ preserved. E.g. if you choose a particular
date range and an interpreter, then after amending the booking, when you return to the Selection screen,
this criteria will be preserved. If you uncheck the field the selection data will be cleared and you will get
blank selection criteria when you return to this screen.
To continue with the Booking creation – Click on the Button displaying the Customer number (41957) in
this case.
Confidential
© Stanford Systems, 2004
Page 67 of 184
Online Management of Interpretive Services (OMIS)
Version: 4.1
Date: 15-Nov-2004
OMIS Administrator Manual
The booking Organisation (Department) will default to the department that was selected earlier.
The mandatory fields (fields that must be entered to create the booking) are displayed in bold highlight:
First name, Surname, Gender of Patient, Language, Appointment Date, Appointment Time, Duration in Hrs
and Duration in Minutes.
Enter the details for the Booking as appropriate and then click on the Submit button and confirm the
update:
Confidential
© Stanford Systems, 2004
Page 68 of 184
Online Management of Interpretive Services (OMIS)
Version: 4.1
Date: 15-Nov-2004
OMIS Administrator Manual
The minimum details in the form above have been entered. You can submit and confirm the booking. Note
that the Caller details include all users that have been registered for the respective organisation.
If any of the Mandatory fields are missing, or there is an error in the data, the messages will be displayed at
the top of the form in RED and a star next to the field associated with the error.
Once the booking has been created, a message will be displayed as follows: You may want to note the
Booking number for future reference.
Confidential
© Stanford Systems, 2004
Page 69 of 184
Online Management of Interpretive Services (OMIS)
Date: 15-Nov-2004
OMIS Administrator Manual
3.4.2
Version: 4.1
Booking Amendments
To amend bookings use the ‘Booking’, ‘Amend’ option from the main menu
The Booking selection screen offers many fields that can be used to search for Bookings:
Old Job No: - This is job number from the ‘previous’ system.
Appointment Date – From or To. This allows you to enter a start and end date. All bookings found
between these dates and that satisfy the rest of the criteria will be displayed
Confidential
© Stanford Systems, 2004
Page 70 of 184
Online Management of Interpretive Services (OMIS)
Version: 4.1
Date: 15-Nov-2004
OMIS Administrator Manual
Booking Ref – This is the booking reference number generated whenever a booking is created
Patient Surname – Enter the full or part of the patient’s surname if required for the search
Interpreter – Select an interpreter from the list so that bookings that have been confirmed with this
interpreter only will be displayed.
Language – Select a Language so that only bookings for the selected language will be displayed
Patient ID – Enter the Customer patient ID
Postcode – Enter the customer postcode, so that bookings in a particular area can be found.
For our example we have entered the patient’s surname and the language to identify the relevant booking.
When the booking has been found, click on the button that displays the booking reference number:
Confidential
© Stanford Systems, 2004
Page 71 of 184
Online Management of Interpretive Services (OMIS)
Version: 4.1
Date: 15-Nov-2004
OMIS Administrator Manual
Amend any of the fields that require changes and then submit the changes:
Confidential
© Stanford Systems, 2004
Page 72 of 184
Online Management of Interpretive Services (OMIS)
Date: 15-Nov-2004
OMIS Administrator Manual
3.4.3
Version: 4.1
Booking Confirmation
Once Bookings have been created and amended, they will have a status of ‘Unconfirmed’. This means that
staff that are responsible for confirming bookings should only see these bookings.
When you select the ‘Booking’, ‘Confirm’ option from the main menu, only unconfirmed bookings will be
displayed after you have entered the search criteria.
OMIS users that are responsible for confirmations usually work with interpreters for particular languages
and will be working through the confirmation for a particular day. This reflects the criteria shown below as
the date of 27/08/2004 for ‘French’ Bookings.
3.4.3.1 Viewing Interpreter’s diary:
When a particular booking has been found, the OMIS user will need to find an appropriate interpreter. To
help with this process pop-up screen can be used to displays the Interpreter’s booked appointments:
Click on the ‘Int Diary’ button to display the Interpreter’s booked appointment diary:
Confidential
© Stanford Systems, 2004
Page 73 of 184
Online Management of Interpretive Services (OMIS)
Version: 4.1
Date: 15-Nov-2004
OMIS Administrator Manual
When the Pop-up screen is displayed, the language will be picked up by default (French in this case). Next,
click on the Combo field to get a list of Active French Interpreter.
On selecting an Interpreter, all future appointments will be displayed:
Confidential
© Stanford Systems, 2004
Page 74 of 184
Online Management of Interpretive Services (OMIS)
Version: 4.1
Date: 15-Nov-2004
OMIS Administrator Manual
You should be able to evaluate whether the Interpreter is free on the date/time of the current appointment.
In this case we can call the above Interpreter to see if he can attend our appointment on 27/08/2004 at
13:00.
To view the Interpreter’s Phone number click on the List of Interpreters and scroll to the right:
Confidential
© Stanford Systems, 2004
Page 75 of 184
Online Management of Interpretive Services (OMIS)
Version: 4.1
Date: 15-Nov-2004
OMIS Administrator Manual
Once interpreter’s have been called, if they are not able to fulfil the appointment, another screen is
available that allows you to capture this information.
3.4.3.2 Tracking Interpreter availability
If you click on the left of the booking details as shown below, a pop-up screen will be displayed that shows
which interpreter’s have been called and those that have rejected the appointment:
Confidential
© Stanford Systems, 2004
Page 76 of 184
Online Management of Interpretive Services (OMIS)
Version: 4.1
Date: 15-Nov-2004
OMIS Administrator Manual
The above screen shows that the interpreters Hoda Aouf, Ahmed Bousetta, Sandrine Caldwell and Giorgina
Dona have been called and are not able to fulfil this appointment.
This information will stay with this appointment and any other staff viewing this data will be able to
continue with the confirmation by calling other interpreters on the list. Make sure you click on the ‘Update’
button to save the changes.
If all the Interpreters have been called and none of them are able to attend the appointment, then the
booking can be considered for allocating to an Agency.
To confirm the Booking, click on the button displaying the booking reference number.
Then select the interpreter appropriate for this booking
Confidential
© Stanford Systems, 2004
Page 77 of 184
Online Management of Interpretive Services (OMIS)
Version: 4.1
Date: 15-Nov-2004
OMIS Administrator Manual
You can also access the Interpreter’s diary and Availability tracking screen from within the booking screen.
Use the ‘Search’ button to view the interpreter’s diary and the ‘Int Avail’ button to track the interpreter’s
availability.
Confidential
© Stanford Systems, 2004
Page 78 of 184
Online Management of Interpretive Services (OMIS)
Version: 4.1
Date: 15-Nov-2004
OMIS Administrator Manual
When the booking has been confirmed a message will be displayed as follows:
Confidential
© Stanford Systems, 2004
Page 79 of 184
Online Management of Interpretive Services (OMIS)
Version: 4.1
Date: 15-Nov-2004
OMIS Administrator Manual
3.4.3.3 Booking Lock
There may be occasions when a booking is being confirmed at the same time that a user wants to amend the
booking. For example a Customer that has created a booking, may want to amend the time of appointment.
If OMIS users are trying to confirm the appointment at the same time, this can cause problems. In this case
whoever enters the booking first for confirming or amending will ‘Lock’ the booking. The second or
subsequent users trying to access the booking will receive a message that the booking is locked.
As an example, the customer is amending the booking we created earlier:
At the same time an OMIS user is attempting to confirm the booking. In this case, the OMIS user will receive a
message that the Booking has been locked by the Customer.
Confidential
© Stanford Systems, 2004
Page 80 of 184
Online Management of Interpretive Services (OMIS)
Date: 15-Nov-2004
OMIS Administrator Manual
3.4.4
Version: 4.1
Un-confirming Bookings
There are occasions when a confirmed booking needs to be unconfirmed. This allows the booking to go
back into the pool on unconfirmed bookings so that OMIS user can find another interpreter for this
booking.
To change the status of a booking to unconfirmed use the ‘Booking’, ‘Unconfirm’ options form the main
menu:
We have used our selection criteria as appointment date of 27/08/2004 and the Language as French:
Confidential
© Stanford Systems, 2004
Page 81 of 184
Online Management of Interpretive Services (OMIS)
Version: 4.1
Date: 15-Nov-2004
OMIS Administrator Manual
Click on the button with the Booking reference number to view the booking details. Add any notes to the
booking details indicating the reason for Un-confirming.
Submit and press ‘OK’ to Un-confirm the booking:
The message below will be displayed to show that the booking has been Un-Confirmed.
Confidential
© Stanford Systems, 2004
Page 82 of 184
Online Management of Interpretive Services (OMIS)
Date: 15-Nov-2004
OMIS Administrator Manual
3.4.5
Version: 4.1
Booking Cancellation
There are occasions when bookings need to be cancelled. When this is done, the job status of the booking
will need to be amended to indicate the reason for cancellation:
To cancel a booking, select the ‘Booking’, ‘Cancel’ option from the main menu:
You first need to identify the Booking(s) that need to be cancelled. This time the criteria used id the
Patient’s Surname and Language
Confidential
© Stanford Systems, 2004
Page 83 of 184
Online Management of Interpretive Services (OMIS)
Version: 4.1
Date: 15-Nov-2004
OMIS Administrator Manual
Click on the Booking Reference Number to View the Booking and change the status to Cancelled:
Confidential
© Stanford Systems, 2004
Page 84 of 184
Online Management of Interpretive Services (OMIS)
Version: 4.1
Date: 15-Nov-2004
OMIS Administrator Manual
Before submitting for cancellation, select a reason, in this case ‘Interpreter Cancelled’. Then submit the
booking by clicking on the ‘Submit’ button and pressing the ‘OK’ button
The message above confirms that the booking has been cancelled
Confidential
© Stanford Systems, 2004
Page 85 of 184
Online Management of Interpretive Services (OMIS)
Date: 15-Nov-2004
OMIS Administrator Manual
3.4.6
Version: 4.1
Booking UnCancellation
If the Booking needs to be UnCancelled, in case another Interpreter has been found who can fulfil the
appointment, then use the ‘Booking’, ‘UnCancel’ option from the main menu.
Enter the Booking reference number or other search criteria to find the Booking to be cancelled:
Confidential
© Stanford Systems, 2004
Page 86 of 184
Online Management of Interpretive Services (OMIS)
Version: 4.1
Date: 15-Nov-2004
OMIS Administrator Manual
Click on the Booking Reference number button
Press the ‘Submit’ button and then ’OK’ to uncancel the Booking
The following message should be displayed with the booking reference number that was Uncancelled:
The status of Bookings that are Uncancelled is set to ‘UnConfirmed’
Confidential
© Stanford Systems, 2004
Page 87 of 184
Online Management of Interpretive Services (OMIS)
Date: 15-Nov-2004
OMIS Administrator Manual
3.4.7
Version: 4.1
Booking Sign-off
Once Bookings have been confirmed and the Interpreter has completed the appointment, a completed Job
Form is returned to OMIS users indicating that the Booking can be included in the end of month Batch Run
for payment.
For Bookings to allow invoicing to Customers and Payment to Interpreters, the Bookings must be Signedoff. The menu options that allow this are as follows:
Select the ‘Booking’, ‘Sign-off’ option from the main menu:
Future bookings cannot be signed off; therefore only completed bookings will be displayed. The OMIS
users need to cross-check the information on the Job Form with the information on the Booking before the
Sign-off.
The Signoff forms are received from interpreters are kept in chronological order, therefore a batch of these
can be selected at once for multiple signoffs. This is possible by selecting a list of all the signoffs for an
Interpreter and then using the ‘Next’ or ‘Skip’ button to move to the next selected booking. The skip button
is useful in case a Job Form has not been returned by the Interpreter.
Confidential
© Stanford Systems, 2004
Page 88 of 184
Online Management of Interpretive Services (OMIS)
Version: 4.1
Date: 15-Nov-2004
OMIS Administrator Manual
In our example case we only have one booking which needs to be signed off.
You can also use the Sign-off screen to create multiple Follow-ups. When in the Booking, the ‘Follow-up’
button can be used to create additional Follow-ups from the booking that is being signed-off.
Confidential
© Stanford Systems, 2004
Page 89 of 184
Online Management of Interpretive Services (OMIS)
Version: 4.1
Date: 15-Nov-2004
OMIS Administrator Manual
To sign-off the booking you must enter the Arrival time, Interview start time, Interview end time,
Appointment Outcome, Customer signoff name (From Job Form) and the Reason for Payment (If required).
If any of these fields are left empty an error message will be displayed.
Confidential
© Stanford Systems, 2004
Page 90 of 184
Online Management of Interpretive Services (OMIS)
Version: 4.1
Date: 15-Nov-2004
OMIS Administrator Manual
3.4.7.1 Creating Follow-ups from Sign-off
If you want to create a Follow-up from the Signoff, enter the sign-off details and click on the ‘Follow-Up’
button
Confidential
© Stanford Systems, 2004
Page 91 of 184
Online Management of Interpretive Services (OMIS)
Version: 4.1
Date: 15-Nov-2004
OMIS Administrator Manual
If the booking has been signed off without the follow-up requirement then you should get the message
displayed above: otherwise the following message is displayed after a followup.
Confidential
© Stanford Systems, 2004
Page 92 of 184
Online Management of Interpretive Services (OMIS)
Date: 15-Nov-2004
OMIS Administrator Manual
3.4.8
Version: 4.1
Booking UnSignoff
There may be occasions when mistakes have been made with sign-offs and the booking needs to be
Unsigned-off. This is only possible before the end of the month, when all the signed-off bookings are
Invoiced (Status is changed to Invoiced)
In order to Unsign-off a booking use the following menu options:
Enter the relevant criteria to find the booking that needs to be signed off:
Confidential
© Stanford Systems, 2004
Page 93 of 184
Online Management of Interpretive Services (OMIS)
Version: 4.1
Date: 15-Nov-2004
OMIS Administrator Manual
With the booking selected, click on the button with the booking reference number
Confidential
© Stanford Systems, 2004
Page 94 of 184
Online Management of Interpretive Services (OMIS)
Version: 4.1
Date: 15-Nov-2004
OMIS Administrator Manual
Click on the ‘Submit’ button and press ‘OK’ to confirm the Un-Signoff.
When bookings are Unsigned-off, their status is reverted to ‘Confirmed’
Confidential
© Stanford Systems, 2004
Page 95 of 184
Online Management of Interpretive Services (OMIS)
OMIS Administrator Manual
3.4.9
Version: 4.1
Date: 15-Nov-2004
View Booking
To view a Booking, select the ‘Booking’, ‘View’ option from the main menu:
Enter the criteria to find the booking whose details need to be viewed.
You may want to check the ‘Display History’ box so that all the details for this booking can be viewed:
Confidential
Page 96 of 184
© Stanford Systems, 2004
Online Management of Interpretive Services (OMIS)
Version: 4.1
Date: 15-Nov-2004
OMIS Administrator Manual
Click on the Booking reference number button to view the details for this booking:
This time the booking details will contain all the historic details such as: Caller details, Booked By,
Confirmed By, Signed-off by, Interpreter details. This is because the ‘Display History’ box was switched
on.
Confidential
© Stanford Systems, 2004
Page 97 of 184
Online Management of Interpretive Services (OMIS)
Date: 15-Nov-2004
OMIS Administrator Manual
Confidential
Version: 4.1
© Stanford Systems, 2004
Page 98 of 184
Online Management of Interpretive Services (OMIS)
Version: 4.1
Date: 15-Nov-2004
OMIS Administrator Manual
3.4.10 Booking History
To view full history of a booking click on the ‘History’ button when the booking is open:
Confidential
© Stanford Systems, 2004
Page 99 of 184
Online Management of Interpretive Services (OMIS)
Version: 4.1
Date: 15-Nov-2004
OMIS Administrator Manual
3.4.11 Print Booking
To print booking details, click on the ‘Print’ button when the booking is open:
Then enter any additional details that you may want to add to the booking and click on the ‘Submit’ button:
The print preview will be displayed as a report. You can amend the details before the final print/email using
Word or Adobe PDF format.
Confidential
© Stanford Systems, 2004
Page 100 of 184
Online Management of Interpretive Services (OMIS)
Date: 15-Nov-2004
OMIS Administrator Manual
Confidential
Version: 4.1
© Stanford Systems, 2004
Page 101 of 184
Online Management of Interpretive Services (OMIS)
Version: 4.1
Date: 15-Nov-2004
OMIS Administrator Manual
3.4.12 Follow-Up Bookings
To create Follow-Up bookings use the ‘Booking’, ‘Follow-Up’ option from the main menu
Enter the Booking Reference number of the booking that is to be used for the Follow-up
Confidential
© Stanford Systems, 2004
Page 102 of 184
Online Management of Interpretive Services (OMIS)
Version: 4.1
Date: 15-Nov-2004
OMIS Administrator Manual
Enter the Appointment Date and Time. You can then submit and save the Follow-up or use the ‘Next’
button to create more follow-ups from this one booking.
Confidential
© Stanford Systems, 2004
Page 103 of 184
Online Management of Interpretive Services (OMIS)
Version: 4.1
Date: 15-Nov-2004
OMIS Administrator Manual
3.4.13 Creating Regular Sessions
To create Regular Sessions, use the ‘Booking’, ‘Regular Session’ option from the main menu
Enter the booking reference number that is to be used to create the regular sessions
Confidential
© Stanford Systems, 2004
Page 104 of 184
Online Management of Interpretive Services (OMIS)
Version: 4.1
Date: 15-Nov-2004
OMIS Administrator Manual
Enter the Appointment Date and then use the ‘Next’ or the ‘Submit’ button to create another Regular
session or save the last session respectively.
Confidential
© Stanford Systems, 2004
Page 105 of 184
Online Management of Interpretive Services (OMIS)
Version: 4.1
Date: 15-Nov-2004
OMIS Administrator Manual
3.4.14 Creating Block Bookings
To create Block Bookings use the ‘Booking’, ‘Block Book’ option from the main menu
Enter the booking reference number for creating the block bookings:
Confidential
© Stanford Systems, 2004
Page 106 of 184
Online Management of Interpretive Services (OMIS)
Version: 4.1
Date: 15-Nov-2004
OMIS Administrator Manual
Enter the Appointment date and time and the use either the Submit button to save the booking, or the
‘Next’ button to create more Block Bookings
When the Final block Booking is complete, click on the ‘Submit’ button to save and return to the Home
Page.
Confidential
© Stanford Systems, 2004
Page 107 of 184
Online Management of Interpretive Services (OMIS)
Version: 4.1
Date: 15-Nov-2004
OMIS Administrator Manual
3.4.15 Urgent Bookings
Whenever there are bookings on the system with only four hours or less left before the appointment time,
an ‘Urgent Bookings’ message will be displayed on the footer of the screen as shown below:
Click on the button that shows the number of Urgent Bookings.
The screen above displays the ‘Urgent’ bookings. These can be confirmed/cancelled... as necessary.
Confidential
© Stanford Systems, 2004
Page 108 of 184
Online Management of Interpretive Services (OMIS)
Date: 15-Nov-2004
OMIS Administrator Manual
3.5
Version: 4.1
Scheduled Bookings
Scheduled Bookings can be accessed via the main menu option as follows:
Click on the ‘Schedule Booking’ option to enter the Booking Screen
Confidential
© Stanford Systems, 2004
Page 109 of 184
Online Management of Interpretive Services (OMIS)
Version: 4.1
Date: 15-Nov-2004
OMIS Administrator Manual
The above screen shows the default display for the Booking Screen. The language defaults to ‘Arabic’
since this is the most used language. The date defaults to today.
The screen shows all the interpreter’s for the selected language and on the left and their availability on the
main screen.
Confidential
© Stanford Systems, 2004
Page 110 of 184
Online Management of Interpretive Services (OMIS)
Date: 15-Nov-2004
OMIS Administrator Manual
3.5.1
Version: 4.1
Selecting the Language
Select the Language for the booking you are interested in. On selecting the Language, the screen will redisplay and show all the interpreters for the selected language, ‘Bengali’ in the screen below.
Confidential
© Stanford Systems, 2004
Page 111 of 184
Online Management of Interpretive Services (OMIS)
Date: 15-Nov-2004
OMIS Administrator Manual
Confidential
Version: 4.1
© Stanford Systems, 2004
Page 112 of 184
Online Management of Interpretive Services (OMIS)
Version: 4.1
Date: 15-Nov-2004
OMIS Administrator Manual
3.5.2
Selecting the Date
Use the Calendar to select the date that you need for the Booking:
Use the Blue icons to navigate to the
Next/Previous month.
Use the Next/Previous Month picker to view dates for different months of the year. Click on the Day that
you want to start viewing the Calendar. In the example above the diary will start on the 5th July 2004.
Popup Month/Year picker
Month/Year Picker
Use the Popup Month/Year selector to navigate to the required Year and Month. After selecting the
Month/Year click on the ‘OK’ or ‘Cancel’ button.
Confidential
© Stanford Systems, 2004
Page 113 of 184
Online Management of Interpretive Services (OMIS)
Date: 15-Nov-2004
OMIS Administrator Manual
3.5.3
Version: 4.1
Selecting the Interpreter’s Preferred Gender
This option allows you to selectively view the Male, Female or both gender interpreters.
3.5.3.1 All Interpreters
By default the first view that is displayed for All gender interpreters.
Confidential
© Stanford Systems, 2004
Page 114 of 184
Online Management of Interpretive Services (OMIS)
Version: 4.1
Date: 15-Nov-2004
OMIS Administrator Manual
3.5.3.2 Male Interpreters
The Male selection allows you to view the Diary for the ‘Male’ interpreters only.
Select the ‘Male’ option as shown above to amend the diary
Confidential
© Stanford Systems, 2004
Page 115 of 184
Online Management of Interpretive Services (OMIS)
Version: 4.1
Date: 15-Nov-2004
OMIS Administrator Manual
3.5.3.3 Female Interpreters
The Female view allows you to view the Diary for the ‘Female’ Interpreters only.
Select the ‘Female’ option as shown above to amend the diary to.
Confidential
© Stanford Systems, 2004
Page 116 of 184
Online Management of Interpretive Services (OMIS)
Date: 15-Nov-2004
OMIS Administrator Manual
3.5.4
Version: 4.1
Viewing Bookings by Status
You can view bookings for the Interpreter by selecting/unselecting the status of the bookings that you need
to view:
By default all the Bookings status’ are selected. Unselect any booking status that you do not wish to view.
This will trigger a refresh and the bookings for the status that was unselected will not be displayed. In the
above example all ‘Cancelled’ bookings have been unselected and are not displayed on the diary after the
refresh.
Confidential
© Stanford Systems, 2004
Page 117 of 184
Online Management of Interpretive Services (OMIS)
Date: 15-Nov-2004
OMIS Administrator Manual
Confidential
Version: 4.1
© Stanford Systems, 2004
Page 118 of 184
Online Management of Interpretive Services (OMIS)
Date: 15-Nov-2004
OMIS Administrator Manual
3.5.5
Version: 4.1
Booking Status Colours
The colour scheme that is used for the status of the bookings is as follows:
Booking Status
3.5.6
Colour
Confirmed
Yellow
Cancelled
Red
Signed-off
Green
Invoiced
Blue
View Booking Notes
You can view the booking notes by using two methods:
(1) Click on the notes icon shown within the booking
(2) Click twice on the booking notes (which may not all be visible). Once to select the booking and the
second time to view the notes
Use the OK or Cancel button to close the notes. Bookings cannot be created or edited via the Interpreter’s
Diary. You can view the details only.
Confidential
© Stanford Systems, 2004
Page 119 of 184
Online Management of Interpretive Services (OMIS)
Date: 15-Nov-2004
OMIS Administrator Manual
3.5.7
Version: 4.1
Create a Booking
This function allows you to create a Booking for the criteria you have selected.
You can create the booking in two ways:
(1) Click on a day cell
(2) Select a contiguous range of day cells
Contiguous cells selected by holding and dragging the mouse cursor
Confidential
© Stanford Systems, 2004
Page 120 of 184
Online Management of Interpretive Services (OMIS)
Version: 4.1
Date: 15-Nov-2004
OMIS Administrator Manual
This will display the following prompt so that you can enter the notes relating to the unavailability
Enter the text and click on the ‘OK’ button
3.5.8
Create Booking Details
Confidential
© Stanford Systems, 2004
Page 121 of 184
Online Management of Interpretive Services (OMIS)
Version: 4.1
Date: 15-Nov-2004
OMIS Administrator Manual
The above screen will be displayed for the selected language Interpreter, Language and Time:
(1) Select the Organisation for the Booking
(2) Enter the First name and Surname of the patient
(3) Amend the Notes and enter other details of the patient
(4) Click on the ‘Submit’ button to save the booking
Confidential
© Stanford Systems, 2004
Page 122 of 184
Online Management of Interpretive Services (OMIS)
Date: 15-Nov-2004
OMIS Administrator Manual
3.6
Version: 4.1
Reports
This section describes the Reports that are available to OMIS Administrators.
3.6.1
Month End/ Error Check
Batch Jobs are run at the end of each month. Some jobs can be run throughout the month so that any data
entry errors in sign-off can be detected. The Month End Error check report is one of these
3.6.1.1 Batch Run
The Batch run job will process any jobs that have been signed-off since the last time this job was run and
calculate the Costs for all these bookings.
To start the job Select the option from the Menu
Confidential
© Stanford Systems, 2004
Page 123 of 184
Online Management of Interpretive Services (OMIS)
Version: 4.1
Date: 15-Nov-2004
OMIS Administrator Manual
When the job is selected, the title displays the current job number. Click on the ‘Submit’ button and press
the ‘OK’ button to star t the job. A Progress bar will appear at the button (part of the Internet Explorer).
Which this is complete, the jobs will have finished and all jobs that have been signed off this month will
have been calculated.
You can now print the Staff Error Report to look for errors in the signed-off bookings.
3.6.1.2 End of Month Job
The End of Month Job is used to close all signed-off bookings entered since the last batch and convert them
all to ‘Invoiced’. The next batch job number is then created and this is set to the ‘Current’ batch number.
This job is password protected and should only be run by the OMIS administrator at the end of the month
when all the job forms that have been received are signed-off
Enter the password and then Click on the ‘submit’ button and press the ‘OK’ key to complete the job.
Confidential
© Stanford Systems, 2004
Page 124 of 184
Online Management of Interpretive Services (OMIS)
Version: 4.1
Date: 15-Nov-2004
OMIS Administrator Manual
3.6.1.3 Staff Error Report
The staff Error Report is used to identify any errors that may exist during the Sign-off process, especially
where large payments are made due to an incorrect entry of the appointment time.
To create the Report, Select the Batch number that you require the report for and any notes that you may
want to enter, then click on the ‘Submit’ button:
A sample of the report is shown below
Confidential
© Stanford Systems, 2004
Page 125 of 184
Online Management of Interpretive Services (OMIS)
Version: 4.1
Date: 15-Nov-2004
OMIS Administrator Manual
Any Sign-offs where the appointment is more than three hours is displayed in this report.
3.6.2
Month End Reports
3.6.2.1 Customer Invoice Report
The Customer Invoice Report is available after the ‘End Of month’ job has been run. This provides all the
invoices that are sent to the Account Holders.
Confidential
© Stanford Systems, 2004
Page 126 of 184
Online Management of Interpretive Services (OMIS)
Version: 4.1
Date: 15-Nov-2004
OMIS Administrator Manual
Select the Batch ID that you require for the report and enter any notes that need to be added at the end of
each section for each Customer. The same notes will be added for each Customer.
An example of the report is shown below. The report is printed in Landscape:
Confidential
© Stanford Systems, 2004
Page 127 of 184
Online Management of Interpretive Services (OMIS)
Version: 4.1
Date: 15-Nov-2004
OMIS Administrator Manual
3.6.2.2 Interpreter Job Report
The interpreter Job report lists all future appointments booked for interpreters. This is posted to all
interpreters at the end of the month after the batch Job has run. The Report can be run at any time of the
month since it does not require a Batch ID. The Start date is required for this report:
You can either select ‘All’ for all Interpreters to select an individual interpreter by name.
A sample of the report is shown below:
Confidential
© Stanford Systems, 2004
Page 128 of 184
Online Management of Interpretive Services (OMIS)
Date: 15-Nov-2004
OMIS Administrator Manual
Confidential
Version: 4.1
© Stanford Systems, 2004
Page 129 of 184
Online Management of Interpretive Services (OMIS)
Version: 4.1
Date: 15-Nov-2004
OMIS Administrator Manual
3.6.2.3 Travel Expense Report
The travel expense report gives a list of payments for the interpreter and the amount for each day of the
month.
Confidential
© Stanford Systems, 2004
Page 130 of 184
Online Management of Interpretive Services (OMIS)
Version: 4.1
Date: 15-Nov-2004
OMIS Administrator Manual
3.6.2.4 Staff Attendance Report
This report provides the Staff Attendance Report that is sent to Payroll for payment.
Confidential
© Stanford Systems, 2004
Page 131 of 184
Online Management of Interpretive Services (OMIS)
Version: 4.1
Date: 15-Nov-2004
OMIS Administrator Manual
Select the Batch ID and enter the Month Text you want to display in the Report. Also enter any notes which
will appear in each attendance Record.
An example report is shown above
Confidential
© Stanford Systems, 2004
Page 132 of 184
Online Management of Interpretive Services (OMIS)
Version: 4.1
Date: 15-Nov-2004
OMIS Administrator Manual
3.6.2.5 Staff Monthly Pay Report
The Staff monthly Report gives details of all the payments to be made to Interpreters for the Batch:
The Report below shows a sample of the Report from Batch 141
Confidential
© Stanford Systems, 2004
Page 133 of 184
Online Management of Interpretive Services (OMIS)
Version: 4.1
Date: 15-Nov-2004
OMIS Administrator Manual
3.6.2.6 Invoice Request Report
Confidential
© Stanford Systems, 2004
Page 134 of 184
Online Management of Interpretive Services (OMIS)
Date: 15-Nov-2004
OMIS Administrator Manual
Confidential
Version: 4.1
© Stanford Systems, 2004
Page 135 of 184
Online Management of Interpretive Services (OMIS)
Version: 4.1
Date: 15-Nov-2004
OMIS Administrator Manual
3.6.3 Operations Performance Reports
These reports are for the use of OMIS Administrators for performance monitoring:
3.6.3.1 Daily Confirmation
Select the report from the main menu as shown below
Enter the Start and End dates for the period of the report, enter any notes and press the ‘Submit’ button
Confidential
© Stanford Systems, 2004
Page 136 of 184
Online Management of Interpretive Services (OMIS)
Version: 4.1
Date: 15-Nov-2004
OMIS Administrator Manual
An example Daily confirmation Report is shown above
Confidential
© Stanford Systems, 2004
Page 137 of 184
Online Management of Interpretive Services (OMIS)
Version: 4.1
Date: 15-Nov-2004
OMIS Administrator Manual
3.6.3.2 Customer Activity Summary Report
This Report provides a summary of Customer activity for each batch
Select the batch number and enter any notes required for the Report
Confidential
© Stanford Systems, 2004
Page 138 of 184
Online Management of Interpretive Services (OMIS)
Version: 4.1
Date: 15-Nov-2004
OMIS Administrator Manual
An example of the Report is shown above
Confidential
© Stanford Systems, 2004
Page 139 of 184
Online Management of Interpretive Services (OMIS)
Date: 15-Nov-2004
OMIS Administrator Manual
3.6.4
Version: 4.1
Management Batch Summary Report
Select the batch number and enter any notes required for the Report:
Confidential
© Stanford Systems, 2004
Page 140 of 184
Online Management of Interpretive Services (OMIS)
Version: 4.1
Date: 15-Nov-2004
OMIS Administrator Manual
An example of the report is shown above
Confidential
© Stanford Systems, 2004
Page 141 of 184
Online Management of Interpretive Services (OMIS)
Version: 4.1
Date: 15-Nov-2004
OMIS Administrator Manual
3.6.5 Activity Trend Analysis Report
Enter the start and end dates to identify a period for the report:
Confidential
© Stanford Systems, 2004
Page 142 of 184
Online Management of Interpretive Services (OMIS)
Version: 4.1
Date: 15-Nov-2004
OMIS Administrator Manual
An example of the Report is shown above
Confidential
© Stanford Systems, 2004
Page 143 of 184
Online Management of Interpretive Services (OMIS)
Version: 4.1
Date: 15-Nov-2004
OMIS Administrator Manual
3.6.6 Customer/OMIS User Activity
Enter the start and end dates for the period of the Report. Enter any notes for the Report
Example of Report shown above
Confidential
© Stanford Systems, 2004
Page 144 of 184
Online Management of Interpretive Services (OMIS)
Version: 4.1
Date: 15-Nov-2004
OMIS Administrator Manual
3.6.7 Agency Volume Report
This report compares the volume of appointments between and Interpreters and Agency staff
Enter the Start and End dates for the period of the report. Enter any notes required for the report:
Confidential
© Stanford Systems, 2004
Page 145 of 184
Online Management of Interpretive Services (OMIS)
Version: 4.1
Date: 15-Nov-2004
OMIS Administrator Manual
Sample report is shown above
Confidential
© Stanford Systems, 2004
Page 146 of 184
Online Management of Interpretive Services (OMIS)
Version: 4.1
Date: 15-Nov-2004
OMIS Administrator Manual
3.6.8 Interpreter DNA Report
This report shows the Interpreter’s DNA and punctuality details over a specified period.
Example report is shown above
Confidential
© Stanford Systems, 2004
Page 147 of 184
Online Management of Interpretive Services (OMIS)
Version: 4.1
Date: 15-Nov-2004
OMIS Administrator Manual
3.6.9 Customer Account Reports
3.6.9.1 By Parent
This report lists all the bookings entered on a particular day by a Customer. The list is by Account Holder
and shows all the department’s bookings for the account holder.
Enter the start and end date for the report and select the Account Holder. Add any notes required for the
Report
Confidential
© Stanford Systems, 2004
Page 148 of 184
Online Management of Interpretive Services (OMIS)
Version: 4.1
Date: 15-Nov-2004
OMIS Administrator Manual
Example of report is shown above
Confidential
© Stanford Systems, 2004
Page 149 of 184
Online Management of Interpretive Services (OMIS)
Version: 4.1
Date: 15-Nov-2004
OMIS Administrator Manual
3.6.9.2 By Appointment Date
This report list all bookings by Status.
Enter the Start and End Appointment dates for the report and select the Account Holder:
Confidential
© Stanford Systems, 2004
Page 150 of 184
Online Management of Interpretive Services (OMIS)
Version: 4.1
Date: 15-Nov-2004
OMIS Administrator Manual
Example of report is shown above
Confidential
© Stanford Systems, 2004
Page 151 of 184
Online Management of Interpretive Services (OMIS)
Version: 4.1
Date: 15-Nov-2004
OMIS Administrator Manual
3.6.9.3 Account Holder Report
This report lists all the departments for a particular Account Holder including the Address, Phone numbers
and fax numbers.
Select the Account Holder and click on the ‘Submit’ button
Confidential
© Stanford Systems, 2004
Page 152 of 184
Online Management of Interpretive Services (OMIS)
Version: 4.1
Date: 15-Nov-2004
OMIS Administrator Manual
Sample report is shown above
Confidential
© Stanford Systems, 2004
Page 153 of 184
Online Management of Interpretive Services (OMIS)
Version: 4.1
Date: 15-Nov-2004
OMIS Administrator Manual
3.6.9.4 Customer Performance Report
Enter the Start date for the report and select the Account Holder
Confidential
© Stanford Systems, 2004
Page 154 of 184
Online Management of Interpretive Services (OMIS)
Version: 4.1
Date: 15-Nov-2004
OMIS Administrator Manual
Sample report is shown above
Confidential
© Stanford Systems, 2004
Page 155 of 184
Online Management of Interpretive Services (OMIS)
Version: 4.1
Date: 15-Nov-2004
OMIS Administrator Manual
3.6.9.5 Late Cancellation Report
This report provides details of Late cancellation by Account Holder
Select the Account Holder and the Start date for the report
Confidential
© Stanford Systems, 2004
Page 156 of 184
Online Management of Interpretive Services (OMIS)
Version: 4.1
Date: 15-Nov-2004
OMIS Administrator Manual
Sample Report shown above
Confidential
© Stanford Systems, 2004
Page 157 of 184
Online Management of Interpretive Services (OMIS)
Version: 4.1
Date: 15-Nov-2004
OMIS Administrator Manual
3.6.10 User Login Report
This Report shows the date and time that users logged onto the system. This includes OMIS users,
Customers and Interpreters.
Enter the Start date for the Report
Confidential
© Stanford Systems, 2004
Page 158 of 184
Online Management of Interpretive Services (OMIS)
Version: 4.1
Date: 15-Nov-2004
OMIS Administrator Manual
Sample Report is shown above
Confidential
© Stanford Systems, 2004
Page 159 of 184
Online Management of Interpretive Services (OMIS)
Version: 4.1
Date: 15-Nov-2004
OMIS Administrator Manual
3.6.11 Unconfirmed Bookings Report
3.6.11.1 By Date
Enter the start and end dates for the report
Sample Report shown above
Confidential
© Stanford Systems, 2004
Page 160 of 184
Online Management of Interpretive Services (OMIS)
Version: 4.1
Date: 15-Nov-2004
OMIS Administrator Manual
3.6.11.2 By Language
This report show unconfirmed bookings by language. This can be useful for Interpreters
Select the Language and click on ‘Submit’ to create the report
Confidential
© Stanford Systems, 2004
Page 161 of 184
Online Management of Interpretive Services (OMIS)
Version: 4.1
Date: 15-Nov-2004
OMIS Administrator Manual
3.6.12 Daily Confirmation Report
This report shows the number of confirmation completed by users
Confidential
© Stanford Systems, 2004
Page 162 of 184
Online Management of Interpretive Services (OMIS)
Version: 4.1
Date: 15-Nov-2004
OMIS Administrator Manual
Enter the Start and End dates and ‘Submit’ to start the report
Confidential
© Stanford Systems, 2004
Page 163 of 184
Online Management of Interpretive Services (OMIS)
Date: 15-Nov-2004
OMIS Administrator Manual
3.7
Version: 4.1
Administration
3.7.1 Languages
This section shows how to view and amend the Language Costs for various Languages and Agency
Confidential
© Stanford Systems, 2004
Page 164 of 184
Online Management of Interpretive Services (OMIS)
Version: 4.1
Date: 15-Nov-2004
OMIS Administrator Manual
Use the (+) symbol to navigate and view the Languages that are defined in the various classes (Core, Non
Core and Rare).
If any of the costs are amended, then you must provide a password to update the details
3.7.2 St Mary’s Upload
This section describes the upload procedure for loading St Mary’s Bookings. The upload should be run
from the Customer site. The upload procedure is as follows:
(1) The (Telemagic) export file needs to be uploaded onto the Server
(2) The bookings can be loaded and create in the OMIS System
(3) Report printed to check and make any manual amendments
Any Mapping changes between St Mary’s and OMIS need to be made by the Mapping screen.
3.7.2.1 Bookings File Upload
Confidential
© Stanford Systems, 2004
Page 165 of 184
Online Management of Interpretive Services (OMIS)
Version: 4.1
Date: 15-Nov-2004
OMIS Administrator Manual
Click on the ‘Browse’ button to select the file to be uploaded onto the Server
Select the file to be uploaded
Enter the Save as filename to be create don the Server
Click on the ‘Upload’ button
Confidential
© Stanford Systems, 2004
Page 166 of 184
Online Management of Interpretive Services (OMIS)
OMIS Administrator Manual
Version: 4.1
Date: 15-Nov-2004
If the upload is successful then the message ‘File Uploaded successfully on the web server’ will be
displayed.
3.7.2.2 Create St Mary’s Bookings
Once the file has been uploaded onto the server, you can then create the bookings from this file
Click on the button which identifies the file you have just uploaded. This will start the upload procedure
and you should get a message confirming that the upload was successful.
Confidential
Page 167 of 184
© Stanford Systems, 2004
Online Management of Interpretive Services (OMIS)
Version: 4.1
Date: 15-Nov-2004
OMIS Administrator Manual
3.7.2.3 Bookings File Upload Report
The upload report should identify any errors that occurred during the upload process.
Enter the start and end dates for the report and click on the ‘Submit’ button
Confidential
© Stanford Systems, 2004
Page 168 of 184
Online Management of Interpretive Services (OMIS)
Version: 4.1
Date: 15-Nov-2004
OMIS Administrator Manual
Sample of report is shown above
Confidential
© Stanford Systems, 2004
Page 169 of 184
Online Management of Interpretive Services (OMIS)
Version: 4.1
Date: 15-Nov-2004
OMIS Administrator Manual
3.7.2.4 St Mary’s Department Mappings
This allows you to create and maintain a mapping between the ST Mary’s file departments and those held
on the OMIS system
Confidential
© Stanford Systems, 2004
Page 170 of 184
Online Management of Interpretive Services (OMIS)
Version: 4.1
Date: 15-Nov-2004
OMIS Administrator Manual
Click on the left edge beside the department that needs to be amended and the Pop-up screen be displayed
showing the details for this department. Amend the screen as necessary and press the ‘Update’ button
Confidential
© Stanford Systems, 2004
Page 171 of 184
Online Management of Interpretive Services (OMIS)
Date: 15-Nov-2004
OMIS Administrator Manual
3.8
Version: 4.1
Amend Interpreter Diary
The Interpreter’s diary can be accessed via the main menu option as follows:
Click on the ‘Amend’ option to enter the Interpreter’s Diary
The above screen shows the default display for the Interpreter’s diary.
Confidential
© Stanford Systems, 2004
Page 172 of 184
Online Management of Interpretive Services (OMIS)
Date: 15-Nov-2004
OMIS Administrator Manual
3.8.1
Version: 4.1
Selecting the Interpreter
Select the name of the Interpreter whose diary needs to be amended. On selecting the interpreter, the screen
will default to the Interpreter’s diary for today.
Confidential
© Stanford Systems, 2004
Page 173 of 184
Online Management of Interpretive Services (OMIS)
Version: 4.1
Date: 15-Nov-2004
OMIS Administrator Manual
3.8.2
Selecting the Date
Use the Calendar to select the date that you need for viewing the Interpreter’s diary:
Use the Blue icons to navigate to the
Next/Previous month.
Use the Next/Previous Month picker to view dates for different months of the year. Click on the Day that
you want to start viewing the Calendar. In the example above the diary will start on the 5th July 2004.
Popup Month/Year picker
Month/Year Picker
Use the Popup Month/Year selector to navigate to the required Year and Month. After selecting the
Month/Year click on the ‘OK’ or ‘Cancel’ button.
Confidential
© Stanford Systems, 2004
Page 174 of 184
Online Management of Interpretive Services (OMIS)
Date: 15-Nov-2004
OMIS Administrator Manual
3.8.3
Version: 4.1
Selecting Day/Week/Month Views
3.8.3.1 Day View
By default the first view that is displayed is the Day view. This shows 7 days starting from today’s date. If
another date is selected from the Calendar, then the view will show the next seven days starting from the
selected date.
Confidential
© Stanford Systems, 2004
Page 175 of 184
Online Management of Interpretive Services (OMIS)
Version: 4.1
Date: 15-Nov-2004
OMIS Administrator Manual
3.8.3.2 Week View
The Week view allows you to view the Diary for the next two weeks.
Select the ‘Week’ option as shown above to amend the diary to ‘Week’ View
In the ‘Week’ view the dates are shown on the side and the time on the Top of the view.
Confidential
© Stanford Systems, 2004
Page 176 of 184
Online Management of Interpretive Services (OMIS)
Version: 4.1
Date: 15-Nov-2004
OMIS Administrator Manual
3.8.3.3 Month View
The Month view allows you to view the Diary for the next month starting from the selected date.
Select the ‘Month’ option as shown above to amend the diary to ‘Month’ View
The month view, similar to the Week view shows the dates at the side of the display and the time at the top
of the display.
Confidential
© Stanford Systems, 2004
Page 177 of 184
Online Management of Interpretive Services (OMIS)
Version: 4.1
Date: 15-Nov-2004
OMIS Administrator Manual
3.8.4 Viewing Bookings by Status
You can view bookings for the Interpreter by selecting/unselecting the status of the bookings that you need
to view:
By default all the Bookings status’ are selected. Unselect any booking status that you do not wish to view.
This will trigger a refresh and the bookings for the status that was unselected will not be displayed. In the
above example all ‘Confirmed’ bookings have been unselected and are not displayed on the diary after the
refresh.
Confidential
© Stanford Systems, 2004
Page 178 of 184
Online Management of Interpretive Services (OMIS)
Date: 15-Nov-2004
OMIS Administrator Manual
Confidential
Version: 4.1
© Stanford Systems, 2004
Page 179 of 184
Online Management of Interpretive Services (OMIS)
Version: 4.1
Date: 15-Nov-2004
OMIS Administrator Manual
3.8.5 Booking Status Colours
The colour scheme that is used for the status of the bookings is as follows:
Booking Status
Colour
Confirmed
Yellow
Cancelled
Red
Signed-off
Green
Invoiced
Blue
3.8.6 View Booking Notes
You can view the booking notes by using two methods:
(3) Click on the notes icon shown within the booking
(4) Click twice on the booking notes (which may not all be visible). Once to select the booking and the
second time to view the notes
Use the OK or Cancel button to close the notes. Bookings cannot be created or edited via the Interpreter’s
Diary. You can view the details only.
Confidential
© Stanford Systems, 2004
Page 180 of 184
Online Management of Interpretive Services (OMIS)
Version: 4.1
Date: 15-Nov-2004
OMIS Administrator Manual
3.8.7 Enter Interpreter ‘Unavailability’
This function allows you to enter the times when the interpreter is not available on a particular day.
You can create the unavailability block in two ways:
(3) Click on a day cell
(4) Select a contiguous range of day cells
Contiguous cells selected by holding and dragging the mouse cursor
Confidential
© Stanford Systems, 2004
Page 181 of 184
Online Management of Interpretive Services (OMIS)
Version: 4.1
Date: 15-Nov-2004
OMIS Administrator Manual
This will display the following prompt so that you can enter the notes relating to the unavailability
Enter the text and click on the ‘OK’ button
Confidential
© Stanford Systems, 2004
Page 182 of 184
Online Management of Interpretive Services (OMIS)
Version: 4.1
Date: 15-Nov-2004
OMIS Administrator Manual
The availability of the interpreter is entered and is shown in purple colour. You can edit the text for this by:
(5) Clicking on the notes icon shown within the booking
(6) Clicking twice on the notes (which may not all be visible). Once to select the event and the second
time to view the notes
3.8.8 Deleting Interpreter Unavailability
To delete the event showing the Interpreter’s unavailability click on the X on the top right of the event:
Then click on the ‘OK’ button and the event will be deleted.
Confidential
© Stanford Systems, 2004
Page 183 of 184
Online Management of Interpretive Services (OMIS)
Date: 15-Nov-2004
OMIS Administrator Manual
Confidential
Version: 4.1
© Stanford Systems, 2004
Page 184 of 184