1
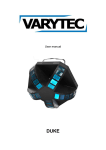
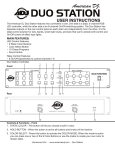
USER MANUAL SAFETY INSTRUCTIONS WARNING Please keep this User Guide for future consultation. If you sell the unit to another user, be sure that they also receive this user guide. Unpack and check carefully that there is no transportation damage before using the unit. Before operating, ensure that the voltage and frequency of power supply match the power requirements of the unit. The unit is for indoor use only. Use only in a dry location. Replace fuse only with the same type. Do not use any other type of fuse. Make sure there are no flammable materials close to the unit while operating. Avoid placing flammable material near any electronics while they are plugged in. In the event of serious operating problem, stop using the unit immediately. Never try to repair the unit by yourself. Repairs carried out by consumer can lead to damage or malfunction. Please contact the nearest authorized technical assistance center. . To prevent or reduce the risk of electrical shock or fire, do not expose the unit to rain or moisture. Do not look directly at the light while the bulb is on. Caution There are no user serviceable parts inside the unit. Do not open the housing or attempt any repairs yourself. In the unlikely event your unit may require service, please contact your nearest authorized dealer. Installation The unit should be mounted via its screw holes on the bracket. Always ensure that the unit is firmly fixed to avoid vibration and slipping while operating. Always ensure that the structure to which you are attaching the unit is secure and durable. Lighting Source: Lighting Source: 3 x 3W LEDs (R:1 G:1 B:1) LEDs produce a variety of color effects (Red, Green, Blue, Purple, Yellow, Cyan & White) 34 color-changing beams Function Mode: Strobe effect Auto Mode Sound Active mode with a built in Mic DMX-512, Master/slave 4 Channels DMX-512 protocol Master/Slave linkable via XLR cable Flash:Flash 1-10/s,speed controllable Includes metal hanging bracket Voltage: AC 100V-240V 50/60Hz (Auto Adjustable) Fuse: T 1A Power consumption: 20W How to control the unit You can operate the unit in 2 ways: 1. By master/slave built-in preprogrammed functions 2. By universal DMX controller DMX Channels - Standard DMX512 signal addressing and can be controlled by any universal DMX controller. - Channel mode: 6 channels. Control by Dip-switches This lighting fixture is Dip-switch type. The 10 Dip-switch function is as follow: DIP# Function Sound Activated and automatic. Controls DIP 2 / 3.4.5 on or off RGB mixing and strobe RGB mixing RGB mixing and strobe RGB mixing DIP1 DIP2 DIP3 DIP4 DIP5 DIP6 DIP7 DIP8 DIP9 DIP10 Red color Green color When dip 6 &7 is on it is blue color Mixing Red and Green LED color Controls RGB LED turn on one by one Master and Slave How to control the DMX channels Channel NO. Channel Value CH1 000-255 Turn on Red LED CH2 000-255 Turn on Green LED CH3 000-255 Turn on Blue LED CH4 000-255 Dimmer function 000-007 No strobe 008-255 Strobe,strobe speed faster and faster 000-009 Motor static 010-120 The motor run as clockwise,fast to slow 121-134 Motor static 135-245 The motor run as counterclockwise ,slow to fast 246-255 Motor static CH5 CH6 Function Linking Master/Slave preprogrammed function By linking the units in master/slave connection, the first unit will control the other units to give an automatic, sound activated and synchronized light show. This function is good when you want an instant show. Its DMX input jack should have nothing plugged into it, and its master LED will be constantly on with the sound LED flashing to the music. Scroll through the digital display and select any of the 13 auto modes on the master unit. On the other units that you wish to use in slave mode, scroll through the display and select slave mode. Each slave unit that follows after the master should have its input jack plugged into the output jack of the previous unit. Troubleshoot Following are a few common problems that may occur during operation. Here are some suggestions for easy troubleshooting: A. The unit does not work, and there is no light Check power and main fuse. B. Not responding to DMX controller 1. DMX LED should be on. If not, check DMX connectors, cables to see if it is linked properly. 2. If the DMX LED is on and there is no response to the channel, check the settings and DMX polarity. 3. If you have intermittent DMX signal problems, check the pins on connectors or on PCB of the unit or the previous one. 4. Try to use another DMX controller. 5. Check in the DMX cables run near or run alongside to high voltage cables that may cause damage or interference to DMX interface circuit. C. Some units don’t respond to the easy controller 1. You may have a break in the DMX cabling. 2. Check the LED for the response of the master / slave mode signal. D. No response to the sound 1. Make sure the unit that does not receive DMX signal. 2. Check microphone to see if it is good by tapping the microphone. 3. Sensitivity is too low, check and set it higher. E. The lamp is cutting out intermittently The lamp is not working well. Check the main voltage it may be either too high or too low. Cleaning The cleaning of internal and external housing can be carried out periodically to optimize light output. Cleaning frequency depends on the environment in which the fixture operates: damp, smoky or particularly dirty surrounding can cause greater accumulation of dirt on the unit’s optics. Clean with soft cloth using normal glass cleaning fluid. Always dry the parts carefully. Clean the external optics at least every 20 days. Clean the internal optics at least every 30/60 days. Xstatic Pro Lighting INC. 901 Essex St Brooklyn NY 11208 USA Tel: 718.237.2299 Fax: 718.237.2318 www.XSTATICUSA.com www.proXcases.com facebook.com/xstaticpro twitter.com/XstaticPro