1
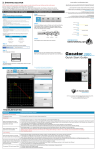
Application Note: Interfacing a Gocator To Common Vision Blox
Title
Page
1 ( 7)
Interfacing a Gocator to Common Vision Blox
Purpose
This document explains how to interface a Gocator sensor to Common Vision Blox (CVB)
Equipment
Gocator Firmware Release 3.2 or later
Common Vision Blox 2011 or later
Sherlock Version 7 or later (if Sherlock is required)
Sherlock CVB Driver (if Sherlock is required)
Table of Contents
1 Overview .................................................................................................................................................................. 2
2 Verifying the Connection Between the Gocator and CVB ....................................................................................... 3
3 Verifying the Connection Between Sherlock and CVB ............................................................................................ 5
Gocator-2000-2300-Appnote_Common_Vision_Blox_Interface.doc
Application Note: Interfacing a Gocator To Common Vision Blox
Page
2 ( 7)
1 Overview
Common Vision Blox (CVB) is an open architecture, hardware independent toolkit for 3D image processing. Gocator
includes a GenTL driver that can be used to stream 3D height map and intensity images into CVB in real-time.
Sherlock is an advanced machine vision software interface that can be applied to a wide variety of automated
inspection applications. Sherlock can communicate to the Gocator via the Sherlock CVB driver.
This document assumes that CVB is already installed. If Sherlock is used, the document assumes that the Sherlock
CVB driver and Sherlock are installed.
Refer to the GenTL chapter in the Gocator’s User Manual on how to install and setup the Gocator GenTL driver. This
document describes how to verify that CVB and Sherlock are properly connected to the Gocator. Users are assumed
to be already familiar with the operation of the Gocator Whole Part mode.
Gocator-2000-2300-Appnote_Common_Vision_Blox_Interface.doc
Application Note: Interfacing a Gocator To Common Vision Blox
Page
3 ( 7)
2 Verifying the Connection Between the Gocator and CVB
Follow the steps below to setup CVB with Gocator for the first time:
1. Connect a Gocator to the PC running CVB.
2. Power up the Gocator and put the Gocator into Whole Part mode and enable the Ethernet output. Check Acquire
Intensity if intensity data is required.
3. Start the CVB Management Console.
4. Click GenICam at the bottom right corner.
Gocator-2000-2300-Appnote_Common_Vision_Blox_Interface.doc
Application Note: Interfacing a Gocator To Common Vision Blox
Page
4 ( 7)
5. Select Device Configurator.
Detected Gocators will be listed in the Configured Device table. The Gocator must be running and connected to
the PC for this step to be successful.
If no device is detected, select Advanced Config, select the LMI sensor from the list in the left and click “>>” to
assign a Gocator to the CVB camera port.
When a Gocator is detected, the device shows up in the Configured Device list.
Gocator-2000-2300-Appnote_Common_Vision_Blox_Interface.doc
Application Note: Interfacing a Gocator To Common Vision Blox
Page
5 ( 7)
6. Check Grab box to start data capturing.
7. Trigger the Gocator to output a part object. The method to trigger the Gocator depends on the Gocator setup.
The output will be displayed in the Preview Window.
An acquisition timeout error might display periodically if the Gocator is put into encoder trigger mode and there is
no parts scanned for a period of time.
User can configure the acquisition timeout under Settings and Information->General Settings.
3 Verifying the Connection Between Sherlock and CVB
1. Shut down CVB Management Console.
2. The camera port in the file CVBDriv.ini (normally under C:\Program Files\ipd\Sherlock\Drivers) should point to
GenICam.vin, as shown below.
[Camera0]
Driver = %CVB%\Drivers\GenICam.vin
CameraPort = 0
3. Start Sherlock.
Gocator-2000-2300-Appnote_Common_Vision_Blox_Interface.doc
Application Note: Interfacing a Gocator To Common Vision Blox
Page
6 ( 7)
It is normal to see an Acquisition Failed error in the Monitor window.
4. Select Image Window -> Options
5. Check the box “On acquisition timeout: Skip execution of this “image window” and continue executing program
without a timeout error”. Close the dialog box.
This setting prevents Sherlock from executing the program when an acquisition is timed out. Acquisition timeout is
normal when no parts are detected.
6. Press the Run Continuously button to begin acquisition.
Gocator-2000-2300-Appnote_Common_Vision_Blox_Interface.doc
Application Note: Interfacing a Gocator To Common Vision Blox
Page
7 ( 7)
7. Trigger the Gocator to generate a part height map. The height map should be displayed in the image window.
Gocator-2000-2300-Appnote_Common_Vision_Blox_Interface.doc