1
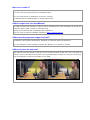
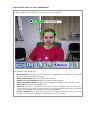
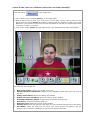
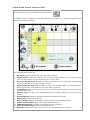
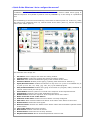
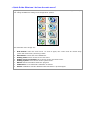
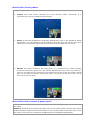
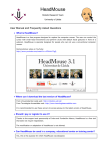
HeadMouse Robotic Research Team University of Lleida User Manual and Frequently Asked Questions What is HeadMouse? HeadMouse is a free program designed to replace the computer mouse. The user can control the cursor with small head movements and perform clicks with facial gestures in front of a webcam. HeadMouse is specially designed for people who can not use a conventional computer mouse. Demonstrative video on YouTube: http://www.youtube.com/watch?v=vFRVxh1TigQ http://www.youtube.com/watch?v=9OeeX8csfUI Where can I download the last version of HeadMouse? From Universidad de Lleida web: http://robotica.udl.cat From Tecnologias Accessibles web: http://www.tecnologiasaccesibles.com It is recommended to use these servers to access always to the latest version of HeadMouse. Should I pay or register to use it? Thanks to the support and sponsorship of Indra and Fundación Adecco, HeadMouse is a free tooll that does not require registration. The modification or adaptation of HeadMouse is not allowed. Can HeadMouse be used in a company, educational centre or training centre? Yes, this is the purpose for which HeadMouse was designed. How can I install it? Run the installation software and follow the instructions. You can select the language and the installation folder. It is not required the un-installation of previous versions. HeadMouse can be installed again to correct malfunctions. What is required to use HeadMouse? An USB webcams that operates in video mode at 640x480 pixels video resolutions at 30 fps and sends the data in RGB, YUV420 or YUV422 format. Mostly of the webcams are compatibles with HeadMouse. There is a list of verified compatible webcams in http://robotica.udl.cat. What operating systems support the tool? HeadMouse was originally designed for Windows XP, Windows Vista and Windows 7. It is not available in other operating systems like MacOS, Linux, iPhad, or Android. Where to place the webcam? The webcam must be placed on the top of your monitor pointed to the user, but it can also be placed in front of and below the monitor. One important aspect to take into account is that user’s face must appear as centred as possible in the image. Quick Guide: How can I use HeadMouse? Once HeadMouse is started a picture is shown to detect (calibrate) automatically the user’s face. To start HeadMouse stay static a few seconds (don’t move the head). The elements of the image are: 1. 2. 3. 4. 5. 6. 7. Pause button: This button stops temporally the initialization of HeadMouse. The process continues by pressing again this button. Setting clicks button: Opens the setting click window. Setting on cursor movement: Opens the setting camera window. Manual calibration button: Toggles to the manual eye calibration mode with the mouse. Exit button: Closes and exits HeadMouse. Load bar: Indicates if the position of the user and if the distance with the webcam are correct. If the user position is correct and the user remains static few seconds, the load bar will be filled completely and HeadMouse will start automatically. Location head box: The green box with solid lines appears when the user is in a correct position; a red box with a dashed line represents an incorrect position. Quick Guide: How can I calibrate (select the user head) manually? Press the button of the window and: a) Take a photo of the user with button 1 of the image below. b) Make a manual click on each eye. If the click is correct then a green cross on each eye will appear and the confirm button 2 will blink indicating that the program is ready to be used. Otherwise, if the selection is incorrect the cross will appear in red and you should make further clicks and / or take a new photo. c) Click on the confirm button 2 of the image below. Then HeadMouse will start automatically. The elements of the image are: 1. 2. 3. 4. 5. 6. 7. 8. 9. New photo button: Capture new image of the user. Manual selection confirmation: Button to start HeadMouse after clicking on both eyes of the user. Setting clicks button: Opens the setting click window. Setting on cursor movement: Opens the setting camera window. Automatic calibration button: Toggles to the automatic starting mode. Exit button: Closes and exits the program. Reference axes: Shows the current cursor position. Working area: Marks the optimum work area; the user's head should not leave these limits. Eye Marker: Marks the clicks over the user's eyes. Green crosses will appear if the eye positions can be used by HeadMouse, a red cross will appear otherwise. Quick Guide: How to setup the click? The click menu window is accessed pressing the button HeadMouse can be configured to perform different click actions by configuring different facial gestures or waiting some time. The elements of the image are: 1. 2. 3. 4. 5. 6. 7. 8. 9. 10. 11. 12. 13. OK button: Saves changes and closes the setting window. Cancel button: Undoes the changes and closes the setting window. If you hold the cursor over the cancel button during 5 seconds a click event is done. Eye click and test area: Available to select and test the eye click sensitivity. When clicked this area is painted in red colour during 1 second. Mouth clicks and test area: Available to select and test the mouth eye click sensitivity. When clicked this area is painted in red colour during 1 second. Time clicks: Selects a click with a timer. The cursor must remain static from 2 to 8 seconds to perform this click. Security zone: At least one of these shaded zones must be marked to assure computer control. Dropdown menu: Shows a selectable multi-click window in the screen. Option drag: Drags until next click. Macros button: Enables the addition of macro buttons in the dropdown menu. Setting macros button: Opens the setting macros window. Calibration buttons: Increases or decreases the click sensitivity. Click sensitivity gauge: Shows the sensitivity level. Statistics: Shows the number of clicks and the cursor displacement (in pixels). Quick Guide: What can I do to configure the macros? Watch video: http://www.youtube.com/watch?v=9OeeX8csfUI HeadMouse can be used with different files of macros. The macros enable direct typing of different sequences of keyboard keystrokes such as [CONTROL X] or the writing of a predefined text. The methodology to be used is the following: select a file of macros (items 15, 16 and 17), select the macro to be configured (item 11), edit the name of the macro (item 12), edit the keyboard action of the macro (item 3). The elements of the image are: 1. 2. 3. 4. 5. 6. 7. 8. 9. 10. 11. 12. 13. 14. 15. 16. 17. 18. OK button: Saves changes and closes the setting window. Cancel button: Undoes the changes and closes the setting window. Edit text: When selected enables the typing of the contents of the macro. Password button: Enables private typing, replacing each character for asterisk (*) Open/Execute button: Enables the selection of any file to run (if it’s an executable file) or to open (if it’s a .doc, .txt, .bmp, .jpg, .wav, etc.) by its default program. URL/Command button: Enables the typing of the name of a program, folder, document or internet resource that you wish open. Pause button: Inserts a pause of 1 second in the sequence of the keyboard actions. Copy button: Copies the text of the clipboard on the macro. Delete button: Deletes the sequence of the keyboard action of the macro. Name of the file in use of the macros. Selection of the macro: Selects the macro button currently configured. Edit name: When selected enables the edition of the name of the button of the macro. Delete button: Deletes the name typed. Restore button: Restores the default macro button name and the default keyboard actions of this button. Files of the macro: Macro files selection. New button: Creates a new file of macros. Delete button: Deletes the file currently selected. Displacement button: Allows window displacement with one click. Quick Guide: How to setup the cursor movement? The movement setup window is accessed pressing the button This window enables the configuration of: the image orientation, the cursor movement type, the movement accuracy and the cursor movement speed. The elements of the image are: 1. 2. 3. OK button: Saves changes and closes the window. Cancel button: Undoes the changes and closes the window. Movement of the cursor disabled: When selected, the displacement of the cursor is disabled and only the clicks are operative. 4. Relative movement: The cursor movement is performed in a relative way. For instance, if the user tilts the head to the right side, the cursor moves continually to the right side. 5. Absolute movement: The cursor movement is performed in an absolute way. For instance, if the user tilts his head to the right, the cursor locates on the screen proportionally to the tilt angle. 6. Small movements of head to move the cursor. 7. Medium movements of head to move the cursor. 8. Large movements of head to move the cursor. 9. Slow speed in the displacement of the cursor. 10. Medium speed in the displacement of the cursor. 11. Fast speed in the displacement of the cursor. 12. and 13. Reverses the horizontal displacement of the cursor: It should be selected if the cursor movement is in the opposite direction of the movement of the head. Quick Guide: What can I do from the main menu? If you place the cursor over the small HeadMouse window, the main menu will appear and you can change HeadMouse settings and configuration options. The elements of the image are: 1. 2. 3. 4. 5. 6. 7. 8. Hide button: Hides the main menu. To show it again, the cursor must be moved away (more than half screen) and bring it back. Exit Button: Closes and exits HeadMouse. Setting clicks: Direct access to the click menu. Setting cursor movement: Direct access to the movement menu. Setting system: Direct access to the system menu. About: Shows information about the program. Calibration: A new automatic calibration is started. Pause: HeadMouse remains disabled until this button is pressed again. Quick Guide: How to configure the system? The system setup window is accessed pressing the button The elements of the image are: 1. 2. 3. 4. 5. 6. 7. 8. 9. OK button: Saves changes and closes the window. Cancel button: Undoes the changes done and closes the window. Auto Adjustment: The program checks if the position of the face of the user in the image is correct every 30 seconds and, if it is necessary, starts the automatic calibration process. Calibration after a pause: HeadMouse starts a new face detection after a pause mode. Pause: Enable or disable the Pause mode. This mode pauses HeadMouse execution. To start/stop this mode must turn the head from right to left some times. Size of the main window: The main menu is available in three different sizes. Click sound: Enables or disables a sound after a click. Auto start HeadMouse: HeadMouse can run automatically when Windows starts. Language: The user can change the language of messages and menus. Quick Guide: What is the meaning of the dropdown menu symbols? When selected, the dropdown menu enables all click options. If the macros option is selected then the buttons of the selected macro are also shown (item 7). The elements of the image are: 1. 2. 3. 4. 5. 6. 7. Cancel button: Hides the window. Central click: Makes a middle click. Left click: Makes a left click. Right click: Makes a right click. Double left click: Makes a double left click. Drag option: Makes a click to drag. Macros available: Shown if the macros option is selected in the click menu window. Quick Guide: Visual symbols. The visual symbols show the operating mode of the program: Control, Pause and Manual. 1. Control: This mode allows controlling the cursor through head’s movements. It is represented by a green rectangle around the head. 2. Pause: In this mode HeadMouse is temporally disabled (the cursor is not affected by head’s movements). It is represented by a blue rectangle around the head and a pause icon. Three lateral turns of the head changes from Control mode to Pause mode (and vice versa). 3. Manual: This mode is similar to the pause mode. It is represented by a yellow rectangle around the head and a pause icon. Any manual displacement of the cursor by means of a mouse or any input device connected to the computer forces this mode; this mode is exited after few seconds of inactivity of the input device. The green bar shows the time left to return to the control mode. Quick Guide: How to access to pause mode? Method 1: Press the pause button on the main menu. To exit the pause mode click the button play again. Method 2. Accessed when selecting the pause mode in the system window. Perform three lateral head movements; repeat the lateral movements or click the play button of the main menu to exit this mode. If user’s face is not detected, HeadMouse will be recalibrated automatically. Quick Guide: Can I use the mouse when I am using HeadMouse? Yes, Headmouse enters in Manual mode when the physical mouse is moved. The Control mode is achieved after a few seconds when the physical mouse is no longer moved. Quick Guide: Can HeadMouse operate if the user wears glasses or contact lens? Yes, HeadMouse operates properly in any of those cases. Problem: What can I do if the webcam’s image appears black? This problem has been detected on some laptop webcams. The problem is due to a partial incompatibility of the webcam with the operating system. To use HeadMouse the internal webcam must be disabled and an external webcam must be plugged and used. Problem: An error message appear when the program runs You can realize the following actions: - Check if the webcam is connected (and it should be just one). - Check if the drivers of the webcam are installed. - Disable any television cards or similar in the computer. - If the problem persists send an email with the detail description of the problem. Are there some scientific papers that describe the HeadMouse operating? Yes, check the webpage of publications of the Robotic Research Team of the University of Lleida: http://robotica.udl.cat How it come up the idea of HeadMouse? The original idea of HeadMouse comes up with the possibility of applying algorithms of artificial vision used in robotics to control the cursor’s displacement on the screen through the head’s movements. The idea of HeadMouse is available as a free program thanks to the work of the Robotic Research Team of the University of Lleida and the support and sponsorship of Indra and Fundación Adecco.