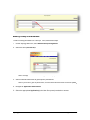
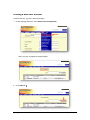
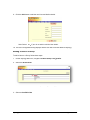
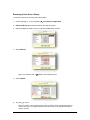
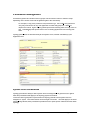
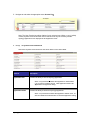
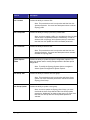
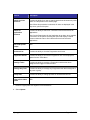
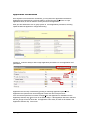
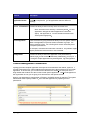
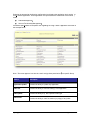
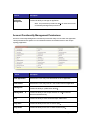
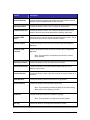
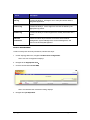
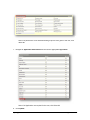
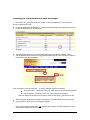
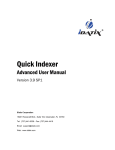
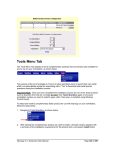
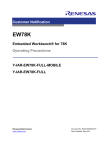
1
Group and User Permissions
Account management techniques allow an Administrator to control the levels of document access
and permissions granted to individual Users and Groups (of users) working within iSynergy.
Assigning individual users as members of group account(s) is an effective way to ease account
administration overhead. Each user assigned to a group account inherits the permissions
granted to the group.
For example, a user assigned group permissions can have additional permissions
assigned individually to his user account.
When working with a dynamic information database, it is necessary to institute security measures
of varying levels among Users within the system to ensure its integrity.
Within iSynergy, it is possible to deny a User or Group access to an Application(s) or to limit
functionality while within an Application. Various Users may be granted access to Applications
pertinent to their duties while being refused access to Applications outside the scope of their
duties.
Additionally, it is possible to grant a User or Group access to an Application while limiting access
to particular Document types or Document statuses within the Application. Similarly, Index-Level
permission controls can be placed on sensitive Index fields to control (i.e., prevent or enable)
visibility or edit capabilities for selected users.
By combining Application-level, Document-level and Index-level security approaches, it is
possible to create a highly granular mode of access control in iSynergy.
User Account Management
At the most basic level, a User account grants an individual Authentication and Entry privileges
into iSynergy. Permissions assigned to a User account determine the access and functionality an
individual has at his/her fingertips when logged into iSynergy.
The basic configuration attributes of a User account include:
#
#
#
#
#
User name
Full Name
Email Address
Cost
Account password
iSynergy 3.11 Advanced User Manual
Page 135 of 257
Group accounts in iSynergy lessen the task load of the system administrator. The administrator
can set permissions within Group accounts and subsequently assign User accounts membership
in various Groups.
Note: This is a more effective approach than assigning permissions for each User
account on an individual basis.
Group Account examples include:
#
#
#
#
Groups based on department membership (Sales, HR, Customer Service).
Groups based on job scope and responsibility (scanner operators, data entry personnel,
analysts, supervisors, etc.).
).
Basic groups of users with limited permissions for identified types of duties and
responsibilities.
System Administrators group with full permissions.
Note: The rights and permissions granted to User accounts based on multiple
memberships are cumulative.
iSynergy 3.11 Advanced User Manual
Page 136 of 257
Creating a New Group
To add a new Group to the iSynergy system, follow the below steps:
1. On the iSynergy Menu bar, navigate to Admin>Group Configuration.
Note: The Group Configuration dialog window displays.
2. Select Add Group
up.
Note: A new text box displays under the existing iSynergy Groups.
3. Enter the New Group Name.
4. Select Add Group.
5. The newly created Group displays in the Group Configuration table.
iSynergy 3.11 Advanced User Manual
Page 137 of 257
Modify Group Permissions
To add or modify permissions of a Group account, follow these steps:
1. On the iSynergy Menu bar, select Admin>Group Configuration.
2. Select the Group Access Key.
Note: The Application Permission dialog window displays.
3. Select individual checkboxes to grant specific permissions.
Note: If you want to give all permissions, choose Select All Permissions and click Update.
4. Navigate to Application Permissions.
5. Select the appropriate Application(s) the User Group need permission to access.
iSynergy 3.11 Advanced User Manual
Page 138 of 257
6. Select Update.
iSynergy 3.11 Advanced User Manual
Page 139 of 25
257
Creating a New User Account
To add a new iSynergy User, follow these steps:
1. On the iSynergy Menu bar, select Admin>User Configuration.
Note: The User Configuration dialog displays.
2. Click Add User.
iSynergy 3.11 Advanced User Manual
Page 140 of 257
Note: This User Details dialog displays.
3. Tab to the Username field and define the Username.
4. Tab to the Full Name text field and enter the Users full name.
5. Tab to the Email Address text field and enter the Email Address.
iSynergy 3.11 Advanced User Manual
Page 141 of 257
6. Tab to the cos
ost and define the hourly cost.
Note: This cost field is an optional field; however, if you are using the iDatix Business
Automation Product, Progression, this cost field will be helpful for production reports to
compute task costs by tracking the amount of hours an employee spends on specific
tasks.
7. Tab to the Password text field and .
8. Tab to the Confirm Password text field and Renter the Password as defined in Step 7.
Note: Passwords are case sensitive! Passwords must be unique, and cannot be the
same as the username.
iSynergy 3.11 Advanced User Manual
Page 142 of 257
9. Click the Add button to add the new User and his/her details.
Note: Select cancel if you do not wish to add the User details.
10. The User Configuration dialog displays and the user has now been added to iSynergy.
Adding a User to a Group
To add a User to a Group, follow these steps:
1. On the iSynergy Menu bar, navigate to Admin>Group Configuration
2. Select the Group Name.
Note: The Group Name dialog window displays.
3. Select an Available User.
iSynergy 3.11 Advanced User Manual
Page 143 of 257
4. Select Add.
Note: To make multiple selections, use the Shift or Ctrl keys on your keyboard as
appropriate.
3.
Click Update.
To check the Group membership status of a User, navigate to Admin>User Configuration
page; the group membership displays in the Member of Groups column.
iSynergy 3.11 Advanced User Manual
Page 144 of 257
Removing a User from a Group
To remove a User from a Group, follow these steps:
1. On the iSynergy menu bar, navigate to Ad
Admin>Group Configuration.
2. Select the Group that contains the User you want to remove.
3. Select the User you want to remove in the Group MembersT6B?H@ A
4. Select Remove.
Note: The removed user is re
re-added to the Available Users.
5. Select Update.
6. The selected user is removed from the Group.
8=. % 8 ?.;2/B * & <.;H<;.6 8?*5/;86 * ;8>9 58*- =1. User Configuration page to
, 87/2;6 =1. & <.;2<78 5
870.;27, 5>-.- @2=127 =1. ;8>9+B ?2.@270 =1. G .6 +.;8/
;8>9<H, 85
>6 7
iSynergy 3.11 Advanced User Manual
Page 145 of 257
Delete a User Account
To delete a User account, follow these steps:
1. On the iSynergy Menu bar, navigate to Admin>User Configuration.
2. Locate the user you want to Delete.
3. Select the desired Username.
Note: The User Details dialog displays.
3.
Select Delete.
Note: A Windows Internet Explorer dialog window displays with the selected user name.
4. Select OK.
iSynergy 3.11 Advanced User Manual
Page 146 of 257
Permission Management
Permissions granted to individual users or groups can be limited in nature or broad in scope
depending on the various roles and the granted rights of the User/Group.
For example, it may prove prudent to limit permissions granted to data entry personnel.
They may need access to only one Application for data entry purposes. Whereas,
Supervisors and Managers may be granted permissions allowing them to assign users to
Group memberships that permit actions such as adding Applications and creating new
UDLs.
iSynergy permissions are defined initially at the System Level, followed immediately by the
Application level.
System Level Permissions
iSynergy provides the ability to define system level role assignments to grant access to global
tasks and permissions that apply to the iSynergy system as a whole.
Each user and/or group who requires access to iSynergy should have a system level role
assignment. System Level Permissions can be thought of as defined rules that apply to the entire
physical filing cabinet; these permissions provide access to open specific cabinets and files within
iSynergy.
iSynergy 3.11 Advanced User Manual
Page 147 of 257
To define a User or " EBHCTFSystem Level Permissions, follow the procedure below:
1. From the iSynergy Menu bar, navigate to Admin>User Configuration.
Note: The User Configuration dialog displays.
2. Select Add User.
3. Define the new User Details.
4. Select Update.
Note: The user returns to the User Configuration screen.
iSynergy 3.11 Advanced User Manual
Page 148 of 257
5. Navigate to and select the appropriate users Access Key.
Note: The User Permissions dialog displays for the selected user. When a user is initially
created, System Level Permissions are not selected and only the currently created
iSynergy Applications are displayed at the Application Level.
6. Navigate to System Level Permissions.
Note: Each System Level Permission has been defined in the below table.
Element
Description
Application Add
Provides the ability to add an iSynergy Application.
Note: This permission enables the Applications Admin Menu
item, as well as enables the Add New Application button the
Application Configuration dialog.
Application Delete
Provides the ability to delete an iSynergy Application.
Note: This permission enables the Application Admin menu, as
well as enables the Delete button on the Edit Application dialog.
iSynergy 3.11 Advanced User Manual
Page 149 of 257
Element
Description
User Add
Provides the ability to create a new iSynergy user account.
Note: This permission works in conjunction with the User
Update permission. You must have both permissions selected in
order to create a new user.
User Update
Provides the ability to update a user account, as well as update all
System Level Permissions of another user..
Note: In order to add a user to iSynergy, you must have both the
User Add and User Update permission. Additionally, in order to
delete a user from iSynergy, at the System Level you must have
both the User Update and User Delete permission selected.
User Delete
Provides the ability to delete an existing user account.
Note: This permission words in conjunction with the User
Update permission. You must have both permissions selected in
order to delete a user.
Index Type Add
Provides the ability to add an index type.
Note: This permission works in conjunction with the Index Type
Update permission. You must have both permissions selected in
order to add and update an index type.
Index Type Update
Provides the ability to update an index type.
Note: In order to update an index type, you must have both the
Index Type Add and Index Type Update. Additionally, in order to
delete an index type from iSynergy, at the System Level you
must have both the Index Type Update and Index Type Delete
permission selected.
Index Type Delete
Provides the ability to delete an index type.
Note: This permission works in conjunction with the Index Type
Update permission. You must have both permission selected in
order to delete an index type.
iSynergy 3.11 Advanced User Manual
Page 150 of 257
Element
Description
User List Add
Provides the ability to create a UDL.
Note: This permission works in conjunction with the User List
Update permission. You must have both permissions to add an
iSynergy UDL.
User List Update
Provides the ability to modify a previously created UDL.
Note: In order to update a UDL, you must both the User List Add
and the User List Update permission. Additionally, in order to
delete a UDL in iSynergy, at the System Level you must have
both the User List Update and User List Delete permission.
User List Delete
Provides the ability to delete a UDL.
Note: This permission works in conjunction with the User List
Update permission. You must have both permissions selected
to delete an iSynergy UDL.
System Options
Update
Provides the ability to update the system configuration options. This
option also allows users to modify settings within the Scandox profile
configuration.
Note: To modify the iSynergy System Options, navigate to
Admin>System Configuration>System Options.
User Group Add
Provides the ability to create a new user group.
Note: This permission works in conjunction with User Group
update. You must have both permissions selected to add an
iSynergy User Group.
User Group Update
Provides the ability to update a user group.
Note; In order to update an iSynergy User Group, you must
have both the User Group Add and the User Group update
permission. Additionally, to delete a User group, you must have
both the User Group and User Group Delete permission
selected.
iSynergy 3.11 Advanced User Manual
Page 151 of 257
Element
Description
User Group Delete
Provides the ability to delete a user group.
Note: This permission works in conjunction with the User Group
Update permission. You must have both permissions selected
to delete an iSynergy User Group.
Pre Sort Application
Provides the ability for a user to access to the General Capture page
and therefore whether or not the presort general capture option shows
up in the menu.
Pre Sort Person
Determines if a user may route to an inbox from General Capture. The
Sa^_ S^f] P[[^fX]V P dbTa c^ bT[TRc P dbTapb X]Q^g c^ a^dcT c^ Xb ]^c
present on the general capture page if the user does not have the
System Level Permission to Pre Sort Application.
Inbox
Provides the ability to access an inbox for a specified user. Documents
that are placed in an iSynergy dbTapb inbox are available to be routed to
either another iSynergy Application or another User or Group.
Note: When a document has been sent to your inbox, you will
not be able to see the index fields and therefore you are unable
to update them. Any document that is placed in a users inbox
must first go through manual indexing before it is submitted to
an application. Additionally, selecting the Inbox permission
provides the ability to access the Routing option on the iSynergy
Menu.
System Reporting
Provides the ability to generate iSynergy reports.
Note: This permission provides the ability to access
Admin>Reporting. Additionally, reporting permissions are
restricted to the Application Level. The document level security
and security permissions are not enforced with this permission.
Remove Session
Provides the ability to remove other logged in accounts from active
iSynergy session.
ScanDox
Provides the ability to install the iDatix capture software product
ScanDox.
Note: This permission provides the ability to install ScanDox as
a clickonce application. Navigate to the iSynergy Tool Bar and
select Tools>Scandox.
iSynergy 3.11 Advanced User Manual
Page 152 of 257
Element
Description
Search Any User
Checkout
Provides the ability for a user to search checked out documents by other
users via a drop down on the Search page.
Note: When this permission is selected, all users are displayed in the
drop down, plus an All option.
Search All
Applications
Checkout
Provides the ability to search for a checked out document across all
applications.
Hide iLink Update
Prompt
TBD
Work Item List
Provides the ability to view the Progression work items.
Progression Studio
Provides the ability to access the Progression click once deployment
option from the Tools Menu.
Reassign Tasks
Provides the ability to reassign a Progression task that has been
assigned to the logged in users account.
Reassign Any Task
Provides the ability to reassign any Progression task that is assigned to
any user or group.
Priority Edit
Provides the ability to change priorities on workflow documents.
Perform iLink Index
Update
TBD
Note: On the Search page for the Application drop down, when enabled
there will be an All option. Selecting this option will display a search
screen to allow the user to find a document check out across all
applications.
7. Define the appropriate user System Level Permissions.
8. Select Update.
iSynergy 3.11 Advanced User Manual
Page 153 of 257
Application Permissions
Once System Level Permissions are defined, you may define the Application Permissions.
Application level permissions provide the ability to control the user permissions on a per
application basis, as well as enhance security access to the application.
After you have defined the user or group system level and application permission, selecting
update enables the application configuration dialog.
iSynergy provides the ability to define single application permissions or multi-application level
permissions.
Application level security is achieved by granting or restricting Application permissions.
Application level permissions can be assigned to both User and Group accounts.
If the account has permission to search an Application, the Application is available from the
Application Selector drop-down menu in the Search Page. If the Application has been restricted,
the User/Group will not be aware that the Application even exists, as it will not be visible in the
Application Selector drop-down menu.
iSynergy 3.11 Advanced User Manual
Page 154 of 257
Element
Description
Application Names
Provides a complete listing of all applications that are defined in
iSynergy.
iS
Doc Le
Level Permission Provides the ability to define security at the document level.
Note: Document Level Security is selectively defined for each
Application. Navigate to Admin>Applications. Select the
appropriate application and choose enabled document level
security when appropriate.
ILS Configuration
Index Level Security (ILS) provides the ability to secure specific Indexes
within each application to prevent certain individuals or groups from
viewing sensitive information or limiting their access unless they have
the required permissions.
For example, a sensitive HR Index field or Social Security Number might
require permissions before access or use is allowed.
Configuration
Provides the ability to define the application level permissions by
Cabinet, System and Account Functionality. Additionally, you may elect
to configure multiple applications by selecting Multi-App Configuration.
Cabinet Management Permissions
iSynergy provides complete application security that can be defined at the cabinet, system and
account functionality level. Cabinet Management permissions are the permissions for the overall
application. In other words, you can think of the cabinet as the drawer you would pull out in a
filing cabinet that contains all of the records for that specific application. Cabinet management is
the organization of how you are going to file documents in that specific drawer.
When a new Application is implemented in iSynergy, the default access is restricted. The system
administrator must explicitly enable access to the new Application by updating account
permissions.
iSynergy 3.11 Advanced User Manual
Page 155 of 257
Selecting the appropriate Application configuration icon displays the application level permission
for the chosen application. These application level permissions are determined at the following
levels:
Cabinet Management.
Account Functionality Management.
) 8E@ <FF<BA FC86<9<64G<BAF9BE4 FC86<9<6 HF8EE8: 4E7<A: G;8 Q H: -E46>8ER 4CC?<64G<BA 4E8 F;BJA <A
the example below.
Note: The same approach can also be used to assign these permissions for a specific Group.
Element
Description
Application Update
Provides the ability to update any Application.
Index Add
Provides the ability to add new Index(s) to an Application.
Index Update
Provides the ability to update a specific Index type.
Index Delete
Provides the ability to mark for deletion (no purge) of any index.
iSynergy 3.11 Advanced User Manual
Page 156 of 257
Element
Description
Application
Management
Provides the ability to manage an application.
Note: This permission provides the ability to utilize the Account
Functionality Management permissions.
Account Functionality Management Permissions
Account Functionality Management Permissions provide the ability to work within the Application.
These permissions are specific for user interaction with the documents stored in each unique
iSynergy Application.
Element
El
Description
Route Application
Determines if a user may route documents out of an application.
Route Person
Determines if a user may route to a dbTapb inbox from this application.
Indexing Edit
Provides the ability to update index values.
Indexing MultiEdit
Provides the ability to edit multiple indexes for multiple selected
documents simultaneously.
Email
Provides the ability to send email with object attachments.
Query Save
Provides the ability for the user to save a query.
Query Delete
Provides the ability for the user to delete a saved query.
iSynergy 3.11 Advanced User Manual
Page 157 of 257
Element
Description
Document History
Report
Provides the ability for system events history to be displayed with the
Reporting functionality.
Document Hard
Delete
Provides the ability for an object to be purged from system, or true
deletion from storage subsystem. Hard delete permission enables the
group to view the XHh]TaVhpb DQYTRc HcPcdb field with soft-deleted status
(i.e., mXn).
Document Soft Delete Provides the ability for an object to seem to be deleted from iSynergy,
but it is flagged (i.e., mXn Object-Status) for purge from the system.
Annotation View
Provides the ability to view any existing Annotations.
Annotation Edit
Provides the ability to create, edit, or delete Annotations.
Note: By default, this permission also provides the ability to view the
annotation(s) you have created.
Annotation Add
Provides the ability to add, edit, and delete new annotations.
Note: By default, this permission also provides the ability to view
the annotation(s) you have created.
Hide Redaction
Provides the ability to hide a Redaction when a user selects the Hide
Annotations Icon in the Viewer. The user can then see the content
underneath redaction annotations.
Note Add
Provides the ability to View and Add new notes.
Note: This permission is dependent on Note View.
Note View
Provides the ability to View pre-existing notes.
Note: This Permission is necessary to also allow Adding of
Notes.
Print Image
Provides the ability to print an image.
Scan Image
This permission is not being used.
Export
Provides the ability to export a Document out of the iSynergy.
iSynergy 3.11 Advanced User Manual
Page 158 of 257
Element
Description
Show All Statuses
Provides the ability to display searchable and unsearchable items that
normally would not display based on search criteria.
Edit Object Status
Provides the ability to allow a user to change an object status.
Annotation Edit Own
Provides the ability to create, edit or delete annotations that the user
created. This does not include annotations created by other users.
Use Native PDF
Viewer
Allows the user to view PDF documents within the native viewer. This is
typically used when users have full versions of Adobe.
Revision Control
Provides the ability to check in/out documents within the designated
application.
Document View
Revisions
Provides the ability to review document revisions within a designated
application.
Note: This permission is dependent upon Revision Control
being selected.
Undo Any Checkout
Provides the ability to undo any checked out document.
Download Document
Provides the ability to select the download option and save it to a
directory of your choice.
Promote Revision
Provides the ability to make a previous revision the current version of a
document.
Delete Revision
Provides the ability to delete revisions from an application.
Manual Indexing
Provides the ability to manually index a document.
Note: This permission provides the ability to view the Indexing
Menu option on the iSynergy Tool bar.
Upload File
Provides the ability to upload a file while in iSynergy.
Note: This permission is located in the Indexing Menu.
View Tag
Provides the ability to view tags associated with a record.
iSynergy 3.11 Advanced User Manual
Page 159 of 257
Element
El
Description
Add Tag
Provides the ability to add tags to one or many documents within a
designated application.
Remove Tag
Provides the ability to remove tags from a record as defined by the
appropriate tag search.
Rename Tag
Provides the ability to rename tags that are already associated with a
record.
Select All
Permissions
Checkbox enables all permissions for all items under Cabinet
Management, System Management, Account Management, and
Account Functionality Management.
User Permissions
To add or modify User account permissions, follow these steps:
1. On the iSynergy Menu bar, navigate to Admin>User Configuration.
Note: This User Configuration displays.
2. Navigate to the Appropriate User.
3. Click the desired User Access Key
ey.
Note: The selected User Permissions dialog displays.
4. Navigate to Login Expiration.
iSynergy 3.11 Advanced User Manual
Page 160 of 257
5. Select the Drop-Down Menu and choose the appropriate option.
Note: If you wish to force the user to define a new password, select Reset Password Next
Login.
6. Select the Appropriate System Level Permissions.
iSynergy 3.11 Advanced User Manual
Page 161 of 257
Note: If all permissions in the aforementioned groups are to be given to the user, click
Select All.
7. Navigate to Application Permissions and choose the appropriate Application.
Note: If all Applications are required for the user, click Select All.
8. Click Update.
iSynergy 3.11 Advanced User Manual
Page 162 of 257
Index Level Security (ILS)
ILS is a permission option that can be configured for Applications, Users and Groups. ILS
settings can prevent restricted users or groups from searching, viewing or changing ILS index
fields.
For example, certain users or groups may not be permitted to search, view or edit a Social, 86HE<GL' H@ 58EBE4A @ C?BL88 , 4?4EL<A78K 9<8?7 J;8A G;8 HF8ETF#%, C8E@ <FF<BAF4E8
restricted from viewing and/or editing.
Defining ILS Security for an Application
The following example shows ILS permissions being configured in the HR Application (Cabinet)
for the Social-Security Number (SSN) index field after selecting the HR application definition to
Edit.
Since some users or groups that access HR documents are to be prevented from Searching,
Viewing or 7<G<A: 4A , , ' <A78K 9<8?7TFI4?H8 G;8 Enable ILS checkbox is checked in the row for
the SSN index field of the HR Application cabinet.
Clicking the Update Button activates ILS feature for the SSN Index.
iSynergy 3.11 Advanced User Manual
Page 163 of 257
Granting ILS Permissions to Users or Groups
Th next step is to select the desired User (Admin > User Configuration) or Group (Admin >
The
Group Configuration) to edit.
Locate the application permissions for the selected User/Group that is displayed and click on
its ILS Configuration icon, shown below:
The ILS Configuration for the selected User/Group name and Name of the Application
cabinet appears along with a list of ILS-activated Index fields for you to Restrict or Grant ILS
permissions using the checkboxes.
Click a checkbox to set (checked box)) or reset (unchecked box) the permission:
View Permission l Allows the index (e.g., SSN index) to be viewed and searched
Edit Permission l Allows the index (e.g., SSN index) to be changed.
Note: the Select All checkbox can be used to set and reset both options with one click.
After setting the appropriate permission checkboxes for all index fields in the list, click the
Update button to apply your ILS permission changes.
Note: ILS permission settings affect All related iDatix products including iSynergy to ensure
comprehensive permissions control.
iSynergy 3.11 Advanced User Manual
Page 164 of 257