1
Application Management
An Application in iSynergy is the virtual equivalent of a traditional physical filing cabinet or
shelving system. These filling cabinets are analogous to the filing cabinets within the major
divisions in your company. Whether you store your documents in a filing cabinet or electronically
in iSynergy, the indexing and search retrieval are conceptually the same
For example, Accounting, Operations, Insurance and Human Resources all have a filing
cabinet where they keep documents important to their department. People in the
Insurance department do not file their documents in the same cabinet as Human
Resource department.
An iSynergy application can be used as a simple archive for documents post processing and is
most often the starting point for application implementations. Starting with a back-file conversion
project is a good way to develop experience and a comfort level with the new solution, but this
approach does not provide the greatest benefits to the business.
Moving the capture processes to the front-end of your business process, instead of the back-end,
leverages the benefits of document management and provides the capabilities for true process
automation.
By capturing documents and content at the front of a business process at the time of receipt, you
eliminate many labor-intensive activities and instantly eliminate risks such as lost documents as
you perform the tasks that make up your work process. You enhance information access, process
tracking, process flexibility, compliance, quality and overall throughput. This is because
documents and content are routed through the process electronically without the need for
handling and moving physical files, making copies or being limited to a linear process.
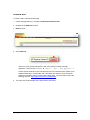
The Application structure in iSynergy is configurable to comply with all the organizational needs of
the enterprise, which makes managing Applications in iSynergy straight forward and simple. To
aTP[XiT cWT Ud[[ _^cT]cXP[ ^U XHh]TaVhpb bc^aPVT P]S aetrieval functionality, careful thought and
planning must be given to the development of your Applications.
Note: Please review iDatix sample Best Practices Application Configuration worksheet in
Appendix A and/or the iDatix Configuration Guide for further details.
In following sections, we will examine the different elements of an iSynergy Application structure
in detail and describe how to construct an effective application.
iSynergy 3.11 Advanced User Manual
Page 81 of 257
Index Fields
A fundamental Application element is the Index field, which is used to assign identifying
characteristics, or index values, to a Document stored in the iSynergy Repository.
Note: An index value is a data value in the iSynergy repository that helps to identify a
Document within iSynergy. Additionally, index fields are data-entry fields used to assign
values for indexes and must comply with database standards. To help insure standards
are met, Index values are assigned specific attributes known as Index types.
iSynergy relies on indexes to file Documents correctly. These indexes correlate to labels on a file
folder. When first creating an iSynergy application, the indexes you choose typically will be the
same as the filing procedure in the office.
iDatix Client Support Services recommends the following core index values for an iSynergy
Application:
ID Number
Name
Date
Document Type
Status
Each of these generic indexes can be translated to an industry, department or application specific
term.
Note: It is important when communicating with the potential users of the new iSynergy
Application to use the specific term and not the generic term. This provides the user with
the context necessary for them to identify with the application and to gain a quick
understanding of how it applies to their own personal job function.
iSynergy 3.11 Advanced User Manual
Page 82 of 257
User-Assigned Index Fields
The System Administrator defines User-Assigned Index Fields for each Application. These Index
fields vary with each unique iSynergy Application.
Note: For example, the Checks Application may have a unique Index field, such as
Purchase Order, while Human Resources may have a unique Index field for Social
Security Number. User-Assigned Index Fields are used primarily to search and retrieve
Documents from the iSynergy repository.
System Assigned Index Fields
By design, each iSynergy Ap
Application has System-Assigned Index fields. These index fields
contain values used by the iSynergy Repository to track events and changes in the status of
objects stored in iSynergy.
Note: Report generation and various system administration tasks make use of these values.
iSynergy 3.11 Advanced User Manual
Page 83 of 257
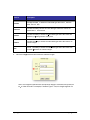
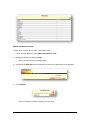
The following table lists the System Assigned Index Field names and descriptions:
Element
Description
Pages
Provides the ability to search within a range by the number of pages contained
in the submitted document.
CreatedBy
Provides the ability to search by the name of the user who originally submitted
the Document to iSynergy.
CreateDate
Provides the ability to search by the date within a range that the Document was
originally submitted to iSynergy.
ModifiedBy
Provides the ability to search by the user who made the most recent
modification to a submitted Document.
ModifiedDate
Provides the ability to search within a range by the date the Document was
most recently modified.
iSynergy 3.11 Advanced User Manual
Page 84 of 257
Element
Description
BatchID
Provides the ability to search within a user defined range 9BE4 7B6H@ 8AGTF
identification number. When utilizing any of the iDatix capture products, a
unique batch ID is created and associated with the Document.
Note: Each document that is submitted to iSynergy receives a unique
batch ID
ID. The object ID in the repository denotes the object, where as
the batch ID denotes the Documents that are submitted.
iSynergy 3.11 Advanced User Manual
Page 85 of 257
Element
Description
Object Status
Provides the ability to choose a search the status of an object within iSynergy
from a drop down menu.
Hard Coded Object Status Codes
E: Searchable Documents (Display in the result set for a search
in the system).
P: Manual Indexing (Display in the Manual Indexing screen for
user intervention).
I: Routed to Inbox (Documents routed to an individuals or
groups inbox).
X: Deleted (Documents that have been soft deleted).
C: Corrupt (Documents that have been determined to be
corrupt or of incorrect resolution).
Y: Source Copy (Large multi-page TIFF files that have been
separated into smaller sections are retained).
Standardized Object Status Codes
A: xT
xTractor (Documents to be processed by xT
xTractor
Recognition).
R: Data Exchange (Documents to be processed by Data
Exchange Service).
V: RapidDoc (Documents to be processed by RapidDoc
stations).
M: MultiFunction (Documents to be processed by MultiFunction
Service).
iSynergy 3.11 Advanced User Manual
Page 86 of 257
Element
Description
Checked Out
by User
Provides the ability to search for a document by choosing a user from the drop
down menu.
Note: The Checked Out by User field is only displayed if at the
application level, Revision control settings are selected.
Records Per
Page
Provides the ability to define the number of displayed records per page.
iSynergy 3.11 Advanced User Manual
Page 87 of 257
Index Field Formats
Index Fields allow you to enter values for a search. There are three types of index field formats:
# Standard.
# Drop Down Menus (UDLpb'.
# Range (Numbers and Dates).
To use a standard index field, simply type in the appropriate information.
iSynergy 3.11 Advanced User Manual
Page 88 of 257
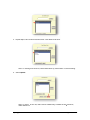
The drop-down menu allows you to choose a single index value. Simply, select the user defined
list drop down arrow and choose an index value from list.
Additionally, to select more than one value from a drop-down field:
1. On your keyboard, select the Ctrl key and choose the appropriate Multiple Indexes. Note
that the user can also left click and click drag multiple items in a row.
2. Click outside the user defined list. The list will denote that multiple items have been selected.
iSynergy 3.11 Advanced User Manual
Page 89 of 257
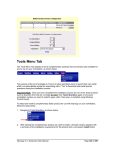
Type-Ahead UDL Feature
The user defined lists are enhanced to allow users to find values within a list very quickly using
the Type-Ahead UDL feature. Users may now begin typing in the drop-down list to limit the
number of choices available for selection to efficiently reach the desired choice in a drop-down
menu list, even when the list is very long.
For instance, consider the following list:
Cat l Siamese
Dog l Bulldog
Dog l Australian Shepherd
Dog l German Shepherd
Fish l Catfish
. F8EF@ 4L58: <A GLC<A: G;8 ?8GG8EFQ 4R 4A7 G;8 7EBC7BJA ?<FGJ<?? ?<@ <GG;8 BCG<BAFGBQ 4Gl
, <4@ 8F8R 4A7 Q!<F; l 4G9<F;R ?G8EA4G<I8?L HF8EF6BH?7 GLC8 G;8 ?8GG8EFQ B: R 4A7 G;8 ?ist would
be limited to the three Dog entries. The Advanced user defined list Type-Ahead filtering offers
users the ability to select from similar values within a large list very quickly.
In order to select multiple items while narrowing the list to a particular subset:
1. 8: <A GLC<A: G;8 JBE7 G;4GLBH JBH?7 ?<>8 GB9<A7 #A G;<F<AFG4A68 58: <A GLC<A: Q B: R , 88
above)
2. Select multiple items by selecting each item individually in the list while holding down the
control key. Note that the user may also select multiple items by left drag clicking down
the list.
iSynergy 3.11 Advanced User Manual
Page 90 of 257
3. ?84EG;8 8AGELQ B: R 5L546>FC46<A: BE78?8G<A: G;8 I4?H8 J<G;<A G;8 , 4@ C?8 . %9<8?7
Note that you should not deselect any of the items previously selected within the list. Now
enter another value in the textbox to narrow down the list of items again. In this case, we
@255.7=.;E 2<1F
Notice that the other values previously selected remain in the list despite the fact that
G;8L7BABG@ 4G6; G;8 Q!<F;R 6E<G8E<4 8AG8E87 <A G;8 G8KG5BK -;<F<F5Ldesign as it allows
the user to view which items were previously selected.
4. , 8?86GG;8 I4?H8 Q!<F;-" EBHC8ER 4A7 6?<6>4J4L9EB@ G;8 ?<FG -;8 . %9<8?7 J<?? ABJ
denote that multiple items are selected. Clicking on the user defined list will again show
the entries that were selected during the previous steps.
iSynergy 3.11 Advanced User Manual
Page 91 of 257
Range Field Format
The range field format applies to query strings composed of numbers or dates. To use a range
field, enter two numbers that represent a range of numbers or dates within which you wish to
search.
Note: Unless otherwise indicated by your System Administrator, the Date Range must be
in the following format: mm/dd/yyyy.
Note: You are required to specify a full range with a range query. However, to search on
a specific number or date, fill in only the first field and leave the second field empty.
iSynergy 3.11 Advanced User Manual
Page 92 of 257
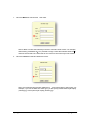
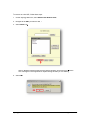
Display Fields
The Display Fields functionality allows a user to modify the displayed Index fields on the currently
selected Application Search page, as well as the Results page.
Note: Display Fields settings are Application specific, as well as specific to the logged in
user.
To modify which fields display on both the Search page and Results page for the current
Application, follow these steps:
1. Select Display Fields.
Note: The Selected Indexes dialog displays.
iSynergy 3.11 Advanced User Manual
Page 93 of 257
2. Only Check the Index Fields you want to display.
3. Select Update.
4. The current Application now displays only the Index fields selected.
iSynergy 3.11 Advanced User Manual
Page 94 of 257
Clear Fields
This option provides a simple way to remove all search criteria previously entered by the user.
1. Select Clear Fields.
2. The data contained in each respective index field is removed.
iSynergy 3.11 Advanced User Manual
Page 95 of 257
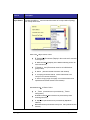
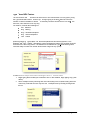
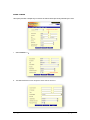
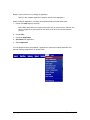
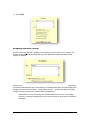
Index Types Administration
Selecting the Admin > Index Types from the iSynergy Menu Bar opens the Index Types
administration features:
An Index type is composed of a set of attributes that allows storage of values as records in a
database that complies with ODBC standards. Index Types are user defined and provide the
ability to restrict the type of data that can be added for a particular type of field. Furthermore,
formatting and masking can be set when defining the index types.
For example, you can use the Zip index Type or the Zip + 4 Index Type to standardize
the way a user inputs the zip code for the business process.
By design, iSynergy contains pre-defined index types such as address line, company name, first
name and social security number, as well as many others. These Index Types are designed to
simplify your application definition process.
To view, edit and delete an iSynergy Index Types follow the steps below.
1.
Navigate to the iSynergy Menu Bar.
2. Select Admin>Index Types.
Note: The Index Type dialog window displays.
iSynergy 3.11 Advanced User Manual
Page 96 of 257
3. Select Add Type.
Note: The Add Index Type dialog window displays.
4. Define the Index Type Name.
5. Navigate to Data Type and select the Drop Down Menu.
iSynergy 3.11 Advanced User Manual
Page 97 of 257
Element
Description
Boolean
Provides the ability to define an index data type where the values are
either True or False.
DateTime
Provides the ability choose an index data type where the values are
defined with a date and time.
Decimal
Provides the ability to choose an index data type where the values are
defined by a floating numeric value point.
Numeric
Provides the ability to choose an index data type where the value is an
numeric integer.
Text
Provides the ability to choose an index data type where the values can
be either characters or numeric integer.
6. Tab to the Length text field and define the character length.
Note: The Length text field denotes the maximum length of characters and spaces an
Index Value can hold For example, if the Data Type is Text, the Length might be 25.
iSynergy 3.11 Advanced User Manual
Page 98 of 257
7. Tab to the Mask text field and define the mask.
Note: A Mask is a filter that selectively includes or excludes certain values. For example,
when defining a database field, it is possible to assign a mask that indicates what sort of
value the field should hold. Values that do not conform to the mask may not be entered.
8. Tab to the Format text field and define the format.
Note: The format text field provides additional control and functionality to index types. For
example, if you use the DateTime Index type, you can specify United States style display
(mm/dd/yyyy) or European style display (dd/mm/yyyy).
iSynergy 3.11 Advanced User Manual
Page 99 of 257
9. Select Create.
Note: An Index Type has been created and will be available for the use within an
Application.
Editing and Deleting an Index Type
To edit an index type, follow the below steps:
1. On the iSynergy Menu bar, select Admin>Index Types.
Note: The Index Types dialog window displays.
2. Navigate to the far left column and select Edit.
3. Navigate to the Appropriate Index Value and make the appropriate changes.
iSynergy 3.11 Advanced User Manual
Page 100 of 257
4. Select Update.
Note: Selecting Cancel will not save your changes.
5. The Index Type has now been modified and updated in the Repository.
To delete an index type, follow the below steps:
1. On the iSynergy Menu bar, select Admin>Index Types.
Note: The Index Types dialog window displays.
2. Navigate to the far left column and select Delete.
Note: A Windows Internet Explorer dialog window displays confirming you want to delete
the selected index type.
3. Select OK
OK.
Note: Select Cancel to close the Windows Internet Explorer dialog window and keep the
index type.
4. The index type is removed from the Index Type dialog.
iSynergy 3.11 Advanced User Manual
Page 101 of 257
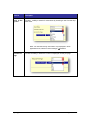
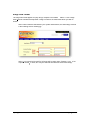
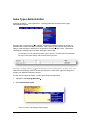
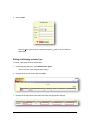
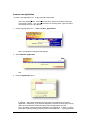
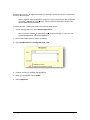
User Defined List (UDL) Administration
Selecting the Admin > User Defined Lists from the iSynergy Menu Bar opens the User Defined
Lists administration features:
User Defined Lists (UDLs) are named lists of values that can be used to select a value to enter
into an iSynergy Index Field. UDLs provide convenience, efficiency and ensure consistency
during the data entry of Index Field values.
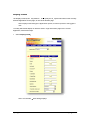
The following example illustrates the convenience, efficiency and consistency that results from
using a drop-down menu of value choices that is provided by a UDL associated with an Index
Field by the iSynergy administrator after the index field and UDL are defined.
Convenience of UDLs
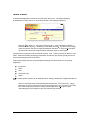
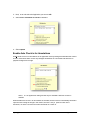
-;8 HF8E6BAI8A<8AG?L@ 4>8F4 F8?86G<BA FH6; 4FG;8 Q ?84EJ4G8ER ?B64G<BA 4A7 G;8 F8?86G<BA <F
immediately entered as a data value in the Location Index field on the form for the current
Document being indexed, as shown below.
The entered value is not saved until all appropriate indexes are supplied and the operator uses a
button to Submit or Update all of the entered indexes.
Efficiency of UDLs
Selection from a displayed list is usually quicker and easier than typing the correct value,
especially when the values such as for Location contain many letters and the user does not need
to remember what values are appropriate for each Index Field.
Ideally, short UDL lists of up to eight (8) values are ideal because the user does not have too
many choices and the entire list can be seen in one drop-down display.
iSynergy 3.11 Advanced User Manual
Page 102 of 257
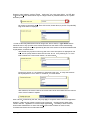
However, many Indexes such as Q ;86>87 BHG5LHF8ER can have many choices in a UDL that
offers a list of all user-names which may be a large number of possible selections on a system
with many users.
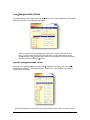
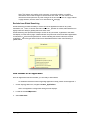
By clicking on the above, Drop-Down List control, shown above, a portion of a potentially
long list of values is displayed.
In order to efficiently address the need for longer UDL lists of values, a Type-Ahead feature
allows the user to key a portion of the desired selection into the Index Field to automatically
advance down a long list of values provided by the UDL to the section of the list that matches the
keyed pattern, as shown below.
Assume that only a portion of this long UDL list of users and options is displayed at one
=26 . @. , *7 : >2, 45
B *-?*7, . -8@7 =1. 52<==8 =1. E F <., =287 +B .7=.;270 *7 E6 F 27 =1.
field to advance to a user na6 . E6 +*74F *<<18@7 +.5
8@.
B 4.B270 * <., 87- E6 F =1. <.5
., =287 2<*-?*7, .- =8 =1. 7.A=& .7=;B =1*=6 *=, 1.<
=1. 4.B.- 9*==.;7 8/E6 6 F @12, 1 2<E6 6 .-2, *5F, as shown below.
After selection, the chosen value is the current value to be saved when the user does an
action such as Submit or Update.
Each UDL list, as defined by the user, may only apply to a specific Index Field for an Application.
However, a UDL list may contain a common set of values that are also used for other Index
Fields in the same application or across multiple applications. The ability to share common
UDLs makes maintenance of choice lists simpler plus makes it easier for users to learn,
remember and select correct Index field values.
iSynergy 3.11 Advanced User Manual
Page 103 of 257
Consistency of UDLs
Minimizing human errors such as misspellings, juxtaposition of characters while typing and
incorrect keying of data is an extremely important factor that is addressed by the use of UDL
value selections.
Just as important to the quality of your iSynergy data is the consistent use of well-defined UDL
code values that can be associated with Index fields. UDL-driven entry prevents undefined and
incorrect data from being entered into its associated Index field to provide consistent data values.
The consistent use of identical data values provided by UDLs improves Document search
accuracy while providing accurate iSynergy database data. Since searches can be done within
an application as well as across applications using advanced search techniques such as Global
and Cross-Query search, having consistent data values maintained by shared UDLs makes them
much simpler to specify and more effective to use.
UDLs are defined and available for viewing, by navigating to the iSynergy Menu Bar and selecting
Admin>User Defined List.
Note: A UDL is automatically included in the default list of Index types and is assigned a
data type of Select. All UDL columns contain a Null selection, which is a system-assigned
Index value. If an Index field is not a required field and if left empty by the user, the
Document will be assigned a Null Index value.
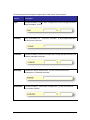
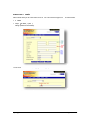
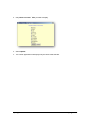
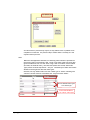
To better understand how a UDL might assist in Ad Hoc workflow processing, you may have a
status-type UDL that contains consistent values that
at define specific steps in a business process.
For example, the HR Application might have a Pay Status index field that will be
associated with a Payroll Process Status UDL (shown below) that defines the status
?*5
>.< EPendingb, aIn Processb, aCompleteb and aCancelledb.
iSynergy 3.11 Advanced User Manual
Page 104 of 257
As a Document is processed by Payroll, its Pay Status index is updated at the
completion of each business process step to reflect where it currently is in the
Payroll business process.
Note:
Within the HR Application definition, the following Index Fields are specified for
the various types of documents in HR. Some of the Index Fields can have data
typed in without the use of a UDL since using a UDL for Indexes such as Name
(text field, 50 character max.), and Hire Date (Date/Time format, Date Index
Type) values would be impractical ` They are controlled by the edits and formats
allowed for these generic data and index types.
However, the Pay Status Index Field 1*<* *=*% B9. 8/E$ .5
., =F 27-2, *=270 =1*=
?*5
>.<*;. , 18<.7 /;86 =1. *<<8, 2*=.- & E!*B;85
5!;8, .<<$ =*=><F
-5-91+ );) 5, -? $ @7 -:
): 1;: 5, -? $ @7 ::6 +1);-, % )4 $2 +42 V (,(% 4W.'(< =0 (
"81/,, 1/$& 22 3"342
iSynergy 3.11 Advanced User Manual
Page 105 of 257
Constraints on UDLs
Although UDLs provide the valuable benefits of Convenience, Efficiency and Consistency, they
also have some constraints that must be observed to maintain the discipline needed to realize
these benefits.
UDLs contain static lists of values that can only be altered through the Admin > User
Defined Lists editing features by a user with the required UDL administrative permissions.
. %TF?<FGB9I4?H8F64AABG58 8KG8A787 BE4?G8E87 5L4A 8A7-user while indexing a
document to protect the integrity of UDL definitions.
Care must taken in the definition and maintenance of UDL definitions since the values
selected from UDLs are stored as data in the iSynergy eSpeed database l Perhaps
many times in many places on many different documents.
"
Updates to UDLs should normally only be addition of new values to the UDL list.
"
iSynergy database data could be corrupted should a UDL value list entry be
changed or deleted since Documents containing that value in one or more index
fields could be missed.
Since the Search form would no longer supply the altered UDL value to a search
from its drop-down list, it cannot be used in a query plus iSynergy monitors Index
values matching their code values against their associated UDL definitions l A
mismatch will generate a system error.
"
Wh a UDL list value must be changed or removed, it is essential that the
When
administrator:
1.
Add G;8 4?G8E87 ?<FGI4?H8TFA8J E8C?468@ 8AG6B78 GBG;8 . %?<FGBE58
sure that an entry to substitute for it already exists in the UDL (e.g., by
7894H?GG;8 I4?H8 Q' . %%R <F4?J4LFCE8F8AG<A 8I8EL. %
2.
Locate all Documents in the eSpeed database that contain the value
which is about to be altered l Then apply the change to the replacement
code value in the UDL (i.e., the new code, an existing code or the default
mCJA%R GB4?? 49986G87 E86BE7F 589BE8 4?G8E<A: G;8 BE<: <A4? . %6B78
value. It is recommended that this step be done when no one is
currently using the system when possible.
3.
Now that the UDL list entry that needs to be changed or removed no
longer exists in the iSynergy eSpeed database documents, it is safe to
remove the UDL code value to be altered since its replacement value is
already in the UDL list (from step #1).
"
Removal of an entire UDL also requires similar care once the iSynergy UDL
definitions have been implemented.
"
If the system is in use while a user with administrative permissions alters a UDL
by adding a new value or otherwise altering it, when the UDL change is updated
the UDL definition is changed.
However, it is possible that some active users still have the prior UDL list of
values in cache memory and may not see the recent changes immediately. They
can use the Admin>Reset iSynergy feature to ensure that the latest changes to
the UDL are downloaded after the reset. For this reason, it is best to deploy UDL
changes during times of little or no production activity.
iSynergy 3.11 Advanced User Manual
Page 106 of 257
Create a UDL
To create a UDL, follow the below steps:
1. On the iSynergy Menu bar, navigate to Admin>User Defined Lists.
2. Navigate to the Add List text field.
3. Name the UDL.
4. Select Add List.
Note: Do not use special characters in UDL value selections when creating an
application. These include: ! $ % ^ & * ( ) + : ; ' < > . , ? / { } [ ] | \ ~ ` ".
Certain special characters could unexpectedly cause an unwanted mass update in the
database table due to a known MS SQL Flaw called SQL injection. If you would like
additional information, please contact iDatix Client Support services and/or review the
following web site. http://support.microsoft.com/kb/954476
5. The name of the UDL displays in the User Defined List dialog.
iSynergy 3.11 Advanced User Manual
Page 107 of 257
Add a List item to a UDL
To add one or more list item to a UDL, follow these steps:
1. On the iSynergy Menu bar, select Admin>User Defined Lists.
2. Navigate to the UDL you want to modify.
Note: The User Defined List dialog displays.
3. Navigate to the Add Item text field and enter the name of the Index value to be displayed.
4. Click Add Item.
Note: The defined List Value is placed in the UDL pane.
iSynergy 3.11 Advanced User Manual
Page 108 of 257
5. Repeat steps 3 and 4 until all list items have been added to the UDL.
Note: To rearrange the list items, select either Move Up, Move Down or Sort Ascending.
6. Select Update.
Note: To cancel the UDL list, select Cancel. Additionally, to delete the entire UDL list,
select Delete List.
iSynergy 3.11 Advanced User Manual
Page 109 of 257
Delete an Item in a UDL
iDatix best practice does not recommend deleting a UDL item in an implemented Application
because you could potentially disrupt a workflow and cause database orphans.
This will result in a system generated error; however, if you choose to delete an item on a UDL,
follow the steps below:
1. On the iSynergy Menu bar, navigate to Admin>User Defined Lists.
2. Navigate to the UDL you want to delete.
Note: The User Defined Lists Modification dialog displays.
3. Select the item in the list you want to delete.
4. Click Delete.
5. You have now deleted an item in the UDL.
Delete an Entire User Defined List
As mentioned previously, once you have created, implemented and began using an application, it
is important to remember that you should normally not delete a UDL list item or an entire UDL.
If an index value contained in the UDL is presently in any record for the application, deleting an
index in the list and/or the complete UDL may cause database orphans.
In other words when a user accesses a document, iSynergy matches its index value against the
associated UDL list -- should the UDL no longer contain the list item, iSynergy will no longer
recognize the former index value which produces a system error.
For example 2/* -8, >6 .7=1*<*7 27-.A ?*5
>. /;86 * & 8/G *2- 27 6 .;2, *H*7- 5*=.;
=1. & 2<, 8;;., =.- =8 <18@ G *-. 27 6 .;2, *H =1. -8, >6 .7=, *7 78 5
870.;/27- =1.
original entry and will generate an error.
The way to avoid this is to have someone update all database tables that reference the
changed or deleted item. The table needs the same entry as the document to prevent the
error. If there is no DBA on hand to make the changes, it is advisable to refrain from
altering existing UDL items. You can add to the list, but not delete or edit. For additional
help, please contact the iDatix Client Support Services department.
iSynergy 3.11 Advanced User Manual
Page 110 of 257
To remove an entire UDL, follow these steps:
1. On the iSynergy Menu bar, select Admin>User Defined Lists.
2. Navigate to the UDL you want to delete.
3. Select Delete List.
Note: A Windows Internet Explorer dialog window displays. Ensure that you read the
error message as some applications maybe utilizing the UDL you are deleting.
4. Select OK
OK.
iSynergy 3.11 Advanced User Manual
Page 111 of 257
Creating an Application
Once you have thoughtfully planned the structure and function of your Application, it is easy to
create and implement your Application in iSynergy. Proper analysis and planning combine to
ensure effective implementation of Application(s) that meet or exceed intended goals for their
use.
The basic Application definition requires a minimal set of defined parameters to accomplish the
definition process. The fundamental parameters are the index values that will be used to access,
search, secure and manage the stored documents. This data stored in index fields is also called
metadata since it is data that describes documents and their content.
iSynergy allows for a practically unlimited number of index values per iSynergy Application
(Virtual Filing Cabinet). Each index can be completely customized to meet the need of the
documents and processes being automated. Again, the basic core index values are:
#
#
#
#
#
ID Number
Name
Date
Document Type
Document Status
You will find that there is a common theme when defining indexes for iSynergy. You just have to
ask yourself what am I looking for and how do I want to be able to find it.
If you think about most filing solutions, they are organized by a number in numerical order or by a
name in alphabetical order. In an actual paper-base environment when you wanted to store a
document by both methods, you would have to copy the document and store it in two different
physical files.
iSynergy allows you to file a document in multiple ways without the need for copies or the labor to
manage two different filing systems. You simply create multiple index values in the Application
definition and a single stored copy of each document can be retrieved by searching any of the
Indexes as well as any combination of Indexes.
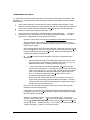
iSynergy can be configured to use a simple process Status value to represent where work is at
each step in a business process. The Status values are defined using a User Defined List (UDL)
of possible work steps (or process tracking values) such as: Pending, Waiting for Approval,
Approved, Denied and Completed.
Note: For more information, please review the UDL section of this manual.
iSynergy 3.11 Advanced User Manual
Page 112 of 257
As work is captured by the iSynergy solution, the business process Status Index is set to
mAwaiting Approvaln to initiate the workflow process. Each worker may execute a search in
iSynergy to find work that needs to be completed for a given Status and then save the query; thus
allowing the same saved-query to be easily reused to simplify the search process and automate
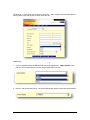
the method for each user to obtain their work.
The following example, shows the progress of work from initial capture having its process Status
Index field updated as the work moves from one work step to another while it is handled by
different users at each task in the business process.
Often it is necessary to assign work to a specific user or team. This can be done by creating an
Assign To index to help drive the ad-hoc process. Used with the Status index values, you can
control the flow of documents and content through the defined business process for a specific
user or team doing a specific work-process task.
Thus, the user of iSynergy can send work to the accounting manager for approval. After approval,
the accounting manager can send the work to the payment department for payment or back to
the submitter for additional information.
Ad-Hoc workflow is a user-SaXeT] _a^RTbb P]S Xb ST_T]ST]c ^] cWT dbTapb PQX[Xch c^ correctly
assign the index values for the process Status Index Field at the end of their task in order for the
work move to the next task in the process.
With Ad-Hoc workflow, there is no process enforcement and no business rules that automatically
test for the conditions that determine what actions should be taken.
For example, a business rule might define: m?U cWT P\^d]c Xb VaTPcTa cWP] $-,,0 then send it to a
manager for approval; otherwise the current operator is allowed to continue processing itn* AdHoc workflow is driven by user knowledge and action and does not process or enforce business
rules. The user must know the rule and adhere to it. Basic Ad-Hoc workflow is included with the
base iSynergy product suite.
At the next higher level of workflow functionality, iDatix Progression is a comprehensive
workflow tool that can enforce business rules and processes plus give the user the ability to use a
graphical tool to design a business process application without the need for programming.
For example, with Progression a business rule can be defined and automatically enforce the rule:
m?U cWT P\^d]c Xb VaTPcTa cWP] $-,,0 then send it to a manager for approval; otherwise the current
operator is allowed to continue processing itn* This simplifies the userps job and ensures uniform
compliance with defined business rules.
The iSynergy solution is the foundation for implementing the Progression workflow automation
product.
Note: For further example and documentation on workflow status and workflow
automation, please review the iDatix Progression Advanced User Manual.
iSynergy 3.11 Advanced User Manual
Page 113 of 257
Below is a quick reference for creating an application.
Note: For the complete application checklist, please review Appendix 1.
When creating an Application, it is highly recommended that you follow these steps.
1. Create new Index types (if required).
Note: iDatix best practice for custom index values are no more than five; however, this
will vary slightly up or down based on the needs of the end user and the particular
process.
2. Create UDLs.
3. Create the Application.
4. Add Indexes to Application.
5. Select Implement.
You use the Menu Bar to select Admin > Application to open the functions that define and
maintain iSynergy Applications, as shown below.
iSynergy 3.11 Advanced User Manual
Page 114 of 257
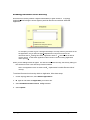
Create a new Application
To create a new Application in iSynergy, follow the steps below:
Note: The following instructions assume that Index Type(s) and UDL(s) have been
successfully created. If not, see the instructions on creating Index Types and UDLs
discussed previously in this Manual.
1. On the iSynergy Menu bar, navigate to Admin>Applications.
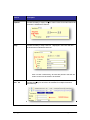
Note: The Application dialog window displays.
2. Select Add New Application.
Note: The Add Application dialog window displays.
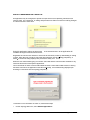
3. Enter the Application name.
If applicable, tab to the Description Pane and enter a description for the named
Application. Additionally, if you want the Application to have Document level security
and/or be excluded from Global searching, select the appropriate checkbox.
Note: By default, all newly created Applications are assigned the P status. For more
information regarding iSynergy status, please review Appendix 2 ` iSynergy Statuses.
iSynergy 3.11 Advanced User Manual
Page 115 of 257
4. Select Create.
Note: If an Application is implemented, the Implemented column on the Application
Configuration is listed as True. If the Application is de-implemented, the column value is
listed as False.
5. You have now created an Application and you can begin adding indexes.
Deleting an Application
To delete an application, follow the below procedure:
Note: When you delete an entire Application, the associated work items and documents
are also deleted.
1. Navigate to Admin>Application.
2. Select the Application you want to delete.
Note: The Edit Application dialog displays.
3. Select De
De-implement.
iSynergy 3.11 Advanced User Manual
Page 116 of 257
4. Select Delete.
Enabling Revision Control
Revision Control provides the capability to retain a history of older versions of documents. The
revision control feature can be configured for specific application cabinets and with several
degrees of retention.
Revision control provides the ability to manage multiple revisions of a document. iSynergy offers
this robust functionality so that you may simplify your workplace through a one stop shopping and
management for all your documents. Enabling Revision Control provides the ability to manage
multiple versions of a document contained within an Application.
Note: Revision Control functionality has additional features that can be used to tightly
control the document management process. Please see the sections below for additional
information.
iSynergy 3.11 Advanced User Manual
Page 117 of 257
1. On the iSynergy Menu bar, select Admin>Applications.
Note: If you have created the application, simply select and modify it. If you have not
created the application, select Add Application.
2. Select Enable Revision Control
3. Continue creating or modify the Application.
4. Select Update.
5. When you are finished, select Implement.
Enabling Revision Tracking and Audit Trail
The Revision Tracking and Audit Trail option provides the ability to track the document versions.
Note: This is an application setting and will only be available if Revision Control is
enabled.
Utilizing both Enable Revision Control and Enable Revision Tracking and Audit Trail application
settings, provides the ability to track all document changes as separate revisions. This
functionality allows a user to roll back to previous versions of a document, view the original
iSynergy 3.11 Advanced User Manual
Page 118
18 of 257
document and recover the original document by promoting it back to the current or most recent
version of the document.
Note: In addition to these application settings, the user must also have defined Account
Functionality Management permissions. Please review the permission section of this
manual for additional information.
To enable Revision Tracking and Audit Trail, follow the steps below:
1. On the iSynergy Menu bar, select Admin>Applications.
Note: If you have created the application, simply select and modify it. If you have not
created the application, select Add Application.
2. Ensure that Enable Revision Control is selected.
3. Select Enable Revision Tracking and Audit Trail.
4. Continue creating or modifying the application.
n.
5. When you are finished, select Update.
6. Select Implement.
iSynergy 3.11 Advanced User Manual
Page 119 of 257
Enabling Document Level Security
Document level security enables a System Administrator to grant access to an iSynergy
Application while limiting the access rights to particular Documents contained within that
Application.
For example, you want to give a manager the ability to securely view any document in the
HR application, but you want the payroll department to only have access to the
-8, >6 .7=<@2=1 * EPending New HiresF application status value and will not be able to
access documents with other application status values in the Accounting Application
under iSynergy.
When you are adding indexes to applications with document level security, the security setting for
the new indexes for each User and Group must be selected.
th
Note: The Application does not need to be De
De-implemented to enable Document level
security.
To activate Document level security within an Application, follow these steps:
1. On the iSynergy Menu bar, select Admin>Applications.
2. Na
Navigate to and select the Application you want to edit.
3. Select Enabled Document Level Security checkbox.
4. Select Update.
iSynergy 3.11 Advanced User Manual
Page 120 of 257
User Account Document Level Security
The following steps configure Document Level Security for a specific user account.
Note: The Document Level Security procedure is the same for Groups as well, with the
exception of Step 1. You will navigate to Admin>Group Configuration.
1. On the iSynergy Menu bar, select Admin>User Configuration.
2. Select the desired Users Access Key.
3. Navigate to Application Permissions.
4. Select the Application with Document Level Security.
iSynergy 3.11 Advanced User Manual
Page 121 of 257
5. Select the UDL values you wish to make available to the User or the Group.
Note: To select multiple Indexes hold the Ctrl key and select the appropriate indexes with
your mouse. Additionally, if a specific user should have permission to access and modify
the Index, click Select All.
6. Select Update.
iSynergy 3.11 Advanced User Manual
Page 122 of 257
Force Comments on Check In
An application may be configured to provide a simple check in/out capability, which will force
users to check out a document for editing and prevents more than one user from making changes
to a document at the same time.
Using this application setting, the documents that are checked back in to the application will
overwrite the original version of the document.
Regardless of how the user chooses to check out the document, either by downloading or editing
in place, when the user is ready to check the document back into the iSynergy Repository, a
Check-In Document dialog displays and provides the ability to enter text.
When the user has finished typing a comment, select OK and the comments are available to any
user who has access to that specific application.
Force comments on check in works with Enable Revision Control and Enable Revision Tracking
and Audit Trail. When an application uses this functionality, a comments dialog displays upon
checking in a document into the iSynergy Repository.
To activate Force Comments on Check In, follow these steps.
1. On the iSynergy Menu bar, select Admin>Applications.
iSynergy 3.11 Advanced User Manual
Page 123 of 257
2. Navigate to and select the Application you want to edit.
3. Select Force Comments on check in checkbox.
4. Select Update.
Enable Auto Check in for Annotations
Enable Auto Check in for Annotations is an Application security setting that eliminates the need to
check in a document when a user only changes annotations on a document and there are no
physical changes to the image.
Note: This is an application setting and will only be available if Revision Control is
enabled.
When Enable Auto Check in for annotations is selected, the document is automatically checked in
upon the user leaving the image in the Viewer; the user is not prompted to check in the
document, nor is the user forced to make comments on a check in.
iSynergy 3.11 Advanced User Manual
Page 124 of 257
Note: This feature only applies to the case were a user adds, deletes or modifies
annotations and no other changes to the document are made. If a user checks out a
document and also performs any other changes to the document, such as a page rotation
or page deletion, the auto check in for annotations will not apply.
Exclude from Global Searching
Global Searching provides the ability to search across all applications based on any index,
annotation, note, event, or full text data value. When an application is created, administrators can
tightly control the ability to globally search for these values.
Global Searching also provides the ability to search for any document, regardless of the status
and display it on the Search page. Global searches are performed across all enabled Applications
for which the User has access permissions. Values matching the search criteria are returned
regardless of the index type and the index name associated with the index value following a
global search.
Add Indexes to an Application
Once an Application has been created, you are ready to add indexes.
For additional reference material regarding Application Setup, please review Appendix 1.
1. On the iSynergy Menu bar, navigate to Admin>Applications.
Note: The Application Configuration dialog window displays.
2. Locate the created Ap
Application.
3. Select Add Index.
iSynergy 3.11 Advanced User Manual
Page 125 of 257
4. Enter the Index Name.
5. Select the Index Type drop-down menu and choose the appropriate index type.
6. If appropriate, select Required, Sticky and/or Multi-Edit.
iSynergy 3.11 Advanced User Manual
Page 126 of 257
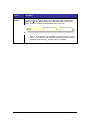
Element
Description
Required
Provides the ability to require a user to enter a value for an index before the
document is submitted to iSynergy.
Sticky
Provides the ability to keep a data value displayed in the index field after
the document is submitted to iSynergy.
Note: If a UDL is made sticky, the value last placed in the UDL will
remain for the next document to be indexed.
Multi-Edit
Provides the ability for an index to be modified for multiple documents
simultaneously.
iSynergy 3.11 Advanced User Manual
Page 127 of 257
7. Select Add.
Note: The newly created Index appears in the Application table pane. Within this table,
you can edit or delete Index values associated with the Application.
Editing Application Indexes
To edit an Application index, follow these steps:
1. On the iSynergy Menu bar, navigate to Admin>Applications.
Note: The Application Configuration dialog window displays.
2. Select the appropriate Application.
3. Select De
De-Implement.
4. Navigate to the Index Field you want to edit and select Edit.
iSynergy 3.11 Advanced User Manual
Page 128 of 257
5. Make the appropriate changes.
6. Select Update.
7. Select Update
te.
8. Select Implement.
iSynergy 3.11 Advanced User Manual
Page 129 of 257