1
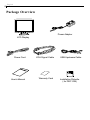
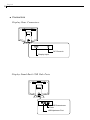
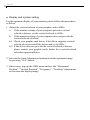
English
1
Table of Contents
Usage Notice
Precautions ................................................................................. 2
Introduction
About the Product ....................................................................... 3
Package Overview ...................................................................... 4
Installation
Product Overview ........................................................................ 5
Start Your Installation .................................................................. 7
User Controls
Front Bezel Controls ................................................................... 11
How to Use the OSD Menus ....................................................... 13
On-Screen Display Menus ......................................................... 14
Appendices
Troubleshooting ........................................................................... 16
Product Dimensions ................................................................... 17
Compatibility Modes ................................................................... 18
English
2
Usage Notice
Warning-
To prevent the risk of fire or shock hazards, do not
expose this product to rain or moisture.
Warning-
Please do not open or disassemble the product as this
may cause electric shock.
Precautions
Follow all warnings, precautions and maintenance as recommended in this user’s manual to maximize product usage life.
Do:
!
!
!
!
!
Turn off the product before cleaning.
Use only a dry soft cloth or clean room wiper when cleaning the
LCD panel surface.
Use a soft cloth moistened with mild detergent to clean the
display housing.
Use only the AC/DC power adapter provided by manufacturer.
Disconnect the power plug from AC outlet if the product will not
be used for a long period of time.
Don’t:
!
!
!
Do not touch the LCD panel surface with sharp or hard objects.
Do not use abrasive cleaners, waxes or solvents for your
cleaning.
Do not operate the product under the following conditions:
- Extremely hot, cold or humid environment.
- Areas susceptible to excessive dust and dirt.
- Near any appliance generating a strong electronic magnetic,
emission/radiation field.
- Direct sunlight place.
English
3
Introduction
About the Product
Having a 14.1” inch flat panel screen with an active, thin-film
transistor (TFT) liquid crystal display (LCD) , this product also demonstrates following outstanding features.
!
Direct analog RGB input
!
14.1” diagonal screen size
!
16.7 million displayable colors
!
1024 x 768 resolution
!
XGA/SVGA/VGA/VESA compatible
!
31~50kHz horizontal scan
!
60~70Hz refresh rate
!
Auto adjustment capability
!
Full screen re-scaling
!
Multilingual OSD menus in five languages: English, French,
German, Spanish, and Italian
!
USB hub with 1 upstream and 4 downstream ports on the
stand base
!
VESA DDC 1/2B data communication
!
VESA DPMS power saving
!
Stand with tilt and cable management functions
!
VESA standard 75mm x 75mm mounting interface
English
4
Package Overview
Power Adapter
LCD Display
Power Cord
User’s Manual
VGA Signal Cable
Warranty Card
USB Upstream Cable
Installation Diskette
( for DDC1/2B)
English
5
Installation
Product Overview
"
Main Unit
LCD Display
Stand
User Controls
Power
"
Rear View
Cable Management
Device
English
6
"
Connectors
Display Rear Connectors
DC Power-In
Display Input
Display Stand Back USB Hub Ports
4 USB Downstream
Ports
USB Upstream Port
English
7
Start Your Installation
Connecting the Display
To setup this display, please refer to the following figure and procedures.
"
1. Be sure all equipment is off.
2. Connect the VGA signal cable from display input connector to the 15-pin
connector of your host computer and tighten the screws.
3. Connect the DC power cord to the power connector; plug one end of the
AC power cord into the power adapter, and then the other end into an
electrical outlet.
VGA Cable
AC/DC Power
Adapter
AC Power Cord
Notice:
To ensure the LCD display can work well with your computer,
please configure the display mode of your graphic card to make it
less than or equal to 1024 x 768 resolution and make sure timing
of the display mode is compatible with the LCD display. We have
listed the “Compatibility Modes” of this LCD display in appendices
for your reference.
English
8
Display and system setting
For the optimum display of your monitor, please follow the procedures
as below.
"
1. Adjust the vertical refresh of your graphic card to 60Hz:
a. If the monitor setting of your computer provides vertical
refresh selection, set the vertical refresh to 60Hz.
b. If the monitor setting of your computer does not provide the
vertical refresh selection:
b-1. Check your graphic card driver, if the driver supports vertical
refresh selection, install the driver and set to 60Hz.
b-2. If the driver does not provide the vertical refresh selection,
please contact your graphic card’s dealer for a vertical refresh
selection supported driver.
2. Activate the Auto-Adjustment function to obtain optimum image
by pressing “S/A” button.
3. If necessary, pop up the OSD menu and use the “Horizontal
Position”, “Vertical Position”, “Frequency”, “Tracking” adjustments
to fine-tune the display image.
English
9
"
USB Hub
$
#
$ USB Downstream Ports
These four USB ports are available for connecting USB type peripheral
devices such as keyboard, mouse, printer and so on.
# USB Upstream Port
This port is for connecting the USB Upstream cable to computer’s or
other hub’s USB port.
English
10
"
Cable Management
1. Route the cables through the cable management device.
2. Connect the cables to their respective connectors on the back panel of
the display.
Cable Management
Device
English
11
User Controls
Front Bezel Controls
$ #
% & ' (
) *
No.
Control
Function
$
Brightness Minus/Minus
1. Decreases the brightness of
the display image.
2. Decreases value of the
adjustment items.
#
Brightness Plus/Plus
1. Increases the brightness of
the display image.
2. Increases value of the
adjustment items.
%
Menu button
To pop up the OSD menus.
&
Select/Auto
Select- To select the adjustment items from OSD menus.
Auto- To activate the “Auto
Adjustment” function to obtain
an optimum image.
English
12
'
Contrast Minus/Minus
1. Decreases the contrast of
the display image.
2. Decreases value of the
adjustment items.
(
Contrast Plus/Plus
1. Increases the contrast of
the display image.
2. Increases value of the
adjustment items.
)
Power Switch
Switches on/off the power of the
LCD display.
*
Power LED
1. Green indicates the display is
turned on.
2. Amber indicates the display in
power-saving mode.
English
13
How to Use the OSD Menus
1. Press the “ (Menu)” button to pop up the on-screen menu and to toggle
between Main Menu Page 1 and Page 2.
2. Choose the adjustment items by pressing the “S/A (Select/Auto)” button.
3. Adjust the value of the adjustment items by pressing the “-” or “+”
button.
4. Once you don’t operate the OSD menu after a pre-set time, the OSD
menu will automatically disappear.
English
14
On-Screen Display Menus
First OSD Menu:
Main Menu
Page 1
Horizontal Position
Vertical Position
Frequency
Tracking
Reset
OSD Off-Time
L"
0
!R
! Horizontal Position
Changes the horizontal position of the image.
! Vertical Position
Changes the vertical position of the image.
! Frequency
Changes the display data frequency to match the frequency of your
graphic card. When you are experiencing vertical flickering bar, use
this function to make an adjustment.
! Tracking
Synchronizes the signal timing of the display to that of the graphic card.
When you are experiencing unstable to flickering image, use this function
to make an adjustment.
! Reset
Returns the display parameters of the current mode to its factory default
settings.
! OSD Off-Time
Adjusts the time period for the OSD menu to disappear.
English
15
Second OSD Menu:
Main Menu
Page 2
Color Setting
Color Adjustment-Red
Color Adjustment-Green
Color Adjustment-Blue
Display Mode
Language
Ye s
No
! Color Setting
Obtains an optimum color of the display.
! Color Adjustment-Red
Adjusts the red color of the display.
! Color Adjustment-Green
Adjusts the green color of the display.
! Color Adjustment-Blue
Adjusts the blue color of the display.
!Display Mode
Shows the display resolution, vertical refresh, and horizontal scan of the
current mode.
! Language
Chooses the language you need. There are English, French, German,
Spanish, and Italian for your choices.
English
16
Appendices
Troubleshooting
If you are experiencing trouble with the LCD display, refer to the
follows. If the problem persists, please contact your local dealer or
our service center.
Problem: No image appears on screen.
! Check that all the I/O and power connectors are correctly and
well connected as described in the “ Installation ” section.
! Make sure the pins of the connectors are not crooked or broken.
Problem: Partial image or incorrectly displayed the image.
! Check to see if the resolution of your computer is higher than that
of the LCD display.
! Reconfigure the resolution of your computer to make it less than
or equal to 1024 x 768.
! Adjust the vertical refresh of computer to 60Hz.
Problem: Image has vertical flickering line bars.
! Use “ Frequency ” to make an adjustment.
! Check and reconfigure the display mode of the vertical refresh
rate of your graphic card to make it compatible with the LCD
display.
Problem: Image is unstable and flickering
! Use “ Tracking ” to make an adjustment.
Problem: Image is scrolling
! Check and make sure the VGA signal cable is well connected.
! Check and reconfigure the display mode of the vertical refresh
rate of your graphic card to make it compatible with the LCD
display.
Problem: Vague image (characters and graphics)
! Use “ Frequency ” to make an adjustment. If this problem still exists,
use “Tracking” to make an adjustment.
English
17
Product Dimensions
342mm/13.5”
322.5mm/12.7”
Front View
128.9mm/5.1”
Side View
40.9mm/1.6”
Top View
English
18
Compatibility Modes
Resolution
H. Frequency
(kHz)
V. Frequency
(Hz)
I BM & VES A VG A
64 0 x 35 0
31 .4 7
70 .0 9
I BM & VES A VG A
64 0 x 40 0
31 .4 7
70 .0 9
I BM & VES A VG A
72 0 x 40 0
31 .4 7
70 .0 9
I BM & VES A VG A
64 0 x 48 0
31 .4 7
59 .9 4
VES A S VG A
80 0 x 60 0
37 .8 8
60 .3 2
VES A XG A
1 02 4 x 76 8
48 .3 6
60 .0 0
Mode