1
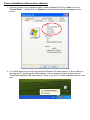
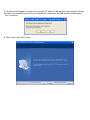
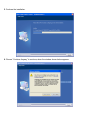
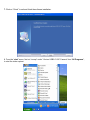
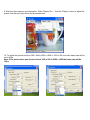
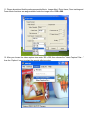
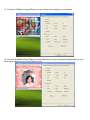
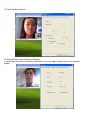
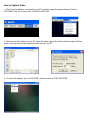
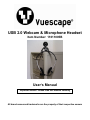
USB 2.0 Webcam & Microphone Headset Item Number: 11011005B User’s Manual * Important Notice: Please read this manual carefully All brand names and trademarks are the property of their respective owners Introduction Thank you for choosing our new generation WebCam and headphone combination. It has a high resolution and fast transmission rate, and it is easy to transport with you for remote broadcasting. It can be used as a Plug and Play (PnP) WebCam for real-time data transmission to PC via USB Port. Specifications ¾ ¾ ¾ ¾ ¾ ¾ ¾ ¾ ¾ ¾ ¾ ¾ ¾ ¾ ¾ 350k pixels resolution (when used as Plug and Play) 5 Megapixel resolution (with the driver/software installed) High resolution CMOS color sensor Video mode: 24bit true color Large video capture size: 640 x 480 (when used as Plug and Play) Large video capture size: 2560 × 1920 (with the driver/software installed) Interface: USB 2.0 high-speed Transmission Rate: 640 × 480 up to 30fps Noise-signal ratio: greater than 48db (30fps 220LUX) Dynamic range: greater than 72db Image focus: 5cm to infinity Built-in image compression Automatic brightness adjustment Automatic color compensation Manual focus override Note: Under the Windows XP Service Pack 2 operation system, please make sure you have plugged the camera’s USB cable into the initial USB port interface controlled by the driver software. Otherwise it will perform as a Plug and Play USB Video Device with the lower resolution and video capture size. System Requirement • • • • • • Desktop PC or Laptop PC with USB 2.0 interface Pentium 200 or higher CPU 32MB or higher RAM memory Over 200MB free hard disc space CD ROM drive to load driver Compatible with Windows® XP Service Pack 1 (or higher), and Vista®. Note: The Plug and Play feature works only with Windows® XP Service Pack 2+ and Vista®. Package Contents USB WebCam Microphone Headset Software CD User’s Manual Getting Started Hardware Installation 1. Plug the audio connectors of the Microphone Headphone to the Audio and Microphone line out at the rear of your PC. 2. Plug the USB WebCam to an available USB port on your computer. 3. Power on the computer and the monitor. 4. You may now adjust the Volume control of the Microphone Headphone to your desired setting. Camera Installation (without driver software) 1. Verify the version of your operation system. Under Windows® XP click on Start -> click on “Control Panel” -> double click on “System” and the System Properties will appear on the screen. 2. If you have check out your OS is the version of Windows XP service pack 2 or above, than you can plug the PC camera into the USB interface, on the computer will show as below picture “Found New Hardware USB Video Device”, this is to say your PC camera hardware can be used now. 3. Where you can preview the PC camera video capture? Double click on “My Computer” on the desk, then you will find “USB Video Device #*” from the following window: 4. Double click on “USB Video Device #*”, then you can preview the video capture as in the following window, also you can take still captures here. Camera Driver Software Installation ***Plug the PC camera USB cable into the computer interface first before you install the driver. 1. Insert the software CD to your CD-ROM drive, and locate the software Icon from the CD ROM as shown below, double click on it to start the driver installation. 2. Software installing. 3. This window will appear to remind you to plug the PC camera USB cable into the computer interface first before you install the driver. After you inserted the camera into the USB interface, please press “Yes” to continue. 4. Then, click on the “Next” button…. 5. Continue the installation. 6. Choose “Continue Anyway” to continue, when the window shown below appears. 7. Click on “Finish” to exit and finish the software installation. 8. From the “start” menu, find out “vmcap” under “Vimicro USB2.0 UVC Camera” from “All Programs”, to start the video capture. 9. Start the video capture, and choose the “Video Capture Pin…” from the “Options” menu to adjust the picture size that you want shown by the camera lens. 10. To adjust the picture size from 320 x 240 to 2560 x 1920 or 1024 x 768, the video frame rate will be set to 30fps. Note: If the picture sizes you choose is from 1280 x 960 to 2560 x 1920 the frame rate will be 15fps. 11. Please be advised that the webcam special effects: Image effect, Photo frame, Face tracking and Face effects functions are only available under the image size of 352 x 288. 12. After you choose the video capture size under 352 x 288, then choose the “Video Capture Filter…” from the “Options” menu to select the special effects modes. 13. You have 10 different Image Effects you may choose from to apply to your webcam. 14. You have 9 different Photo Frames you may select from or you can download frame styles of your choosing by clicking on the “Load Frame” option. 15. Face Tracking Function. 16. Special Effects Face functions (9 choices): a. Face Detect will locate the position of the face so you may apply special effects to the webcam subject. b. Mosaic c. Mask d. Put Glasses e. Crown Hat f. Animal Face g. Cartoon Face h. Background Picture i. Background Smooth How to Capture Video 1. First, have the webcam connected to your PC, and then open the Amcap software. Click on CAPTURE. Next, the in menu click on START CAPTURE. 2. Next, choose the location on your PC where the video capture file will be stored and give the file a name. Then you may set the capture file size and click on OK. 3. To stop video capture, click on CAPTURE, and then click on STOP CAPTURE. FCC Norm FCC This equipment has been tested and complies with limits for Class B digital devices pursuant to Part 15 of Federal Communications Commission (FCC) rules. FCC Compliance Statement These limits are designed to provide reasonable protection against frequency interference in residential installations. This equipment generates, and radiates radio frequency energy, and if not installed properly or used in accordance with the instructions, may cause harmful interference to radio communication. However, there is no guarantee that interference will not occur in television reception, which can be determined by turning the equipment on and off. Interference may be corrected by one or more of the following measures: Reorient or relocate the receiving antenna Increase the separation between the equipment and the receiver Plug the equipment into an outlet on a circuit different from that to which the receiver is connected. CAUTION! The Federal Communications Commission warns the user that changes or modifications to the unit not expressly approved by the party responsible for compliance could void the user’s authority to operate the equipment. Service Procedure For information regarding the return or exchange of this item within 14 days of purchase, please visit your Inkstop store location or go to www.inkstop.net to read the instructions regarding customer service returns procedures. Click on Satisfaction Guaranteed icon on the website. For technical support after the first 14 days of purchase, please call the toll free number below to obtain service. A customer service representative will assist you and provide a return authorization number (RA number) if needed allowing you to ship your product to the service center. Please have the following information available when you call the service center: Your Name and Address Date of Purchase Model Number Serial Number Store Name and Address Store Location Number Type of problem with the unit To contact the technical support facility, please call 508-435-4830 or 800-639-3803 Email Support: [email protected] Warranty 90 Days Limited Warranty This product is warranted to be free from defects in material and workmanship for a period of 90 days. Warranty obligations are limited to replacement or repair of defective parts and components, at the option of the manufacturer. The warranty of this product is null and void if the product is subjected to negligence, abuse, modification, misuse, accident or if the customer uses the product for a function it was not intended for. This warranty is only valid for the original purchaser of this product and will not be honored if the product is resold. This warranty gives you specific legal rights, and you may also have other rights which vary from state to state. The manufacturer will not be liable for incidental or consequential damages caused by the use of this product. The manufacture will not be liable for any costs such as lost profits or revenues, cost of temporary replacements, loss of data, loss of equipment or use of equipment or any claims by third parties. After 14 days from purchasing the product, please call the phone number mentioned below to obtain service. DO NOT RETURN THIS PRODUCT TO THE STORE. A customer representative will give you a return authorization (RA number) allowing you to ship the product to the service center. The purchaser must have a copy of the original receipt for proof of purchase within 90 days. The purchaser of this product is responsible for any shipping charges to the repair facility. The manufacturer service center will repair or replace the unit in question and send it back to the purchaser within 10 working days of receipt of the unit. In order to contact the service facility, please call 508-435-4830 or 800-639-3803. The address for this facility is: Four Star Group 26840 Fargo Ave. Unit C Bedford Heights, OH 44146 E-mail Support: [email protected]