1
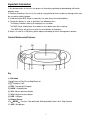
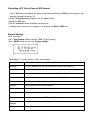
MP3 Music Player 1GB/2GB
Item Number: 11009930B/C
User’s Manual
* Important Notice: Please read this manual carefully
All brand names and trademarks are the property of their respective owners
Important Information
1. Any disconnection of the unit in the process of formatting, uploading or downloading will lead to
program errors.
2. Remove the battery if the unit is not used for a long period of time to avoid any damage which may
be caused by battery leakage.
3. Avoid leaving the MP3 Player in especially hot, cold, dusty or humid conditions.
4. Change the battery as soon as possible in the following cases:
The battery indicator shows that the battery has run down.
The MP3 Player automatically shuts down or shuts down soon after restarting.
The MP3 Player will not turn on after the re-installation of the battery.
5. When it is used as a USB drive, please operate according to the file management software.
Control Buttons and Features
Key Functions
(1) Belt hook
(2) - Power on/Play/Pause/Stop/Power off
(3) - Earphone Jack
(4) REC - Recording/A-B repeat
(5) HOLD - Keyboard lock
(6) VOL- Volume decrease button
(7) VOL+ Volume increase button
(8) USB - USB port
(9) Display Screen
(10) .MODE. - Previous, Skip backward, Switching Mode, Menu, Next, Skip Forward
(11) MIC - Microphone
2
Getting Started
Step 1: Set up the software:
1: If your computer is running Windows 98, you should download the Windows 98 driver from the
software CD included with your MP3 Player. To do this insert the CD in your CD-ROM drive and follow the
steps below:
Double-click on the ”My Computer” icon, then double click on “Set-Up” to install the soft ware and
follow the installation instructions.
After you finish the installation, you can find this file in your “Program files” in your “C” drive.
If your computer is running Windows ME/2000/XP or Vista your MP3 player will be “seen” by the
computer upon plugging the unit into the computer via the USB cable connector. No extra set up steps
are necessary.
Step 2: Transferring Music and Content
Once your MP3 player is seen by the computer you may now begin to transfer music files onto the
device.
1: How to copy Music files from your PC to MP3 Player directly:
Select the music file by clicking on the file, - Choose “Copy” – then go to the MP3 player Icon and
choose “Paste”, it is that simple. Repeat this procedure to add the music files you want to listen to.
2: If you want to transfer music or individual songs from a CD, please use the Windows Media Player
software which may be on your computer to convert the CD file to MP3 music files. For the detailed
software which may be on your computer to convert the file to MP3 music files. For the detailed
instructions of this procedure please check your Windows Media Player software guide for reference
.
3: For those people who may have some music files that are not in .mp3 format, all is not lost. In fact,
anything that you can play on your computer can be easily recorded as an MP3 with the free program,
Audacity. Just go to: http://audacity.sourceforge.net/ And as you know, MP3s can be played on
anything. Please note that this is a 3rd party software and any support for it would be done by
contacting Audacity.
Step 3: Disconnect your player
When you have finished transferring files, disconnect your MP3 player.
Be careful not to disconnect your player while files are still being downloaded, otherwise you may lose or
damage the content being transferred.
Step 4: Playing Media Files, listening to Music
You are now ready to play media files on your player.
- Insert the earbuds into the earphone jack output.
- Firmly press the “Play” button to turn the unit on, choose the “MSC” (music) mode, then lightly
depress the “MODE” button to view the audio files, press “Play” to activate the play mode.
- Press “VOL+” or “VOL-“ when in play mode to adjust the volume.
- Enjoy your MP3 Player!
3
Understanding the Display Screen
Song number/total songs
Repeat mode
EQ mode
Bit rate/file format
Playing time
Program mode illustrator
Battery indicator
Name of
song/singer
nderstanding the Function Modes
Music Mode
Insert earbuds into the earphone jack.
Firmly press "Play" button to turn on the unit, choose “MSC” (Music) then lightly depress "MODE"
button to view the audio modes, press "Play" to activate play mode.
Press "VOL+" or "VOL-" when in play mode to adjust the volume.
Equalizer Modes
You may adjust the tone quality of the music you are listening to by adjusting the equalizer modes to
suit the music you have selected.
When playing music, lightly depress the "MODE" button to view the sub-menu.
Press the "Fast forward" button to activate the "Equalizer" menu.
Slightly depress "MODE" button to view the " Equalizer " option setting.
Menu of EQ Modes.
Natural
Rock
Pop
Classic
Soft
Jazz
DBB
Press "fast forward" button to select the mode, then lightly depress the "MODE" button to confirm
selection.
4
Synchronized Lyric Display
This player supports ”*.LRC” lyric files, so as to achieve the synchronized playing of lyrics and songs
which will allow the match up of lyric files that are matching to those of the songs. For example :
Name of song: Du-Split of Night.mp3
Name of lyric file: Du-Split of Night.lrc
If there is lyric available for the current song, then the icon “ ” will change to “ ” in the audio mode.
Songs Lyric found:
Firmly press the "MODE" button to interface with lyrics.
Lyrics are displayed.
Lightly depress "MODE" to return to song mode.
Manual lyric check: slightly depress "VOL+" or "VOL-" button to read the lyrics.
Recording Mode
Note: *insure that battery supply is sufficient when recording.
Enter the main menu.
Press the "Fast forward" button to choose "
" –REC (recording) mode.
Lightly depress the "MODE" button to confirm entry into the recording mode, the display will appear as:
Lightly depress the "Play" button to begin recording notes:
- If the display shows "room crammed", it means there is no room for new recorded files, please
delete other files to create more room.
- If the display shows "directory crammed", it means there are already 99 recorded files in this
directory, please change to another directory.
- Firmly press the "Play" button to stop recording.
- Firmly press “Play” button again for saving
5
Choose the recording type; the record mode display will look like this:
Lightly depress the "MODE" button to see the sub-menu of recording modes, press the "Fast forward"
button and choose the "Recording type" sub-menu, then Lightly depress the "MODE" button to enter
this item,
Here is the recording type selection interface:
Lightly depress the "Fast forward" button to choose the desirable recording type, and then Lightly press
“MODE” button to confirm your choice.
Recording type:
Fine REC : High-quality recording, WAV format, good sound quality.
Long REC : Long-playing recording, ACT format, ordinary sound quality.
Fine VOR : High-quality sound control, WAV format (sound-control recording, automatic pause of
recording in the absence of sound).
Long VOR : Long-playing sound control, ACT format.
Press "MODE" button to confirm then press “PLAY” to begin recording.
Voice Mode
Playing recorded files;
Enter the main menu.
Press the "Fast forward" button to choose "RPL”(Voice Mode).
Lightly depress the "MODE" button to choose the “Voice Mode” interface.
Press "Play" button to begin. When the unit is not playing, press "Fast Backward" or "Fast forward" to
select the files in the "Voice Mode".
Volume control
VOL+: Increase the volume.
VOL-: Decrease the volume.
6
Converting ACT files to those of WAV format.
Files of ACT format recorded by this player can be converted to those of WAV format through the tool
program attached in the driver CD.
Run the "Sound Converter" program, click the "open" button.
Choose the ACT files.
Click the "converter" button and begin the conversion.
In addition to the conversion, this program is also able to run WAV and MP3 files.
System Settings
Enter main menu.
Press "Fast forward" button to choose "SYS” (System setting).
Press "MODE" button to enter into “System settings”.
Main options in “system settings”. (Icons shown above)
Record Time
Sets the date and time when you saved the recorded files.
Backlight
Turns the backlight On and sets the amount of time it will remain On.
Back Color
Sets the color of backlight when activated.
Language
Selects different languages on the display. English or Spanish
Power off
Sets a count down time (minutes) for automatic shut down.
Replay mode
Sets the play mode for repeating.
Contrast
Sets the contrast of the screen display.
Online Mode
Sets the options for operating online.
Memory Info
Checks the capacity and current use of memory
Firmware version
Indicates the version of the MP3 player’s firmware.
Firmware
upgrade
Exclusive for use in the updating of the firmware.
(Exit)
Exit this function.
7
Specifications
Dimensions
Weight
95mm*20mm*31mm
32g (not including battery)
Display dot matrix
Memory
Power
Support ID3 title display
Flash memory: 1GB/2GB
1 x AAA battery
Record
Sampling rate
Record format
8KHz
WAV
Record time
Max. output of
earphone
35 hours (ACT, 128M Flash)
(L) 10mW+(R) 10mW (320hm)
MP3 bit rate
WMA bit rate
32Kbps-320K bps
32K bps-192K bps
Frequency
response
20Hz to 20KHz
Signal-to-Noise
>85dB
Distortion degree
<0.1%
MP3,WMA
Music format
Operation systems supported
MP3, WMA,
Windows: 98SE / ME / 2000 / XP/Vista
IV. Troubleshooting
No power
No sound from earphone
Strange characters show on the display
Music files can not be downloaded
normally
Please check if the batteries are installed in the correct
position in the battery compartment.
Please check that the volume is not set at “0” and if the
earbuds are connected in a right way. Please keep the
earbuds clean. Noise may result from the earbuds becoming
damaged. Check the music files to see that they are not
damaged.
Please make sure that you have chosen the right language
to be displayed
Please check if the USB cable is damaged and is connected
correctly to both PC and MP3 player. Check to see that the
Software driver program is installed correctly, and check for
available memory.
8
Customer Service
For information regarding the return or exchange of this item within 14 days of purchase , please
visit your Inkstop store location or go to www.inkstop.net to read the instructions regarding
customer service returns procedures. Click on the Satisfaction Guaranteed icon on the website.
For technical support in regards to operation and installation of this item please call the toll free number
below to obtain assistance. A customer service representative will assist you and provide operating
information on the product.
Please have the following information available when you contact technical support:
Your Name and Address
Date of Purchase
Model Number
Serial Number
Store Name and Address
Type of problem with the unit
To contact the technical support facility, please call
508-435-4830 or 800-639-3803.
Email Support: [email protected]
9
Warranty
90 Days Limited Warranty
This product is warranted to be free from defects in material and workmanship for a period of 90 days.
Warranty obligations are limited to replacement or repair of defective parts and components, at the option
of the manufacturer. If the original model is no longer available, we will substitute with a model of equal
or better value than the original item. The warranty of this product is null and void if the product is
subjected to negligence, abuse, modification, misuse, accident or if the customer uses the product for a
function it was not intended for. This warranty is only valid for the original purchaser of this product and
will not be honored if the product is resold. This warranty gives you specific legal rights, and you may also
have other rights which vary from state to state.
The manufacturer will not be liable for incidental or consequential damages caused by the use of this
product. The manufacturer will not be liable for any costs such as lost profits or revenues, cost of
temporary replacements, loss of data, loss of equipment or use of equipment or any claims by third
parties.
After 14 days from the purchase date of this product, please call the phone number listed below to obtain
service. A customer service representative will give you a return authorization (RA number) allowing you
to ship the product to the service center. The purchaser must have a copy of the original receipt for proof
of purchase within 90 days. The purchaser of this product is responsible for any shipping charges to the
repair facility. The manufacturer service center will repair or replace the unit in question and send it back
to the purchaser.
In order to contact the service facility, please call 508-435-4830 or 800-639-3803.
The address for this facility is:
Fourstar Group
26840 Fargo Ave.
Suite C
Bedford Heights, OH 44146
E-mail Support: [email protected]
10