1
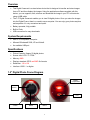
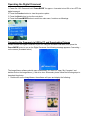
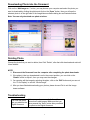
1.5” Digital Ornament
Item Number: 11010025
User’s Manual
* Important Notice: Please read this manual carefully
All brand names and trademarks are the property of their respective owners
Overview
•
This Digital Ornament is a stand-alone device that is designed to transfer and store images
from a PC and then display the images. Using the application software supplied with this
device, you can organize, edit, enhance and download the image in your PC to this device
using a USB cable.
•
The 1.5” Digital Ornament enables you to view 59 digital photos. Once you store the images
into the Digital Frame, there’s no need to use a computer. You can enjoy your photos anytime
and anywhere. It’s very convenient and quick.
•
Battery operated, fully portable.
•
Built-in Clock.
•
USB connection for easy downloads.
System Requirements
•
•
•
IBM PC or Compatible Computer
Microsoft Windows® 2000, XP and Vista®.
An available USB port
Specifications
•
•
•
•
•
•
Picture Capacity: Approx 59 digital photos
Screen size; LCD 1.5” CTSN
Memory: 8MB
Displays standard JPEG and BMP file formats
Resolution: 128 x 128
Interface: USB 1.1 or higher
1.5” Digital Photo Frame Diagram
Battery
Compartment
LCD
Screen
Mini USB
Port
Up / Previous
Button
Power / MODE
Button
Down / Next
Button
2
Package Contents
1.5” Digital Photo Frame
Stand
USB Cable
User’s Manual
Replacing the Batteries:
This pedometer uses two AAA size alkaline batteries (not included). Follow these steps to install
batteries:
1. Press down on the back cover and slide the cover down and off the unit.
2. Remove the exhausted cells and insert two AAA size batteries as indicated by the polarity.
4. Replace the back cover.
Note: If the sound weakens, distorts, or the display dims, replace the batteries.
3
Operating the Digital Ornament
1. Power On / Off: Press and hold “Power/MODE” for approx. 4 seconds to turn ON or turn OFF the
digital ornament.
2. Press the Previous button to view the previous photo.
3. Press the Next button to view the next photo.
4. Press the Power/MODE button to enter into main menu, functions as followings:
Connecting the Ornament via USB to PC and Downloading Pictures
Please connect the Digital Ornament to your PC using the included USB cable, then press the
Power/MODE button to turn on the Digital Ornament, the following message appears: Connecting…
on the screen (illustrated below).
The ImageViewer software should open automatically. If it does not, open “My Computer” and
double-click on the ImageViewer (:) disk drive icon. Afterwards, please follow the following steps to
download the photos:
1. Double-click on the ImageViewer, the software will open and display the following:
4
Downloading Photo into the Ornament
Click on the “Add Image as...” button, you may browse your computer and select the photo you
want to download by clicking the phtoto and click on the “Open” button, then you will see the
selected photo is in the right side of the ImageViewer software dialog box as illustrated below.
Note: You can only download one photo at a time.
Deleting Photo
Choose the photo that you want to delete, then Click “Delete”, after that click download and wait until
it has finished.
NOTE:
1. Disconnect the Ornament from the computer after completing the photo downloads.
2. If the photo(s) that you downloaded is not in the correct position, you can click on the
“Rotate” button to adjust it, then you may save the changes.
3. You can also edit the image by selecting the photo, click on the “Edit” button and you can set
it to “Fit for Display” or see the “Whole Image”.
4. After you have finished downloading your photos, please choose Exit to exit the Image
viewer software.
Troubleshooting
Make sure you have correctly followed the
Can’t see the photo
procedure to add images. Make sure that you
that you added to the
have pressed the “Save” button after you added
Digital Ornament
the photo to the Digital Ornament.
5
Main Menu
Time
Displays the date and time. Press the Power/MODE button to confirm your
choice.
SlideShow
Press the Previous/Next button to select Slideshow and press the Power/MODE
button to access the Slideshow settings. You can set the time transition between
photos from 0 to 31 seconds to have the photos transition automatically.
Screen Save
Press the Previous/Next button to select Slideshow and press the Power/MODE
button to access the Screen Save settings. You can set the time from 1 to 30
minutes to have the Digital Ornament turn off automatically.
Brightness
Press the Previous/Next button to adjust the brightness of the screen, and press
the Power/MODE button to confirm the setting.
Time Settings
Press the Previous/Next button to set the date and time of the Digital Ornament,
and press the Power/MODE button to confirm the setting.
6
FCC and CE Radiation Norm
FCC
This equipment has been tested and complies with limits for Class B digital devices pursuant to Part 15 of
Federal Communications Commission (FCC) rules.
CE
This equipment has been tested and complies with the limits of the European Council Directive on the
approximation of the law of the member states relating to electromagnetic compatibility (89/336/EEC)
according to EN 55022 Class B.
FCC and CE Compliance Statement
These limits are designed to provide reasonable protection against frequency interference in residential
installations. This equipment generates, and radiates radio frequency energy, and if not installed properly
or used in accordance with the instructions, may cause harmful interference to radio communication.
However, there is no guarantee that interference will not occur in television reception, which can be
determined by turning the equipment on and off. Interference may be corrected by one or more of the
following measures:
Reorient or relocate the receiving antenna
Increase the separation between the equipment and the receiver
Plug the equipment into an outlet on a circuit different from that to which the receiver is
connected.
CAUTION!
The Federal Communications Commission warns the user that changes or modifications to the unit not
expressly approved by the party responsible for compliance could void the user’s authority to operate the
equipment.
Important Safety Instructions
WARNING:
•
Do not use this unit near the presence of water. Do not expose this unit to rain, moisture, water
drip or splash. Also ensure that no container with liquids, such as vases, be placed near or on the
unit.
•
Do not operate or install near any heat sources such as radiators, heat registers, stoves, or similar
unit.
•
Do not open product cover and do not attempt to repair this product by yourself. Please refer to
qualified service personnel.
•
Avoid applying pressure on the LCD screen or exposing it to direct sunlight. Clean with a dry, soft
cloth only.
•
Please note the machine will only play files with compatible formats.
7
Service Procedure
For information regarding the return or exchange of this item within 14 days of purchase,
please visit your Inkstop store location or go to www.inkstop.net to read the instructions
regarding customer service returns procedures. Click on the Satisfaction Guaranteed icon
on the website.
For technical support in regards to operation and installation of this item please call the toll free
number below to obtain assistance. A customer service representative will assist you and provide
operating information on the product.
Please have the following information available when you call the service center:
Your Name and Address
Date of Purchase
Model Number
Serial Number
Store Name and Address
Type of problem with the unit
To contact the technical support facility, please call
508-435-4830 or 800-639-3803.
Email Support: [email protected]
8
90 Days Limited Warranty
This product is warranted to be free from defects in material and workmanship for a period of 90 days.
Warranty obligations are limited to replacement or repair of defective parts and components, at the
option of the manufacturer. If the original model is no longer available, we will substitute with a model
of equal or better value than the original item. The warranty of this product is null and void if the
product is subjected to negligence, abuse, modification, misuse, accident or if the customer uses the
product for a function it was not intended for. This warranty is only valid for the original purchaser of
this product and will not be honored if the product is resold. This warranty gives you specific legal
rights, and you may also have other rights which vary from state to state.
The manufacturer will not be liable for incidental or consequential damages caused by the use of this
product. The manufacture will not be liable for any costs such as lost profits or revenues, cost of
temporary replacements, loss of data, loss of equipment or use of equipment or any claims by third
parties.
After 14 days from the purchase date of this product, please call the phone number mentioned below
to obtain service. A customer representative will give you a return authorization (RA number) allowing
you to ship the product to the service center. The purchaser must have a copy of the original receipt
for proof of purchase within 90 days. The purchaser of this product is responsible for any shipping
charges to the repair facility. The manufacturer service center will repair or replace the unit in
question and send it back to the purchaser.
In order to contact the service facility, please call 508-435-4830 or 800-639-3803.
The address for this facility is:
Fourstar Group
26840 Fargo Ave. Suite C
Bedford Heights, OH 44146
E-mail Support: [email protected]
9