1
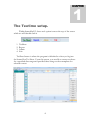
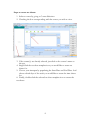
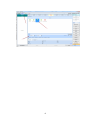
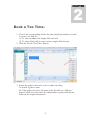
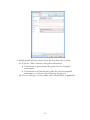
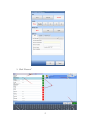
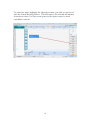
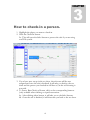
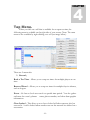
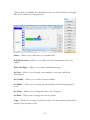
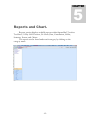
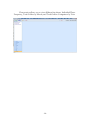
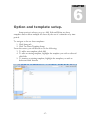
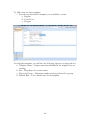
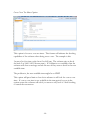
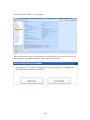
StarterHut V3 User Manual -1- 1 CHAPTER The Teetime setup. Within StarterHutV3, there are 4 option icons at the top of the screen which we will describe below 1. 2. 3. 4. TeeSheet Report Admin Exit TeeSheet button is where the program is defaulted to when you log into the Starter Hut Tee Sheet. From this screen, you are able to create tee sheets for a specified date range and specified dates using tee sheet templates for selected courses. -2- Steps to create tee sheets. 1. Select a course by going to Course Selection. 2. Checking the box corresponding with the course you wish to view. 3. If the course(s) are already selected, just click on the course’s name at the top. 4. Single click the tee sheet template icon you would like to create tee sheets for. 5. Choose your timespan by populating the Start Date and End Date. And choose which days of the week you would like to create the time sheets for. 6. Finally, double click the selected tee sheet template icon to create the tee sheets. -3- -4- 2 CHAPTER Book a Tee Time. 1. Choose the corresponding cell for the time and player number you wish to create a tee time for. 1a. To select multiple cells, simply click each cell. 1b. To select all the cells for one tee time, simply click the time. 2. Click the “Book a Tee Time” button. 3. Search the golfer’s name who want to make a booking 3a. Search a golfer’s name 3b. If the golfer don’t have the name in the list click on “Add new” button, It will show the screen for add member or player and the red fields are the require information. -5- 4. Simply double click the person from the drop down list to select. 4a. It has the “Edit” button to edit golfer information. If the button is green means that golfer has all of required information. If the button is red means that golfer don’t has the required information so it doesn’t allow selecting this person. 4b. Choose what type of cart, caddie and/or rental clubs, if applicable. -6- 5. Click “Reserve” -7- To cancel tee times, highlight the selected tee times you wish to cancel and click the Cancel Booking button. This will remove the selected information from the tee sheet. You can set an option in the option screen to track cancellation reasons. -8- 3 CHAPTER How to check-in a person. 1. Highlight the player you want to check-in. 2. Click the Check-In button. 2a. This will open the Sales Screen to process the sale if you are using our POS system. 3. If you have rates set up in the tee sheet, then the rate will be auto assigned and once the sale is finalized, it will take you back to the tee sheet and the person you checked in will have a $ in the cell showing it was paid. 4. To issue a Rain Check or Return, click on the corresponding buttons. (only available when clicking on a paid reservation. 4a. After clicking either button, it will take you to the Sales Screens. 4b. Once the sale is finalized, it will then take you back to the tee sheet. -9- -10- 4 CHAPTER Tap Menu. When you click on a cell that is available for an open tee time, the following menu is available on the right side of your screen. (Note: The same menu is also available by right clicking on a cell (see image below). There are 2 menu tabs 1. General ; Book a Tee Time - Allows you to setup tee times for multiple players at one time. Reserve Wizard – Allows you to setup tee times for multiple days in advance, such as leagues. Event – Go here to book an event for a specific time period. You also gather and enter the event’s planner name, phone number, and other demographic information. Clear Locked – This allows you to clear a locked cell after someone else has accessed it. A cell is locked when another user on the network has clicked on a reservation. -11- Block – Allows you to block specific tee times or cells. (To unblock these cells, simply click on the blocked tee times or cells you wish to unblock and select the Block button again.) Squeeze Time – Allows you to insert a tee time between two other tee times on the selected tee sheet. You can set up password and define squeeze times color codes in the options screen. Add Wait List – Allows you to add players to a wait list for available tee times. If you have multiple courses, you can opt to make the wait list either facility or course specific. Set Special Price Upward Bidding Auction Periodic Price Reduction Allows you to set a special teetime for Auction 2. Advance ; Tee Sheet Note – Allows you to type a note on the tee time. Delete Tee Sheet – Allows you to delete the tee time. Expand Player Column – Allows you to expand the player column more than 4 players. Change Tee# - Allows you to change time selected to others tee #. Push Back Tee Time – Allows you to change tee time earlier or later. Set Today’s default rate – Allows you to set default rate for today only. -12- Options that are available for a booked tee time or cell are located on the right side of the window (see image below). Notes – Allows you to add notes to a specified cell. Edit Reservation – Allows you to edit reservation information (rate, cart, caddie). Print Cart Signs – Allows you to print standard cart signs. Set Cart – Allows you to identify a cart number, a cart type, and driver information. Set Caddie – Allows you to add or remove caddies. Set Holes – Allows you to change selected number of holes being played, 9 or 18. Set Class – Allows you to change the class code of a player. Set Rate – Allows you to change the rate of a player. Copy – Allows you to copy a booked tee time to be later pasted or placed into another open tee time or cell. -13- Move – Allows you to move a booked tee time to be later pasted or placed into another open tee time. Change Player – Allows you to change a player of a tee time already booked before check-in. Cancel – Allows you to cancel a booked tee time. Squeeze Time – Allows you to insert a tee time between two other tee times on the selected tee sheet. Credit Card – Allows you to store credit card information to be used for reserving tee times and/or payment through the point of sale. Send Email – Allows you to manually send emails such as reminder and cancellation emails. Print Cart Signs – Allows you to print standard cart signs. -14- 5 CHAPTER Reports and Chart. Reports section displays available reports within StarterHutV3 such as Tee Sheet, 15-Day Golf Forecast, No Show, Rate, Cancellation, Golfer, Statistics, Events, and Others. The reports can be found under each category by clicking on the category name. -15- Chart section allows you to view different bar charts, Individual Player Frequency, Total Golfers by Month, and Total Golfers Comparison by Year. -16- 6 CHAPTER Option and template setup. Setup section is where you go to Add, Edit and Delete tee sheet templates and to delete multiple tee sheets by the use of a calendar or by time period. To navigate to the tee sheet templates: 1. Click Setup tab 2. Click Tee Sheet Template Setup From this screen, you will be able to do the following: 3. To add a new template, click Add 4. To edit an existing template, highlight the template you wish to edit and click Edit 5. To inactive an existing template, highlight the template you wish to delete and click Inactive -17- To Add a new tee sheet template: 1. First choose what kind of template you would like to create a. Regular b. Cross-Over c. Shotgun For a Regular template, you will have the following options (see image above): a. Template Name – Unique name that will identify the template you are creating. b. Site – Drop down for course names c. Players in Group – Maximum number of players allowed in a group. d. Default Rate – Uses a default rate for the template -18- Cross Over Tee Sheet Option This option is for cross over tee times. This feature will enhance the booking capabilites of the software when doing cross overs. The example is this I want to book a time on the front 9 at 8:00 am. The software tries to book the back 9 at 10:00 AM (2 hr turn time). If 10:00am is not available, then the software will show a message and ask the user if they want to book at the next available time The problem is, the next available time might be at 4PM!!! This option will put a limit on how far in advance it will look for a cross over time. If a cross over time is not available in the time period you set in the option screen the software will ask if you want to only book a 9 hole booking or cancel the reservation. -19- See Screen Shots Below to set option: Here is the screen shot of the message you will receive if you try to book a tee time where no available turn time exists on the cross over -20- Admin The admin screen is where you set up all your specific course and facility settings. We recommend you password protect this module as making changes in this screen can have serious effects on how the software will react. The Admin screen will give you the ability to customize the software to your facilities needs. Most options are self explanatory and we often add new options based on product development. We STRONGLY recommend that you get training on this module. We will spend time with you when we do your onsite training go thru every option and can arrange phone training for refresher course. Since many options are one time settings and many setting rely on other settings in this module, we do not go into detail in the manual describing each setting. If you have questions on any of the options or how to best set up an option, please call the support number and schedule a training session. At this time the Admin screen options are note described in this manual. -21-