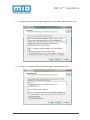
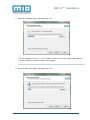
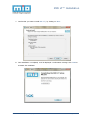
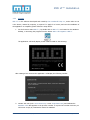
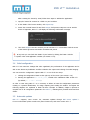
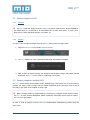
1
C2C
C2C Consultoría
Consultoría TSIS
TSIS SL
SL
República
República Dominicana
Dominicana 33 bajos
bajos local
local 11
07014
07014 Palma
Palma de
de Mallorca
Mallorca (Spain)
(Spain)
Tel
Tel(+34)
(+34) 971
971 919
919 124
124 –– Fax
Fax (+34)
(+34) 971
971 918
918 423
423
www.c2ctsis.com
www.c2ctsis.com –– [email protected]
[email protected]
MIO LT™ v2
User Manual
©2012 C 2C - the eHealth company – MIO LT v2 – User Manual (EN) rev.111213
www.c2ctsis.com – [email protected]
Table of contents
Table of content
1. Introduction ..................................................................................................................... 5
1.1 MIO LT ™ - Desktop application for medical image integration...........................................6
1.2 User interface ................................................................................................................7
1.2.1 Patient bar ...........................................................................................................7
1.2.2 Capture toolbar ....................................................................................................7
1.2.3 Gallery area .........................................................................................................8
1.2.4 Send toolbar ........................................................................................................8
1.2.5 Notifications area .................................................................................................8
1.2.6 Additional controls ...............................................................................................8
2. MIO LT™ Installat ion ..................................................................................................... 10
2.1 Hardware requirements ................................................................................................ 10
2.2 Software requirements ................................................................................................. 10
2.3 Step by Step ................................................................................................................ 11
2.3.1 Dow nload .......................................................................................................... 11
2.3.2 Installation ........................................................................................................ 11
2.3.3 Licensing ........................................................................................................... 15
2.4 Initial configuration ...................................................................................................... 16
2.5 Automatic updates ....................................................................................................... 16
3. Patient ident ification with MIO LT™ ............................................................................. 17
3.1 Introduction................................................................................................................. 17
3.2 DICOM Wor klist ........................................................................................................... 17
3.2.1 Patient selection................................................................................................. 17
3.2.2 Problems and solution ........................................................................................ 20
3.3 Parameters passing ...................................................................................................... 21
3.3.1 Patient Selection ................................................................................................ 21
3.3.2 Problems and solutions....................................................................................... 21
3.4 Identification manual.................................................................................................... 22
3.4.1 Patient data entry .............................................................................................. 22
4. Capture images with MIO LT™ ...................................................................................... 23
4.1 Introduction................................................................................................................. 23
4.2 Open files .................................................................................................................... 24
4.2.1 Procedure .......................................................................................................... 24
MIO LT™ v2 - USER MANUAL (EN)
Page 2 of 70
Table of contents
4.2.2 Supported formats ............................................................................................. 24
4.3 Capture of image/video ................................................................................................ 25
4.3.1 Capturing images ............................................................................................... 25
4.3.2 Recording videos................................................................................................ 26
4.4 Automatic capture of images stored in US B or CD devices. ............................................. 27
4.4.1 Procedure .......................................................................................................... 27
4.4.2 Problems and solutions....................................................................................... 28
4.5 Capturing images from CD / CD DICOM......................................................................... 28
4.5.1 Auto send .......................................................................................................... 29
4.5.2 Manual sending.................................................................................................. 31
4.5.3 Images support without DICOM .......................................................................... 32
4.6 Receiving DICOM ......................................................................................................... 32
4.7 Using galler y................................................................................................................ 33
4.7.1 Rearrangement of images................................................................................... 33
4.7.2 Image selection ................................................................................................. 34
4.7.3 Study review ...................................................................................................... 38
4.7.4 Pathologies location ........................................................................................... 39
4.7.5 Printing images .................................................................................................. 41
4.7.6 Saving images ................................................................................................... 41
5. Sanding images with MIO LT™...................................................................................... 42
5.1 Introduction................................................................................................................. 42
5.2 Sending images to PACS ............................................................................................... 43
5.2.1 Selection ........................................................................................................... 43
5.2.2 Sending ............................................................................................................. 43
5.3 Sanding images to multiple PACS .................................................................................. 43
5.4 Sending images to MEDT ING ........................................................................................ 44
5.4.1 Preliminary information ...................................................................................... 44
5.4.2 Sending images ................................................................................................. 45
5.5 Saving images ............................................................................................................. 46
5.6 Sending queue............................................................................................................. 48
5.6.1 Introduction....................................................................................................... 48
5.6.2 State of sending................................................................................................. 48
5.6.3 Queue management tool .................................................................................... 49
5.7 Multistudy sending ....................................................................................................... 50
MIO LT™ v2 - USER MANUAL (EN)
Page 3 of 70
Table of contents
6. Configuration of MIO LT™ ............................................................................................. 51
6.1 Access to configuration module..................................................................................... 51
6.2 Basic configuration ....................................................................................................... 52
6.2.1 Identification of the patient by DICOM Wor klist.................................................... 52
6.2.2 Capture of image/video ...................................................................................... 53
6.2.3 Sending to PACS ................................................................................................ 54
6.3 Configuration parameters ............................................................................................. 54
6.3.1 General ............................................................................................................. 55
6.3.2 DICOMDIR......................................................................................................... 60
6.3.3 DICOM Listener.................................................................................................. 61
6.3.4 MEDT ING .......................................................................................................... 62
6.3.5 Print .................................................................................................................. 63
6.3.6 Save.................................................................................................................. 63
6.3.7 COMM ............................................................................................................... 64
6.3.8 PACS ................................................................................................................. 66
6.3.9 Capture ............................................................................................................. 68
6.3.10 Watcher ............................................................................................................ 68
6.3.11 USB & CD detection ........................................................................................... 69
7. Addit ional infor mation ................................................................................................... 70
7.1 Terminology ................................................................................................................ 70
7.2 To find out more .......................................................................................................... 70
MIO LT™ v2 - USER MANUAL (EN)
Page 4 of 70
Introduction
1. Introduction
Thank you for purchasing MIO LT™, C2C’s solution for medical imaging devices integration.
This document is MIO LT™ User Manual, and it is outlined as follows:
This chapter introduces MIO LT™, listing the more common uses of the application, and giving a
first description regarding the user interface.
Chapter 2 describes the application requisites, as well as the installation process itself.
Chapter 3 describes the different options allowed by MIO LT™ to identify properly patients and
images.
Chapter 4 describes the different procedures available to capture image, video or files offered by
MIO LT™.
Chapter 5 describes the method used to send captured images to the medical imaging repository
(PACS).
Chapter 6 describes all MIO LT™ configuration options.
Lastly, chapter 7 describes the technical terminology used in this document, as well as the different
information sources regarding to MIO LT™ offered by C2C to complement this User Manual.
This manual corresponds to MIO LT™ version 2.11. Please check your MIO LT™ version, as
there may be some discrepancies between what is described in the manual and what is really
available in your application if they are not the same version.
MIO LT™ v2 - USER MANUAL (EN)
Page 5 of 70
Introduction
1.1 MIO LT™ - Desktop application for medical image integration
MIO LT™ is a tool for capture, DICOM conversion, and sending to PACS images, video or data
generated by a modality or medical imaging device.
Figure 1.1: Basic scheme of MIO LT™ installation: image capture,
reception of patient data and sending to PACS
MIO LT™ allows images to be acquired in the following ways:
Capture from a folder or path
Capture by video card
By existing or custom made plugins
By the DICOM SEND or DICOM PRINT services available on the device.
MIO LT™ allows patient data and “Accession Number” to be acquired in order to create a study in
PACS as fallow:
Retrieving a Worklist (DICOM Worklist Retrieve)
Receiving it as parameters from the HIS (call HTTP)
Obtaining it directly from MIO Broker™ (another product of the MIO family that falls out of
the scope of this document)
Furthermore, C2C has developed many plugins for MIO LT™ that expands the functionalities
offered by the base product, such as:
DICOM Virtual Printer for Windows applications
Automatic capture of images stored in USB devices
Specific functionalities depending on the manufacturer and the device to integrate
MIO LT™ has been used in many hospitals and health care centers to integrate all kinds of devices
from multiple specialties. A complete and updated list of the devices integrated to this date can be
found at:
http://www.c2ctsis.com/archives/317
MIO LT™ v2 - USER MANUAL (EN)
Page 6 of 70
Introduction
1.2 User interface
MIO LT™ user interface is both clear and intuitive, and has been designed to minimize user
intervention and to facilitate as much as possible the capture, processing and delivery of studies
and images.
A MIO LT™ screenshot mark the areas, in which is divided main application screen that can be
seen in figure 1.2 (page 9).
1.2.1
Patient bar
The Patient bar shows the age, clinical history number or unique Identifier, and the name and
surnames of the selected patient.
New Patient button
Selected patient data
The Patient bar includes as well New Patient button, which enables an introduction or selection of
a new patient.
The actual performance of the New Patient button varies according to the configuration
and application license. Please refer to chapter 3 for further information.
1.2.2
Capture toolbar
The Capture toolbar shows all the options available in your MIO LT™ version to an acquisition of
new images.
The available options for the acquisition of images vary according to the configuration and
application license. Please refer to chapter 4 for further information.
MIO LT™ will automatically link the acquired images with the previously selected patient’s data,
thus generating a DICOM study for future sharing and delivery.
MIO LT™ v2 - USER MANUAL (EN)
Page 7 of 70
Introduction
1.2.3
Gallery area
The Gallery area is a central section of MIO LT™ main screen, where the images are generated by
medical devices connected to MIO LT™. The images selected by user and which have been
automatically opened by one of the Capture toolbar options are displayed.
Section 4.7 of this document describes in detail the functionalities and options available for the
Gallery area.
1.2.4
Send toolbar
The Send toolbar shows all available options for your MIO LT™ version to send and share opened
or captured images.
The available options for sending the studies vary according to the configuration and
application license. Please refer to chapter 5 for further information.
1.2.5
Notifications area
The Notifications area is a central section of MIO LT™ main screen, where the information
regarding to the application status is shown. By default this information is displayed as a “traffic
light” showing the status of the delivery queue (Section 5.6.2), however, temporal notifications can
be also displayed depending on the application status.
1.2.6
Additional controls
MIO LT™ incorporates the following additional controls, located at the top right hand corner of the
main screen:
Details of
the license
Configuration
Minimize
Exit
Control slider
(size of images of the gallery)
MIO LT™ v2 - USER MANUAL (EN)
Page 8 of 70
Introduction
Patient bar
Capture toolbar
Additional controllers
z
Gallery area
Send toolbar
Figure 1.2: MIO LT™ main screen
Notification area
MIO LT™ v2.0 - USER MANUAL (EN)
Page 9 of 70
MIO LT™ Installation
2. MIO LT™ Installation
MIO LT™ should be installed on a workstation or PC that can be physically connected to the
medical imaging device to integrate.
2.1 Hardware requirements
The following table details the minimum and recommended hardware system requirements to run
MIO LT™.
2.2 Software requirements
It is recommended to uninstall any previous version MIO LT™ before installing the new one.
MIO
LT™
to
work
properly
require
prior
and
complete
installation
of
the
Microsoft
Framework.NET4.0. This framework is available as a free download package on:
http://www.microsoft.com/downloads/es-es/details.aspx?FamilyID=9cfb2d51-5ff4-4491-b0e5b386f32c0992
Please
check
Microsoft
documentation
for
a
correct
installation
and
configuration
of
Framework .NET 4.0.
It is necessary to install Full version of Framework .NET 4.0, and not the Client version.
MIO LT™ v2 - USER MANUAL (EN)
Page 10 of 70
MIO LT™ Installation
2.3 Step by Step
MIO LT™ installation process consists of 4 steps:
1.
Downloading the installer
2.
The installation itself
3.
Licensing
4.
Configuration
2.3.1
Download
Regardless of whether you have acquired MIO LT™ or you just want to test it, please contact with
C2C (www.c2ctsis.com) or your software provider, and we will provide you with a required
installer.
2.3.2
Installation
Once you have downloaded the installation file for MIO LT™, please follow these steps:
1.
Close any other application that may be running in your system.
2.
Run the installation file (usually MIOLT.Installer.msi) and click Next>
MIO LT™ v2 - USER MANUAL (EN)
Page 11 of 70
MIO LT™ Installation
3.
You may read the general information regarding to the program; afterwards click Next>
4.
You ought to read and accept the license agreement; afterwards click Next>
MIO LT™ v2 - USER MANUAL (EN)
Page 12 of 70
MIO LT™ Installation
5.
Select the installation folder; afterwards click Next>
The installation of MIO LT™ v 2.x.x should be carried out in a new (empty) folder that has
not been used by the previous version of the program.
6.
Select the start menu folder; afterwards click Next>
MIO LT™ v2 - USER MANUAL (EN)
Page 13 of 70
MIO LT™ Installation
7.
8.
Confirm that you want to install MIO LT™, by clicking on Next>
Once installation is completed, it will be displayed a confirmation message. Click Finish to
terminate the installation.
MIO LT™ v2 - USER MANUAL (EN)
Page 14 of 70
MIO LT™ Installation
2.3.3
Licensing
MIO LT™ is the software developed and owned by C2C Consultoría TSIS, S.L., and in order to use
it the license, emitted by company, is required. To apply for a license, and once the installation of
the application is completed, please follow the steps below:
1.
For the first time start MIO LT™, by double click on MIO LT™ icon located on the Windows
desktop, or accessing the program from the button Start> All Programs> MIO LT
The application will briefly display a start window similar to the following:
After waiting a few moments the application will display the following window:
2.
Contact with C2C (web: www.c2ctsis.com, e-mail: [email protected]) and facilitate the
Activation Code that appears in the previous window. In a period of less than 24 hours you
will receive a reply by email with a license file attached.
MIO LT™ v2 - USER MANUAL (EN)
Page 15 of 70
MIO LT™ Installation
After receiving the license by email, follow these steps to validate the application:
3.
Copy the license file received in a folder on your hard disc.
4.
In the details of the license window, click Import key.
5.
Locate the received license file and click Accept. If all previous steps are correct and the
license is legitimate, MIO LT™ will display the following confirmation message.
6.
Then click Accept. From this moment you can use MIO LT™ in accordance with the terms
of the license agreement and within the authorized period.
At any time you can check the details of your license by clicking the button with the
"?" symbol in the main application window (see section 1.2.6).
2.4 Initial configuration
MIO LT™ has numerous settings that alter significantly the performance of the application and is
able to suit almost any healthcare workflow related to the capture and sharing of medical imaging.
You can access the configuration options MIO LT™ in one of the two ways:
1.
Clicking the configuration button at the right top of the screen (see section 1.2.6).
2.
Running the application MIO.Config.exe, located in the installation folder of MIO LT™
(by default, C: \ C2C \ MIOLT)
In order to start using MIO LT™ it is necessary to define at least the configuration parameters
relating to a patient identification, for image capturing and sending the studies. Throughout the
following chapters are explained in detail all these concepts. In addition, chapter 6 presents a
complete list of all configuration parameters for MIO LT™, indicating their possible values and their
effects.
2.5 Automatic updates
MIO LT™ supports, since version 2.6, automatic updates through MIO Server Updater™.
For more information please consult C2C (www.c2ctsis.com) and revise section 6.3.1.7.
MIO LT™ v2 - USER MANUAL (EN)
Page 16 of 70
Patient identification
3. Patient identification with MIO LT™
3.1 Introduction
Prior to image capturing with MIO LT™ it is necessary to identify the patient to who will be the
study conducted. In this way, MIO LT™ links images correctly with the corresponding patient,
facilitating search and subsequent review from other information systems.
MIO LT™ allows to identify the patient in one of the following ways:
By downloading a worklist or calendar from a hospital server.
By receipt of patient data through a parameters passing (http) from another
information system (HIS, Electronic Medical Records, Health History, etc).
By direct manual entry MIO LT™.
The method of patient identification defined in the configuration of MIO LT™ and not
during use of the application. For more information please refer to section 6.3.1.1.
3.2 DICOM Worklist
3.2.1
Patient selection
The patient selection window based on Worklist presented in the figure 3.1. In case of being
configured for this option, MIO LT™ displays this window when the application starts and after
sending images to PACS.
Figure 3.1: Patient selection window based on DICOM Worklist.
MIO LT™ v2 - USER MANUAL (EN)
Page 17 of 70
Patient identification
To select a patient from the list it is enough to click twice on the name or any other field of the
record.
After selecting a patient, his data will be displayed in the Patient bar at the top of the main
screen (see section 1.2.1). Any subsequent action by MIO LT™ (capturing, sending images,
etc.) will be linked to that patient.
The Worklist window incorporates a toolbar with the following features:
Refresh
New patient
button
button
Search
button
Refresh button. Update Worklist with recent changes made on the server.
New patient button. Permits manually enter a new patient even if the Worklist is
default identification method. This feature can be useful in the event that, for any
reason Worklist is temporarily not available.
Search button. Permits to select a range of dates on the base of which it is possible to
retrieve patients on the Worklist.
Figure 3.2: Date selection window
Without specifying a date range, MIO LT™ retrieves all available appointments from the
Worklist (regardless of date), or only the current day's appointments, depending on the
parameter Only Ask For Today. For more information please refer to section 6.2.1.
MIO LT™ v2 - USER MANUAL (EN)
Page 18 of 70
Patient identification
Figure 3.3: Manual patient data entry window
New patient button may be available or not for Worklist depending on the configuration of
the application. For more information please refer to section 6.2.1.
A patient selection window based on Worklist has the following additional features:
Reordering Worklist by any field. By clicking on any column heading, Worklist is
reordered alphabetically or numerically in that field.
Reordering columns. The columns of Worklist can be changed by clicking and dragging
a column heading to another position.
Change width of columns. You can change the width of a particular column by clicking
and dragging the cursor from the edge of the column heading.
MIO LT™ v2 - USER MANUAL (EN)
Page 19 of 70
Patient identification
3.2.2
Problems and solution
Problem: An error message appears when the application was launching or after completing a
study.
Possible causes and solutions:
1.
The application is incorrectly configured to access the Worklist server. Please check if the
configuration data of MIO LT™ for access to server are correct (see section 6.2.1) or
contact with the technical support service.
2.
The workstation on which it is installed MIO LT™ does not have network access. Please
check if you have network access from other applications. In the negative case retry the
query after a few minutes or contact the technical support service.
Problem: On the Worklist window displays the message: "No records found"
Possible causes and solutions:
1.
There are no appointments for this modality and for the selected day.
Try to change the date range query or contact with a person responsible for citation.
MIO LT™ v2 - USER MANUAL (EN)
Page 20 of 70
Patient identification
3.3 Parameters passing
For those environments in which a Worklist is no available, MIO LT™ allows to perform patient
identification and study by passing parameters from an external application (typically the HIS or
Electronic Medical Records).
The patient identification method is defining in MIO LT™ configuration, and not during the
use of the application. Please contact the technical support service and refer to section 6.3.1.1
for more information.
3.3.1
Patient Selection
With MIO LT™ correctly configured to receive parameters passing, patient selection is performed
from the HIS or Medical Record by a provided button for that purpose by the technical support
service.
Although the appearance and location of the button depends on its Medical Record, below is
presented a generic workflow:
1.
In the HIS or Electronic Medical Records (EMR), perform search of patient to study.
2.
In the HIS or EMR, click the button New images. This will start MIO LT™ with patient data
already preloaded, avoids having to make additional selections. [NOTE: The name of the
button depends on the Medical Record in use and may vary in different cases]
3.
Perform the study (see chapter 4)
4.
By means of MIO LT™, send images to PACS or selected repository (see chapter 5)
5.
Then MIO LT™ will automatically close, again showing the HIS or Medical Record.
3.3.2
Problems and solutions
Problem: By clicking the button New images (or equivalent) of the HIS or Medical Record nothing
happens.
Possible causes and solutions:
1.
A delay of up to 20 seconds is normal. Wait a few moments. The boot the process of MIO
LT™ from HIS passing patient data may take a while, especially if it is the first time you
perform that day.
2.
The MIO Application Launcher (Applauncher.exe) is not launched. Check section
6.3.1.6 or contact the technical support service.
MIO LT™ v2 - USER MANUAL (EN)
Page 21 of 70
Patient identification
3.4 Identification manual
MIO LT™ permits enter patient data manually.
In order to minimize potential patient identification errors, caused by manual data entry, it
not advisable to use this identification system. It is recommended to configure MIO LT™ for
downloading data from a DICOM Worklist or receiving data by a parameters passing (call to
URL).
3.4.1
Patient data entry
The figure 3.4 presents manual patient data entry window. In case of being configured for this
option, MIO LT™ displays this window when the application starts and after sending images to
PACS.
Figure 3.4: Manual patient data entry window.
MIO LT™ v2 - USER MANUAL (EN)
Page 22 of 70
Images capture
4. Capture images with MIO LT™
4.1 Introduction
MIO LT™ can open or capture images in the following ways:
Manually opening images stored on a hard disk or CD-ROM (see section 4.2)
Capturing real-time video or image generated by a medical device with video output
(ultrasound scanner, endoscope, etc. see section 4.3)
Automatically opening the images stored on a CD-ROM or memory or USB device (e.g.
a digital camera see section 4.4)
Automatically or manually opening the images stored in DICOM CD DIR (see section
4.5)
Receiving automatically the images generated by DICOM device (see section 4.6)
Depending on the configuration of the application and the required workflow, images captured or
opened by MIO LT™ can be displayed or not in the Gallery area for further selection or editing by
the user and for processing and sending to PACS or repository selected by MIO LT™
This chapter describes in detail the different options offered by MIO LT™ for capturing images. All
options available for the acquisition of images are displayed as large icons on the Capture toolbar,
at the top of the main screen of the application.
Figure 4.1: Example of Capture toolbar
Options available for image acquisition depend on the configuration and application
license. Please check with your software provider if any of the above options is of your interest
and is not available in your application.
MIO LT™ v2 - USER MANUAL (EN)
Page 23 of 70
Images capture
4.2 Open files
4.2.1
Procedure
To open image files manually, follow the steps below:
1.
Click Open files icon on the Capture Toolbar.
2.
Select the desired files in the browser window.
3.
Click Open. Selected image files will be displayed in the Gallery area.
4.2.2
Supported formats
MIO LT™ permits manually open the following image file formats: dcm, jpg, png, bmp, tif and gif.
In addition, the application also allows to open video files in the formats mpg and avi.
MIO LT™ v2 - USER MANUAL (EN)
Page 24 of 70
Images capture
4.3 Capture of image/video
In order to capture in real time with MIO LT™ images and videos generated by an external
device (such as an endoscope etc.) it is essential to previously install and configure a video
capture card and optionally a USB control pedal. Please refer to section 6.2.2 and consult with
the technical support service.
4.3.1
Capturing images
To capture images generated by an external device (such as an endoscope) perform the following
steps:
1.
Click Capture video icon on the Capture toolbar.
2.
It will appear Capture of image/video window, displaying in real time the image generated
by the external device.
MIO LT™ v2 - USER MANUAL (EN)
Page 25 of 70
Images capture
3.
Click Camera icon in the upper left corner of Capture of image/video window.
Fixed
Image capture
4.
Close
the window
With each click on Camera icon, a new image is captured and displayed automatically in
the Gallery area, behind the Capture of image/video window.
5.
Once you have captured all the images you wanted, close Capture of image/video window
by clicking Close icon in the upper right corner of the window.
4.3.2
Recording videos
To capture real-time video signal generated by an external device (such as an endoscope) perform
the following steps:
1.
Click Capture video icon on the Capture toolbar.
2.
It will appear Capture of image/video window, displaying in real time the image generated
by the external device.
3.
Click Video camera icon in the upper left corner of Capture of image/video window.
Video capture
4.
The video recording starts automatically. After a few seconds, recording will stop
automatically.
MIO LT™ v2 - USER MANUAL (EN)
Page 26 of 70
Images capture
MIO LT™ allows to configure the default duration of captured videos, making it
unnecessary to manually end recording. For more information please refer to section 6.2.2.
5.
If desired, you can stop recording at any time by clicking [STOP] icon.
Stop recording
[STOP]
6.
Close
the window
Once you have captured all the images you wanted, close Capture of image/video window
by clicking Close icon in the upper right corner of the window.
MIO LT™ allows also use external USB pedals to perform actions of image capture, start
and end video recording. For more information please contact with the technical support
service.
4.4 Automatic capture of images stored in USB or CD devices.
MIO LT™ has the ability to automatically detect storage devices connected by USB (USB keys,
external hard drives, etc.), as well as automatically open and display in the Gallery area images
containing these devices. This feature is useful to prevent a user from having to perform the
manual search for folders and subfolders, images acquired with a memory device accessible by
USB (e.g. a camera).
MIO LT™ also has ability to automatically detect CDs and automatically display the images or
videos that contain CD.
4.4.1
Procedure
To automatically open images stored on a USB or CD device, please perform the following steps:
1.
Startup MIO LT™
2.
Connect your workstation USB device or insert a CD containing images.
3.
MIO LT™ will display a status message of automatically charging images process.
MIO LT™ v2 - USER MANUAL (EN)
Page 27 of 70
Images capture
4.
MIO LT™ displays in the Gallery area images as they are loaded.
MIO LT™ does not erase the images acquired via USB device. However, MIO LT™ does
not automatically open or display images that have already been shown previously.
4.4.2
Problems and solutions
Problem: While connecting USB device (memory, camera, etc.) to the PC an error message
appears:
Possible causes and solutions:
1.
The device contains no images. Please check that effectively no images stored on the
device.
2.
The device contains images that were downloaded previously. In order to avoid duplication
of studies, MIO LT™ keeps track of images downloaded and not opens automatically
images that had already been previously shown. If in any case you want to upload the
images, locate and open the file manually (see section 4.2)
4.5 Capturing images from CD / CD DICOM
MIO LT™ has the ability to explore CDs compatible with DICOMDIR format as well as open,
convert and send the images stored in them. This functionality is typically useful when you want to
import a study of a patient from another facility.
A CDs DICOMDIR usually are created by radiological imaging devices with capacity to do so and
contain, in addition to DICOM images in themselves, a tree structure that holds an organization of
images in the form of studies and series.
The option to import DICOM CD (Load CD button) may not be available in your version of
MIO LT™, as it depends on the application license. If you need this functionality, please
contact your software provider.
MIO LT™ v2 - USER MANUAL (EN)
Page 28 of 70
Images capture
Additionally, MIO LT™ allows exploring of any standard CD-ROM (ISO 9660), providing for them
the same functionality for DICOM CDs, except for the tree navigation DICOMDIR.
MIO LT™ allows, in two different ways, imports and sends images stored on the CD:
Auto Send. ALL images are sent on CD. The content of the CD is NOT displayed in the
Gallery area. The user cannot select images to send.
Manual Send. The user can select images to send which are displays in the Gallery
area. Only are sending the images that appear in the Gallery area.
It is strongly recommended to configure and use MIO LT™ for automatic delivery whenever
possible. Manual sending CDs with many images (CT, MRI etc.) can significantly penalize
performance and operation of the workstation.
4.5.1
Auto send
To enable the function CD Auto send, please refer to section 6.3.2 or contact your
technical support service.
To import and automatically send ALL the images on a CD DICOMDIR:
1.
Insert a CD into the workstation
2.
Click Load CD icon on the Capture toolbar.
3.
After a few moments a informative window will appear with the CD contents. Press the
button Send to PACS.
4.
MIO LT™ automatically starts exploring the CD, importing and sending all the images
contained therein and simultaneously displaying a progress bar.
MIO LT™ v2 - USER MANUAL (EN)
Page 29 of 70
Images capture
5.
At the end of the process, the CD tray will open automatically.
The termination of the process does not imply that the images have already reached the
PACS, but it has successfully joined the MIO LT™ sending queue. For more information about
the sending queues, please refer to section 5.6.
MIO LT™ v2 - USER MANUAL (EN)
Page 30 of 70
Images capture
4.5.2
Manual sending
To manually import the images on a CD DICOMDIR:
1.
Insert a CD into the workstation
2.
Click Load CD icon on the Capture toolbar.
3.
In case of appearing informative window with the CD contents. Press the button Explore.
4.
After a few moments DICOMDIR selection window will appear, showing a content of the
CD as spanning tree.
MIO LT™ v2 - USER MANUAL (EN)
Page 31 of 70
Images capture
In case that exploring CD is not compatible with DICOMDIR format, MIO LT™ will display a
browse window for selecting files instead of DICOMDIR tree.
5.
Select individual images, entire series or complete study by clicking on the name of each
series or image. Selected series and images will be highlighted in blue and the total
number of selected images will appear at the bottom of the window.
6.
4.5.3
Click Import button. Selected images will be displaying in Gallery area.
Images support without DICOM
The plugin DICOMDIR MIO LT™ is configured by default to importation and sending actions are
performed solely for DICOM files (*. dcm and without content extension on the CD. Nevertheless,
it is possible to configure the plugin that supports conventional image formats (jpg, bmp, etc.). For
more information, please refer to section 6.3.2.
4.6 Receiving DICOM
MIO LT™ can act as SCP of DICOM store, that is mean, that can receive and display real-time
images generated by a DICOM device, in order to subsequently allow its manipulation and sending
to PACS or the corresponding repository.
To make possible the reception of DICOM studies, it is necessary to properly configure both
devices: one that send the images and the MIO LT™ station that is receiving. For more information
please refer to section 6.3.3.
MIO LT™ v2 - USER MANUAL (EN)
Page 32 of 70
Images capture
4.7 Using gallery
The Gallery area is the central section of the MIO LT™ main screen. It shows the images captured
by MIO LT™ using any of the methods described in the previous sections.
Figure 4.2: MIO LT™ Gallery area with images
Besides allowing reviewing the captured images, the Gallery also fulfills a preprocessing of them:
As a preform of sending the study to the PACS or selected repository, the user can take the
following actions over the images:
4.7.1
Rearrange
Select
Remove
Include diagram with localization of pathologies
Print
Rearrangement of images
MIO LT™ allows rearrange the images, one by one, within the Gallery area. To place a specific
image in another position, follow these steps:
1.
Click on the image that you want to move and drag it to a new position.
MIO LT™ v2 - USER MANUAL (EN)
Page 33 of 70
Images capture
2.
Drop the image in the desired position. The image will be relocated in all respects,
including its position in the series DICOM, its storage order and visualization in the PACS
display.
4.7.2
Image selection
MIO LT™ permits multiple forms selection of images within the Gallery area. The selected images
will be those which are identify as affected by subsequent actions (deleting, editing, etc.), and are
depicted in the Gallery area framed in blue and illuminated surroundings.
Figure 4.3: Gallery with 3 images selected
The set of selected images will be affected by a subsequent action of deleting or editing.
However, there are two exceptions to this rule: the rearrangement (which can only be done
frame by frame) and sending (affecting ALL images from the Gallery, not just those selected).
Please ELIMINATE the images that are not desired to be transmitted prior to take send action.
The following describes the different procedures of selection of images:
4.7.2.1
Individual selection
To select a single image, just click on it.
MIO LT™ v2 - USER MANUAL (EN)
Page 34 of 70
Images capture
Figure 4.4: Gallery with 1 image selected
To deselect a single image, click on it again.
4.7.2.2
Selection of multiple adjacent images:
1.
Click on the first images of a range to select.
2.
Press the Shift key and click the last images of a range to be selected. The Gallery will look
similar to the following:
Figure 4.5: Gallery with 6 adjacent images selected.
MIO LT™ v2 - USER MANUAL (EN)
Page 35 of 70
Images capture
4.7.2.3
Selection of multiple non-adjacent images
To select multiple non-adjacent images simply click on each of them. The selection of an image is
not lost when you click on another:
Figure 4.6: Gallery with 3 non-adjacent images selected.
4.7.2.4
Selection of all images
To select all the images from the Gallery, follow these steps:
1.
On any of the images, click the right mouse button. Displays the following context menu:
2.
Click Select > Select All
MIO LT™ v2 - USER MANUAL (EN)
Page 36 of 70
Images capture
4.7.2.5
Reverse selection
At any time you can reverse the selection, that is select all unselected images and vice versa, in a
single step. To do this, follow these steps:
1.
On any of the images, click the right mouse button. Displays the following context menu:
2.
Click Select > Revers selection
MIO LT™ v2 - USER MANUAL (EN)
Page 37 of 70
Images capture
4.7.2.6
Images unselecting
At any time you can unselect an image already selected simply by clicking on it.
It is also possible unselect all selected images simultaneously, following these steps:
1.
On any of the images, click the right mouse button. Displays the following context menu:
2.
Click Select > Unselect all
4.7.3
Study review
While MIO LT™ is not a medical image viewer, it does have some rendering capabilities, in order to
allow review of the study prior to submission to the PACS or selected repository.
On the one hand, the Gallery displays all images captured. You can change the display size of
thumbnail images using the slider at the top right corner of the screen:
The functionality of slider is configurable. For more information, please refer to section
6.3.1.2.
On the other hand, MIO LT™ allows reviewing images in full screen mode. By double clicking on
any of the images, the image is displayed in full screen, along with 2 controls, left and right, to
display Previous and Next images.
MIO LT™ v2 - USER MANUAL (EN)
Page 38 of 70
Images capture
It is also possible to review previous and subsequent images consecutively moving the
mouse wheel.
4.7.4
Pathologies location
MIO LT™ includes a series of diagrams to facilitate, during the subsequent review of the study, the
correct location of the explored zone. To do this MIO LT™ has a number of templates that can be
added to the Gallery, and on which you can mark points of interest or study areas.
By default, MIO LT™ has the following diagrams template:
Entire masculine body
Masculine face
Female face
Stomach
Intestine
MIO LT™ supports also incorporation of fully defined diagrams by the user. For more
information, please refer to section 6.3.1.5.
To insert to the Gallery a diagram with location of pathologies, and mark on it the points of interest
studied, follow these steps:
1.
Select an image from the Gallery by clicking the right mouse button.
2.
On the context menu that displayed, click on Pathologies location.
z
MIO LT™ v2 - USER MANUAL (EN)
Page 39 of 70
Images capture
3.
In the dropdown menu of Pathologies location window, select the desired diagram:
4.
Click on the points of interest in the picture, which will be conspicuously marked with red
dots.
MIO LT™ v2 - USER MANUAL (EN)
Page 40 of 70
Images capture
5.
Click Accept. The edited diagram is added to the Gallery.
Depending on the configuration of your application, MIO LT™ will display the pathologies
location diagram as a separate image or as an image attached to the clinical picture of interest.
For more information, please refer to section 6.3.1.5.
4.7.5
Printing images
MIO LT™ permits, from version 2.3 onwards, printing images from the Gallery. Printing does not
replace sending images to PACS or repository, but it serves as a supplement in case you want to
get a copy of the full study or part of it.
To perform the desired image printing, please follow the steps below:
1.
Select the images that you want to print. MIO LT™ will print only selected images or entire
study in case of selection absence. Please refer to 4.7.2 to see the various methods of
image selection.
2.
Click on the Print icon on the Capture toolbar.
The appearance of the Capture toolbar may vary depending on configuration options and
license version of MIO LT™.
3.
In the printer selection window, choose the printer you want to use and click the Print
button.
4.
The selected images will be printed. MIO LT™ includes in the printed document a header
with the patient's name, medical record number, date of procedure performed and
printing.
4.7.6
Saving images
For more information, please refer to section 5.5.
MIO LT™ v2 - USER MANUAL (EN)
Page 41 of 70
MIO LT™
5. Sanding images with MIO LT™
5.1 Introduction
After completing the process of capturing and selection images, MIO LT™ can be sent to one or
more of the following destinations:
To the system of archiving and communication of the image (PACS) of the hospital.
A one or more additional PACS located in other centers.
To MEDTING platform for sharing medical images in a web environment.
MIO LT™ incorporates
a powerful queue management module for conducting deliveries,
forwarding and administration of transmission errors. This module allows working with MIO LT™
even if there are studies in progress.
Moreover, apart from the proper sending, MIO LT™ permits to save a copy of the images in a
folder or hard drive.
En el presente capítulo se describen en detalle las diferentes opciones que ofrece MIO LT™ para el
envío de imágenes. Todas ellas se muestran en forma de grandes iconos en la Barra de
herramientas de envío, en la parte inferior de la pantalla principal de la aplicación.
This chapter describes in detail the various options for sending images offered by MIO LT™. All of
them are displayed as large icons on the Send toolbar in bottom part of the main screen of the
application.
Figure 5.1: Send toolbar
Options available for sending images depend on configuration and application license.
Please consult your software provider if any of above options is of your interest and is not
available in your application.
Before sending studies is necessary to configure certain aspects of both MIO LT™ and the
PACS or the selected repository. Please contact the Informatics service and see section 6.2.3
for more information.
MIO LT™ v2 - USER MANUAL (EN)
Page 42 of 70
MIO LT™
5.2 Sending images to PACS
5.2.1
Selection
MIO LT™ sends ALL images from the Gallery, not just the selected ones. Please ELIMINATE
the images that are not desired to be transmitted prior to take send action. To learn more
about how to select and delete images, see section 4.7.
5.2.2
Sending
In order to send to PACS all images from the Gallery, please follow the steps below:
1.
Click the Send to local PACS button on Send toolbar:
2.
MIO LT™ displays for a few moments the following informational message:
3.
After a while the above message will disappear and all gallery images and patient data will
be deleted. MIO LT™ is now ready for conducting a new study.
5.3 Sanding images to multiple PACS
MIO LT™ allows sending several PACS studies simultaneously. This feature can be useful when for
example you want to share a studio with an outside hospital but at the same time retain a copy of
the study in the PACS of the hospital of study origin.
Before sending studies to multiple PACS it is necessary to configure certain aspects of both
MIO LT™ as well as PACS destination. Please contact the Informatics service and see section
6.2.3 for more information.
In order to send all images from the Gallery to multiple PACS simultaneously, please follow the
steps below:
MIO LT™ v2 - USER MANUAL (EN)
Page 43 of 70
MIO LT™
1.
Click Send to all button on the Send toolbar:
2.
MIO LT™ displays for a few moments the following informational message:
3.
After a while the above message will disappear and all gallery images and patient data will
be deleted. MIO LT™ is now ready for conducting a new study.
For more information about the sending status and its management, please refer to
section 5.6.
5.4 Sending images to MEDTING
5.4.1
Preliminary information
MIO LT™ allows sending pictures to MEDTING, collaborative web platform for exchange of clinical
cases with images. This feature allows a fast and simple implementation of telemedicine projects
and circuits, second opinions, clinical committees and medical accreditation and formative groups
based on MEDTING.
Figure 5.2: MEDTING images uploaded directly from medical devices with MIO LT™
MIO LT™ v2 - USER MANUAL (EN)
Page 44 of 70
MIO LT™
Before sending studies to MEDTING it is necessary to have a registered user on the
platform and set certain parameters in MIO LT™. Please contact the technical support service
and refer to section 6.3.4 for more information.
For more information on MEDTING, please visit the website http://medting.com
5.4.2
Sending images
In order to send all images from the Gallery to MEDTING, please follow the steps below:
1.
Click Send to MEDTING button on the Send toolbar:
2.
Optionally, you may be required to log in with your MEDTING user. Please enter your
username and password and click Accept.
3.
Optionally, you may need to choose between adding the images to an existing case and
creating a new case in MEDTING. Choose the desired option and enter, if it is required, the
descriptive information of the case to create and click OK.
MIO LT™ v2 - USER MANUAL (EN)
Page 45 of 70
MIO LT™
4.
MIO LT™ displays for a few moments the following informational message:
5.
After a while the above message will disappear and all gallery images and patient data will
be deleted. MIO LT™ is now ready for conducting a new study.
After sending the output, the study will be available in the private area of MEDTING corresponding
to the user defined in the configuration of MIO LT™.
For more information about the sending status and its management, please refer to
section 5.6.
5.5 Saving images
MIO LT™ allows, from version 2.4 onwards, save a copy of the images from the gallery in a folder
or local hard disk or network. The action of saving one or more images does not replace sending
MIO LT™ v2 - USER MANUAL (EN)
Page 46 of 70
MIO LT™
the study to PACS or repository, but it serves as a supplement in case you want to get a copy of
the full study or part of it.
MIO LT™ enables save images using a software plugin which must be purchased
separately from the application. Please consult your software provider if "Save" option does not
appear on the Send toolbar of main screen of MIO LT™ (see section 1.2.4).
To save a copy of the desired images in one folder, please follow those steps:
1.
Select the images that you want to save. MIO LT™ saves only selected images or entire
study in case of selection absence. Please refer to section 4.7.2 to see the various methods
of images selection.
2.
Click Save icon on the Send toolbar.
3.
Depending on the configuration of your MIO LT™ application, you will be asked or not to
select a folder in which ought to be saved the images.
4.
The selected images will be saved in the chosen route or in the default path defined in the
configuration (for more information see section 6.3.6)
5.
Depending on the configuration of your MIO LT™ application will erase all pictures from
the Gallery and delete the context of the patient (for more information see section 6.3.6)
MIO LT™ v2 - USER MANUAL (EN)
Page 47 of 70
MIO LT™
5.6 Sending queue
5.6.1
Introduction
MIO LT™ internally manages studies and images to send via a queue. Having a sending queue has
the following advantages:
Allows to keep working with the application even if there are some studies in the
process of sending (Pending).
The user has all the time an accurate knowledge of the state of the application and
processed studies (Pending, Sent or Erroneous).
5.6.2
Minimizes sending errors due to connection failures, unavailability of the network, etc.
Facilitates identification and forwarding erroneous studies.
Allows you to configure the way in which studies are processed.
State of sending
MIO LT™ informs the user about the state of sending by "traffic light" icon in the lower right
corner of the application (Notification area). Notifications code used is as follows:
Erroneous sending. The application can continue to be using, but some of the studies
has not reached its destination. Please contact the technical support department.
Sending in progress. MIO LT™ is processing the pending send, but the application still
can be used normally.
Sent correctly. All consignments are processed correctly.
You can obtain detailed information about the status of sending by placing the mouse, without
clicking, on the "traffic light" icon. After a while there will appear a window with detail information:
In the picture above you can see, for example, that MIO LT™ has sent a total of 68 images to
PACS, of which there remains no pending neither erroneous sending.
For more detailed information about the state of sending it is necessary to use Queue management
tool described in the next section.
MIO LT™ v2 - USER MANUAL (EN)
Page 48 of 70
MIO LT™
5.6.3
Queue management tool
To open the Queue management tool, click twice on any of the status indicators of "traffic light"
icon, displayed in the Notification area at the bottom right corner of the main application window.
After a while you will see a window similar to the following:
Queue selector
Type of study
filter tab
Study selection
area
Action button bar
MIO LT™ v2 - USER MANUAL (EN)
Page 49 of 70
MIO LT™
The queue management tool incorporates the following features:
Queue selector. MIO LT™ has an independent sending queue for consignments to
PACS and another repository (such as MEDTING). By this dropdown, queue that is
desired to manage can be selected.
Filter tabs. Allow display studies only rated as Pending, Sent or Erroneous.
Study selection area. Allows a selection of studies and images stored in the queue. The
selection is made by "marking" the study or individual images
Action button bar. Allows to perform actions on the selected studies:
-
Forward. Resends marked studies to the corresponding repository.
-
Remove. Deleted marked studies from the queue (not the repository).
To learn more about configuration options of sending queue, please see sections 6.3.4.2
(Sending to MEDTING), 6.3.7.3 (Sending to MIO Comm™) and 6.3.8.3 (sending to PACS).
5.7 Multistudy sending
MIO LT™ allows, from version 2.9 onwards, make partial sending of the images displayed in the
Gallery area. This option, denominated as Multistudy sending, causes, in the case of being
activated, notable differences in the way in which MIO LT™ processes the images for sending.
Specifically, with activated Multistudy sending option:
Sending only the images selected by the user (instead of all images).
After sending selected images, they are deleted from the Gallery area.
After sending selected images, the not selected images (and therefore not sent) are
still displayed in the Gallery area, then may be sent in one or more successive partial
sending.
The patient context is not deleted until the Gallery area become empty of images from
one or more successive consignments.
In order to minimize potential user errors, MIO LT™ is configured by default with disable a
Multistudy sending option. If you require to activate it please contact the technical support
service.
MIO LT™ v2 - USER MANUAL (EN)
Page 50 of 70
MIO LT™
6. Configuration of MIO LT™
MIO LT™ is an extremely flexible tool for the integration of medical imaging and can be configured
to fit multiple clinical and research workflows. The majority of features and performances of MIO
LT™ are adaptable to the needs of the user.
6.1 Access to configuration module
You can access MIO LT™ configuration options in the following ways:
From the main application interface by clicking on the configuration icon, in the
additional controls area (upper right corner of the screen)
Configuration
Running MIO.Config.exe file directly, that is located in the installation folder of the
application.
MIO LT™ v2 - USER MANUAL (EN)
Page 51 of 70
MIO LT™
6.2 Basic configuration
As a following there configuration parameters indicated that affect MIO LT™ to the most typical
image integration: identification of the patient by worklist, image capture and sending to PACS.
For an exhaustive description of all configuration parameters MIO LT™, please refer to
section 6.3.
6.2.1
Identification of the patient by DICOM Worklist
The following parameters are accessible in the General tab of MIO Config™, configured a
reception of Worklist by MIO LT™:
General
Option
Parameter
Possible value
Description
Graphic interface
Startup mode
Worklist
Method selected for patient
identification
Graphic interface
Show button
“New Patient”
Activated/
Deactivated
Graphic interface
Show button
“Close Window”
Activated/
Show / hide the New Patient button
in the Worklist window
Shows / hides the Close Window
button in the New Patient window.
Deactivated
Worklist server
Node
Address IP
Worklist server IP
Worklist server
Port
Natural number
Port on which the Worklist server
listens for requests
Worklist server
CallingAE
Alphanumeric
string
DICOM Identifier (AETitle) of the
station in which MIO LT is installed
Worklist server
CalledAE
Alphanumeric
string
DICOM Identifier (AETitle) of the
Worklist server
Worklist server
Modality
Alphanumeric
string
Modality for Worklist retrieve
Worklist server
Only ask for today
Activated/
Deactivated
Activates/deactivates the Worklist
queries for the current day only
Table 6.1: The configuration parameters for Worklist
MIO LT™ v2 - USER MANUAL (EN)
Page 52 of 70
MIO LT™
6.2.2
Capture of image/video
The following parameters are accessible in the Capture tab of MIO Config™, affect the way in
which MIO LT™ captures the image or video generated by a medical imaging device with video
output (such as an endoscope or ultrasound):
Capture
Option
Parameter
Possible value
Description
General
Show configuration
options
Activated/Deactivated
Show / hide dropdown menus of
video device and formats selection
in the video capture window
General
Maximum video
capturing seconds
Natural number (>2)
Predefined duration of video
capture
General
Device
Alphanumeric string
Device selected for video
capturing
General
Format
Alphanumeric string
Video capture format (resolution
and fps)
General
Deinterlaced
General
Video capture
enabled
Activated/Deactivated
Activated/Deactivated
Activates/deactivates
enhancement filter to capture
interlaced video signal
Activates/deactivates an ability to
capture video in addition to
images
Table 6.2: The configuration parameters for Video capture
The easiest way to configure the Device and Format parameters is by marking Show
configuration options as active, and then restarting the application and starting a Video capture
with MIO LT™. The available options will appear in two dropdown menus in the video capture
window (see section 4.3).
Selector de fuente
de vídeo
MIO LT™ v2 - USER MANUAL (EN)
Selector de formato
Page 53 of 70
MIO LT™
6.2.3
Sending to PACS
The following parameters are accessible in the PACS tab of MIO Config™ configure Images
sending to PACS from MIO LT™:
PACS
Option
Parameter
Possible value
Description
Primary PACS
Node
IP Address
PACS IP
Primary PACS
Port
Natural number
Port on which the PACS listen sending
studies by MIO LT
Primary PACS
CallingAE
Alphanumeric string
DICOM Identifier (AETitle) of the station in
which MIO LT is installed
Primary PACS
CalledAE
Alphanumeric string
DICOM Identifier (AETitle) of PACS
Table 6.3: The Configuration parameters for Sending to PACS
6.3 Configuration parameters
As a following it is performed an exhaustive description of all MIO LT™ configuration options that
are accessible from different tabs of MIO Config™.
Many of the advanced features offered by MIO LT™ are implemented through software
plugins, which must be purchased in addition to the basic license, so may not be available in
your installation program. For more information, please contact your software provider.
MIO LT™ v2 - USER MANUAL (EN)
Page 54 of 70
MIO LT™
6.3.1
General
The following options and parameters affect global configuration of MIO LT™:
6.3.1.1
Graphic interface
The following parameters affect the method of patient identification and the performance of
certain windows in MIO LT™
Parameter
Possible value
Description
Startup mode
Worklist, HTTP, Manual
Method selected for patient identification
Show buttom
“New patient”
Activated/Deactivated
Show / hide New Patient button at the
Worklist window
Show button
“Close window”
Activated/Deactivated
Show / hide the Close Window button in
the New Patient window. Affects Worklist
and Manual modes
Table 6.4: The configuration parameters for User interface
6.3.1.2
Gallery
The following parameters affect the way in which MIO LT™ displays images in the Gallery area:
Parameter
Possible value
Description
Minimum elements per row
Natural number
Minimum number of images per row in
the Gallery. Corresponds to the "Large"
position of the control sliding the image
size in the gallery
Maximum elements per row
Natural number >
MinimumPerRow
Maximum number of images per row in
the gallery. Corresponds to the "Small"
position of control sliding the image size
in the Gallery
Allow move elements
Activated/Deactivated
Allows / prevents drag images in the
gallery to reorder the study
Table 6.5: The configuration parameters for Gallery area
MIO LT™ v2 - USER MANUAL (EN)
Page 55 of 70
MIO LT™
6.3.1.3
General
Parameter
Possible value
Description
Multistudy enabled
Activated/Deactivated
Activates / deactivates the possibility of
sending images in batches, sending only
selected images, instead of the entire
gallery
Patient data fields
Fields list of the following
format: <NameField />
Define the fields to display in the window
of patient manual data entry
DICOM logs enabled
Activated/Deactivated
Activates / deactivates the generation of
log files on DICOM functions
DICOM logs path
Route
Route where are stored log files on the
DICOM functions
DICOM root UID
DICOM UID
C2C prefix for generating unique DICOM
objects
Table 6.6: The configuration parameters for General MIO LT™
6.3.1.4
Worklist server
The following parameters configure MIO LT™ for a search and retrieval of patient data through the
Worklist (DICOM Worklist) obtained from an external server:
Parameter
Possible value
Description
Node
IP Address
Worklist server IP
Port
Natural number
Port on which the worklist server listens for
requests
CallingAE
Alphanumeric string
DICOM Identifier (AETitle) of the station in
which MIO LT is installed
CalledAE
Alphanumeric string
DICOM Identifier (AETitle) of Worklist
server
Modality
Alphanumeric string
Modality for which the worklist should be
retrieved
Only ask for today
Activated/Deactivated
Activates/deactivates consultations of the
Worklist only for the current day
Table 6.7: The configuration parameters for Worklist
MIO LT™ v2 - USER MANUAL (EN)
Page 56 of 70
MIO LT™
6.3.1.5
Pathology location
The following parameters activated graphic templates of MIO LT™ for the localization of the study
area, in addition to defining how they are displayed and saved in the gallery:
Parameter
Possible value
Add diagram as
single image
Activated/Deactivated
Add diagram as
merged image
Activated/Deactivated
Relative
measurement
Full body male
Full body female
Face male
Face female
Stomach
Natural number (1-100)
Activated/Deactivated
Activated/Deactivated
Activates/deactivates that generated
pathologies location diagram is added to
the Gallery as attached to the original
image
Size of pathologies location diagram,
expressed as percentage of the original
image size
Activates/deactivates a template of the
male human body for a location of
pathologies
Activates/deactivates a template of the
female human body for a location of
pathologies
Activates/deactivates male face template
for a localization of pathologies
Activated/Deactivated
Activates/deactivates female face template
for a localization of pathologies
Activated/Deactivated
Custom templates
Activates/deactivates that generated
pathologies location diagram is added to
the Gallery as a single image
Activated/Deactivated
Activated/Deactivated
Intestines
Description
Customized templates list ,
in format:
< TemplateName >
<FileName>archivoimage
n.extensión</FileName>
<Description>Etiqueta<
/Description>
</ TemplateName >
Activates/deactivates a template of the
digestive system with highlighted stomach,
for localization of pathologies
Activates/deactivates a template of the
digestive system with the intestines
highlighted, for location of pathologies
Activates image files chosen by the user, to
be located in the same path as the default
templates (*), for use as templates for
localization of pathologies.
(*)The default installation path is:
.../MIOLT/Images/Templates
Table 6.8: The Configuration parameters for Templates of pathologies location
MIO LT™ v2 - USER MANUAL (EN)
Page 57 of 70
MIO LT™
6.3.1.6
App Launcher
The following parameter affect the configuration of MIO LT™ when is going to receive patient data
through a parameter passing (call HTTP) from another information system (HIS, Electronic Medical
Records, Health History, etc.).
Parameter
Possible value
Description
Port
Natural number
Port on which the MIO LT listen call HTTP
by parameter passing
Table 6.9: The configuration parameters of App Launcher module
In order to MIO LT™ receives patient data correctly by passing parameters (call HTTP) it is
necessary to previously run the application Applauncher.exe, which is located in the
installation folder of MIO LT™.
If you want that MIO LT™ always receive patient information by passing parameters (not by
Worklist or manually), you should leave the application Applauncher.exe configured to boot by
default when Windows starts.
The format of the call HTTP is as follow:
http://IP:8000/GetPatientData?Tag1=ValorTag1&Tag2=ValorTag2&...
Where:
IP: Node of the workstation (can be Localhost) in which MIO LT™ is installed, that
will receive the parameters
TagX: DICOM tag name to convey, for example PatientID, PatientName, etc.
ValueTagX: DICOM tag value to be transferred, for example 938745 (for PatientID)
or Surname ^ Name (for PatientName)
MIO LT™ v2 - USER MANUAL (EN)
Page 58 of 70
MIO LT™
6.3.1.7
MIO Updater
The following parameters configure the MIO LT™ connection to a server for automatic software
updates:
Parameter
Possible value
Description
Server URL
IP Address: port
IP: server port of automatic updates
Enabled
Activated/Deactivated
Activates/deactivates automatic updates at
MIO LT startup
MainFileName
Name of File.extension
Executable file name of the application to
automatically update
InstallType
Worklist, HTTP
Selected method for patient identification
at the time of MIO LT installation
SecondsTimeout
Natural number
Timeout, in seconds, for a response from
automatic updates server
InfoUrl
URL
Web page address with additional
information on the improvements included
in the latest actualization by MIO Updater
Table 6.10: The configuration parameters for Automatic update server
6.3.1.8
Common options
The next parameter defines the primary language of the application. At the moment of preparing
this manual MIO LT™ is available in Spanish, English and Catalan.
Parameter
Possible value
Description
Language
ES, EN, CA
Main language of the application. Available
languages: Spanish, English, Catalan
Table 6.11: The configuration parameter for Application language
6.3.1.9
Plugin list
The following parameter is used to activate the licensed plugins:
MIO LT™ v2 - USER MANUAL (EN)
Page 59 of 70
MIO LT™
Parameter
Possible value
Description
Plugins
Lista de plugins a activar, en formato:
It defines, among all licensed plugins,
which ones must be loaded into memory at
startup MIO LT and in what order they
should appear in the toolbar user interface
<Plugin
Filename="PluginName" Key=
"KeyPlugin" />
Table 6.12: The parameter for activation of available plugins
6.3.2
DICOMDIR
The following parameters configure the performance of the plugin of MIO LT™ to explore, capture
and content delivery to PACS CD / CD DICOMDIR:
6.3.2.1
General
Parameter
Possible value
Description
Show file
explorer
Activated/Deactivated
Activates/deactivates displaying in the Gallery the
entire contents of CD prior to sending to the PACS
Auto send to
primary PACS
Activated/Deactivated
Auto send to all
PACS
Activated/Deactivated
Auto send to
MEDTING
Activated/Deactivated
Activates/deactivates possibility to send the contents
of the CD directly to main PACS, showing no images
in the MIO LT Gallery. It is recommended for large
CDs.
Activates/deactivates possibility to send the contents
of the CD directly to PACS, showing no images in the
MIO LT Gallery. It is recommended for large CDs.
Activates/deactivates possibility to send the contents
of the CD directly to MEDTING, showing no images in
the MIO LT Gallery. It is recommended for large CDs.
Table 6.13: The general configuration parameters for plugin DICOMDIR
6.3.2.2
Data Acquisition
Parameter
Possible value
Description
Auto detect CD
Activated/Deactivated
Activates/deactivates automatic detection of
CD's in the reader
Table 6.14: Additional configuration parameters for plugin DICOMDIR
MIO LT™ v2 - USER MANUAL (EN)
Page 60 of 70
MIO LT™
6.3.2.3
File Seeker
Parameter
Possible value
Description
Specific folder
Route
Route over which the CD files search is
performed in order to import/send it
Recursivity
Activated/Deactivated
Activates/deactivates recursive search through
folders within SpecificFolder
Valid extensions
List of .extensions
separated file by ;
Extensions file to be processed by the FileSeeker
Excluded extensions
List of .extensions
separated file by ;
File extensions to be ignored by the FileSeek
Table 6.15: The specific configuration parameters for File Seeker module
MIO LT™ enables advanced functionality for processing DICOM CD through a software
plugin, which must be purchased separately from the basic program license. For more
information, please contact your software provider.
6.3.3
DICOM Listener
The following parameter affects the configuration of MIO LT™ for receiving images from a DICOM
device and using DICOM communications:
Parameter
Possible value
Description
Port
Natural number
Port on which MIO LT listens DICOM devices that send
studies through services DICOM Storage or DICOM
Print.
Table 6.16 The configuration parameter for plugin DICOM Listener
MIO LT™ v2 - USER MANUAL (EN)
Page 61 of 70
MIO LT™
6.3.4
MEDTING
The following parameters configure the plugin MIO LT™ for studies sending to MEDTING, a
collaborative web platform for sharing of clinical picture (http://medting.com):
6.3.4.1
General
Parameter
Possible value
Description
Url
URL
Web Service URL published by MEDTING to
upload images and cases
Proxy
Activated/Deactivated
Activates/deactivates a connection configuration
through MEDTING proxy
Timeout
Natural Number
Maximum time, in seconds, for MEDTING server
response
ProxyServer
IP Address
Proxy IP
ProxyPort
Natural Number
Proxy port
ProxyUser
ProxyPassword
ProxyDomain
Username
Password
Alphanumeric string
Alphanumeric string
Domain name
Alphanumeric string
Alphanumeric string
Proxy user Identifier
Proxy access password
Proxy domain Identifier
User Identifier of MEDTING owner of upload case
User password of MEDTING owner of upload case
Dicomize
Activated/Deactivated
Activates/ deactivates conversion into DICOM
images to upload to MEDTING
Autocreate case
Activated/Deactivated
Activates/ deactivates automatically creating a
new case in MEDTING for Image upload
Table 6.17: The general configuration parameters for Sending plugin to MEDTING
MIO LT™ v2 - USER MANUAL (EN)
Page 62 of 70
MIO LT™
6.3.4.2
Queue
The following parameters configure sending queue from MIO LT™ to MEDTING:
Parameter
Possible value
Description
Maximum attempts
Natural number
Maximum number of send retries before marking a
study as erroneous
Hours maintenance
Natural number
Days record alive
Natural number
Seconds paused timer
Natural number
Interval, in hours, between two consecutive queue
cleanings, carried out by the automatic
maintenance of all elements with a life time> Days
record alive
Maximum days number that an item will remain in
the queue before being automatically deleted by
the maintenance service
For those controlled delivery errors (e.g.
communication failure), number of seconds to wait
before checking if the error has been solved.
[NOTE: The forwarding attempts not carried out
until the error has been resolved.]
Table 6.18: The configuration parameters for Sending queue to MEDTING
MIO LT™ performs sending images to MEDTING through a software plugin which must be
purchased separately from the basic program license. Please consult your software provider if
the "Send to MEDTING" option does not appear in the Sending toolbar of the MIO LT™ main
screen (see sections 1.2.4 and 5.4).
6.3.5
Print
The following parameter affects the configuration of MIO LT™ plugin for captured studies printing:
Parameter
Possible value
Description
Print preview
Activated, Deactivated
Activates/ deactivates the print preview
Table 6.19: The configuration parameters for Printing plugin
6.3.6
Save
The following parameters configure the MIO LT™ plugin, that allows you to save in a folder on the
workstation, a copy of captured images and video:
MIO LT™ v2 - USER MANUAL (EN)
Page 63 of 70
MIO LT™
Parameter
Possible value
Description
Default path
Route
Default route in which are stored images from the
gallery
Select folder
Activated/Deactivated
Activates/ deactivates user intervention for choosing
the path where the images from gallery are saved. If
disabled, are stored in the default path.
Clear Gallery
Activated/Deactivated
Activates/ deactivates removal of the Gallery and the
patient in a context after saving the gallery items
Table 6.20: The configuration parameters for Saving images
MIO LT™ allows you to save images in a folder, or disk path by using a software plugin,
which must be purchased separately from the basic program license. Please consult your
software provider if the "Save" option does not appear in the Sending toolbar of the MIO LT™
main screen (see sections 1.2.4 and 5.3)
6.3.7
COMM
MIO LT™ can be configured, using the appropriate plugin, to perform sending studios to MIO
Comm™ server, rather than directly to the final repository (PACS, MEDTING, etc.). Installations
based on MIO Comm™ offer specific functionality for centralized management of multiple stations
MIO LT™.
6.3.7.1
General
The following parameters configure the communication between the client MIO LT™ and MIO
Comm™ service if it is available:
Parameter
Possible value
Description
Endpoint name
Alphanumeric string
Name of the server hosting MIO Comm™
Server name
Alphanumeric string or IP
Address
IP: Server Port Comm™ MIO or your name
registered in DNS
Show report
Activated/Deactivated
Activates/deactivates a pop up window in MIO
LT™ which draft a report on the study, in order to
MIO Comm™ process conveniently (e.g. to be
sent as a message to HIS)
Table 6.21: The configuration parameters for MIO Comm™ service
MIO LT™ v2 - USER MANUAL (EN)
Page 64 of 70
MIO LT™
6.3.7.2
CommData
The following parameters define the overall performance of MIO Comm™ when process a study
from MIO LT™:
Parameter
Possible value
Description
Dicomize files?
Activated/Deactivated
Activates/deactivates conversion into DICOM
images in MIO Comm™
Preplugin name
Postplugin name
Alphanumeric string
Name of plugin that run MIO Comm previously
to study sending to repository.
Alphanumeric string
Name of plugin that run MIO Comm
subsequent to study sending to repository.
PACS list
Format list <PacsID>ID of
first one
pacs</PacsID>…
<PacsID>ID of last one
PACS</PacsID>
PACS list of which MIO Comm may perform
sending
ExtraFields
<ServiceName
Description="Service
name">Service
Name</ServiceName>
Additional fields required by MIO Comm to run
through pre and post plugins, actions on
studies
Table 6.22: The general configuration parameters for MIO Comm™
MIO LT™ v2 - USER MANUAL (EN)
Page 65 of 70
MIO LT™
6.3.7.3
Queue
The following parameters configure the studies sending queue from MIO LT™ to MIO Comm™:
Parameter
Possible value
Description
Maximum Attempts
Natural number
Maximum number of send retries before marking a
study as erroneous
Hours Maintenance
Natural number
Days record alive
Natural number
Seconds paused timer
Natural number
Interval, in hours, between two consecutive queue
cleanings, carried out by the automatic
maintenance of all elements with a life time> Days
record alive
Maximum days number that an item will remain in
the queue before being automatically deleted by
the maintenance service
For those controlled delivery errors (e.g.
communication failure), number of seconds to wait
before checking if the error has been solved.
[NOTE: The forwarding attempts not carried out
until the error has been resolved.]
Table 6.23: The configuration parameters for Sending queue to MIO Comm™
6.3.8
PACS
MIO LT™ can be configured through the appropriate plugin, to perform studies sending to one or
several PACS simultaneously.
6.3.8.1
Primary PACS
The following parameters configure connection between MIO LT™ and main PACS (which usually is
the only one):
Parameter
Possible value
Description
Host/IP
IP Address
PACS IP
Port
Natural number
Port on which the PACS listen sending studies by
MIO LT
CallingAE
CalledAE
Alphanumeric string
Alphanumeric string
DICOM Identifier (AETitle) of the station in which
MIO LT is installed
DICOM Identifier (AETitle) of PACS
Table 6.24: The configuration parameters for main PACS
MIO LT™ v2 - USER MANUAL (EN)
Page 66 of 70
MIO LT™
6.3.8.2
PACS_1
The following parameters configure the MIO LT™ connection with additional PACS, for sending
studies to multiple PACS simultaneously:
Parameter
Possible value
Description
Host/IP
IP Address
Additional PACS IP
Port
Natural number
Port on which the PACS listen sending studies by
MIO LT
CallingAE
Alphanumeric string
CalledAE
Alphanumeric string
DICOM Identifier (AETitle) of the station in which
MIO LT is installed
DICOM Identifier (AETitle) of additional PACS
Table 6.25: The configuration parameters for additional PACS
Depending on the version of your MIO LT™ installer, it is possible that PACS_1 module
does not appear in its configuration options. Please consult your software provider if the "Send
to all" does not appear in the Sending toolbar of MIO LT™ main screen (see sections 1.2.4 and
5.3).
6.3.8.3
Queue
The following parameters configure the studies sending queue from MIO LT™ to main PACS:
Parameter
Possible value
Description
Maximum Attempts
Natural number
Maximum number of send retries before marking a
study as erroneous
Hours Maintenance
Days record alive
Seconds paused timer
Natural number
Natural number
Natural number
Interval, in hours, between two consecutive queue
cleanings, carried out by the automatic
maintenance of all elements with a life time> Days
record alive
Maximum days number that an item will remain in
the queue before being automatically deleted by
the maintenance service
For those controlled delivery errors (e.g.
communication failure), number of seconds to wait
before checking if the error has been solved.
[NOTE: The forwarding attempts not carried out
until the error has been resolved.]
Table 6.26: The configuration parameters for Sending queue to PACS
MIO LT™ v2 - USER MANUAL (EN)
Page 67 of 70
MIO LT™
6.3.9
Capture
The following parameters configure the MIO LT™ plugin for acquiring images and video through a
capture card:
Parameter
Possible value
Description
Show configuration
options
Activated/Deactivated
Shows / hides the dropdown menus for
selecting video devices and formats in the
video capture window
Maximum video capturing
seconds
Natural number (>2)
Duration predefined of video capture
Device
Alphanumeric string
Format
Alphanumeric string
Selected device for video capture
Video capture format (resolution and fps)
Deinterlaced
Activated/Deactivated
Activates/ deactivates improved filter to
capture interlaced video signal
Video capture enabled
Activated/Deactivated
Activates/deactivates the ability to capture
video besides images
Tabla 6.27: Configuration parameters of the video capture plugin
6.3.10 Watcher
The following parameters configure the MIO LT™ plugin for automatic detection and processing of
files in a determined route:
Parameter
Possible value
Description
Path
Route
Route over which detection is performed (arrival
monitoring) of new files
Seconds to wait before
processing file
Natural Number
Timeout, in seconds, between the detection of a file
and further processing
Renamed action available
Activated/
Deactivated
Activates/ deactivates that the action of renaming a
file is equal to the arrival of a new file to detect
Triggering file name
File name
File name and extension to detect. Allows wildcard
characters (?, *).
Delete source file
Activated/
Deactivated
Activates/deactivates a removal, once processed,
detected files
Table 6.28: The configuration parameters for File Watcher plugin
MIO LT™ v2 - USER MANUAL (EN)
Page 68 of 70
MIO LT™
6.3.11 USB & CD detection
The following parameters configure the MIO LT™ plugin for the detection and automatic load the
Gallery files on external USB devices and CD-ROM's
6.3.11.1
6.3.11.2 General
Parameter
Possible value
Description
Detect CDROM
Activated/Deactivated
Activates/deactivates automatic detection of
CD's in the reader
Table 6.29: The configuration parameters for USB & CD detection plugin
6.3.11.3 File Seeker
Parameter
Possible value
Description
SpecificFolder
Route
Route over which the action is performed on the
files
Recursivity
Activated/Deactivated
Activates/deactivates recursive search through
folders within SpecificFolder
ValidExtensions
List of .extensions
separated file by ;
Extensions file to be processed by the FileSeeker
ExcludedExtensions
List of .extensions
separated file by ;
File extensions to be ignored by the FileSeek
Table 6.30: : The specific configuration parameters for File Seeker module
MIO LT™ v2 - USER MANUAL (EN)
Page 69 of 70
MIO LT™
7. Additional information
7.1 Terminology
DICOM (Digital Imaging and Communication in Medicine) DICOM (Digital Imaging and
Communication in Medicine) is the globally recognized standard for the exchange of medical
images, designed for the handling, storing, printing and transmitting medical images. It includes
the definition of a file format as well as a network communication protocol. The communication
protocol is an application protocol that uses TCP / IP to communicate between systems. DICOM
files can be exchanged between two entities that are able to receive images and patient data in
DICOM format.
DICOM enables the integration of scanners, servers, workstations, printers and network hardware
from multiple providers within a storage system and image communication. Different machines,
servers and workstations have a DICOM conformance statement (conformance statements) which
clearly states DICOM classes they support. DICOM has been widely adopted by hospitals. (Source:
Wikipedia)
HIS (Health/Hospital Information System) The system formed by computer equipment,
software, uses procedures and trained personnel for the registration, maintenance and specific
data review of the hospital environment, such as: patient identification data, citation agendas,
doctors’ profiles, rooms and beds occupancy data etc.
MEDTING Collaborative web platform developed exclusively for professional clinics that enable an
exchange of clinical images. MEDTING includes features for rapid implementation of telemedicine
circuits, second opinions, clinical committees, repositories of cases of interest and training material.
Includes case review tools, web multimedia viewer, keyword index through SNOMED CT, multilanguage support (automatic translation), user and group management, customizing workflows,
personal work areas (My MEDTING) and messaging and notification system. To learn more please
visit http://medting.com
PACS (Picture Archiving and Communication System) PACS is a communication and storage
of medical imaging system that traditionally has served as a centralized repository of radiographic
images. However, thanks to MIO LT™, any PACS can be used for storage and image sharing
pertaining to any medical specialty.
7.2 To find out more
The C2C website (www.c2ctsis.com) provides updated information about MIO LT™, in addition to
supporting forms and contact details of the company.
MIO LT™ v2 - USER MANUAL (EN)
Page 70 of 70