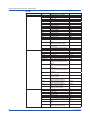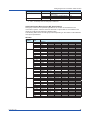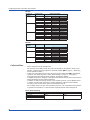
1
User’s
Manual
Model
GX10/GX20/GP10/GP20/GM10
WT Communication (/E2)
User’s Manual
IM 04L51B01-19EN
2nd Edition
Introduction
Notes
Trademarks
Thank you for purchasing the SMARTDAC+ Series GX10/GX20/GP10/GP20/GM10
(hereafter referred to as the recorder, GX, GP, or GM).
This manual explains the WT communication function of the GX, GP, and GM.
Although the display of GX20 is used in this manual, GX10/GP10/GP20 can be
operated similarly. Moreover, for the GM10, the same content can be displayed on a
Web browser.
In this manual, the GX20, GP20, and GM10 standard type and large memory type are
distinguished using the following notations.
• Standard type: GX20-1/GP20-1/GM10-1
• Large memory type: GX20-2/GP20-2/GM10-2
For details on the features of the recorder and how to use it, read this manual together with
the following user’s manuals.
• Model GX10/GX20/GP10/GP20 Paperless Recorder First Step Guide (IM 04L51B0102EN)
• Model GX10/GX20/GP10/GP20 Paperless Recorder User’s Manual (IM 04L51B01-01EN)
• Data Acquisition System GM First Step Guide (IM 04L55B01-02EN)
• Data Acquisition System GM User’s Manual (IM 04L55B01-01EN)
To ensure correct use, please read this manual thoroughly before beginning operation.
• The contents of this manual are subject to change without prior notice as a result of
continuing improvements to the instrument’s performance and functions.
• Every effort has been made in the preparation of this manual to ensure the accuracy of its
contents. However, should you have any questions or find any errors, please contact your
nearest YOKOGAWA dealer.
• Copying or reproducing all or any part of the contents of this manual without the
permission of YOKOGAWA is strictly prohibited.
• vigilantplant and SMARTDAC+ are registered trademarks of Yokogawa Electric
Corporation.
• Microsoft and Windows are registered trademarks or trademarks of Microsoft Corporation
in the United States and/or other countries.
• Adobe and Acrobat are registered trademarks or trademarks of Adobe Systems
Incorporated.
• Company and product names that appear in this manual are registered trademarks or
trademarks of their respective holders.
• The company and product names used in this manual are not accompanied by the
registered trademark or trademark symbols (® and ™).
Using Open Source Software
• The TCP/IP software of this product and the document concerning the TCP/IP software
have been developed/created by YOKOGAWA based on the BSD Networking Software,
Release 1 that has been licensed from University of California.
Revisions
May 2014
December 2014
1st Edition
2nd Edition
2nd Edition: December 2014 (YK)
All Right Reserved, Copyright © 2014, Yokogawa Electric Corporation
IM 04L51B01-19EN
i
Recorder Versions Described in This Manual
The contents of this manual correspond to the GX/GP with release number 2 (see the
STYLE S number) and style number 1 (see the STYLE H number) and the GM with release
number 2 (see the STYLE S number) and style number 1 (see the STYLE H number).
Edition
1
2
Product
GX/GP: Version 2.01 and later
GX/GP: Version 2.01 and later
GM: Version 2.02 and later
Explanation
—
Describes the GM.
Conventions Used in This Manual
Unit
K
k
Markings
WARNING
CAUTION
Note
Reference Item
Denotes 1024. Example: 768K (file size)
Denotes 1000.
Improper handling or use can lead to injury to the user or damage to
the instrument. This symbol appears on the instrument to indicate that
the user must refer to the user’s manual for special instructions. The
same symbol appears in the corresponding place in the user’s manual
to identify those instructions. In the manual, the symbol is used in
conjunction with the word “WARNING” or “CAUTION.”
Calls attention to actions or conditions that could cause serious or fatal
injury to the user, and precautions that can be taken to prevent such
occurrences.
Calls attention to actions or conditions that could cause light injury
to the user or cause damage to the instrument or user’s data, and
precautions that can be taken to prevent such occurrences.
Calls attention to information that is important for the proper operation
of the instrument.
Reference to related operation or explanation is indicated after this
mark.
Example: section 4.1
Conventions Used in the Procedural Explanations
Bold characters Denotes key or character strings that appear on the screen.
Example: Volt
Indicates the character types that can be used.
Aa# 1
a lowercase alphabet,
# symbol,
A uppercase alphabet,
1
Procedure
Explanation
Path
numbers
Carry out the procedure according to the step numbers. All procedures
are written with inexperienced users in mind; depending on the
operation, not all steps need to be taken.
Explanation gives information such as limitations related the procedure.
Indicates the setup screen and explains the settings.
Description
ii
IM 04L51B01-19EN
Contents
Introduction................................................................................................................................................. i
Recorder Versions Described in This Manual........................................................................................... ii
Conventions Used in This Manual............................................................................................................. ii
Using the WT Communication (/E2 option).......................................................................................... 1
Overview................................................................................................................................................... 1
Procedure up to Data Collection............................................................................................................... 2
Configuring the WT connection client function..................................................................................... 3
Basic settings............................................................................................................................................ 3
WT server settings..................................................................................................................................... 4
Assigning WT Data to Communication Channel....................................................................................... 5
Data group name and data name.............................................................................................................. 6
Collected Data......................................................................................................................................... 12
Configuring Communication Channels, Recording Settings, and Display Settings ........................... 13
Communication channel settings............................................................................................................ 13
Recording settings................................................................................................................................... 13
Display settings....................................................................................................................................... 13
Other settings.......................................................................................................................................... 13
Monitoring the WT Collection Status.................................................................................................. 14
IM 04L51B01-19EN
iii
Blank
Using the WT Communication (/E2 option)
Overview
The WT communication function collects values measured and computed on WT power
meters and analyzers made by Yokogawa Meters & Instruments Corporation using Ethernet
communication into the recorder.
The collected data can be assigned to communication channels (/MC option) and displayed
and recorded simultaneously with the measured data of the recorder.
GM
GX/GP
Communication channel
Communication channel
Measurement value,
Computation value
Measurement value,
Computation value
SET
ESC
RESET
CAL
PAGE
PAGE
ELEMENT
2
1
RANGE
VOLTAGE
CURRENT
3
ELEMENT
ALL
AUTO
AUTO
DISPLAY
NUMERIC
FORM
WAVE
OTHERS
ITEM
CURSOR
INTEGRATOR
SETUP
START/
STOP
HOLD
INPUT INFO
RESET
SINGLE
IMAGE
STORE
LOCAL
MISC
SHIFT
MENU
STORE SET
KEY LOCK
NULL
POWER
FILE
Server 1
WT1800
WT500
WT300
Ethernet
•••••
Server 2
Server n
Communication Medium
Ethernet
Connectable Models and Options
Maker
Yokogawa Meter & Instrument
Models
WT310/WT330/WT332
WT500
WT1800
Option
/G5
/G5
/DT
/G5
/G6
/DT
/MTR
/AUX
Description
Harmonics Measurement
Harmonics Measurement
Delta computation
Harmonic Measurement
Simultaneous Dual Harmonic
Measurement
Delta Computation
Motor Evaluation Function
Auxiliary Sensor Inputs
Maximum Number of Simultaneous Server Connections
Models
GX10/GP10
GX20/GP20
GM10
Maximum Number of Connections
8
16
16
Data Collection Interval
500ms to 30s
IM 04L51B01-19EN
1
Using the WT Communication (/E2 option)
Procedure up to Data Collection
1.
2.
3.
4.
2
Connect WTs to the recorder using Ethernet cables.
Configure the WT connection client function.
• Basic settings
Set the WT connection client function to On.
Set the data collection interval and recovery action.
• Connection destination server settings
Set the server names (IP address or host name) and the model names of the servers (WTs) that the Recorder is to connect to.
• Assignment of collection data to communication channels
Set the WTs that data is to be collected from, collected items, and exponential scaling of the data read from the WT.
Configure communication channels, recording settings, display settings, and so on.
• Communication channel settings
Set the span, unit, etc.
• Recording settings
Assign communication channels to recording channels.
• Display settings
Assign communication channels to display groups.
• Other settings
Set the watchdog timer.
Collect data.
IM 04L51B01-19EN
Configuring the WT connection client function
Basic settings
Path
GX/GP: MENU key > Browse tab > Setting > Setting menu Communication (Ethernet)
settings > WT connection client settings > Basic settings
Web browser: Config. tab > Communication (Ethernet) settings > WT connection client
basic settings
Hardware configurator: Communication (Ethernet) settings > WT connection client
basic settings
Description
WT connection client function
Setup Item
On/Off
Selectable Range or Options
Off/On
Default Value
Off
On/Off
Select On to use the WT connection client function.
Communication 1
Setup Item
Interval
Selectable Range or Options
500ms/1s/2s/5s/10s/20s/30s
Default Value
1s
1 Appears when the WT connection client function is set to On.
Interval
Set the interval to collect measured and computed data from the WTs.
Recovery action 1
Setup Item
Wait time
Selectable Range or Options
30s/1min/2min/5min
Default Value
2min
1 Appears when the WT connection client function is set to On.
Wait time
Set the communication recovery wait time when communication with a WT is interrupted.
The Recorder checks the connection status at the specified interval and performs a
connection procedure if the connection is disconnected.
IM 04L51B01-19EN
3
Configuring the WT connection client function
WT server settings
Path
GX/GP: MENU key > Browse tab > Setting > Setting menu Communication (Ethernet)
settings > WT connection client settings > WT server settings
Web browser: Config. tab > Communication (Ethernet) settings > WT connection client
server settings
Hardware configurator: Communication (Ethernet) settings > WT connection client
server settings
Description
Setup Item
Server number
Selectable Range or Options
GX10/GP10: 1 to 8
GX20/GP20: 1 to 16
GM10: 1 to 16
Default Value
1
Server number
Select the connection destination server number, which specifies the target WT.
WT server settings
Setup Item
On/Off
Server name1
Model name1
Selectable Range or Options
Off/On
Character string (up to 64, A a # 1 )
WT300/WT500/WT1800
Default Value
Off
WT300
1 Appears when the On/Off settings is set to On.
On/Off
Set this to On to connect to a WT.
Server name
Set the IP address or host name (when DNS is in use) of the WT to connect to.
Model name
Set the model name of the WT to connect to.
Note
If the specified model is different from the actual model, data will not be collected.
4
IM 04L51B01-19EN
Configuring the WT connection client function
Assigning WT Data to Communication Channel
Path
GX/GP: MENU key > Browse tab > Setting > Setting menu Communication (Ethernet)
settings > WT connection client settings > WT data allocation settings
Web browser: Config. tab > Communication (Ethernet) settings > WT connection client
data allocation settings > Allocation No (display example: 1-20)
Hardware configurator: Communication (Ethernet) settings > WT connection client data
allocation settings > Allocation No (display example: 1-20)
Description
Setup Item
Allocation No
Selectable Range or Options
GX10/GP10: 1 to 50
GX20/GP20: 1 to 300
GM10: 1 to 300
Default Value
1
Allocation No
Specify the number to assign to the collected data.
WT data allocation settings
Setup Item
On/Off
Server No1
Data group name1
Data name2
Exponential scaling2
Communication channel1
Selectable Range or Options
Off/On
GX10/GP10: 1 to 8
GX20/GP20: 1 to 16
GM10: 1 to 16
3
3
-9 to 18
GX10/GP10: 1 to 50
GX20-1/GP20-1: 1 to 300
GX20-2/GP20-2: 1 to 500
GM10-1: 1 to 300
GM10-2: 1 to 500
Default Value
Off
1
Off
0
1
1 Appears when the On/Off settings is set to On.
2 Appears when the data group name is not set to Off.
3 Refer to “Data group name and data name”.
On/Off
Set this to On to collect data from the WT.
Note
IM 04L51B01-19EN
If the On/Off setting is set to Off, data collection from the WT will be stopped.
In this situation, communication data will not be updated and will hold the previous value.
For the detailed operation, see “Watchdog Timer” under “Other Settings” in page 13 ,
“Configuring Communication Channels, Recording Settings, and Display Settings”.
5
Configuring the WT connection client function
Server No
Set the connection destination server number of the server (WT) that data is to be collected
from.
Data group name
Set the data group name of measurement function to collect.
Refer to “Data group name and data name”.
Note
Data group names can be specified regardless of the number of WT elements to be connected
or options. If data is read from elements or options that are not installed in the target WT, it will
become NaN (Not a Number) data.
If the data group name is set to OFF, communication data will not be updated and will hold the
previous value.
For the detailed operation, see “Watchdog Timer” under “Other Settings” in page 13 , “Configuring
Communication Channels, Recording Settings, and Display Settings”.
Data name
Set the data name of measurement function to collect.
Refer to “Data group name and data name”.
Exponential scaling
Set the exponent used to exponentially scale the data read from the WT using base 10.
For example, if the measured value of the WT is 123.45 kW and you specify -3, the data will
be scaled by 10-3 to derive data in unit of kW.
Communication channel
Set the communication channel to assign the data collected from the WT to.
Data group name and data name
WT1800
Data group name
Off
ELEMENT1 to ELEMENT6
Data name
Urms
Umn
Udc
Irms
Imn
Idc
P
S
Q
LAMBDA
PHI
fU
fI
Time
WP
WP+
WP‒
q
ElemHrm1 to ElemHrm6
6
q+
q‒
U(1)
U(Total)
I(1)
I(Total)
Description
WT Function mark
Data assignment is disabled.
Urms
True rms voltage
Rectified mean voltage calibrated to Umn
the rms value
Simple voltage average
Udc
True rms current
Irms
Rectified mean current calibrated to Imn
the rms value
Simple current average
Idc
Active power
P
Apparent power
S
Reactive power
Q
Power factor
λ
Phase difference
φ
voltage frequency
fU
current frequency
fI
Integration time
Time
sum of watt hours
WP
Sum of positive P (consumed watt WP+
hours)
Sum of negative P (watt hours
WP
returned to the power supply)
Sum of positive and negative
q
ampere hours
Sum of positive I (ampere hours)
q+
Sum of negative I (ampere hours) q‒
RMS voltage of harmonic order 1
U(1)
Rms voltage
U(Total)
RMS current of harmonic order 1
I(1)
Rms current
I(Total)
Continued on next page
IM 04L51B01-19EN
Configuring the WT connection client function
Data group name
ElemHrm1 to ElemHrm6
Data name
Uthd
Ithd
SigmaA to SigmaC
Urms
Umn
Irms
Imn
P
S
LAMBDA
PHI
WP
WP+
WP–
q
Other
DeltaA to DeltaC
Motor
Aux
q+
q–
ETA1
ETA2
ETA3
ETA4
F1
F2
F3
F4
F5
F6
F7
F8
F9
F10
F11
F12
F13
F14
F15
F16
F17
F18
DELTA U1
DELTA U2
DELTA U3
DELTA U
SIGMA
DELTA I
DELTA P1
DELTA P2
DELTA P3
DELTA P
SIGMA
Speed
Torque
SyncSP
Slip
Pm
Aux1
Aux2
Description
Ratio of the total harmonic voltage
to U(1) or U(Total)
Ratio of the total harmonic current
to I(1) or I(Total)
True rms voltage
Rectified mean voltage calibrated to
the rms value
True rms current
Rectified mean current calibrated to
the rms value
Active power
Apparent power
Power factor
Phase difference
Sum of positive and negative watt
hours
Sum of positive P (consumed watt
hours)
Sum of negative P (watt hours
returned to the power supply)
Sum of positive and negative
ampere hours
Sum of positive I (ampere hours)
Sum of negative I (ampere hours)
Efficiency 1
Efficiency 2
Efficiency 3
Efficiency 4
User-defined function 1
User-defined function 2
User-defined function 3
User-defined function 4
User-defined function 5
User-defined function 6
User-defined function 7
User-defined function 8
User-defined function 9
User-defined function 10
User-defined function 11
User-defined function 12
User-defined function 13
User-defined function 14
User-defined function 15
User-defined function 16
User-defined function 17
User-defined function 18
Delta computation voltage 1
Delta computation voltage 2
Delta computation voltage 3
Delta computation wiring voltage
WT Function mark
Uthd
q+ Σ
q- Σ
η1
η2
η3
η4
F1
F2
F3
F4
F5
F6
F7
F8
F9
F10
F11
F12
F13
F14
F15
F16
F17
F18
Δ U1
Δ U2
Δ U3
ΔUΣ
Delta computation current
Delta computation power 1
Delta computation power 2
Delta computation power 3
Delta computation wiring power
ΔI
Δ P1
Δ P2
Δ P3
ΔPΣ
Motor rotating speed
Motor torque
Synchronous speed
Slip (%)
Mechanical output of the motor
(mechanical power)
Auxiliary input 1
Auxiliary input 2
Speed
Torque
SyncSp
Slip
Pm
Ithd
Urms Σ 1
Umn Σ
Irms Σ
Imn Σ
PΣ
SΣ
λΣ
φΣ
WP Σ
WP+ Σ
WP- Σ
qΣ
Aux1
Aux2
1 Will become ΣA, ΣB, or ΣC depending on the WT1800 wiring type.
IM 04L51B01-19EN
7
Configuring the WT connection client function
WT500
Data group name
Off
ELEMENT to ELEMENT3
ElemHrm1 to ElemHrm3
8
Data name
–
Urms
Umn
Description
WT Function mark
Data assignment is disabled.
–
True rms voltage
Urms
Rectified mean voltage calibrated to Umn
the rms value
Udc
Simple voltage average
Udc
Urmn
Rectified mean voltage
Urmn
Uac
AC component
Uac
Irms
True rms current
Irms
Imn
Rectified mean current calibrated to Imn
the rms value
Idc
Simple current average
Idc
Irmn
Rectified mean current
Irmn
Iac
AC component
Iac
P
Active power
P
S
Apparent power
S
Q
Reactive power
Q
LAMBDA
Power factor
λ
PHI
Phase difference
φ
fU
Voltage frequency
fU
fI
Current frequency
fI
U+pk
Maximum voltage
U+pk
U–pk
Minimum voltage
U-pk
I+pk
Maximum current
I+pk
I–pk
Minimum current
I-pk
CfU
CfU
Voltage crest factor
CfI
Current crest factor
CfI
Time
Integration time
Time
WP
Sum of positive and negative watt
WP
hours
WP+
Sum of positive P (consumed watt
WP+
hours)
WP–
Sum of negative P (watt hours
WP
returned to the power supply)
q
Sum of positive and negative ampere q
hours
q+
Sum of positive I (ampere hours)
q+
q–
Sum of negative I (ampere hours)
qWS
WS
Volt-ampere hours
WQ
Var hours
WQ
U(dc)
Rms voltage of harmonic order 0
U(0)
U(1)
Rms voltage of harmonic order 1
U(1)
U(Total)
Rms voltage
U(Total)
I(dc)
Rms current of harmonic order 0
I(0)
I(1)
Rms current of harmonic order 1
I(1)
I(Total)
Rms current
I(Total)
P(dc)
Active power of harmonic order 0
P(0)
P(1)
Active power of harmonic order 1
P(1)
P(Total)
Active power
P(Total)
S(dc)
Apparent power of harmonic order 0 S(0)
S(1)
Apparent power of harmonic order 1 S(1)
S(Total)
Total apparent power
S(Total)
Q(dc)
Reactive power of harmonic order 0 Q(0)
Q(1)
Reactive power of harmonic order 1 Q(1)
Q(Total)
Total reactive power
Q(Total)
LAMBDA(dc) Power factor of harmonic order 0
λ (0)
LAMBDA(1)
Power factor of harmonic order 1
λ (1)
LAMBDA(Total) Total power factor
λ (Total)
PHI(1)
Phase difference between the
φ (1)
voltage and current of harmonic
order 1
PHI(Total)
Total phase difference
φ (Total)
PHI U(3)
Phase difference between harmonic φ U(3)
voltage U(3) and the fundamental
signal U(1).
PHI I(3)
Phase difference between harmonic φ I(3)
current I(3) and the fundamental
signal I(1).
Continued on next page
IM 04L51B01-19EN
Configuring the WT connection client function
Data group name
lemHrm1 to ElemHrm3
Data name
Uthd
Ithd
Pthd
SigmaA
Urms
Umn
Udc
Urmn
Uac
Irms
Imn
Idc
Irmn
Iac
P
S
Q
LAMBDA
PHI
WP
WP+
WP–
q
Other
Delta
Phase
q+
q–
WS
WQ
ETA1
ETA2
F1
F2
F3
F4
F5
F6
F7
F8
DELTA F1
DELTA F2
DELTA F3
DELTA F4
PHI U1-U2
PHI U1-U3
PHI U1-I1
Phase
PHI U1-I2
PHI U1-I3
IM 04L51B01-19EN
Description
Ratio of the total harmonic voltage to
U(1) or U(Total)
Ratio of the total harmonic current to
I(1) or I(Total)
Ratio of the total harmonic active
power to P(1) or P(Total)
True rms voltage
Rectified mean voltage calibrated to
the rms value
Simple voltage average
Rectified mean voltage
AC component
True rms current
Rectified mean current calibrated to
the rms value
Simple current average
Rectified mean current
AC component
Active power
Apparent power
Reactive power
Power factor
Phase difference
Sum of positive and negative watt
hours
Sum of positive P (consumed watt
hours)
Sum of negative P (watt hours
returned to the power supply)
Sum of positive and negative ampere
hours
Sum of positive I (ampere hours)
Sum of negative I (ampere hours)
Integrated value of SΣ
Integrated value of QΣ
Efficiency 1
Efficiency 2
User-defined function 1
User-defined function 2
User-defined function 3
User-defined function 4
User-defined function 5
User-defined function 6
User-defined function 7
User-defined function 8
Delta computation 1
Delta computation 2
Delta computation 3
Delta computation 4
The phase difference between the
fundamental voltage of element 1,
U1(1), and the fundamental voltage
of element 2, U2(1)
The phase difference between the
fundamental voltage of element 1,
U1(1), and the fundamental voltage
of element 3, U3(1)
The phase difference between the
fundamental voltage of element 1,
U1(1), and the fundamental current
of element 1, I1(1)
The phase difference between the
fundamental voltage of element 1,
U1(1), and the fundamental current
of element 2, I2(1)
The phase difference between the
fundamental voltage of element 1,
U1(1), and the fundamental current
of element 3, I3(1)
WT Function mark
Uthd
Ithd
Pthd
Urms Σ
Umn Σ
Udc Σ
Urmn Σ
Uac Σ
Irms Σ
Imn Σ
Idc Σ
Irmn Σ
Iac Σ
PΣ
SΣ
QΣ
λΣ
φΣ
WP Σ
WP+ Σ
WP- Σ
qΣ
q+ Σ
q- Σ
WS Σ
WQ Σ
η1
η2
F1
F2
F3
F4
F5
F6
F7
F8
Δ F1
Δ F2
Δ F3
Δ F4
φ U1-U2
φ U1-U3
φ U1-I1
φ U1-I2
φ U1-I3
9
Configuring the WT connection client function
WT300
Data group name
Data name
Off
–
ELEMENT1 to ELEMENT3 U
I
P
S
Q
LAMBDA
PHI
fU
fI
U+pk
U–pk
I+pk
I–pk
P+pk
P–pk
Time1
WP
WP+
WP–
q
ElemHrm1 to ElemHrm3
q+
q–
U(1)
U(Total)
I(1)
I(Total)
P(1)
P(Total)
LAMBDA(1)
PHI(1)
PHI U(3)
PHI I(3)
Uthd
Ithd
Uhdf(1)
Ihdf(1)
Phdf(1)
FPLL2
SigmaA
U
I
P
S
Q
LAMBDA
PHI
WP
WP+
WP–
10
Description
WT Function mark
Data assignment is disabled.
–
voltage
U
current
I
active power
P
apparent power
S
reactive power
Q
power factor
λ
phase difference
φ
fU
voltage frequency
current frequency
fI
Maximum voltage
U+pk
Minimum voltage
U-pk
Maximum current
I+pk
Minimum current
I-pk
Maximum active power
P+pk
Minimum active power
P-pk
Integration time
Time
sum of watt hours
WP
Sum of positive P (consumed watt WP+
hours)
Sum of negative P (watt hours
WP
returned to the power supply)
q
Sum of positive and negative
ampere hours
Sum of positive I (ampere hours)
q+
Sum of negative I (ampere hours) qRMS voltage of harmonic order 1
U(1)
Rms voltage
U(Total)
RMS current of harmonic order 1
I(1)
Rms current
I(Total)
Active power of harmonic order 1
P(1)
Active power
P(Total)
Power factor of harmonic order 1
λ (1)
Phase difference between the
φ (1)
voltage and current of harmonic
order 1
Phase difference between harmonic φ U(3)
voltage U(3) and the fundamental
signal U(1).
Phase difference between harmonic φ I(3)
current I(3) and the fundamental
signal I(1).
Ratio of the total harmonic voltage Uthd
to U(1) or U(Total)
Ratio of the total harmonic current Ithd
to I(1) or I(Total)
relative harmonic content of
Uhdf(1)
harmonic voltage of order 1
relative harmonic content of
Ihdf(1)
harmonic current of order 1
relative harmonic content of
Phdf(1)
harmonic power of order 1
Current frequency or voltage
fPLL
frequency of PLL source
voltage
UΣ
current
IΣ
active power
PΣ
apparent power
SΣ
reactive power
QΣ
power factor
λΣ
phase difference
φΣ
Sum of positive and negative watt WP Σ
hours
Sum of positive P (consumed watt WP+ Σ
hours)
Sum of negative P (watt hours
WP- Σ
returned to the power supply)
Continued on next page
IM 04L51B01-19EN
Configuring the WT connection client function
Data group name
SigmaA
Data name
q
Description
Sum of positive and negative
ampere hours
q+
Sum of positive I (ampere hours)
Q–
Sum of negative I (ampere hours)
Computed value, such as efficiency
Other
MATH
1 “Time” is valid only when the data group is ELEMENT1.
2 ”FPLL” is valid only when the data group is ElemHrm1.
WT Function mark
qΣ
q+ Σ
q- Σ
Math
Valid Data Groups Based on the WT Specifications
Data group names can be specified regardless of the number of WT elements to be
connected or options. If data is read from elements or options that are not installed in the
target WT, it will become NaN (Not a Number) data.
The following table shows the valid group names depending on the number of WT elements
and option specifications.
WT1800
Number of
element
1
2
3
4
5
6
IM 04L51B01-19EN
Option
code
/G5, /G6
/MTR
/AUX
/G5, /G6
/DT
/MTR
/AUX
/G5, /G6
/DT
/MTR
/AUX
/G5, /G6
/DT
/MTR
/AUX
/G5, /G6
/DT
/MTR
/AUX
/G5, /G6
/DT
/MTR
/AUX
Data group name
Element1
ElemHrm1
Other
Motor
Aux
Element1
ElemHrm1
SigmaA
DeltaA
Other
Motor
Aux
Element1
ElemHrm1
SigmaA
DeltaA
Other
Motor
Aux
Element1
ElemHrm1
SigmaA
DeltaA
Other
Motor
Aux
Element1
ElemHrm1
SigmaA
DeltaA
Other
Motor
Aux
Element1
ElemHrm1
SigmaA
DeltaA
Other
Motor
Aux
Element2
ElemHrm2
Element2 Element3
ElemHrm2 ElemHrm3
Element2 Element3 Element4
ElemHrm2 ElemHrm3 ElemHrm4
SigmaB
DeltaB
Element2 Element3 Element4 Element5
ElemHrm2 ElemHrm3 ElemHrm4 ElemHrm5
SigmaB
DeltaB
Element2
ElemHrm2
SigmaB
DeltaB
Element3 Element4 Element5 Element6
ElemHrm3 ElemHrm4 ElemHrm5 ElemHrm6
SigmaC
DeltaC
11
Configuring the WT connection client function
WT500
Number of
element
1
2
3
Option code
/G5
/DT
/G5
/G5
/DT
/G5
/G5
/DT
/G5
Data group name
Element1
ElemHrm1
Other
Delta
Phase
Element1
ElemHrm1
SigmaA
Other
Delta
Phase
Element1
ElemHrm1
SigmaA
Other
Delta
Phase
Element2
ElemHrm2
Element2
ElemHrm2
Element3
ElemHrm3
WT300
Number of
element
1
2
3
Collected Data
Option code
/G5
/G5
/G5
-
Data group name
Element1
ElemHrm1
Other
Element1
ElemHrm1
SigmaA
Other
Element1
ElemHrm1
SigmaA
Other
Element3
ElemHrm3
Element2
ElemHrm2
Element3
ElemHrm3
• Data is collected from all specified WTs.
WT data that cannot keep up with the read cycle will take on the previous value. In this
situation, a data dropout icon appears in the status display. ( See page 14 , “Monitoring
the WT Collection Status”)
• If data cannot be collected from a WT, the previous value will be held. For the detailed
operation, see “Watchdog Timer” under “Other Settings” in page 13 , “Configuring
Communication Channels, Recording Settings, and Display Settings”.
• If multiple functions are assigned to a single communication channel, the function with the
largest assignment number takes precedence.
In addition, if data input through another communication protocol, such as Modbus client
or master, uses the same channel, the channel will take on values that are retrieved
according to the communication protocol’s data update interval.
Do not assign input from other communication protocols, such as Modbus communication
or general communication, to communication channels that WT data is assigned to.
Error Data Handling
Error Data
Data missing
Over range
Over flow
Over data
12
Communication Channel Value
NaN(0x7fc00000)
9.9E+37
GX/GP digital display
*******
+Over
IM 04L51B01-19EN
Configuring Communication Channels, Recording
Settings, and Display Settings
Communication channel settings
Set the communication channel to assign the data collected from the WT to.
See section 1.15, “Setting Communication Channels (/MC option),” in the User’s Manual
(IM 04L51B01-01EN) or section 2.16, “Setting Communication Channels (/MC option),” in
the User’s Manual (IM 04L55B01-01EN).
Recording settings
Assign communication channels to recording channels.
For details on setting recording channels, see section 1.8.2, “Setting Recording Channels,”
in the User’s Manual (IM 04L51B01-01EN) or section 2.9.2, “Setting Recording Channels,”
in the User’s Manual (IM 04L55B01-01EN).
Display settings
Other settings
Assign communication channels to display groups.
See section 1.6.2, “Setting Display Groups,” in the User’s Manual (IM 04L51B01-01EN) or
section 2.7.2, “Setting Display Groups,” in the User’s Manual (IM 04L55B01-01EN).
Watchdog timer
The watchdog timer function replaces values with their preset values or last values and
when values are not updated within the specified duration (timer) . Set the watchdog timer
so that communication interruptions caused by communication errors can be detected.
See section 1.15, “Setting Communication Channels (/MC option),” in the User’s Manual
(IM 04L51B01-01EN) or section 2.16, “Setting Communication Channels (/MC option),” in
the User’s Manual (IM 04L55B01-01EN).
Status Output
On a GX/GP, notification can be sent when there is a WT communication error due to a
communication error with the status relay (/FL option).
See section 1.18.6, “Setting the FAIL Relay and Instrument Information Output (/FL
option),” in the User’s Manual (IM 04L51B01-01EN) .
On a GM, you can use the event action function to send a notification when there is a WT
communication error.
See section 2.15, “Configuring the Event Action Function,” in the User’s Manual (IM
04L55B01-01EN).
IM 04L51B01-19EN
13
Monitoring the WT Collection Status
You can check the status of the communication with the WT.
Procedure
GX/GP Main Unit
1.
Press MENU.
2.
Tap the Browse tab and then WT Client.
The menu screen appears.
The connection status is displayed.
Scroll
Data Dropout Icon Indication
Tapping the data dropout icon (ACK)
clears the indication.
WT communication information
Drag or flick
to scroll
Number of elements
Model name
Server name
Communication status
3.
Tap an item to display the WT communication information.
The number of elements and options are displayed when connection is established.
Operation complete
Data Dropout Icon Indication
If data cannot be connected from a WT within the read cycle, a data dropout icon appears.
Tapping the data dropout icon (ACK) clears the indication.
14
IM 04L51B01-19EN
Monitoring the WT Collection Status
Details
Status
(Blank)
Blue
Orange
Red
WT is not
registered.
Normal
communication.
TCP connection in
progress.
Detail
Description
(Blank)
When connection to the WT
has not yet been attempted.
Communicating normally.
VALID
CONNECTING Attempting to connect to the
WT.
CONNECTED Connection has been
established, and the WT is
waiting for measurement
commands.
Failed to connect to HOSTPORT
Unresolved host name.
the WT. Waiting for
(During port map)
auto recovery.
HOSTOPEN
Unresolved host name.
(During VXI open)
CNCTPORT
Unable to connect to the
server. (During port map)
CNCTOPEN
Unable to connect to the
server. (During VXI open)
COMMPORT
COMMOPEN
COMMCONF
COMMDATA
IDN
PROTOPORT
PROTOOPEN
PROTOCONF
PROTODATA
ITEMSET
NUMSET
FORMSET
NUM
IM 04L51B01-19EN
Cause of the Error
and Corrective
Action
–
–
–
–
Unresolved DNS.
Check the DNS
settings.
Unable to connect to
the server (WT).
Check the network
settings and the
server IP address.
TCP/IP communication error. Communication error.
(During port map)
Network error. WT
TCP/IP communication error. down, etc.
(During VXI open)
TCP/IP communication error.
(During WT configuration.)
TCP/IP communication error.
(During data Collection)
Device information error from The specified model
the WT.
is not correct.
Error while
RPC,VXI protocol error.
(During port map)
processing
connection.
RPC,VXI protocol error.
Does not occur in
(During VXI open)
normal situations. A
RPC,VXI protocol error.
problem on the WT
(During WT configuration.)
side.
RPC,VXI protocol error.
(During data Collection)
WT data set (number of items)
error.
WT data quantity (number of
outputs) set error.
WT data format set error.
The number of data
values from the WT is not
appropriate.
15
Monitoring the WT Collection Status
Web Browser
On the Web browser, click WT Client on the Data tab. A communication status screen will
appear.
Click a title to sort the items in its ascending or descending order.
An ascending or descending order mark appears.
Data dropout icon
Click to clear it.
Scroll bar
Option
Number of elements
Model name
Server name
16
Communication status
IM 04L51B01-19EN