1
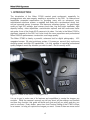
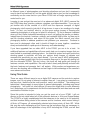
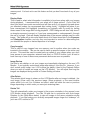
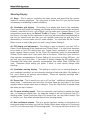
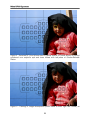
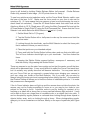
Nikon D7000 Experience
0
Nikon D7000 Experience
Nikon D7000 Experience
The Still Photographer’s Guide to Operation
and Image Creation with the Nikon D7000
by
Douglas J. Klostermann
Full Stop. good writing for better photography
1
Nikon D7000 Experience
All rights reserved. This e-book is licensed for your personal enjoyment only and may not be resold, distributed, torrented, file-shared, or given away. No part of this book may be reproduced
or transmitted in any form or by any means, electronically or in print, without expressed
permission from the author. Every effort has been made to make this e-book as accurate as
possible, but no warranty of fitness is implied. The information is provided on an as-is basis.
The author shall have no liability or responsibility with respect to any loss or damages arising
from the information provided in this e-book including but not limited to the use of any of the
materials or methods described, the products, retailers, Internet web sites, or links provided.
All contents including cover design, text, and photographs, with the exception of products, logos
and content shown in Internet screenshots, are copyright by the author. All products, logos and
content of screenshots are property of the respective companies and websites. Use of terms
which are trademarks or service marks in this e-book should not be regarded as affecting the
validity of any trademark or service mark.
Douglas Klostermann is a participant in the Amazon Services LLC Associates Program, an
affiliate advertising program designed to provide a means for sites to earn advertising fees by
advertising and linking to amazon.com.
Copyright 2011 Douglas J. Klostermann
Cover design and photograph by the author.
Nikon D7000 Experience
The Still Photographer’s Guide to Operation and Image Creation with the Nikon D7000
by: Douglas J. Klostermann
ISBN: 978-1-4524-1742-4
Version 3.0
February 2012
Author’s website: www.dojoklo.com
Author’s blog: http://blog.dojoklo.com/
Published by Full Stop. good writing for better photography
A division of Douglas J. Klostermann Photography
Cambridge, MA 02138 USA
http://www.dojoklo.com/Full_Stop/
2
Nikon D7000 Experience
CONTENTS
1. INTRODUCTION........................................................................................................... 4
2. MENUS and CUSTOM SETTINGS .............................................................................. 9
2.1 Menu Settings - Playback, Shooting ....................................................................... 9
2.2 Custom Settings .................................................................................................... 15
2.3 Menu Settings - Setup ........................................................................................... 23
2.4 My Menu ................................................................................................................ 27
3. IMAGE FILE FORMATS............................................................................................. 28
3.1 JPEG vs. NEF (RAW)............................................................................................ 28
3.2 File Sizes and Maximum Burst Rate ..................................................................... 29
4. CAMERA OPERATION INTRO.................................................................................. 30
5. FOCUSING ................................................................................................................. 31
5.1 Using Autofocus .................................................................................................... 31
5.2 Autofocus Modes ................................................................................................... 34
5.3 Autofocus Area Modes .......................................................................................... 35
5.4 Locking Focus........................................................................................................ 38
5.5 Focus Points and Image Composition................................................................... 39
5.6 Live View and Movie Focusing.............................................................................. 41
6. RELEASE MODES ..................................................................................................... 42
7. EXPOSURE ................................................................................................................ 43
7.1 Aperture, Shutter Speed and ISO ......................................................................... 43
7.2 Aperture-Priority Auto Mode and Shutter-Priority Auto Mode ............................... 46
7.3 Full Stops............................................................................................................... 49
7.4 Manual Exposure Mode (M) .................................................................................. 50
8. METERING MODES ................................................................................................... 53
8.1 Matrix Metering ...................................................................................................... 53
8.2 Center-Weighted Metering .................................................................................... 53
8.3 Spot Metering ........................................................................................................ 55
8.4 Manual Metering .................................................................................................... 57
8.5 Metering Modes and Exposure ............................................................................. 58
8.6 Exposure Lock ....................................................................................................... 60
9. HISTOGRAMS ............................................................................................................ 62
10. EXPOSURE COMPENSATION................................................................................ 63
11. AUTO BRACKETING for EXPOSURE .................................................................... 65
12. ACTIVE D-LIGHTING ............................................................................................... 66
13. WHITE BALANCE .................................................................................................... 67
14. PICTURE CONTROLS ............................................................................................. 69
15. FLASH ...................................................................................................................... 70
16. SENSOR CLEANING ............................................................................................... 71
17. COMPOSITION......................................................................................................... 73
18. THE IMAGE TAKING PROCESS............................................................................. 80
19. VIDEO - AN INTRODUCTION .................................................................................. 82
20. PHOTOGRAPHY ACCESSORIES........................................................................... 83
21. CONCLUSION .......................................................................................................... 87
3
Nikon D7000 Experience
1. INTRODUCTION
The introduction of the Nikon D7000 created great excitement, especially for
photographers who were eagerly awaiting a successor to the D90. Its features and
capabilities exceeded expectations by providing users with an advanced, more
sophisticated autofocus system, a ruggedly built body with a professional sturdy feel,
and an improved sensor, processor, and exposure metering system. Its great image
quality at high ISO settings, dual memory card slots, big and bright viewfinder, high
capacity battery, video capabilities, customization options, and fast continuous frame
rate make it one of the finest dSLR cameras in its class. Not only is the Nikon D7000 a
significant upgrade to the D90, but it also rivals the more expensive semi-professional
Nikon D300s in performance, construction, and image quality.
The Nikon D7000 is clearly a powerful, advanced tool for digital photography: 16.2
megapixel sensor, 39 point autofocus system, 6 frames per second (fps) continuous
shooting speed, and high ISO capabilities. It is fully capable of capturing professional
quality images in most any situation you wish to use it. But it is merely a tool.
Figure 1 - Detail of the Nikon D7000 digital SLR
It is up to you to make use of its features and capabilities to create the images you
envision. While the camera’s manual can tell you about all the settings and controls
and how they function, this guide will build upon that and tell you when and why you
want to use them. Every button, menu item, and Custom Setting of the D7000 is there
for a reason: to help you capture the images you want. Some of them are more useful
4
Nikon D7000 Experience
to different types of photographers and shooting situations and you don’t necessarily
need to learn and use them all, but this guide should help to give you the knowledge to
confidently use the ones that turn your Nikon D7000 into an image capturing tool that
works best for you.
Learning to use and get the most out of an advanced digital SLR (dSLR) camera like
the D7000 takes time, practice, patience, mistakes, and experimentation. If you are not
yet familiar with all the controls of a dSLR and the exposure concepts of digital
photography, don’t expect to just pick it all up at once, in one or two readings of a single
book. (In fact, you wouldn’t want to, as the never ending journey of learning and
mastering photography is a big part of what it’s all about!) Try not to become frustrated
when you don’t quite understand something or aren’t yet getting the results you desire.
Instead learn the controls, functions, settings, and concepts little by little, try them out in
real life shooting situations, and return to this guide, the Nikon manual, and other
photography books to address questions and problems you encounter. Continue to
learn and to photograph often and it should all begin to come together, sometimes
slowly and sometimes in rapid spurts of discovery and understanding.
If you have upgraded from an older dSLR to the D7000, you are in for a treat. Its
additional features and capabilities will more easily help you to capture images that you
were limited in consistently attaining before. Its autofocus system and rapid continuous
shooting speed in particular will help you capture sharp images of subjects and
moments that previously you may have missed. If you are new to dSLR photography,
you have perhaps jumped right into the proverbial deep end of the pool by starting out
with the advanced D7000! But don’t worry, this book will help guide you through its
features, controls, and capabilities. Be sure to take it slowly and patiently and start with
the basic features and concepts that I will explain. With practice and experience you
will soon be shooting with confidence and can begin to take advantage of the camera’s
more advanced functions.
Using This Guide
There are many different ways to use a digital SLR camera and its controls to capture
images, and I’m not going to attempt to explain them all. I am going to concentrate on
the ways that I believe are the most practical, useful, and effective. The settings and
techniques I discuss apply to many types of general photography, including most travel
photography. I will point out other options for users who might wish to work differently
and I encourage you to experiment and find the techniques that work best and are most
comfortable or intuitive for you.
Since this guide is intended to help you get the most out of your D7000, I will not
discuss or go into detail about all of the automatic features or Auto and Scene Modes.
The D7000 is a highly sophisticated tool that deserves to be used to its full potential,
and that involves taking control of the camera and its functions, which means taking it
off Auto, off Program, off automatically selected auto-focus points, off Auto ISO. While
this may be more challenging at first, these are the techniques that are necessary to
take full advantage of the capabilities of any dSLR including the D7000, and will lead
5
Nikon D7000 Experience
you to having more control and consistency over your image making. Hopefully this will
inevitably lead to better images!
This guide is intended to be used with the camera in your hands. That is the best way
to directly see and understand what is being explained. It is also intended to be used in
conjunction with and in addition to the camera’s manual, not to completely replace it, so
every bit of information in the Nikon D7000 User’s Manual will not be repeated here.
Among the official manual’s often brief descriptions and sometimes frustratingly
incomplete explanations, there is some very valuable information, as well as the basics
for buttons, controls, and how to change all the settings. Note that the D7000 User’s
Manual can also be obtained as a PDF file from the Nikon website:
http://support.nikonusa.com/app/answers/detail/a_id/17008
As you can see, there is a lot to make sense of regarding terminology and controls, so I
recommend that you familiarize yourself with the controls and displays of the camera
body, as shown on pages 2-12 of the D7000 User’s Manual, as well as read through the
manual and attempt to understand as much as possible. Yes, much of it may be
complicated and confusing at first, but this guide will attempt to cut through the
numerous buttons, controls, menus, and settings and concentrate on the essential ones
to help you create great images.
Various settings of the Nikon D7000 can be controlled in multiple ways including using
the buttons and dials on the camera body while reading the settings on the top LCD
Control Panel or in the Viewfinder, or through the menus on the rear screen accessed
with the Menu Button and read on the rear LCD Monitor. Explore the options and find
the ways that work most quickly and intuitively for you.
Any time I capitalize something in the text it is a proper term that can be looked up in
the Nikon D7000 manual. I will capitalize the names of actual buttons, controls, camera
parts, and menu items, such as Delete Button, Main Command Dial, Monitor, and
Format. Again, please review the camera body and display diagrams in your D7000
User’s Manual to familiarize yourself with the names of various parts, controls, and
displays, as I will use these proper names in this text. Words and phrases that are
capitalized and bold refer to chapters and sections within this guide. Turn on the
bookmarks or contents navigation panel in your PDF viewer or access the Table of
Contents of your e-book reader to quickly navigate to these different sections.
Many of the functions and controls of a dSLR such as the D7000 are closely interrelated, such as the shooting mode, exposure, and the metering mode. As a result of
this I must sometimes refer to previous or upcoming sections of the text for further
explanation of related function. It is best to read through the entire text, in the order it is
organized, before returning to specific sections for further study. It may take multiple
readings to fully understand both the individual functions and the relationships between
functions.
6
Nikon D7000 Experience
memory card. It is best not to use this feature so that you don’t lose track of any of your
images.
Display Mode
This is used to select what information is available to be shown along with your images
during playback. I recommend that you select all of these options. Focus Point will
show you which focus point was active and will thus verify if you properly focused where
you intended (unless you recomposed after locking focus). Highlights will show if you
have overexposed the highlights (something you typically want to avoid) by having
those areas of the image blink during playback. RGB Histogram will also help show if
an image’s exposure is correct, or if you have overexposed or underexposed it, through
the use of a graph. Data will display detailed data of the camera settings used for each
image. This guide will go into more detail about all of these items later in the Exposure
and Histograms chapters, and why they are important to review for determining that
you obtained the proper or desired exposure of an image.
Copy Image(s)
This is used to copy images from one memory card to another when two cards are
inserted in the camera. This can be used to back up specific images or the entire card
at once. This could be used to create back-up copies of your images when you don’t
have access to your computer, external hard drive, or CD/DVD burner, but it is best to
back them up on one of these more permanent devices as soon as possible.
Image Review
Use this to set whether or not your images are immediately displayed on the rear LCD
Monitor. If you typically review each image after taking it, turn this On. However, if you
don’t review every image, turn it Off to save the battery, then hit the Playback Button
when you wish to review an image on the LCD Monitor. You will adjust how long the
images are displayed during review in Custom Setting c4 below.
After Delete
This selects which image is shown on the LCD Monitor after an image is deleted - the
next image (Show next), the previous image (Show previous), or the most intuitive
option which is to set it on Continue as before, which will show the next or previous
image depending on which order you were just reviewing them.
Rotate Tall
This will automatically rotate your images to the proper orientation in the camera’s rear
LCD Monitor during playback. Turn this On and use in conjunction with Auto Image
Rotation (in the Setup Menu below) to view all images in the same orientation during
playback. If you like seeing your vertically composed images larger but “sideways” on
your rear LCD, set this to Off.
10
Nikon D7000 Experience
Shooting/Display
d1: Beep - This is used to customize the beep volume and sound that the camera
makes for various operations. You may prefer to leave this Off if you find the beeps
unnecessary or distracting in certain situations.
d2: Viewfinder grid display - This setting is to display grid lines in the viewfinder.
These can be very helpful for keeping your framing and your horizons straight and level.
However, note that it is not a “rule of thirds” grid, so make sure it doesn’t throw off your
compositions (more about the Rule of Thirds in Chapter 17 on Composition). If you
turn this on, you may find the viewfinder to look busy with information and distracting at
first but you should soon see that your eye typically looks past the grid and is not
distracted by it, but can make use of it when needed. You could also set the Preview
Button to turn on and off the grid if you wish, using Custom Setting f4.
d3: ISO display and adjustment - This setting is used to choose if you want ISO or
Frame Count displayed in the Viewfinder and Control Panel. It is often more important
to be aware of your ISO setting than your Frame Count, especially if you are using
larger capacity memory cards, so the Show ISO sensitivity option is recommended.
Choose Show frame count if you prefer that to be shown. Note that if you turned on
Easy exposure compensation in Custom Setting b3, do not turn on Easy ISO here - you
can only use one or the other. If you prefer to directly change the ISO setting with a
Command Dial rather than exposure compensation, then select Show ISO/Easy ISO
here. Determine which setting you prefer, if either, to more quickly change while
shooting.
d4: Viewfinder warning display - This setting is used to turn on warning displays in
your viewfinder including if you are currently shooting in black and white, if the battery is
low, and if there is no memory card inserted. These are important warnings and I
suggest you leave them On.
d5: Screen tips - This is used to turn on or off “tool tips” - additional information about
menu items. I recommend you leave this On since these tips are helpful if you have
forgotten what a certain menu item or setting is. Press the Help Button to access these
tips when you are in a menu.
d6: CL mode shooting speed - This is an extremely useful option for setting the frame
rate - or frames per second (fps) - for when the camera is set on Continuous Low (CL)
shooting mode. Since Continuous High (CH) shoots 6 fps, you may wish to select 3 fps
or 4 fps for Low. See which rate best serves your shooting needs.
d7: Max continuous release - This is to set the maximum number of shots taken in a
continuous mode burst when you hold the Shutter Button down while set in Continuous
Low (CL) or Continuous High (CH) shooting mode. You may as well leave it set at 100
19
Nikon D7000 Experience
Figure 3 - Selected AF Point (shown here in yellow and all AF points shown for clarity)
positioned over subject’s eye and focus locked with half-press of Shutter-Release
Button.
Figure 4 - Framing of image recomposed (notice hand at lower right now visible) as
32
Nikon D7000 Experience
focus is still locked by holding Shutter-Release Button half pressed. Shutter-Release
Button fully pressed to take image. (All AF points shown for clarity.)
To see how autofocus point selection works, set the Focus Mode Selector switch, near
the base of the lens, to AF. Make sure the focus mode on your lens is also set for
autofocus (A). (If it ever seems that your camera or lens is not autofocusing, be sure to
check these two switches.) Press the AF Mode Button inside that switch and set the
Autofocus Mode to AF-S (Single-servo AF) using the Main Command Dial and set the
AF-Area Mode to Single-Point AF using the Sub-Command Dial. Ensure that the Focus
Selector Lock switch below the Multi Selector is not set to L (Lock).
1. Set the Mode Dial to P (Program).
2. Tap the Shutter Button with a half-press to wake up the camera and start the
exposure meter.
3. Looking through the viewfinder, use the Multi Selector to select the focus point
that is nearest to where you want to focus.
4. Place that point over your intended subject.
5. Press and hold the Shutter Button halfway down and see that point blink red.
The In-Focus Indicator should light up in your viewfinder. You have locked the
focus.
6. Keeping the Shutter Button pressed halfway, recompose if necessary, and
take the shot by fully pressing the Shutter Button.
There are reasons to use the outer focus points and not just the center one all the time,
which will be discussed later. It may sound difficult to select the Focus Point each time,
but it is actually very quickly done and will become instinctive. You may even start to
set your Focus Point as you approach a scene before even bringing your camera to
your eye, using your thumb on the Multi Selector. But if you wish, you can start by
always using the center point and recomposing before taking the shot. And remember
that Custom Setting a6 allows you to limit the number of selectable points to 11 to make
this process more manageable.
If the In-Focus Indicator does not light up and the camera does not take the photo, the
camera may not be finding something to focus on or you may be too close to your
subject for the lens to focus. Autofocus works in part by looking for contrast, so try
focusing on a detail with a strong line or strong contrast between light and dark. It may
not be able to focus on a large area of consistent color or a subject that is too dark. It
can be disrupted by regular patterns or confused when looking through close objects to
objects farther away, such as looking through a fence. When photographing people,
always try to focus somewhere on the face, ideally on the eyes or eyebrows (see Figure
3).
33
Nikon D7000 Experience
5.2 Autofocus Modes
The D7000 has three different Autofocus Modes to choose from, typically depending if
your subject is still or moving. It also has four different Autofocus Area Modes (or AFArea Modes, discussed in Section 5.3) to specify how many of the AF points are active
and how they follow or track a moving object. You can set these two functions in
various combinations. First the Autofocus Modes. Select the Autofocus Mode by
pressing the AF-Mode Button (the button located inside the Focus-Mode Selector switch
that says AF/M on the camera body near the base of the lens) and rotating the Main
Command Dial (the rear dial) while monitoring the settings on the top Control Panel or
in the Viewfinder.
Single-Servo AF (AF-S)
Use this mode when your subject is stationary, or still and not going to move, or if your
subject is not going to move very much, or if the distance between you and the subject
is not going to change between the time you lock focus, recompose, and take the shot.
Lock focus on the subject and recompose if necessary. When using AF-S, you can
select from two Autofocus Area Modes, either Single-Point AF where you select the AF
point, or Auto-Area AF, where the camera selects the AF point(s) for you. I suggest you
nearly always select your own desired AF point so that the camera autofocuses exactly
where you want it to.
Continuous-Servo AF (AF-C)
Use this mode when your subject is moving. If the subject is moving towards you or
away from you, the camera will keep evaluating the focus distance, as long as the
Shutter Button is kept half-pressed. You will need to use this in conjunction with the
Autofocus Area Modes to determine if and how the camera tracks the subject laterally to
the surrounding AF points, or if it will only track the subject if it remains at the initially
selected AF point. If the subject is going to be difficult to follow set the Autofocus Area
Mode to one of the Dynamic-Area AF modes. If the subject will be moving across your
field of view use the 3D-Tracking mode (further explanation of these situations and the
Autofocus Area Modes section below). Focus on the moving subject initially with your
selected point if using Single-Point, one of the Dynamic Area Modes, or 3D-Tracking, or
let the camera select the AF point in Auto-Area AF (not recommended since it doesn’t
know what you wish to focus on), and then as long as the Shutter Button remains halfpressed the camera will track the subject as it moves closer or farther in distance.
Depending which AF Area Mode you are using, the camera may also maintain focus or
track the subject to some or all of the surrounding focus points if it moves away from the
initially selected point (more about this below).
Auto-Servo AF (AF-A)
This mode is a hybrid of the two other focus modes. It starts in Single-Servo AF (AF-S)
mode then changes to Continuous-Servo AF (AF-C) mode if your subject starts moving.
Why shouldn’t you use this all the time, then? Well, it is typically not the best of both
34
Nikon D7000 Experience
worlds. If you are focusing and then recomposing, as you may often be doing, your
movement of the camera may fool it into thinking that the subject is moving and then
activate subject tracking AF-C mode, and your resulting focus may not be where you
intend it to be or may not be as accurate as it could have been with Single-Servo AF-S
mode. And in this hybrid AF-A Mode it may not be as quick to respond to a moving
subject as it would in Continuous-Servo AF-C mode. Typically you know if your subject
is still or moving so it is better to select one of the other two Autofocus Modes. Plus that
way you always know which AF Mode you are working in and can either lock focus
where you want it or begin tracking a subject without wondering what mode the camera
is in and if it will suddenly change. But there may be situations that call for this
combination mode such as a still bird or animal that may start moving unexpectedly, so
keep it in mind.
Manual Focus
Sometimes you may be taking several photos of the same subject from the same
distance, or for some other reason want to keep the same focus distance and not have
to keep re-focusing and re-composing. Or you may be taking multiple photos for a
panorama. In these situations, turn off the auto-focus on your lens by switching from AF
to M with the camera’s Focus Mode Selector switch and with the A/M switch on the lens
itself. Just remember to switch them back when you are finished. You may also wish to
do this if you want to precisely manually focus with the focus ring on your lens. For
lenses with “full time manual focus” however, you don’t need to switch to M in order to
manually override the autofocus with the lens focus ring. These lenses will have M/A
and M on the lens focus mode switch instead of A and M.
Rangefinder
Use the Rangefinder feature of the D7000 to assist with manual focus. With lenses
having a maximum aperture of f/5.6 or faster (such as f/4.0 or f/2.8) the focus indicator
in the Viewfinder can be used in conjunction with a selected single focus point (see
Autofocus Area Modes Section 5.3 immediately following) to confirm that a stationary
or still subject is in focus.
To use the Rangefinder switch the camera and lens to manual focus, select a single AF
point as you look through the Viewfinder, locate it over the subject, and press and hold
the Shutter-Release Button halfway. Rotate the focus ring on the lens until the focus
indicator - the dot at the bottom-left of the viewfinder - lights up. This indicates that the
subject is in focus.
5.3 Autofocus Area Modes
The Autofocus Area Modes (AF-Area Modes) are used to set if all the AF points are
active and automatically selected by the camera to focus on a subject, if just a single,
user-selected AF point is active, if a specific number of AF points surrounding your
selected AF point will be used to help maintain focus, or if all the AF points will work in
conjunction with a single user-selected point to track a moving subject across your
35
Nikon D7000 Experience
What Readers are Saying About Nikon D7000 Experience:
This book, together with the manual that came with your camera, is all you need to start
discovering the full potential of the D7000.
-Max M.
It’s the first guide I've read which has taken me through all the settings in an understandable
way. I now feel that I have control over the camera.
-Peter S.
Really practical and tremendously helpful. Readers of this e-book can expect to benefit from a
more rewarding photographic experience using this superb camera, and be better able to exploit
its potential to match their personal objectives and photographic style. Highly recommended.
-M.M.
I would recommend this to anyone who wants to get a quick start to using the D7000. Manuals
are nice, but this e-book highlights the important information and gives a quick easy to
understand explanation of most all of the functions and controls.
-Ray M.
I found the Nikon manual good for understanding how to set things up but not much on the why this book really focuses on the WHY.
-Benoit A.
This manual is a clearly written, concise and useful explanation of the rationale for the
seemingly infinite and often confusing settings options for the D7000. Used in conjunction with
the Nikon manual I feel more confident in understanding how to at last proceed in getting better
photographs.
-W.L.S.
It's clear, concise and gets to the heart of the camera's multiple and often confusing options.
Very highly recommended - for experienced user and beginner alike.
-G.S.A.
A well written, professional helpful guide - Just what I was looking for! A manual for the D7000
that was exciting, clear to follow, had examples and was used by a professional who gave just
the right amount of technical with explanations of why you use those settings, when to use those
settings and so on, all properly explained. The book is a revelation, a joy to follow, well thought
through and well written. Nikon should be employing Doug to write every one of their cameras
manuals.
-R.D.C.
Purchase Nikon D7000 Experience at:
http://www.dojoklo.com/Full_Stop/Nikon_D7000_Experience.htm
88