1
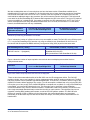
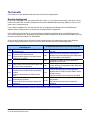
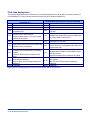
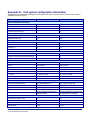
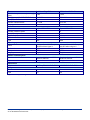
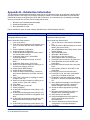
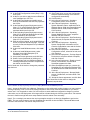
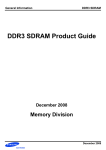
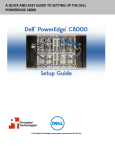
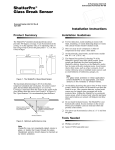
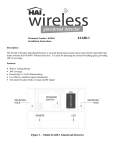
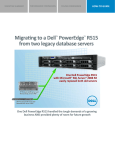
TEST REPORT
AUGUST 2009
Time comparison for OS deployment:
Dell Unified Server Configurator version 1.1 vs.
HP SmartStart version 8.25 x64
Executive summary
KEY FINDINGS
Dell Inc. (Dell) commissioned Principled Technologies (PT)
to compare the operating system deployment times when
using the following two system management applications:
•
•
Dell™ Unified Server Configurator (Dell USC) version
1.1 enabled by the Lifecycle Controller (running on the
Dell™ PowerEdge™ R710 server)
HP SmartStart (SmartStart) version 8.25 x64 (running
on the HP ProLiant DL380 G6 server)
We tested these system management applications, which
provide ease of use for end users as they perform various
server tasks, on similarly configured servers.
We tested the Dell USC version 1.1 with operating system
driver pack 6.1.1.3, a pre-release version Dell plans to
release in the third quarter of 2009, and the HP SmartStart
system management application version 8.25 x64. We
determined the time these applications took to perform the
following tasks:
•
•
•
Setting the NIC boot options for NIC 1
Setting the serial communication options
Deploying Windows Server 2008 Enterprise Edition
x64 SP2
z
The Dell USC was 34.6 percent faster than
HP SmartStart at deploying Windows
Server 2008 Enterprise x64 SP2. (See
Figure 1.)
z
The Dell USC was 56.2 percent faster than
HP SmartStart at deploying Windows
Server 2008 Enterprise x64 SP2 in a firsttime deployment where, in the HP case,
the user had to first download and create a
SmartStart CD. (See Figure 2.)
z
The Dell USC was able to perform all our
tasks without any other utilities. HP
SmartStart required two additional utilities
to perform the same tasks. (See Figure 3.)
z
The Dell USC required 33 steps to deploy
Windows Server 2008 Enterprise x64 SP2,
while HP SmartStart required 35 steps for
a normal deployment and 38 steps for a
first-time deployment when the user had to
first download and create a SmartStart CD.
(See Figure 4.)
z
The Dell USC’s unified interface also
provides several benefits that are less
easily measured. Among these are
simplified upgrade and rollback paths,
which do not depend on keeping track of
external media.
The Dell Unified Server Configurator provides a single
interface for firmware and other updates, hardware
configuration, RAID management, native deployment of
supported operating systems, and system diagnostics.
Because the Dell USC is on an embedded chip, no compact discs (CDs) are necessary. We used SmartStart 8.25
x64 for installing the operating system on the HP server. Unlike the Dell USC, SmartStart is a CD-based utility.
However, we could not execute all management tasks using SmartStart. To set the NIC 1 boot option and Serial
Communication, we had to boot to the ROM-Based Setup Utility (RBSU). We compare the summary deployment
times when we used the Dell Unified Server Configurator to those when we used SmartStart and BIOS-based
utilities. See the Test results section for complete results and a description of the comparison. For complete test
system configuration information, see Appendix A; for more detailed test information, see Appendix B.
Figure 1 shows the times required to deploy Microsoft Windows Server 2008 Enterprise x64 SP2. The Dell USC
using OS driver pack 6.1.1.3 on the Dell PowerEdge R710 took 28 minutes and 14 seconds to complete the
deployment. This is 34.6 percent faster than SmartStart 8.25 x64 on the HP ProLiant DL380 G6, which took 43
minutes and 12 seconds to perform the same tasks.
Normal deployment:
System management
application and server
Total time required
Dell USC OS driver pack version
6.1.1.3 on Dell PowerEdge R710
HP SmartStart 8.25 x64 on
HP ProLiant DL380 G6
28:14
43:12
Figure 1: Time for normal deployment. Times are in minutes:seconds. Shorter times are better.
We also considered the case of a user who does not have the latest version of SmartStart available due to
misplacing the CD or due to an outdated CD. We found that the time to locate, download, and burn a SmartStart
8.25 x64 CD would add a one-time cost of over 21 minutes to the time required for our deployment test, and
would add three additional steps to the procedure. We call this case the first-time deployment. This issue would
never arise for the Dell PowerEdge R710 because Dell integrates the USC in the server. There is no CD required
hence no possibility of a misplaced CD. If an update is required, the USC updates directly via FTP. As Figure 2
shows, the deployment time using SmartStart increased from 43:12 to 64:28, an increase of 21:16. Be aware,
however, that download times can vary considerably.
First-time deployment:
System management
application and server
Total time required
Dell USC OS driver pack version
6.1.1.3 on Dell PowerEdge R710
HP SmartStart 8.25 x64 on
HP ProLiant DL380 G6
28:14
64:28
Figure 2: Time for first-time deployment. Times are in minutes:seconds. Shorter times are better. Note: First-time deployment
assumes an up-to-date copy of SmartStart is not available.
Figure 3 shows the number of utilities we had to use to accomplish our tasks. The Dell USC using OS driver pack
6.1.1.3 on the Dell PowerEdge R710 was the only utility we needed to use. SmartStart 8.25 x64 on the HP
ProLiant DL380 G6 requires the RBSU and Array Configuration Utility (ACU) to perform the same tasks.
Dell PowerEdge R710 (1 utility)
Dell USC version 1.1 (integrated)
HP DL380 G6 (3 utilities, requiring 1 CD)
RBSU
SmartStart 8.25 x64 (CD)
ACU (invoked from inside SmartStart 8.25 x64)
Figure 3: Number of utilities required by each server.
Figure 4 shows the number of steps required to execute both the normal deployment and the first-time
deployment test cases.
Test Case
Normal Deployment
First-time Deployment
Dell USC OS driver pack version
6.1.1.3 on Dell PowerEdge R710
33
33
HP SmartStart 8.25 x64 on
HP ProLiant DL380 G6
35
38
Figure 4: The number of steps required on each server for the deployment.
There are also less-measurable benefits of the Dell USC over the HP management utilities. The Dell USC
provides a single, easy-to-use interface for server management tasks, while HP employs multiple tools. The Dell
USC also provides a more repeatable upgrade/downgrade path. The Dell USC, for instance, stores a copy of the
old BIOS or firmware before applying a new version. You can accomplish a rollback later using only the Dell USC.
HP requires you to have a copy of the old BIOS ROMPaq to complete such a rollback. If a copy of the ROMPaq is
not available, you must find and download a copy. This extra time can be significant in large production
environments where every minute of downtime results in considerable costs to the business. The Dell USC also
has a single automated download location coded into the utility on each machine. This simplifies future server
upgrades, including BIOS updates and firmware, as well as Dell USC platform updates. The Dell USC also
requires no inserting of CDs or USB keys for the deployment; this media independence and automated
functionality of the Dell USC help to avoid version skew, time delays, and other problems associated with CDbased media.
Principled Technologies, Inc.: Time comparison for OS deployment: Dell Unified Server Configurator version 1.1
vs. HP SmartStart version 8.25 x64
2
Test results
In this section, we give detailed steps and times required for the deployments.
Normal deployment
On the Dell PowerEdge R710, we used the Dell USC version 1.1 for all tasks in this section of the report. On the
HP ProLiant DL380 G6, we used SmartStart8.25 x64 and the ROM-Based Setup Utility (RBSU). All times in this
section are in minutes:seconds.
For the Dell PowerEdge R710, we used the Dell USC to install Microsoft Windows Server 2008 Enterprise
x64SP2. Before starting the test, we deleted any preexisting RAID configurations.
For the HP ProLiant DL380 G6, we used SmartStart to install Microsoft Windows Server 2008 Enterprise x64
SP2. Before starting the test, we deleted any preexisting RAID configurations. We pressed the Escape key during
the boot to prevent the creation of a default RAID.
At the end of the install, both servers boot into the operating system. We stopped the timers at the Windows
prompt to change the password. Figure 5 shows the times for each step in the normal deployment.
Dell USC OS driver pack version 6.1.1.3 on Dell
PowerEdge R71
Power on the server and boot to Dell USC
1:49
by pressing F10.
Use the menus to set the first NIC Boot
Protocol to PXE and the Serial
0:34
Communication option to "On with Console
redirection via COM1."
N/A
0:32
0:58
24:21
28:14
HP SmartStart 8.25 x64 on HP ProLiant DL380 G6
1:48
Power on the server and boot to SmartStart CD
8.25 x64.
0:20
Using the menus, set the NIC1 boot option to
Network Boot and the BIOS Serial & EMS option
to "COM1;IRQ4; IO:3F8H-3FFH."
4:18
Select Deploy OS from the menu option and
follow the array configuration.
Complete the remaining steps, selecting
Windows Server 2008 x64 as the operating
system.
Insert the Windows Server 2008 x64 SP2
DVD.
Allow Windows install to complete,
answering any prompts.
Stop the timer at the prompt to change the
password.
Total time
1:00
4:18
31:28
43:12
Press ESC to reboot the server and boot to
SmartStart CD 8.25 x64.
Click through the menus to server deployment
Launch the Array Configuration Utility (ACU) and
configure the array.
Continue through setup, selecting Microsoft
Windows Server 2008, Enterprise Edition as the
OS option setup.
Insert the Windows Server 2008 x64 SP2 DVD.
Allow Windows install to complete, answering
any prompts.
Stop the timer at the prompt to change the
password.
Total time
Figure 5: Time for normal deployment. Times are in minutes:seconds. Shorter times are better.
Principled Technologies, Inc.: Time comparison for OS deployment: Dell Unified Server Configurator version 1.1
vs. HP SmartStart version 8.25 x64
3
First-time deployment
The first-time deployment case is identical to the normal deployment case in all regards, except the creation of a
new SmartStart CD. Figure 6 shows the times for each step in the first-time deployment.
Dell USC OS driver pack version 6.1.1.3 on Dell
PowerEdge R71
N/A
N/A
N/A
Power on the server and boot to Dell USC
1:49
by pressing F10.
Use the menus to set the first NIC Boot
Protocol to PXE and the Serial
0:34
Communication option to "On with Console
redirection via COM1."
N/A
0:32
0:58
24:21
28:14
HP SmartStart 8.25 x64 on HP ProLiant DL380 G6
2:55
11:33
6:48
1:48
0:20
4:18
Select Deploy OS from the menu option and
follow the array configuration.
Complete the remaining steps, selecting
Windows Server 2008 x64 as the operating
system.
Insert the Windows Server 2008 x64 SP2
DVD.
Allow Windows install to complete,
answering any prompts.
Stop the timer at the prompt to change the
password.
Total time
1:00
4:18
31:28
64:28
Locate and browse to SmartStart 8.25 download
Download SmartStart 8.25
Burn the SmartStart 8.25 download to a CD
Power on the server and boot to SmartStart CD
8.25 x64.
Using the menus, set the NIC1 boot option to
Network Boot and the BIOS Serial & EMS option
to "COM1;IRQ4; IO:3F8H-3FFH."
Press ESC to reboot the server and boot to
SmartStart CD 8.25 x64.
Click through the menus to server deployment
Launch the Array Configuration Utility (ACU) and
configure the array.
Continue through setup, selecting Microsoft
Windows Server 2008, Enterprise Edition as the
OS option setup.
Insert the Windows Server 2008 x64 SP2 DVD.
Allow Windows install to complete, answering
any prompts.
Stop the timer at the prompt to change the
password.
Total time
Figure 6: Time for normal deployment. Times are in minutes:seconds. Shorter times are better.
Principled Technologies, Inc.: Time comparison for OS deployment: Dell Unified Server Configurator version 1.1
vs. HP SmartStart version 8.25 x64
4
Appendix A – Test system configuration information
This appendix provides detailed configuration information about each of the test server systems, which we list in
alphabetical order in Figure 7.
Servers
Dell PowerEdge R710
HP ProLiant DL380 G6
General dimension information
Height (inches)
Width (inches)
Depth (inches)
U size in server rack (U)
Power supplies
3.50
17.50
27.00
2
3.39
17.53
25.81
2
Total number
2
2
Wattage of each (W)
Cooling fans
Total number
Dimensions (h x w) of each
Voltage (V)
Amps (A)
General processor setup
Number of processor packages
Number of cores per processor package
Number of hardware threads per core
CPU
Vendor
Name
Stepping
Socket type
Core frequency (GHz)
L1 cache
L2 cache
L3 cache (MB)
Platform
Vendor and model number
Motherboard model number
Motherboard revision number
BIOS name and version
570
460
5
2.50” x 2.50”
12
1.60
6
2.38” x 2.50”
12
2.45
2
4
2
2
4
2
Intel
Xeon E5540
D0
LGA1366
2.53
4 x 32 KB + 32 KB
4 x 256 KB
8
Intel
Xeon E5540
D0
LGA1366
2.53
4 x 32 KB + 32 KB
4 x 256 KB
8
Dell PowerEdge R710
0M233H
13
Dell 1.1.4 (05/08/2009)
Memory Operating Mode set to
Optimizer Mode
HP ProLiant DL380 G6
PADAB0G9VXC1CQ
0G
HP BIOS P62 (06/20/2009)
Advanced Memory Protection set
to Advanced ECC Support
Total RAM in system (GB)
12
12
Vendor and model number
Type
Speed (MHz)
Samsung M393B5673DZ1
PC3-10600R DDR3
1,333
Samsung M393B5673DZ1
PC3-10600R DDR3
1,333
BIOS settings
Memory modules
Principled Technologies, Inc.: Time comparison for OS deployment: Dell Unified Server Configurator version 1.1
vs. HP SmartStart version 8.25 x64
5
Servers
Speed in the system currently running @
(MHz)
Timing/latency (tCL-tRCD-iRP-tRASmin)
Size (GB)
Number of RAM modules
Chip organization
Hard disk
Vendor and model number
Number of disks in system
Size (GB)
Buffer size (MB)
RPM
Type
Operating system
Name
Build number
File system
Language
Network card/subsystem
Vendor and model number
Type
Optical drive
Vendor and model number
USB ports
Number
Type
Dell PowerEdge R710
HP ProLiant DL380 G6
1,066
1,066
7-7-7-37.5
12
6 x 2 GB
Double-sided
7-7-7-37.5
12
6 x 2 GB
Double-sided
Fujitsu MBB2147RC
5
146
16
10,000
SAS
Fujitsu MBB2147RC
5
146
16
10,000
SAS
Windows Server 2008 Enterprise
x64 SP2 without Hyper-V
6001
NTFS
English
Windows Server 2008 Enterprise
x64 SP2 without Hyper-V
6001
NTFS
English
Broadcom NetXtreme II 5709C
Dual-Port Ethernet
Integrated
Broadcom NetXtreme II 5709C
Dual-Port Ethernet
Integrated
TSSTcorp TS-L333A DVD-ROM
LG GDR-D20N DVD-ROM
4
2.0
4
2.0
Figure 7: Detailed system configuration information for the two test servers.
Principled Technologies, Inc.: Time comparison for OS deployment: Dell Unified Server Configurator version 1.1
vs. HP SmartStart version 8.25 x64
6
Appendix B – Detailed test information
This appendix provides detailed information about how we conducted the tests. As we discuss in the Executive
summary section of this report, the process of replacing a mislaid or out-of-date SmartStart CD would add the
following three steps to configuring the HP DL380 G6. However, in a case where you are installing on multiple
servers, you would only incur the cost of creating the CD once.
1. Browse to the SmartStart download page.
2. Download SmartStart 8.25 x64.
3. Burn SmartStart to a CD.
Figure 8 details the steps we used to deploy Windows Server 2008 Enterprise x64 SP2.
Dell PowerEdge R710 (33 steps, requiring 4 reboots)
Before starting this case, delete any pre-existing RAID
configurations that may exist.
HP DL380 G6 (35 steps, requiring 5 reboots)
Before starting this case, delete any pre-existing RAID
configurations that may exist.
Start of timed test: Start the timer.
1. Turn on the server.
2. Push F10 when the BIOS screen prompts you to
do so. The server will boot into the Dell USC
GUI.
3. Select Hardware Configuration.
4. Select Advanced Configuration.
5. At the Advanced Configuration screen, select
the first NIC card in the list.
6. At the Main Page screen, select MBA
Configuration Menu.
7. Select PXE as the Boot Protocol, and click
Back.
8. At the Main Page screen, click Finish.
9. When you see the message box asking you to
confirm your changes, click Yes.
10. Select System BIOS Settings.
11. Select Serial Communication.
12. Under the Serial Communication, choose On
with Console Redirection via COM1, and click
Back.
13. Click Finish. At the pop-up message to confirm
changes, click Yes.
14. When you see the message box asking you to
reboot, click No. (See note 1 below.)
15. Click Back.
16. Select OS Deploy on the left.
17. Select OS deploy.
18. At the RAID Configuration screen (Step 1 of 5),
click Next.
19. At the RAID Configuration screen (Step 2 of 5),
accept the default of PERC 6/i Integrated. Click
Next.
20. At the RAID Configuration screen (Step 3 of 5),
accept the default of Express Wizard. Click
Next.
21. At the RAID Configuration screen (Step 4 of 5),
select the RAID level of RAID 5. Accept all other
Start of timed test: Start the timer.
1. Turn on the server, and insert the SmartStart
CD.
2. Push F9 when the BIOS prompts you to enter
RBSU. (See note 2 below.)
3. At the ROM-Based Setup Utility screen, select
System Options.
4. Select Embedded NICs.
5. Select NIC1 Boot Options.
6. Press Enter to clear the warning.
7. Select Network Boot, and press Enter.
8. Press ESC twice to return to the main menu.
9. Select BIOS Serial Console & EMS, and
press Enter.
10. Select BIOS Serial Console Port, and press
Enter.
11. Select COM1; IRQ4; IO: 3F8H-3FFH, and
press Enter.
12. Press ESC to return to the main menu.
13. Press ESC to exit, and, upon confirmation,
press F10 to complete the process.
14. Press ESC to stop the system from creating
the RAID. It will boot into SmartStart from the
CD.
15. At the Select the language to use during the
Smart Start Process screen, accept the
default of English, and click Continue.
16. Accept the license agreement by clicking
Agree.
17. Ignore the warning about there being no
bootable drive. Click Deploy Server.
18. Click Launch ACU and ADU.
19. Using the dropdown list in the upper left
corner, select Smart Array P410i in
Embedded Slot.
20. Click the Wizards tab, and click Express
Configuration, in the right-hand pane.
21. Click Begin.
Principled Technologies, Inc.: Time comparison for OS deployment: Dell Unified Server Configurator version 1.1
vs. HP SmartStart version 8.25 x64
7
defaults. Click Next
22. At the RAID Configuration screen (Step 1 of 5),
click Finish.
23. At the Do you wish to apply these modifications
now? message box, click Yes.
24. At the RAID configuration successful screen,
click OK, and wait while the Dell USC populates
the OS list.
25. At the Operating System Deployment screen
(Step 1 of 3), select Windows Server 2008 x64.
Click Next, and wait while the Dell USC
populates the drivers for the OS.
26. At the Operating System Deployment screen
(Step 2 of 3), insert the Windows Server 2008
x64 with SP2 DVD, and click Next.
27. At the Operating System Deployment screen
(Step 3 of 3), click Finish.
28. After the system reboots, at the Install Windows
screen, accept the default Language, Time and
currency format, and Keyboard or input Method.
Click Next.
29. At the next Install Windows screen, click Install
now.
30. At the next Install Windows screen, select
Windows Server 2008 Enterprise (Full
Installation). Click Next.
31. Accept the license agreement, and click Next.
32. Select Custom (Advanced) by clicking on it.
33. You should see only one partition available for
installing Windows Server 2008. Accept that as
the default, and click Next.
End of timed test: At the notice to change the password,
stop the timer.
22. Accept the default of RAID 5, and click Next.
23. Click Finish when you see the Configuration
Wizard Complete message. It will save the
configuration automatically.
24. Click Exit ACU.
25. At the Server Deployment – Hardware
Configuration screen, click Continue.
26. At the Server Deployment – Operating
System Selection screen, expand the list for
Windows Server 2008, and choose Microsoft
Windows Server 2008, Enterprise Edition.
Click Continue.
27. At the Server Deployment – Operating
System Media Source screen, accept the
defaults, and click Continue.
28. At the Server Deployment – Disk Partitioning
Options screen, accept the defaults, and click
Continue.
29. At the Server Deployment – Operating
System Configuration Information screen,
enter the Organization name and the license
key, and click Continue.
30. At the Server Deployment – WBEM/SNMP
Configuration screen, select No for both, and
click Continue.
31. At the Server Deployment – ProLiant Support
Pack screen, accept the default of Express,
and click Continue.
32. At the Server Deployment – Ready to Install
screen, click Continue, and wait while
SmartStart prepares the disks.
33. When SmartStart prompts you, remove the
SmartStart CD, and insert the Windows DVD
for Windows Server 2008 x64 with SP2. Click
Continue.
34. At the Server Deployment – Browse Media
screen, click Browse, and select DVD. Click
Continue.
35. Accept the license agreement, and click Next.
End of timed test: At the notice to change the
password, stop the timer.
Figure 8: Number of steps required by each server to deploy Windows Server 2008 Enterprise x64.
Note 1: As per the Dell USC User’s Manual: “Depending on the configuration setting changes, you may receive a
message indicating “One or more of the settings requires a reboot to be saved and activated. Do you want to
reboot now?” It is acceptable to select “No” and continue to make additional configuration changes or perform
other tasks such as OS Deployment. All changes will be activated during the following system boot.” We assume
the user is familiar enough with server setup tasks to know this reboot is not necessary.
Note 2: For our analysis, we assume the user is perceptive enough to not boot into SmartStart to get into the
RBSU. The user could, however, boot into SmartStart first and then invoke the RBSU. This would add several
minutes to the install time. We did not analyze this case.
Principled Technologies, Inc.: Time comparison for OS deployment: Dell Unified Server Configurator version 1.1
vs. HP SmartStart version 8.25 x64
8
About Principled Technologies
We provide industry-leading technology assessment and fact-based marketing services. We bring to every
assignment extensive experience with and expertise in all aspects of technology testing and analysis, from
researching new technologies, to developing new methodologies, to testing with existing and new tools.
When the assessment is complete, we know how to present the results to a broad range of target audiences. We
provide our clients with the materials they need, from market-focused data to use in their own collateral to custom
sales aids, such as test reports, performance assessments, and white papers. Every document reflects the results
of our trusted independent analysis.
We provide customized services that focus on our clients’ individual requirements. Whether the technology
involves hardware, software, Web sites, or services, we offer the experience, expertise, and tools to help you
assess how it will fare against its competition, its performance, whether it’s ready to go to market, and its quality
and reliability.
Our founders, Mark L. Van Name and Bill Catchings, have worked together in technology assessment for over 20
years. As journalists, they published over a thousand articles on a wide array of technology subjects. They
created and led the Ziff-Davis Benchmark Operation, which developed such industry-standard benchmarks as Ziff
Davis Media’s Winstone and WebBench. They founded and led eTesting Labs, and after the acquisition of that
company by Lionbridge Technologies were the head and CTO of VeriTest.
Principled Technologies, Inc.
1007 Slater Rd., Suite 250
Durham, NC 27703
www.principledtechnologies.com
[email protected]
Principled Technologies is a registered trademark of Principled Technologies, Inc.
All other product names are the trademarks of their respective owners.
Disclaimer of Warranties; Limitation of Liability:
PRINCIPLED TECHNOLOGIES, INC. HAS MADE REASONABLE EFFORTS TO ENSURE THE ACCURACY AND VALIDITY OF ITS
TESTING, HOWEVER, PRINCIPLED TECHNOLOGIES, INC. SPECIFICALLY DISCLAIMS ANY WARRANTY, EXPRESSED OR
IMPLIED, RELATING TO THE TEST RESULTS AND ANALYSIS, THEIR ACCURACY, COMPLETENESS OR QUALITY, INCLUDING
ANY IMPLIED WARRANTY OF FITNESS FOR ANY PARTICULAR PURPOSE. ALL PERSONS OR ENTITIES RELYING ON THE
RESULTS OF ANY TESTING DO SO AT THEIR OWN RISK, AND AGREE THAT PRINCIPLED TECHNOLOGIES, INC., ITS
EMPLOYEES AND ITS SUBCONTRACTORS SHALL HAVE NO LIABILITY WHATSOEVER FROM ANY CLAIM OF LOSS OR DAMAGE
ON ACCOUNT OF ANY ALLEGED ERROR OR DEFECT IN ANY TESTING PROCEDURE OR RESULT.
IN NO EVENT SHALL PRINCIPLED TECHNOLOGIES, INC. BE LIABLE FOR INDIRECT, SPECIAL, INCIDENTAL, OR
CONSEQUENTIAL DAMAGES IN CONNECTION WITH ITS TESTING, EVEN IF ADVISED OF THE POSSIBILITY OF SUCH DAMAGES.
IN NO EVENT SHALL PRINCIPLED TECHNOLOGIES, INC.’S LIABILITY, INCLUDING FOR DIRECT DAMAGES, EXCEED THE
AMOUNTS PAID IN CONNECTION WITH PRINCIPLED TECHNOLOGIES, INC.’S TESTING. CUSTOMER’S SOLE AND EXCLUSIVE
REMEDIES ARE AS SET FORTH HEREIN.
Principled Technologies, Inc.: Time comparison for OS deployment: Dell Unified Server Configurator version 1.1
vs. HP SmartStart version 8.25 x64
9