1
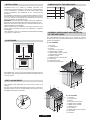
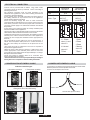
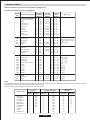
COOKERS
USER INSTRUCTIONS
CANDY HOOVER GROUP S.R.L • Via Privata Eden Fumagalli • 20047 Brugherio Milano Italy
GB
GENERAL WARNINGS
Thank you for choosing one of our products. To get the most out of
your cooker we recommend that you:
•Read the notes in this manual carefully: they contain important
instructions on how to install, use and service this cooker in safety
Keep this booklet in a safe place for easy, future reference.
•In the case of the sale or transfer of the appliance, this manual
should be given together with the appliance in order to guarantee
the proper transfer of the information on installation/usage of the
appliance and the relative warnings .
•All accessible parts are hot when the appliance is in operation,
take care to not touch these elements. When the cooker is first
switched on it may give off acrid smelling fumes-this smoke is
harmless we suggest to operate the cookers for 2 hours while
empty.
• It is dangerous to modify or to attempt to modify the properties of
the appliance.
•Particular attention is necessary when you are frying: do not
leave the appliance unattended.
•The appliance is heavy. Take care when moving.
•The emission of hot air is normal while the appliance is working.
Do not close the vents on the oven.
•Some spillage on the appliance may occur, when placing food on
or into the appliance or when removing food with excess fat or
water. Clean such residues immediately after cooking, in order to
prevent unpleasant smells and possible fires.
• When using any electrical appliance you must follow a few basic
rules:
*It is not generally a good idea to use adapters, multiple
sockets for several plugs and cable extension.
*Do not pull the power cable to remove the plug from the
socket.
*Do not touch the oven with wet or damp hands or feet.
*If the main cable is damaged it must be replaced
promptly:
*When replacing the cable, follow the instructions given
below:
*Cable replacement must be carried out by qualified
technicians. Use only an approved service centre for repairs end
ensure that only original parts are used.
*When necessary, remove the power cable and replace
it with one of the H05RR-F, H05VVF, and H05V2V2-F type. The
cable have the capacity for the electrical current required by the
product.
•Do not leave the appliance unattended before it has cooled down.
SYMBOLS USED IN THIS USER MANUAL
For easier comprehension, the symbols below are used in this
user manual.
Safety Information
Information for Environment Protection
This appliance complies with the EU E.E.C directives.
DECLARATION OF COMPLIANCE
All parts of this appliance that may come into contact with
foodstuffs comply with the provisions of EEC Directive 89/109.
The appliance complies with European Directives 73/23/EEC,
89/336/EEC and 90/396/EEC, replaced by 2006/EC,
2004/108/EC and 2003/55/EC, and subsequent amendments.
The appliance also complies with 93/68 General Directives and
subsequent amendments.
If the above instructions are not adhered to, the
manufacturer cannot guarantee the safety of the cooker.
USEFUL TIPS
SAFETY HINTS
•The cooker must be used only for the purpose for which it was
designed: it must only be used for cooking food. Any other use,
e.g. as a form of heating, is improper use of the cooker and is
therefore dangerous.
•The manufacturers cannot be held responsible for any damage
caused by improper, incorrect or unreasonable use.
•When using any electrical appliance you must follow a few basic
rules. If the appliance breaks down or develops a fault switch it off,
disconnect it from mains, do not touch it, call the authorised
Service.
•This appliance is not intended for use by persons (including
children) with reduced physical, sensory or mental capabilities, or
lack of experience and knowledge, unless they have been given
supervision or instruction concerning use of the appliance by a
person responsible for their safety.
•Children should be supervised to ensure that they do not play
with the appliance.
•An oven by its very nature becomes very hot. Especially the glass
of the oven door. Do not allow children to go near the oven when it
is hot, especially when the grill is on.
•Always use gloves to remove food from the oven.
•Always keep your appliance clean, for safety and health reasons.
Fat and food residues may cause fire.
•Do not insert your hand between oven hinges. Keep children
away.
•Make sure that all the knobs are in the OFF position when the
appliance is not in use.
•The oven drawer is to store empty trays or to keep food warm.
•Do not put flammable, explosive or cleaning materials like nylon
bags, paper, cloths, etc, into the drawer.
•Use only heat resistant pots and pans. Do not use flammable
materials.
•Do not use deformed or unbalanced pans.
•Clean the grill and the fat collecting tray carefully before initial
usage.
•When using cleaning sprays, do not spray on heaters or on the
thermostat.
•Make sure that oven shelves are correctly placed.
•Do not cover oven parts with aluminium foil.
TECHNICAL DATA
FEATURES
TOTAL ELECTRIC
POWER
50 x 60 4 Hilight Heater and Electrical Oven
6.8 kW
60 x 60 4 Hilight Heater and Electrical Oven
8.4 kW
Rating plate (located at the rear of the cooker)
01 GB
DIMENSIONS OF THE APPLIANCE
INSTALLATION
Installation have to be made by qualified personnel. The
manufacturer have no obligation to carry this out. If the assistance
of the manufacturer is required to rectify faults arising from
incorrect installation, this assistance is not covered by the
guarantee.
The installation instructions for professionally qualified personnel
must be followed. Incorrect installation may cause harm or injury
to people, animals or belongings. The manufacturer cannot be
held responsible for such harm or injury.
WARNING! Care must be taken regarding where the appliance is
placed! It can only be installed in a continuously ventilated room.
Electrical connections must always be disconnected before any
repair, installation or modification.
•Before positioning your appliance, check the properties of the
energy supply and make sure that your appliance is regulated
accordingly.
•The appliance must not be installed near flammable materials
(e.g. furniture, curtains, etc.)
50 x 60 60 x 60
Height (mm)
863
863
Width (mm)
510
600
Depth (mm)
600
600
D
H
W
GENERAL APPEARANCE AND DEFINITION
OF THE APPLIANCE
This User Manual has been drawn up as a guide for several
models. Some of the properties mentioned in this manual may not
exist in your appliance.
POSITIONING
60 x 60 COOKER
20 mm
20 mm
400 mm
750 mm
123456789101112-
Cook top
Control panel
Drawer
Oven door (Front door)
Hilight Heater 1200W
Double Hilight Heater 1700W
Hilight Heater 2300W
Warning Lamps
Hilight heaters control knobs
Oven knob
Thermostat knob
5
Electronic programmer
6
7
8
5
1
12
2
10
This appliance is of the "X" type and it has been designed on the
presumption that the adjacent work tops will be no higher than the
cook top surface.
9
11
FEET ADJUSTMENT
Your appliance has adjustable feet at the lower corners of its
chassis.
The feet can be adjusted individually with the aid of a wrench to
guarantee that the oven is perfectly balanced and level, so that
any liquids in the pans is horizontal .
5
6
3
75
4
1
50 x 60 COOKER
2
8
11
10
9
3
4
02 GB
1234567891011-
Cook top
Control panel
Drawer
Oven door (Front door)
Hilight Heater 1800W
Hilight Heater 1200W
Warning Lamp
Timer knob
Hilight heaters control knobs
Oven knob
Fan knob
ELECTRICAL CONNECTION
Cookers can be presented with or without enrgy cable. Cable
connection should be done by Autorited service according to
following instructions.
The electrical connection must be made according to the
standards and regulations in force. Before making the electrical
connection, check the following:
•Is the capacity of the electrical connections and safety fuses in
the building sufficient to cope with the load of the appliance?
(Check with the adhesive info label)
•Does the electricity supply line have an earth connection
conforming with the standards in force? A proper earth connection
must exist in your home. If there is not a proper earth connection at
your home, please apply to an authorized technician to deal with
this problem.
•Is the socket or the multi-pole switch at a easily reachable point
after the installation of the appliance?
•A plug conforming to standards should be connected to the mains
cable and the cable should be inserted into a safe socket.
•A multi-pole switch must be used between the appliance and the
electricity line if a direct electrical connection to the appliance is
required. (It must comply with standards and be appropriate for
the load)
The green-yellow ground cable must not be interrupted by a
switch. The brown phase cable (from the “L" coded connector of
the oven) must always be connected to the phase line of the
mains.
•The power line must be positioned so that it is not exposed to
temperatures higher than 50° C.
•When the power cable must be changed, a cable with a cross
section appropriate to the indicated power must be used. The
green-yellow ground cable should be approximately 2 cm longer
than phase and neutral cables.
•Check the heaters by switching them on for 3 minutes, after
having completed the connection.
•The manufacturer will not accept responsibility for damages
arising due to non-compliance with the safety standards.
Fuse
COOKERS WITHOUT ENERGY CABLE
Three-phase
380-415V3N~
25 A
3 x 16 A
2
Cable - Section
3 G 2.5 mm
Cable - Type
H05VV-F
ou H05RR-F
5 G 1.5 mm
2
H05VV-F
ou H05RR-F
L1 : Phase
1 Phase
shunt 1-2 and
2 Phase
shunt 2-3
3 Phase
N : Neutral
5 Neutral
shunt 4-5
shunt 4-5
T Earth
T Earth
COOKERS WITH ENERGY CABLE
•Connection is exclusively envisaged under tensions of 220-240V
Between phases or between phases and neutral.
•Connect 10/16 amperes to an outlet.
Cable box connection types
1- Monophase connection
Monophase
220-240 V~
2- Three-phase connection
Neutral
Attention: A poor clamping can draw away risks dangerous
heating at the level of the cable feeding
Phase cable
Ground cable (Green-Yellow)
03 GB
VITROCERAMIC COOKTOP
Copper Bottom / stoneware
Heavy weight recommended. Good performance, but copper may
leave residues which can appear as scratches. The residues can
be removed, as long as the hob is cleaned immediately. However,
do not let these pots boil dry. Overheated metal can bond to glass
hobs. An over heated copper pot will leave a residue that will
permanently stain the cook top.
DESCRIPTION OF COOKING ZONES
Highlight zone
A metallic conductor strip is spread uniformly over the whole
surface unit. It is effective within 3 seconds and is suitable for
steady, even and also lengthy cooking.
The glass-ceramic cook top benefits from greater heat output
which is generated by the highlight cooking zones thereby
accelerating the cooking process. Modifications to the design of
the hob have not affected the capacity of the glass to withstand
high temperatures, but they have improved controllability.
With the "Sprinter" facility, reduced cooking times of up to 15% can
be achieved, depending on the method of cooking and the type of
saucepans used.
Ensure that the base of the pot or pan is dry
when filling pans with liquid or using one that has been stored in
the refrigerator, ensure that the base of the pan is completely dry
before placing it on the hob. This will help to avoid staining the
cook top.
Always use good quality cookware with perfectly flat and
thick bases
Using this type of cookware will prevent hot spots that cause food
to stick. Thick metal pots and pans will provide even distribution of
heat.
Halo light zone
This is a combination of halogen (1/3) and highlight (2/3). The
temperature of this surface unit rises extremely quickly. It is
suitable for frying meat, rapid boiling and intensive cooking where
a high temperature is required for a very short period of time.
Porcelain/enamel
Good performance only if the base is thin, smooth and flat.
Radiant zone
Even temperature and great stability in maintaining the required
temperature. It is extremely precise and offers very good heat
diffusion.
Glass-ceramic
Not recommended. Poor performance. May scratch the surface.
Suitability of Cooking Pans
Keep in mind that larger pans have larger heating surfaces.
This will help them to cook the food faster than pans with smaller
heating surfaces.
Always use pan sizes proportionate to the amount of the food to be
cooked. In order to prevent splashing, do not use very small pans,
especially for foods with excess liquid. If you use excessively large
pans for quick cooked foods, sausages and liquids will stick and
residues will remain attached to the pan after being emptied.
Closed pans and baking trays or moulds are suggested for
cooking sweets. Splashed sugar and juices from an open pan may
stick to the cooker surface and will be difficult to remove.This is
especially important for pans used for roasting or pressurized
cooking at high temperature.
Do not leave burners unattended without a pan or with an empty
pan on top.
Check the suitability of cooking pans with respect to the following
criteria;
They should be heavy.
They should completely cover the burner surface; they may be a
little bigger but no smaller.
Base surfaces should be completely flat and fit well on the cooking
surface.
•Some parts of the food may be heated while others remain cold
due to the uneven distribution of heat under the pan. Therefore,
continuous stirring of the food being cooked is necessary in the
case of thin-bottomed pans. Heat is more effectively and evenly
distributed with thick-based pans.
•Use of very small pans is not recommended. Wider, low-sided
pans are more suitable for more effective and quicker cooking
than small, deep pans.
•You cannot shorten cooking time by using a small pan over a
large burner. You will only waste gas in this way. However, a pan
with a lid will save energy.
COOKTOP COOKWARE ADVICE
Efficient cooking
The extra large highlight zone, will depending on the dimensions
of the cook ware and/or the quantity of food being cooked, provide
even higher performance levels.
Using good quality cookware is critical for obtaining the best
performance from your hob.
Use pans with a large enough diameter to completely
cover the surface unit the size of the pan should be no smaller
than the heated area. If it is slightly wider the energy will be used at
maximum efficiency.
THE CHOICE OF COOKWARE
The following information will help you to choose cookware which
will give good performance.
Stainless Steel
Highly recommended. Especially good with a sandwich clad base.
The sandwich base combines the benefits of stainless steel
(appearance, durability and stability) with the advantages of
aluminium or copper (heat conduction, even heat distribution).
Aluminium
Heavy weight recommended . Good conductivity.
Aluminium residues sometimes appear as scratches on the cook
top but can be removed if cleaned immediately. Because of its low
melting point, thin aluminium should not be used.
Cast Iron
Usable, but not recommended. Poor performance. May scratch
the surface.
04 GB
COOKING MEATS
USE OF THE OVEN - GRILLING
•Grilling gives food a rich brown colour quickly. Depending on the
quantity of the food, you can switch the grill on to different
positions. Almost all food can be cooked under the grill except for
very lean game and meat rolls.
•Meat and fish that is going to be grilled should first be lightly
doused with oil.
•Place a fat collecting tray beneath during grilling. Put some water
into the tray to prevent unpleasant smells and to prevent the fat
catching fire.
•Grilling is usually preferred for cooking pieces of meat, for
example steaks, which are not too thick, different sized meat
parts, cleaved hunted birds, fish, some vegetables (e.g.
courgettes, aubergines, tomatoes, etc.) together with meat and
fish products on spits.
Oil the fish lightly before putting it directly under the grill.
Add salt on meat after cooking, salt fish into the cleavage before
cooking.
•The distance from the grill will depend on the thickness of the
meat or fish. If the distance is correctly judged, the outer parts will
not be burnt and the inside will not remain raw.
•Prevent unpleasant odours and smoke caused by dripping fats
and sauces by pouring 1-2 glass of water into the fat-collecting
tray.
•You can also use the grill for toasting, toasted bread or
sandwiches, for example, and also to cook certain fruits (bananas,
grapefruit or pineapple slices, apples etc.). However, fruit must not
come into contact with the heating elements.
•The minimum quantity of meat to be cooked in the oven is 1 kg.
Otherwise, the meat will be too dry.
If you require well done meat, use less fat. If meat has a little fat,
there is no need to use oil. If one side of the meat is fatty, place this
side up. The melted fat will sufficiently grease the part below. Red
meats should be taken out of the fridge at least 1 hour before the
cooking.
•Otherwise the meat may become tough due to the temperature
difference. Do not use salt before cooking, especially when grilling
meat. Salt will draw the blood and juices out of the meat which will
consequently prevent the roasting of the upper surface of the
meat.
•Add salt to roast meat only after half of the cooking time has
elapsed.
•Place the meat to be roasted in a wide, shallow pan.
•Deep sided containers / pans act as a shield against the heat.
Meat can be placed in the oven in a heat resistant pan or directly
onto the grill. Insert a fat / gravy collecting tray beneath the grill.
Sauces must be added at the beginning if the food is cooked for a
short time, while it would be better to add sauces in the last half
hour if the food is cooked for a longer time.
COOKING FISH
Small fish can be cooked at the maximum temperature from start
to finish. Medium sized fish must be cooked at the maximum
temperature at the beginning and then the temperature must be
slowly reduced. Larger fish must be cooked at lower temperatures
from start to finish. Check the cut at the bottom of fish to
understand whether it is cooked properly. In order to understand
whether the fish properly grilled or not, check the cleavage at the
bottom of the fish. The colour (for grilled fish) should be an even
matt white. This is not the case for salmon and trout.
Never cover oven inner walls or the bottom with
aluminium foil. Accumulated heat can damage the
oven enamel and your meal.
SUGGESTIONS FOR COOKING
CONTROL KNOBS OF THE VITROCERAMIC
COOKTOP
Traditional Cooking
Heat is generated from the upper and lower heaters. Generally,
the middle shelf position is preferable for cooking. However, if the
top or bottom surface of the food must be cooked more, place it on
the upper or lower shelf.
HOW TO OPERATE THE COOKTOP
Locate the sign corresponding to the cooking zone that you
need.
Turn the control knob to the required cooking setting.
Initially we recommend that the heat zone be set at the highest
position until the contents of the saucepan have reached the
required temperature; the heat can then be reduced to the
required cooking setting.
The residual heat indicator light will come on when the cook
top surface temperature reaches 60 degrees or above.
It will remain on even if the cook top is switched off and will only go
out when the cook top surface has cooled down.
Convection Cooking (with Fan)
•The food is cooked by evenly distributed preheated air blown into
the oven by the help of the fan located on the inside back wall of
the oven.
It is possible to cook several dishes simultaneously on different
shelves thanks to the evenly distributed heat inside the oven.
•This type of oven is also very useful for defrosting frozen food. It
can also be used for sterilizing canned food, preparing fruit
syrups, and dehydrating fruits and mushrooms.
12
COOKING CAKES
•Unless otherwise suggested, preheat the oven for at least 10
minutes before use. Do not open the oven door when cooking
cakes otherwise they will not rise (cakes or dishes with yeast and
soufflés). The blast of cold air which will enter the oven will prevent
rising. You can check whether cakes are properly cooked by
inserting a rod into the dough. If the rod comes out dry when you
pull it out, it means that the cake is properly cooked. Do not check
in this way until at least three quarters of the cooking time has
elapsed.
1
11
2
10
3
9
4
5
8
7
Positions
Please keep in mind the following tips
•If the surface of the food is cooked well but it is still raw or partly
raw inside, it must be cooked longer at a lower temperature.
•On the other hand, if the surface of the food is too dry, it should be
cooked at a higher temperature for a shorter time.
6
Some Tips
1
1-2 Very Low To keep a dish hot, melt butter and chocolate...
2
3-4 Low
3
5-6 Moderate Beans, frozen foods, fruit, boiling water...
4
7-8 Medium
5 9-10 High
Slow cooking, sauces, stews, rice pudding
poached eggs...
Steamed apples, fresh vegetables, pasta,
crepes, fish...
More intense cooking, omelettes, steaks...
6 11-12 Very High Steaks, chops, frying...
05 GB
To switch off the cook top, turn the knob to "O".
•The oval heating zone consists of two heating areas: a circular
area and an oval shaped section. Turn the control knob from 1 to
12 to regulate the circular area. To operate the oval section, simply
turn the control knob to position12 and then select a position from
1 to 12.
•The heating area consists of two concentric zones. The inner
circle is activated when the knob is turned to any of the positions
from 1 to 12.The outer ring will only be activated when the control
is turned beyond 12 up to a maximum power.
USING THE END OF COOKING TIMER
Mains power to the electric heaters is
controlled by the timer. A correct timer
position should be selected before
using the oven.
The timer guarantees that the oven will
remain switched on for the time
required. You can adjust the timer up to
90 minutes.
If the use of the timer is not required and you do not want to
programme cooking time, turn timer knob to the “ ” position.
Some electric ovens have a timer which must be set at the time at
which cooking must stop. This control allows for the desired
cooking time to be programmed. The oven will automatically
switch off at the end of the set time.
The timer will count down from the set time, return to the “ O ”
position, and switch off automatically. For normal use of the oven,
set the timer to the “ O ” position and it will switch off automatically.
It can then be used by manual control.
ELECTRIC OVEN
Position
Oven Function
Not in function
Turn spit and grill heater
Lamp
Grill heater
Grill heater and fan
Fan
USING THE MINUTE TIMER
Upper heating element and fan
To programme cooking time for the
gas oven, turn dial round completely,
and then turn it back to the required
time. When the time has elapsed, the
signal will ring for a few seconds.
Lower heating element and fan
Upper heating element, lower heating element and fan
Lower and upper heating element
Upper heating element
Lower heating element
USE OF THE ELECTRONIC PROGRAMMER
FUNCTION
HOW TO SWITCH IT OFF
HOW TO ACTIVA
MINUTE MINDER •Press and hold the button
•When the set time as
elapsed an audible alarm
is activated (this alarm will
stop on its own, however
it can be stopped
immediately by pressing
the button)
•Press the buttons or
to set the required time
•Release all the buttons
WHAT IT DOES
WHAT IT IS FOR
• Sounds an alarm at the end of the set time.
• To check how long is left to run press the
button
•Allows to use the oven as alarm clock (could be activated either with operating the oven
or with out operating the oven)
•Enables you to operate the oven.
•For cooking the desired recipes
MANUAL
FUNCTION
•Press the button
•Turn the oven function
•Set the cooking function with selector to position“O”
the oven function selector
COOKING
TIME
•Press and hold the TIMER
button
•Press the buttons or to
set the lenght of cooking
required
•Release all buttons
•Set the cooking function with
the oven function selector
•When the time is elapsed the •It allows to preset the cooking time required
for the recipe chosen.
oven will switch off
•To check how long is left to run press the
automatically. Should you
wish to stop cooking earlier TIMER button.
•To alter/change the preset time press TIMER
either turn the function
buttons
selector to 0, or set time to and
buttons)
0:00(TIMER and
•At the end of the cooking set time, the oven will switch off automatically and an audible
alarm will ring.
END OF
COOKING
•Press and hold the END
button
•Press the buttons
to
set the time at which you
wish the oven to switch off
•Release the buttons
•Set the cooking function with
the oven function selector
•At the time set, the oven will
switch off. To switch off
manually, turn the oven
function selector to position
“O”.
•This function is typically used with “cooking time” function. For example if the dish has to
be cooked for 45 minutes and needs to be ready by 12:30, simply select the required
function, set the cooking time to 45 minutes and the end of cooking time to 12:30.
•Cooking will start automa-tically at 11:45 (12:30 minus 45 mins) and will continue until the
preset end of cooking time, when the oven will switch itself off automatically
WARNING!
If the END of cooking is Selected without setting the length of cooking time, the oven will
start cooking Immediately and it will Stop at the END of cooking time set.
•Enables you to set the end of cooking time
•To check the preset time press the END button
•To modify the preset time press buttons
END+
Setting the correct time:
WARNING : the first operation to carry out after the oven has been installed or following the interruption of power supply (this is recognizable the display pulsating and showing )
is setting the correct time. This is achieved as follows
• Press and hold the TIMER and END buttons (
• Set time with
buttons
• Release all buttons
and
)
ATTENTION the oven only operates if set on manual function
or preset time.
are replaced by + and - .
N.B.: on some models the symbols
06 GB
COOKING TABLES
Traditional and Hot Air Circulation Cooking Methods; Weights (Gr)
TYPE OF THE FOOD Traditional Cooking Method
Weight
(Gr)
TYPE OF THE FOOD
Traditional
Cooking
Method
CAKES AND DESSERTS
Dough with stirred egg
Dough
Small Cakes
Cheese Cake
Apple Pie
Strudel
Jam tart
Small cakes
Biscuits
Cream cakes
Hot Air
Circulation
Method
Cooking
times
(Minutes)
2
1
2
1
1
2
2
2
2
2
180
180
180
175
180
175
180
180
180
100
2 (1 and 3)
2 (1 and 3)
2 (1 and 3)
2
2 (1 and 3)
2 (1 and 3)
2 (1 and 3)
2 (1 and 3)
2 (1 and 3)
2 (1 and 3)
160
160
160
150
160
150
160
160
160
100
45 - 60
20 - 35
20 - 30
60 - 80
40 - 60
60 - 80
45 - 60
15 - 25
10 - 20
90 - 120
BREAD AND PIZZA
White Bread
Rye Bread
Sandwich
Pizza
1
1
2
1
200
200
200
220
2
2
2 (1 and 3)
2 (1 and 3)
175
175
175
200
45 ~ 60
30 ~ 45
20 ~ 35
20 ~ 35
PASTRY
Macaroni
With vegetable
Small pastries
Lasagne
2
2
2
2
200
200
200
200
2 (1 and 3)
2 (1 and 3)
2 (1 and 3)
2
175
175
175
175
40 ~ 50
45 ~ 60
35 ~ 45
45 ~ 60
1000
1200
1000
1500
1200
1000
4000
1500
3000
1200
MEATS
Roast beef
Roast pork
Roast veal
British style roast beef
Lamb
Chicken
Turkey
Duck
Goose
Rabbit
2
2
2
2
2
2
2
2
2
2
200
200
200
220
200
200
200
175
175
200
2
2
2
2
2
2
2
2
2
2
175
175
175
200
175
175
175
160
160
175
50 ~ 70
100 ~ 130
90 ~ 120
50 ~ 70
110 ~ 130
60 ~ 80
210 ~ 240
120 ~ 150
150 ~ 200
60 ~ 80
1000
800
FISH
Whole fish
Fillet
2
2
200
200
2 (1 and 3) 175
2 (1 and 3) 175
1000
500
500
250
40 ~ 60
30 ~ 40
NOTES
Inside the closed oven on
dishes 8 pieces on a tray
Under the grill
Cook on grill
Cook on grill
Cook on grill
Cook on grill
Leg
Full size
Full size
Full size
Full size
In parts
2 Fishes
4 Fillets
NOTE :
1) Cooking times do not include pre heating. Preheating the oven for about 10 minutes is advisable especially for cakes, pizzas and breads.
2) Indicates tray positions for cooking several dishes simultaneously.
3) All cooking operations must be carried out with oven door closed.
QUANTITY
FOOD TYPES
Beefsteak
Grilled cutlet
Sausage
Chicken parts
Mixed grill
Milky desserts
Tomato slices
Fish fillets
Scallops
Toast
Bread slices
N. OF
PARTS
WEIGHT
4
4
8
6
4
4
8
4
6
4
4
800
600
500
800
700
400
500
400
----—
COOKING ON GRILL
SHELF
POSITION
4
4
4
3
4
4
4
4
4
4
4
07 GB
COOKING TIMES
(Minutes)
TEMPERATURE
(°C)
UPPER
SECTION
LOWER
SECTION
max
max
max
max
max
max
max
max
max
max
max
10
12
10
30
12
13
12
8
12
8
2-3
8
8
6
20
10
10
-6
--1
CLEANING AND MAINTENANCE
Before all cleaning and maintenance :
•Disconnect mains voltage.
•If the oven is hot, wait till it has cooled down.
•Never use a steam or high pressure spray to clean the appliance.
•Never use abrasive cleaners, wire wool or sharp objects to clean
the glass oven door.
•Clean enamelled surfaces with warm, soapy water or with
suitable brand products. On no account use abrasive powders
that may damage surfaces and ruin the appearance of the cooker.
It is very important to clean the oven each time it is used.
•Use detergents and abrasive metal pads for the stainless steel
grills.
•The glass surfaces such as the top, the oven door and the
warming compartment door must be cleaned when they are cold.
•Damage caused by failure to respect this rule is not covered by
the guarantee.
•Do not use abrasive products, metal cleaning pads, sharp
objects, rough cloths, or chemical products and detergents that
can permanently damage the catalytic lining.
•It is a good idea to use deep roasting trays for fatty foods such as
joints of meat etc. and to put a tray underneath the grill to catch
surplus fat.
30° Max
Do not use a sponge which is too wet.
Never use a knife or a screwdriver.
A scraper with a razor blade will not damage the surface,
0
as long as it is kept at an angle of 30 .
Never leave a scraper with a razor blade within the reach of
children.
Never use abrasive products or scouring powders.
The metal surround
to safely clean the metal surround wash with soap and water,
rinse, then dry with a soft cloth.
Cleaning of Oven Door
For thorough cleaning of the oven door, it is advisable to remove
the same, as shown in below.
Open the door completely, turn the two feet on the hinge arms
180º. Close the door partly by a 30º. Remove the door by slightly
lifting the it at this position.
For replacing the door, follow the steps above in the reverse order.
Before carrying out any maintenance work on the hob, allow it to
cool down.
Only products, (creams and scrapers) specifically designed for
glass ceramic surfaces should be used. They are obtainable from
hardware stores.
Avoid spillages, as anything which falls on to the hob surface will
quickly burn and will make cleaning more difficult.
It is advisable to keep away from the hob all substances which are
liable to melt, such as plastic items, sugar, or sugar-based
products.
180
0
To Replace the inside light
• Switch off the mains power supply and unscrew bulb.
Replace with an identical bulb that can withstand very high
temperatures.
• Never use steam or a vaporizer for cleaning.
MAINTENANCE
•Place a few drops of the specialised cleaning product on the hob
surface.
•Rub any stubborn stains with a soft cloth or with slightly damp
kitchen paper.
•Wipe with a soft cloth or dry kitchen paper until the surface is
clean.
If there are still some stubborn stains
•Place a few more drops of specialised cleaning fluid on the
surface.
•Scrape with a scraper, holding it at an angle of 30 to the hob, until
the stains disappear.
•Wipe with a soft cloth or dry kitchen paper until the surface is
clean.
•Repeat the operation if necessary.
CATALYTIC SELF - CLEANING OVEN
A FEW HINTS
Frequent cleaning leaves a protective layer which is essential to
prevent scratches and wear. Make sure that the surface is clean
before using the hob again. To remove marks left by water, use a
few drops of white vinegar or lemon juice.
Then wipe with absorbent paper and a few drops of specialised
cleaning fluid.
The control knobs can be removed for a complete cleaning.
•Special self-cleaning panels covered in a micro-porous coating
are available on some of our models. If they are fitted, the oven no
longer needs to be cleaned by hand.
•The lining must be porous for self-cleaning to be effective.
•Excessive splattering of fat may block the pores and therefore
hinder self-cleaning. This self-cleaning capacity may be restored
by switching on the empty oven to maximum for about 10-20
minutes.
•If the walls of the oven are so thickly coated in grease that the
catalytic lining is no longer effective, remove surplus grease with a
soft cloth or sponge soaked in hot water. All catalytic linings
currently on the market have a working life about 300 hours. They
should therefore be replaced after about 300 hours.
However, you must care not to let any liquid go into the open
zones, and then to push the knobs fully on fitting back.
The glass ceramic surface will withstand scraping from
flatbottomed cooking vessels, however, it is always better to lift
them when moving them from one zone to another
08 GB
SERVICE CENTRE & TROUBLESHOOTING
“H” display, residual heat indicator, blinking
The electronic temperature is too high. A technician should verify
the fitting in compliance with the recommendations.
•If the oven is not working, before calling the service centre we
recommended that :
•You should check that the oven is properly plugged into the
power supply.
The oven does not heat up
Are the oven control knobs at the correct position ?
The cooking time is too long
Has the correct temperature been selected ?
PROTECTION OF THE ENVIRONMENT
Smoke comes from the oven
It is advisable to clean the oven after each use. If fat which
splashes during the cooking of meat is not cleaned, it will cause an
unpleasant smell and smoke the next time you use the oven. (See
the Cleaning and Maintenance chapter)
The oven light does not come on
•The light might be faulty. To change the bulb, please see the
relative page.
•If you have checked the above and the oven still does not work
properly, contact the nearest authorized service for assistance
• Model and Production Number (PNC or ENR).
•After positioning the appliance, packaging materials must be
correctly disposed of for safety and environmental purposes.
•Before disposing of old equipment, cut the power cable in order to
render the equipment unusable.
•This appliance is marked according to the European directive
2002/96/EC on Waste Electrical and Electronic Equipment
(WEEE).
•By ensuring this product is disposed of correctly, you will help
prevent potential negative consequences for the environment and
human health, which could otherwise be caused by inappropriate
waste handling of this product.
•The symbol on the product indicates that this product may not be
treated as household waste. Instead it shall be handed over to the
applicable collection point for the recycling of electrical and
electronic equipment
•Disposal must be carried out in accordance with local
environmental regulations for waste disposal.
•For more detailed information about treatment, recovery and
recycling of this product, please contact your local city office, your
household waste disposal service or the shop where you
purchased the product.
The cooking zones do not simmer or only fry gently
Only use flat-bottomed pans. If light is visible between the pan and
the hob, the zone is not transmitting heat correctly.
The pan bottom should fully cover the diameter of the selected
zone.
The cooking is too slow
Unsuitable pans are being used. Only use flat bottomed utensils,
that are heavy and have a diameter at least the same as the
cooking zone.
Small scratches or abrasions on the hob's glass surface
Incorrect cleaning or rough-bottomed pans are used; particles like
grains of sand or salt get between the hob and the bottom of the
pan. Refer to the “CLEANING” section; make sure that pan
bottoms are clean before use and only use smooth bottomed
pans. Scratches can be lessened only the cleaning is done
correctly.
Metal marks
Do not slide aluminium pans on the hob. Refer to the cleaning
recommendations.
You use the correct materials, but the stains persist.
Use a razor blade and follow the “CLEANING” section.
Dark stains
Use a razor blade and follow the “CLEANING” section.
Light surfaces on the hob
Marks from an aluminium or copper pan, but also mineral, water or
food deposits; they can be removed using the cream cleaner.
Caramelisation or melted plastic on the hob.
Refer to the “CLEANING” section.
The hob does not operate or certain zones don't work
The shunts are not positioned correctly on the terminal board.
Have a check made that the connection is done in compliance with
the recommendations.
The control panel is locked.
Unlock the hob.
Frequency of on/off operations for cooking zones
The on-off cycles vary according to the required heat level:
•low level: short operating time,
•high level: long operating time.
09 GB
04.2009 • Code : vitroceran master user manual
GB
The manufacturer will not be responsible for any inaccuracy resulting from printing or transcript errors contained in this brochure. We reserve the right
to carry out modifications to products as required, including the interests of consumption, without prejudice to the characteristics relating to safety or
function.


![VTW Software Operation manual[PDF:17.4MB] - FOR](http://vs1.manualzilla.com/store/data/005725901_1-df2c6d7f9199f46fcf33ffa12e63545b-150x150.png)

![UFM-30CTL Operation manual[PDF:4.1MB] - FOR](http://vs1.manualzilla.com/store/data/005676883_1-d2048345a5eb1a6d8c39e09dd604009b-150x150.png)