1
OPERATION
MANUAL
VTW Software
VTW Software
Version 5.5 - Higher
Software License Agreement
This Software License Agreement is a legally binding agreement between you (“User”) and FOR-A Company Limited
(“Company”). The software, user manual and all other associated documentation (collectively, “Product”) are licensed,
not sold, to the User. By installing and using the software, or by using a product of the Company in which the software is
installed, User agrees to be bound by all terms and conditions of this agreement, as set forth below.
1. Grant of License
a. The Company grants User a license to operate the Product in the manner specified in the user manual
and other associated documentation. User may not use the Product in any manner other than that
specified.
b. The Company only grants User a license to personally use the Product, and does not allow User to
transfer the license to a third person or to enable a third person to use the Product by any other method.
c. In principle, the software may only be used on a single computer or device.
d. While the software may include various programs, they may not be unbundled and used as standalone
programs.
2. Restrictions on Distribution, Duplication, Leasing and/or Transfer of Product
User may not, without the Company’s prior permission, distribute via communication lines, or lease or
transfer electronic copies of the Product to another party, in whole or in part, nor attempt to do so.
3. Limitations of Guarantee
The Company and its program licensors disclaim all legal warranties, express or implied, with respect to the
Product. User must use the Product at his or her own risk. In no event shall the Company and its program
licensors be liable for any damages or loss of data or contents resulting from User’s use of or inability to use
the Product.
4. Provision of Upgrades and Updates
Whenever a software version is upgraded or updated, User may use the new version of the software by
paying the amount separately specified by the Company. After upgrading software, User may not use an
earlier version without the Company’s prior permission.
5. Term of Validity of Agreement
This agreement shall be effective for a period of one year from the day User begins using the software. The
same conditions of the agreement shall be extended for further one-year terms unless User or the Company
expresses, at least one month prior to expiration of the agreement, the intent not to renew the agreement.
6. Termination of Agreement
a. The Company reserves the right to immediately terminate this agreement if User corresponds to any of
the following circumstances.
(1) User violates any terms of this agreement
(2) User is unable or refuses to make any required payment.
b. User may terminate this agreement by written notice to the Company under the following circumstances,
but may not seek a refund of the amount that User has already paid to the Company.
(1) User waives the license.
(2) User destroys or loses the software package and prevents the Company from being able to confirm its
existence.
c. After termination of this agreement, User may not use the Product in any way, shape or form.
7. Ownership
The Company and its program licensors retain all rights, including copyright and intellectual property rights, to
the Product. User may not modify any program included in this software, nor disassemble, decompile, or
reverse-engineer a program to analyze its source code.
8. Others
This agreement will be governed by and construed in accordance with copyright laws and treaties in Japan
and by laws and international treaties relating to intangible property rights. User must comply with all
copyright laws as well as applicable laws and regulations when using the Product.
9. Jurisdiction
Any dispute relating to the Agreement shall be subject to the exclusive jurisdiction of the Tokyo District Court
of Japan.
10. Support
If the Company discovers a flaw in the software or revises a program within one year after User receives the
software, the Company will provide information regarding the flaw or revision or a revised program to User,
free of cost.
COPYRIGHT
Copyright ©2011 Compix Media Incorporated. All rights reserved.
Compix Media, Inc., 26 Edelman, Irvine, CA 92618, U.S.A.
No part of this document may be reproduced or transmitted in any form or by any means, electronic or mechanical, for any purpose, without the express permission of Compix Media Incorporated.
Compix Media is a registered trademark of Compix Media Incorporated. GenCG, and the GenCG logo are trademarks of Compix Media Incorporated. All other company and product names are trademarks of their
respective owners.
Compix Media Incorporated
Software License Agreement
IMPORTANT: PLEASE READ THE TERMS AND CONDITIONS OF THIS LICENSE AGREEMENT CAREFULLY BEFORE USING THE SOFTWARE. COMPIX MEDIA INCORPORATED
IS WILLING TO LICENSE THE SOFTWARE TO YOU AS THE INDIVIDUAL, THE COMPANY, OR THE LEGAL ENTITY THAT WILL BE UTILIZING THE SOFTWARE ONLY ON THE
CONDITION THAT YOU ACCEPT ALL OF THE TERMS OF THIS LICENSE AGREEMENT. THIS IS A LEGAL AND ENFORCEABLE CONTRACT BETWEEN YOU AND COMPIX MEDIA
INCORPORATED. BY OPENING THIS PACKAGE, BREAKING THE SEAL, OR OTHERWISE INDICATING ACCEPTANCE ELECTRONICALLY, OR LOADING THE SOFTWARE, YOU
AGREE TO THE TERMS AND CONDITIONS OF THIS AGREEMENT. IF YOU DO NOT AGREE TO THESE TERMS AND CONDITIONS, COMPIX MEDIA INCORPORATED IS UNWILLING TO LICENSE THE SOFTWARE TO YOU, AND YOU SHOULD NOT UNSEAL THE DISK PACKAGE OR MAKE NO FURTHER USE OF THE SOFTWARE.
1. Definitions.
(A) “Software” means the software program covered by this agreement, and all related updates supplied by Compix Media Incorporated.
(B) “Compix Product” means the Compix Software and any related documentation, models, and multimedia content (such as animation, sound, and graphics), and all related updates supplied by Compix Media
Incorporated.
(C) “End-User Product” means the output file generated by you, if any, using the Compix Software. Examples of end-user products include animations, presentations, interactive multimedia material, interactive
entertainment products, and the like.
2. License.
The Software and documentation that accompanies this license is the property of Compix Media Incorporated, or its licensors, and is protected by copyright law. While Compix Media Incorporated continues to
own the Software, you will have certain rights to use the Software after your acceptance of this license.
The foregoing license gives you limited rights to use the Compix Product. You do not become the owner of, and Compix Media Incorporated retains title to, the Compix Product, and all copies thereof. All rights
not specifically granted in this agreement, including federal and international copyrights, are reserved by Compix Media Incorporated.
Some states do not allow the exclusion of implied warranties, so the above exclusion may not apply to you. You may also have other legal rights which vary from state to state.
These limitations or exclusions of warranties and liability do not affect or prejudice the statutory rights of a consumer; i.e., a person acquiring goods otherwise than in the course of a business.
This agreement allows you to:
(A) Use the Software on the hard disk drive of any single compatible computer that you own. This License does not allow the Software to exist on more than one computer at a time, and you may not make the
Software available over a network where it could be used by multiple computers at the same time. If you wish to use the Software on more than one computer, you must either erase the Software from the first hard
drive before you install it onto a second hard drive, or else License an additional copy of the Software for each additional computer on which you want to use it.
(B) Make one backup copy of the Software, provided your backup copy is not installed or used on any computer and further provided that all such copies shall bear the original and unmodified copyright, patent,
and other intellectual property markings that appear on or in the Software. You may not transfer the rights to a backup copy unless you transfer all rights in the Software as provided under Section A.
(C) Make copies of the End-User Product and distribute those copies for use by others.
3. Restrictions.
You may not, without written permission from Compix Media Incorporated: rent, lease, lend, redistribute, or sublicense the Software or any copy; use, copy, modify, merge, or transfer copies of the Software or
documentation except as provided in this Agreement; use any backup copy of the Software for any purpose other than to replace the original copy in the event it is destroyed or becomes defective; or decompile,
reverse engineer, disassemble, modify, or create derivative works of the Software or any part thereof.
Your rights under this License will terminate automatically without notice from Compix Media Incorporated if you fail to comply with term(s) of this License. Licensee also may terminate this License voluntarily
by giving notice of termination to Compix Media Incorporated and destroying or returning to Compix Media Incorporated all copies of all or any part of the Software and related user documentation in Licenses’
possession or under Licensee’s control.
4. Limited Warranty.
Compix Media Incorporated warrants the media on which the Software is recorded and the hardware delivered by Compix Media Incorporated to be free from defects in materials and workmanship under normal
use for a period of one (1) year from the date of original retail purchase. Your exclusive remedy under this Section shall be, at Compix Media Incorporated’s option, a refund of the purchase price of the Software
or replacement of the Software which is returned to Compix Media Incorporated with a copy of the receipt. In compliance with this Agreement, Compix Media Incorporated will replace a damaged or defective
interlock security device (dongle) no matter what the cause of the damage for a period of one (1) year from the date of purchase. In order to receive a replacement device, you must return the damaged device to
Compix Media Incorporated, 26 Edelman, Irvine, CA 92618, U.S.A.
5. Lifetime Warranty on Software.
Compix Media Incorporated warrants only to the original purchaser of the Software that the Software will be free from defects in material and workmanship under normal use and service. All Software updates are
free of charge for the lifetime of the Software. The Software and documentation are provided on an “As Is” basis and Compix Media Incorporated does not warrant that the Software will satisfy all your requirements or that operation of the Software will be uninterrupted or that the Software will be free from defects.
6. Limitation of Liability.
Compix Media Incorporated shall not be liable for any indirect, special, incidental, or consequential damages or loss (including damages for loss of business, loss of profits, or the like), whether based on break of
contract, tort (including negligence), product liability, or otherwise, even if Compix Media Incorporated or its representatives have been advised of the possibility of such damages. Some states do not allow the
limitation or exclusion of liability for incidental or consequential damages, so this limitation or exclusion may not apply to you.
The exclusive remedies and limited liability set forth above are fundamental elements of the basis of the bargain between Compix Media Incorporated and you. You agree that Compix Media Incorporated would
not be able to provide the Software on an economic basis without such limitations.
7. General.
This agreement shall be governed by the internal laws of the state of California. This agreement contains the complete agreement between the parties with respect to the subject matter hereof, and supersedes all
prior or contemporaneous agreements or understandings, whether oral or written.
All questions concerning this agreement shall be directed to:
Compix Media, Inc., 26 Edelman, Irvine, CA 92618, U.S.A.
Contents
Chapter 1. Getting Started
Chapter 2. Basic Operations
Chapter 3. Object Design
Chapter 4. Style Catalog
Chapter 5. Object Alignment
Chapter 6. Effects Tab & Page Modes
Chapter 7. On-Air
Chapter 8. Scheduler Suite
Appendix
Chapter 1. Getting Started
Start VTW ........................................................................................14
Connect Monitor, Keyboard and Mouse ... ............................................................14
Start VTW ...............................................................................................................14
Exit VTW .................................................................................................................15
4
Chapter 2. Basic Operations
VTW User Interface ........................................................................18
Primary Screen........................................................................................................18
Page List..................................................................................................................19
Attributes Control.....................................................................................................20
Playback Control.....................................................................................................21
Style Catalog...........................................................................................................22
Edit Window.............................................................................................................22
Toolbar Icons Descriptions............................................................24
Menu Options...................................................................................25
File Menu.................................................................................................................25
Edit Menu................................................................................................................28
View Menu...............................................................................................................32
Insert Menu..............................................................................................................35
Tools Menu..............................................................................................................40
Window Menu..........................................................................................................45
Help Menu...............................................................................................................46
Options.............................................................................................47
General Tab.............................................................................................................47
Editor Tab................................................................................................................48
Playback Tab...........................................................................................................49
External Controller Tab............................................................................................50
5
Chapter 3. Object Design
Text Attributes..................................................................................52
Inserting Text...........................................................................................................52
Editing Text..............................................................................................................52
Selecting Text..........................................................................................................52
Aligning Text............................................................................................................53
Face.........................................................................................................................54
Edge........................................................................................................................56
Shadow....................................................................................................................56
Shape Attributes..............................................................................57
Drawing Shapes......................................................................................................57
Creating a Custom Shape.......................................................................................57
Face.........................................................................................................................59
Edge........................................................................................................................61
Shadow....................................................................................................................61
Animation Attributes.......................................................................62
Face.........................................................................................................................62
Color Tab..........................................................................................63
Face, Edge, and Shadow........................................................................................63
Palette.....................................................................................................................63
Texture.....................................................................................................................65
Clock/Timer Tab...............................................................................66
Setting.....................................................................................................................66
Exact Time Sound...................................................................................................66
Object Right Click Options.............................................................67
General Options......................................................................................................67
Options Unique to Image Objects............................................................................69
Options Unique to Text and Shape Objects............................................................69
6
Chapter 4. Style Catalog
Style Catalog Templates.................................................................72
Types of Templates.................................................................................................72
Right Click Options..................................................................................................72
Saving Templates to the Style Catalog...................................................................75
Using Templates from the Style Catalog.................................................................76
Saving Catalogs......................................................................................................78
7
Chapter 5. Object Alignment
Selecting Multiple Objects . ...........................................................80
Selecting Multiple Objects.......................................................................................80
Creating Copies of Objects......................................................................................80
Aligning Objects..............................................................................81
Alignment Related Icons on the Toolbar.................................................................81
Screen Align............................................................................................................81
Area Align................................................................................................................82
Objects Align...........................................................................................................84
Changing Object Size with a Master Object ................................86
Changing the Width of an Object with a Master Object ..........................................86
Changing the Height of an Object with a Master Object . .......................................86
Changing the Width and Height with a Master Object.............................................86
Order of Layers . .............................................................................87
Changing the Order of Layers.................................................................................87
8
Chapter 6. Effects Tab & Page Modes
Effects Tab ......................................................................................90
Transition Effects.....................................................................................................90
Effects Tab..............................................................................................................91
Still Mode..........................................................................................92
Applying Transition Effect in Still Mode...................................................................92
Roll and Crawl Mode.......................................................................92
Speed of Scroll........................................................................................................92
Scroll Area...............................................................................................................92
Typing Mode.....................................................................................93
Applying Typing Transition Effects..........................................................................93
MultiLayer Mode..............................................................................93
Applying Transition Effects on Each Object ...........................................................93
9
Chapter 7. On-Air
Run Tab............................................................................................96
Run Tab...................................................................................................................96
Mask Effect......................................................................................97
Mask Effect..............................................................................................................97
On-Air Shortcuts..............................................................................98
Shortcuts While On-Air............................................................................................98
10
Chapter 8. Scheduler Suite
Introducing Scheduler Suite..........................................................100
What is Scheduler Suite?.......................................................................................100
Menu Options..................................................................................101
File Menu................................................................................................................101
Edit Menu...............................................................................................................102
Playback Menu.......................................................................................................103
11
Appendix
VTW Shortcut List .........................................................................106
Scheduler Suite Shortcut List.......................................................109
12
Chapter
1
Getting Started
Start VTW
Chapter 1 Getting Started
Start VTW
Connect Monitor,
Keyboard and
Mouse
Before starting the VTW
Software, connect a monitor,
keyboard and mouse to the
VTW-350HS as shown at the
right.
Start VTW
1. Power On VTW-350HS.
The VTW software
automatically starts when the
VTW-350HS is powered on.
1
2. The VTW Software screen as shown below will appear on the
monitor in full-screen.
2
14
Chapter 1 Getting Started
Exit VTW and Display the
Desktop screen
Click the close button in the upper right corner of the VTW window
to display the desktop.
The dedicated utility software,
Close button
FOR-A MBP Utility must be
launched from the desktop.
Refer to “VTW-350HS
Operation Manual” for details
on the utility software.
Restart the VTW
Software
Exit VTW
Double-click the VTW software icon on the desktop to restart the
software.
Power Off VTW-350HS.
The VTW software
automatically closes when
the VTW-350HS is powered
off.
15
Chapter 1 Getting Started
16
Chapter
2
Basic Operations
VTW User Interface
Toolbar Icon Descriptions
Menu Options
Options
Chapter 2 Basic Operations
VTW User Interface
Primary Screen
The picture shown to the right is
the user interface of VTW.
5
The user interface is the most essential part of VTW and it is important to
learn the terms and functions
thoroughly.
1
4
2
1
3
Page List: This window allows for the visualization and management of pages. Open
multiple VTW files (*.gcg) to copy and paste pages from one project to another.
2
Attributes Control: Consists of Attributes, Color, Clock/Timer, Effects, and Run
tabs. Control the attributes for design, effects, and more.
3̀
Playback Control: Control the playback of the Page List from this window.
4
Style Catalog: Quickly access saved objects and attributes to be used frequently.
5
Edit Window: View and edit pages within the Page List.
18
Chapter 2 Basic Operations
Page Thumbnail
Page List
Page In Effect
Displays editable pages of an
opened file as thumbnails. The Page
Page Mode
List also acts as a playlist of pages.
Page Out Effect
Tip
Depending on the resolution of the
monitor, the number of pages
Tip
displayed may be different.
Here is a list of the Page Mode abbreviations:
Still Mode
Roll Mode
Crawl Mode
Typing Mode
Multilayer Mode
Selecting a Page
Multiple Page Selection 1
Click on a page from the page list to
Click on the first page of the
Click
select it. To select multiple pages,
collection of pages you want to
1
hold the Shift key and click on the
select in sequence. Click on the
desired pages in sequence or hold
last page while pressing the Shift
the Ctrl key to individually select
key. All the pages in between will
pages.
be selected and highlighted in
yellow.
Click
2
Multiple Page Selection 2
Click
1
Click on pages while pressing the Ctrl key to select
Ctrl +
pages out of sequence.
Click
2
19
Chapter 2 Basic Operations
Changing from Page to
Page
Selecting by Mouse
If there are many pages in one
file it becomes difficult to find and
select a certain page to be edited.
There are a few convenient methods in VTW to help find pages by
number.
Click on the page. The content of the page will appear on the Edit Window.
Selecting by Shortcut Keys
Pressing the
Page
Up
Page
Up
,
Page
Down
Page
Down
keys will select and scroll through the pages
within the Page List. The content of each page will be shown in the Edit
Window as they are selected.
Right Click Options
Right-clicking on a page gives the
user the option to cut, copy, paste,
and insert a new page before the
selected page.
Attributes Control
Attributes include essential features
such as properties of text and objects, clocks and timers, effects, and
play control.
The Attributes Control window
consists of 5 tabs: Attributes, Color,
Clock/Timer, Effects, and Run.
Tip
Detailed information regarding each tab can be found throughout this manual.
20
Chapter 2 Basic Operations
Playback Control
The Playback Control window
contains the standard playback
2
functionality with a Preview and
1
Program thumbnail.
3̀
4
1
Preview & Program Information: Shows thumbnails for both the Preview and
Program, as well as the next page’s in and out effects.
2
Preview Window: Opens a separate Preview Window.
3̀
Preview Control: This bar allows the user to select which page will play on-air next.
4
Output Control: Standard playback functions, such as [Play], [Pause], [Stop],
[Clear], and [Cut].
Preview & Program
Information
This contains the Preview and
Program thumbnails along with the
Preview page’s In and Out Effects.
Preview Thumbnail
Program Thumbnail
Preview Out Effect
Preview Window
Preview In Effect
Page Mode
Clicking on the yellow button
In
Effect
between the Preview In and Out
Effects will open a separate window
that can be used as a Preview
Moni-tor.
The Preview Window also displays
Out
Effect
the page’s Mode, number, and In
and Out Effects.
Page Number
21
Chapter 2 Basic Operations
Output Control
The Output Control comes with the
standard playback functions to play
out the pages from the Page List.
Stops
Cut In a
Preview and
selected
Program
page
without
without
effects
effects
Pauses
Clears Program
effects
without effects
Load and
Play pages
Style Catalog
Access 7 classes of saved templates: Color, Character, Shape,
Image, Background, Animation, and
Page.
Extra folders can be created in each
tab for better organization.
Edit Window
This is the canvas where all editing takes place.
At the bottom of the Edit Window are tabs for each open
VTW file.
Mouse Mode
Choose the mode by right clicking
on the canvas and select the desired behavior of the mouse. These
modes correspond to the toolbar
buttons.
22
Chapter 2 Basic Operations
Save Page to Catalog
To save the page as a template,
right click on the canvas and select
[Save Page to Catalog]. This adds
Right click on
canvas + [Save
Page to Catalog]
the page to the bottom of the Page
tab in the Style Catalog. A template
is an uneditable graphic where even
or
text is fixed. To unlock the page,
select [Edit] > [Unlock Template].
Ctrl
To save the template in an editable
form, first select all objects that are
to remain editable, then save the
page to the Style Catalog.
23
Alt
P
Chapter 2 Basic Operations
Toolbar Icon Descriptions
Toolbar 1
Toolbar 2
New (Ctrl+N):
Create new project
Live View (F5)
Open (Ctrl+O):
Open project
View Text (Ctrl+Alt+V)
Select (Ctrl+Shift+M)
Save (Ctrl+S):
Save project
Multiple CG Page List:
View both VTW Page Lists
(Dual Channel Only)
Text (Ctrl+Shift+M)
Cut (Ctrl+X)
Multiple CG Controller (Alt
+M): Control both VTW
outputs (Dual Channel Only)
Shape (Ctrl+Shift+M)
Copy (Ctrl+C)
Genlock VGA Control (Ctrl+Alt+G)
Insert Image (Ctrl+P)
Paste (Ctrl+V)
Scheduler Suite (Ctrl+Alt+C)
Insert Background image (Ctrl+Shift+P)
Delete
Options (Ctrl+Alt+O)
Align Left
Undo (Ctrl+Z)
Take In (Ctrl+Enter(Keypad)):
Play out the current page
Align Center
Redo (Ctrl+Y)
Take Out (Ctrl+.(Del)):
Cut the current page out
Align Right
Lock (Alt+L):
Lock an object in place
Stop:
Stops the currently playing page
Page Mode
Screen Align
Unlock (Alt+L):
Unlock a locked object
Area Align
Bundle Attributes (Ctrl+Shift+O):
Change attributes across multiple pages
Object Align
Update Page List:
Show changes from Bundle Attributes
Match Width
First Page
Match Height
Previous Page
Match Size
Next Page
Front (Ctrl+Shift+Up Arrow)
Last Page
Back (Ctrl+Shift+Down Arrow)
Mask Effect (Alt+K):
Mask an area in Still, Roll, and Crawl Mode
Forward (Ctrl+Shift+Right Arrow)
Backward (Ctrl+Shift+Left Arrow)
24
Chapter 2 Basic Operations
Menu Options
File Menu
The File Menu contains all
options regarding VTW files.
New and Open
Open Folder
Open a new document with [New]
or open an existing document with
[Open...]. The [Open Folder] option
opens all VTW files within the
selected folder.
Close
Close a currently opened file or
select [Close All] to close all opened
files
25
Chapter 2 Basic Operations
Save
Save a document or change the
name of the document with [Save
Save in Previous VTW File Format
VTW’s Save function is backwards compatible. Save VTW files in previous
VTW-330HS format.
As...]. Select [Save All] to save all
opened files
Tip
New features saved to files from newer versions of VTW will not be available if opened on previous verions.
GenCG Embedded Files
Import Option
(GEF)
The Import Option window
Import or Export a GEF. These files
appears once [File] >
embed the imported images and
[Import GEF] is selected.
animations from the entire page list
From here, chose to either
into the GEF itself. Embedding the
extract to the default path
images eliminates the need to bring
or to select a path using
all original image and animation files.
the [Browse] button.
If a GEF is not used, the images and
animations must be linked directly to
their original files.
Save As Text File
This saves only the text from the
selected page. Choose which pages
to save from in the Save As Text File
window and check whether or not to
include the page numbers.
26
Chapter 2 Basic Operations
Save As Template
A VTW Template file allows a
Tip
single page to become fixed and
unmovable for ease of use as a
template. Even text becomes fixed
Select the objects to remain editable. Save the file
as a template.
unless the object is selected before
Templates can be unlocked for editing if necessary by going to [Edit]
> [Unlock Template] or
saving as a template.
pressing
Ctrl
U
Insert the template into another file or page. All
objects that weren’t previously selected cannot be
edited, however these text objects can.
Save As Image
Tip
Similar to the [Save As Text File]
Saving selected pages as an image will flatten the
option, save selected pages as an
page, allowing for easy manipulation of the whole
image. Choose which pages to save
page. It may be much easier to save a lower third
from the Save As Image window. Im-
graphic, which consists of multiple objects, as an im-
age types supported are 32 and 24
age and apply a transition than grouping the objects
together to get the same effect.
bit targa, 32 and 24 bit bitmap, and
24 bit jpeg files
Convert File Resolution
Convert the opened VTW file to the
current resolution. Select the
resolution of the file and whether o
not to keep the original ratio.
Exit
Close VTW and all opened files.
27
.
Chapter 2 Basic Operations
Edit Menu
The Edit Menu contains all
options regarding the editing of
VTW pages and files.
Undo and Redo
Undo or redo the last action performed on the canvas or Page List.
Edit Functions
This section contains the basic functions of any editor: cut, copy, paste,
and delete. These commands are
for the canvas only.
Select All
Selects all objects on the current
page.
Group and Ungroup
When multiple objects need to have
the same attributes adjusted, such
1
as positioning and size, it may be
convenient to group the objects
2 & 4
together. Text, shape, and image
1
Select two or more objects to be grouped.
objects can be grouped together,
2
Click on [Edit] > [Group/Ungroup].
however animation objects can only
3
The selected objects are now grouped.
4
If the objects no longer need to be grouped, click on
be grouped with other animation
objects.
[Edit] > [Group/Ungroup] again to separate them.
28
3
Tip
Adding an effect to a
grouped object affects the
whole object.
Chapter 2 Basic Operations
Page Edit Functions
This section contains the basic functions of any editor: cut, copy, and
paste. These commands are for the
Page List only.
Go To Page
When there are many CG pages in
a file, it becomes too time consu ing to go through the list, page by
page. Find a specific page using the
[Go to Page] function in the [Edit]
menu.
Find
Search for text within pages with the
[Find] function. Select [Edit] > [Find]
and type in the text to search for
when the window appears.
Progress Direction
Replace
Use [Replace] to find and change
one word with another. To substitute
all matching text, click [Replace All].
To exchange matching text one by
one, select [Replace].
29
Chapter 2 Basic Operations
1
Bundle Attributes
Change the text and object attributes across multiple selected
pages simultaneously.
3
2
4
1
Select the object to be changed.
2
Highlight all desired pages in the Page List.
3
4
Click the [Bundle Attributes] button in the toolbar or go to [Edit] > [Bundle Attributes].
Now change the attribute of the object in the Attribute or Color tabs. All selected pages in the
Page List will update their corresponding objects accordingly.
Tip
If the [Update Page List] button is active in the toolbar, all selected thumbnails in the Page List will display the
changes created through [Bundle Attributes].
Bundle Attributes
30
Update Page List
Chapter 2 Basic Operations
Match Attributes
Use the [Match Attributes] feature to
copy a particular object’s attributes
to like objects on the rest of the
1
page. This becomes a helpful tool
when the same adjustment needs to
be made to multiple objects at once,
such as text size, font, or color.
Tip
To match attributes to multiple pages at
the same time, select the desired pages
in the Page List before using the [Match
Attributes] feature.
2
1
Select the object that has the attributes to be copied.
2
Select [Edit] > [Match Attributes] or use the keyboard shortcut
Ctrl
Shift
objects within the page have been given the same attributes as the original.
Unlock Template
Templates are typically saved so
that adjustments cannot be made
to them. To be able to edit a locked
template, go to [Edit] > [Unlock
Template].
31
S . All similar
Chapter 2 Basic Operations
View Menu
The View Menu allows the user to
toggle the windows within VTW’s
UI. Guides and grid lines can also
be viewed on the Edit Window
through the View Menu.
Toggle UI Windows
Toggle the Folder List window.
These options allow the user to
toggle the UI Windows within
VTW, including the Page List,
Style Catalog, Attributes Control,
and Playback Control.
This window allows for the quick selection of
Style Catalog templates and attributes.
Guides
View the guides in the Edit Window.
These guides can be used as a
safety area for the graphic output.
They are only viewable when their
corresponding boxes are checked
under [Tools] > [Options] > [Editor] >
[Guides].
32
Chapter 2 Basic Operations
Grid
View a grid in the Edit Window. The
grid can be used for more precise
placement of objects.
Disclose Alias
Show object aliases. Aliases are
used when integrating VTW
templates with AutoCast for
dynamic updates.
Live View and Preview
Edit Window
Window
Editing pages in VTW can be
viewed in real time through the
video output with the Live View
function.
The best way to view the changes
from Live View is through the
Preview Window. This window is
completely adjustable. When not in
Live View mode, the Preview
Window acts as the preview
monitor.
33
Preview Window in Real Time
Chapter 2 Basic Operations
16:9 <-> 4:3
Toggle between viewing the Edit
Window in 4:3 standard or 16:9
widescreen ratio. This function is
available for NTSC and PAL only.
Tip
This option does not
change the video output
resolution, only canvas.
4:3
Page Window
Displays a list of all pages in the
file along with in and out transition
effects and page modes. The list will
also show which page is currently
on air.
This list is for display only and cannot be edited.
Page currently on air
Stamp Size
This adjusts the size of the thumbnails for both the Page List and
Playback Controls.
Refresh
This refreshes the current view if
an image or animation has been
changed in an external image
editing program.
34
16:9
Chapter 2 Basic Operations
Insert Menu
The Insert Menu contains all the
commands to insert various objects
into the Edit Window.
VTW Document
Insert an additional VTW document
into the currently opened file. The
new pages will be inserted above
the selected page in the Page List.
Added Pages
File As Text
Insert a text (*.txt) file into the cu rent page. Be sure to select the
Text File Commands
desired attributes and color of the
text object in VTW before importing the text file. Certain commands
within the text file can help format
the text as it is inserted. If no commands are given, VTW will place
text by default settings.
35
<>
Center align text
>>
Right align text
<<
Left align text
//
Page break
Chapter 2 Basic Operations
In the image to the right, all three
types of text alignment from the text
file are present: cente , right, and
left.
Center, right, and left text alignment.
This second image depicts the page
break from the text file. Notice that it
runs off the screen. To turn on word
wrapping, go to the Options menu.
Under the [General] tab, check the
[Word Wrap] box.
Also note the triangles along the
x and y rulers. These restrict the
canvas space that can be used by
the File As Text insert function. To
restrict where the text is inserted,
simply move the markers as needed. Any text that does not fit within
the defined space will be placed on
the next page.
Page break without Word Wrap.
The image to the right depicts the
same text as in the second image,
but this File As Text insert included
Word Wrap and restricted the canvas space.
Word Wrap and restricted canvas space.
36
Chapter 2 Basic Operations
Template
Insert a VTW template (*.tpl) file
into the current Page List. Note
that the inserted template page
will replace the selected page in
the Page List.
Image and Background
Image Sequence
Insert any number of sequential images on sequential pages as either
an image object with [Image Sequence] or as a background object
with [Background Image
Sequence]. For VTW to
successfully insert the image
sequence, ascending numbers
must be located at the end of the
file name. Each inserted image
2
appears on a separate page, new
3̀
pages being created until the end of
the sequence of images.
1
4
1
Preview: Shows a preview of the selected image file
2
Position: Center the images on the page or uncheck the [Center] box and manually
position the images using [Left] and [Top].
3̀
Size: Set the [Width] and [Height] of the image. When [Maintain Aspect Ratio] is
checked, the width and height change accordingly to keep the original ratio.
4
Start and End File: Select the start and end image in the sequence. These field
update automatically upon selection to the full range of numbered files
37
Chapter 2 Basic Operations
Image and Background
Image
Insert image objects into the selected page with [Image...] or an image
as a background with [Background
Image...].
Background images can only be
moved, resized, or edited by holding
down the
Alt
and clicking the
background.
Clock/Timer...
A digital clock and timer can be
inserted into the page. Timers can
count either up or down and only
in seconds. Only one clock or timer
object can be active at a time per
page.
VTW has precreated clock and
timer formats to chose from. It also
allows for formatting the display using the Time Format Notation guide.
1
1
2
Setting: Select whether to insert a Clock or Timer, then set up its Format, Duration,
Start, and End times, if applicable.
2
Time Format Notation: The guide for creating customized formats for time. Use
this guide to enter the desired format into the [Format] field
38
Chapter 2 Basic Operations
Resident Clock
Placing a resident clock on a page
will display it automatically on air
for all pages thereafter, ignoring
other In and Out transition effects.
The resident clock will display at the
same time with other clock and timer
objects.
Tip
All clocks in VTW receive the time from the Date & Time Properties on the Microsoft Windows system. Syncing
the clock with an external source can be done with a traditional GPS/Time Code or NTP (Computer Network Time
Protocol) if needed.
Animation
Insert previously created animations as targa (*.tga), jpeg (*.jpg), or
bitmap (*.bmp) image sequences.
The animations are imported
Animation files such as *.gpf and *.tad have already had the image sequence combined. Image file
have yet to be combined and saved as an animation file
directly through the VTW software
and are then saved in *.tad format.
Tip
After selecting an image file to insert and click [Open], two warning windows will pop up. The first asks whether or
not to save the new *.tad file in the same folder as the current images. The second warning asks whether or not to
delete the originial image sequence files. It it recommended to select [ es].
Replace Image
The selected image will be replaced
by the one selected in the Open window that appears.
39
Chapter 2 Basic Operations
Distribute Objects
The selected object or objects
are distributed over any number
of pages, whether or not they are
sequential.
New Page
Inserts a new page before the
crrently selected page.
40
Chapter 2 Basic Operations
Tools Menu
The Tools Menu has the commands
for Scheduler Suite, Safe Area, Options, and more.
Run Scheduler Suite
Opens GenCG’s Scheduler Suite
application in another window.
Please see Chapter 8: Scheduler Suite for more information on this application.
APC Client Mode
APC Client Mode will display the
window to the right. VTW waits
for commands from the remote.
41
Chapter 2 Basic Operations
Capture
To get to the Capture function, go to
[Tools] > [Capture] while no files are
playing out. This opens the window
shown to the right.
Capture Window
Select the type of unit to capture:
Preview Window
Even captures all the even lines of
the screen, Odd captures the odd
lines, and Frame captures both the
Grab Button
Even and Odd lines.
Click Grab to capture an image.
The captured image will appear in
Type of Unit
Image Captured
the Capture screen.
To save the captured image to an
image file, click Save.
42
Chapter 2 Basic Operations
Safe Area
Adjusted Safe Area
While [Adjust Safe Area] is selected,
click the [Live View] button in the
toolbar to see the adjustments on
the output monitor.
Once all adjustments have been
made, be sure to go back to [Tools]
> [Adjust Safe Area] to deselect the
option.
To change the safe area back to
Default Safe Area
default, select [Tools] > [Set Safe
Area to Default].
Options...
Displays a new window with all op-
Please see the section labeled Options in this chapter.
tions for specific needs
43
Chapter 2 Basic Operations
Spell Checker
Check the spelling of the file by
Select these options to undo the
last instance of [Ignore All] or
[Change All].
going to [Tools] > [Spell Checker] >
[Spell Check]. The Spelling window
to the right appears, displaying the
words that are not in the current
dictionary as well as suggested
changes. There are options to
ignore and change the single usage
of the word or all matching words
as well as to add the word to the
dictionary. Click on [Options] to open
the Spell Checker Options window.
1
2
3
4
1
Check Spelling as You Type: Toggle the red lines that appear under misspelled
or unknown words within the file
Tip
Right click on a word underlined in red
2
Suggestions: Toggle automatically viewing suggestions for corrections and whether
or not to get suggestions from only the main dictionaries.
to view suggested corrections or select
[Add to Dictionary] or [Ignore All].
3̀
Ignore: Toggle whether or not to ignore uppercase words, words with numbers, and
internet and file addresses
4
Dictionaries: List of custom and main dictionaries to be used. The custom dictionary
contains all words added to the dictionary by the user.
44
Chapter 2 Basic Operations
Window Menu
The Window Menu has all commands regarding the file windows
Cascade
All files currently open in VTW become individual, resizable windows.
Tile
All files currently open in VTW become individual, resizable windows
and are fitted into the Edit Window
for easier viewing.
Arrange Icons
If all opened files in VTW are
minimized, [Arrange Icons] organizes the files in the lower Edit
Window.
45
Chapter 2 Basic Operations
Currently Opened Files
Displays all currently opened files
2 files are currently open
Help Menu
The Help Menu has all
additional information on VTW.
About VTW...
The About page contains information on VTW, including version
number, build number, and
copyright information.
Numeric Keypad
Shortcuts
This window contains all the playback shortcuts that can be used with
the numeric keypad while on air.
46
Chapter 2 Basic Operations
Options
General Tab
The
General
tab
allows
for
toggling of options that apply
globally to the VTW software.
1
1 General:
Auto Backup(*.GBK): If
selected, VTW will automati-cally
backup the current file as a
*.gbk file. The backup file is saved
within the same folder as the original
VTW file.
Non-Existing Fonts Warning:
Decide whether to display a pop up
window upon opening a file if the
current fonts cannot be found.
Scheduler Alert: An alert message appears the selected number
of minutes before a scheduled file is
to be played on air.
Word Wrap: Inserted text from a
file will wrap if the text is longer than
the canvas.
Refresh Thumbnail in Style
Catalog when VTW Starts:
VTW will re-populate the Style
Catalog upon startup.
Style Catalog with Folder
List: The directory Folder List appears with this box checked. The
Folder List is linked to the Style
Catalog which will automatically
populate upon the selection of a
folder.
47
Chapter 2 Basic Operations
Editor Tab
The Editor tab contains the options
for editing and the canvas.
1 Font:
1
2
3
4
Soften Fonts: Adds anti-aliasing
to font edge for a softer effect.
2 Moving Object With
Keyboard:
Offset X and Y: Control the
number of pixels on the x and y
axes that the arrow keys will move
an object.
5
3 Guides:
Start with Guides: Guides appear upon VTW startup. Video
Safe Title Area: Upon startup,
display the area in which no
information will be cut off on-air.
Vertical and Horizontal Center: Upon startup, the vertical or
horizontal center line will appear.
SD Area: If the canvas is viewed in
wide-screen (16:9) format, two
vertical lines appear to show the
standard (4:3) format area.
4 Grid:
Start with Grid: Grids appear
upon VTW startup.
Width and Height: Controls the
amount of pixel space between each
point on the grid.
5 Background Pattern:
Select one of the available background patterns for the canvas area.
48
Chapter 2 Basic Operations
Playback Tab
The Playback tab contains the options for playback control.
1
1 Playback:
Apply Modification while Running: Apply changes made to the
file immediately if the page is not yet
in Preview or Progam. If deselected,
changes are not applied until playout is stopped and restarted.
Always Open File with Default Run Mode: Select the
default Run Mode to be used upon
opening a file
Enable the Numeric Keypad
for Text Input: Enable the use
of the numeric keypad to enter
numbers into the canvas. This is
particularly helpful when using Alt
commands to insert symbols. This
feature can be toggled on and off
using the [Num Lock] key after
checking this box.
49
Chapter 2 Basic Operations
External Controller
Tab
The External Controller tab contains
the options for remote controllers,
GPI, and APC.
1
1 Remote Controller/GPI
Trigger:
To use GPI controls, change
Port to Enable.
2 APC:
2
To receive serial commands, set
the serial port connection settings
here, go to [Tools] > [APC Client
Mode] and select Serial Comm..
GPI Trigger Control
The GPI Trigger is designed for
For connection details and connector pin assignments, see VTW-350HS
Operation Manual.
easy playback control of VTW 5.5
without any programming.
50
Chapter
3
Object Design
Text Attributes
Shape Attributes
Animation Attributes
Color Tab
Clock/Timer Tab
Object Right Click Options
Chapter 3 Object Design
Text Attributes
Inserting Text
Insert text on the canvas using the
Text tool by simply clicking within
the Edit Window.
Text Tool
Editing Text
By clicking on a text object, the cursor switches to the Text Tool, ready
for editing.
Selecting Text
Selecting Partial Text
Create higher quality pages by
applying attributes on only part of
Select-by-letter (Using Mouse)
Place the cursor in front of the letter and drag.
the text. Select partial text prior to
applying attributes.
Drag
Select-by-letter (Using Keyboard)
Shift
Arrow key
Place the cursor in front of the letter and press the left or right arrow key while holding Shift.
Arrow Key
52
Chapter 3 Object Design
Moving Between Text
Objects
Use the Tab or Shift
Tab
buttons to move between text
objects, highlighting each in turn. To
move between text objects without
highlighting, use the arrow keys.
Aligning Text
Within the toolbar, there are three
buttons relating to the alignment of
text within the text object. These
are: Align Left, Align Center, and
Align Right.
53
Chapter 3 Object Design
Face
By clicking on a text object, the cursor switches to the Text Tool, ready
1
for editing.
2
4
3̀
5
2
1
Font Attributes: Change the font and font effects.
2
Spacing Attributes: Adjust the spacing between letters, words, and lines.
3̀
Typing: With the Typing Page Mode selected, adjust the amount of time between the
appearance of each letter. For detailed information, please see the Typing Mode section in
Chapter 7: Page Modes.
Font Attributes
Select the desired font from the
4
Font Size: Change the size of the font.
5
Font Thickness: Change the thickness of the font.
Font Effects
dropdown menu. Using the up and
down arrow keys to browse through
the list of fonts will preview the selected text in that font. Most recently
used fonts appear at the bottom of
the list. Both TrueType and OpenType fonts are supported.
Font effects include Bold, Italic,
Outline, and Underline.
If [Thickness] is set to a number greater than 0, the [Outline]
checkbox will change the face of the text to transparent, keeping only the outline. Adjust the value of [Thickness] to change the
width of the outline.
54
Chapter 3 Object Design
Spacing Attributes
Leading
Change the spacing between lines
of text with the [Leading] field.
[Spacing], or kerning, adjusts the
space between each character.
The [Spacing (%)] field adjusts the
space between words.
Spacing
Spacing (%)
Font Size
Changing the value in [Height] will
affect the overall size of the text,
whereas changing [Width] will only
affect the width of the text. Size
can also be changed by using the
mouse to click and drag on one of
the eight adjustment points.
Adjustment Point
Font Thickness
Change the thickness of each
character.
55
Chapter 3 Object Design
Edge
Default Edge
The edge of a text object is the border around each character. Use the
[Edge] section in the [Attributes] tab
Hard Edge
to change the thickness and sharpness of the edge.
Soft Edge
Edge Thickness
Shadow
Default Shadow
Use the [Shadow] section in the [Attributes] tab to change the softness,
position, and distance of the text
shadow.
Increase Shadow
Softness & Distance
Shadow
Softness
Shadow
Distance
Shadow Position
56
Chapter 3 Object Design
Shape Attributes
Drawing Shapes
Create shapes, such as rectangles,
circles, and polygons, with the Shape
tool by simply clicking and dragging
on the canvas.
Shape Tool
Different shapes can be created
by selecting the desired shape in
[Attributes Control] > [Attributes] >
[Face] > [Shape Type]. Please see
the Face sub-section for detailed
information.
Tip
Change the selected shape to another one by selecting the desired shape in [Attributes Control] >
[Attributes] > [Face] > [Shape Type] drop down menu.
Creating a Custom
Shape
Red Frame
Point
Creating custom shapes becomes
more involved than the typical click
and drag. Certain points on the
shape can be manipulated in different ways to create the desired effect.
Red Frame Points are reserved
specifically for corners of the shape.
The Green and Blue Frame Points
Adjustment
Point
create curves between the corner
points. Just like any other object, the
Custom Shape object includes eight
Green and Blue Frame Points
adjustment points for resizing.
57
Chapter 3 Object Design
Add a Frame Point
Right-click on a Green or Blue
Frame Point and select [Add a
Frame Point] or hold down the left
mouse button then right-click. This
turns it into a Red Frame Point to be
used as another corner. Note that
new Green and Blue Frame Points
were created between the new and
old Red Frame Points.
New Red Frame Point
New Green and Blue Frame Points
Convert to Line
Convert a curved line to a straight
line by right-clicking on the Green
or Blue Frame Point and selecting
[Convert to Line] or by double clicking. This straightens the Green and
Blue Frame Points between the Red
Frame Points.
Remove a Frame Point
Right-click on a Red Frame Point
and select [Remove a Frame Point]
or hold down the left mouse button
then right-click. This will remove
the selected Red Frame Point and
straighten the line between the
remaining Red Frame Points.
58
Chapter 3 Object Design
Link/Unlink
Right-click on a Red Frame Point
and select [Link/Unlink] or double
click the Frame Point. This links the
adjacent Green and Blue Frame
Points to the Red Frame Point with
orange circles. These points move
together as a straight line, creating
smoother curves.
Linked Frame Points
Face
By clicking on a shape object, the
1
Attributes tab automatically changes
to display fields related to editing
2
shapes.
3̀
4
1
Shape Type: Select the object shape.
2
Pen Size: If the shape is framed, select the width of the outline.
3̀
Arc Attributes: For rounded rectangle and octagon shapes, select the height and
width of the arcs or corners.
4
Animation Loop: This field only applies to animations. The default setting is 1. For
detailed information, please see the Animation Attibutes section in this chapter.
59
Chapter 3 Object Design
Shape Type
The following shapes can be created by VTW: box, framed box,
circle, framed circle, diamond,
framed diamond, rounded rectangle, octagon, and custom shape.
Pen Size
When a framed box, circle, or
diamond is selected, the [Pen Size]
field is active. Adjust the thickness
of the frame with this field
Arc Attributes
When a rounded rectangle or octagon is selected, the [Arc Height]
and [Arc Width] fields are active
Arc Height = 80.0
Arc Height = 30.0
Arc Width = 40.0
Arc Width = 60.0
60
Chapter 3 Object Design
Edge
The edge of a shape object is the
Hard Edge
border around the shape itself. Use
the [Edge] section in the [Attributes]
tab to change the thickness and
sharpness of the edge.
Soft Edge
Edge Thickness
Shadow
Increase Shadow
Softness & Distance
Use the [Shadow] section in the [Attributes] tab to change the softness,
position, and distance of the shape’s
shadow.
Shadow
Softness
Shadow
Distance
Shadow Position
61
Chapter 3 Object Design
Animation Attributes
Face
By clicking on a shape object, the
Attributes tab automatically changes
to display fields related to editing
shapes.
1
2
1
Animation Loop: Select the number of times the animation loops before continuing
on to the next page. 0 forces the animation to loop indefinitely until manually bringing in the
next page. 100 will loop the animation infinitel , even when the Run Mode is set to [Auto].
2
Scale to Full Screen: When setting an animation as a background image, check
this box to scale the animation to the entire screen. Full screen animations have an Animation Loop automatically set to 0.
Scale to Full Screen
This option is only available when
setting an animation (such as a
*.tad) as a background. Since some
animations are small, this option will
[Scale to Full
Screen] unchecked
automatically scale the object to the
dimensions of the screen.
To insert an animation as a background, go to [Insert] > [Background...] and change the Files
of Type field to [Animation Files]
before opening.
Tip
In order for the [Scale to Full Screen]
option to register, the background
image must be selected by holding
down the Alt button then clicking
on the background.
[Scale to
Full Screen]
checked
62
Chapter 3 Object Design
Color Tab
Face, Edge, and
Shadow
Click corresponding button to
1
change the color for the object’s
face, edge, and shadow. A color
2
swatch is provided to the right of the
button as a preview.
3̀
1
Face: Select the color for the face of the object.
2
Edge: Select the color of the edge of the object.
3̀
Shadow: Select the color for the shadow of the object.
Palette
Click corresponding button to
2
change the color for the object’s
face, edge, and shadow. A color
swatch is provided to the right of the
3̀
4
1
5
button as a preview.
6
1
Gradation: Select the color gradation of the object.
2
RGB Level: Enter a specific color value
3̀
Transparency: Select the amount of transparency for the object.
4
Angle: Control the angle of the color gradation.
5
Bi-Directional: Allows the first color of the gradation to sandwich the second colo .
6
Color Palette: Select the desired color from one of the available color palettes.
63
Chapter 3 Object Design
Gradation
First select the position to be
changed by clicking on the [Top],
[Both], or [Bottom] button. Selecting [Both] will change the top and
bottom colors at the same time. A
Position Color
color swatch is provided to the right
of the buttons as a preview.
Angle
Change the angle of the object’s
gradient. The angle can be adjusted
from -90 to 90.
Angle = 0
Bi-Directional
Checking the [Bi-Dir] box sandwiches the second gradation color between the first colo . It also makes
the width field active. Change the
number in this field to increase or
decrease the width of the center
color.
Color Palette
There are 5 pages of color
palettes available in VTW. Click on
the up and down arrow buttons to
view them.
64
Angle = 90
Chapter 3 Object Design
Texture
Map graphic formats, such as *.tga,
*.bmp, or *.jpg, to shapes and text.
Simply click on the texture screen
to browse for the desired image file.
A thumbnail preview of the texture
appears in the texture screen along
with the name of the file
To detach the texture from a selected object, simply click on the
texture screen again.
65
Chapter 3 Object Design
Clock/Timer Tab
Setting
Once a clock or timer has been
selected from the canvas, the Clock/
1
Timer tab becomes available to
2
change its settings.
3̀
4
1
Mode: Select whether the object is a clock or timer.
2
Format: Enter a specific Format for the clock or time .
3̀
Duration: Select how long the clock or timer is to be displayed on the page.
4
Start & End: Select the start and end numbers for the timer.
Format
Select a predetermined format
from the dropdown list of common
formats or type in a custom format.
The Time Format Notation section
has been provided for easy
access to the shorthand used in
VTW.
Exact Time Sound
Assign a WAV format sound file to
the clock object. The sound will play
every hour on the hour. The [Sec.]
Example
field sets the number of seconds
before the top of the hour that the
WAV file will start playing
66
Setting
in Sec.
WAV File Beginning Time
(hour:minute:second)
0
XX:00:00
5
XX:59:55
10
XX:59:50
Chapter 3 Object Design
Object Right Click Options
Selecting an object on the Edit Window and right-clicking displays a different set of commands for each object type. This section will
cover all the differences and similarities.
General Options
This sub-section will cover the right
click options that are applicable to
all objects. Please see other subsections for unique options to each
object type.
Edit Functions
This section contains the basic functions of any editor: cut, copy, paste,
and delete.
Assign Alias
Aliases are used when integrating
VTW templates with AutoCast for
dynamic updates. Use [Assign Alias]
to enter the desired alias name.
67
Chapter 3 Object Design
Group/Ungroup
Group multiple objects together.
Text, shape, and image objects can
be grouped together. Animation objects can only be grouped with other
animation objects.
Grouped Image, Text, and Shape Objects
Object Lock
Lock an object in place to prevent
accidentally moving it. When an
object is locked, it is surrounded by
yellow tick marks.
Distribute Objects
Distribute any object over a range of
pages. This is particularly useful for
logos that must appear on multiple
pages.
68
Grouped Animation
Objects
Chapter 3 Object Design
Options Unique to
Image Objects
The right-click options that apply
only to image object types are [Replace Image] and [Object Info].
Replace Image
Replace an image with another image. The new image retains the size
of the old image.
Object Info
Displays the image object’s information, such as the file type, path, and
size.
Tip
[Object Info] is also relevant to
animation objects and displays the
same information.
Options Unique to Text
and Shape Objects
Text and shape objects are often
handled similarly. The right-click options that applies only to text are the
spell check options while the only
option for both of these object types
is [Save Attribute to Catalog].
69
Chapter 3 Object Design
Spell Check
Right click on a word with a red
Suggested Corrections to the
Misspelled Word
underline and suggested corrections
appear along with the option to add
the word to the dictionary or ignore
all instances of that word in the cur-
Add the Word to the Dictionary
rent file
Ignore All Instances of the
Word
Save Attribute to Catalog
Once the desired text or shape
Text Attributes
Shape Attributes
object has been created, save all of
its attributes into the Style Catalog
for use at another time. Attributes for
This text is ready to have its attributes saved.
text are saved under the Char tab
This shape object is ready to have its attributes
saved.
and attributes for shapes are saved
under the Shape tab.
Right-clicking on the text object and selecting
[Save Attribute to Catalog] inserts the saved font,
face, edge, shadow, size, and other settings into
the end of the Style Catalog’s Char tab.
Right-clicking on the shape object and selecting
[Save Attribute to Catalog] inserts the saved face,
edge, shadow, and other settings into the end of
the Style Catalog’s Shape tab.
Later, any text can be changed to the attributes in
Later, any shape can be changed to the attributes
the Style Catalog by dragging and dropping the
in the Style Catalog by dragging and dropping the
desired attributes onto the text object itself.
desired attributes onto the shape object itself.
70
Chapter
4
Style Catalog
Style Catalog Templates
Chapter 4 Style Catalog
Style Catalog Templates
Types of Templates
Background
Animation
Page
Color
Character
Shape
There are 7 catalogs to save templates to: Background, Animation,
Page, Color, Character, Shape, and
Image. Register newly designed
styles of text, shape, and lower
thirds as templates to reapply them
to other objects and pages quickly
by just dragging and dropping.
Image
Right Click Options
Right-click anywhere within the
Catalog of
Backgrounds
Style Catalog window to open the
options shown in the image on the
left.
Right clicking on the catalogs below
the tabs of the Style Catalog opens
a different set of commands. These
commands actually correspond to
those of the [Catalog] list of options.
Right Click on Window
Edit Functions
This section contains the basic functions of any editor: copy, paste, and
remove.
72
Right Click on Catalog
Chapter 4 Style Catalog
Rename
Give the thumbnail a different name.
This option is only available for the
Background, Animation, and Image
tabs.
View
View changes the way the Style
Catalog items are viewed. Default
shows both the thumbnails and
names of each template.
Icons and Names
Icons Only
Names Only
Icon
[Change Icon] allows the thumbnail
icon to be replaced with another
image. The object remains the same
regardless of the icon.
Change Icon
Set the icons to small or large.
Larger icons will display more detail
and are the default setting for Background, Animation, Page, Shape,
and Image tabs.
Large Icons
73
Small Icons
Chapter 4 Style Catalog
Catalog
The [Catalog] list of options reflects
the same commands as that of right
clicking the catalog. These commands create, open, and close the
selected catalogs.
[New] and [Open...] are only available for Page, Color, Character, and
Shape tabs.
Tip
Default Catalog
Create a New
Close the New
Catalog
Catalog
New catalogs can be saved as a
catalog (*.cat) file once an attribute
is saved into the tab.
Tip
Catalogs are useful in that they
can separate the Style Catalog into
different television shows, sports, or
even college courses.
Default Catalog
Open an Existing
Catalog
Add Folder
Add all attibutes from a folder into
the the Style Catalog as a new
catalog. This option is only available
to the Background, Animation, and
Image tabs.
Refresh
The Background, Animation, and
Image tabs read from a particular
folder. To add files, simply paste
Refresh to view
them into these folders and use
new templates.
the [Refresh] option to view them
in VTW.
74
Chapter 4 Style Catalog
Saving Templates to
the Style Catalog
There are two main types of templates that can be saved: attributes
and pages.
Saving Attributes
Attributes of text and shape objects
are saved in the same fashion.
Simply right click on the desired
object and select [Save Attribute to
Catalog]. Attributes from text objects
automatically save in the Char tab
and attributes from shape objects
are saved in the Shape tab.
Saving a Text Attribute
Saving a Shape Attribute
Saving Pages
Save all the objects on a page as
an uneditable template within the
Style Catalog. Right click on the
background of the desired page and
select [Save Page to Catalog]. The
template automatically saves in the
Page tab.
Saving a Page Template
75
Chapter 4 Style Catalog
Saving Color
Save a color from the Color tab in
the Attributes Control window to the
Style Catalog. Simply drag and drop
the color thumbnail from the Color
tab to the Style Catalog’s Color tab.
Saving a Color Template
Using Templates from
the Style Catalog
To use the templates saved in the
Style Catalog, simply drag and
drop. There are some subtle dif-
ferences depending on the type of
template in use.
Background Template
Backgrounds in the Back tab are
Drag and Drop
files pulled from the linked folde .
from Back Tab
To use these templates on a page,
just drag and drop it into the background.
Animation Template
Animations are used from files in
the Animation folder. Saving new
animations to this folder adds them
to the Style Catalog in VTW. To use
Drag and Drop
an animation, simply drag and drop
from Animation
it from the Animation tab to the
Tab
canvas.
76
Chapter 4 Style Catalog
Page Template
If a page is saved in the Page tab,
all attributes of the page will be
[Save Page to
registered as a template. Drag and
Catalog]
drop the template onto a page to
replace the whole page with the
new template.
Tip
Drag and Drop
Saving a page to the Style Catalog
creates an uneditable template. To
keep text fields editable, select all
text objects before saving to the
Style Catalog.
from Page Tab
Color Template
Color templates are saved from the
Color tab in the Attributes Control window. Color templates can be used for
changing text and shape objects by
Drag and Drop
just dragging and dropping the color
from Color Tab
template onto the desired object.
Character Template
If text objects are saved in the Char
tab, attributes of the text (such as
[Save Attribute
color, texture, and font) will be regis-
to Catalog]
tered as a template. Drag and drop
the template onto a text object to apply the attributes to the selected text.
Drag and Drop
from Char Tab
77
Chapter 4 Style Catalog
Shape Template
If shape objects are registered in
the Shape tab, attributes of the
[Save Attribute
object (such as color, texture, size,
to Catalog]
and shape) will be registered as
a template. Drag and drop the
template onto the page to use the
shape template.
Tip
A shape object can be replaced by
a shape template by drag and dropping the template directly onto the
shape object.
Drag and Drop
from Shape Tab
Image Template
Images are displayed from files in
a particular folder. Saving new images to this folder adds them to the
Drag and Drop
Style Catalog under the Image tab.
from Image Tab
To use an image, drag and drop it
onto the canvas.
Saving Catalogs
Create a new catalog under one
of the Style Catalog tabs and it
appears as an empty catalog. Once
the appropriate template is added to
that catalog, VTW asks to save the
catalog with a new name. Catalogs
are saved as a *.cat file in C:\Users
\User_Name\Documents\ FOR-A
\VTW\CATS folder.
78
5
Chapter
Object Alignment
Selecting Multiple Objects
Aligning Objects
Changing Object Size with a Master Object
Order of Layers
Chapter 5 Object Alignment
Selecting Multiple Objects
There are situations when it becomes necessary to adjust attributes of multiple objects collectively. For this situation, there are a few
methods to select multiple objects at the same time.
Selecting Multiple
Objects
Using the Shift or Ctrl Key
Select all desired objects whil holding
down the Shift or Ctrl key. If an object
is clicked again while the shift key is
pressed, it becomes deselected.
Shift
Click
Ctrl
Click
Using the Mouse
Drag the mouse over multiple objects
to select them. The selection must
cover the entire object for it to be
Drag with the Mouse
selected.
Using the Edit Menu
Click [Edit] > [Select All] to select all
objects on the current page.
Select All
Ctrl
Creating Copies of
Objects
There is a simpler way to make
copies of any object other than
copying and pasting. This method
consists of holding down the Ctrl
button then clicking and dragging
the object. The mouse will drag
away a brand new copy of the
object.
80
A
Chapter 5 Object Alignment
Aligning Objects
It is very difficult to adjust each object one by one when there are many objects in one page. Situations arise when multiple
objects need to be collectively aligned. VTW provides various alignment tools in the Toolbar for quick and easy access.
Alignment Related
Icons in the Toolbar
Area
Align
Screen
Align
Adjust Selected
Objects to the
Same Size as the
Master Object
Objects
Align
Changing Order
Screen Align
Screen Align moves the selected
objects according to the Guides.
Align Objects Vertically or Horizontally
Align Objects to a Particular Position
Align Objects Vertically or
Horizontally
Horizontal
Left
Center
Right
Note that these options only change
either the vertical or horiztonal value
of the objects, keeping the opposite
value the same.
Top
Vertical Center
Original
81
Bottom
Chapter 5 Object Alignment
Align Objects to a
Particular Position
Top Left
Top Center
Top Right
Center Left
Center
Center Right
Bottom Left
Bottom Center
Bottom Right
Note that these options change both
the vertical and horiztonal value of
the objects, overlapping the object
layers so that only the red shape is
visible.
Original
Area Align
Area Align moves the selected
objects according to the triangle
markers in the x and y axes.
Align Objects Vertically or Horizontally
Align Objects to a Particular Position
82
Chapter 5 Object Alignment
Align Objects Vertically or
Horizontally
Horizontal
Left
Right
Center
Note that these options only change
either the vertical or horiztonal value
of the objects, keeping the opposite
value the same.
Top
Vertical Center
Original
Align Objects to a
Particular Position
Bottom
Top Left
Top Center
Top Right
Center Left
Center
Center Right
Bottom Left
Bottom Center
Bottom Right
Note that these options change both
the vertical and horiztonal value of
the objects, overlapping the object
layers so that only the red shape is
visible.
Original
83
Chapter 5 Object Alignment
Objects Align
Objects Align moves the selected
objects according to the master
object. The master object is the
Align Objects Vertically or Horizontally
object which is last selected and will
have the eight adjustment points
around it.
Align Objects to a Particular Position
Master Object
Secondary Object
Tip
Changing the Master Object
Currently the red object is selected as a
Master Object.
Click
Select another secondary object to change
the Master Object, in this case blue.
84
Chapter 5 Object Alignment
Align Objects Vertically or
Horizontally
Horizontal
Left
Right
Center
Note that these options only change
either the vertical or horiztonal value
of the objects, keeping the opposite
value the same. The blue shape is
Top
the Master Object.
Vertical Center
Original
Align Objects to a
Particular Position
Bottom
Top Left
Top Center
Top Right
Center Left
Center
Center Right
Bottom Left
Bottom Center
Bottom Right
Note that these options change both
the vertical and horiztonal value of
the objects, overlapping the object
layers so that the red shape is visible on top. The blue shape is the
Master Object.
Original
85
Chapter 5 Object Alignment
Changing Object Size with a Master Object
Changing the Width of an Object with a Master Object
Master Object
Changing the Height of an Object with a Master Object
Master Object
Changing the Width and Height with a Master Object
Master Object
86
Chapter 5 Object Alignment
Order of Layers
Changing the Order of
Layers
Tip
Ctrl
Animation objects can be arranged
using this method as well, but only in
MultiLayer Page Mode.
Shift
Bring Backward
Ctrl
Ctrl
Shift
Bring to Front
Shift
Bring Forward
Ctrl
Shift
Bring to Bottom
87
Chapter 5 Object Alignment
88
Chapter
6
Effects Tab & Page Modes
Effects Tab
Still Mode
Roll and Crawl Mode
Typing Mode
MultiLayer Mode
Chapter 6 Effects Tab & Page Modes
Effects Tab
Transition Effects
Transition effects can be applied in
all page modes. Effects are used for
What Effects Do on Page Modes
Still Mode
In and Out transitions between pages. In MultiLayer Mode, effects can
also be used on individual objects as
In and Out transitions as well.
Effects apply on Page In/Out (on whole Page)
Roll & Crawl Mode
Out effect only (scroll stops at end then transitions out)
Typing Mode
Page In (on Background), Page Out (on whole Page)
MultiLayer Mode
Page In/Out (on Background), Object In
The Difference Between
In and Out Effects
In Effect
In effects occur as the page or
object appears. Out effects occur as
the page or object disappears from
A
B
When the In effect is set, a page or object appears with the desired
effect from Page B to Page A.
IN
view.
Out Effect
CG Page
On-air Screen
A
B
When the Out effect is set, a page or object disappears gradually
with the desired effect from Page A to Page B.
OUT
Effect Patterns
Cut Effect
Typing Effect
Here is a list of effect patterns that
Cuts in and out to black space.
Rolls the page up. Can only be used in
may be useful to know.
Tip
To activate the Overlay Effect, click on the
[No Effect] button twice. Overlay Effect
cannot be used with Roll or Crawl Mode.
Click Twice
Roll Mode.
No Effect
Typing Effect
Cuts in and out directly, without black
Crawls the page from right to left. Can
space.
only be used in Crawl Mode.
Overlay Effect
Roll Effect
Use as an out effect to overlay the cur-
Rolls the page up. Can only be used in
rent page on the next page.
Roll Mode.
Blink Effect
Crawl Effect
Creates a blinking effect. Set the blink-
Crawls the page from right to left. Can
ing speed in the Effects tab.
only be used in Crawl Mode.
Fade Effect
Scroll Pass Effect
Fades the page or object.
Can only be used with Roll or Crawl
Mode. This forces the page to continue
scrolling off screen without interruption.
90
Chapter 6 Effects Tab & Page Modes
Effects Tab
The Effects tab contains all the transition effects available to pages and
objects in VTW. Transitions are
1
2
adjustable by selecting the pattern,
speed, and display time.
1
Transitions: Adjust the transitions for the page and object.
2
Effects: Select the type of desired effect from this list.
Transitions
There are three types of transitions:
1
In, Out, and Object. In effects occur
2
as the page appears. Out effects
3̀
4
5
occur as the page disappears from
view. Object effects occur when the
object appears on the page. Each of
these three transition types has the
same options to customize.
1
Transition Effect: Select the pattern of the transition effect to be used.
2
Transition Speed: Adjust the speed of the effect by either typing in the number or
using the sliding bar. For Roll and Crawl Mode, this becomes the speed of the scroll.
3̀
Blinking Speed: If the Blink effect is selected, this field becomes active to chang
the blinking speed.
4
Transition Display Time: Adjust the amount of time between transitions.
5
Object Transition Auto Run: When checked, all objects on the page will
automatically appear with their selected transition effects, even if the Run Mode is set to
[Manual].
Tip
Transition Display Times differ depending on which transition. This field for the [In] transition controls the display
time of the page or how long the page stays on air before beginning the Out transition. The Transition Display
Time for [Out] transitions controls the delay between pages, adding a “blank space” for the set amount of time.
For the [Object] transition, this field controls the length of time between this object appearing and the next object
appearing on the page. In order for the Transition Display Time to function correctly for the [Object] transition, the
Object Transition Auto Run box must be left unchecked.
91
Chapter 6 Effects Tab & Page Modes
Still Mode
Applying a Transition
Effect in Still Mode
Transition effects in Still Mode are
applied to the entire page, not each
object individually. Still Mode is the
default Page Mode.
Still Mode: The page and objects appear at the same time with the desired In and Out
transition effect.
Roll and Crawl Mode
Speed of Scroll
As shown in the previous Effects Tab
section, the Transition Speed field
and slider also act as the speed control for scrolling pages.The minimum
is 1 and the maximum is 9.9.
The speed of scrolls can be changed
while on air with the - & + buttons on the keypad.
Scroll Area
The scroll area can be set using the
Mask Effect option.
Please see Chapter 7: Mask Effect for more information on this application.
92
Chapter 6 Effects Tab & Page Modes
Typing Mode
Applying Typing
Transition Effects
Typing Mode refers to the effect in
which letters appear on the screen
one by one in a certain interval. The
speed in which the letters appear
is adjustable through the Attributes
tab. The Typing field can range from
1 (fastest) to 1000 (slowest).
MultiLayer Mode
Applying Transition
Effects on Each
Object
Page Background
In MultiLayer Mode, transition
effects can be applied to each
object.
MultiLayer Mode: The page background
appears first, then the objects appear sep rately with each desired transition effect. All
objects are brought off air simultaneously
with the Out effect.
Object #1
Object #2
Object #3
93
Chapter 6 Effects Tab & Page Modes
Special MultiLayer Mode
Effects
MultiLayer Mode also has special
effects disigned especially for this
page mode. These effects are indicated by an “M” located on the lower
left of the effect.
MultiLayer Effects
Object Transition Auto
Run
Checking the box under [Obj] forces
each object to automatically begin
their In effect whether or not the Run
Mode is set to [Auto].
94
Chapter
7
On-Air
Run Tab
Mask Effect
On-Air Shortcuts
Chapter 7 On-Air
There are few ways to play pages on-air as well as control what is currently on the air.
Run Tab
Run Tab
The Run tab allows for the control of
the playback.
2
1
3̀
1
Start & End Page: Select the start and end page numbers from the Page List.
2
Mode: There are 6 different playback styles available, allowing for more or less auto-
mation on the page in and out transitions.
3̀
Loop Options: Set the number of loops and the delay time between loops in min-
utes and seconds. Loop Wait is only available when [Auto] is selected in Mode.
Mode
Run Modes and their Effects
Run Mode is what can give VTW
more automation when playing
pages from the Page List. There
are three basic modes -- Manual,
Auto, and Cut -- for which each are
separated into In/Out transitions or
(In/Out)
Adds a break between pages. Each page triggered manually.
(In)
Does not add a break between pages. Each page triggered manually.
(In/Out)
Adds a break between pages. Each page triggered automatically.
(In)
Does not add a break between pages. Each page triggered automatically.
(In/Out)
Adds a break between pages. Each page triggered manually. Disregards effects.
(In)
Does not add a break between pages. Each page triggered manually. Disregards effects.
Manual
Auto
just In transitions.
Cut
Run Mode Without Page Breaks
Run Mode With Page Breaks
Preview
Program
Preview
Program
Page 2
Page 1
Page 2
Page 1
Page 3
Page 2
Page 2
Blank
Page 3
Page 2
96
Chapter 7 On-Air
Mask Effect
Mask Effect
Creates a display area on the canvas. Click on the [Mask Effect] button and create a box. The box can
be moved and resized as necessary.
The area within the box will be displayed on air while the area outside
of the box will remain blank.
The image to the right is a page in
Roll Mode. The text rolls up from the
bottom of the screen and is only visible through the Mask Effect box.
97
Chapter 7 On-Air
On-Air Shortcuts
The keyboard is yet another way to control how pages get on-air in VTW.
Shortcuts while On-Air (Num Lock Must Be Turned Off)
1 Stop
Must Be Turned Off
Num
Lock
/
*
7
8
9
Home
8 Page Number Input
Tip
7 Cut In
2 Pause Scroll
Pg Up
4
5
6
1
2
3
End
Pg Dn
0
.
Ins
Del
-
3 Decrease Scroll Speed
+
4 Increase Scroll Speed
Enter
5 Load (In/Out)
While on air, pressing
[0(Ins)] on the keypad
6 Clear
then pressing [Enter]
will load the previously
played page.
1 Stop: Stops playing the current scroll, clock, timer, and object effects on the page. In effects will continue to play but Out effects will not.
2 Pause Scroll: Pause the current Roll or Crawl page.
3 Decrease Scroll Speed: Decreases the scrolling speed.
4 Increase Scroll Speed: Increases the scrolling speed.
5 Load (In/Out): Used to play pages In and Out in sequential order. Press once to bring the next page to Preview, press again to bring the
page in Preview to air.
6 Clear: Page Out without transition effects.
7 Cut In: Page In the current page without transition effects. This functions only when nothing is previously loaded to Preview.
8 Page Number Input: Input a page number then press [Enter] to load the page into Preview.
98
Chapter
8
Scheduler Suite
Introducing Scheduler Suite
Menu Options
Chapter 8 Scheduler Suit
Introducing Scheduler Suite
What is Scheduler
Suite?
The Scheduler Suite in VTW was
made specifically to make bulletin
board applications easier than ever
before. Schedule an unlimited number of files for timed playback. Just
choose a file, adjust a few settings,
1
click [Start], and walk away knowing
that the file will play on time
To open the Scheduler Suite, simply
go to [Tools] > [Run Scheduler Suite]
or press the
Ctrl
Alt
C
2
buttons.
1
3̀
Schedule Window: This window displays the list of Schedule Items along with
some details such as start and stop times, the VTW file being played, which pages will
be played, and how many loops.
2
Schedule Item Buttons: Create, edit, and delete Schedule Items.
3̀
Scheduler Control: Start and stop this list of Schedule Items.
100
Chapter 8 Scheduler Suit
Menu Options
The Scheduler Suite has its own set of Menu Options available for scheduling files which are completely different than those of VTW.
File Menu
The File Menu contains all options
regarding Scheduler files
New and Open
Scheduler File Name
Open a new Scheduler file with
[New] or open an existing file with
[Open...]. A Scheduler file consists
of a saved list of Schedule Items.
The [Error File Open...] option opens
a Scheduler file that was saved under a previous version of VTW.
A Schedule Item
Save
Save a Scheduler file or change the
name of the current file with [Save
As...]. Files are saved as a VTW
Schedule File (*.gsc).
Exit
Close the VTW Scheduler Suite
and any opened files.
101
List of Schedule Items
Chapter 8 Scheduler Suit
Edit Menu
The Edit Menu contains all options
regarding the editing of Schedule
Items.
Insert...
Creates a new Schedule Item
through the new window that appears. Fill in all necessary fields and
click [OK] to add the Schedule Item
1
to the Scheduler list.
2
3̀
4̀
5̀
6̀
1
Start Date & Time: Select the starting date and time for the Schedule Item.
2
Stop: The Set Stop section allows for the choice to set a stop date and time to have
the file immediately stop. Choose also to let the file play out to completion. If the [Set Stop
box is checked, the Stop Date & Time section will be active to select the ending date and
time.
3̀
File: Choose the VTW file to use for this Schedule Item.
4̀
Start & End Pages: Select the Start and End Pages within the VTW file.
5̀
Loop: If the [Set Stop] box is left unchecked, [Loop] becomes available. Select the
number of times to loop the file before ending
6̀
Description: Enter a description to easily identify this Schedule Item.
102
Chapter 8 Scheduler Suit
Edit...
Opens the Schedule Item window
to edit the selected Schedule Item.
Change fields as necessary and
click the [OK] button to return to the
Scheduler list.
Delete
Delete the selected Schedule Item
from the list.
Playback Menu
The Playback Menu contains the
Start and Stop functions for the
Scheduler file. [Start] will begin
bringing the Schedule Items to air at
the appropriate times. [Stop] takes
all Schedule Items off air and will no
longer play out any Schedule Items.
Tip
Be sure to click the [Start] button prior
to the Schedule Items’ start times.
103
Chapter 8 Scheduler Suit
104
Appendix
VTW Shortcut List
Scheduler Suite Shortcut List
Appendix
VTW Shortcut List
▶File
New File
Ctrl + N
Open File
Ctrl + O
Open All Files in Folder
Alt + O
Close File
Ctrl + W
Close All Files
Ctrl + Alt + W
Save File
Ctrl + S
Save As
Alt + S
Save All Files
F3
Import GEF
Ctrl + E
Export GEF
Ctrl + Alt + E
Save As Text File
Ctrl + Alt + S
Save As Image
Alt + Shift + S
Undo
Ctrl + Z
Redo
Ctrl + Y
Cut
Ctrl + X
Copy
Ctrl + C
Paste
Ctrl + V
Delete
Del or Shift + Del
Select All
Ctrl + A
Group/Ungroup
Ctrl + G
Cut Page
Ctrl + Shift + X
Copy Page
Ctrl + Shift + C
Paste Page
Ctrl + Shift + V
Go To Page
F4
Find
Ctrl + F
Replace
Ctrl + R
Bundle Attributes
Ctrl + Shift + O
Match Attributes
Ctrl + Shift + S
Unlock Template
Ctrl + U
▶Edit
▶View
Guides
Alt + U
Grid
Alt + D
Live View
F5
Preview Window
F12
Page Window
F11
View Text
Ctrl + Alt + V
106
▶Insert
Insert VTW Document
Alt + G
Insert File As Text
Alt + X
Insert Template
Ctrl + Shift + T
Insert Image Sequence
Ctrl + Alt + I
Insert Background Image
Sequence
Ctrl + Alt + B
Insert Image
Ctrl + P
Insert Background
Ctrl + Shift + P
Insert Clock/Timer
Ctrl + T
Insert Animation
Alt + A
Replace Image
Alt + P
Distribute Objects
Ctrl + D
Insert New Page
Alt + N
Cancel Select
Esc
Run Scheduler Suite
Ctrl + Alt + C
Adjust Safe Area
Ctrl + Alt + U
Options
Ctrl + Alt + O
Spell Check
F8
Mask Effect
Alt + K
▶Tools
▶Help
About VTW
Shift + F1
▶Arrange
Send to Front
Ctrl + Shift + Up Arrow
Send to Back
Ctrl + Shift + Down Arrow
Send Forwards
Ctrl + Shift + Right Arrow
Send Backwards
Ctrl + Shift + Left Arrow
Lock/Unlock
Alt + L
Select/Text/Shape Tool Toggle
Ctrl + Shift + M
Assign Alias
Ctrl + Shift + A
Save Attribute to Catalog
Ctrl + Alt + A
Save Page to Catalog
Ctrl + Alt + P
Object Info
F1
▶Object Options
107
Appendix
▶Play
Take In
Ctrl + Enter (Keypad)
Take Out
Ctrl + .(Del) (Keypad)
/
Stop
*
Pause Scroll
-
Decrease Scroll Speed
+
Increase Scroll Speed
Enter
Load (In/Out)
.(Del)
Clear
0(Insert)
Cut In/Previous Page Load
0-9
Page Number Input
Keypad / Num Lock Off
108
Scheduler Suite Shortcut List
▶File
New Scheduler File
Ctrl + N
Save Scheduler File
Ctrl + S
Open Scheduler File
Ctrl + O
Delete Schedule Item
Del
▶Edit
Insert New Schedule Item
Ins
109
2014/08/21 Printed in Japan
FOR-A COMPANY LIMITED
Head Office
Overseas Division
Japan Branch Offices
R&D/Production
3-8-1 Ebisu, Shibuya-ku, Tokyo 150-0013, Japan
Phone: +81(0)3-3446-3936, Fax: +81(0)3-3446-1470
Osaka/Okinawa/Fukuoka/Hiroshima/Nagoya/Sendai/Sapporo
Sakura Center/Sapporo Center
FOR-A America Corporate Office
11155 Knott Ave., Suite G&H, Cypress, CA 90630, USA
Phone: +1-714-894-3311 Fax: +1-714-894-5399
FOR-A America East Coast Office
2 Executive Drive, Suite 670, Fort Lee Executive Park, Fort Lee, NJ 07024, USA
Phone: +1-201-944-1120 Fax : +1-201-944-1132
FOR-A America Distribution & Service Center
2400 N.E. Waldo Road, Gainesville, FL 32609, USA
Phone: +1-352-371-1505 Fax: +1-352-378-5320
FOR-A Corporation of Canada
346A Queen Street West, Toronto, Ontario M5V 2A2, Canada
Phone: +1-416-977-0343 Fax: +1-416-977-0657
FOR-A Latin America & the Caribbean
5200 Blue Lagoon Drive, Suite 760, Miami, FL 33126, USA
Phone: +1-305-931-1700 Fax: +1-305-264-7890
FOR-A Europe S.r.l.
Via Volturno 37, 20861 Brugherio MB, Italy
Phone: +39-039-879-778 Fax:+39-039-878-140
FOR A UK Limited
Trident Court, 1 Oakcroft Road, Chessington, KT9 1BD, United Kingdom
Phone: +44 (0)20-3044-2935 Fax: +44(0)20-3044-2936
FOR-A Italia S.r.l.
Via Volturno 37, 20861 Brugherio MB, Italy
Phone: +39-039-881-086/103 Fax: +39-039-878-140
FOR-A Corporation of Korea
1007, 57-5,Yangsan-ro,Yeongdeungpo-gu, Seoul 150-103, Korea
Phone: +82(0)2-2637-0761 Fax: +82(0)2-2637-0760
FOR-A China Limited
708B Huateng Bldg., No. 302, 3 District, Jinsong, Chaoyang, Beijing 100021, China
Phone: +86(0)10-8721-6023 Fax: +86(0)10-8721-6033
FOR-A Middle East-Africa Office
Jebel Ali Free Zone, LOB-16, Office 619, P. O. Box: 261914 Dubai, UAE
Phone: +971 4 887 6712 Fax: +971 4 887 6713
http://www.for-a.com/


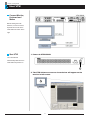
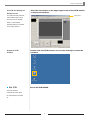


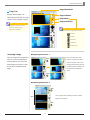
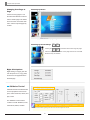
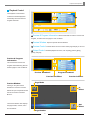

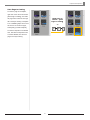


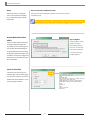

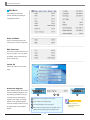

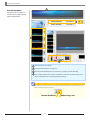

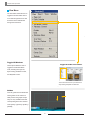
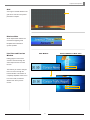

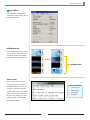
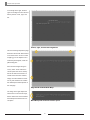
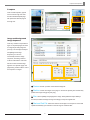
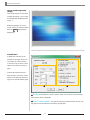
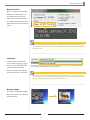
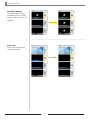
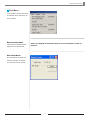
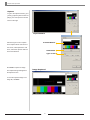
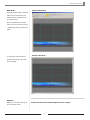
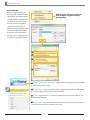

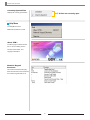
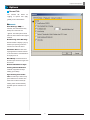
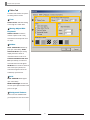


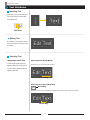
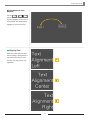


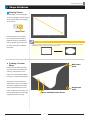
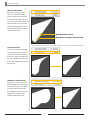


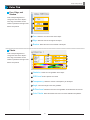
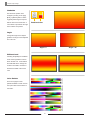
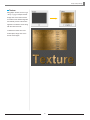
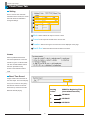
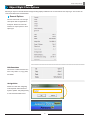


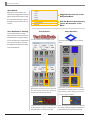
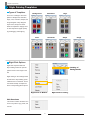

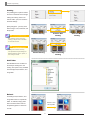
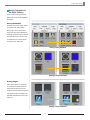
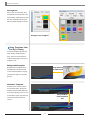
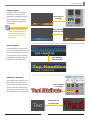


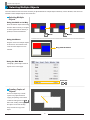


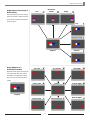


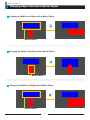
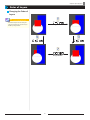


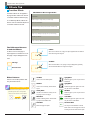


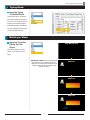


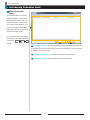
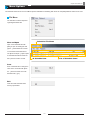

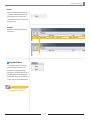

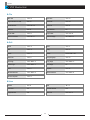
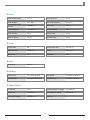


![UFM-30CTL Operation manual[PDF:4.1MB] - FOR](http://vs1.manualzilla.com/store/data/005676883_1-d2048345a5eb1a6d8c39e09dd604009b-150x150.png)