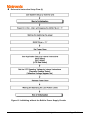
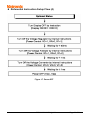
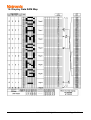
1
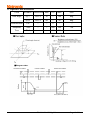
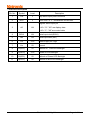
LCD Module User Manual
Customer
:
MASS PRODUCTION CODE
: TG12864H3-04MA0_A00
DRAWING NO.
: M-TG12864H3-04MA0_A00
Approved By Customer:
Date:
Approved By
Checked By
Prepared By
Vatronix Holdings Limited
ADD:4/F,No.404 Blg,Shangbu Industrial Zone,Futian District,Shenzhen,China
TEL:+86-755-83234801 83233058
E-mail:[email protected]
FAX:83225058
Http://www.vatronix.com
TG12864H3-04MA0_A00
Page 1 of 31
Contents
1. Precautions in Use of LCM-------------------------------------------P3
2. General Specification-------------------------------------------------------P3
3. Absolute Maximum Ratings-----------------------------------------------P3
4. Electrical Characteristics--------------------------------------------------P4
5. Backlight Information------------------------------------------------------P4
6. Optical Characteristics-----------------------------------------------------P5
7. Interface Description--------------------------------------------------------P6
8. Contour Drawing & Block Diagram--------------------------------------P7
9. Application circuit----------------------------------------------------------P8
10. LCM Function Description-----------------------------------------------P8
11. User instruction Definitions--------------------------------------------P15
11.1 Instruction table----------------------------------------------------P15
11.2 Instruction description --------------------------------------------P16
12. Timing Characteristics -------------------------------------------------P23
13. Initializing flow chart ---------------------------------------------------P26
14. Display Data RAM Map ------------------------------------------------P30
15. Revision records------------------------------------------------------------P31
TG12864H3-04MA0_A00
Page 2 of 31
1. Precautions in Use of LCD Module
(1) Avoid applying excessive shocks to the module or making any alterations or modifications to it.
(2) Don’
t make extra holes on the printed circuit board, modify its shape or change the components of LCD
Module.
(3) Don’
t disassemble the LCM.
(4) Don’
t operate it above the absolute maximum rating.
(5) Don’
t drop, bend or twist LCM.
(6) Soldering: only to the I/O terminals.
⑺ Storage: please storage in anti-static electricity container and clean environment.
2. General Specification
ITEM
STANDARD VALUE
UNIT
Number of dots
128X64 Dots
Dots
Outline dimension
95.0(W)X55.0(H)X10.3MAX.(T)
mm
View area
65.5(W)X38.0(H)
mm
Active area
60.775(W)X32.935(H)
mm
Dot size
0.45(W)X0.49(H)
mm
Dot pitch
0.475(W)X0.515(H)
mm
LCD type
FSTN,Positive,Transflective
View direction
6 o’
clock
Backlight
RGB LED
Controller
Sitronix ST7565P
Interface
Serial
3. Absolute Maximum Ratings
ITEM
SYMBOL
MIN.
Operating Temperature
TOP
-20
Storage Temperature
TST
MAX.
UNIT
-
+70
℃
-30
-
+80
℃
VI
0
-
VDD
V
Supply Voltage For Logic
VDD
0
-
5.0
V
Supply Voltage For LCD
VDD-VEE
0
-
13.0
V
Input Voltage
TYP.
TG12864H3-04MA0_A00
Page 3 of 31
4. Electrical Characteristics
ITEM
SYMBOL
Logic Voltage
VDD-VSS
Supply Volt.For LCD
VDD-VO
CONDITION
Ta=25℃
MIN.
TYP.
MAX.
UNIT
2.4
3.0
3.3
V
---
10.0
---
V
Input High Volt.
VIH
-
2.0
-
VDD
V
Input Low Volt.
VIL
-
-0.3
-
0.8
V
Output High Volt.
VOH
IoH=-0.2mA
2.4
-
VDD
V
Output Low Volt.
VOL
IoL=1.6mA
0
-
0.4
V
Supply Current
IDD
---
---
1.0
mA
-
5. Backlight Information
Absolute Maximum ratings (Ta=25℃)
Symbol
Conditions
Rating
Unit
Reverse voltage
Vr
-
5.0
V
Reverse Current
Ir
-
20
uA
500
mA
120
mA
Item
Absolute maximum forward Current
Ifm
Peak forward current
Ifp
Power dissipation
Pd
165
mW
Operating Temperature Range
Toper
-30~+70
℃
Storage Temperature Range
Tst
-40~+80
℃
I msec plus 10% Duty Cycle
Electrical/Optical Characteristics (Ta=250C,If=20*3mA)
Color
R
G
B
Wavelength
λp(nm)
-------
Spectral line half
widthΔλ(nm)
-------
Operating
voltage(v)
(±0.15V)
2.0
3.1
3.1
TG12864H3-04MA0_A00
Forward
Current (mA)
18
18
18
Page 4 of 31
6. Optical Characteristics
ITEM
View Angle
SYMBOL CONDITION
MIN
TYP
MAX
UNIT
(V)θ
CR≧2
10
-
120
deg.
(H)φ
CR≧2
-45
-
45
deg.
Contrast Ratio
CR
-
-
5
-
-
Response
T rise
-
-
200
300
ms
Time
T fall
-
-
150
200
ms
TG12864H3-04MA0_A00
Page 5 of 31
7.Interface Description
Pin No.
Symbol
Level
Description
1
/CS
L
Chip select input pins.Low active
2
/RST
L
When /RST is "L", initialization is executed.
Register select input pin
3
A0
H/L
A0 = "H": "A0" are display data
A0 = "L": "A0" are control data
4
SCLK
H/L
Serial input clock(SCLK)
5
SID
H/L
Serial input data (SID)
6
VDD
3.0V
Power supply for Logic
7
VSS
0V
Ground
8
R(LED-)
0V
Cathode of
9
A(LED+)
3.0V
10
G(LED-)
0V
Cathode of Green LED Backlight
11
B(LED-)
0V
Cathode of Blue LED Backlight
Red LED Backlight
Anode of LED Backlight
TG12864H3-04MA0_A00
Page 6 of 31
8. Contour Drawing & Block Diagram
TG12864H3-04MA0_A00
Page 7 of 31
9. Application circuit
10. LCM Function Description
The LCM built-in Sitronix ST7565P. ST7565P is a single chip driver & controller LSI for
graphic dot-matrix liquid crystal display systems. This chip can be connected directly to a
microprocessor, accepts serial or 8-bit parallel display data from the microprocessor, stores
the display data in an on-chip display data RAM of 65 x 132 bits and generates a liquid crystal
display drive signal independent of the microprocessor. It provides a high-flexible display
section due to 1-to-1 correspondence between on-chip display data RAM bits and LCD panel
pixels. It contains 65 common driver circuits and 132 segment driver circuits, so that a single
chip can drive a 65 x 132 dot display. And the capacity of the display can be increased
through the use of master/slave multi-chip structures.
These chip are able to minimize power consumption because it performs display data RAM
read/write operation with no external operation clock. In addition, because it contains power
supply circuits necessary to drive liquid crystal,which is a display clock oscillator circuit, high
performance voltage converter circuit, high-accuracy voltage regulator circuit, low power
consumption voltage divider resistors and OP-Amp for liquid crystal driver power voltage, it is
possible to make the lowest power consumption display system with the fewest components
for high performance portable systems.
On-chip Display Data RAM
-Capacity: 65 x 132 = 8,580 bits
-RAM bit data “1”: a dot of display is illuminated.
-RAM bit data “0”: a dot of display is not illuminated.
Various Function Set
-Display ON/OFF, set initial display line, set page address, set column address, read status,
write/ read display data, select segment driver output, reverse display ON/OFF, entire display
ON/OFF, select LCD bias, set/reset modify-read, select common driver output, control display
power circuit, select internal regulator resistor ratio for V0 voltage regulation, electronic
volume, set static indicator state.
-H/W and S/W reset available
-Static drive circuit equipped internally for indicators with 4 flashing modes
Built-in Analog Circuit
-On-chip oscillator circuit for display clock (external clock can also be used)
-High performance voltage converter (with booster ratios of x2, x3, x4 and x5, where the
step-up reference voltage can be used externally)
TG12864H3-04MA0_A00
Page 8 of 31
-High accuracy voltage regulator (temperature coefficient: -0.05%/ºC or external input)
-Electronic contrast control function (64 steps)
-Vref = 2.1V±3% (V0 voltage adjustment voltage)
-High performance voltage follower (V1 to V4 voltage divider resistors and OP-Amp for
increasing drive capacity)
Operating Voltage Range
- Supply voltage (VDD): 2.4 to 3.6 V
- LCD driving voltage (VLCD = V0 - VSS): 4.5 to 13.0 V
Low Power Consumption
-Operating power: 400uA typical. (Condition: VDD = 3V, x 4 boosting(VCI is VDD),V0 = 11V,
internal power supply ON, display OFF and normal mode is selected)
-Standby power: 30uA maximum. (During power save [standby] mode)
Microprocessor interface
-High-speed 8-bit parallel interface with 6800-series or 8080-series. (These LCM masked).
-Serial interface (only write operation) available.
(These LCM available).
Chip Select Input
There are /CS1 pins for chip selection. The LCM can interface with an MPU only when /CS is
"L" . When these pins are set to any other combination, RS, E_RDB, and RW_WRB inputs
are disabled and DB0 to DB7 are to be high impedance. And, in case of serial interface, the
internal shift register and the counter are reset.
Parallel / Serial Interface (These LCM use serial interface only)
LCM used ST7565P has three types of interface with an MPU, which are one serial and two
parallel interfaces.
This parallel or serial interface is determined by PS pin as shown in following table.
PS
Type
CS1B
CS2
C68
Interface mode
H
Parallel
CS1B
CS2
L
Serial
CS1B
CS2
H
6800-series MPU mode
L
8080-series MPU mode
*
Serial-mode
*: Don't care
Parallel interface (PS = "H")
The 8-bit bi-directional data bus is used in parallel interface and the type of MPU is selected
by C68 as shown in following table.
Microprocessor Selection for Parallel Interface
C68
CS1B
CS2
RS E_RDB RW_WRB DB0 to DB7 Interface mode
H
CS1B
CS2
RS
E
RW
DB0 to DB7
6800-series
L
CS1B
CS2
RS
/RDB
/WR
DB0 to DB7
8080-series
The type of data transfer is determined by signals at RS, E_RDB and RW_WRB as following Table.
Parallel Data Transfer
Common
6800-series
8080-series
Description
RS
E_RDB RW_WRB E_RDB RW_WRB
H
H
H
L
H
Display data read out
H
H
L
H
L
Display data write
L
H
H
L
H
Register status read
Writes to internal register
L
H
L
H
L
(instruction)
TG12864H3-04MA0_A00
Page 9 of 31
Figure 1.
Figure 2.
6800-Series MPU Interface protocol (PS=”H”, MI=”H”)
8080-Series MPU Interface Protocol (PS=”H”, MI=”L”)
TG12864H3-04MA0_A00
Page 10 of 31
Serial Interface (PS = "L")
When the ST7565P is active, serial data (DB7) and serial clock (DB6) inputs are enabled. And
not active, the internal 8-bit shift register and the 3-bit counter are reset. Serial data can be
read on the rising edge of serial clock going into DB6 and processed as 8-bit parallel data on
the eighth serial clock. Serial data input is display data when RS is high and control data
when RS is low. Since the clock signal (DB6) is easy to be affected by the external noise
caused by the line length, the operation check on the actual machine is recommended.
Figure 3. Serial Interface Protocol
Busy Flag (For parallel interface only)
The Busy Flag indicates whether the LCM is operating or not. When DB7 is "H" in read status
operation, this device is in busy status and will accept only read status instruction. If the cycle
time is correct, the microprocessor needs not to check this flag before each instruction, which
improves the MPU performance.
DISPLAY DATA RAM (DDRAM)
The Display Data RAM stores pixel data for the LCD. It is 65-row by 132-column addressable
array. Each pixel can be selected when the page and column addresses are specified. The 65
rows are divided into 8 pages of 8 lines and the 9th page with a single line (DB0 only). Data is
read from or written to the 8 lines of each page directly through DB0 to DB7. The
microprocessor can read from and write to RAM through the I/O buffer. Since the LCD
controller operates independently, data can be written into RAM at the same time as data is
being displayed without causing the LCD flicker.
Page Address Circuit
The LCM incorporates 4-bit Page A ddress register changed by only the "Set Page"
instruction. Page Address 8 (DB3 is "H", but DB2, DB1 and DB0 are "L") is a special RAM
area for the icons and display data DB0 is only valid.When Page Address is above 8, it is
impossible to access to on-chip RAM. See in “Display Data RAM Map”
Line Address Circuit .
This circuit assigns DDRAM a Line Address corresponding to the first line (COM0) of the
display. Therefore, by setting line address repeatedly, it is possible to realize the screen
scrolling and page switching without changing the contents of on-chip RAM as shown in
“Display Data RAM Map”It incorporates 6-bit line address register changed by only the initial
display line instruction and 6-bit counter circuit. At the beginning of each LCD frame, the
contents of register are copied to the line counter which is increased by CL signal and
generates the Line Address for transferring the 132-bit RAM data to the display data latch
circuit. However, display data of icons are not scrolled because the MPU can not access Line
Address of icons.
TG12864H3-04MA0_A00
Page 11 of 31
Column Address Circuit
Column Address circuit has an 8-bit preset counter that provides column address to the
Display Data RAM. When set Column Address MSB / LSB instruction is issued, 8-bit [Y7:Y0]
is updated. And, since this address is increased by 1 each a read or write data instruction,
microprocessor can access the display data continuously. However, the counter is not
increased and locked if a non-existing address above 84H. It is unlocked if a column address
is set again by set Column Address MSB / LSB instruction. And the Column Address counter
is independent of page address register. ADC select instruction makes it possible to invert the
relationship between the Column Address and the segment outputs. It is necessary to rewrite
the display data on built-in RAM after issuing ADC Select instruction.
RESET CIRCUIT
Setting /RST to "L" or Reset instruction can initialize internal function.
When /RST becomes "L", following procedure is occurred.
Display ON / OFF: OFF
Entire display ON / OFF: OFF(normal)
ADC select: OFF(normal)
Reverse display ON / OFF: OFF(normal)
Power control register (VC, VR, VF) = (0, 0, 0)
Serial interface internal register data clear
LCD bias ratio: 1/9 (1/65 duty), 1/8 (1/55 duty), 1/8 (1/49duty),1/6 (1/33 duty)
On-chip oscillator OFF
Power save release
Read-modify-write: OFF
SHL select:OFF (normal)
Static indicator mode: OFF
Static indicator register: (S1, S0) = (0, 0)
Display start line: 0 (first) Column address: 0
Page address: 0
Regulator resistor select register: (R2, R1, R0) = (1, 0, 0)
Reference voltage set: OFF
Reference voltage control register: (SV5, SV4, SV3, SV2, SV1, SV0) = (1, 0, 0, 0, 0, 0)
While /RST is "L" or Reset instruction is executed, no instruction except read status could be
accepted. Reset status appears at DB4. After DB4 becomes "L", any instruction can be
accepted. RESETB must be connected to the reset pin of the MPU, and initialize the MPU
and this LSI at the same time. The initialization by RESETB is essential before used.
TG12864H3-04MA0_A00
Page 12 of 31
POWER SUPPLY CIRCUITS
The Power Supply circuits generate the voltage levels necessary to drive liquid crystal driver
circuits with low power consumption and the fewest components. There are voltage converter
circuits, voltage regulator circuits, and voltage follower circuits. They are valid only in master
operation and controlled by power control instruction. For details, refers to "Instruction
Description".
Voltage Converter Circuits
These circuits boost up the electric potential between VCI and VSS to 2, 3, 4 or 5 times
toward positive side and boosted voltage is outputted from VOUT pin. These LCM fixed to 4
times.
Voltage Regulator Circuits
The function of the internal Voltage Regulator circuits is to determine liquid crystal operating
voltage, V0, by adjusting resistors, Ra and Rb, within the range of |V0| < |VOUT|. Because
VOUT is the operating voltage of operational-amplifier circuits, it is necessary to be applied
internally or externally. For the Eq. 1, we determine V0 by Ra, Rb and VEV. The Ra and Rb
are connected internally or externally by INTRS pin. And VEV called the voltage of electronic
volume is determined by Eq. 2, where the parameter a is the value selected by instruction,
"Set Reference Voltage Register", within the range 0 to 63. VREF voltage at Ta= 25°C is
shown in table 1.
V0 = ( 1 + Rb/ Ra) x VEV [V] ------ (Eq. 1)
VEV=(1-(63-a)/162) x VREF [V]-------(Eq. 2)
REF
H
L
Table 1. VREF Voltage at Ta = 25 °C
Temp. coefficient
VREF [V]
-0.05% / °C
2.1
External input
VEXT
Figure 4. Internal Voltage Regulator Circuit
TG12864H3-04MA0_A00
Page 13 of 31
In Case of Using Internal Resistors, Ra and Rb. (INTRS = "H") (LCM fixed to "L" )
When INTRS pin is "H", resistor Ra is connected internally between VR pin and VSS, and Rb
is connected between V0 and VR. We determine V0 by two instructions, "Regulator Resistor
Select" and "Set Reference Voltage".
The following figure shows V0 voltage measured by adjusting internal regulator resistor ratio
(Rb / Ra) and 6-bit electronic volume registers for each temperature coefficient at Ta = 25°C.
F
Figure 5. Electronic Volume Level
In Case of Using External Resistors, Ra and Rb. (INTRS = "L")
When INTRS pin is "L", it is necessary to connect external regulator resistor Ra between VR
and VSS, and Rb between V0 and VR. Example: For the following requirements
1. LCD driver voltage, V0 = 10V
2. 6-bit reference voltage register = (1, 0, 0, 0, 0, 0)
3. Maximum current flowing Ra, Rb = 1uA
From Eq. 1
10 = ( 1 + Rb/ Ra) x VEV [V] ------ (Eq. 3)
From Eq. 2
VEV=(1-(63-32)/162) x 2.1 =1.698 [V]-------(Eq. 4)
From requirement 3.
10 / (Rb + Ra)=1 [uA ] ------ (Eq. 5) From equations Eq.3, 4 and 5
Ra @ 1.69 [MW]
Rb @ 8.31 [MW]
The following table shows the range of V0 depending on the above requirements.
Table 2. V0 Depending on Electronic Volume Level
Electronic volume level
0
…
32
…
63
V0
7.57
…
10.00
…
12.43
TG12864H3-04MA0_A00
Page 14 of 31
11. User instruction Definitions
11.1 Instruction table
TG12864H3-04MA0_A00
Page 15 of 31
11.2 Instruction Description
1) Display ON / OFF Turns the Display ON or OFF
RS RW DB7 DB6 DB5 DB4 DB3 DB2 DB1 DB0
0
0
1
0
1
0
1
1
1
DON
DON = 1: display ON
DON = 0: display OFF
2) Initial Display Line
Sets the line address of display RAM to determine the Initial Display Line.The top row
(COM0 when SHL= L, COM63 when SHL = H) of LCD panel.
RS RW DB7 DB6 DB5 DB4 DB3 DB2 DB1 DB0
0
0
0
1
ST5 ST4 ST3 ST2 ST1 ST0
ST5 ST4
ST3 ST2 ST1
ST0
Line address
0
0
0
0
0
0
0
0
0
0
0
0
1
1
:
:
:
:
:
:
:
1
1
1
1
1
0
62
1
1
1
1
1
1
63
3) Set Page Address
Sets the Page Address of display data RAM from the microprocessor into the Page Address
register. Any RAM data bit can be accessed when its Page Address and column address are
specified. Along with the column address, the Page Address defines the address of the
display RAM to write or read display data. Changing the Page Address doesn't effect to the
display status.
RS RW DB7 DB6 DB5 DB4 DB3 DB2 DB1 DB0
0
0
1
0
1
1
P3
P2
P1
P0
P3
P2
P1
P0
Page address
0
0
0
0
0
0
0
0
1
1
:
:
:
:
:
0
1
1
1
7
1
0
0
0
8
4) Set Column Address
Sets the Column Address of display RAM from the microprocessor into the Column Address
register. Along with the Column Address, the Column Address defines the address of the
display RAM to write or read display data. When the microprocessor reads or writes display
data to or from display RAM, Column Addresses are automatically increased.
Set Column Address MSB
RS RW DB7 DB6 DB5 DB4 DB3 DB2 DB1 DB0
0
0
0
0
0
1
Y7
Y6
Y5
Y4
TG12864H3-04MA0_A00
Page 16 of 31
Set Column Address LSB
RS RW DB7 DB6 DB5
0
0
0
0
0
DB4
0
DB3
Y3
DB2
Y2
DB1
Y1
DB0
Y0
Y7
Y6
Y5
Y4
Y3
Y2
Y1
Y0 Column ddress
0
0
0
0
0
0
0
0
0
0
0
0
0
0
0
0
1
1
:
:
:
:
:
:
:
:
:
1
0
0
0
0
0
1
0
130
1
0
0
0
0
0
1
1
131
5) Read Status (For parallel interface only)
Indicates the internal status of the LCM
RS RW
DB7 DB6
DB5
DB4 DB3 DB2 DB1 DB0
0
1
BUSY ADC ON/OFF /RST
0
0
0
0
Flag
BUSY
ADC
Description
The device is busy when internal operation or reset. Any instruction is rejected
until BUSY goes Low.
0: chip is active, 1: chip is being busy.
Indicates the relationship between RAM column address and segment driver
0: reverse direction (SEG131---SEG0), 1: normal direction (SEG0---SEG131)
ON/OFF Indicates display ON/OFF status 0: display ON, 1: display OFF
/RST
Indicates the initialization is in progress by /RST signal
0: chip is active, 1: chip is being reset
6) Write Display Data
8-bit data of display data from the microprocessor can be written to the RAM location
specified by the column address and page address. The column address is increased by 1
automatically so that the microprocessor can continuously write data to the addressed page.
RS RW DB7 DB6 DB5 DB4 DB3 DB2 DB1 DB0
1
0
Write data
7) Read Display Data
RS RW DB7 DB6 DB5 DB4 DB3 DB2 DB1 DB0
Read data
1
1
TG12864H3-04MA0_A00
Page 17 of 31
Figure 6. Sequence for Writing Display Data
Figure7. Sequence for Reading Display Data
8) ADC Select (Segment Driver Direction Select)
Changes the relationship between RAM column address and segment driver. The direction of
segment driver output pins can be reversed by software. This makes IC layout flexible in LCD
module assembly.
RS RW DB7 DB6 DB5 DB4 DB3 DB2 DB1 DB0
1
0
0
0
0
ADC
0
0
1
0
ADC = 0: normal direction (SEG0---SEG131)
ADC = 1: reverse direction (SEG131---SEG0)
9) Reverse Display ON / OFF
Reverses the display status on LCD panel without rewriting the contents of the display data
RAM.
RS RW DB7 DB6 DB5 DB4 DB3 DB2 DB1 DB0
REV
0
1
0
1
0
0
1
1
0
REV
RAM bit data = "1"
RAM bit data = "0"
0(normal)
LCD pixel is illuminated
LCD pixel is not illuminated
0(reverse) LCD pixel is not illuminated
LCD pixel is illuminated
10) Entire Display ON / OFF
Forces the whole LCD points to be turned on regardless of the contents of the display data
RAM. At this time, the contents of the display data RAM are held. This instruction has priority
over the reverse display ON / OFF instruction.
RS RW DB7 DB6 DB5 DB4 DB3 DB2 DB1 DB0
EON
0
0
1
0
1
0
0
1
0
EON = 0: normal display
EON = 1: entire display ON
TG12864H3-04MA0_A00
Page 18 of 31
11) Select LCD Bias
Selects LCD bias ratio of the voltage required for driving the LCD.
RS RW DB7 DB6 DB5 DB4 DB3 DB2 DB1 DB0
0
0
1
0
1
0
0
0
1
Bias
Bias = 0: 1/9 Duty Bias = 1: 1/7 Duty
12) Set Modify-Read
This instruction stops the automatic increment of the column address by the read display data
instruction, but the column address is still increased by the write display data instruction. And
it reduces the load of microprocessor when the data of a specific area is repeatedly changed
during cursor blinking or others. This mode is canceled by the reset Modify-read instruction.
RS RW DB7 DB6 DB5 DB4 DB3 DB2 DB1 DB0
0
0
1
1
1
0
0
0
0
0
13) Reset Modify-Read
This instruction cancels the Modify-read mode, and makes the column address return to its
initial value just before the set Modify-read instruction is started.
RS RW DB7 DB6 DB5 DB4 DB3 DB2 DB1 DB0
0
0
1
1
1
0
1
1
1
0
Figure 8. Sequence for Cursor Display
TG12864H3-04MA0_A00
Page 19 of 31
14) Reset
This instruction resets initial display line, column address, page address, and common output
status select to their initial status, but dose not affect the contents of display data RAM. This
instruction cannot initialize the LCD power supply, which is initialized by the /RST pin.
RS RW DB7 DB6 DB5 DB4 DB3 DB2 DB1 DB0
0
0
1
1
1
0
0
0
1
0
15) SHL Select (Common Output Mode Select)
COM output scanning direction is selected by this instruction which determines the LCD
driver output status. *: Don’
t care
RS RW DB7 DB6 DB5 DB4 DB3 DB2 DB1 DB0
0
0
1
1
0
0
SHL
*
*
*
SHL = 0: normal direction (COM0--- COM63)
SHL = 1: reverse direction (COM63---COM0)
16) Power Control
Selects one of eight power circuit functions by using 3-bit register. An external power supply
and part of internal power supply functions can be used simultaneously.
RS RW DB7 DB6 DB5 DB4 DB3 DB2 DB1 DB0
0
0
0
0
1
0
1
VC
VR
VF
VC
VR
VF
Page address
Internal voltage converter circuit is
0
OFF
1
Internal voltage converter circuit is ON
0
1
Internal voltage regulator circuit is OFF
Internal voltage regulator circuit is ON
0
Internal voltage follower circuit is OFF
1
Internal voltage follower circuit is ON
17) Regulator Resistor Select
Selects resistance ratio of the internal resistor used in the internal voltage regulator. See
voltage regulator section in power supply circuit. Refer to the following table.
RS RW DB7 DB6 DB5 DB4 DB3 DB2 DB1 DB0
0
0
0
0
1
0
0
R2
R1
R0
R2
0
0
0
0
1
1
1
1
R1
0
0
1
1
0
0
1
1
R0
0
1
0
1
0
1
0
1
(1 + Rb / Ra) ratio
3.0
3.5
4.0
4.5
5.0 (default)
5.5
6.0
6.4
TG12864H3-04MA0_A00
Page 20 of 31
18) Reference Voltage Select
Consists of 2-byte instruction. The 1st instruction sets reference voltage mode, the 2 one
updates the contents of reference voltage register. After second instruction, reference voltage
mode is released.
st
The 1 Instruction: Set Reference Voltage Select Mode
RS RW DB7 DB6 DB5 DB4 DB3 DB2 DB1 DB0
0
0
1
0
0
0
0
0
0
1
nd
The 2 Instruction: Set Reference Voltage Register
RS RW DB7 DB6 DB5 DB4 DB3 DB2 DB1 DB0
0
0
x
X
SV5 SV4 SV3 SV2 SV1 SV0
SV5
SV4
SV3
SV2
SV1
SV0 Reference
voltage
parameter (a)
V0
Contrast
0
0
0
0
0
0
0
Minimum
Low
:
0
0
0
0
0
1
1
:
:
:
:
:
:
:
:
:
:
:
:
1
0
0
0
0
0
32 (default)
:
:
:
:
:
:
:
:
:
:
:
1
1
1
1
1
0
62
Maximum
High
1
1
1
1
1
1
63
19) Set Static Indicator State
Consists of two bytes instruction. The first byte instruction (set Static Indicator mode) enables
the second byte instruction (set Static Indicator register) to be valid. The first byte sets the
Static Indicator ON / OFF. When it is ON, the second byte updates the contents of Static
Indicator register without issuing any other instruction and this Static Indicator state is
released after setting the data of indicator register.
The 1st Instruction: Set Static Indicator Mode (ON / OFF)
RS RW DB7 DB6 DB5 DB4 DB3 DB2 DB1 DB0
0
0
1
0
1
0
1
1
0
SM
SM = 0: static indicator OFF
SM = 1: static indicator ON
The 2nd Instruction: Set Static Indicator Register
RS RW DB7 DB6 DB5 DB4 DB3 DB2 DB1 DB0
0
0
x
x
x
x
x
x
S1
S0
S1
S0
Status of static indicator output
0
0
OFF
0
1
ON (about 1 second blinking)
1
0
ON (about 0.5 second blinking)
1
1
ON (always ON)
20)NOP No Operation Instruction
RS RW DB7 DB6 DB5 DB4 DB3 DB2 DB1
0
0
x
x
x
x
x
x
S1
TG12864H3-04MA0_A00
DB0
S0
Page 21 of 31
21) Power Save (Compound Instruction)
If the entire display ON/OFF instruction is issued during the display OFF state, ST7565P
enters the Power Save status to reduce the power consumption to the static power
consumption value. According to the status of static indicator mode, Power Save is entered to
one mode of sleep and standby mode. When Static Indicator mode is ON, standby mode is
issued. When OFF, sleep mode is issued. Power Save mode is released by the entire display
OFF instruction.
Figure 9. Power Save (Compound Instruction)
-Sleep Mode
This stops all operations in the LCD display system, and as long as there are no access from
the MPU, the consumption current is reduced to a value near the static current. The internal
modes during sleep mode are as follows:
a. The oscillator circuit and the LCD power supply circuit are halted.VSS level.
b. All liquid crystal drive circuits are halted, and the segment in common drive outputs output
a VSS level.
- Standby Mode
The duty LCD display system operations are halted and only the static drive system for the
indicator
continues to operate, providing the minimum required consumption current for the static drive.
The internal modes are in the following states during standby mode.
a. The LCD power supply circuits are halted. The oscillator circuit continues to operate.
b. The duty drive system liquid crystal drive circuits are halted and the segment and common
driver outputs a VSS level. The static drive system does not operate.
When a reset command is performed while in standby mode, the system enters sleep
mode.
TG12864H3-04MA0_A00
Page 22 of 31
12. Timing Characteristics
Read / Write Characteristics (8080-series MPU) (For parallel interface only)
Figure 10. Read / Write Characteristics (8080-series MPU)
TG12864H3-04MA0_A00
Page 23 of 31
Read / Write Characteristics (6800-series Microprocessor)
(For parallel interface only)
Figure 11. Read / Write Characteristics (6800-series Microprocessor)
TG12864H3-04MA0_A00
Page 24 of 31
Serial Interface Characteristics
Figure 12. Serial Interface Characteristics
Reset Input Timing
Figure 13. Reset Input Timing
TG12864H3-04MA0_A00
Page 25 of 31
13.Initializing flow chart
l
Referential Instruction Setup Flow (1)
Figure 14. Initializing with the Built-in Power Supply Circuits interface mode
TG12864H3-04MA0_A00
Page 26 of 31
l
Referential Instruction Setup Flow (2)
Figure 15. Initializing without the Built-in Power Supply Circuits
TG12864H3-04MA0_A00
Page 27 of 31
l Referential Instruction Setup Flow (3)
Figure 16. Data Displaying
TG12864H3-04MA0_A00
Page 28 of 31
l Referential Instruction Setup Flow (4)
Figure 17. Power OFF
TG12864H3-04MA0_A00
Page 29 of 31
14. Display Data RAM Map
TG12864H3-04MA0_A00
Page 30 of 31
15. Revision records
Version Ref.pages
A00
All
Revision Items
New release
TG12864H3-04MA0_A00
Date
2007.03.06
Page 31 of 31