1
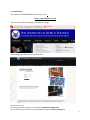
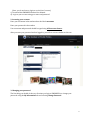
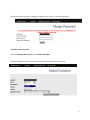
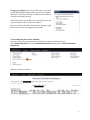
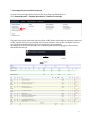
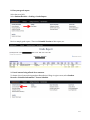
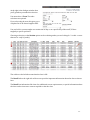
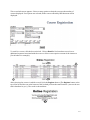
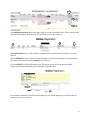
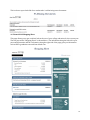
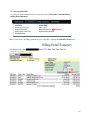
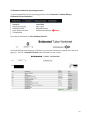
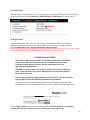
EMPOWER
Self-Service Portal
Student User Manual
by
Hasanna Tyus1
Registrar
1
Adapted from the OASIS Student User Manual, July 2013, Benedictine College.
1
Table of Contents
1.
Introduction ............................................................................................................................................................ 3
2.
Accessing your account ...................................................................................................................................... 4
3.
Changing your password ................................................................................................................................... 4
4.
Set the semester/term........................................................................................................................................ 5
5.
Setting up your Welcome screen.................................................................................................................... 6
6.
View and print your course schedule........................................................................................................... 7
7.
View and print your unofficial transcript ................................................................................................... 9
8.
View your grade report ....................................................................................................................................10
9.
List the courses being offered for a semester ........................................................................................ 10
10.
Information about holds ................................................................................................................................. 12
11.
Update personal information ....................................................................................................................... 13
12.
Student Self-Registration guide ................................................................................................................... 13
13.
Financial aid award letter .............................................................................................................................. 18
14.
Accepting or declining your financial aid ................................................................................................ 20
15.
Missing financial aid documents ................................................................................................................. 20
16.
Student Shopping Sheet .................................................................................................................................. 21
17.
Current tuition bill ............................................................................................................................................ 22
18.
Estimated tuition for upcoming semester............................................................................................... 23
19.
1098T report ....................................................................................................................................................... 24
20.
Degree Audit…………………………………………………………………………………………………………….24
Every effort has been made to ensure that this document is accurate. If you notice any errors, please contact Hasanna Tyus at
[email protected].
2
1. Introduction
The website for the EMPOWER self-service portal, is:
https://iwp.empower-xl.com
There are also a links to this page on the IWP homepage.
The opening page of the website looks like this:
From here you can:
a) Have your password sent to you using the Forgotten Password tab
b) See all the courses offered in a given semester using the Course Catalog tab
3
(Note: you do not have to login to see the list of courses)
c) Download this EMPOWER Student User Manual
d) Login to your account using your name and password.
2. Accessing your account:
Enter your username in the textbox above the label: username.
Enter your password in the textbox.
Your username and password should be typed using all lowercase letters.
After you enter your password and are logged in, you will see a screen similar to this one:
3. Changing your password
The first thing you should do the very first time you login to EMPOWER is to change your
password using the My Information tab and selecting Change Password.
4
Follow the directions given to change your password to one you can easily remember.
4. Set the semester/term
Select the Settings & Searches tab and Global Variables.
From the pull-down menu, select the term for the information you wish to view.
5
5. Setting up your Welcome Screen
If you click the blue circle in the upper right hand corner of the OASIS login page (shown below),
you will have the option to personalize your home page of OASIS. After you set your term, you can
view your schedule for the term if you have one.
The “Currently Set” window will allow you to set the desired term more easily than the option
described above.
6
Dragging the Degree option to your Welcome screen gives
you the following information about your declared majors
and minors. This may be handy to always have available as
reference each time you login.
If there are menus on your Welcome screen that you do not
want, click on the red “X” in the box to hide it.
Be sure to click on the Green check mark in the upper right
hand corner to save any changes that you make.
6. View and print your course schedule
Set your term for the appropriate semester (#4) if you have not already done so.
Select Student Records then under Schedule Information heading choose Student Schedule
(Summary).
And here’s what you will see….
7
If you click on the underlined course name, you get the “Details” of the class. This is important
because it tells you about additional course fees and additional materials that may be required in the
class.
You can print this page or select the Printable Version (button in the upper right hand corner) and get
a schedule that looks like the one below:
8
7. View and print your unofficial transcript
Set your term for the appropriate semester (#4) if you have not already done so.
Select Student Records > Schedule Information > Unofficial Transcript.
This option lists all the classes that you have taken at IWP, all the classes that you may have transferred
to IWP , and the classes you are enrolled in for the next semester. There is also a Printable Version so
you can easily print an unofficial copy of your transcript. (see next page for
an example of an unofficial transcript.) Your cumulative grade point average (gpa) is also listed on
this unofficial transcript.
9
8. View your grade report
Select the term (#4).
Select Student Records > Grading > Grade Report.
Here’s a sample grade report. There is a Printable Version of this report, too.
9. List of courses being offered for a semester
To obtain a list of courses being taught at Benedictine College in a given term, select Student
Records > Schedule Information > Course Schedule.
10
At the right is the dialogue window that
you’ll get when you make this selection.
You must select a Term. The other
selections are optional.
If you select only the term, this gives you a
complete list of all classes taught at IWP.
You can look for courses taught at a certain time of day or on a specific day of the week, or those
taught by a specific professor.
Choosing a selection on the Session option can be confusing unless you are looking for 2-credit courses
that run for only 8 (weeks).
The red dot on the left side means that the class is full.
The Detail link on the right side of the screen provides important information about the class as shown
here.
The Detail lists information like class fees, additional course requirements, or special information about
the class such as instructor consent required to take the class.
11
10. Information about holds
If there is currently a hold on your account, you will not be able to drop or add a class, view your
grades, or get a copy of your transcript. Current holds are listed on the Welcome page when you log
in to EMPOWER. The holds are shown here on the left side of the Welcome page, but it may be in a
different location if you have personalized your Welcome page.
There is also the option to see a history of all your holds by selecting Student Records > Inquiries >
Student Holds Inquiry.
A Student Holds Inquiry looks like this. Notice in this example, there was once a hold on this
student’s account but it was overridden. This student has no current, active holds on their account.
12
11. Update personal information
If you have a change of address, get a new phone number, etc., you need to update your personal
information. Select My Information > Personal Information > Update Personal Information.
We do not allow students to update their name without bringing official notification of a name
change to the Office of the Registrar.
Notice that you can select to update your address, phone, or employment information as stored in
EMPOWER and these will be reviewed up and updated.
12. Student Self-Registration Guide
Choose Student Records > Course Tools > Course Registration.
The main EMPOWER screen for Course Registration will then appear. This shows the current
13
status of your schedule for the next semester.
The courses listed below the heading “Successful Registration” are those in which you are
currently enrolled. The courses listed below the heading “Pending Registration” are just that—
pending. You are NOT enrolled in any of these courses until some specific action is taken.
Clicking on the DROP link will remove that course from your schedule. There is no warning given—
the course is just dropped! WARNING: If you click DROP and remove yourself from a class that is
full, you will not be able to get back into the class without seeing the instructor for special
permission.
To Add a Class
To enroll in a
class, click on
the “Add
Courses”
button.
14
This screen below now appears. Select as many options as desired to narrow the number of
courses displayed. If no options are selected, all the courses offered by IWP that term will be
displayed.
To enroll in a course, click the box on the left. Click on Detail to find out about course fees or
additional expenses associated with the course or if the course requires consent of the instructor
(See #9 above for example).
After selecting the courses in which to enroll, click the Register button. (The Register button at the
top of the list and the one at the bottom of the list both perform the same function—just use the one
that is handiest for you.) The result is shown below.
15
Click on See Detail to return to the Course Registration screen. After we return to the Registration
home screen, right now we’ll just look at the Pending Registrations since they are the ones that
need attention. Remember that the classes above this line in the Successful Registration area are
those you are enrolled in for the next semester.
Notice that the reasons why you were unable to enroll in these classes. For the examples shown,
the reasons include: (Note that this is not an exhaustive list of reasons.)
1. Course requisites not met – you have not completed the prerequisites so you can’t this this class.
2. Time conflict – will either have to drop this class or the class you’re already enrolled in since both
meet at the same time.
3. Duplicating course – you have already taken this course or are currently enrolled in the class. If
you need to repeat the class due to a low grade, complete a paper registration form and contact
the Dean for permission to be added to this class.
Another reason a course could be pending is that it is waiting for consent from the instructor. If this
is the case, you need to contact the instructor and ask him or her to approve you for the course.
After the instructor gives approval, you must return to this screen and hit the “Reprocess
Pending” button. The course will then move from Pending to Successful Registration if there are
seats available in the class and all pre-requisites have been met.
Clicking on the Delete link will remove these courses.
To add another class, just click on Add Courses and repeat the process as above. You can do this as
many times as you wish.
Wait list Information
All of these Pending courses shown in this example (see next page) have the WL symbol to show
that the student is currently on the wait list for each of these courses.
16
Click Student Wait List button in the upper right to view the following screen. This screen provides
important information about the wait lists a student is on for this semester.
Current Position shows you the number of students on the waitlist and what number you are on
that list.
Click on REMOVE to remove the class from the wait list. The class will remain on the pending list.
(To remove the course from the Pending list, see above.)
Click on UPDATE to see the following screen. This allows you to add a comment giving the
Registrar information about why you want/need to take this class.
Note that this comment is viewable by more than just you and the Registrar, so use discretion in
what you say in your comment.
17
To Print the Schedule
From the Online Registration Screen, select Print Schedule option. If needed, see #6 above for
more information about printing.
Don’t forget to log out when you finish with changing your schedule. This is especially critical if you
are using a public computer.
You also use EMPOWER to access your Financial Aid and Billing
information.
13. Financial Aid award letter
To view your Financial Aid award letter, select Financials > Financial Aid > Financial Aid Award
Letter.
18
You will be prompted to
select the academic
Award Year (shown on
right). After selecting
the academic year, you
will be able to view your
complete financial aid
package as shown
below.
19
14. Accepting or declining your financial aid
You have the option to Accept or Decline your financial aid when you view your financial aid award
letter (click on the link on the lower left-hand corner) of the letter or you can select Financials >
Financial Aid > Accept-Decline Award Letter.
(Do not do this until you are notified by the Financial Aid Office for the 2014-2015 aid year)
After selecting the award year, you can see your financial aid award for the year. You can accept or
decline the financial aid package that has been prepared for you by checking the appropriate box.
You must formally accept your award before any funds can be credited to your account.
15. Missing Financial Aid documents
To make sure you have all your financial aid documents completed, select Financials > Financial
Aid > Missing Documents.
The Financial Aid office cannot complete your financial aid package until you have submitted all
your documents to them.
20
This is what a report looks like for a student who is still missing some documents.
16. Financial Aid Shopping Sheet
This page allows you to get a realistic look at the cost of your college education for the current year.
The first part of this “Shopping Sheet” is shown below. The information along the left side is your
personal information and the information along the right side of the page gives you information
such as IWP’s graduation rate and loan default rate.
21
17. Current tuition bill
To view your current tuition bill for the semester, select Financials > Student Billing >
Billing Detail Summary.
Here you can view your billing statement and pay your bill by selecting the Submit Payment button.
22
18. Estimated tuition for upcoming semester
To get an estimated bill for the upcoming semester, select Financials > Student Billing >
Estimated Tuition Worksheet.
Select the term and then click Get Estimated Invoice.
As with the Billing Detail Summary (#19 above), you can also submit your payment from this web
page, too. There is a Printable Version if that is needed for some reason .
23
19. 1098T report
When it is time in January/February, you can print your copy of the 1098T report that is needed for
an income tax report. Select Financials > Student Billing > 1098T Query (as shown below).
20. Degree Audit
A degree audit allows you to see you’re the courses you’ve taken and how they fulfill core
education, specialization, and elective requirements. You can access your degree audit by
selecting Student Records > Degree Information > Degree Audit.
Before you run your degree audit, be sure to Set the Term to “blank” or to your first semester at IWP.
For instructions on how to Set the semester/term, see page 5 of this manual.
IMPORTANT DISCLAIMER
This is not an official degree audit. It is meant as a useful tool. You should
keep track of the classes that you have taken and plan to take the core
education requirements, electives, and the requirements for your
specialization (if applicable).
This audit is set up to keep track of the 52 credit hours you are required to
take. It may not reflect any course substitutions or waivers that you have
been approved to take.
Classes that you take for audit will appear on here as if they are for credit, but
they are NOT and will not fulfill ANY graduation requirement.
If you find errors in your degree audit, please contact the Registrar right away. We
would like to correct any mistakes so that this is a more reliable tool for students to use.
Click on Degree Audit button to view your degree audit. Even though there is a printable
version, please do not print this report as it will be 18 or more pages long!
24
There is a note at the bottom of the screen that says you can request an updated degree audit, but
this is incorrect. We will run an audit update for all students sometime during the first week of each
month.
Since the audit is so large, it has a show/hide option. Please click Show for each section you’d like to
see.
The Major area will list your major, catalog year, and specialization.
The Totals area will display your cumulative totals (credits, GPA, etc.) and will also let you
know if all graduation requirements have been met.
The Audit Class area will have subgroups that you can also click on to Show or Hide. Each
subgroup that you view (Core Courses, areas of Specialization, or Electives) will show you
whether you’ve met the requirements of that group. You can show “NeedHave” in each of
these areas to see which courses are required for this area and which of the required courses
you’ve completed.
The Elective courses are listed at the very bottom of the degree audit. These may be actual
electives or extra courses that you’ve taken that may not “fit” within your degree requirements. If
you’ve been approved for a course substitution or waiver, these courses may appear as well.
Study this degree audit carefully. There is a lot of information here that can be helpful when
planning your future semesters at IWP.
Every effort has been made to ensure that this document is accurate. If you notice any errors, please
contact the Registrar, Hasanna Tyus at [email protected].
25